entegris SemiChem APM 2000 User guide

ADVANCED MATERIALS HANDLING |APPLICATION GUIDE
SemiChem APM 200 with HF and
H2O2in DSP+
Application guide

2Application Guide | Entegris, Inc.
SEMICHEM APM 200 WITH HF AND H202IN DSP+
TABLE OF CONTENTS
—
Introduction ........................................................................ 3
A.1 Precautions................................................................... 3
A.2 Reassembly................................................................... 3
A.2.1 Start-up Kit .............................................................. 3
A.2.2 Glass Burettes......................................................... 4
A.2.3 Reagents and Tubing............................................ 5
A.2.4 ORP and Fluoride Sensors .................................. 5
A.3 Preparing to Run......................................................... 6
A.3.1 Facilities .................................................................... 6
A.3.2 Flush Burettes......................................................... 6
A.3.3 Settings..................................................................... 6
A.3.4 Recipes and Adjustments.....................................7
A.3.4.1 Recipes..........................................................7
A.3.4.2 Adjustments................................................ 8
A.3.5 ORP Sensor Calibration ..................................... 12
A.3.6 Fluoride ISE Sensor Calibration ....................... 12
A.3.6.1 Auto Cal Adjustments ............................ 13
A.4 Running ........................................................................13
A.4.1 First Run.................................................................. 13
A.4.2 Process Calibration ............................................. 14
SEMICHEM APM 200 WITH HF AND H202IN DSP+
3Application Guide | Entegris, Inc.
INTRODUCTION
—
Our SemiChem APM 200 (advanced process monitor)
application guide provides step-by-step instructions
for properly configuring the SemiChem APM 200 for
the DSP+ application for measuring low level HF and
hydrogen peroxide only. This guide is designed for
trained and qualified personnel. It is complimentary
to the SemiChem APM 200 Installation and Operating
Manual, not a replacement.
A.1 PRECAUTIONS
—
Be sure any personnel working on the SemiChem
APM 200 has read and understands the Installation
and Operating Manual. There are inherent hazards
to working with the SemiChem APM 200.
WARNING: Service of the SemiChem APM 200
may cause exposure to hazardous conditions
including chemical, electrical, and mechanical
dangers. Personnel should be properly trained
in all areas before attempting to service or
troubleshoot the analyzer.
WARNING: Electrical Precaution: High
voltage electronics (⁄ VAC) are located
throughout the electronics module. Printed
circuit boards are powered with 24 VDC. All
service should be performed by a qualified
electrician/electrical technician.
WARNING: Chemical Precaution: Corrosive
or poisonous liquids. Some reagents may
be corrosive to the eyes, skin, and respiratory
tract and may be hazardous if ingested. Wear
chemical resistant gloves, face shield, and
apron when changing the burette O-ring. See
MSDS for further health hazard information.
To minimize chemical exposure, purge the
burette with air by removing the reagent intake
line from the reagent bottle, then flush the
appropriate burette. This will remove most
of the reagent from the burette assembly.
If replacing the burette glass, consult with
on-site environmental personnel for proper
disposal of remaining reagents. If replacing
a burette O-ring, keep the burette glass
assembly within the enclosure for proper
exhaust of fumes.
It is the user's responsibility to fully understand the
use, application, and hazards associated with the
SemiChem APM 200. Refer to the SemiChem APM 200
Installation and Operating Manual for more information.
A.2 REASSEMBLY
—
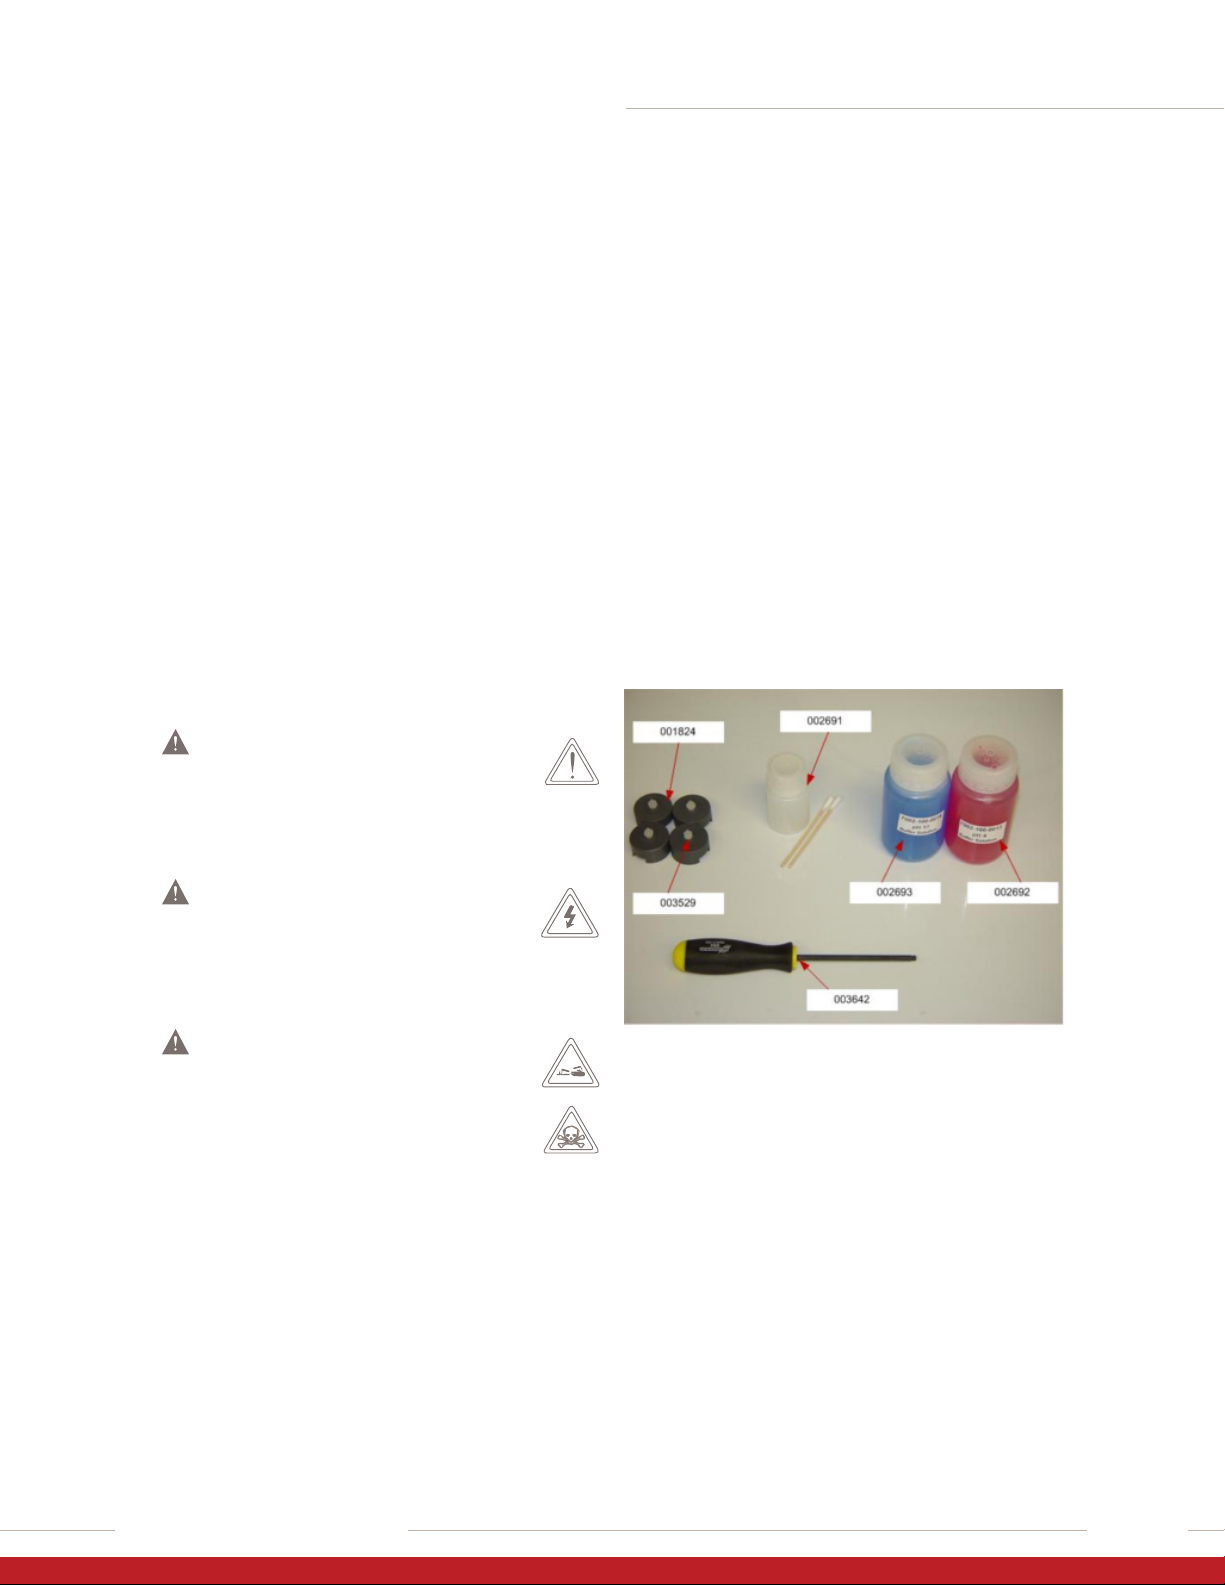
A.2.1 START-UP KIT
To complete the start-up of the SemiChem APM 200,
you will need:
1. 1 ea. ⁄” ball driver (003642).
2. 4 ea. tube weights and barbs (001824 and 003529).
3. Silicone paste kit (002691).
Start-up kit items.

4
SEMICHEM APM 200 WITH HF AND H202IN DSP+
Application Guide | Entegris, Inc.
In addition, you will need:
1. Glass burettes (000503) – the number of glass
burette assemblies will vary depending on
the application.
2. 8 – 32 × ⁄” SHCS (000762-050).
3. The sensor, Electrode, ORP Combination (001836) and
the sensor Electrode, F-, ISE Half Cell (001770).
A.2.2 GLASS BURETTES
Burette installation:
1. Using the silicone paste kit, apply a small amount
of silicone to each burette piston’s O-ring.
NOTE: Silicone paste is not needed on jacketed O-rings.
2. Install the glass burette into the piston and
guideposts using a slight twist motion.
3. Secure the burette glass assembly with the
8 – 32 × ⁄” SHCS and ⁄” ball driver.
4. Repeat for burettes 2 and 3.
Installed burettes.
SEMICHEM APM 200 WITH HF AND H202IN DSP+
5Application Guide | Entegris, Inc.
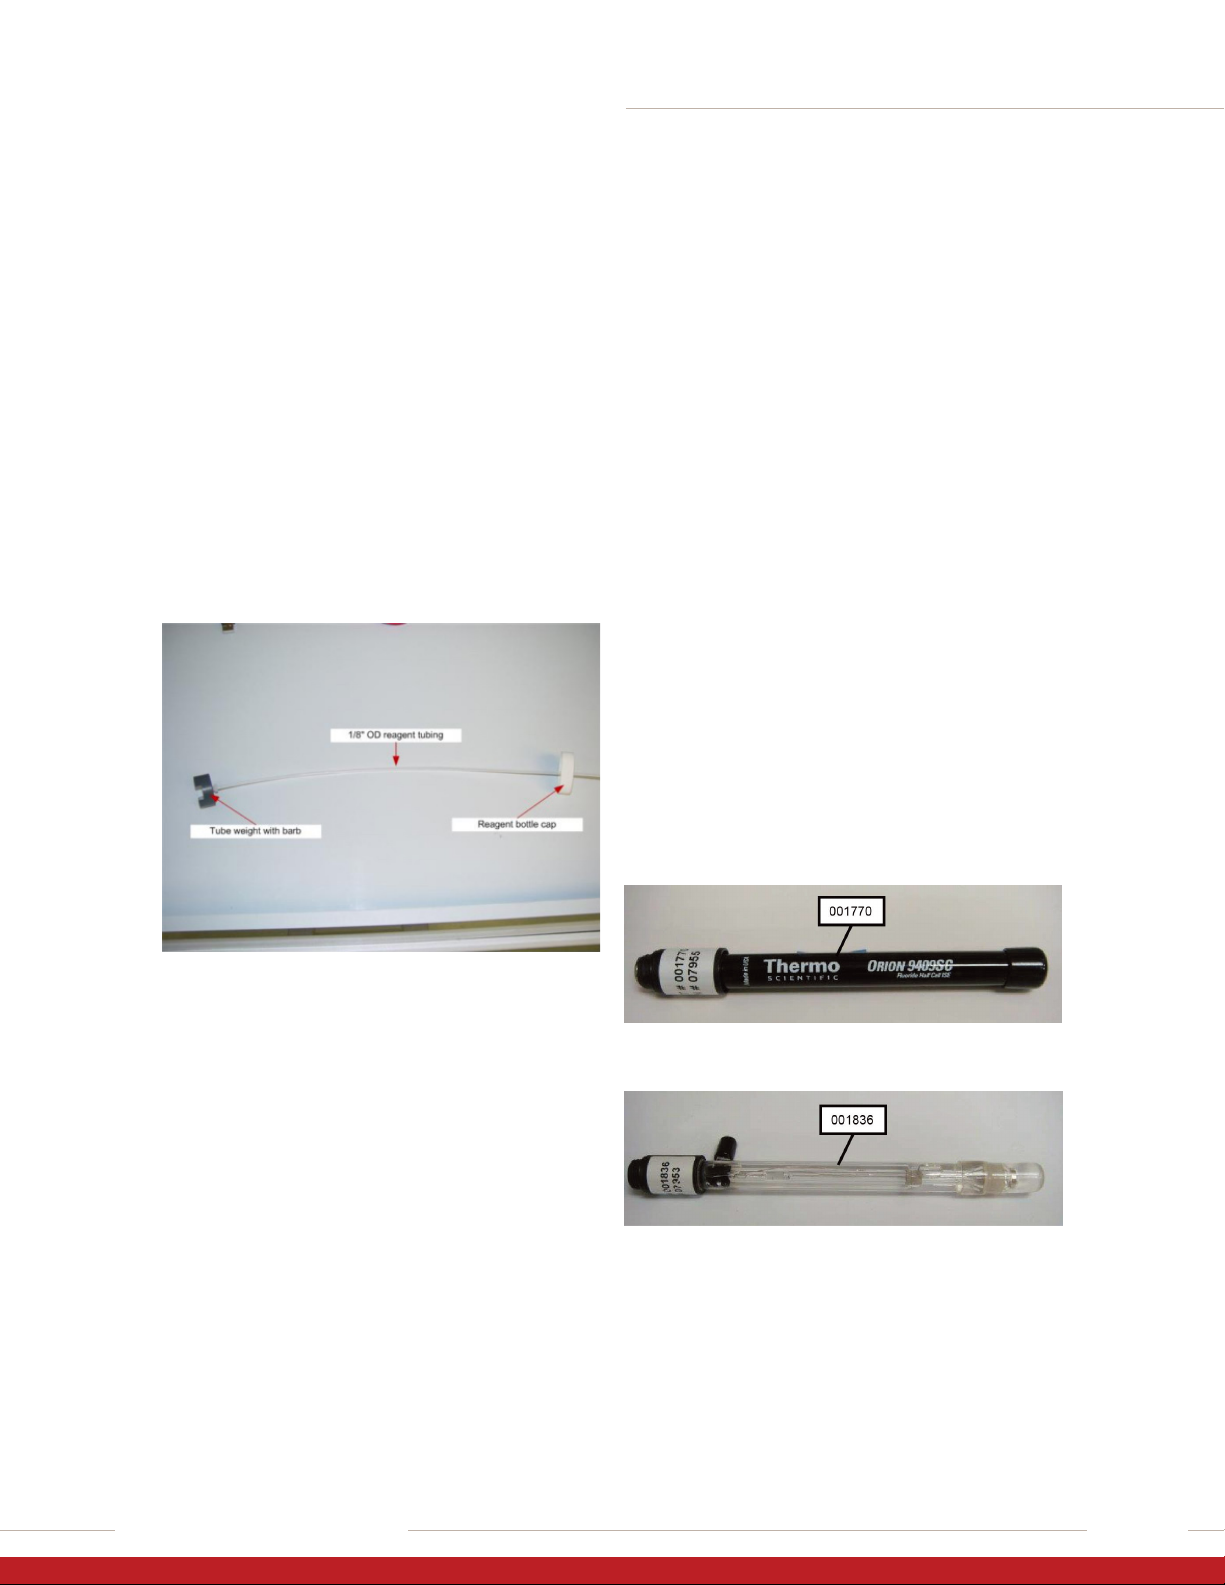
A.2.3 REAGENTS AND TUBING
Reagents installation:
1. Within the reagent storage, locate and uncoil the
reagent tubing.
NOTE: Each reagent tube is labeled with its
corresponding burette.
2. Insert the barb into the tube weight.
3. Remove the reagent cap from the reagent bottles
and slide the reagent 1 tube through the cap.
4. Install the barb/tube weight combination onto the
end of the reagent tube.
5. Repeat for reagents 2 and 3.
Installed tube weight.
6. Fill each reagent bottle with the reagents:
– Reagent bottle 1: 500 ppm fluoride
standard
– Reagent bottle 2: TISAB buer
– Reagent bottle 3: 0.25 N ceric sulfate in
1.0 N sulfuric acid
7. Carefully insert the tube weight/tube/cap
combination into corresponding reagent bottle.
Be sure the tube weight falls to the bottom and
sits flat. Secure the cap. Place reagent bottles
into the corresponding slots within the reagent
storage area.
NOTE: To follow the recipe parameters it is important that
the reagents are correctly assigned to the proper burettes.
A.2.4 ORP AND FLUORIDE SENSORS
1. Remove any caps and covers on the ORP sensor.
NOTE: There may be residual white crystals. These
crystals are saturated potassium chloride solution.
They are normal and can simply be wiped away.
2. Remove all caps and covers on the fluoride ion
selective electrode (ISE).
3. Remove the electrode retaining nut(s) from the
measuring cell. Remove the 3 mm × 11 mm O-ring
from the electrode port. You can choose to use any
of the open ports.
4. Slide the electrode into the retaining nut. Be
careful, the electrode is glass and can break.
Slide the O-ring onto the electrode shaft.
5. Insert the electrode/retaining nut/O-ring
combination into the measuring cell.
Repeat for the fluoride ISE.
6. Locate the electrode cable labeled “Input 1”.
Connect the ORP electrode and the electrode
cable. Locate the electrode cable labeled “Input 2”.
Connect the fluoride ISE and the electrode cable.
NOTE: To follow the recipe parameters it is important
that the electrodes are connected to the proper inputs.
Fluoride ion selective electrode with protective cap.
ORP electrode with protective cap.
6
SEMICHEM APM 200 WITH HF AND H202IN DSP+
Application Guide | Entegris, Inc.
A.3 PREPARING TO RUN
—
A.3.1 FACILITIES
At this point, the SemiChem APM 200 should be
fully installed and reassembled. All utilities can now
be energized.
1. Close all doors and be sure the exhaust is
connected and active.
2. Power up the SemiChem APM 200. The SemiChem
APM 200 information system will turn on. The MAIN
screen will be available shortly.
NOTE: If the system has been provided with safety
interlocks, the screen will have a RED background
indicating the safety interlocks require a reset. Press the
"GREEN" button below the EPO button to initiate the
safety circuits. Once pressed, and all safety interlocks
have been satisfied, the system is now ready.
3. Turn on CDA, water, and sample. Visually verify
there are no leaks.
4. From the MAIN screen, press "Service," then
press "Recipes."
5. From the service screen, select the recipe "Flush Cell."
Press "Run Now."
6. Verify water sprays into the cell from the top. It will
spray into the cell with the drain open for about 20
seconds, the drain closes and the water level will
reach the level sensor and stop the spray.
Service > Recipes.
Entegris / Service / Recipes
Recipe Menu:
Edit
New
Delete
Set As Main
Run Now
Done
Recipe Name
HF and Total Acid Sample 1 and 2
HF and Total Acid Sample 1
HF and Total Acid Sample 2
Flush Cell A
Empty Cell A
Flush Burette 1
Flush Burette 2
Flush Burette 3
Flush Burette 4
Flush All Burettes
Homemotors
Import
HF and H2O2 Sample 1 and 2
HF and H2O2 Sample 1
HF and H2O2 Sample 2
H2O2 in CMP Slurry Sample 1
H2O2 in CMP Slurry Sample 2
A.3.2 FLUSH BURETTES
Flushing the burettes with the appropriate reagents:
1. From Recipes, choose "Refill_Burette_1." Press
"Run Now." The burette will proceed to cycle
up and down three times. During which, it will
displace the air in the burette with the reagent.
Once complete, the reagent tubing and glass
burette will be completely filled with reagent.
Repeat for burettes 2 and 3.
2. Carefully inspect the burette glass and all tubing to
verify that all the air and bubbles have been purged
from the burette system. If not, repeat the above
step. For proper performance, the burette system
must be completely free from air bubbles.
3. Select "Flush_cell." Press "Run Now."
A.3.3 SETTINGS
The SemiChem APM 200's operation and behavior
within a process environment can be configured
to suit specific user needs. The settings allow the
SemiChem APM 200 to fit into the user’s process
control systems. There are eight setting screens.
Use the following to program the settings. Refer to
the “Software Flow Chart” in the SemiChem APM
200 Installation and Operating Manual for more
information on each setting.
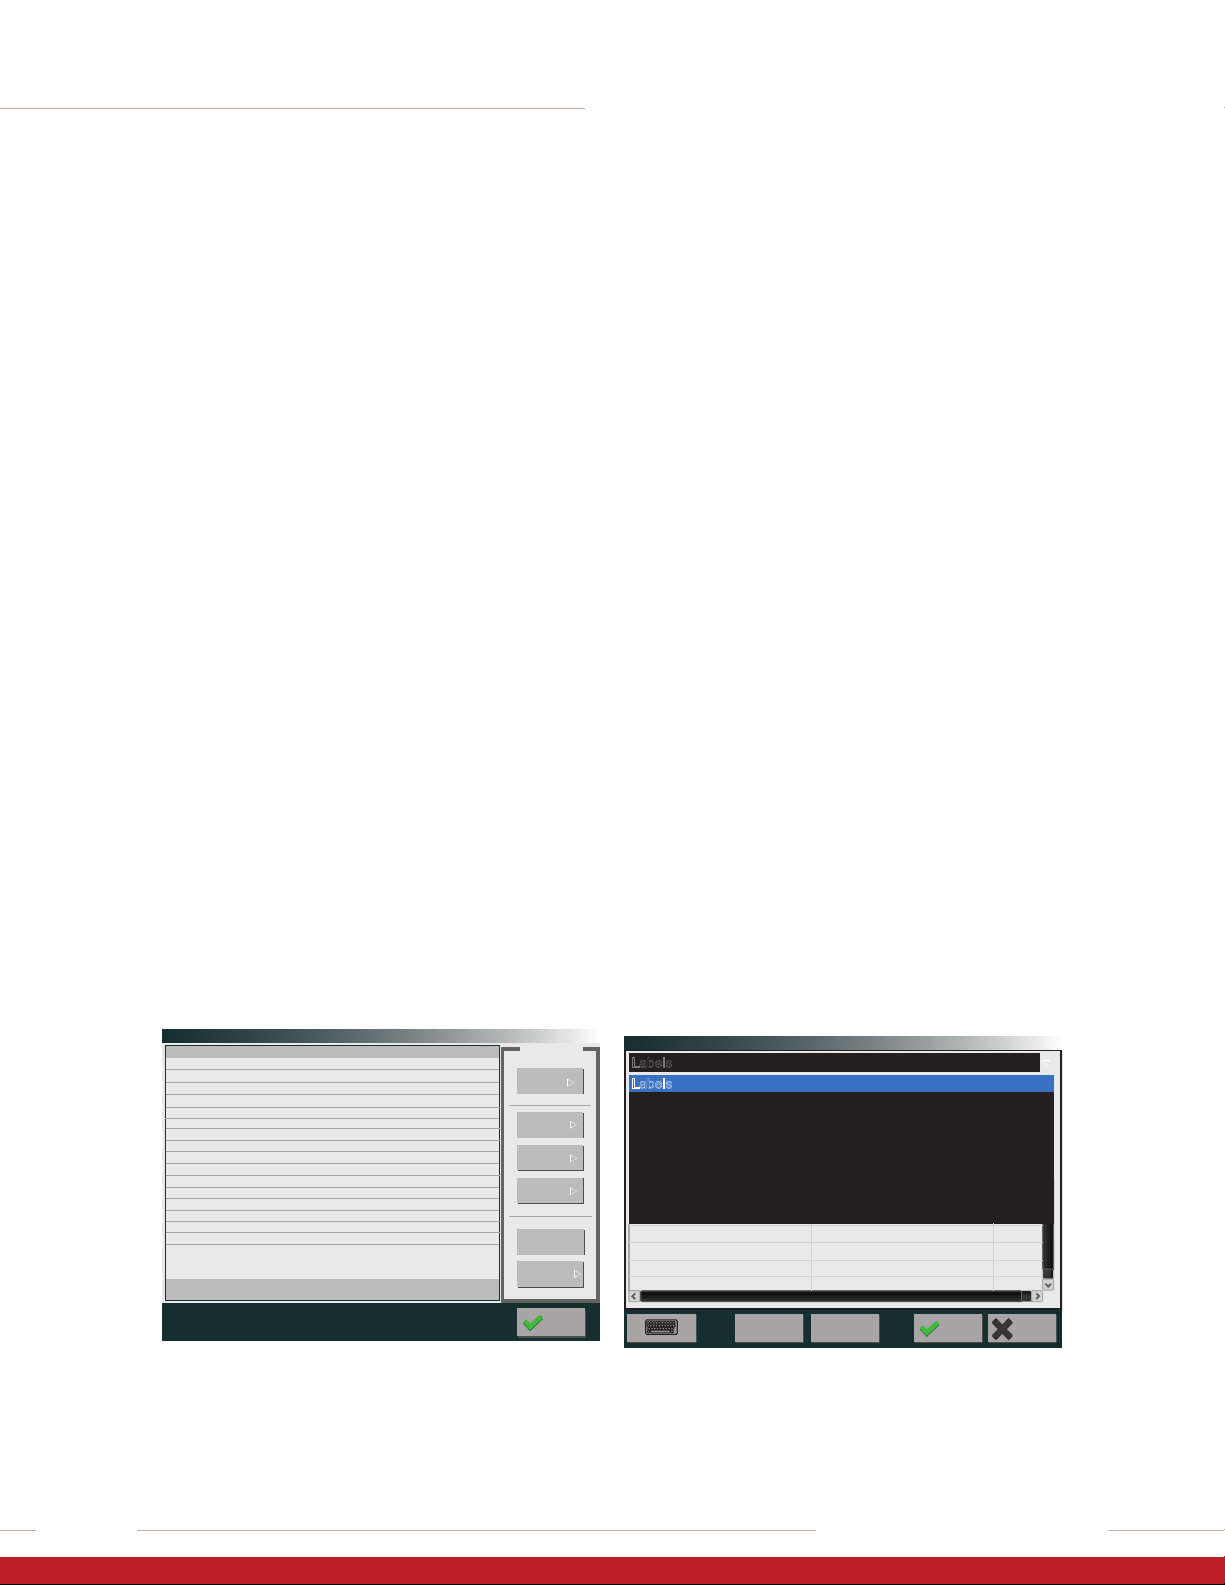
1. From the MAIN screen, press "Service," then
press "Settings."
Service/Settings.
Entegris / Service / Settings
OK Cancel
Back Next
Labels
Labels
Analog Outputs
Channel 1-4 Configuration
Channel 5-8 Configuration
Calibration Data / Trigger / Calculation Factors
pH Buffer Concentrations
Remote Input Triggers
Analysis Timing
Channel 2 Label
Channel 3 Label
Channel 4 Label
Channel 5 Label
Channel 6 Label
System Date / Time

SEMICHEM APM 200 WITH HF AND H202IN DSP+
7Application Guide | Entegris, Inc.
Labels: The “Labels“ menu is used for labeling the
SemiChem APM 200. As an example:
– Burette 1 Label: Fluoride Standard
– Burette 2 Label: TISAB
– Burette 3 Label: 0.25 N Ceric Sulfate
– Sample 1 Label: Tank 1 DSP+
– Sample 2 Label: Tank 2 DSP+
– Output 1 Label: HF Tank 1
– Output 2 Label: Hydrogen Peroxide Tank 1
– Output 3 Label: HF Tank 2 (if used with the
dual sample system option)
– Output 4 Label: Hydrogen Peroxide Tank 2
(if used with the dual sample
system option)
Analog Outputs: Sets the range for each output.
NOTE: The SemiChem APM 200 utilizes 4 – 20 mA analog
signals. 4 mA will be 0, 20 mA will correspond
to the high range.
Relays: Sets the behavior and threshold for each alarm.
Calibration Data/Trigger/Calculation Factors:
1. Trigger: If set to local, the SemiChem APM 200 will
run independent and will run whichever recipe
is set as default based on the internal analysis
frequency. If set to remote, the SemiChem APM
200 will run with PLC handshaking. In addition,
the user can select which recipe to run when using
the recipe select feature. If set to computer, the
SemiChem APM 200 will respond to commands
from the RS232. Refer to the SemiChem APM 200
Installation and Operating Manual, section 4.2.
2. Calculation Factors: These are set as part of the
process calibration.
pH Buer Concentration: When using an ORP
electrode, these are not used.
Remote Trigger Inputs: Each remote trigger input
can be tied to a recipe. Therefore, when either a
PLC (remote mode) or a PC (computer) send the
input (as per the SemiChem APM 200 Installation
and Operating Manual, section 4.2) the SemiChem
APM 200 will run the recipe tied to the input. For
example, Remote Recipe 0 may be the "HF and
Hydrogen Peroxide in Sample 1" recipe, and Remote
Recipe 1 may be the "HF and Hydrogen Peroxide in
Sample 2" recipe, and Remote Recipe 1 may be the
"HF and Hydrogen Peroxide in Sample 2" recipe.
In this case, the user can select which analysis
to perform depending on the control needs of
the process.
Analysis Timing: Sets the analysis frequency and sensor
equilibration time.
NOTE: The SAMPLE TRANSFER VOLUME must be set to
whatever the cell volume is in milliliters. This is typically
set to 200.
System Date and Time: Sets the date and time.
A.3.4 RECIPES AND ADJUSTMENTS
A.3.4.1 Recipes
The SemiChem APM 200 is provided with a variety of
recipes as a set of application defaults. These recipes
should be considered “starting points” and will most
likely need to be adjusted to meet individual needs.
The recipes available for the DSP+ process for HF and
H2O2are:
HF and Hydrogen Peroxide Sample 1: This recipe will
measure both HF and Hydrogen Peroxide in series on
sample 1 only.
HF and Hydrogen Peroxide Sample 2: This recipe will
measure both HF and Hydrogen Peroxide in series on
sample 2 only.
HF and Hydrogen Peroxide Sample 1 and 2: This recipe
will measure both HF and Hydrogen Peroxide in series
on sample 1 and sample 2.
AutoCal channel 2: This recipe sets the calibration
parameters to calibrate the fluoride ISE on input 2.
HF self test: This recipe allows the user to confirm
the operation of the fluoride ISE by creating an
internal sample.

8
SEMICHEM APM 200 WITH HF AND H202IN DSP+
Application Guide | Entegris, Inc.
A.3.4.2 Adjustments
Once the desired recipe is selected, there are a number of parameters that can be adjusted to optimize the perfor-
mance of the SemiChem APM 200. As an example, the recipe shown below is for HF and H2O2for Sample 1.
# Recipe: APM 200 HF and H2O2Sample 1
# Process: HF at 300 ppm, SHydrogen Peroxide at 4%
# Loop Size: 1 mL
# Burette Assignments: 1.500 ppm Fluoride Standard 2. TISAB Buer 3. 0.25 N Ceric Sulfate in Strong Acid
# Sensor Inputs: 1. ORP 2. F ISE
# Output Assignments: 1. HF in ppm 2. Hydrogen Peroxide in %
function main
# HF Analysis
call HOMEMOTORS motor1=yes motor 2=yes motor3=yes motor4=no
call CONDITION number=2 volume=0.25 valve=EV02
These recipes can be edited and adjusted. Additionally,
recipes can be imported via the USB.
Text notations of the recipe assumptions are within
each of the recipes. These assumptions are based on
the SemiChem APM 200 configuration, the sample
loop volume, the burette assignments, the electrode
input assignments, the reagent concentrations, and
the process concentration range. Generally, it is
assumed that:
1. Sample loop is 1.0 mL. This is the factory default.
2. Burettes and electrode are assigned as per A.2.3
and A.2.4 (page 5).
3. Fluoride standard is 500 ppm and Ceric Sulfate
is 0.25 N.
4. The expected HF concentration is 300 ppm, and
the Hydrogen Peroxide expected concentration
is 4%. If the expected concentrations vary the
system configuration and reagent concentration
may need to be adjusted. Please contact Entegris.
for more information.

SEMICHEM APM 200 WITH HF AND H202IN DSP+
9Application Guide | Entegris, Inc.
call CONDITION number=3 volume=0.25 valve=EV03
call BURETTE number=1 action=setvol volume=0.00 valve=EV01
call BURETTE number=2 action=setvol volume=0.00 valve=EV02
call BURETTE number=3 action=setvol volume=0.00 valve=EV03
call EMPTY_APM200_CELLA time=15
call FLUSH_APM200_CELLA time=25
call EMPTY_APM200_CELLA time=15
call SAMPLE time=8 valve=AV01
call TRANSFER_APM200_CELLA time=6000
call CONTROLIO io=MIXERA value=1 time=0
call TITRATE cell=1 number=3 channel_id=2_sensor_ch=1 endpoint=850 window=1.00 end=10.5 sensor=pH
algorithm=seek_set direction=up_1 min_inc=.03 max_inc=.4 goal=4.1 formula=normal units=mL oset=0.00 equib=3
call CONTROLIO io=MIXERA value=0 time=0
call CONDITION number=2 volume=4 valve=EV02
call CONTROLIO io=MIXERA value=1 time=10
call ISE cell=1 number=1 channel_id=1 sensor_ch=2 ph_sensor_ch=1 addn_mode=default meas_mode=fixed
meas_time=30 cell_volume=200 std_conc=500 units=ppm def_conc=.75 factor=9 sensor=mV cal=no cal_ch=1
call EMPTY_APM200_CELLA time=15
call FLUSH_APM200_CELLA time=25
call EMPTY_APM200_CELLA time=10
call CONTROLIO io=MIXERA value=0 time=0
call FLUSH_APM200_CELLA time=10
call HOMEMOTORS motor1=yes motor2=yes motor3=yes motor4=no
end

10
SEMICHEM APM 200 WITH HF AND H202IN DSP+
Application Guide | Entegris, Inc.
HOMEMOTORS: This brings the burettes motors to
their uppermost position.
CONDITION number=1 volume=0.25 valve=EV01:
Injects 0.25 mL of burette 1 using electric valve 1. This
essentially prepares the burette for use and clears the
reagent dispensing tip of any bubbles.
BURETTE number=1 action=setvol volume=0.00
valve=EV01: Resets the system’s tracking of the
volume of reagent injected.
EMPTY_APM200_CELLA time=15: Opens the drain
valve for 15 seconds. The time can be adjusted
to ensure that the drain fully empties prior to the
next step.
FLUSH_APM200_CELLA time=25: Spray rinses the cell
for 25 seconds. This time can be adjusted to ensure
the cell is completely rinsed prior to the next step.
SAMPLE time=8 AV01: This command prepares the
6-port valve to take a sample. Additionally, it opens
valve AV01, the sample 1 inlet valve, and diverts sample
to the 6-port valve for eight seconds. This time can be
adjusted to accommodate varying sample inlet flow
rates. Note, the sample time only has to be long
enough for a fresh sample to go from the 3-way
recirculating AV01 to the 6-port valve.
TRANSFER_APM200_CELLA time = 6000: Prepares
the 6-port valve to deliver sample to the measuring
cell. Opens AV03 to transfer the contents of the
sample loop to the measuring cell. AV03 will remain
open until either the cell level sensor trip or the time
is reached. If the level sensor is not tripped within the
defined time (6000 seconds), the system will respond
with an error code: 64.
CONTROLIO = MIXERA value = 1 time = 10: Turns
the mixer motor on. This is not adjustable.
TITRATE (for the H2O2measurement):
– cell = 1: Cell 1 in single cell system, cell 1 or 2 in
dual cell system.
– number = 3: Defines which burette is used to
perform the titration.
– channel_id = 2: Defines which displayed and
analog output is used for this measurement.
– sensor_ch = 1: Defines the ORP electrode is
connected to sensor input 1.
– endpoint = 850: Defines the titration endpoint
value. Can be optimized for the chemistry’s
endpoint.
– window = 100: Defines the tolerance in which
the SemiChem APM 200 will seek for the actual
endpoint. In this case, the SemiChem APM 200
will search from 750 to 950 for the endpoint.
– end = 1050: Defines when the titration
is terminated.
– sensor = mV: Defines the displayed sensor
graph scale.
– algorithm = seek/set: Defines how the SemiChem
APM 200 determines the endpoint. Seek allows the
SemiChem APM 200 to determine the endpoint
within the window. Setpoint assigns the endpoint
at a fixed value. Seek/set allows the SemiChem
APM 200 to first search for the endpoint within
the window. If unable, then it will revert to the
setpoint value.
– direction = up_1: Defines the direction of the
titration. It also defines the method of reagent
injection. Up value configures the reagent
injection volumes based on the slope of the
sensor response curve using the min. and max.
increments. Up-1 value configures the reagent
injection volumes based on a goal volume of
where the endpoint is expected.
– min_inc = 0.03 and max_inc = 0.4: Sets the range
of reagent volume injections. Min. increment is
usually 0.03. Max. increment is usually 10% of
the expected goal volume.
– goal = 4.1: When using the up-1 (or down-1)
titration direction, the SemiChem APM 200
will optimize reagent volume injections based
on the expected endpoint volume. As the total
reagent volume injections get closer to the goal
volume, the system will inject smaller and smaller
increments as it slowly approaches the endpoint.
Thus, giving the SemiChem APM 200 more data
points in the critical portion of the sensor response
curve to determine the most precise endpoint.
This value can be adjusted to match the expected
endpoint value. This feature is only suitable for
applications in which the process is fairly stable.

SEMICHEM APM 200 WITH HF AND H202IN DSP+
11Application Guide | Entegris, Inc.
– formula = normal: The calculation formula simply
takes the endpoint volume and multiplies by a
calibration factor to report sample concentration.
Other formulas can be used, but are not applicable
for the DSP+ application.
– units = %: Defines the units labeled on the
display output.
– oset = 4.00: Defines if there is a reagent injection
oset. This volume is subtracted from the overall
reagent used in the recipe from a given burette
to that point.
– equib = 3: Defines the amount of time (seconds)
between reagent injection, mix, and sensor reading.
In this case, the system is allowed three seconds
for the solution to be mixed prior to a sensor
reading. This can be adjusted if the sensor response
curve is not smooth.
CONDITION number = 2 volume=4.00 valve=EV02:
Injects 4.00 mL of burette 2 using electric valve 2.
This step injects 4.00 mL of TISAB buer into the cell
to prepare for the HF measurement. This step brings
the pH value to about 5.5. This is the proper pH to
measure the fluoride ion.
ISE (for the HF measurement).
– cell = 1: Cell 1 in single cell system, cell 1 or 2 in
dual cell system.
– number = 1: Defines which burette is used to
perform the standard addition.
– channel_id = 1: Defines which displayed and
analog output is used for this measurement.
– sensor_ch = 2: Defines the pH electrode is
connected to sensor input 2.
– pH sensor_ch = 1: Defines the pH electrode
input. When using the ORP electrode, this selects
the input the ORP is connected to.
– addn_mode = default: This defines the single
point standard addition method.
– meas_mode = fixed: Defines duration of the
sensor’s measuring time. Fixed time is defined
in meas_time. Auto time is defined as self
determined sensor’s stability.
– meas_time = 30: Can be adjusted shorter or
longer based on the ISE’s measuring stability.
– cell_vol = 200: Defines the total volume in the
cell during the measurement. This value is used
to determine the proper volume of standard to
be added to create the upper calibration limit.
– std_conc = 500: Defines the fluoride standard
concentration. This is used to calculate the
calibration and addition volumes.
– def_conc = 0.75: Defines the lower calibration
range. The formula is:
– Cell Volume/Sample Volume = Sample
Dilution. 200 (cell volume)/1 (sample
loop volume) = 200 Sample Dilution.
– Expected concentration in the cell =
Expected concentration/sample dilution.
– 1.5 (ppm expected concentration
in the cell= 300 ppm (process HF
concentration)/200.
– Def_Conc= Expected concentration in
the cell × 0.5. 0.75 = 1.5 × 0.5.
– factor = 9: This sets the top value for
the calibration range. It also defines the
standard injection volume for the standard
addition during the measurement. If the
default concentration is 0.75 (which
represents 150 ppm), the factor sets the
high as 7.5 (or 1500 ppm). This sets the
calibration range at 150 ppm to 1500 ppm.
ISE calibration slopes are characterized by
a slope value over a “decade” change in
concentration. The fluoride ISE, it has
a slope of 57 mV for every 10 times change
in value. 1 ppm to 10ppm is 57 mV slope. 10
ppm to 100 ppm is another 57 mV slope,
and on and on.
– The factor sets the decade change to be:
– def conc x factor + def conc = 7.5
(or 1500 ppm).
– 0.75 × 9 + 0.75 = 7.5 This defines the
calibration range (in ppm in the cell) at
0.75 and 7.5.
– sensor = mV: This defines the sensor
response graphical display’s y-axis scale.

12
SEMICHEM APM 200 WITH HF AND H202IN DSP+
Application Guide | Entegris, Inc.
A.3.6 FLUORIDE ISE SENSOR CALIBRATION
The pH sensor requires periodic calibration to set the
slope of the sensor’s response. The calibration is
performed using a two-point calibration.
1. Idle the system.
2. From the MAIN screen, press "Calib." Press the
"ISE Calibration" tab.
3. Set the Channel to “2”, which is the Fluoride ISE
input. Press "Auto Cal."
The system will begin performing the calibration
routine as described in the recipe “ISE 2 Auto Cal”.
Briefly, the system will create the low range fluoride
concentration in the cell, measure the created sample
with the ISE, then create the high range fluoride
concentration in the cell and measure again. The
system will then determine the dierence in the
sensor response to calculate the sensor’s slope. This
slope will be updated in the “ISE Slope History”. The
slope should be 61 ±3 mVs.
If the sensor does not report back an acceptable
slope, verify electrode electrical connections,
reagent assignments, and the recipe to ensure
proper calibration range.
Entegris / Service / Calibrate
Done
Set Low pH
Auto Cal
(ISE) Slope History 1:
Parameters
Channel: Readings:
Titration Calibration
ISE Calibration
Ch:
mV:
Parameter Value
gpHStdLow
gpHStdHigh
gpHSlope
gpHOffset
1
-42.09
1
Calibration/ISE Calibration.
– cal = no: These parameters are used for
the sample. If this recipe was to define the
sensor calibration this would be “yes."
– cal_ch = 1: These parameters are used for
the sample. If this recipe was to define the
sensor calibration this would be 2 because
the ISE is connected to sensor input 2.
The recipe shown above is for the above stated
assumption. However, these parameters can be
adjusted to optimize the system. Additionally, if the
process concentrations vary from the above stated
assumption, then there may need to be further
adjustments in the recipe, reagent concentrations,
and/or sample loop size.
A.3.5 ORP SENSOR CALIBRATION
The ORP does not require calibration.

SEMICHEM APM 200 WITH HF AND H202IN DSP+
13Application Guide | Entegris, Inc.
If in remote mode:
1. Using the host PLC system, initiate a
measurement sequence.
2. If using recipe select function, the SemiChem APM
200 will perform that recipe. It will flush the cell,
drain the cell, fill the sampling loop, and transfer
the sample to the cell with DI water until it trips the
level sensor. Next it will then add 5.0 mL of TISAB
solution to bring the pH to about 5. The system
will continue with the HF measurement. Once
complete, the cell will drain, flush, and drain again.
The SemiChem will flush and rinse the cell, take
another sample and it will begin with the titration
of the hydrogen peroxide. Once complete, the cell
will again empty and flush, the burettes will reset
and the displayed results will update. It will close
the “READY” contact.
If in computer mode:
1. Using the host PC system, initiate a measurement
sequence.
2. If using recipe select function, the SemiChem APM
200 will perform that recipe. It will flush the cell,
drain the cell, fill the sampling loop, and transfer
the sample to the cell with DI water until it trips the
level sensor. Next it will then add 5.0 mL of TISAB
solution to bring the pH to about 5. The system
will continue with the HF measurement. Once
complete, the cell will drain, flush, and drain again.
The SemiChem will flush and rinse the cell, take
another sample and it will begin with the titration
of the hydrogen peroxide. Once complete, the cell
will again empty and flush, the burettes will reset
and the displayed results will update. It will close
the “READY” contact.
A.3.6.1 Auto Cal Adjustments
The “Auto Cal 2” recipe is similar to the “HF and H2O2”
recipe with these notes:
1. The “Auto Cal 2” does not take a sample. It creates
the low and high concentrations of the calibration
range using the Fluoride Standard.
2. The ISE measurement parameters between the
“Auto Cal 2” and “HF and H2O2” have to match with
the exception of the cal=xxx parameter in the “Auto
Cal 2” recipe, which has to be cal=yes to indicate
this recipe will be used to create and store the slope.
3. The ISE calibration should be run two to three times to
ensure repeatability. Each calibration slope should
be 1.5 to 3 mVs within each other.
A.4 RUNNING
—
A.4.1 FIRST RUN
If in local mode:
1. From the service screen, press "Recipes." Select
recipe “HomeMotors." This recipe will reset the
motors. Press "Run Now."
2. From the Recipe screen, choose the appropriate
Auto Cal recipe for the situation. Press "Save As
Main." This will make this the default recipe.
3. Press "Run Now." The SemiChem APM 200 will
proceed to perform the recipe. It will flush the cell,
drain the cell, fill the sampling loop, and transfer
the sample to the cell with DI water until it trips
the level sensor. Next it will add 5.0 mL of TISAB
solution to bring the pH to about 5. The system
will continue with the HF measurement. Once
complete, the cell will drain, flush, and drain again.
The SemiChem will flush and rinse the cell, take
another sample and it will begin with the titration
of the hydrogen peroxide. Once complete, the cell
will again empty and flush, the burettes will reset
and the displayed results will update.

Entegris®, the Entegris Rings Design®, and other product names are trademarks of Entegris, Inc. as listed
on entegris.com/trademarks. All third-party product names, logos, and company names are trademarks or
registered trademarks of their respective owners. Use of them does not imply any aliation, sponsorship,
or endorsement by the trademark owner.
©2013-2021 Entegris, Inc. |All rights reserved. |Printed in the USA |7133-11560TAN-0421
129 Concord Road
Billerica, MA 01821
USA
Tel +1 952 556 4181
Fax +1 952 556 8022
Toll Free 800 394 4083
Corporate Headquarters Customer Service
LIMITED WARRANTY
Entegris' products are subject to the Entegris, Inc. General Limited Warranty. To view and print this information,
visit entegris.com and select the Legal & Trademark Notices link in the footer. Entegris does not warrant any
failure in the case of customers using unapproved foreign components.
FOR MORE INFORMATION
Please call your Regional Customer Service Center today to learn what Entegris can do for you.
Visit entegris.com and select the Contact Us link to find the customer service center nearest you.
TERMS AND CONDITIONS OF SALE
All purchases are subject to Entegris’ Terms and Conditions of Sale. To view and print this information,
visit entegris.com and select the Terms & Conditions link in the footer.
www.entegris.com
Installation and Use Manual | PS4-MT50-H
A.4.2 PROCESS CALIBRATION
The following procedure calibrates the SemiChem
APM 200 to the process. The system can be calibrated
with either the factor or process calibration method.
Factor Calibration:
1. The analyzer's calculation factor can be derived
from first principals using the following equation:
Calculation Factor = (Ctit × RR × U × MW)/Vsamp
Ctit = Titrant concentration (normality)
RR = Reaction ratio (moles of sample that will react
with each mole of titrant)
U = Unit factor (typical values: "1" for g/L, "0.1" for %,
"1000" for mg/L, etc.)
MW = Molecular weight of sample species
(e.g., H2SO4= 98)
Vsamp = Volume of sample taken (typically 0.25– 1 mL)
For example:
Ctit = 0.2
RR = 0.5
U = 0.1
MW = 98
Vsamp =0.5
4.900 = (Ctit × RR × U × MW)/Vsamp
This factor is used in the Settings/Calculation Factors
for output 1.
Process Calibration:
1. At the same time the SemiChem APM 200 takes
a sample, take a grab sample.
2. Once the SemiChem APM 200 is complete, note
the result. For example: 0.816 mL.
3. Make a note of a trusted laboratory’s result. For
example: 4.00% H2SO4.
4. Divide the laboratory result by the SemiChem APM
200 result. For example: 4.00/0.816 = 4.900.
5. In this case, 4.900 is the factor to be used in
the Settings.
The calculation factor converts the SemiChem APM
200's milliliters of titrant to reach the endpoint into a
concentration that the customer can use for process
control. Once the SemiChem APM 200 is calibrated to
the process, it should not have to be repeated unless
maintenance is performed on the burette O-rings,
there is a change in reagent, or there is a change
in electrode.
At this point, the SemiChem APM 200 is reassembled,
calibrated, and ready for use.
Table of contents
Popular Test Equipment manuals by other brands

Hanna Instruments
Hanna Instruments HI 98103 instruction manual

ULTIMATE SPEED
ULTIMATE SPEED UAWSB 2 B1 Operation and safety notes

Viavi
Viavi OneAdvisor 800 Platform Quick Card User Guide

Fluke
Fluke 6100B Getting started

JDS Uniphase
JDS Uniphase IP Video Test Option HST-3000 Product guide

Forch
Forch EBT 03 manual

Glas-Col
Glas-Col 099D HST230N User instructions

Keithley
Keithley Interactive SourceMeter 2450 Reference manual

Laversab
Laversab 6500 user manual

Tintometer
Tintometer Lovibond TB 350 quick start guide

Megger
Megger PFL22M1500 Series user guide

Sanyo Denki
Sanyo Denki San Ace 9AT2560 Series instruction manual


