Entes ETMO-02 Instruction manual
ETMO Modem
Hızlı Kurulum
Talimatı
Quick Start Manual
Schnellinstallations-
anleitung
A9200 Rev.1

Cihaz Bağlantısı
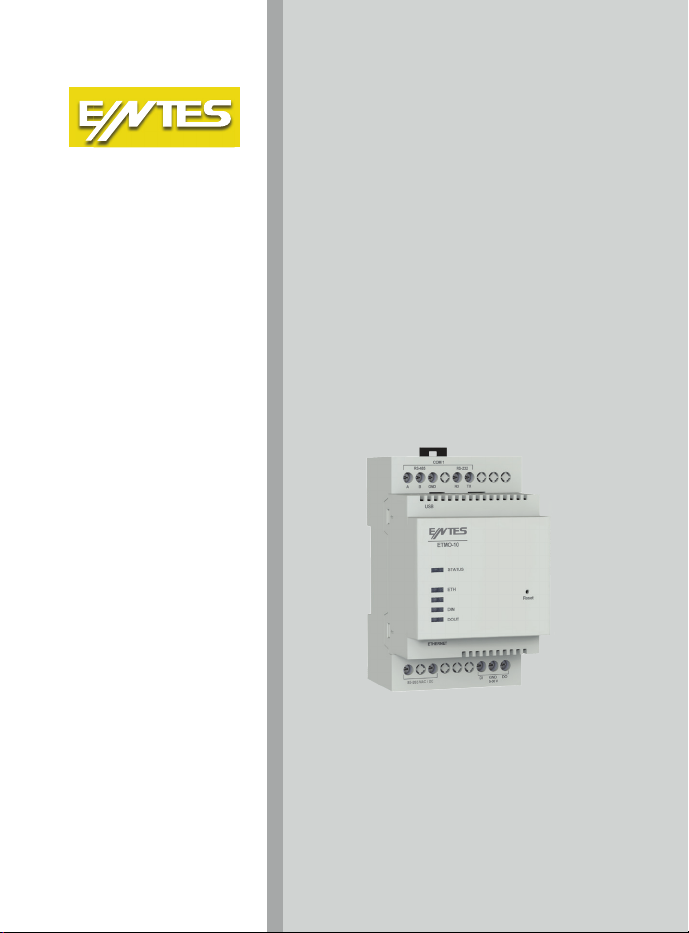
Cihazın MODBUS bağlantısını gerçekleştiriniz ve Ethernet bağlantınızı yapınız. Cihazın
besleme aralığı 85-265 VAC/DC. Besleme aralığına uygun bir gerilim ile cihazı enerjilendiriniz..
PC
Micro USB
Ethernet
85-265 VAC / DC
Dijital I/O
RS-232
RX TX
RS-485
A(+)B(-)
GND
LED Göstergeler
Status LED
Kırmızı - Sürekli Yanıyor: Cihazda enerji var fakat henüz IP almamış, bu sebepten ötürü WEB
arayüzüne erişim sağlayamazsınız.
Yeşil - Sürekli: Cihazda enerji var, IP alınmış. WEB arayüzüne bağlanabilirsiniz.
Beyaz Flaşör: Fabrika ayarlarına dönülüyor.
Sarı - Sürekli: USB bağlandı
Kırmızı ve Mavi Ardışık Flaşör: Cihazda arıza var. ENTES Müşteri Hizmetleri bölümü ile iletişime geçin.
Ethernet LED
Sürekli
: Bağlantı kuruldu
Flaşör
: Bağlantı kuruldu, şu anda iletişim var
Sönük
: Bağlantı kurulmadı
Dijital Giriş LED’i
Sürekli
: Dijital giriş aktif
Sönük
: Dijital giriş pasif
Dijital Çıkış LED’i
Sürekli: Dijital çıkış aktif
Sönük: Dijital çıkış pasif
Ayar Arayüzü
Cihaz ayarlarının web arayüzünden yapılabilmesi için micro USB kablosu ile bilgisayara bağlanması
gerekmektedir. Daha sonra web tarayıcınızdan http://usb.entes veya 192.168.7.1 adreslerinden
arayüze erişebilirsiniz. Cihazın şifresi, MAC ID sinin son 4 hanesidir.
Dikkat Edilmesi Gerekenler
• ModemebağlıolantümcihazlarınModbusadresleribirbirindenfarklı,seriportayarlarınınise
birbiri ile aynı olması gerekmektedir. (Baudrate, parite, data bit, stop bit)
• Okunacakcihazlarilecihazınızarasındakiserihaberleşmehattınınuçlarının(A-B-GND)
doğruluğundan emin olunuz.
• ETMO-02kodluürünlerenerjilendirildiktensonrailkokunanikifarklıadrestenbaşkaadresin
okunmasına izin vermez.
• CihazınIPayarlarınınnetworkyapınıza(subnetmask,gatewayaddress,DNS,IPaddress)uygun
olduğundan emin olunuz.
• Networkağınızdaherhangibirgüvenlikduvarıvarisehaberleşmeiçinkullanılacakolanportun
(502veya700)açıkolduğundaneminolunuz.
IT Talimatı:
IT yetkilinizle veya internet erişiminden sorumlu teknik ilgiliyle bu bilgileri paylaşınız.
Herhangi bir ENTES hizmetine, internet sağlayıcınız tarafından verilen statik IP adresini kullanarak
erişim sağlamak istiyorsanız (TCP sunucu, statik IP haberleşmesi ) ;
Varsayılanport502veyakongürasyonunuyaptığınızilgiliportüzerindenerişimyetkisisağlayınız.
Bağlantı ve özellikle model bazında farklılık gösterebilir
Arayüz Çalışma aralığı
Besleme 85-265 VAC/DC
Dijital Giriş 5-30VDC
Dijital Çıkış 5-30VDC

Cihaz Bağlantısı
Cihazın MODBUS bağlantısını gerçekleştiriniz ve Ethernet bağlantınızı yapınız. Cihazın
besleme aralığı 85-265 VAC/DC. Besleme aralığına uygun bir gerilim ile cihazı enerjilendiriniz..
PC
Micro USB
Ethernet
85-265 VAC / DC
Dijital I/O
RS-232
RX TX
RS-485
A(+)B(-)
GND
LED Göstergeler
Status LED
Kırmızı - Sürekli Yanıyor: Cihazda enerji var fakat henüz IP almamış, bu sebepten ötürü WEB
arayüzüne erişim sağlayamazsınız.
Yeşil - Sürekli: Cihazda enerji var, IP alınmış. WEB arayüzüne bağlanabilirsiniz.
Beyaz Flaşör: Fabrika ayarlarına dönülüyor.
Sarı - Sürekli: USB bağlandı
Kırmızı ve Mavi Ardışık Flaşör: Cihazda arıza var. ENTES Müşteri Hizmetleri bölümü ile iletişime geçin.
Ethernet LED
Sürekli
: Bağlantı kuruldu
Flaşör
: Bağlantı kuruldu, şu anda iletişim var
Sönük
: Bağlantı kurulmadı
Dijital Giriş LED’i
Sürekli
: Dijital giriş aktif
Sönük
: Dijital giriş pasif
Dijital Çıkış LED’i
Sürekli: Dijital çıkış aktif
Sönük: Dijital çıkış pasif
Ayar Arayüzü
Cihaz ayarlarının web arayüzünden yapılabilmesi için micro USB kablosu ile bilgisayara bağlanması
gerekmektedir. Daha sonra web tarayıcınızdan http://usb.entes veya 192.168.7.1 adreslerinden
arayüze erişebilirsiniz. Cihazın şifresi, MAC ID sinin son 4 hanesidir.
Dikkat Edilmesi Gerekenler
• ModemebağlıolantümcihazlarınModbusadresleribirbirindenfarklı,seriportayarlarınınise
birbiri ile aynı olması gerekmektedir. (Baudrate, parite, data bit, stop bit)
• Okunacakcihazlarilecihazınızarasındakiserihaberleşmehattınınuçlarının(A-B-GND)
doğruluğundan emin olunuz.
• ETMO-02kodluürünlerenerjilendirildiktensonrailkokunanikifarklıadrestenbaşkaadresin
okunmasına izin vermez.
• CihazınIPayarlarınınnetworkyapınıza(subnetmask,gatewayaddress,DNS,IPaddress)uygun
olduğundan emin olunuz.
• Networkağınızdaherhangibirgüvenlikduvarıvarisehaberleşmeiçinkullanılacakolanportun
(502veya700)açıkolduğundaneminolunuz.
IT Talimatı:
IT yetkilinizle veya internet erişiminden sorumlu teknik ilgiliyle bu bilgileri paylaşınız.
Herhangi bir ENTES hizmetine, internet sağlayıcınız tarafından verilen statik IP adresini kullanarak
erişim sağlamak istiyorsanız (TCP sunucu, statik IP haberleşmesi ) ;
Varsayılanport502veyakongürasyonunuyaptığınızilgiliportüzerindenerişimyetkisisağlayınız.
Arayüz Çalışma aralığı
Besleme 85-265 VAC/DC
Dijital Giriş 5-30VDC
Dijital Çıkış 5-30VDC

Device Connection
Make the MODBUS connection of the device and make the Ethernet connection. The device’s
supply voltage range is 85-265 VAC/DC. Supply the device with a suitable voltage within the supply
range.
PC
Micro USB
Ethernet
85-265 VAC / DC
Digital I/O
RS-232
RX TX
RS-485
A(+)B(-)
GND
LED Indicators
Status LED
Red - On:
The device is energized but IP has not been received yet, so you will not be able to access
the WEB interface.
Green - ON:
The device is energized and IP has been received. You could connect to the WEB
interface.
White Flasher:
Reset factory settings (In progress)
Yellow - ON:
USB connected.
Red and Blue Sequential Flasher: Device has malfunction. Please contact ENTES Customer Service.
Ethernet LED
ON:
Connection is ON
Flasher:
Connection is ON, communication is available.
OFF:
Connection is OFF
Digital Input LED
ON:
Digital input ON
OFF:
Digital input OFF
Digital Output LED
ON:
Digital output ON
OFF:
Digital output OFF
Setting Interface
Inordertocongurethedevicesettingsfromthewebinterface,itmustbeconnectedtothe
computer with a micro USB cable. Then you could access the interface via http://usb.entes or
192.168.7.1. The device’s password is the last 4 digits of the MAC ID. You could check the device’s
connection status to GSM on this interface.
Attention
• Modbusadressesofalldevicesconnectedtothemodemmustbedierentfromeachotherand
the serial port settings must be same. (Baudrate, parity, data bit, stop bit)
• Makesuretheaccuracyofserialcommunicationlineterminals(A-B-GND)betweenthedata
receiving devices and the device..
• EnergizedETMO-02modelsdonotallowtoreadanyaddressotherthanthersttwodierent
addresses.
• MakesuretheIPsettingsofthedevicearesuitableforyournetworkstructure(subnetmask,
gateway address, DNS, IP address).
•
Ifthereisanyrewallatyournetwork,makesurethecommunicationport(502or700)isavailable.
IT Instructions:
Share this information with your IT authorized or technical personnel responsible for internet access.
If you wish to access any ENTES service via static IP address by your internet provider (TCP server,
static IP communication);
Giveaccessauthorizationoverdefaultport502ortherelevantportyoucongured.
Connection and features may vary based on models
Interface Operating Range
Supply 85-265 VAC/DC
Digital Input 5-30VDC
Digital Output 5-30VDC

Device Connection
Make the MODBUS connection of the device and make the Ethernet connection. The device’s
supply voltage range is 85-265 VAC/DC. Supply the device with a suitable voltage within the supply
range.
PC
Micro USB
Ethernet
85-265 VAC / DC
Digital I/O
RS-232
RX TX
RS-485
A(+)B(-)
GND
LED Indicators
Status LED
Red - On:
The device is energized but IP has not been received yet, so you will not be able to access
the WEB interface.
Green - ON:
The device is energized and IP has been received. You could connect to the WEB
interface.
White Flasher:
Reset factory settings (In progress)
Yellow - ON:
USB connected.
Red and Blue Sequential Flasher: Device has malfunction. Please contact ENTES Customer Service.
Ethernet LED
ON:
Connection is ON
Flasher:
Connection is ON, communication is available.
OFF:
Connection is OFF
Digital Input LED
ON:
Digital input ON
OFF:
Digital input OFF
Digital Output LED
ON:
Digital output ON
OFF:
Digital output OFF
Setting Interface
Inordertocongurethedevicesettingsfromthewebinterface,itmustbeconnectedtothe
computer with a micro USB cable. Then you could access the interface via http://usb.entes or
192.168.7.1. The device’s password is the last 4 digits of the MAC ID. You could check the device’s
connection status to GSM on this interface.
Attention
• Modbusadressesofalldevicesconnectedtothemodemmustbedierentfromeachotherand
the serial port settings must be same. (Baudrate, parity, data bit, stop bit)
• Makesuretheaccuracyofserialcommunicationlineterminals(A-B-GND)betweenthedata
receiving devices and the device..
• EnergizedETMO-02modelsdonotallowtoreadanyaddressotherthanthersttwodierent
addresses.
• MakesuretheIPsettingsofthedevicearesuitableforyournetworkstructure(subnetmask,
gateway address, DNS, IP address).
•
Ifthereisanyrewallatyournetwork,makesurethecommunicationport(502or700)isavailable.
IT Instructions:
Share this information with your IT authorized or technical personnel responsible for internet access.
If you wish to access any ENTES service via static IP address by your internet provider (TCP server,
static IP communication);
Giveaccessauthorizationoverdefaultport502ortherelevantportyoucongured.
Interface Operating Range
Supply 85-265 VAC/DC
Digital Input 5-30VDC
Digital Output 5-30VDC
This manual suits for next models
2
Table of contents
Languages:
Popular Media Converter manuals by other brands


H&B
H&B TX-100 Installation and instruction manual

Bolin Technology
Bolin Technology D Series user manual

IFM Electronic
IFM Electronic Efector 400 RN30 Series Device manual

GRASS VALLEY
GRASS VALLEY KUDOSPRO ULC2000 user manual

Linear Technology
Linear Technology DC1523A Demo Manual

Lika
Lika ROTAPULS I28 Series quick start guide

Weidmuller
Weidmuller IE-MC-VL Series Hardware installation guide

Optical Systems Design
Optical Systems Design OSD2139 Series Operator's manual

Tema Telecomunicazioni
Tema Telecomunicazioni AD615/S product manual

KTI Networks
KTI Networks KGC-352 Series installation guide

Gira
Gira 0588 Series operating instructions

Lika
Lika SFA-5000-FD user guide