Enviracaire Germ-Free EWM-300W Operation and maintenance manual

In English 1-10
En français 11-20
En Español 21-30
Portable Electric Warm Mist Humidier
Germ-Free™ Model EWM-300W and EWM-350
• Instructions for Operation, Care and Cleaning
• Limited Warranty
READ AND SAVE THESE INSTRUCTIONS
Printed in CHINA
Imprimé en CHINA
Impreso en CHINA
Publication EWM-300W, EWM-350
Part Number 31IM300W190
EWM-350 Shown
EWM-300W-350_OM.indd 1 3/26/07 2:58:02 PM

2
READ ALL OF THE FOLLOWING INSTRUCTIONS BEFORE
ATTEMPTING TO OPERATE YOUR HUMIDIFIER. FOLLOWING
THESE SIMPLE GUIDELINES FOR USE AND CARE WILL HELP
ENSURE YEARS OF DEPENDABLE AND EFFICIENT SERVICE.
IMPORTANT SAFEGUARDS
CAUTION: BECAUSE HIGH TEMPERATURE IS GENERATED IN THIS HUMIDIFIER,
BASIC SAFETY PRECAUTIONS SHOULD ALWAYS BE FOLLOWED ESPECIALLY
WHEN CHILDREN ARE PRESENT.
WHEN USING ELECTRICAL APPLIANCES, THESE BASIC SAFETY PRECAUTIONS MUST
BE FOLLOWED:
1. DO NOT operate the humidier without the water tanks.
2. ALWAYS use clean, cool tap water to ll the water tanks.
3. To avoid risk of re or shock, DO NOT use an extension cord.
4. DO NOT handle the unit with wet hands.
5. NEVER tilt, move, or attempt to empty the unit while it is operating or plugged
in. Shut o, unplug and remove water tanks before moving unit.
6. DO NOT place the unit close to heated areas, such as near stoves, heaters or in
direct sunlight.
7. DO NOT operate OUTDOORS. This humidier is intended for indoor use only.
8. DO NOT let water get into the air inlets on the bottom of the enclosure or on the
cord or plug.
9. DO NOT store or use gasoline or other ammable vapors and liquids near the
humidier.
10. ALWAYS make sure the water tank caps and gaskets are rmly in place.
11. DO NOT touch hot surfaces.
12. ALWAYS turn the humidier o when the water tanks are empty or when
the unit is not in use. If you turn your unit o for extended periods, ALWAYS
disconnect the power cord and empty the water tanks and base.
13. ALWAYS place the unit on a rm at, level, water resistant surface and arrange
the power cord so that the product is unlikely to be upset.
14. DO NOT clean the product or service the UV bulb without disconnecting the
power cord.
15. Before connecting to electric power outlet, check your electrical power supply.
It must be 120 volts A.C. (alternating current). The outlet may be 15 amp or 20
amp. The circuit must be of adequate size and must be protected by fuse or
circuit breaker.
16. This item has a polarized plug. As a safety feature, this plug will t in a polarized
electrical receptacle (outlet) only one way. If the plug does not t fully in the
outlet, reverse the plug. If it still does not t, contact a qualied electrician.
EWM-300W-350_OM.indd 2 3/26/07 2:58:02 PM

3
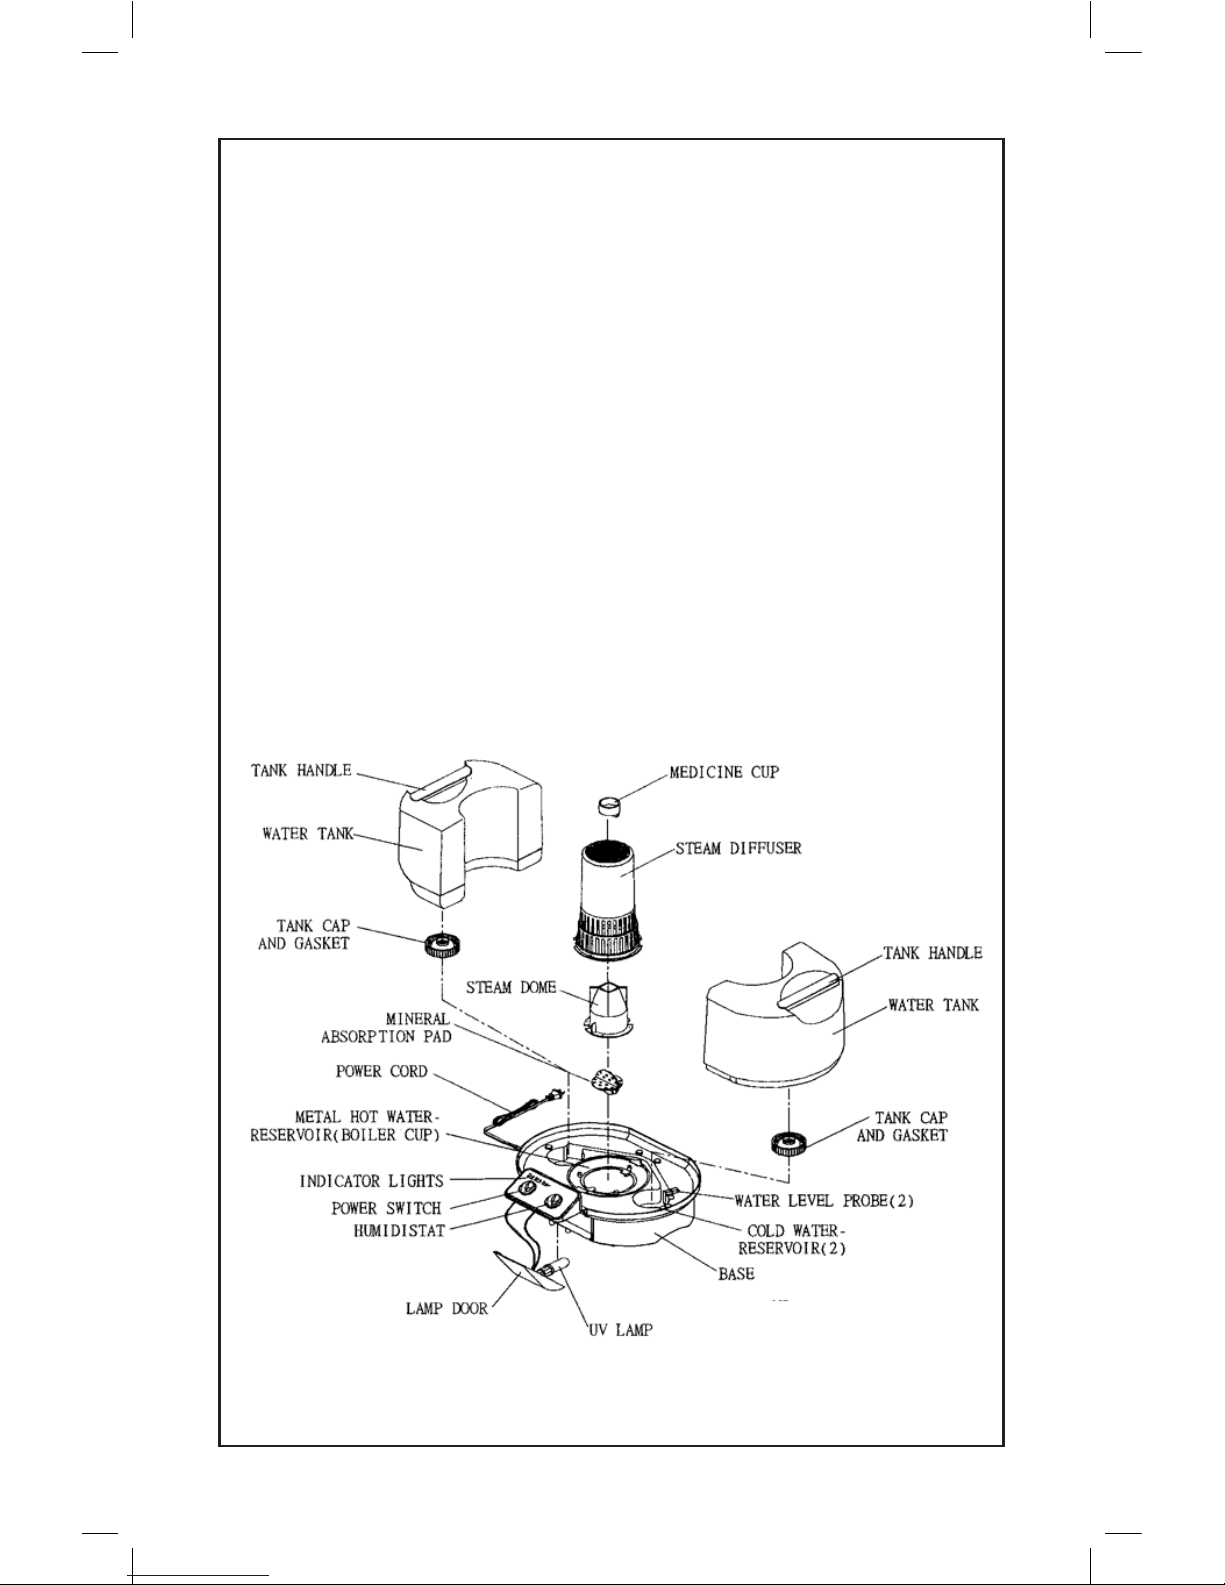
17. DO NOT attempt to remove TOP HOUSING, NOZZLE OR MINERAL ABSORPTION
PAD, during operation, or within 15 minutes after the humidier is turned to the
“OFF”position and unplugged. Serious injury may result. MINERAL ABSORPTION
PAD, TOP HOUSING AND NOZZLE should only be removed for cleaning and
maintenance purposes.
DO NOT place hands or face directly over TOP HOUSING while unit is in
operation.
18. Place unit in an area where it is not accessible to children.
19. Before using the unit, check the power cord for any signs of damage.
20. This humidier requires daily and weekly maintenance.
21. Refer to CLEANING AND MAINTENANCE instructions provided. NEVER clean
humidier in any other manner than as instructed by this manual.
22. WARNING – Eye damage may result from directly viewing the light produced by
UV bulb. DO NOT energize unit while lamp door is removed.
23. This product complies with Title 21 Code of Federal Regulations Chapter 1, Sub
chapter J.
SAVE THESE INSTRUCTIONS
EWM-350 Shown
EWM-300W-350_OM.indd 3 3/26/07 2:58:03 PM

4
WEEKLY CLEANING AND MAINTENANCE ADVISORY
At least weekly cleaning is recommended, when the unit has been in use. Regular
cleaning prevents mineral scale buildup in the hot water reservoir. It also helps
prevent buildup of bacteria, molds or other microorganisms in the tank or system.
This ensures that your humidier will operate at maximum eciency.
(See page 6 for full cleaning instructions.)
HOW YOUR ENVIRACAIRE
WARM MIST
HUMIDIFIER WORKS
This humidier uses a two-step approach
to eliminate potentially harmful
microorganisms from the water before they
are spread with the mist into the air. The rst
step uses a UV bulb, located inside the base
of the humidier, that shines on the water
through a special glass tube as it passes from
the cold water reservoirs to the hot water
reservoir. The second step is the boiling
action that takes place in the hot water
reservoir just before the mist is distributed
to the air in the room.
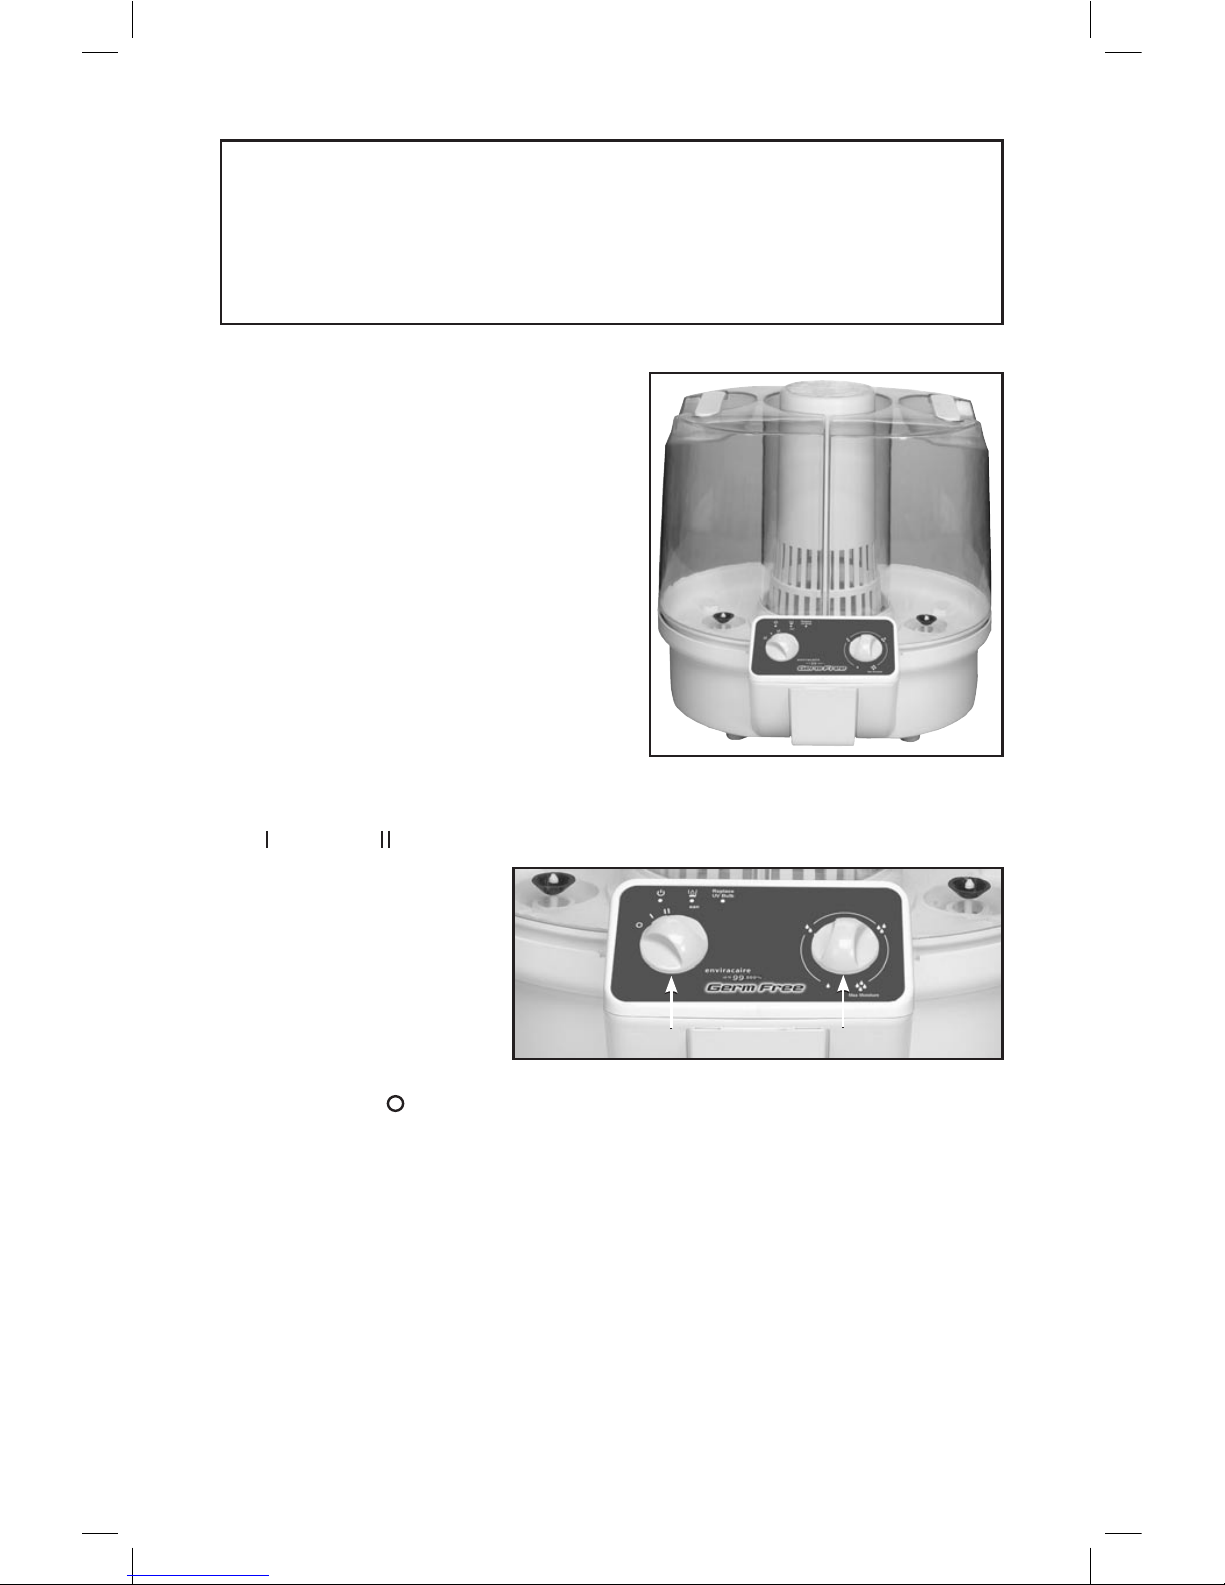
CONTROL PANEL
POWER SWITCH —
LO ( ) AND HI ( ) POSITIONS
When the switch is turned to
the“LO”or “HI” setting and the
unit is plugged in, the power
is on. With the unit running
in the“LO”setting, it will be
producing vapor at a lower
rate than when running in the
“HI”setting.
OFF POSITION ( ) - This cuts power to unit and should be used (in addition to
unplugging unit) before moving, performing maintenance, etc.
REPLACE UV BULB
If the “REPLACE UV BULB” signal light is continuously illuminated during normal use
(an occasional faint glow may occur when switching power on or other times, but
this is normal), the bulb must be replaced with the same special 3.5W bulb, EUV-
13B. See the enclosed order form. The UV bulb will operate at maximum output for
approximately 2,000 hours. The UV bulb may operate longer than 2,000 hours but
at a reduced output. To keep your humidier operating at maximum eciency it is
recommended that the UV bulb be replaced after 2,000 hours of use.
EWM-350 Shown
EWM-350 Shown
HumidistatPower Switch
EWM-300W-350_OM.indd 4 3/26/07 2:58:03 PM

5
REFILL INDICATOR ()- When illuminated, the water tanks need relling.See the
section “Filling the Water Tank”. If still illuminated a few minutes after full tank is placed
on base, reposition water tanks. (Unit will operate with only one water tank.) Each
time you ll tanks, rinse tanks, hot water reservoir and cold water reservoirs. Clean
them according to CLEANING INSTRUCTIONS if minerals or lm are present.
RELATIVE HUMIDITY CONTROL ( ) - This controls the humidity level. If moderate
humidity is desired, the control should be turned counterclockwise toward “LO”; and if
higher humidity is desired, clockwise toward “HI”.
NOTE: When you unpack your humidier, you may nd it has droplets of water on
some surfaces. This is normal as every unit is tested prior to shipping. Carefully unpack
humidier and remove all packing material.
OPERATING INSTRUCTIONS
1. Place the base of the unit on a rm, at, level and water resistant surface.
2. Fill the water tanks according to the instructions below and place on humidier base.
3. Plug the power cord rmly and completely into the wall outlet.
4. Turn the power switch to either the LO or HI position (Lights may icker
momentarily). Then turn the relative humidity knob clockwise until you hear a faint
click and the power light comes on. It will be normal for the humidier to take a
few minutes to warm up and begin to mist.
5. When the water tanks are empty, (after approximately 36 hours running time), the
“REFILL WHEN LIT” lamp will go on, and the unit will stop heating. Refer to the
“FILLING THE WATER TANKS”section.
6. Whenever the water falls below the level of the probes during operation, the
heating element will shut o and stop heating, and the REFILL indicator will light.
7. The unit will operate as long as there is water in either tank and unit will operate
with either one or both tanks.
FILLING THE WATER TANKS
1. Before lling the water tanks, turn the POWER switch to the“OFF”position and
unplug unit. Refer to cleaning instructions.
2. Remove water tanks from base, turn each tank upside down and remove tank cap
by turning counterclockwise. Fill tank with clean cold tap water.
If using distilled water, add a few grains of table salt to each tank.
Replace the tank cap by turning clockwise. Tighten rmly.
3. Carefully pick up tank, since it will be heavy when full, and slippery if wet.
4. Place water tanks on base. Make sure tanks are properly placed, otherwise, the
humidier will not work correctly.
EWM-300W-350_OM.indd 5 3/26/07 2:58:04 PM

6
USING THE MEDICINE CUP
In order to add a medicated vapor to the “mist”output:
1. Turn the POWER switch to the “OFF”position and allow the steam diuser to cool.
2.
Carefully add liquid medicine to medicine cup. DO NOT ll the cup more than half full.
3. Carefully place medicine cup on top of steam diuser
4. Turn the POWER switch to either the LO or HI position.
5. After use, remove the cup from the unit and clean any residue from the cup with
warm water.
WARNING:
DO NOT use any liquid medicine other than those specically recommended for use
with a steam vaporizer or warm mist humidier.
DO NOT pour medicine directly into the steam diuser openings nor add it to the
water in the tank or tray.
MINERAL ABSORPTION PAD INSTRUCTIONS
Warm mist humidiers do not spread ne mineral dust into the air that you breathe
nor on your furniture, the way that other type humidiers do. The mineral dust remains
trapped in the humidier hot water reservoir. Use of mineral absorption pads will
play a major role in capturing and removing minerals from hot water reservoir, and
preventing a stubborn mineral buildup. The unit can run without pads, but more
frequent cleaning will be required. The Mineral Absorption pad that ts your unit is the
EMP-15P
1.
Before starting humidier, place mineral absorption pad in the hot water reservoir.
After the humidier has been operating, the water will become HOT, and CAUTION
should be exercised when handling mineral absorption pad. It is best to allow
humidier water to cool down, and to use tongs or long tweezers when handling pad.
2. The useful life of the mineral absorption pad will vary, depending on the mineral
content of the water used. In areas of moderate mineral content water supply,
the mineral absorption pad should be changed after approximately (3) weeks
of continuous use. If the water is “Hard Water”, the pad should be changed more
frequently. The best way to tell when the pad should be changed is to examine it
AFTER the water has cooled down, to see if it is still soft and pliable. When the pad
is near the end of its life, it becomes sti and hard and should be replaced with a
new pad. Another sign to change pad is when scale begins to buildup on interior of
hot water reservoir. If pad appears to disintegrate (normally due to use of softened
water) discontinue use of pads.
CLEANING AND MAINTENANCE
Water contains minerals and other particles. During operation most of these minerals
will remain in the water reservoir. Gradual buildup of deposits will coat the hot water
reservoir and reduce its eciency. The importance of routine cleaning and care cannot
be over-emphasized. Hard water contains more minerals and other particles.
EWM-300W-350_OM.indd 6 3/26/07 2:58:04 PM

7
CLEANING INSTRUCTIONS
Failure to perform the necessary cleaning steps will damage unit.
1. Before cleaning, set CONTROLS to“OFF”position and unplug unit.
2. Remove water tanks from humidier base, and drain water from tanks.
3. Allow at least 15 minutes for the hot water to cool after shutting unit“OFF”before
moving base. Rotate steam diuser counterclockwise until steam diuser slots line
up with tabs in base, and lift up. Rotate steam dome until steam dome slots line
up with tabs in base and lift out. Remove mineral absorption pad from hot water
reservoir using tweezers or tongs to prevent burns from hot water. When the
cleaning procedure is completed, replace mineral absorption pad. To drain water
from humidier base, grasp with both hands and tilt to the side, draining water into
the sink.
BE CAREFUL NOT TO HAVE DRAINING WATER FALL INTO CONTROLS OR VENT
OPENINGS. DO NOT drain in any manner other than indicated.
WARNING: DO NOT place directly under running faucet.
4. Pour about 1 cup of white vinegar into either reservoir and allow it to soak for only
20 to 30 minutes.
5. Hold the base of the humidier over the sink and tilt it on its side to empty the
vinegar. Fill the cold and hot water reservoirs with clean, warm water to remove all
traces of the vinegar. Remove any buildup of minerals in the hot water reservoir
and from the two metal water level probes (they appear like two metal wires)
using a small brush, such as a toothbrush. NOTE: The buildup is due to water
hardness. The harder your water, the more often this maintenance will be needed.
Empty all of this water by turning the unit on its side. If minerals remain in the
metal (stainless steel) boiler cup, a metal scraper can be used to scrape o the
mineral deposits. Be careful not to use any metal blade on any plastic parts.
DO NOT ALLOW WATER TO ENTER THE BOTTOM OF THE HUMIDIFIER BASE OR ANY
OTHER OPENINGS, OR IMMERSE THE CORD AND PLUG.
6. Disinfect the water tanks using a solution of one teaspoon of household chlorine
bleach in 1 gallon of water. Let the solution sit for 20 minutes, swishing every few
minutes to wet all surfaces. Empty the tanks completely; rinse thoroughly until all
of the bleach smell is gone. Fill the tanks with fresh, cool water and replace them
onto the humidier base.
7. NEVER use any metal or hard objects to clean plastic parts which may cause
scratching of the plastic parts. The only exception to this is the metal part of the
hot water reservoir. A metal scraper can be used to clean this part only. NEVER use
gasoline, kerosene, glass cleaner, furniture polish, paint thinner or other household
solvents to clean any part of the humidier.
8. Each day the reservoirs and tanks should be drained, rinsed and relled with fresh
tap water.
9. To clean exterior surfaces, use a solution of water and mild detergent with a wrung-
out damp cloth. Rinse and wring out the cloth and wipe the exterior surfaces again.
Finally, wipe with a dry cloth. Allow sucient time to dry before plugging the
electrical cord into the outlet.
10. After base is totally cleaned and dried, replace mineral absorption pad. Place steam
dome on base by aligning its slots with tabs in base. (You may have to reposition
steam dome to other set of tabs, because it will only t one way.) Rotate steam
dome clockwise until it locks. Place steam diuser on base so that the slots in
steam diuser line up with tabs on the base. Rotate steam diuser clockwise until it
locks in place.
11. Replace tanks. Plug in the unit and resume normal use.
EWM-300W-350_OM.indd 7 3/26/07 2:58:04 PM

8
CHANGING THE UV BULB
1. If the “REPLACE UV BULB”indicator illuminates during normal use, it is time to
change the UV bulb, which is a special 3.5W bulb.
2. Turn the POWER switch to the “OFF”position, unplug it and allow it to cool.
3. Remove the water tanks from the base of the humidier. Remove steam diuser
and steam dome by rotating them counterclockwise and lift up.
4. Place the base of the humidier over
the sink and tilt the unit to remove any
remaining water.
5. Carefully turn the base of the humidier
over and place it upside down on a
at level surface. You will see a door
at front of unit that is closed with two
Phillips head screws.
6. Using a Phillips head screwdriver,
carefully turn the screws
counterclockwise until the screws
separate from the door.
7. Open the door, by pulling forward. The UV light bulb will be visible. Pull the door
out the minimum amount to have access to unscrew bulb from socket.
8. Take a replacement 3.5W UV bulb that you purchased from Kaz Incorporated or
another supplier and change the bulb. To prolong the life of the bulb, limit your
direct contact with the glass of the bulb by using a cloth or tissue to screw it into
place.
9. When the new bulb is in place, close the door and replace the screws by using your
Phillips head screwdriver and rotating them clockwise until they are just tight.
DO NOT OVER TIGHTEN.
10. DO NOT turn power on, while UV lamp door is open, and DO NOT view illuminated
bulb directly because eye damage may occur.
11. Turn the unit upright, place the water tanks on top of the base of the humidier,
plug the unit in, and turn the POWER switch to either the LO or HI position. The
“REPLACE UV BULB”indicator should no longer be lit.
IMPORTANT NOTE: Even though you will not receive maximum germicidal eects, you
can still use your humidier until the replacement bulb arrives.
NOTE: You will hear a rattling sound and notice a small round object inside your bulb.
This is normal. Your bulb is fully operational.
Lamp contains mercury. Manage in accordance with disposal laws.
See www.lamprecycle.org or call 1-800-895-8842
EWM-300W-350_OM.indd 8 3/26/07 2:58:04 PM

9
STORAGE TIPS
If you do not plan to use your humidier for an extended period of time, such as during
the summer months, it is important that you follow these instructions to help prevent
problems from developing in the unit.
1. Clean your humidier as instructed in the section titled,“Cleaning and
Maintenance”.
2. Make sure all water is emptied from the tanks and the hot and cold water reservoirs.
3. Dry your unit thoroughly.
4. Leave the tank caps o to expose the tanks to air.
5. Pack your humidier in its original carton and store it in a cool, dry place.
SERVICE
DO NOT attempt to repair this humidier yourself. For repairs covered under the
warranty, contact Kaz Incorporated by telephone or mail for a Return Authorization
Number.
TROUBLESHOOTING
TROUBLE POSSIBLE CAUSES SOLUTION
Unit does not mist Unit is not plugged in Plug in unit
Power failure Check circuit breaker
Water tanks empty Remove and rell
Power switch not turned on Turn on switch to LO or HI
Unit not reset after relling tanks Reposition water tanks
Water tank not properly Reposition water tanks
located on base unit
Humidity level set is achieved Turn Relative Humidity
Control to higher setting
Using distilled or treated water Add“pinch” of table salt
which does not contain
enough ions
Only one tank empties Move unit to level surface.
Raise end with full tank.
Water leaks from unit Tank cap or tank cap Tighten cap.
gasket is missing or improperly Replace tank cap
positioned or reposition cap
gasket.
Moist air output low Mineral buildup in hot water Clean unit as per
reservoir instructions.
Rell indicator light on Water level is below water Rell water tanks
level probes and mount tanks on base
Water level probes Clean probes per
are covered with lm cleaning instructions
Mineral buildup in hot water Clean unit per
reservoir cleaning instructions
EWM-300W-350_OM.indd 9 3/26/07 2:58:04 PM

10
LIMITE D WARRANTY
IMPORTANT NOTICE
PLEASE CLEAN THIS GERM-FREE HUMIDIFIER AT LEAST ONCE A WEEK BY FOLLOWING
THE CLEANING INSTRUCTIONS IN THE OWNER’S MANUAL. FAILURE TO REGULARLY
CLEAN THIS GERM-FREE HUMIDIFIER WILL RESULT IN A BUILDUP OF MINERAL
DEPOSITS WHICH WILL CAUSE THE UNIT TO CEASE TO OPERATE. IF THE UNIT FAILS TO
FUNCTION BECAUSE IT HAS NOT BEEN CLEANED, THIS WILL VOID THE WARRANTY.
To the original purchaser or gift recipient of this humidier.
1. If your Enviracaire humidier fails in normal use because of a manufacturing defect
within 90 days from the date of original purchase, Kaz Incorporated will repair the
humidier at no charge for parts, labor or shipment back to you (see instructions
for returning unit below).
2. After the rst 90 days, if a component part fails because of a manufacturing defect,
Kaz Incorporated will repair or replace that component part up to 3 years from
purchase date. There will be no charge for the component part or shipment back
to you, but Kaz Incorporated reserves the right to charge for installation labor.
3. For cracked, chipped or broken water tanks, see item 4 below.
4. This warranty does not cover any product which in Kaz Incorporated’s judgment
has been (1) damaged as a result of accident, misuse or abuse (2) used for a
purpose for which it was not designed, or (3) repaired or altered in any way that
adversely aected its performance or reliability. This warranty does not cover
scratches and wear of surfaces.
5. UV bulb replacement is a normal maintenance procedure and is therefore not
covered under this warranty unless the bulb is found to be defective.
6. For repairs, call customer service at 1-800-477-0457 to request a return
authorization number. Returned units will not be accepted at Kaz Incorporated
without a return authorization number. Return humidier to address shown below
with dated sales receipt. The cost of shipment to Kaz Incorporated must be paid by
the consumer. We suggest having tracking or delivery conrmation. Return to: Kaz
Incorporated, Attn: Returns Dept., 4755 Southpoint Drive, Memphis, TN 38118.
In Canada: Kaz Canada, Inc., Attn: Returns Dept., 510 Bronte Street South, Milton,
Ontario L9T 2X6.
7. This warranty gives you specic legal rights and you may also have other rights
which vary from state to state.
8. Kaz Incorporated makes no express warranties other than the warranties contained
herein. Kaz Incorporated’s sole obligation in the event of a breach of any implied
warranty (including, but not limited to, implied warranties of merchantability and
tness for a particular purpose) is limited to repair or replacement, and all such
warranties are limited in duration to the time periods after the date of original
purchase as stated above. The warranty does not cover claims for incidental or
consequential damages resulting from a breach of any express or implied warranty
or any other reason including damages due to accident, abuse, lack of responsible
care, the axing of any unauthorized attachment, loss of parts, or use at a voltage
other than specied.
Customer Service #: 1-800-477-0457
EWM-300W-350_OM.indd 10 3/26/07 2:58:04 PM

11
Humidicateur électrique portatif à atomisation
de bruines tièdes Germ-FreeMC, modèle EWM-300W
et EWM-350
• Instructions sur le fonctionnement, l’entretien
et le nettoyage
• Garantie limitée
READ AND SAVE THESE INSTRUCTIONS
Imprimé en CHINE
EWM-350 Breveté
EWM-300W-350_OM.indd 11 3/26/07 2:58:05 PM

12
LIRE ATTENTIVEMENT LES INSTRUCTIONS SUIVANTES AVANT DE
FAIRE FONCTIONNER CET HUMIDIFICATEUR. LE FAIT DE SUIVRE
CES SIMPLES DIRECTIVES SUR L’EMPLOI ET L’ENTRETIEN DE
L’APPAREIL CONTRIBUE À ASSURER UN RENDEMENT FIABLE ET
EFFICACE DURANT DES ANNÉES DE VIE UTILE.
MESURES DE SÉCURITÉ IMPORTANTES
MISE EN GARDE : ÉTANT DONNÉ QUE CET APPAREIL FONCTIONNE À
TEMPÉRATURE ÉLEVÉE, IL FAUT TOUJOURS PRENDRE LES PRÉCAUTIONS
NORMALES, PARTICULIÈREMENT EN PRÉSENCE D’ENFANTS.
LORS DE L’UTILISATION DE TOUT APPAREIL ÉLECTRIQUE, LES MESURES DE SÉCURITÉ
SUIVANTES DOIVENT ÊTRE RESPECTÉES :
1. NE PAS faire fonctionner cet humidicateur sans les réservoirs d’eau.
2. TOUJOURS utiliser une eau propre et fraîche provenant du robinet pour remplir
les réservoirs d’eau.
3. Pour éviter les risques de feu ou de chocs électriques, NE PAS employer de
rallonge.
4. NE PAS manipuler l’appareil avec les mains mouillées.
5. NE JAMAIS incliner, déplacer ni tenter de vider l’appareil lorsqu’il est sous tension
ou branché. Éteindre, débrancher et retirer les réservoirs d’eau avant de déplacer
l’appareil.
6. NE PAS PLACER l’appareil dans un endroit chaud tel qu’à proximité d’une
cuisinière, d’une chauerette ou sous les rayons du soleil.
7. NE PAS FAIRE FONCTIONNER À L’EXTÉRIEUR. Cet humidicateur a été conçu pour
une utilisation à l’intérieur seulement.
8. NE PAS laisser de l’eau s’inltrer dans le reniard (admission d’air) situé au bas du
boîtier, ni dans la prise de courant. NE PAS LAISSER l’eau entrer en contact avec le
cordon d’alimentation.
9. TENIR l’humidicateur loin de l’essence, de liquides ou de produits émanant des
vapeurs inammables lors de son utilisation ou de son entreposage.
10. TOUJOURS S’ASSURER que le bouchon et la garniture d’étanchéité des
réservoirs d’eau soient fermement en place.
11. NE PAS toucher aux surfaces chaudes.
12. TOUJOURS éteindre l’humidicateur lorsque le réservoir d’eau est vide ou que
l’appareil n’est pas utilisé. Si l’appareil reste inutilisé pendant une longue période,
TOUJOURS débrancher le cordon d’alimentation et vider le socle et le réservoir
d’eau.
13. TOUJOURS placer l’appareil sur une surface plane et au niveau qui résiste à l’eau
et s’assurer que le cordon d’alimentation soit à l’abri des endroits passants.
14. NE PAS nettoyer l’appareil ou changer l’ampoule UV sans avoir débranché au
préalable le cordon d’alimentation.
15. Avant de brancher dans la prise de courant, vérier la tension de l’alimentation
électrique. Celle-ci doit être de 120 volts c.a. (courant alternatif). La prise
de courant peut être de 15 ou de 20 A. Le circuit électrique doit fournir une
puissance adéquate et être protégé par un coupe-circuit ou un disjoncteur.
EWM-300W-350_OM.indd 12 3/26/07 2:58:05 PM

13
16. Cet appareil est muni d’une che polarisée. Par mesure de sécurité, cette che est
conçue pour ne s’insérer dans un réceptacle électrique (prise de courant) polarisé
que d’une seule façon. Si la che ne s’insère pas complètement dans la prise, la
tourner dans l’autre sens. Si elle ne s’insère toujours pas, appeler un électricien
qualié.
17. NE PAS tenter de retirer LE DÔME DE VAPORISATION, l’atomiseur de bruines
OU LES TAMPONS D’ABSORPTION DES MINÉRAUX durant le fonctionnement de
l’appareil ou moins de 15 minutes après avoir éteint et débranché l’appareil en
raison du risque de graves blessures. LE DÔME DE VAPORISATION, l’atomiseur
de bruines OU LES TAMPONS D’ABSORPTION DES MINÉRAUX ne devraient être
enlevés que pour le nettoyage et l’entretien de l’appareil.
NE PAS PLACER les mains ou le visage directement au-dessus de l’atomiseur de
bruines durant le fonction-nement de l’appareil.
18. Placer l’appareil dans un endroit qui est hors de portée des enfants.
19. Avant d’utiliser l’appareil, vérier si le cordon d’alimentation est endommagé.
20. Cet humidicateur exige un entretien quotidien et un nettoyage hebdomadaire.
21. Voir la section intitulée NETTOYAGE ET ENTRETIEN.
NE NETTOYER l’humidicateur que de la façon qui y est décrite et pas autrement.
22. AVERTISSEMENT – Les yeux peuvent être blessés si vous regardez directement
la lumière émise par l’ampoule UV. NE PAS mettre l’appareil en marche si le
panneau de l’ampoule est ouvert.
23. Ce produit est conforme au titre 21 du Code of Federal Regulations, chapitre 1,
section J.
VEUILLEZ CONSERVER CES INSTRUCTIONS
EWM-350
EWM-300W-350_OM.indd 13 3/26/07 2:58:05 PM

14
CONSEILS SUR L’ENTRETIEN ET LE NETTOYAGE HEBDOMADAIRE
Nous recommandons de nettoyer l’appareil au moins une fois par semaine lorsqu’il
est utilisé. Un nettoyage régulier prévient l’accumulation de tartre dans le réservoir
d’eau chaude. II évite l’accumulation de bactéries, de moisissures ou d’autres micro-
organismes dans les réservoirs ou dans l’appareil. Un nettoyage régulier assure une
ecacité maximale de l’appareil. (Voir la page 16 pour les instructions complètes
sur le nettoyage).
FONCTIONNEMENT DE
L’HUMIDIFICATEUR
ENVIRACAIRE
À BRUINES TIÈDES
Le modèle utilise une méthode à deux
étapes pour éliminer les micro-organismes
potentiellement nuisibles qui se trouvent
dans l’eau avant qu’ils puissent se disperser
dans l’air. La première étape utilise une
ampoule UV, située à l’intérieur du socle de
l’humidicateur, qui irradie l’eau à travers un
cylindre de verre spécial lorsqu’elle passe du
contenant d’eau froide au contenant d’eau
chaude. La deuxième étape consiste en
l’ébullition dans le contenant d’eau chaude
juste avant la poussée des bruines dans la
pièce par le ventilateur.
BOUTON DE MISE EN
MARCHE-ARRÊT DU
TABLEAU DE COMMANDE
RÉGLAGE À INTENSITÉS
FAIBLE ( ) ET ÉLEVÉE ( )
L’humidicateur est en fonction
lorsque le bouton de mise en
marche-arrêt est en position
FAIBLE « LO » ou en position ÉLEVÉE « HI » et que l’appareil est
branché. Lorsque l’appareil fonctionne en position FAIBLE « LO », le
débit de vapeur est inférieur à celui qui est produit à intensité élevée « HI ».
POSITION D’ARRÊT ( ) e bouton permet de couper le courant d’alimentation
de l’appareil et doit être utilisé (en plus du débranchement de l’appareil) avant de le
déplacer, d’en faire l’entretien, etc.
VOYANT LUMINEUX DE REMPLACEMENT DE L’AMPOULE UV
Quand le voyant de remplacement « REPLACE UV BULB » s’allume et demeure allumé
au cours du fonctionnement normal de l’appareil (il pourrait s’illumuner faiblement
lors de la mise en marche ou dans d’autres conditions, mais cela est normal), cela
signie que l’ampoule doit être remplacée par une ampoule semblable de 3,5 W qui
est spéciale, EUV-13B. Voir le bon de commande ci-joint. L’ampoule UV fonctionne à
une puissance de sortie maximale durant 2000 heures environ. La durée de vie utile de
l’ampoule UV peut être plus longue si elle est utilisée à une puissance de sortie réduite.
Pour un rendement optimal de l’humidicateur en tout temps, nous recommandons
de remplacer l’ampoule UV après 2 000 heures d’utilisation.
EWM-350
EWM-350
HygrostatBouton de mise
EWM-300W-350_OM.indd 14 3/26/07 2:58:06 PM

15
VOYANT DE REMPLISSAGE ( )- Il s’allume pour indiquer que les réservoirs d’eau
nécessitent un remplissage. Voir la section « Remplissage des réservoirs ». Si le voyant
est toujours allumé quelques minutes après la remise en place d’un réservoir plein,
replacez les réservoirs sur le socle. (L’appareil peut fonctionner avec un seul réservoir
d’eau). À chaque remplissage, rincer les réservoirs, tant celui à eau chaude que celui
à eau froide, les nettoyer selon les INSTRUCTIONS SUR LE NETTOYAGE lorsqu’il y a
formation d’une pellicule ou de dépôts de minéraux.
RÉGLAGE DE L’HUMIDITÉ RELATIVE ( )
Il sert à régler le taux d’humidité. Pour abaisser le taux d’humidité, tournez le bouton de
réglage dans le sens contraire des aiguilles d’une montre (LO) ; pour augmenter le taux
d’humidité, tournez le bouton de réglage dans le sens des aiguilles d’une montre (HI).
REMARQUE : Il se peut qu’il y ait de nes gouttelettes d’eau sur certaines surfaces de
l’humidicateur lorsque vous le déballez. C’est normal, chaque appareil étant vérié
avant l’expédition. Déballez soigneusement l’appareil et retirez tout le matériel
d’emballage.
MODE D’EMPLOI
1. Placer la base sur une surface plane, au niveau et résistante à l’eau.
2. Remplir les réservoirs d’eau selon les instructions plus bas et les placer sur le socle
de l’humidicateur.
3. Brancher le cordon d’alimentation fermement en l’insérant à fond dans la prise
murale.
4. Tourner le bouton de marche en position faible « LO » ou élevée « HI » (les
voyants pourraient clignoter). Tournez ensuite le bouton de réglage de l’humidité
relative en le faisant tourner dans le sens des aiguilles d’une montre jusqu’à ce
que vous entendiez un petit déclic et que le voyant de mise en marche s’allume.
Normalement, l’humidicteur prend quelques minutes pour se réchauer avant de
produire la bruine.
5. Lorsque les réservoirs d’eau sont vides (après un fonctionnement d’environ 36 h), le
voyant de nettoyage/remplissage « REFILL WHEN LIT » s’allume et l’appareil cesse de
chauer. Voir la section « Remplissage dES réservoirs ».
6. Dès que l’eau atteint un niveau inférieur à celui des sondes lors du fonctionnement
de l’appareil, l’élément chauant s’éteint et le voyant de REMPLISSAGE s’allume.
7. L’appareil fonctionne aussi longtemps qu’il y a de l’eau dans l’un ou l’autre des
réservoirs. L’appareil peut fonctionner avec un ou deux réservoirs.
REMPLISSAGE DES RÉSERVOIRS D’EAU
1. Avant de remplir les réservoirs d’eau, tourner le bouton de marche-arrêt en
position d’arrêt « OFF » et débrancher l’appareil. Voir les INSTRUCTIONS SUR LE
NETTOYAGE.
2. Retirer les réservoirs d’eau du socle, tourner les réservoirs à l’envers puis enlever
le bouchon des réservoirs en le tournant dans le sens contraire des aiguilles d’une
montre. Remplir les réservoirs d’eau propre et fraîche provenant du robinet. Si
vous utilisez de l’eau distillée, ajoutez quelques grains de sel à chaque réservoir.
Remettre les bouchons en les tournant dans le sens des aiguilles d’une montre.
Serrer fermement.
3. Soulever les réservoirs d’eau avec précaution étant donné qu’il sont lourds une fois
remplis et peut-être glissants s’il sont mouillés.
4. Placer les réservoirs d’eau sur le socle. S’assurer qu’ils sont bien en place.
Sinon,l’humidicateur ne peut fonctionner adéquatement.
UTILISATION DU GODET À MÉDECINE
An d’ajouter une bruine médicamenteuse à la sortie de l’atomiseur :
1. Tourner le bouton de marche-arrêt en position d’arrêt « OFF » et laisser se refroidir
l’atomiseur de bruines.
2. Verser soigneusement le médecine liquide dans le godet à médecine. NE PAS
REMPLIR le godet à plus de la moitié.
EWM-300W-350_OM.indd 15 3/26/07 2:58:06 PM

16
3. Colocar el depósito para medicina cuidadosamente sobre el difusor de vapor.
4. Girar el interruptor a la posición de LO (Bajo) o HI (Alto).
5. Cuando se agote la medicina, sacar el depósito y lavarlo con agua tibia para
eliminar todos los residuos.
ADVERTENCIA:
SÓLO USAR medicinas líquidos que estén especícamente recomendados para usarse
con vaporizadores o humedecedores de vapor tibio.
NO ECHAR la medicina directamente en la abertura del difusor de vapor, al agua de los
tanques ni a la bandeja.
INSTRUCCIONES PARA LA ALMOHADILLA DE ABSORCIÓN DE MINERALES.
Los humedecedores de vapor tibio no propagan al aire el no polvo mineral que se
respira o que cae a los muebles, como ocurre con otros tipos de humedecedores. Este
polvo mineral se queda atrapado en el depósito de agua caliente del humedecedor. El
uso de estas almohadillas es de principal importancia en la acción de capturar y limpiar
los minerales en el depósito de agua caliente, evitando así una tenaz acumulación de
minerales. La unidad puede funcionar sin sus almohadillas de absorción de minerales,
pero en ese caso se requerirá una limpieza más frecuente. Le tampon d’absorption des
minéraux qui convient à votre appareil est le EMP-15P
1. Antes de hacer funcionar el humedecedor, colocar una almohadilla de absorción
de minerales en el depósito de agua caliente. Después que el humedecedor ha
estado funcionando, el agua se CALIENTA y es necesario tener gran CUIDADO para
anipular la almohadilla. Lo mejor es permitir que el agua se enfríe y usar unas
tenazas o pinzas largas para manipular la almohadilla.
2. La vida útil de la almohadilla varía de acuerdo con el contenido de minerales que
tenga el agua que se usa. En lugares donde el agua tiene un contenido moderado
de minerales, la almohadilla debe cambiarse después de aproximadamente tres
(3) semanas de uso continuo. Cuando se utiliza“agua dura”, la almohadilla debe
cambiarse con más frecuencia. La mejor manera de saber que la almohadilla
necesita cambiarse es inspeccionándola DESPUÉS de que el agua se ha enfriado,
para ver si todavía está blanda y exible. Al acercarse al nal de su vida útil, la
almohadilla se hace inexible y dura y es necesario cambiarla por una nueva. Otra
señal que es necesario cambiar la almohadilla es cuando se empieza a formar una
capa de incrustaciones en el depósito de agua caliente. Si la almohadilla pareciera
desintegrarse, (normalmente debido al uso de ablandadores o agua), deje de
usarlas.
LIMPIEZA Y MANTENIMIENTO
El agua contiene minerales y otras partículas. Durante el funcionamiento del
humedecedor, la mayoría de estos minerales permanecerán en el depósito de agua.
La acumulación gradual de minerales llenará el depósito y reducirá su eciencia. No
es exageración recalcar la importancia de un mantenimiento, limpieza y cuidado
rutinario. El agua dura contiene más minerales y otras partículas.
INSTRUCCIONES PARA LA LIMPIEZA
Omitir las medidas necesarias para la limpieza causará daños al humedecedor.
1. Antes de limpiar el humedecedor, poner los CONTROLES en posición de “OFF”
(Apagado) y desconectar el humedecedor.
2. Retirar el tanque de agua de la base del humedecedor y vaciar el agua de los
tanques.
3. Esperar por lo menos 15 minutos después de apagar el humedecedor para que el
agua se enfríe antes de mover la base. Girar el difusor de vapor contra el sentido
EWM-300W-350_OM.indd 16 3/26/07 2:58:06 PM

17
del reloj hasta que sus ranuras se alineen con las uñas de la base y levantarlo.
Girar la cúpula de vapor hasta que sus ranuras se alineen con las uñas de la base
y levantarla. Sacar la almohadilla de absorción de minerales del tanque de agua
caliente usando pinzas o tenazas para evitar quemarse con el agua caliente.
Cuando se termine el procedimiento de limpieza, reinstalar la almohadilla de
absorción de minerales. Para vaciar el agua de la base del humedecedor, agarrar la
base con ambas manos e inclinarla para vaciar el agua en el fregadero.
NO PERMITIR QUE EL AGUA SE DERRAME SOBRE LOS CONTROLES NI LOS
ORIFICIOS DE VENTILACIÓN. NO VACIAR la base de manera distinta a la indicada.
ADVERTENCIA: NO COLOCAR la base directamente bajo el chorro de agua de la llave.
4. Verter aproximadamente una taza de vinagre blanco en cualquiera de los dos
depósitos y dejarlo reposar por sólo unos 20 a 30 minutos.
5. Colocar la base del humedecedor sobre el fregadero e inclinarla para vaciar el
vinagre. Llenar los depósitos de agua fría y caliente con agua limpia y tibia para
eliminar completamente los residuos de vinagre. Limpiar las acumulaciones de
minerales en el depósito de agua caliente y de los dos sensores metálicos de nivel
deagua, usando un cepillo pequeño, como para dientes. NOTA : Las acumulaciones
seproducen por la dureza del agua. Cuanto más dura sea el agua, con más
frecuenciase requerirá este mantenimiento. Vaciar toda el agua inclinando el
tanque. Si quedasen residuos minerales en la taza metálica (acero inoxidable) de
hervir, puede usarse un instrumento metálico y para rascar y sacar los depósitos
minerales. Cerciorarse de no usar metales en parte alguna de plástico.
NO PERMITIR QUE EL AGUA ENTRE POR DEBAJO DE LA BASE DEL HUMEDECEDOR O
POR CUALQUIER OTRO ORIFICIO, NI SUMERGIR EL CORDÓN O EL ENCHUFE.
6. Desinfectar los tanques de agua con una solución de 1 galón (3.785 litros) de agua
con una cucharada pequeña de blanqueador de cloro para uso doméstico. Dejar
quela solución repose por 20 minutos, agitándola de vez en cuando para mojar
toda lasupercie. Vaciar los tanques completamente y enjuagarlos muy bien
hasta que elolor del cloro desaparezca. Llenar los tanques con agua fresca y fría y
regresarlos a su lugar en la base del humedecedor.
7. NUNCA usar utensilios de metal o de materiales duros para limpiar las piezas
de plástico porque pueden causar raspaduras. NUNCA usar, gasolina, kerosene,
limpiador de cristales, cera para muebles, diluyente de pintura ni cualquier otra
solución casera para limpiar parte alguna del humedecedor.
8. Diariamente, el depósito y los tanques se deben vaciar, enjuagar y volver a llenar
con agua fresca de la llave.
9. Para limpiar las supercies exteriores usar un paño exprimido después de haberlo
mojado en una solución de agua con detergente suave. Enjuagar el paño,
exprimirlo y volver a limpiar las supercies exteriores. Finalmente, limpiar con un
paño seco. Esperar un tiempo suciente para que las supercies se sequen antes
de enchufar el cordón en el tomacorriente.
10. Después que la base esté completamente limpia y seca, volver a instalar
laalmohadilla la de absorción de minerales. Instalar la cúpula en la base alineando
sus ranuras con las uñas en la base. (La cúpula encaja en una sola posición en las
uñas, por lo que tal vez se tenga que reposicionar). Luego girar la cúpula de vapor
en el sentido del reloj hasta que enganche en posición. Instalar el difusor de vapor
alineando sus ranuras con las uñas en la base y girar en el sentido del reloj hasta
que enganche en posición.
11. Reinstalar los tanques. Enchufar la unidad a la corriente y volver a usarla en
forma normal.
EWM-300W-350_OM.indd 17 3/26/07 2:58:06 PM

18
CAMBIO DEL FOCO UV
1. Si se enciende la luz de REPLACE UV BULB durante el uso normal, es señal que es
necesario cambiar el foco UV que es un foco especial de 3.5W.
2. Colocar el interruptor en la posición de “OFF”(Apagado), desconectar el
humedecedor del tomacorriente y dejarlo enfriar.
3. Sacar los tanques de agua de la base del humedecedor. Desmontar el difusor de
vapor y la cúpula de vapor girándolos contra el sentido del reloj y levantándolos.
4. Colocar la base del humedecedor sobre
el fregadero e inclinarla para sacarle
toda el agua que pueda tener.
5. Cuidadosamente, invertir la base del
humedecedor boca abajo sobre una
supercie plana y bien nivelada. Notará
que hay una compuerta en el frente
de la unidad que está cerrada con dos
tornillos con cabeza en cruz.
6. Usando un desarmador con punta
en cruz (Phillips), girar los tornillos
cuidadosa-mente contra el sentido del
reloj hasta que salgan de la compuerta.
7. Abrir la compuerta halándola hacia adelante y se podrá ver el foco UV. Halar la
compuerta el mínimo necesario para desenroscar el foco UV y sacarlo.
8.
Cambiar el foco UV por otro nuevo de 3.5W comprado a Kaz Incorporated o a otro
proveedor. Para prolongar la vida útil del foco nuevo, no tocar el vidrio del foco
directamente con los dedos. Usar un paño o pañuelo de papel para instalar el foco.
9. Después de instalar el foco nuevo, cerrar la compuerta y volver a instalar los
tornillos con un desarmador en cruz y girarlos en el sentido del reloj con el
desarmador, pero sólo hasta ajustarlos. NO SOBREAJUSTAR.
10. NO encender mientras la compuerta del foco UV esté abierta, y NO mirar directa-
mente al foco cuando esté encendido porque podrían ocasionarse lesiones a los
ojos.
11. Poner el humedecedor parado, instalarle los tanques de agua en la base, conectarlo
al tomacorriente y girar el interruptor a la posición de LO (Bajo) o HI (Alto). El
indicador de REPLACE UV BULB (Cambiar foco UV) no debe volverse a encender.
NOTA IMPORTANTE: Aunque no se obtenga el efecto germicida máximo, el
humedecedor puede seguirse usando hasta recibir el foco de repuesto.
NOTA: Oirá un crujido y verá un pequeño objeto redondo dentro de la bombilla. Es
normal, la bombilla funciona normalmente.
La luz contiene mercurio. Bótela de acuerdo con la normativa referente a la
eliminación de este tipo de residuos. Visite el sitio www.lamprecycle.org o llame
al 1 800 895-8842.
EWM-300W-350_OM.indd 18 3/26/07 2:58:06 PM

19
CONSEILS POUR L’ENTREPOSAGE
Si vous prévoyez ne pas utiliser l’humidicateur pour une longue période, comme la
saison estivale, il est important que vous suiviez les directives suivantes pour éviter
d’avoir des problèmes avec l’appareil.
1. Nettoyer l’humidicateur selon les directives dans la section intitulée « Nettoyage
et entretien ».
2. S’assurer qu’il n’y ait plus d’eau dans les réservoirs ni dans les contenants d’eau
froide et d’eau chaude.
3. Bien assécher l’appareil.
4. Enlever les bouchons pour exposer les contenants à l’air.
5.
Placer l’humidicateur dans son emballage original et le ranger dans un endroit frais et sec.
ENTRETIEN
NE PAS TENTER de réparer soi-même l’humidicateur. Pour les réparations durant la
période de la garantie, communiquer par téléphone ou par écrit avec Kaz Incorporated
pour obtenir un numéro d’autorisation de retour.
GUIDE DE DÉPANNAGE
PROBLÈMES CAUSES POSSIBLES SOLUTIONS
L’appareil n’émet pas L’appareil n’est pas branché. Brancher l’appareil.
de bruines Panne de courant. Vérier le disjoncteur.
Réservoirs d’eau vide. Retirer et remplir.
Bouton marche-arrêt n’est Tourner le bouton
pas allume. en position faible « LO »
ou élevé « HI ».
L’appareil ne s’est pas remis Replacer le réservoir
en marche après remplissage d’eau.
du réservoir.
Le réservoir d’eau n’est pas bien Replacer le réservoir
placé sur le socle de l’appareil. d’eau.
Le taux d’humidité voulu est atteint. Tourner l’humidistat
à un réglage plus élevé.
Usage d’eau distillée ou traitée ne Ajoutez une pincée de sel
contenant pas assez d’ions. de table
Un seul reservoir se vide Mettre l’appareil sur une
surface au niveau.
Souiever l’extremité du
réservoir plein.
Fuite d’eau Bouchon du réservoir Resserrer le bouchon.
ou garnitures d’étanchéité Remplacer ou remettre
du réservoir manquant en place la garniture
ou mal placé. du bouchon
Faible émission Accumulation de calcaire dans Nettoyer l’appareil
de bruines le contenant d’eau chaude. selon les directives.
Voyant lumineux de L’eau a atteint un niveau inférieur Remplir les réservoirs
remplissage allumé aux sondes. d’eau et monter les
réservoirs sur le socle.
Les sondes sont recouvert d’une Nettoyer les sondes
pellicule de dépôts minéraux. selon les instructions.
Accumulation de dépôts Nettoyer l’appareil
minéraux dans le réservoir selon les instructions.
d’eau chaude.
EWM-300W-350_OM.indd 19 3/26/07 2:58:07 PM

20
GARANTIE LIMITÉE
AVIS IMPORTANT
NETTOYER CET HUMIDIFICATEUR GERM-FREE AU MOINS UNE FOIS PAR SEMAINE EN
SUIVANT LES DIRECTIVES DE NETTOYAGE DANS LE GUIDE DE L’UTILISATEUR. UNE
ACCUMULATION DE DÉPÔTS DE MINÉRAUX PAR FAUTE D’UN NETTOYAGE RÉGULIER
PROVOQUE L’ARRÊT DU FONCTIONNEMENT DE L’APPAREIL. UNE PANNE DE L’APPAREIL
CAUSÉE PAR UN MANQUE DE NETTOYAGE PROVOQUE L’ANNULATION LA GARANTIE.
Cette garantie s’applique au premier acheteur ou à la personne qui a reçu cet
humidicateur en cadeau (client).
1. Si votre humidicateur ENVIRACAIRE présente un défaut de fabrication dans les
90 jours suivant la date d’achat original, Kaz Incorporated s’engage à le réparer
gratuitement pour ce qui est des pièces, de la main-d’oeuvre et de l’expédition de
retour au client (voir les instructions ci-dessous pour retourner l’appareil).
2. Si une pièce présente un défaut de fabrication après la période de 90 jours, Kaz
Incorporated s’engage à la réparer ou la remplacer et ce, pour une période de trois
ans à compter de la date d’achat. Aucuns frais ne seront imputés pour les pièces ou
l’expédition de retour au client ; cependant Kaz Incorporated se réserve le droit de
facturer les frais de main-d’oeuvre.
3. Pour les réservoirs craquelés, ébréchés ou brisés, consultez l’article 4 ci-dessous.
4. Cette garantie ne couvre pas un produit qui, selon Kaz Incorporated : 1) a subi des
dommages à la suite d’un accident, d’une mauvaise utilisation ou d’un emploi
abusif ; 2) a été utilisé dans un but pour lequel il n’a pas été conçu ; 3) a été réparé
ou modié ce qui en a diminué le rendement ou la abilité. Cette garantie ne
couvre pas les éraures, ni l’usure des surfaces.
5. Le remplacement de l’ampoule UV est une tâche d’entretien normale. Par
conséquent, l’ampoule ne tombe pas sous cette garantie à moins qu’elle ne soit
défectueuse.
6. Pour une réparation, appeler le service à la clientèle au 1 800 477-0457 pour
obtenir un numéro d’autorisation de retour. Les appareils retournés sans numéro
d’autorisation de retour, ne seront pas acceptés par Kaz Incorporated. Retourner
l’humidicateur avec le coupon de caisse indiquant la date d’achat à l’adresse plus
bas. Les frais d’expédition de l’appareil à Kaz Incorporated doivent être défrayés
par le client. Nous vous suggérons de demander une conrmation de suivi ou de
livraison. L’adresse est la suivante : Kaz Incorporated, Attn: Returns Dept., 4755
Southpoint Drive, Memphis, TN 38118.
Au Canada : Kaz Canada, Inc., Attn: Returns Dept., 510 Bronte Street South, Milton,
Ontario L9T 2X6.
7. Cette garantie vous donne des droits particuliers qui sont reconnus par la loi. Il se
peut que vous ayez d’autres droits qui varient d’un État ou d’une province à l’autre.
8. Kaz Incorporated ne donne aucunes garanties, implicites ou explicites, autres que
la garantie plus haut indiquée. Dans le cas d’une rupture de garantie implicite (y
compris, sans toutefois se limiter, les garanties implicites de la qualité marchande
ou de l’à-propos du produit pour un besoin particulier), la seule obligation de Kaz
Incorporated se limite à la réparation ou au remplace-ment de l’appareil. La durée
de la garantie se limite aux périodes indiquées plus haut et est en vigueur à partir
de la date d’achat. La garantie ne couvre pas les demandes de règlement pour
des dommages directs ou indirects découlant d’un bris d’une garantie implicite
ou explicite ou pour toutes autres raisons, y compris les dommages causés par un
accident, un emploi abusif, un manque de soins, la xation d’un accessoire non
autorisé, la perte de pièces ou de l’utilisation de l’appareil à une tension autre que
celle indiquée.
SERVICE À LA CLIENTÈLE : 1 800 477-0457
EWM-300W-350_OM.indd 20 3/26/07 2:58:07 PM
This manual suits for next models
1
Table of contents
Languages:
Popular Dehumidifier manuals by other brands

Ultra-Aire
Ultra-Aire 70H installation instructions

RDZ
RDZ DA 1000 Installation, use and maintenance

Olimpia splendid
Olimpia splendid AQUARIA 18 P Instructions for installation, use and maintenance

Ingersoll-Rand
Ingersoll-Rand TZ730 user manual

Master
Master DH 7220 User and Maintenance Book

LG
LG UD701KOG Series Svc manual