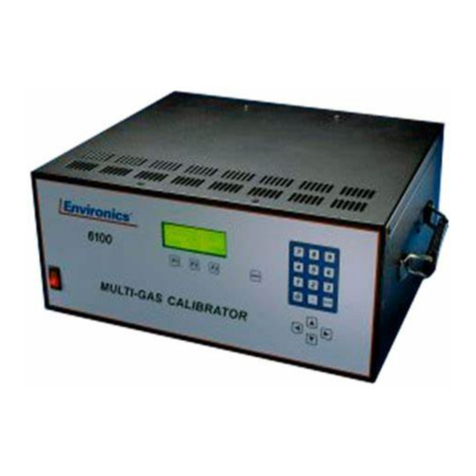
Environics 6103 User manual

Model 6103
OZONE TRANSFER STANDARD
MULTI-GAS CALIBRATOR
User’s Guide
Rev 4
12SEPT2003
For S/W Rev 6103-1.35-XX
Environics, Inc.
69 Industrial Park Road East
Tolland, CT 06084-2805 USA
Phone (860) 872-1111 Fax (860) 870-9333
www.environics.com
SEPTEMBER 2003

COPYRIGHT
© 2002 Environics, Inc. All Rights Reserved. This manual and the software contained within the
product(s) described are copyrighted with all rights reserved.
TRADEMARKS
Environics is a registered trademark of Environics, Inc. All other brand names, company names and
product names mentioned are the property of their respective owners.
WARRANTY
Environics, Inc. warrants this product to be free from defects in material and workmanship for a period
of one year from the date of shipment. Environics warrants the following expendable items for 30 days
from the date of shipment: fuses, lamps, batteries, scrubbers/filters. During the warranty period,
Environics will, at our option, either repair or replace any product that proves to be defective.
To exercise this warranty, contact Environics at the address below for assistance and instructions for
returning the products. Repaired or replaced products are warranted for the balance of the original
warranty period or at least 30 days.
LIMITATION OF WARRANTY
This warranty does not apply to defects resulting from product modification made without Environics’
express written consent, or misuse of any product or part. This warranty also does not apply to
software, damage from battery leakage or problems arising from normal wear or failure to follow
instructions.
This warranty is in lieu of all other warranties, expressed or implied, including any implied warranty of
merchantability or fitness for a particular use. The remedies provided herein are the buyer’s sole and
exclusive remedies.
Neither Environics nor any of its employees shall be liable for any direct, indirect, special, incidental or
consequential damages arising out of the use of its instruments and software even if Environics has
been advised in advance of the possibility of such damages. Such excluded damages shall include, but
are not limited to: costs of removal and installation, losses sustained as the result of injury to any
person or damage to property.
WARNING
READ THIS MANUAL CAREFULLY BEFORE USING THIS INSTRUMENT.
FAILURE TO DO SO MAY VOID THE WARRANTY;
DAMAGE THE INSTRUMENT OR CAUSE SERIOUS INJURY.
ENVIRONICS, INC.
69 INDUSTRIAL PARK ROAD EAST TOLLAND, CT 06084 USA
PHONE: (860) 872-1111 FAX: (860) 870-9333
SERIES 6103 USER’S GUIDE SEPTEMBER 2003i

6103 User’s manual changes
Manual
Revision
#
Software
Revision
#
Manual
Release
Date
Enhancements
2 1.31-03 10/12/2002 Initial release
3 1.33-01 4/8/2003 Added manual change log page, added UL listing requirements to preface,
Adjusted index, Pages 6 and 13 - Changed PORTS Mode to GASES Mode.
System now supports multi-component cylinders. Page 22 – Added saving
And recalling gas blend routines. Pages 20, 21 – Added new view modes.
Pages 6, 34-37 added REMOTE mode. Page 17 – added power-up mode.
4 1.35-02 9/12/03 Pages 37, 38 - Added remote mode commands for flow mode, photo mode, ozone
control and diagnostic information. Page 17, 33 - Added functionality for 2nd analog
output channel and adjustable range for both analog output channels.
Page 40 - Added automatic pump control for PHOTO mode, CONC mode, FLOW
mode and REMOTE mode.
SERIES 6103 USER’S GUIDE SEPTEMBER 2003ii

FORWARD
The Environics Model 6103 Computerized Ozone Transfer Standard/ Multi-Gas
Calibrator was designed to be the finest instrument available for producing highly
precise mixtures of ozone and other gases. The system incorporates user-friendly
software, mass flow controllers (MFCs) and a custom-designed ozone generator
module.
The Model 6103 is a 6100 Multi-Gas Calibrator with an added photometer. The
addition of the photometer allows the 6103 to be used as an Ozone Transfer
standard for performing ozone calibration.
Although the Model 6103 is very easy to operate, we strongly suggest you read
this User’s Guide portion of this document completely prior to operating the
system. It describes all the functions and operations of the system.
Environics is pleased to provide this quality instrument that utilizes state-of-the-art
electronic technology. Our knowledgeable service team is ready to assist you in the
use of this instrument should the need arise.
Troubleshooting, servicing and calibration information can be found in the separate
6103 service manual.
Note: The Model 6103 is intended for use with ambient gases, which don’t
interact (NO, NO2, SO2, CO, CO2 and O3). If you intend to connect other gases
to the system, consult with Environics prior to doing so.
SERIES 6103 USER’S GUIDE SEPTEMBER 2003iii

USER’S GUIDE
TABLE OF CONTENTS
FEATURE PAGE
UNPACKING AND INSPECTING THE SYSTEM 1
SYSTEMLAYOUT 2-5
Front Panel 2,3
Rear Panel Layout 4,5
OPERATING MODE SUMMARY 6,7
POWER AND GAS CONNECTIONS 8-10
Power Connection 8
Gas Connections 9,10
SYSTEM OPERATION 11-31
Entering data 11
Main Screen (READY) 12
Gas Setup Mode (GASES) 13,14
Preferences Mode (PREFS) 15-17
Ozone setup variables 15
Status input variables 16
Setting the Time and Date 16
Adjusting the Contrast 16-17
Setting power up mode 17
Analog out setup 17
Concentration Mode (CONC) 18-22
Flow mode (FLOW) 23,24
Verify MFCs individually 24
Ozone generator operation 25
Gas Phase Titration 25,26
Photometer mode (PHOTO) 27,28
System mode (SYSTEM) 28
Leak Test Mode (LEAK) 28
Status input mode 29-31
Status output mode 32
Series 101 status emulation 33
Analog outputs 33
Remote mode, RS232 (REMOTE) 34-39
Automatic photometer pump control 40,41
(*) = As seen on display in one of three main menus
SERIES 6103 USER’S GUIDE SEPTEMBER 2003i
v

LIST OF ILLUSTRATIONS
ILLUSTRATION TITLE PAGE #
Front panel layout 3
Rear panel layout 5
Photometer diagnostics 20
Ozone generator diagnostics 21
Photometer mode display options 27
Piping and instrument diagram 42
SERIES 6103 USER’S GUIDE SEPTEMBER 2003
v

LIST OF ABBREVIATIONS / ACRONYMS
AC Alternating Current
ADC Analog to Digital Converter
CCM Cubic Centimeter Per Minute
CGC Cylinder Gas Concentration
DAC Digital to Analog Converter
EPA Environmental Protection Agency
Hz Hertz
LCD Liquid Crystal Display
Lbs Pounds
SLPM Standard Liters Per Minute
MFC Mass Flow Controller
NIST National Institute of Standards and Technology
OGC Output Gas Concentration
P&ID Piping and Instrument Diagram
PPM Parts Per Million
PSIA Pounds Per Square Inch Absolute
PSIG Pounds Per Square Inch Gauge
SCCM Standard Cubic Centimeters per Minute
VAC Volts, Alternating Current
VDC Volts, Direct Current
SERIES 6103 USER’S GUIDE SEPTEMBER 2003vi

SERIES 6000
MULTI-GAS CALIBRATOR
ENVIRONICS, INC
69 INDUSTRIAL PARK ROAD EAST
TOLLAND, CT 06084
EQUIPMENT SUMMARY – TYPE: (X) Measurement; ( )Control; ( ) Laboratory
Marked electrical rating:
115 VAC, 50/60 Hz, T2.0A
230 VAC, 50/60 Hz, T1.0A
Connection to Supply: Standard IEC Inlet Coupler/Cord Connected
Environmental rating: Standard
Temperature: 15-30 deg C
Humidity: <95% RH @ 15-30 deg C
Altitude: up to 2000 Meters
Installation Category (Annex J): Installation Category (Over voltage
Category) II Pollution Degree:2
Equipment Class (Annex H): Class II Equipment
Equipment function/feature/description:
S6000 was designed for precision Multi-Gas Calibrations with Ozone.
Mode of operation:
Concentration Mode, Flow Mode, Program Mode, Calibrate Mode.
Degree of mobility:
( ) Permanently Connected; (X) Other Cord Connected.
Overall size: 17”x7”x15” Weight: 27 lbs.
Ventilation requirements:
Do not cover or block the ventilation holes in the top cover or fan filter on the rear
panel.
SERIES 6103 USER’S GUIDE SEPTEMBER 2003vii

POWER CONNECTION
WARNING
Operating the Model 6103 at an incorrect line voltage will damage the
instrument and void the manufacturer’s warranty. Check the line voltage
before plugging the instrument into any power source.
For 230 volt input power, only qualified personnel shall determine the correct
input power connections needed to be supplied to the system. Operating the
Model 6103 with an incorrect line voltage may damage the instrument and
could cause personal injury.
The standard supplied 115 volt power cord should be plugged into the rear
panel power entry module of the Model 6103, the other end should then be
plugged into a properly grounded outlet.
IMPORTANT:
Before connecting or disconnecting any cables, wiring harnesses or other
sources of potential electrical impulse, be sure the unit is powered OFF.
The main power disconnect for the unit shall be the power cord that is plugged
into the rear of the unit. The instrument is totally enclosed at all times with a
top and bottom cover for safety.
Position the equipment so that it is not difficult to operate the disconnecting
device.
WARNING
DISCONNECT POWER CORD FROM REAR OF UNIT BEFORE SERVICING
SERIES 6103 USER’S GUIDE SEPTEMBER 2003viii

SYMBOLS
USED PUBLICATION MEANING
ISO 3864, No.
B.3.1
CAUTION (Refer to accompanying
documents).
Refer to specific WARNINGs and CAUTIONs
in Operating Manual.
IEC 417, No. 5019
PROTECTIVE CONDUCTOR TERMINAL
IEC 417, No. 5007 ON (SUPPLY)
IEC 417, No. 5008 OFF (SUPPLY)
SERIES 6103 USER’S GUIDE SEPTEMBER 2003i
x

UNPACKING AND INSPECTING THE SYSTEM
The Model 6103 is shipped completely assembled and ready for use. You only need
to properly unpack and inspect the system prior to connecting the power and gas
sources.
The Model 6103 should be removed from its shipping container and inspected for
damage. Any damage to the shipping case should be noted and immediately
reported to the freight carrier.
Report any damage to the Model 6103 to the Environics home office or your local
Environics distributor.
Place the unit at the desired operating location where there is easy access to both
the front and rear panels of the unit.
SERIES 6103 USER'S GUIDE - 1 - SEPTEMBER 2003

SYSTEM LAYOUT
FRONT PANEL
POWER SWITCH
To turn the system on, press the top of the rocker-type power switch. The switch and
display will illuminate and the READY message will appear on the display.
LCD DISPLAY
The backlit liquid crystal display (LCD) is a four line, 20 characters display, protected
by a clear lens. The display is illuminated when the system is in operation.
FUNCTION KEYS
Three function keys (F1, F2 and F3) are located below the display and are used to
make various selections from the menu displayed on the bottom line of the screen.
The current function of each key is displayed above each function key on the bottom
line of the display. While the system is in operation, the function of each key will
change, depending on the current operating mode.
NUMERIC KEYPAD
The numeric keypad is used for data entry of numbers 0 through 9 and a decimal
point. Pressing the ENTER key completes the entry of the numeric data selected.
ARROW KEYS
The arrow keys are used to move the cursor on the display screen to different fields
located on the different entry screens or to scroll information up or down. Pressing
and holding the arrow keys will cause them to repeat.
MENU KEY
The menu key allows the function menu, currently being displayed, to change. The
functions are displayed on the bottom line of the screen above the three function
keys. Each time the menu key is pressed, the menu will advance to the next menu (if
applicable).
The nine function modes are described in detail in the operating mode Summary and
system operation sections of this User’s Guide
SERIES 6103 USER'S GUIDE - 2 - SEPTEMBER 2003

FRONT PANEL LYOUT (CONTINUED)
FRONT PANEL LAYOUT
SERIES 6103 USER'S GUIDE - 3 - SEPTEMBER 2003

REAR PANEL LAYOUT
POWER INPUT
This EMI/RFI AC input power module, supplies power to the internal power supply.
GAS INPUT PORTS
These ports supply source gas to the system. Port 1 is for the zero air connection for
MFC1. Ports 2 through 5 are for span gas connections for MFC2.
OUTPUT MANIFOLD PORTS
The three output ports supply gas to external instrumentation.
VENT PORT (IF EQUIPPED)
The vent port prevents the internal glass supply manifold from being over-
pressurized. If not equipped with the vent port, use one of the three manifold output
ports as a vent.
REFERENCE PORT
The reference port supplies the photometer with a constant source of zero air.
SAMPLE IN PORT
The Sample in port allows the photometer to analyze an externally generated source
of ozone.
EXHAUST PORT
The exhaust port vents the ozone-containing sample once it has been analyzed by
the photometer system
RS-232 PORTS
Two RS-232 serial ports are supplied for connection to a serial terminal or for remote
communications.
SERIES 6103 USER'S GUIDE - 4 - SEPTEMBER 2003

REAR PANEL LAYOUT (CONTINUED)
STATUS INPUT/OUTPUT
The status outputs allow the Model 6103 to signal external devices when certain
operating events occur. The Status inputs allow external devices to initiate various
system functions.
ANALOG OUTPUT
Two analog output signals are supplied. Currently only analog channel one is active.
Channel one is configured to supply 0-1 VDC for a photometer reading of 0 – 1 PPM.
POWER
INPUT
POWER
INPUT
REAR PANEL LAYOUTREAR PANEL LAYOUT
REFERENC
E
REFERENC
E
RS232/2
RS232/1
ANALOG OUTPUT
SAMPLE IN
OUTPUT MANIFOLD PORTS
VENT
PORT
PORT 1
PORT 5 PORT 4 PORT 3 PORT 2
EXHAUST
SERIES 6103 USER'S GUIDE - 5 - SEPTEMBER 2003

OPERATING MODE SUMMARY
The nine main function modes are: concentration (CONC), FLOW, Photometer
(PHOTO), Gas setup (GASES), REMOTE, Preferences (PREFS), SYSTEM,
LEAK and INFO.
Descriptions of the nine function modes follow:
CONCENTRATION MODE (CONC)
The Concentration Mode allows the user to create a gas mixture by specifying the
desired output span gas (MFC2) concentration (OGC); which pre-mixes with the
diluent gas (MFC1).
The User defines the required OGC from a single or multi-component gas cylinder
and the total flow rate required. If ozone is required in this mix, the ozone
concentration is also entered in this mode. The Model 6103 software then translates
these output concentrations into gas flow rates and, using the dilution flow controller
(MFC1), proceeds to dilute the span gas to the defined OGC, with or without ozone.
FLOW MODE (FLOW)
In the Flow Mode, you specify the amount of flow for the diluent (MFC1) and the span
gas (MFC2). The difference between the Flow Mode and the Concentration Mode is
that in Flow Mode, you decide what flow rate is used by the MFCs, instead of having
the system software compute the flows as it does in Concentration Mode.
PHOTOMETER MODE (PHOTO)
The Photometer mode allows the user to analyze an externally generated source of
ozone. Within this mode, all photometer diagnostic information is displayed.
GAS SETUP MODE (GASES)
The gas setup mode is used to specify the gas types connected to the ports on the
rear panel of the system. This information is used internally for error checking and all
concentration and flow calculations. The CGC of the calibration gas is entered for
ports two through five; port one is typically 100% zero air. 20 gases can be identified
in this mode allowing for multi-gas (multi-component) cylinders.
REMOTE MODE (REMOTE)
The remote mode prepares the system to be run from the RS232 port using
Environics’ remote mode protocol.
SERIES 6103 USER'S GUIDE - 6 - SEPTEMBER 2003

OPERATING MODE SUMMARY (CONTINUED)
PREFERENCES (PREFS)
This setup mode is used to program ozone generator control features, status input
conditions, time and date information, adjust the contrast of the LCD, power up mode
and analog output channel setup.
SYSTEM MODE (SYSTEM)
The system mode consolidates all system calibration data. The system mode is used
to enter, view or edit calibration information for various system devices such as
MFCs, ozone module, photometer, analog to digital converters (ADC) and digital to
analog converters (DAC). Calibration data compares measured versus desired
performance of the various devices, so that corrections can be made to improve their
operation.
NOTE: It is important that a hard copy of the calibration data be kept in a safe place.
The calibration data will be required to restore the system in the unusual event of
data loss.
LEAK TEST MODE (LEAK)
Using a pressure decay test, this mode allows all of the system plumbing to be
automatically checked for leaks.
INFO MODE (INFO)
This mode displays the system model number, software version and serial number.
NOTE: A detailed description of each mode, outlined in this section, appears in
the system operation section of this manual. Mode that is under development
is the Program mode.
SERIES 6103 USER'S GUIDE - 7 - SEPTEMBER 2003

POWER AND GAS CONNECTIONS
After the Model 6103 is unpacked and inspected, the User should connect the
power and appropriate gas sources to the gas inlet ports on the rear panel.
POWER CONNECTION
WARNING
OPERATING THE MODEL 6103 AT AN INCORRECT LINE VOLTAGE WILL
DAMAGE THE INSTRUMENT AND VOID THE MANUFACTURER’S WARRANTY.
CHECK THE LINE VOLTAGE BEFORE PLUGGING THE INSTRUMENT INTO
ANY POWER SOURCE.
If the system you received has a bare wire power cord, first install the correct plug
for your power source. Make this connection before plugging into the rear panel of
the Model 6103.
(1) Insert the standard power cord supplied with the system into the power
connector on the rear panel and insert the plug into a properly grounded
outlet. The standard unit allows for 100 – 250 VAC (50/60 Hz).
(2) Turn the front panel switch to the ON position. The screen will indicate that a
self-test is being performed and then READY will appear. When READY
appears on the screen, turn the power switch to the OFF position and proceed
to the section on Gas Connection.
IMPORTANT:
Before connecting or disconnecting any cables, wiring harnesses or other sources of
potential electrical impulse, be sure the unit is powered OFF.
SERIES 6103 USER'S GUIDE - 8 - SEPTEMBER 2003

POWER AND GAS CONNECTIONS (CONTINUED)
GAS CONNECTIONS
Gas connections are standard ¼-inch (optional 1/8-inch) compression fittings.
PORT 1 serves as a diluent or balance port for use with zero air.
PORTS 2 through 5 feed a solenoid valve manifold. The outputs of the manifold
are in common and feed the input of MFC2. Environics recommends connecting
span gases sequentially, beginning with PORT 2 and proceeding to PORT 5.
The REFERENCE port supplies the photometer with a vented source of zero air.
The photometer needs a constant source of reference gas (ozone-free zero air) in
order to make reference measurements against the sample gas containing ozone.
An internal fixed orifice sets the flow to 3 to 3.5 SLPM with a REFERENCE port
input pressure of 20 to 25 PSIG. All venting is done internally and the supply line to
this port should not be vented. The internal diaphragm pump draws an average of
2 SLPM. Instantaneously, it will draw more as the diagram strokes; hence the
need to supply excess gas, as to not “starve” the pump. The same principle
applies to the sample in port below.
The SAMPLE IN port is for connecting an external source of ozone (not ambient).
When supplying this port with an externally generated source of ozone, it is
important to make sure that the ozone source is externally vented. Ideally, the vent
should be as close to the input of the SAMPLE IN port as possible. Also, it is
important to supply the sample port with at least 3 SLPM of a sample containing
ozone. The 6103 internal photometer will draw 2 SLPM from this sample and 1
SLPM will exhaust through the external vent.
The OUTPUT MANIFOLD PORTS are supplied for connecting up to three gas
analyzers.
The VENT PORT prevents the internal glass output manifold from being over-
pressurized; I.E when connecting multiple analyzers to the output manifold. The
Vent port is internally connected to the output manifold. This port may or may not
need to be capped for different plumbing schemes and total flow rates. If there are
problems with the supply of gas to analyzers, incorrect or unstable values, consult
the factory. If not equipped with the vent port, use one of the three manifold
outputs as a vent.
SERIES 6103 USER'S GUIDE - 9 - SEPTEMBER 2003

GAS CONNECTIONS (CONTINUED)
Turn the compression fittings with a wrench following the fitting manufacturer’s
procedure for compression tube connections.
1. On the rear of the Model 6103, connect a source of zero air, at a pressure of 20
to 25 PSIG (30 PSIG MAX.), to PORT 1 (dilution gas port). Connect all span
gases to PORTS 2 through 5 (span gas ports) at a pressure between 15 and 25
PSIG. When using the photometer, supply zero air at a pressure of 20 to 25 PSIG
to the REFERENCE port.
It is important that the gas pressures stay within the ranges specified for
each gas port. Otherwise the system may produce gas blends that fall
outside the accuracy specifications of the system.
Call your Environics representative or the Environics home office with any
questions regarding input pressure.
2. Open cylinder valves and pressurize lines to between 15 and 25 PSIG. (These
pressures may vary depending on system configuration. For example, if flow
rates exceed 10 SLPM, input pressures may need to be higher.)
3. Make the output gas connections as required using the OUTPUT MANIFOLD
PORTS. The VENT PORT should not be used as an output port.
Do not pressurize the output of the Model 6103.
The Model 6103 is now ready for set up of the various functions.
Read Data Entry Explanation in this document. Then begin the system set up
procedure.
IMPORTANT: When supplying an external manifold, from the 6103 output
manifold, tube size and technique for gas venting is critical to system ozone
stability and accuracy. If problems arise in supplying an external manifold, contact
Environics technical services.
SERIES 6103 USER'S GUIDE - 10 - SEPTEMBER 2003
Other manuals for 6103
1
Table of contents
Other Environics Test Equipment manuals

