EOS Australia PTY LTD SRN-1670D Instruction sheet

SRN
Configuration
Manual

SRNI
© 2015 Enter your company name
Table of Contents
Part I Product Overview 1
................................................................................................................................... 11 Comparison
.......................................................................................................................................................... 1
Normal Range
.......................................................................................................................................................... 2
Plug & Play Range
Part II Getting Started 3
................................................................................................................................... 31 Making a physical connection
.......................................................................................................................................................... 3
Normal Mode .......................................................................................................................................................... 4
Plug & Play Mode
.......................................................................................................................................................... 5
Plug & Play NVR in Manual Mode
................................................................................................................................... 62 Samsung Tools
.......................................................................................................................................................... 6
IP Installer .......................................................................................................................................................... 8
IPOLIS Device Manager
Part III Configuring Samsung NVR 14
................................................................................................................................... 141 Initial Bootup
.......................................................................................................................................................... 14
Install Wizard
................................................................................................................................... 182 Network Setup
.......................................................................................................................................................... 19
Interface Setup
................................................................................................................................... 213 Camera Setup
.......................................................................................................................................................... 23
Registering Camera
.......................................................................................................................................................... 24
Adjusting a Camera
Part IV Record Setup 27
................................................................................................................................... 281 Configuring Recording
Part V Playbacks 33
................................................................................................................................... 331 Search
.......................................................................................................................................................... 35
Time Search .......................................................................................................................................................... 36
Event Search
................................................................................................................................... 372 Backup
.......................................................................................................................................................... 39
Backup Viewing
Product Overview 1
EOS Australia PTY LTD
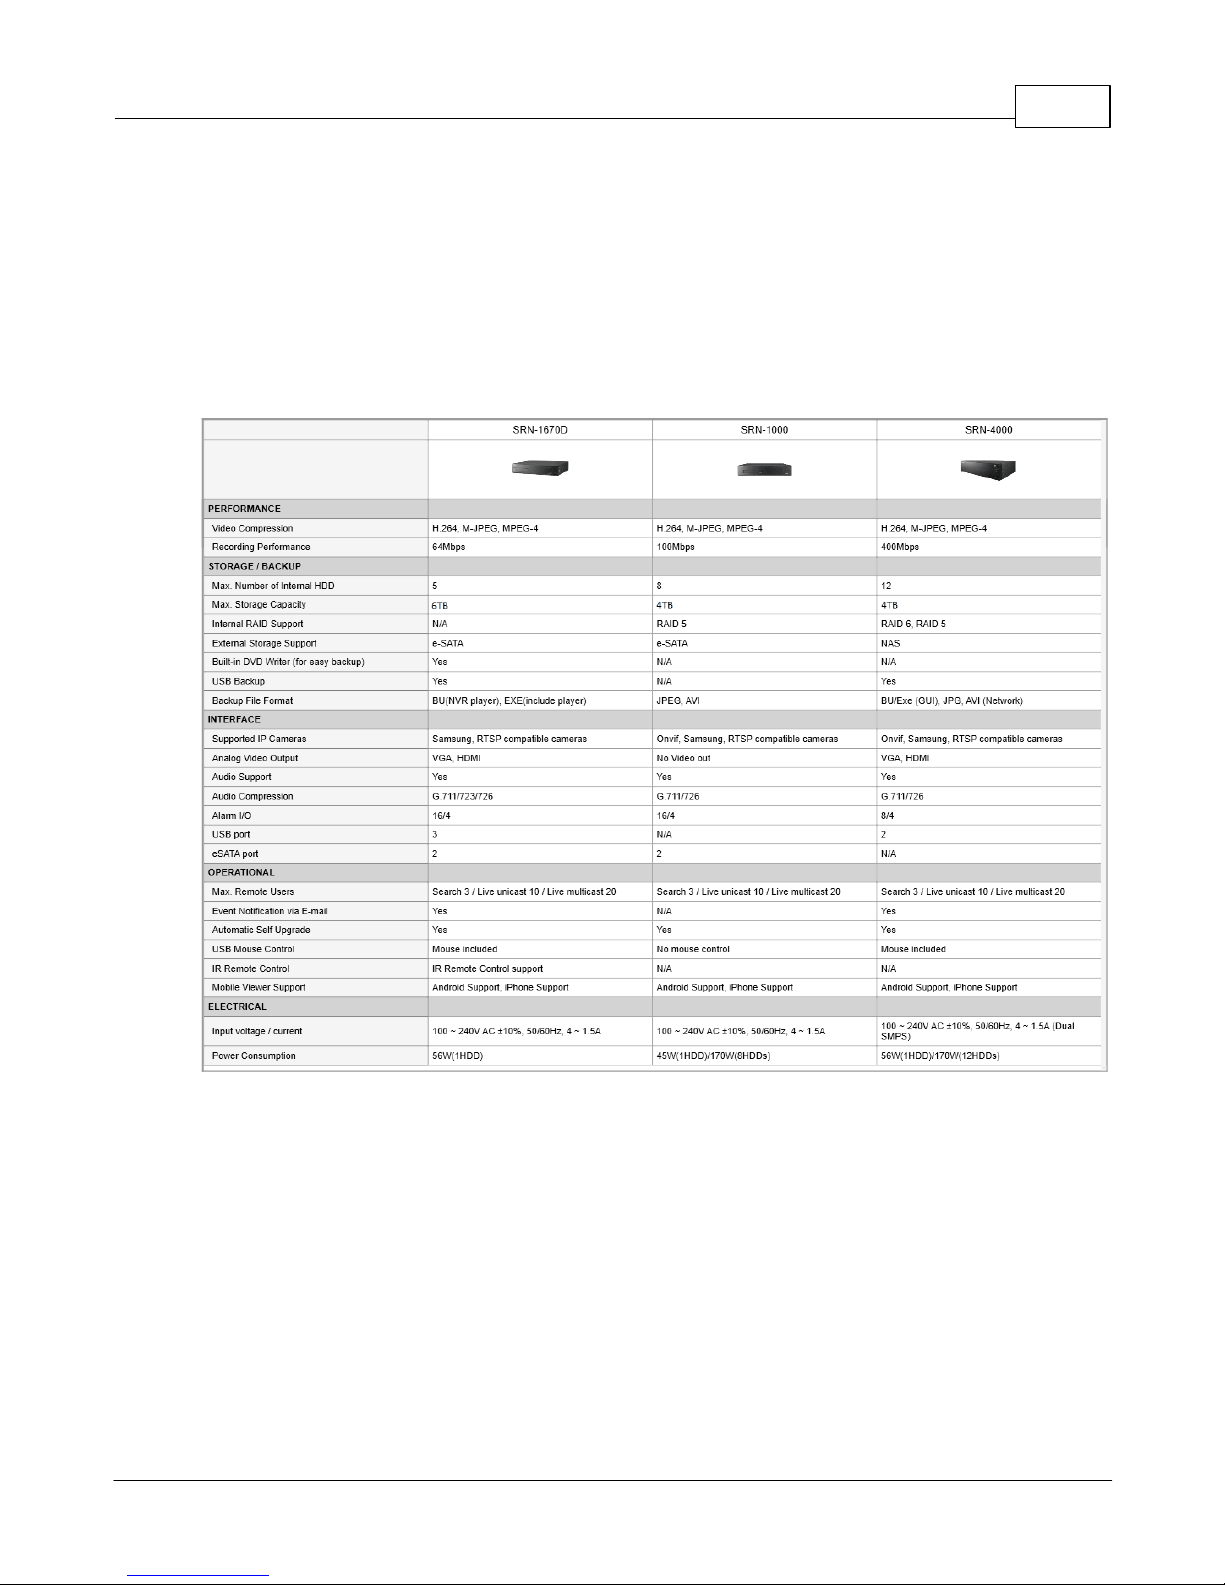
1 Product Overview
1.1 Comparison
Some NVR shared similar specifications.
1.1.1 Normal Range
SRN2
EOS Australia PTY LTD
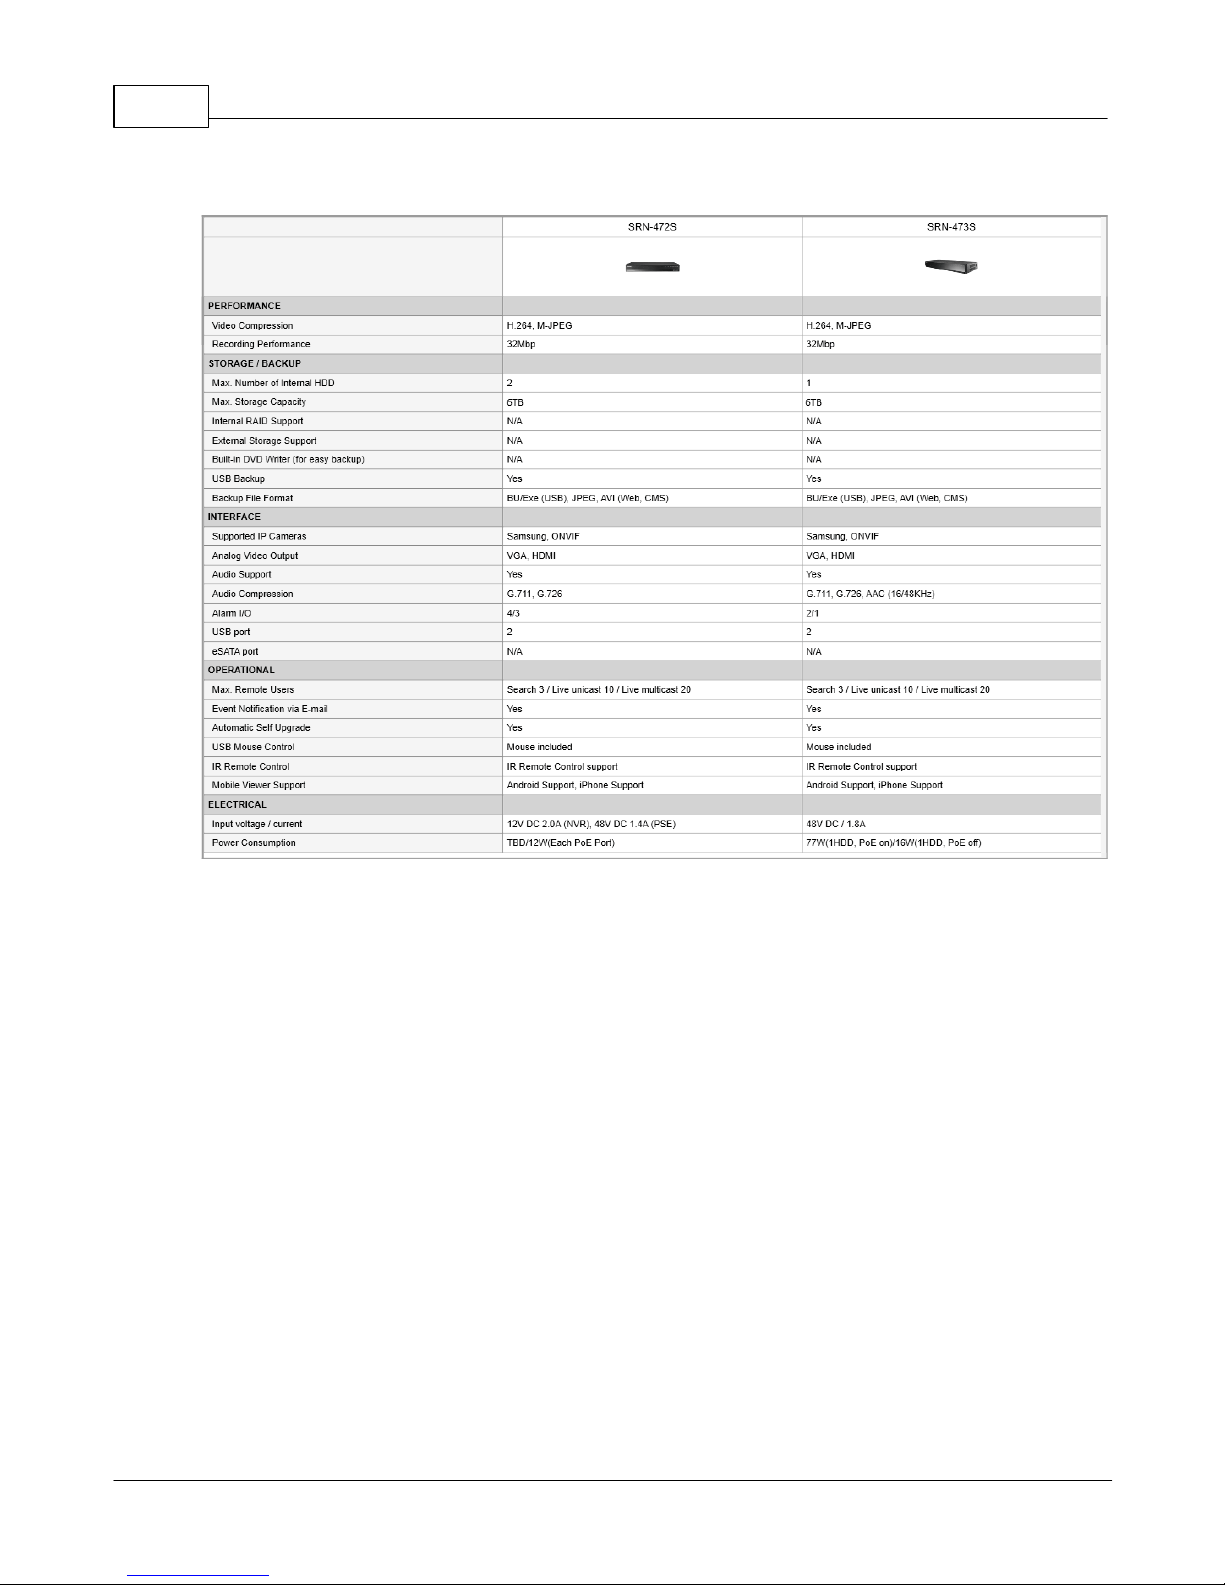
1.1.2 Plug & Play Range

Product Overview 3
EOS Australia PTY LTD
2 Getting Started
2.1 Making a physical connection
2.1.1 Normal Mode
In normal mode application, you can combine the use of both Network 1 and Network 2 for your cameras
or you can choose to use Network 1 for cameras and use Network 2 for your Internet Connection.
SRN4
EOS Australia PTY LTD
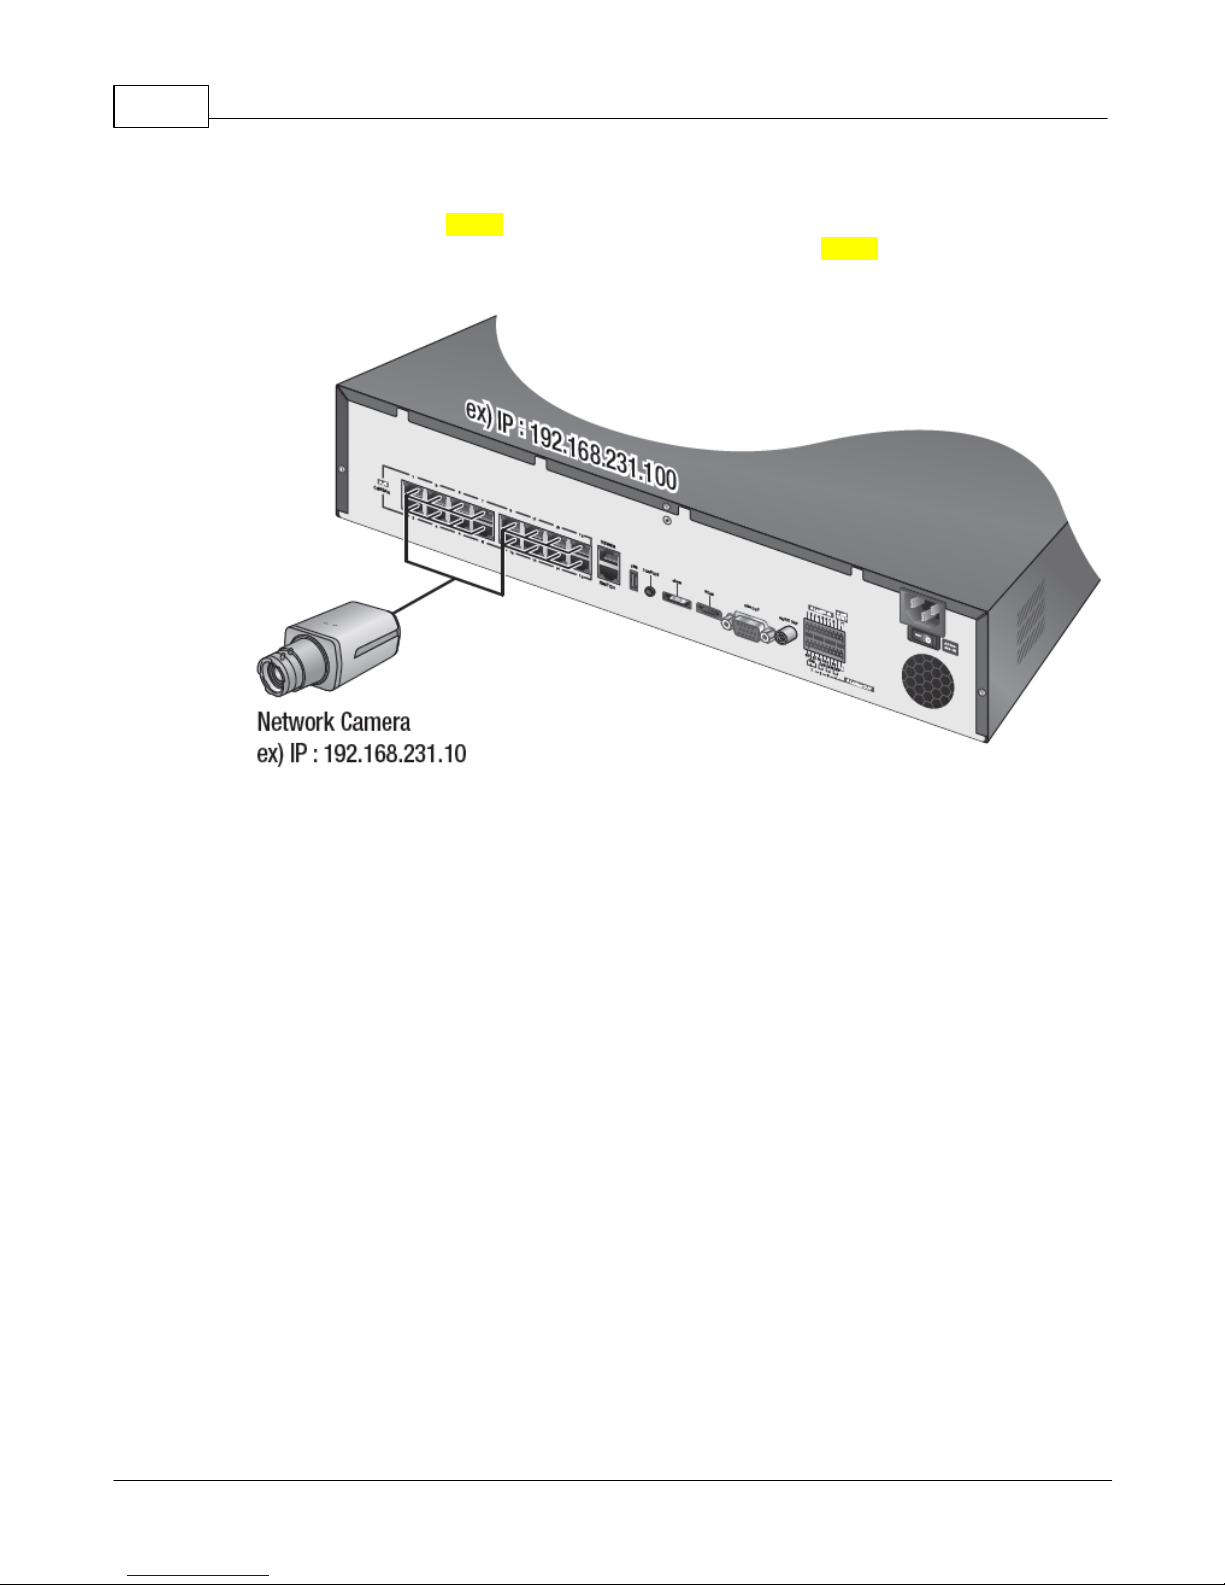
2.1.2 Plug & Play Mode
In Plug and Play mode. The Switch port is disabled, because the in built switch is overtaking its
functionality, and the IP address cannot be changed, so that leaves the Viewer port by itself for the
Internet Connection.

Getting Started 5
EOS Australia PTY LTD
2.1.3 Plug & Play NVR in Manual Mode
For a Plug and Play unit, you can turn off PnP mode and make the NVR run using standard mode if you
want more control over how you want your network to be.
In Manual Mode, you can use either the ports on in built switch, connect a switch to one of the port on
the in built switch or use the dedicated Switch port for your switch. They will all share and function within
the allowed bandwidth from the Samsung NVR.

SRN6
EOS Australia PTY LTD
2.2 Samsung Tools
IP Installer vs IPOLiS Device Manager
IP Installer is an simple little application, that helps the user to IP addressing the cameras.
IPOLiS Device Manager is a program that helps the user to configure, manage and diagnose multiple
network devices.
You can obtain both application from www.samsungsecurity.com
2.2.1 IP Installer
IP Installer requires no installation. Simply double click the IP Installer icon to start the program
Click [Search].
IP Installer should pickup all the Samsung IP device that are connected on the same network

Getting Started 7
EOS Australia PTY LTD
Choose a device and click [Manual Set]
Choose [Static] and put the IP address you wish to use
Input the password of the camera and then click [OK] to confirm the change
SRN8
EOS Australia PTY LTD
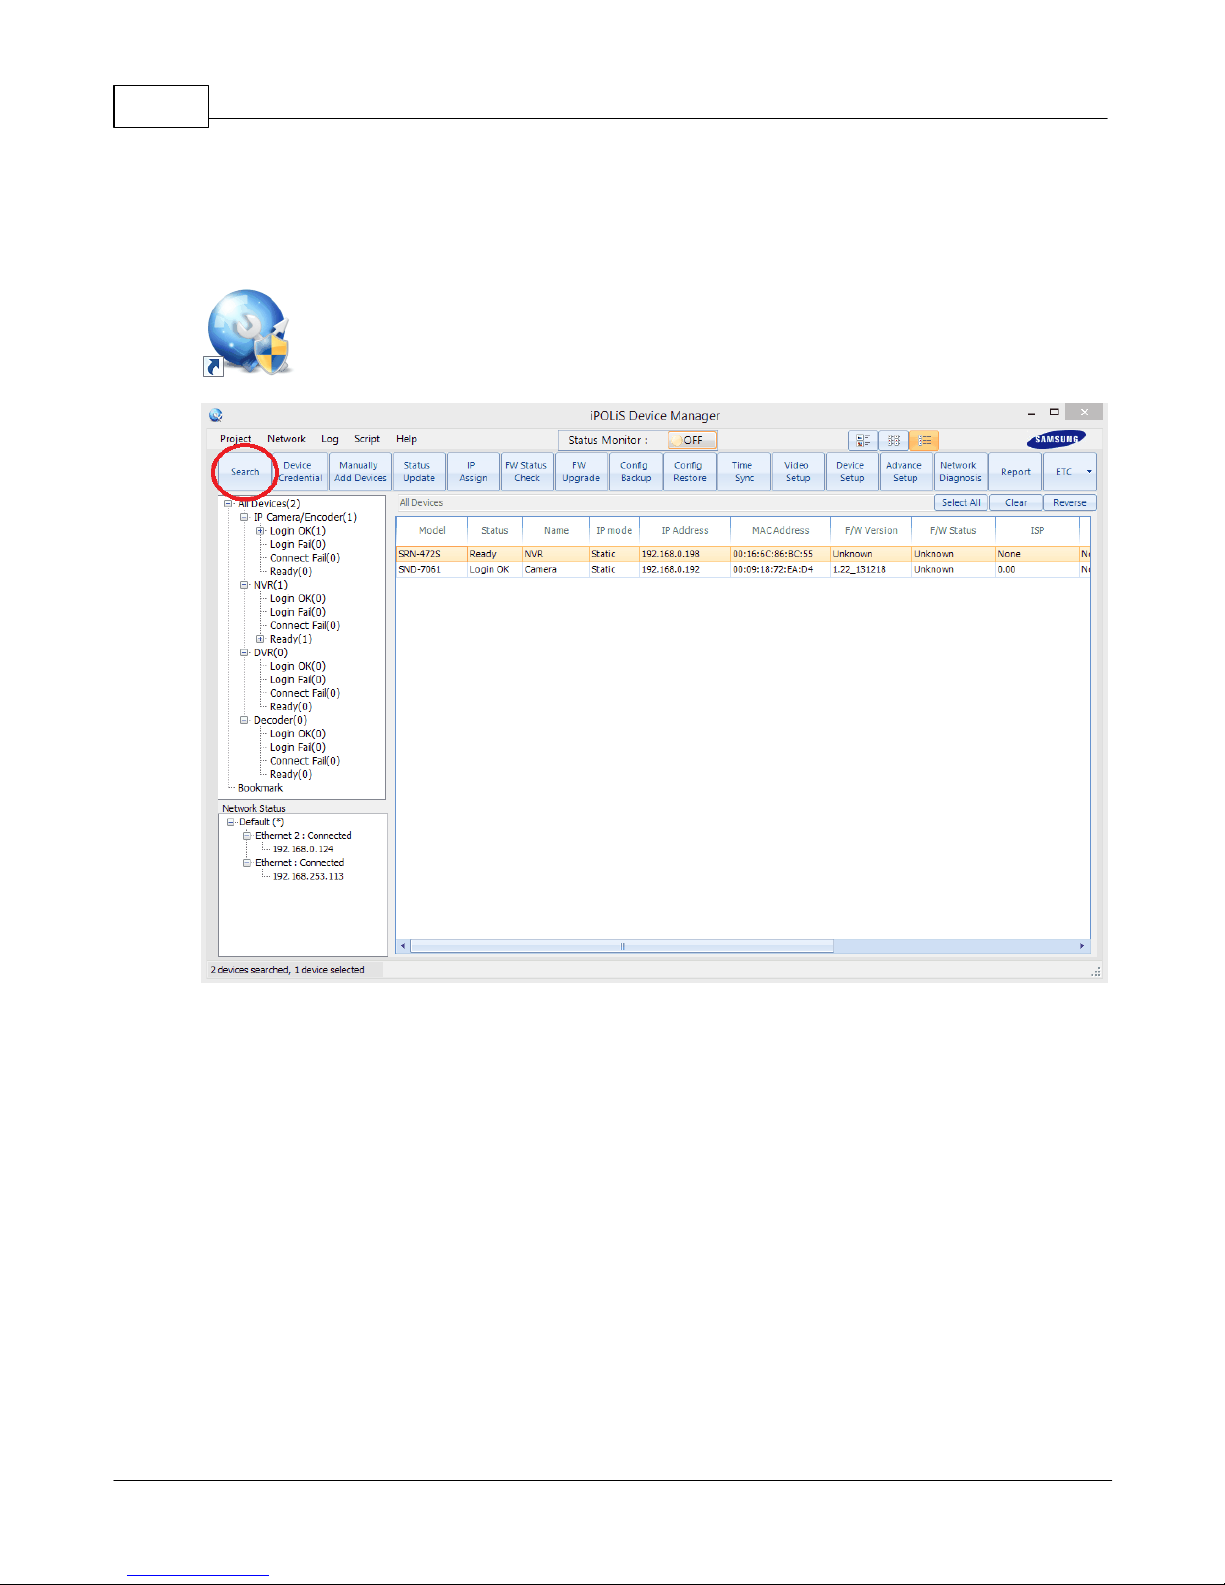
2.2.2 IPOLIS Device Manager
IPOLiS Device Manager requires installation before use. Double click the IPOLiS Device Manager icon
after installation
Click the [Search] button. Give 30 seconds for the search to complete

Getting Started 9
EOS Australia PTY LTD
Assign IP Address
1. Click [IP Assign] button after selecting 1 or more cameras from the list
2. Put the IP address you want to assign to the camera
3. Click [Simulate] to assign the IP
4. Click [Apply] to confirm the change. Now you should be able to see OK in the result section
SRN10
EOS Australia PTY LTD
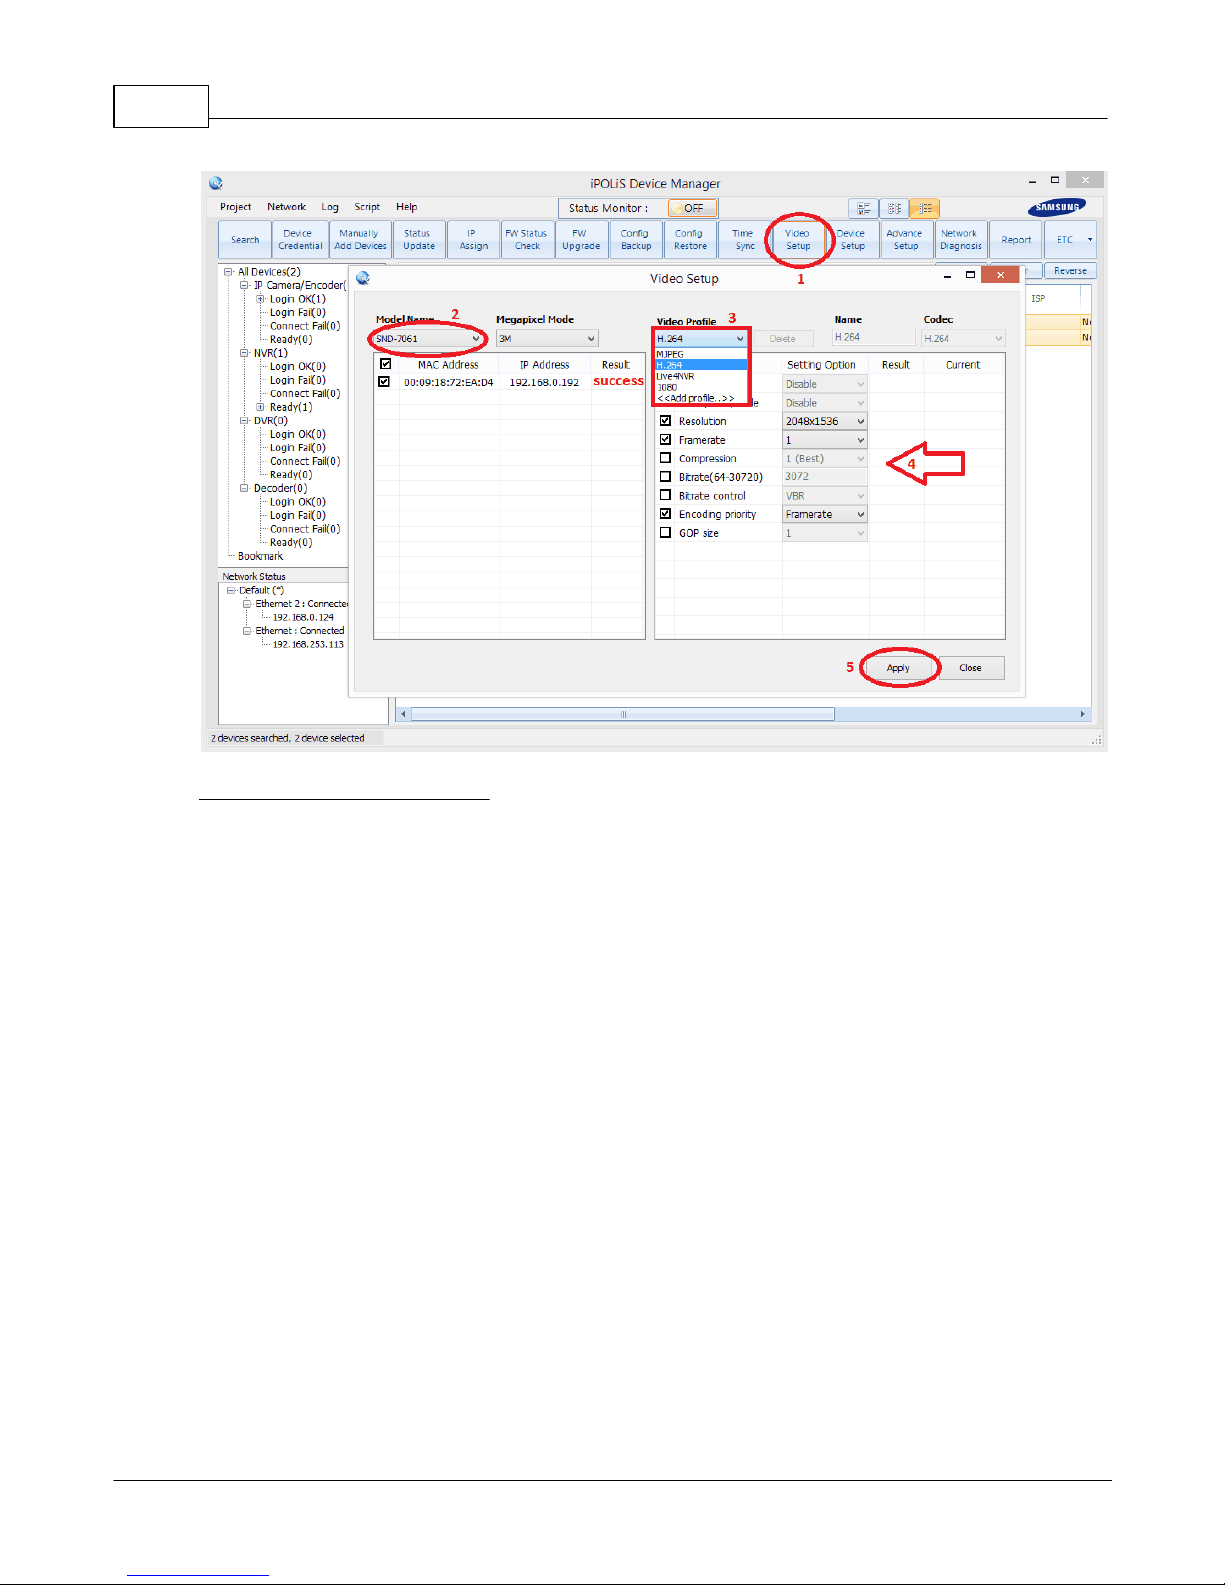
Create or Edit Camera Profiles
1. Click [Video Setup]
2. Choose the camera model (You will be able to configure multiple camera at ones as long as
the model is the same)
3. You can edit or create profile in the camera
4. Set resolution, framerate or birate etc, for the profile selected in step 3
5. Hit [Apply] to save and wait until you see success for each camera

Getting Started 11
EOS Australia PTY LTD
Camera Quick Functions
1. Click [Device Setup]
2. Choose the camera model (You will be able to configure multiple camera at ones as long as
the model is the same)
3. You can factory default, flip/flop camera image and simple focus from this page
4. You should see success in result section if done correctly
SRN12
EOS Australia PTY LTD
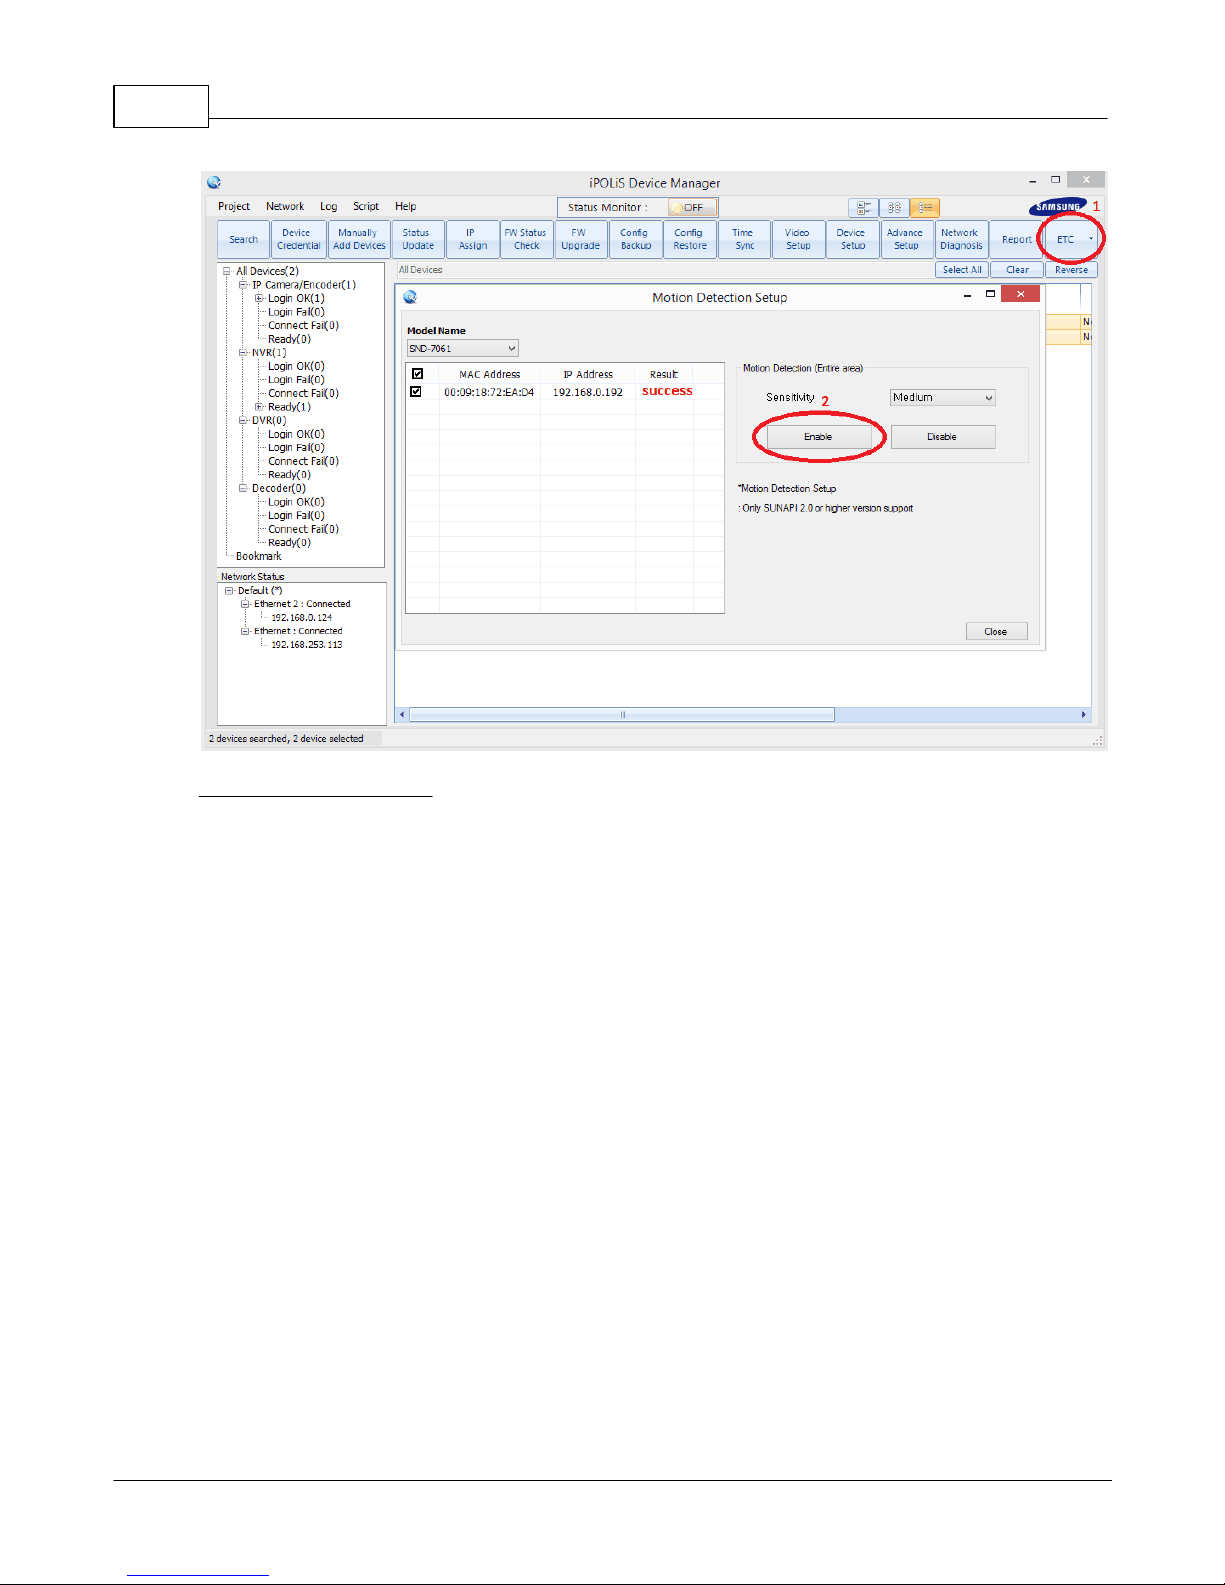
Enable Motion Detection
1. Click [ETC] and choose [Motion Detection]
2. Click [Enable] and you should see success if camera you are using support this function

Getting Started 13
EOS Australia PTY LTD
Camera Setup
1. Click [ETC] and choose [Camera Setup]
2. Choose the camera model you want to configure
3. Choose what you like to configure
4. Hit [Apply Selected Devices] and you should see success once completed
SRN14
EOS Australia PTY LTD
3 Configuring Samsung NVR
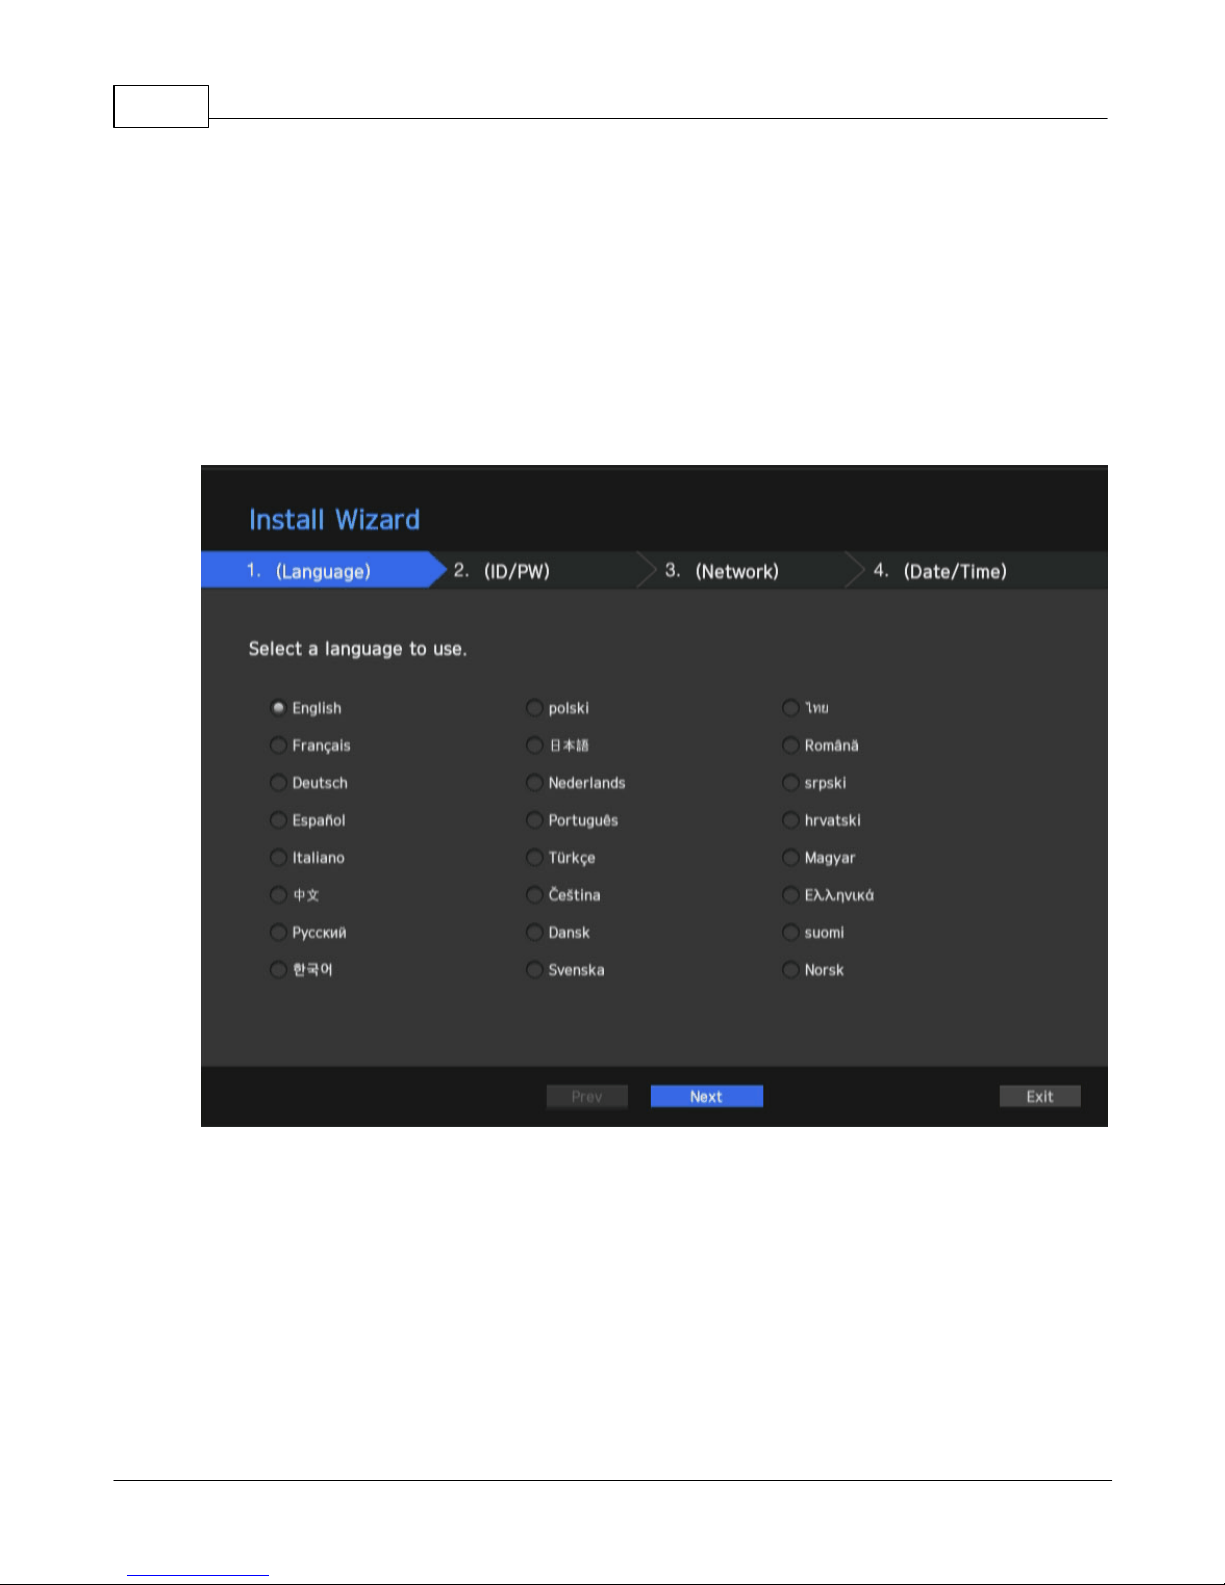
3.1 Initial Bootup
When you boot up the NVR for the first time the unit will go through Install Wizard (This is the only time
you can ever do it, unless factory defaulting the unit).
You can cancel this whole process and configure each individual setting via the main menu.
3.1.1 Install Wizard
Configuring Samsung NVR 15
EOS Australia PTY LTD
1. In the [Language] tab, select the language and press [Next] button
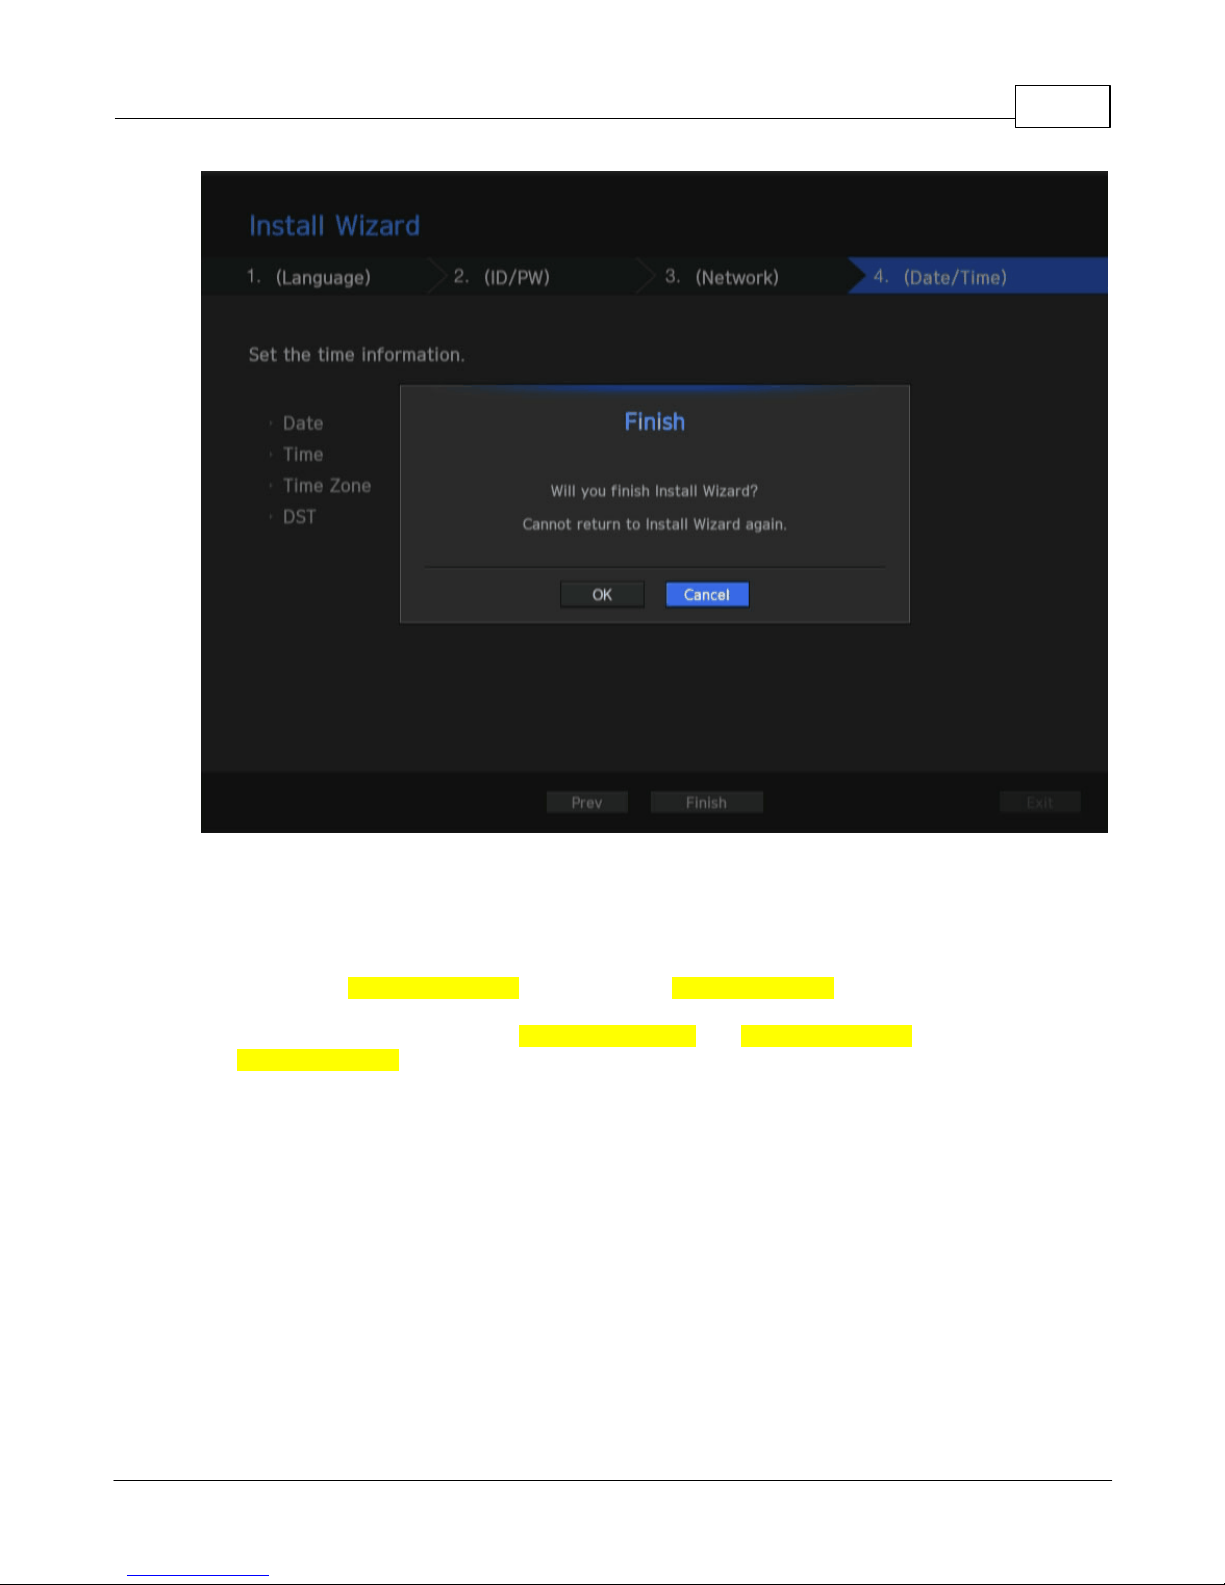
2. In the [IP/PW] tab, set the password you want to use and press [Next]
3. In the [Network] tab, setup the network range you want to use for the camera and the Internet
NOTE: Depends on the model of the unit, you may have 2 or more networks available in the NVR
Always dedicate Network 1 (Camera) for cameras and Network 2 (Viewer) for the Internet connection
If you have a Plug & Play unit, then Network 1 will be automatically assign to 192.168.231.100
If its an SRN-4000, then you can use Network 1 (Camera) and Network 2 (Camera) for the cameras, and
use Network 3 (Viewer) for the Internet Connection
4. Setup up [Date/Time] and click next to proceed
SRN16
EOS Australia PTY LTD
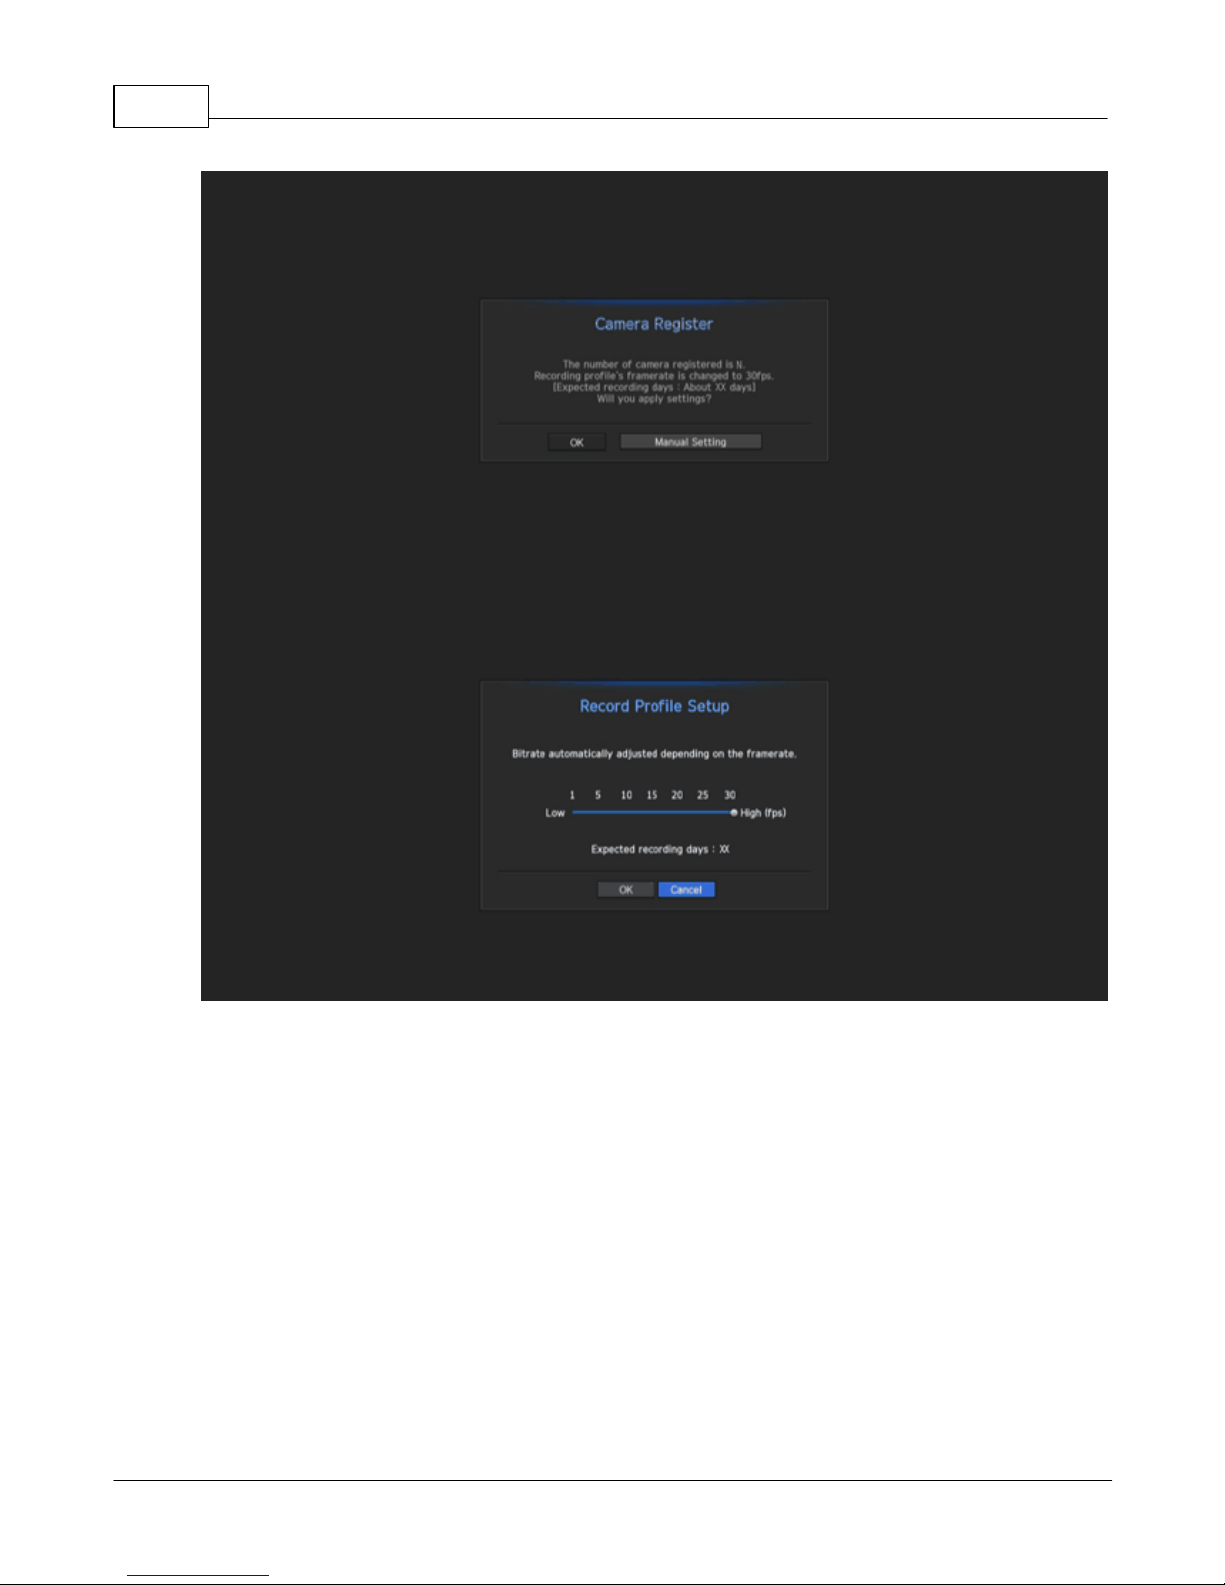
If there are 16 or less cameras searched, it will attempt to automatically register the device

Configuring Samsung NVR 17
EOS Australia PTY LTD
But if there are more 16 cameras searched, then you have to first choose which camera to connect
before proceeding to the next stage
SRN18
EOS Australia PTY LTD
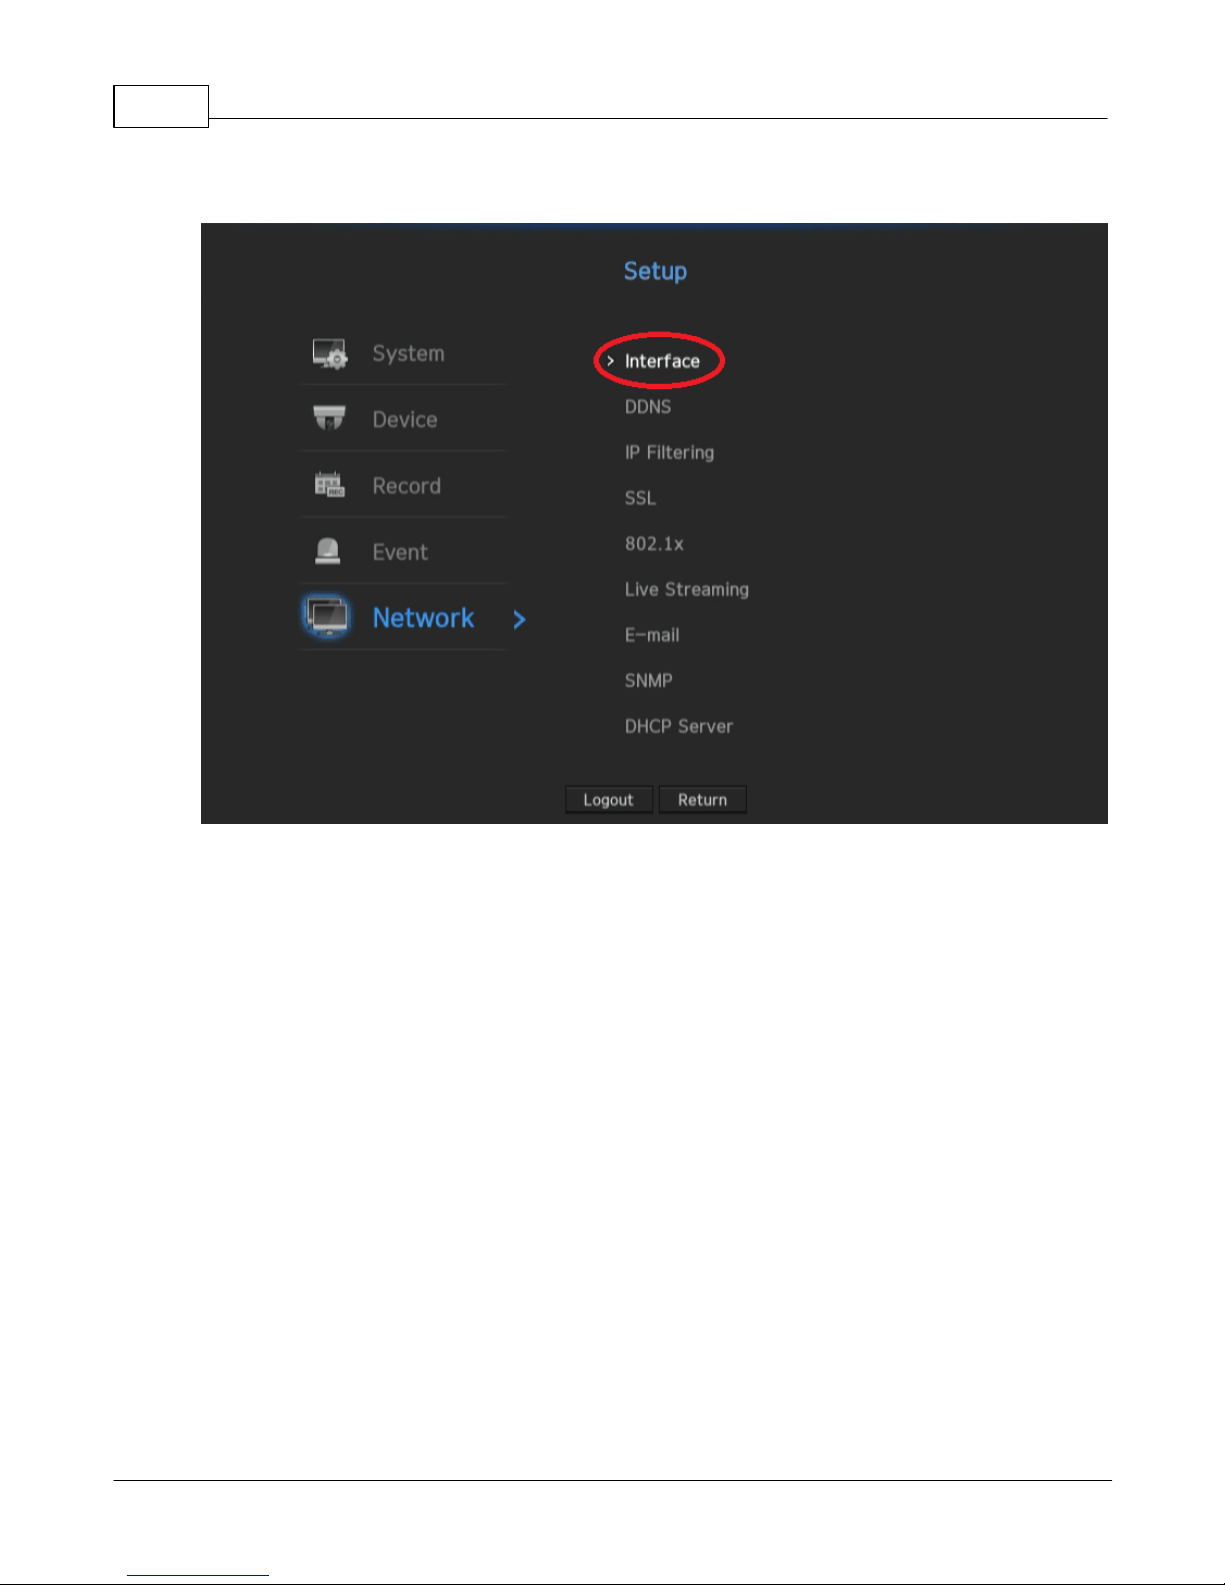
3.2 Network Setup
From main menu select [Network] and click [Interface]
This manual suits for next models
2
Table of contents
Popular DVR manuals by other brands


Magnavox
Magnavox ZV427MG9 A owner's manual

Vista
Vista SmartDisc VLS-DR Installation instructions manual

Image Vault
Image Vault Digital Video Recor installation manual

Archos
Archos Gen 5 user manual

Idview Digital
Idview Digital IV-SGVA-100 user guide

Mobile Video Systems
Mobile Video Systems SSD4m user manual