PNI House H814 User manual

DVR / NVR
PNI House H814
EN User manual ......................................................... 3
BG Ръководство за употреба ............................. 32
DE Benutzerhandbuch .............................................. 63
ES Manual de usuario ............................................... 93
FR Manuel utilisateur ............................................... 122
HU Használati utasítás .............................................. 151
IT Manuale utente .................................................. 180
NL Handleiding ........................................................ 209
PL Instrukcja obsługi ............................................... 238
RO Manual de utilizare ............................................. 267


3User manual
English
Main features
»Simultaneous HDMI and VGA video output
»Supports up to one 14TB SATA HDD
»10 / 100Mbps RJ45 Ethernet port
»H.265 + video compression
»ONVIF compatible
»Supports Cloud and P2P service
»Remote control
»Supports XVI / AHD / TVI / CVI / CVBS / IP signal
»Supports human face identification
»Motion detection
Technical specifications
Video compression H.265
Video inputs 4 x BNC
Video output 1 x VGA / 1 x HDMI
Playback resolution 1080P(VGA) / 1080P(HDMI)
Registration resolution
and number of channels
Analog: 4 x 5MP
IP: 16 x 1080P / 8 x 5MP
Hybrid: 4 x 5MP + 2 x 1080P
Motion detection Yes
Audio compression G.711A
Recording mode Manual, alarm, motion detection, scheduled
Network interface RJ45 10/100Mbps
PTZ control Yes, it supports
USB 2 x USB 2.0
HDD 1 x SATA (max. 14Tb)
Power voltage 12V / 2A
Consumption < 15W (without HDD)
Working temperature -10°C ~ +50°C
Dimensions 255 x 218 x 43 mm

User manual 4
English
Software
The PNI House H814 DVR can be controlled locally or remotely from both
smartphones and computers with Windows operating system:
Operating system Application Download
Android, iOS XMEye
Android iOS
Windows General CMS
The installation file can be
downloaded from the CD
included in the package or from
the Download section on the
product web page (www.mypni.
co.uk)
Connections
1
5 83
2 4 6 7 9 10
1Video inputs Connect the 4 cameras included in the package
2Audio output Connect an audio amplifier
3Video output Connect a monitor (composite video)
4HDMI Connect a monitor via an HDMI cable (max. 1080P)
5VGA Connect a monitor via a VGA cable (max. 1080P)
6Audio inputs Connect a microphone to each RCA port

5User manual
English
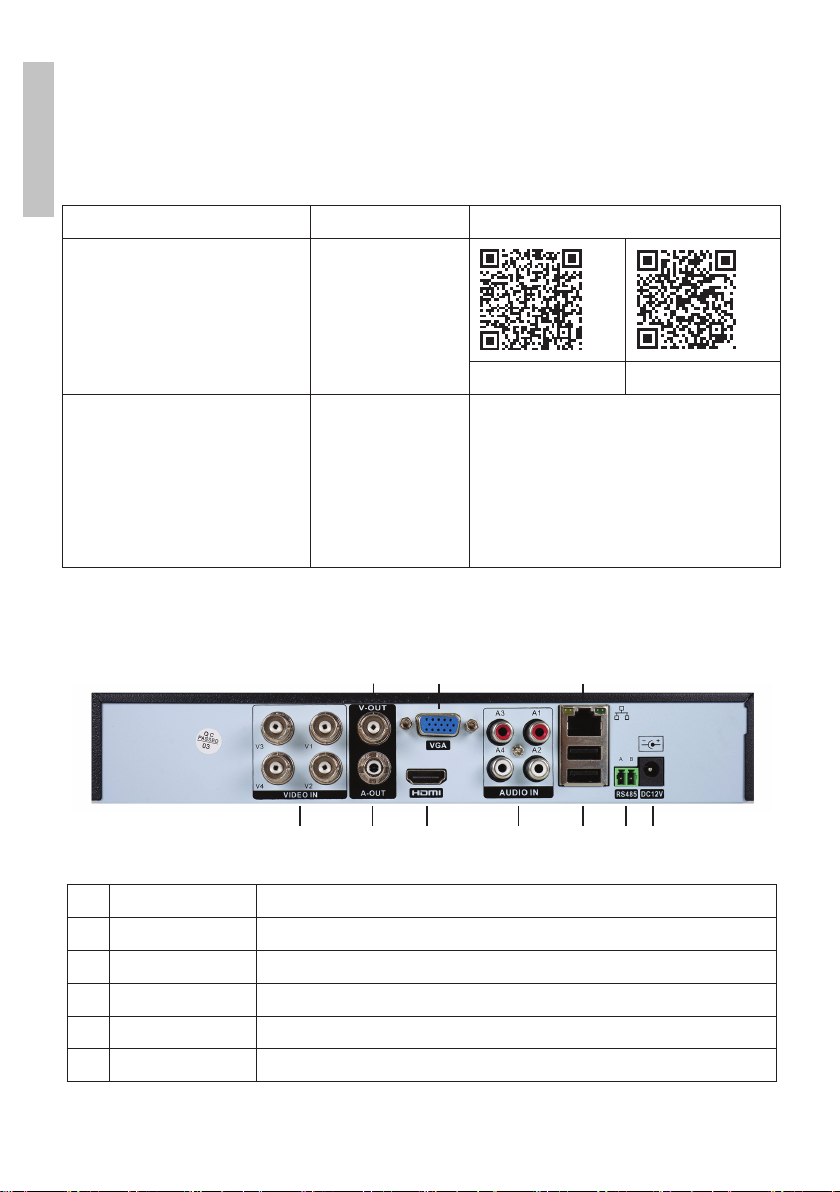
7 2 x USB Insert a USB mouse or USB flash drive for firmware
update or backup
8Ethernet port Insert an Ethernet cable to connect the NVR to the
router
9RS485 Serial interface
10 Power source Insert the 230V - 12V / 2A power adapter
Instructions for use
Installing the storage unit
Before first use, please install the storage unit. A single SATA HDD with a
maximum capacity of 14TB can be installed inside the recording unit (the
HDD is not included in the package) .
• Loosen the screws and remove the NVR cover
• Connect the data cables and secure the hard drive to the screws
• Replace the NVR cover
• Connect the power and internet cable to the NVR
Turn the device on
Plug the power cord into a 230V outlet. The NVR will start. The indicator LED
will light up. By default, 16 channels will be displayed on the screen.
If the start time is within the preset program for recording, then the recording
function will start automatically.
Notes:
1. Check that the input voltage corresponds to the recommended voltage of the
device. The supply voltage is 230V ± 10% / 50 Hz 2A.
2. We suggest using a UPS device to protect the device from voltage variations.
Turn the device o
There are two ways to turn o the device.
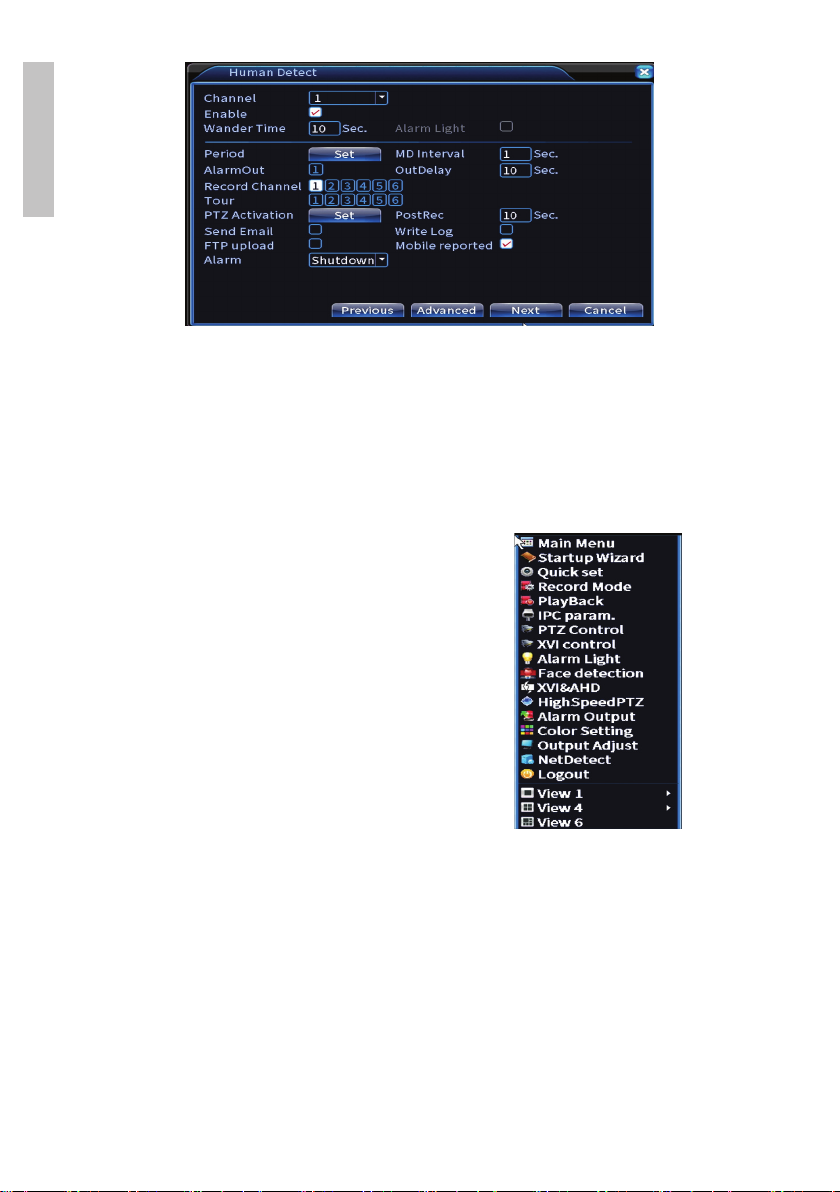
1. Access the main menu (right click on the screen) and select the option
Logout - Shutdown
2. Turn o the power supply.

User manual 6
English
System authentication
After turning on the device, log in to the system.
By default, the admin user is protected by password 1234. If the password is
entered incorrectly 5 times in a row, the account will be blocked. By restarting
the device or after half an hour, the account will be unlocked automatically .
Note: For the security of your system, please change the password after the first
login.
Quick setup guide
After starting the device, the quick setup guide will start.
Note: We recommend configuring the system before installing the NVR and
cameras in the final location.
Set the time, date and time zone
Network test
The system will start an automatic check of the network parameters. In case
of an error, click on the Network button, check the DHCP option or enter the
parameters manually.

7User manual
English
Quick set
Quickly add and configure cameras.
Add cameras interface
1. Select the communication protocol between the NVR and the cameras.
Options: NETIP, ONVIF, Full Netcom.
2. Search. Press the Search key to search for cameras connected to the same
router (same network) as the NVR.
3. Add. From the list of displayed cameras, select the desired cameras and
click Add to add them to the system.
4. Network. Configure network parameters for cameras (IP address, gateway,
etc.)
5. Quick set. Quick addition and configuration of cameras.
6. IP Bulk Modify. Quick change of IP to multiple cameras .
Channels interface
1. Delete. Delete the camera from the selected channel. Click Apply to run.
2.Clear. Delete the information on the selected channel. Click Apply to run.

User manual 8
English
3. Encode. Displays the technical parameters of the connected cameras
(resolution, frame rate, video compression, quality, etc.).
4. Edit devices. Change IP and port for the selected channel.
5. Bulk upgrade. Firmware update for selected cameras.
6. Network detect. Cloud network and server testing and diagnostics.
7. Channel title. Rename cameras.
8. NVR Network. Configure NVR network parameters.
9. Close adaptive. Disables the IP adaptation function for the selected cameras.

9User manual
English
Install mobile app
Scan the QR code for installing the XMEye mobile application and the code
for adding the system to the application.
Human detect
Activate and configure the human detection function.

User manual 10
English
Click Next and OK to exit the quick setup guide.
The menu
In the main preview interface, right-
click with the mouse to access the
menu.
Main Menu
Options: Record, Alarm, System, Advanced, Info, Logout.

11 User manual
English
Record
Options: Record config, Playback, Backup.
Record Conf.
The interface allows the following settings: duration of a recording file,
recording mode (programmed or manual), period (day and time interval) and
recording type (normal recording, motion detection and alarm) .

User manual 12
English
Playback
The system oers numerous filters and options for identifying the desired
registration file. You can search by channel number, date and time interval or
by file type.
Backup
The USB memory or external HDD must be installed in the NVR before
starting the backup. Press the Detect button to identify the storage device,
then the Backup button to perform the backup.

13 User manual
English
Alarm
Options: Intelligent Alert, Video Blind, Video Loss, Alarm input, Alarm
Output, Abnormality, Human detect, Face detection.
Intelligent Alert
Activate the function, select the channel, the level of sensitivity to motion, the
period and the behavior of the system in case of motion detection: send email,
upload the registration on an FTP server or send notification in the mobile
application.

User manual 14
English
Video blind and Video loss
Activate the function, select the channel, sensitivity level, period and behavior
of the system in case of missing image or missing video signal: send email,
upload the registration on an FTP server or send notification in the mobile
application.

15 User manual
English
Alarm input
The function is only useful when the surveillance system is connected to an
alarm system.
Alarm output
The function is only useful when the surveillance system is connected to an
alarm system.
Abnormality
Set the system behavior in case of: storage device error, lack of space on the
storage device, lack of internet connection or IP conflict. In such situations you
can set the sending of a notification in the application or an email.

User manual 16
English
Human detect
Activate the function, select the channel, period and behavior of the system in
case of human detection: send email, upload the registration on an FTP server
or send notification in the mobile application.
Face detection
Activate the function, select the channel, period and behavior of the system in
case of face detection: send email or send notification in the mobile application.

17 User manual
English
System
Options: General, Encode, Network, NetService, Display, PTZ Config,
RS232, Tour, Digital, XVI settings.
General
Set the time zone, time and date, system display language, and duration of a
work session.

User manual 18
English
Encode
Displays the technical parameters of the connected cameras (resolution,
frame rate, video compression, quality, etc.).
Network
Manually set the network parameters (IP address, gateway, DNS, port, etc.)
or check the DHCP option for automatic parameter retrieval.
Note: For the settings to take eect, restart the system. Right click on the screen
- Logout - Reboot.

19 User manual
English
NetService
Make various settings, such as: the email address where to receive alerts, or the
FTP server where to send the system records.
Display
In the local preview mode can be displayed: time, channel name, recording
status, alarm status, transparency and display resolution. The maximum viewing
resolution supported by this device is 1920 x 1080px.
Note: Before changing the resolution, make sure that your monitor supports that
resolution. If the set resolution is higher than the resolution of your monitor, nothing
will appear on the monitor and you will not be able to access the menu. If this
happens, however, connect the NVR to a lower resolution monitor, access the menu,
and change the resolution.

User manual 20
English
PTZ Config
The settings can only be applied if you have connected PTZ cameras to the
NVR.
Tour
Activate the cyclic display of the cameras.
This manual suits for next models
1
Table of contents
Languages:
Other PNI DVR manuals