Epilady EP-720-01 User manual

713-666-4582
www.epiladyusa.com
FCC Compliance Statement
This device complies with Part 18 of the FCC Rules & Regulations. Operation is subject to the following
two conditions: (1) This device may not cause harmful interference and (2) this device must accept any
interference received, including interference that may cause undesired operation.
Covered by one or more of the following patents:
U.S. patent No. 9,364,684 B2 Additional patents pending.
©EpiladyUSA, Inc. 5250 Gulfton Street, Suite 4B, Houston,TX 77081 USA
All rights reserved. Epilaser, Epilady, and the Epilady logo are trademarks of EpiladyUSA, Inc.
United States
EPILADY CUSTOMER SUPPORT
Epilady Epilaser Hair Removal Laser for Home Use
Model EP-720-01
Instructions for Use

TABLE OF CONTENTS
SAFETY CHART - CHECK IF YOU CAN SAFELY USE THIS LASER
WHERE YOU CAN AND CANNOT USE THIS LASER
INTRODUCTION TO EPILASER & LASER HAIR REMOVAL
Congratulations on your new Epilaser!
How does laser hair removal work?
How long should my hair be?
What does it feel like when I laser a hair?
How long should I treat the area(s) I want to laser?
Read these instructions before using
Who should I contact if I have questions or concerns?
Epilaser has 4 safety features to ensure safe use
EPILADY EPILASER INTENDED USE (INDICATIONS)
WHO SHOULD NOT USE THE EPILASER (CONTRAINDICATIONS)
WARNINGS
BENEFITS & RISKS
GETTING TO KNOW YOUR EPILASER
Screen
Laser
1
2
3
3
3
4
4
4
4
4
5
7
8
9
11
13
13
14

EPILASER TREATMENT OVERVIEW
Before your First Treatment
Between Treatments
During your First 3 Months
After 3 Months
SPOT TEST INSTRUCTIONS
CHARGING THE SCREEN & LASER
Charging the Screen
Charging the Laser
EPILASER TREATMENT INSTRUCTIONS
CARING FOR YOUR EPILASER
Cleaning the Laser
Cleaning the Screen
Recharge Every 3 Months for Long-Term Storage
Recycling/Disposal
TROUBLESHOOTING
LIMITED WARRANTY
TECHNICAL SPECIFICATIONS
TREATMENT JOURNAL
15
15
15
15
15
16
17
17
18
19
25
25
25
26
26
27
31
33
34
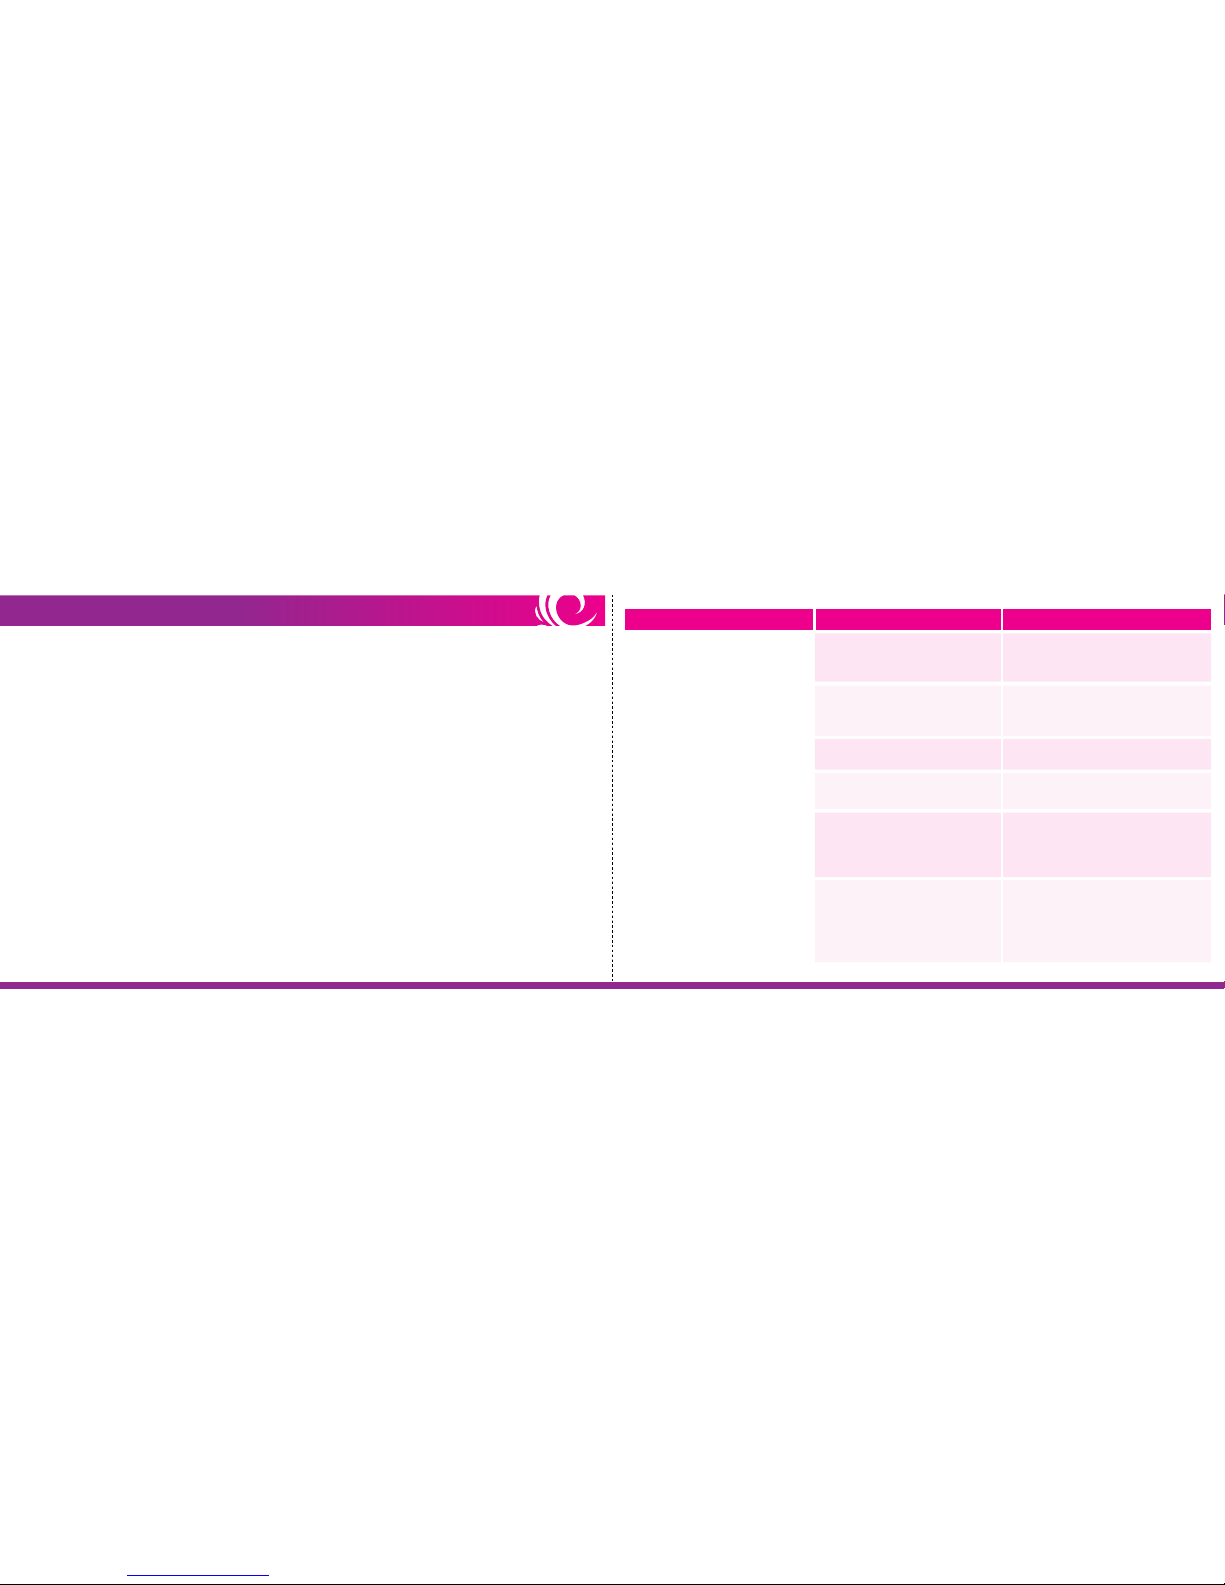
Date Treatment Area Number of Pulses
35

1
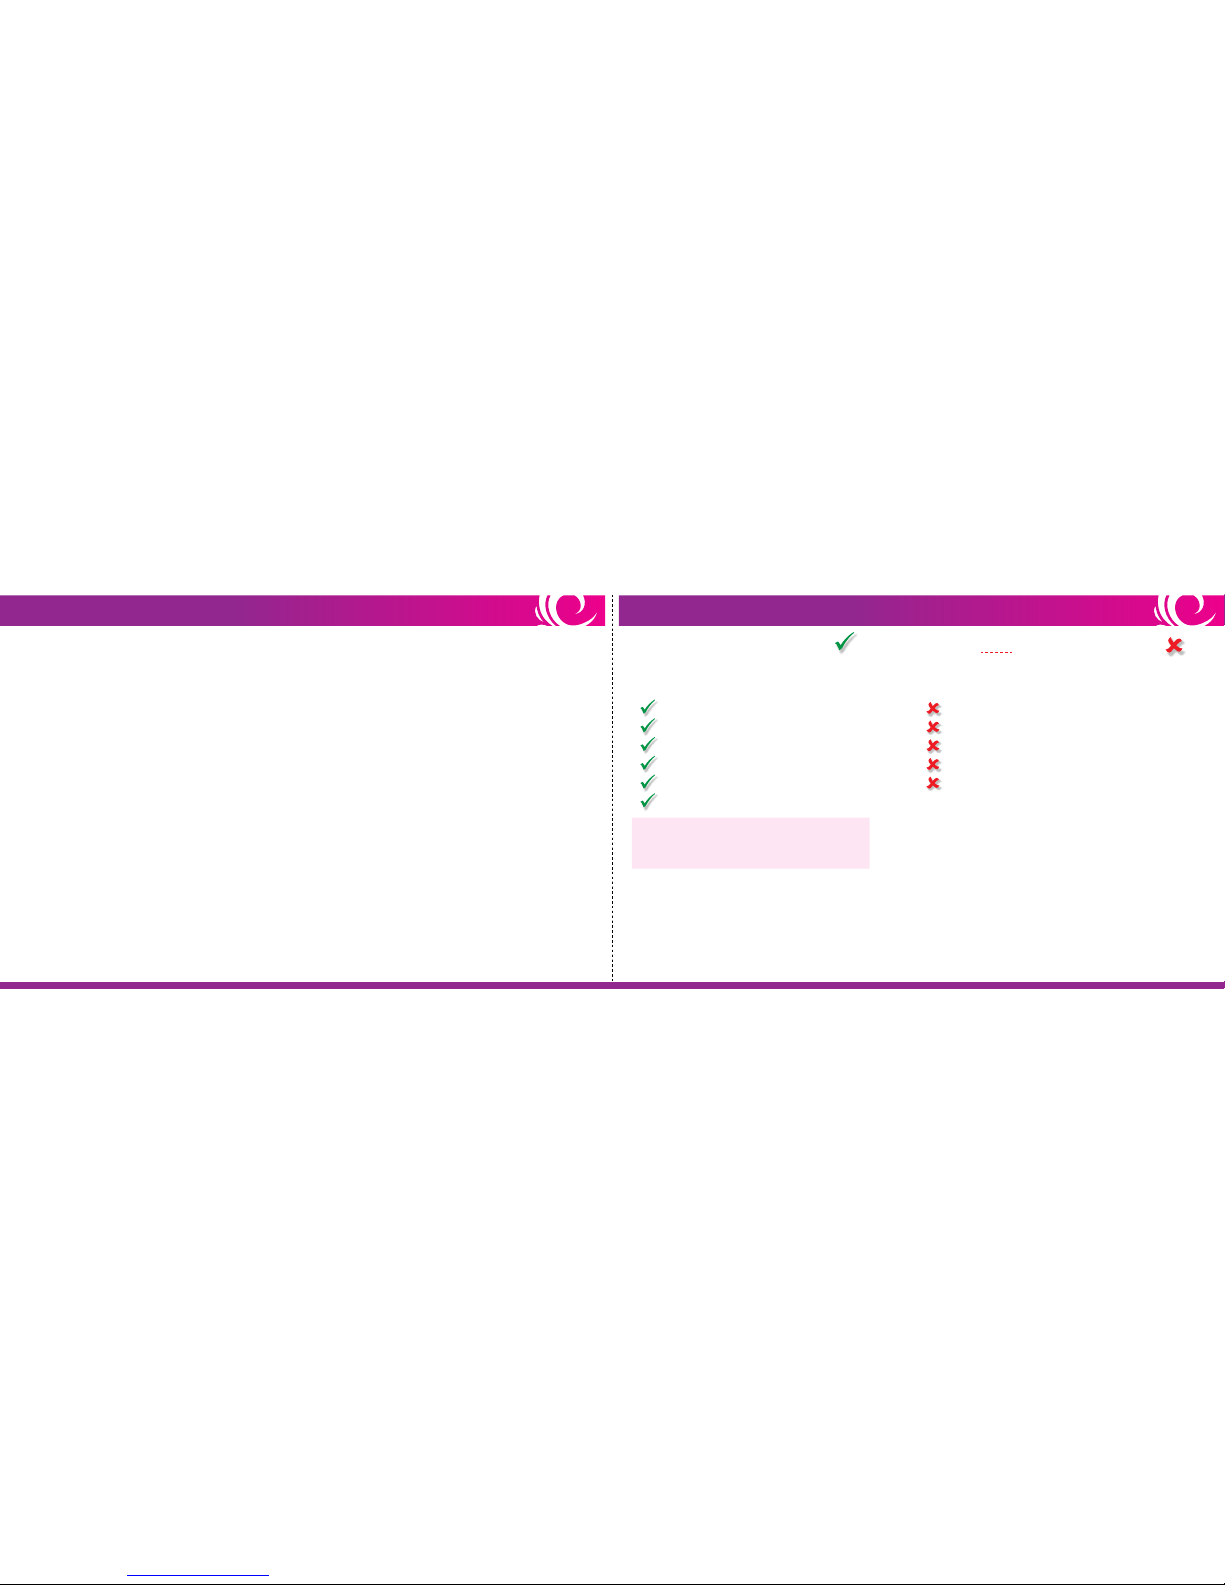
Match your skin tone of the area(s) you wish to treat to the skin tones shown below to determine if you can safely
use this laser. The Epilady Epilaser is intended for use only onType I (white) to Type IV (light brown) skin tones.
Use the table below to keep track of your Epilaser treatments.
IMPORTANT: DO NOT use the Epilaser if your treatment area skin tone matches Type V (medium brown)
or Type VI (dark brown/black). Dark skin may absorb too much laser light, which can injure the skin.
Check your Skin Tone
2
The Epilaser works best on naturally dark hair (black, dark brown, medium brown, or light brown). Epilaser
will operate, but will not be eective on white, gray, blonde, or red body hair.
Check your Hair Color
1 34
SAFETY CHART : CHECK IF YOU CAN SAFELY USE THIS LASER TREATMENT JOURNAL
Type I
(White)
Black White Gray Blonde RedDark Brown Medium Brown Light Brown
Type II
(Ivory)
Type III
(Beige)
Type IV
(Light Brown)
Type V
(Medium Brown)
Type VI
(Dark Brown/Black)
Date Treatment Area Number of Pulses
NOT SAFE
Laser Type: Diode laser
Laser class: 1M
Output wavelength: 808 +/- 20% nm
Output uence: 24 J/cm2
Power adaptor input: 100-240V, 50-60Hz, 0.5A
Power adaptor output: 5.0V DC, 2.0A
Microscope camera area magnication: Approximately 25x
WHERE TO USE THIS LASER
Epilaser can be used on the following areas
of the body:
Women’s Facial Hair (cheeks and below)
Underarms
Hands and Feet
Bikini Line
Arms and Legs*
Back*
33 2
Eye Areas (eyes, eyebrows, and eyelashes)
Ears
Nipples
Genitals
Anus
* NOTE: Epilaser works best with small areas of body
hair growth (e.g., face). If used on larger areas (e.g.,
legs) the treatment time will be longer.
WHERE NOT TO USE THIS LASER
Epilaser is not safe for use on the following
areas of the body:
TECHNICAL SPECIFICATIONS WHERE YOU CAN AND CANNOT USE THIS LASER

The Epilady Epilaser gives you long-lasting hair removal results at home, unlike temporary solutions such as
shaving and waxing. The Epilaser works in the same way as professional laser hair removal. It treats the hair
follicle, not just the hair, giving you permanent hair reduction after a series of treatments.
Congratulations on your new Epilaser!
The Epilaser emits a pulse of laser light, which heats the dark pigment inside the hair and deactivates the
hair-producing follicle.This is what allows Epilaser to provide permanent results and is why it only works on
naturally dark hair (black, dark brown, medium brown, or light brown). To be most eective, the Epilaser
needs to treat each hair follicle during its active growth period. Hair grows in cycles, so multiple treatments
will be necessary.
The main advantage of the Epilaser system is that its beam size is only 1 mm² (0.04 inches²), thus only
treating the area in immediate proximity to the hair follicle. This prevents exposing large areas of skin to
unnecessary laser light, allowing you to focus eorts on the actual hairs and not the surrounding skin.
The built-in microscope video camera magnies the visible skin area on a screen, allowing you to examine
your skin closely and choose the individual hair you intend to treat. By sliding the Epilaser over the skin,
treatment is easy and convenient, and best of all, you can treat your skin in the comfort of your own home
whenever you want.
How does laser hair removal work?
3 32
INTRODUCTION TO EPILASER & LASER HAIR REMOVAL
DO NOT return your product to the seller if you need service.
If your Epilaser needs service before the 1-year warranty period expires, contact EpiladyUSA Customer Support.
We will issue you a Return Authorization (RA) number to send in your Epilaser for repair/replacement.
DO NOT send in your Epilaser without obtaining an RA number rst. It will not be serviced and may get lost.
If we discover a defect covered by the warranty, our service department will determine the cause of the issue and
repair/replace your product accordingly.
If we nd that the defect in your Epilaser is not covered under this limited warranty, we will notify you about the
service alternatives that are available on a fee basis.
If we nd that your Epilaser is not defective, we will notify you and return your Epilaser to you.
All limited warranty services must be authorized and performed by EpiladyUSA, Inc.
Service
EpiladyUSA, Inc. makes every eort to ensure that its products are manufactured without any defects.
However, in the rare event of a defect due to faulty workmanship or materials, we guarantee the repair or
replacement of the product, or any part thereof, free of charge.
Warranty Limitations and Disclaimers
31 4
LIMITED WARRANTY
Treatment hairs must be visible at the time of treatment (as short as stubble to as long as 2mm (0.8 inches). Do not
treat any hair longer than 2mm (0.8 inches). Any hair too long or thick will burn.
How long should my hair be?
Who should I contact if I have questions or concerns?
The sensation varies, depending on the person and the treatment area. You may feel nothing, or you may experience
a warm, prickling sensation. Some users may experience mild redness that usually goes away within 24 hours.
What does it feel like when I laser a hair?
For best results, treat every 2 weeks for up to 3 months or until you are satised with the amount of hair reduction.
How long should I treat the area(s) I want to laser?
This guarantee is granted to the original purchaser only and is valid for one year from the date of
purchase. Proof of purchase must be presented for warranty service.
This guarantee is not extended for any period during which the Epilaser (or any part thereof) is in
repair or if your Epilaser is replaced by Epilady during the warranty period.
This guarantee is only valid for products purchased from authorized retailers or directly from Epilady.
This guarantee is only valid for products purchased in the United States of America and its territories.
This guarantee does not apply if the product is altered, repaired, or otherwise tampered with by
unauthorized persons. This guarantee does not apply if the product is used other than in accordance
with the manufacturer’s instructions. This guarantee does not apply if the product is dropped or
otherwise damaged by the user.
We recommend saving these instructions for future reference. Before you use your new Epilaser read this
instruction manual to:
Determine if the Epilaser is safe for you to use (see page 1).
Learn how to correctly use the Epilaser (see pages 19-24).
Review the contraindications (see page 8) and warnings and safety information (see page 9-10).
This Warning Symbol appears next to information about possible safety risks.
Read our Treatment Tips for best results (see page 23).
Read these instructions before using
5 30
Safety Key - The safety key must be physically inserted into the laser to function.
Laser Button - To prevent accidental use the laser button must be pressed for 2 seconds to turn on the laser.
Skin Contact Sensor - The laser treatment window must be in full contact with the skin in order for the laser
to operate. It will deactivate the laser when not in full contact with the skin.
Skin Tone Sensor - A built-in skin tone sensor will deactivate the laser when used with skin tones that are too
dark and“Not Safe”(TypesV and VI, see chart on page 1).
All 4 of these conditions must be met in order for the Epilaser to operate.
Epilaser Safety Features
Your Problem It’s Possible that... What you should do
My Epilaser was working
properly, but then it stopped
working. The screen is o and
does not turn on even when I
press the power button.
The battery needs to be charged. Charge your Epilaser (see page 18).
1
2
3
4

29 6
Your Problem It’s Possible that... What you should do
Everything is connected
correctly, but the laser will
not emit a pulse.
The safety key is not inserted. Insert the safety key into the laser
(see page 19).
The laser has not been turned on. Press the laser button for 2 seconds
until the indicator light at the
bottom of the laser turns green
(see page 21).
The skin tone sensor detects a
skin tone that is determined as
“Not Safe.”
The skin tone in the area to be
treated is too dark to be suited for
laser treatment.
The treatment window isn’t
completely in contact with your
skin.
Conrm that the treatment
window is completely at against
your skin (see page 22).
EPILASER’S 4 SAFETY FEATURES
Skin Contact Sensor Laser Button Safety Key (Shown Inserted)
Skin Tone Sensor
7 28
EPILADY EPILASER INTENDED USE (INDICATIONS) Your Problem It’s Possible that... What you should do
When I put my Epilaser against
my skin, I don’t see anything
on the screen.
The laser is not turned on. Press the laser button for 2 seconds
until the indicator light at the bottom
of the laser turns green (see page 21).
The charger cable is not
connected properly.
Conrm that the laser is connected to
the screen with the micro-USB cable
supplied with the Epilaser kit.
The clear protective cap is still on
the laser.
Remove the clear cap.
The safety key is not inserted. Insert the safety key into the laser
(see page 19).
The treatment window isn’t
completely in contact with your
skin.
Make sure that the treatment
window is completely at against
your skin. Remove clear cap if it is
still on.
The area you’re trying to treat is
too small, curved, or bony to treat.
Try again, pulling the skin at. If you
can’t get the whole treatment
window to touch the treatment
area, then the Epilaser won’t work
on that area.
The Epilady Epilaser is used to remove unwanted hair. It is an over-the-counter device intended for adjunctive
(combined) use with shaving for sustained hair removal with periodic treatments.
It is also intended for permanent reduction in hair regrowth (dened as long-term, stable reduction in the
number of hairs regrowing) when measured out to 6, 9, and 12 months after the completion of the treatment
regimen.
It is intended for use only on light to medium skin tones (see the Skin Tone Safety Chart on page 1) and
naturally dark hair. The Epilaser will operate, but will not be eective on white, gray, blonde, or red hair.

27 8
TROUBLESHOOTING
Your Problem It’s Possible that... What you should do
My Epilaser won’t turn on. Your Epilaser is not connected
properly.
Make sure the charger cable is
connected properly (see page 20).
While I’m charging my
Epilaser, the battery
indicator on the display
doesn’t “ll up.”
Your Epilaser is not connected
properly.
Your Epilaser is already fully
charged and ready to use.
Conrm that:
Even after I charge my
Epilaser, the battery
indicator is still“lling up.”
Your Epilaser isn’t fully charged. Charge your Epilaser(see page 18).
Unplug the power adaptor from the
wall and from the screen.
You are using the adaptor
supplied with the Epilaser kit.
Your screen is rmly plugged
into the adaptor.
The adaptor is plugged into a
wall outlet that is working.
Your Epilaser is not charged. Charge your Epilaser(see page 18).
Please call EpiladyUSA Customer Support at 713-666-4582for additional help. DO NOT use the Epilaser if your skin tone matches one listed as“Not Safe”on
the Skin Tone Safety Chart (see page 1). If you use the Epilaser on medium brown,
dark brown, or black skin tones—all indicated as“Not Safe”for treatment—the skin
may absorb too much laser light, resulting in burning, discoloring, or scarring.
DO NOT use the Epilaser if you are under the age of 18. Do not use the Epilaser
on anyone else under the age of 18. The use of the Epilaser on or by children under
the age of 18 has not been studied and could result in serious injury.
DO NOT use the Epilaser if you have a lighter hair color, such as blonde, white,
red, or gray. For the laser to work, you must have naturally dark hair in the area to
be treated. Lighter hair pigments will not absorb enough of the laser’s energy to
deactivate the hair follicle.
NOTE: The Epilaser is equipped with a built-in skin sensor. If the sensor determines that
your skin tone is“Not Safe,” it will not give the treatment.
WHO SHOULD NOT USE THE EPILASER (CONTRAINDICATIONS)
Not Safe Skin Tones:
Type V and Type VI
Under 18
Blonde, White,
Red, or Gray Hair

9 26
WARNINGS
On or around the eyes, eyebrows, or eyelashes. Doing so may cause permanent eye injury.
Anywhere on or around the forehead, temples, nostrils, ears, nipples, genitals, or around the anus.
These areas may have more sensitive skin, a darker skin tone, and/or a greater hair density, and using the
Epilaser there may cause skin injury.
On parts of your skin that are darker than your usual skin tone: tattoos, dark brown or black spots (such
as large freckles, birthmarks, or moles), tanned skin, or skin that is red or swollen. Dark skin may absorb
too much laser light, which can injure the skin.
On damaged skin including open wounds, cold sores, sunburns, or areas where you have had a skin peel
or other skin resurfacing procedure within the last 6-8 weeks (check with your doctor). These conditions
can make the skin more susceptible to injury.
On any area where you may someday want your hair to grow back. The results may be permanent and
irreversible.
DO NOT use the Epilaser on the following areas of your body:
If you do not plan on using your Epilaser for a long period of time, we recommend that you recharge the laser
every 3 months to maintain the life of the battery. Refer to the charging instructions on pages 17-18.
Recharge Every 3 Months for Long-Term Storage
The Epilaser laser and screen contain rechargeable batteries. To recycle or dispose of these components,
please follow your local regulations or contact EpiladyUSA Customer Support for information.
Recycling/Disposal
If you have African, Indian, Native American, or Pacic Island heritage, you may have a skin tone that is
not suitable – be sure to check the Skin Tone Safety Chart on page 1. Darker skin tones may absorb too
much laser light, which can injure the skin.
DO NOT use the Epilaser if the Skin Tone Safety Chart shows that your
skin tone is identied as “Not Safe.”
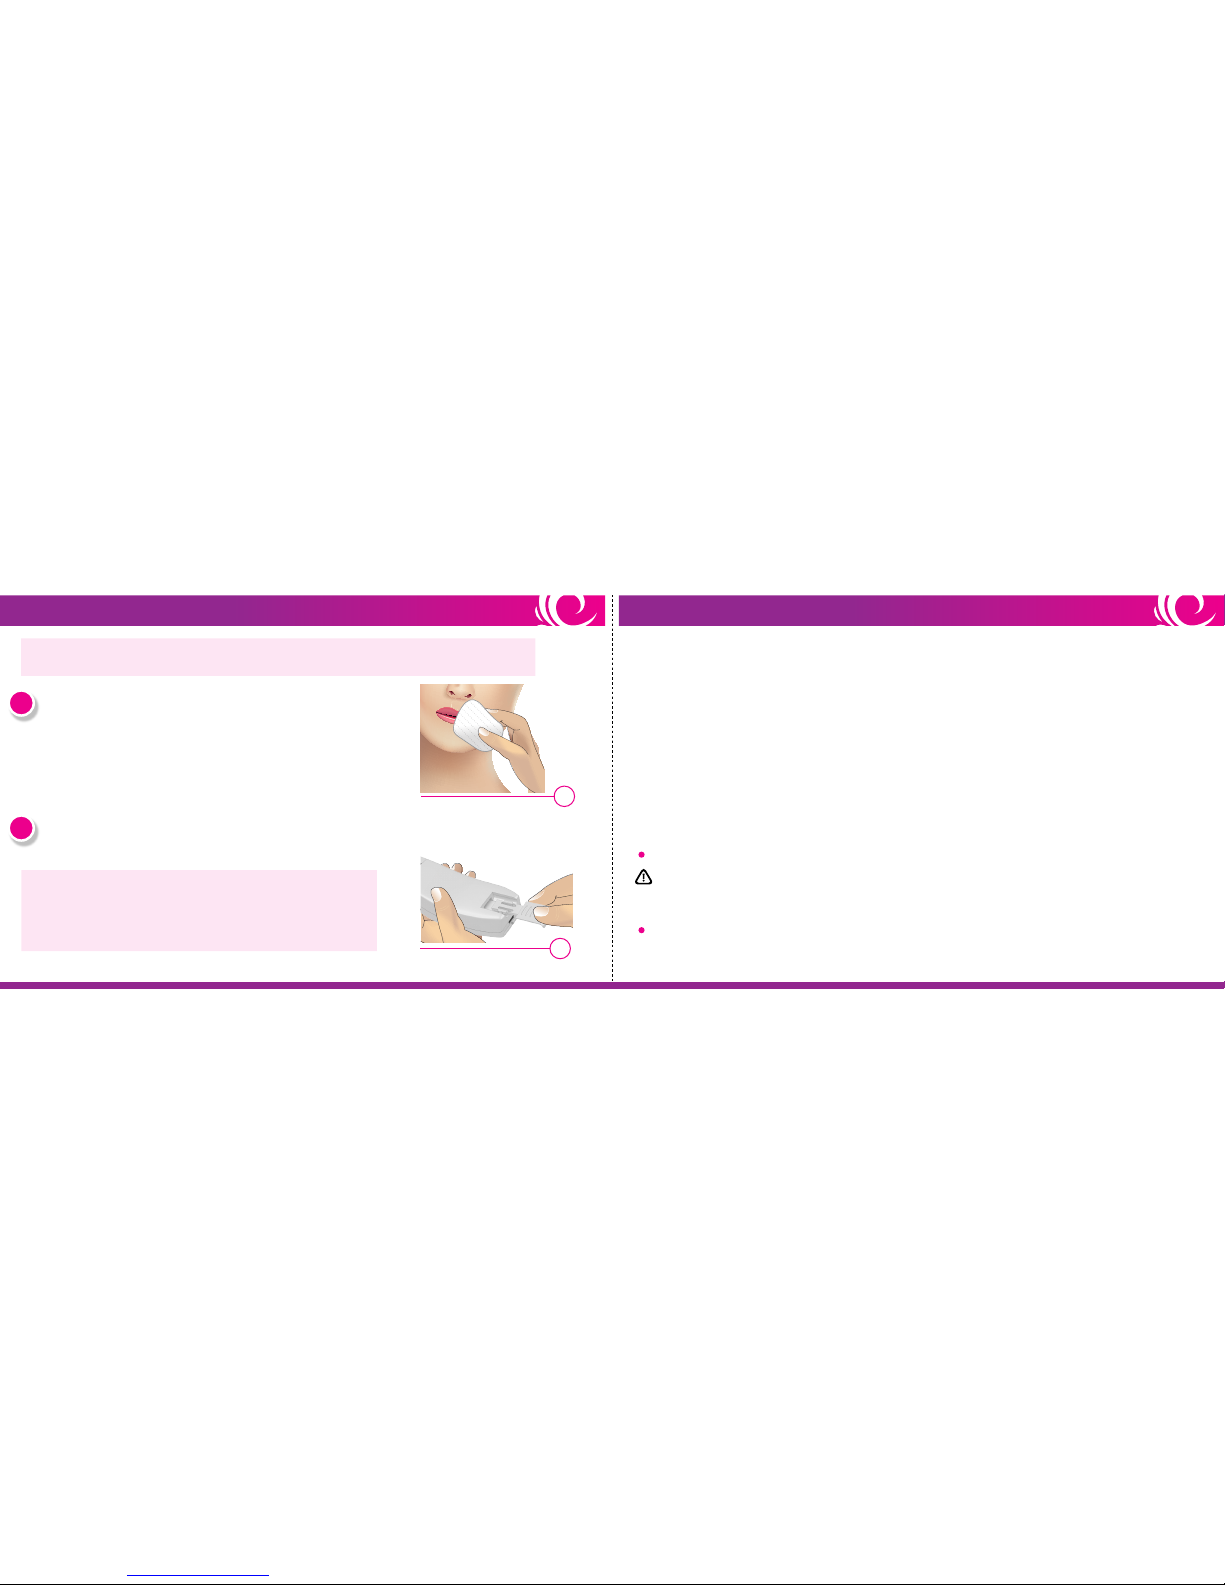
Cleaning the Screen
1. Wipe the screen with a soft cloth only.

25 10
CARING FOR YOUR EPILASER
DO NOT clean any part of the Epilaser kit with soap and water.
Cleaning the Laser
DO NOT insert anything into the treatment window opening or
any other part of the laser.
DO NOT get the Epilaser or power adaptor damp or wet.
The Epilaser doesn’t require special care, but we do recommend that you keep it clean, especially the
treatment window and the screen.
If wet, do not use the Epilaser or the power adaptor. Call Epilady USA Customer Support. Performing a
treatment with a wet Epilaser (or component) can cause electrocution or electric shock.
DO NOT use the Epilaser if you are pregnant or breastfeeding.
Hair removal by laser can cause increased hair growth in some individuals. Based on currently available data,
the highest risk groups for this response are females of Mediterranean, Middle Eastern, and South Asian
heritage, treated on the face and neck.
Always follow the basic safety precautions for electrical devices:
DO NOT get the Epilaser, the cable(s), the screen, or the power adaptor damp or wet.
DO NOT use the Epilaser while bathing or place it near a tub or a sink.
DO NOT use a power adaptor with a damaged plug or cord.
ALWAYS keep the cord away from heated surfaces. Failure to follow these precautions can cause
electrocution or electric shock.
These actions increase the risk of skin or eye injury. Please contact EpiladyUSA Customer Support for
assistance if your Epilaser appears to be damaged.
The Epilaser has not been tested on pregnant women. Hormonal changes could increase skin sensitivity and
the risk of skin injury.
DO NOT point the laser at your eyes.
The laser could cause permanent and irreversible damage.
DO NOT use the Epilaser for any purpose other than hair removal.
DO NOT drop the Epilaser or any of its components, as this may damage
the device.
DO NOT use the Epilaser if it appears to be damaged. DO NOT attempt to
open or repair the Epilaser.
1. Turn OFF the Epilaser and uplug the power adaptor from the Epilaser and the electrical outlet.
2. Clean the laser by gently wiping it with an alcohol wipe.
Focus on the areas that have touched your skin, especially around the treatment window.
Take care to avoid damaging the interior of the treatment window.
11 24
BENEFITS & RISKS
Benets
When used as directed, the Epilaser is an over-the-counter device for personal use that provides permanent
hair reduction. The results vary from person-to-person and depend on which body area is treated and how
closely treatment instructions are followed.
Risks
It is important to use the Epilaser properly. Make sure that you understand and follow all warnings and
instructions. The skin tone sensor will not allow the laser to re if you try to use the Epilaser on skin tones
designated as“Not Safe”(see page 1).
If you use the Epilaser as directed, the risks are low.
You may experience mild to moderate pain or discomfort during the initial treatments, with a reduction
in sensitivity over time. This is normal. You may feel warmth, burning, tingling, or itching. If the pain is
too intense or persists after a treatment, stop using the Epilaser and check with your doctor before using
it again.
Your skin may become red directly following treatment or within 24 hours. This redness generally clears
up within a few hours. See your doctor if the redness does not go away within 2-3 days.
In rare cases, some users may see an increase in the number of hairs in the treated area after the initial
treatment. If this increase persists over several treatments, stop using the Epilaser and see your doctor.
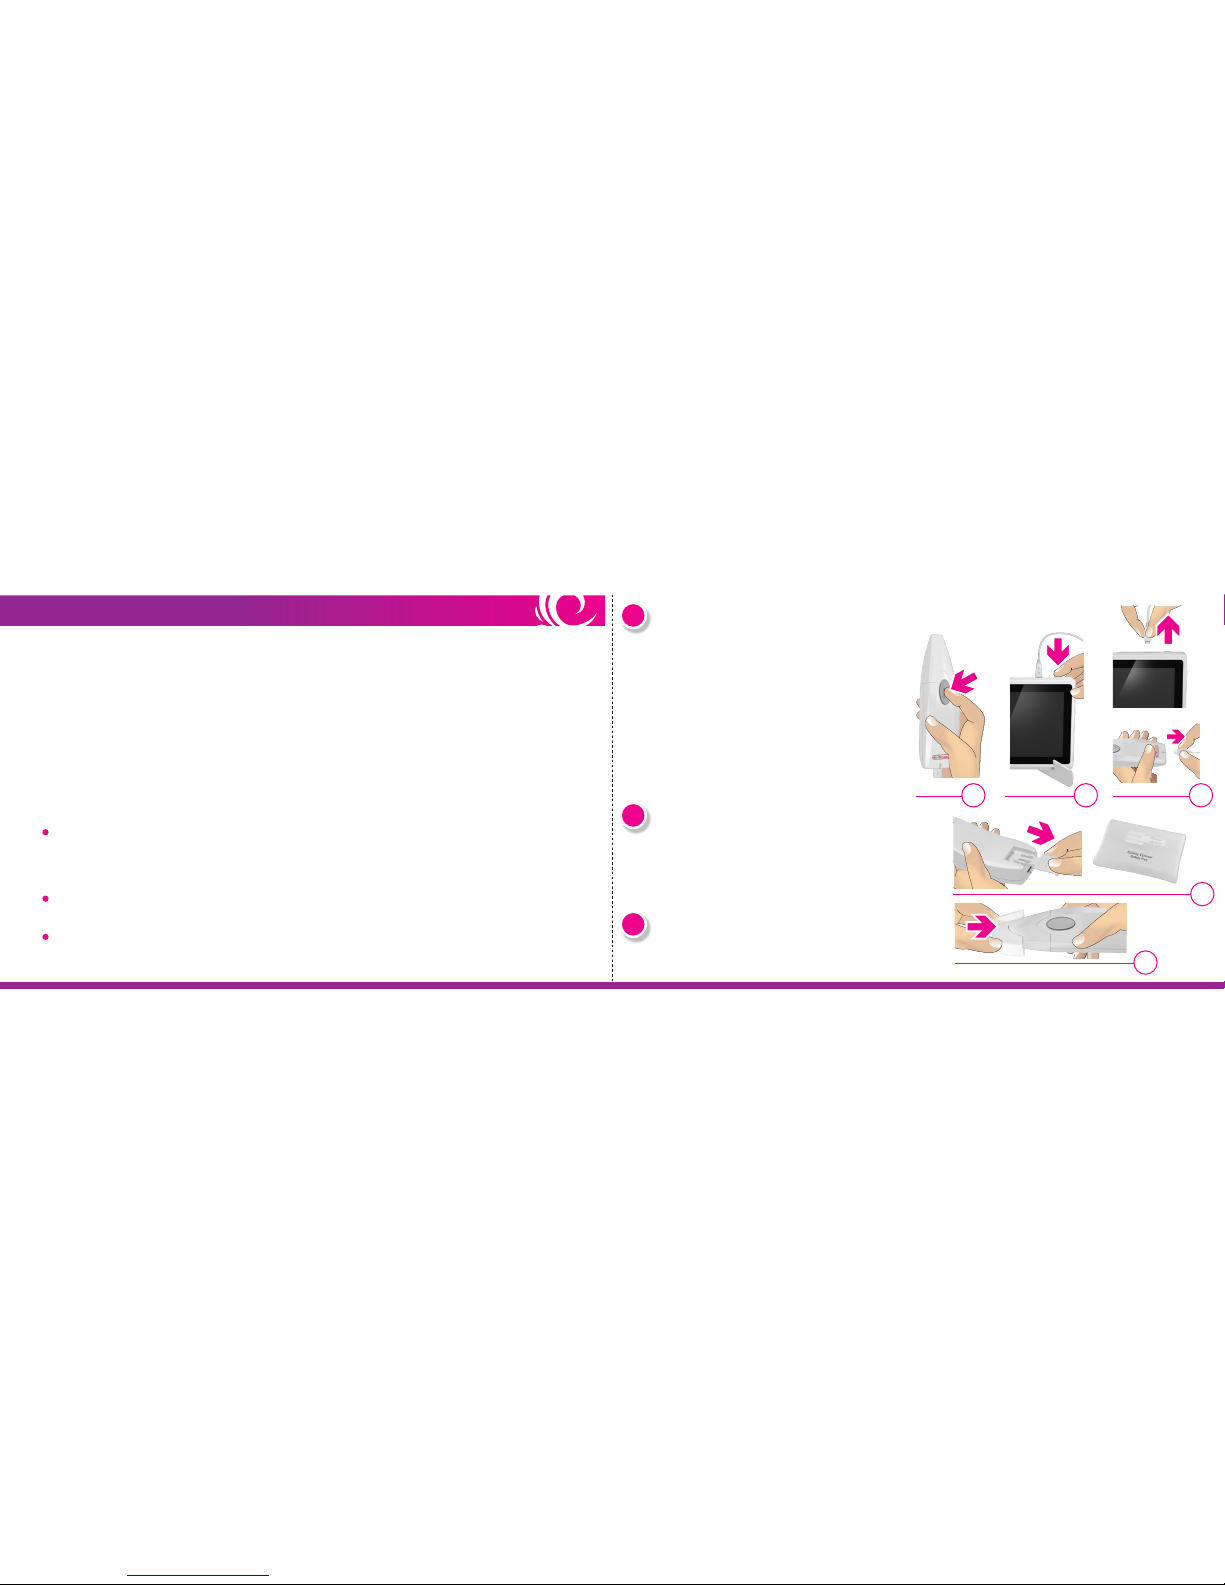
10
10a: Hold down the laser button for 2 seconds to turn
o the laser. The indicator light at the bottom of
the laser will turn red to let you know the laser is
o.
10b: Hold down the power button on the top of the
screen for 10 seconds to turn o the screen.
10c: Unplug the charger cable from the laser and
screen for storage.
Turn O Epilaser and Screen when Done with Treatment
11
After use, always remove the safety key. Store the
key in a dierent place from the laser to prevent
unauthorized use, such as by children under the
age of 18.
Remove Safety Key
12
Put the clear cap back on the end of the laser over
the treatment window.
Replace Clear Cap
10a 10b 10c
11
Unplug Charger Cables
12

23 12
9
After treating one hair, shift and reposition the treatment window in the area until you have located another
hair you want to treat. Follow step 8 (see page 22) for each hair you wish to treat.
The existing hair will eventfully fall out on its own. You may also remove the treated hair with tweezers
after treatment, if desired.
Using the Epilaser correctly takes some practice. At rst, it may take some time to correctly target and
treat the individual hairs. It may help to use two hands, or to rest your elbow on a at surface (table,
counter, etc.) for increased stability. Once you have developed your skills, treatment will become
easier– and you will even have some fun!
In order to help you to position the Epilaser correctly on your face, you may use a mirror. Sitting across
from the mirror will allow you to target the desired treatment area before you apply the Epilaser to
your skin. After a few uses, the mirror will no longer be necessary.
For best results, treat every 2 weeks for up to 3 months or until you see the desired results.
Reposition and Repeat for Next Hair
Treatment Tips
Will my hair fall out after treatment?
In rare cases, some users may experience skin-swelling, especially around the hair follicle. If the swelling
doesn’t go away within 2-3 days, stop using the Epilaser and see your doctor.
In rare cases, temporary or permanent skin discoloration may occur. Because of the small treatment area (1
mm² (0.04 inches²) – about the size of a pencil tip), any discoloration will be in a very small spot, and will
barely be noticeable. If your skin color changes, stop using the Epilaser and see your doctor.
In rare occasions, blisters may form on the treated area. This is very unlikely for people with a light or
medium skin tone. If you develop a blister, stop using the Epilaser and do not let the blister become infected.
Consult your doctor if needed.
NOTE: Laser hair treatment does not immediately remove the treated hair(s).The intended result is that the hair follicle will be
deactivated upon impact and will not grow a new hair.
8
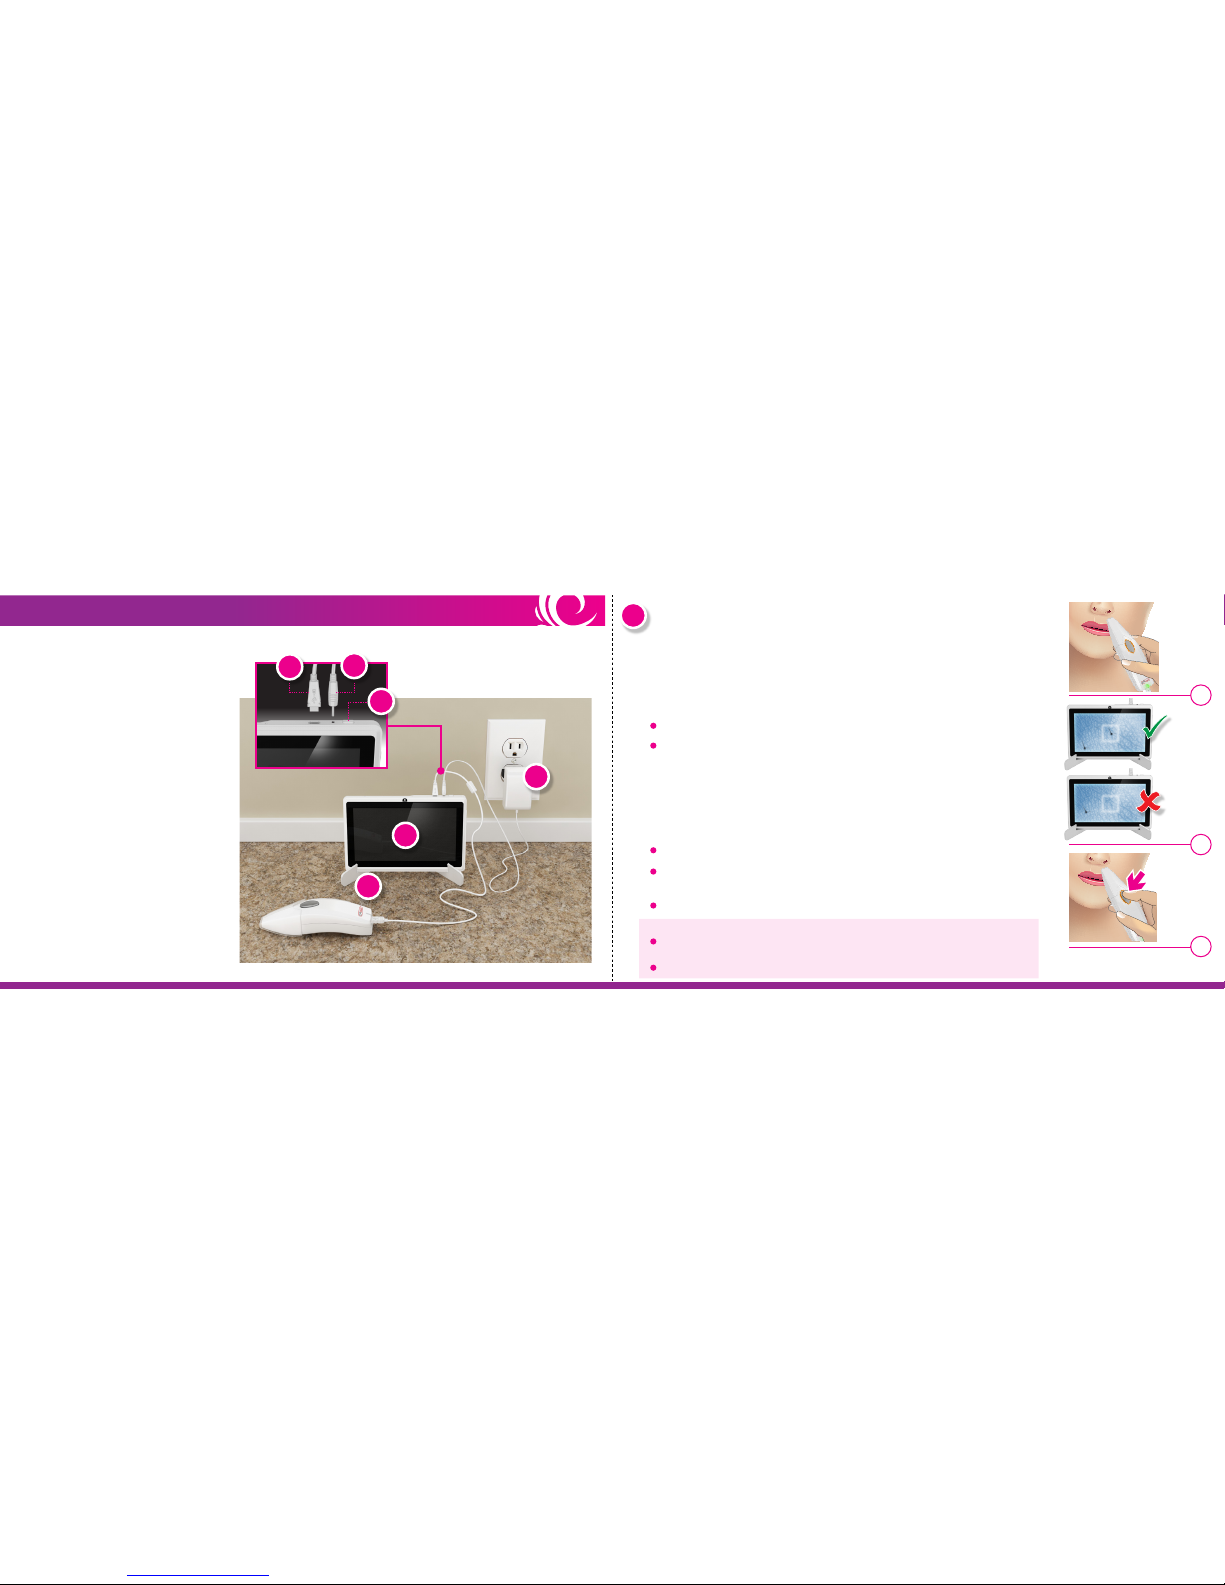
8a: Press the treatment window fully against your skin on the area you want to treat.
If the skin tone sensor detects that the skin is “Not Safe”the laser will not give the
treatment.
8b: When you have good contact with the skin, you should see a white fuzzy target
box in the center of the screen to indicate the treatment area.
8c: When the laser is in a good position, the light around the laser button will be
orange, as shown.
8d: Hold the laser steady against the skin and briey press the laser button only one
time.
Gently position the hair to be treated anywhere inside the target box.
DO NOT lift up. You must keep full contact with the skin in order to see hair
on the screen.
The laser will emit 1 pulse.
The screen will quickly ash to let you know the treatment was successfully
delivered.
The light around the laser button will ash several times.
Target and Treat Hair
8a
8b
8c
NOTE the following when treating a hair:
If the laser button is pressed for several seconds, the laser might turn o. To turn it back on,
press and hold down the laser button for 2 seconds until the indicator light turns green.
After treatment, the hair will still be visible on the screen.
13 22
Example of hair
inside white
target box
Example of no hair
inside white
target box
Treat each hair
with only
one pulse
GETTING TO KNOW YOUR EPILASER
Screen
(A) Screen: Connects to the laser using
the charger cable. When the laser is
touching the skin the screen helps
you locate a hair.
(B) Power Button: Press to turn the
screen on and o.
(C) Power Adaptor: This cable is used
to charge the screen. The small
round end is plugged into the
small hole on the top of the screen.
The other end is plugged into a
wall outlet.
(D) Stand: Supports the screen during
treatment.
The Epilaser kit consists of 2 major components; the screen and the laser.
J
A
C
D
C
B

7a: Press and hold down the laser button for 2 seconds. The indicator
light at the bottom of the laser will turn green and a ring around the
laser button will quickly ash yellow to let you know the laser was
turned on.
7b: Once the laser is on, thetreatment window will emit a white beam of
light to let you know the Epilaser is ready for use. This is not the laser
beam. It is a light that allows the camera to see the skin. You can see
this light reected o your hand if you put the hand near the laser.
6
6a: Press and hold the power button on
the top of the screenfor 3 seconds.
6b: The screen will turn on and the
operating system will load. This may
take a few minutes. Once loaded,
you will see a white/gray blank
display on the screen.
Turn On Screen
7Turn On Laser
6a
7a 7b
6b
NOTE: If not used for 2 minutes the laser will automatically turn o.
21 14
Laser
(E) Treatment Window: The end of the laser that
must make contact with the skin and the area you
wish to laser. When the laser is on you will see a
white light shine from this end.
(F) Laser Button: Press to turn on and to deliver
treatment. The ring around the button will let you
know when the laser is on and has good contact
to deliver a treatment.
(G) Indicator Light: A light at the bottom of the laser
that lets you know the status of the laser.
(H) Safety Key: The key must be inserted into the
bottom of the laser in order to use the laser.
(I) Clear Cap: Covers the laser when not in use.
(J) Charger Cable: This cable has 2 ends:
Micro-USB end connects to the screen (J-1)
Mini-USB end connects to the laser (J-2)
I E F G H
J-1
Mini-USB to Laser
Flash yellow when
laser turned on
Orange when laser
is in good position
Blinking red = Charging Orange = Charge complete Green = Laser turned on
J-2
Micro-USB to screen
J-1
J-2
3
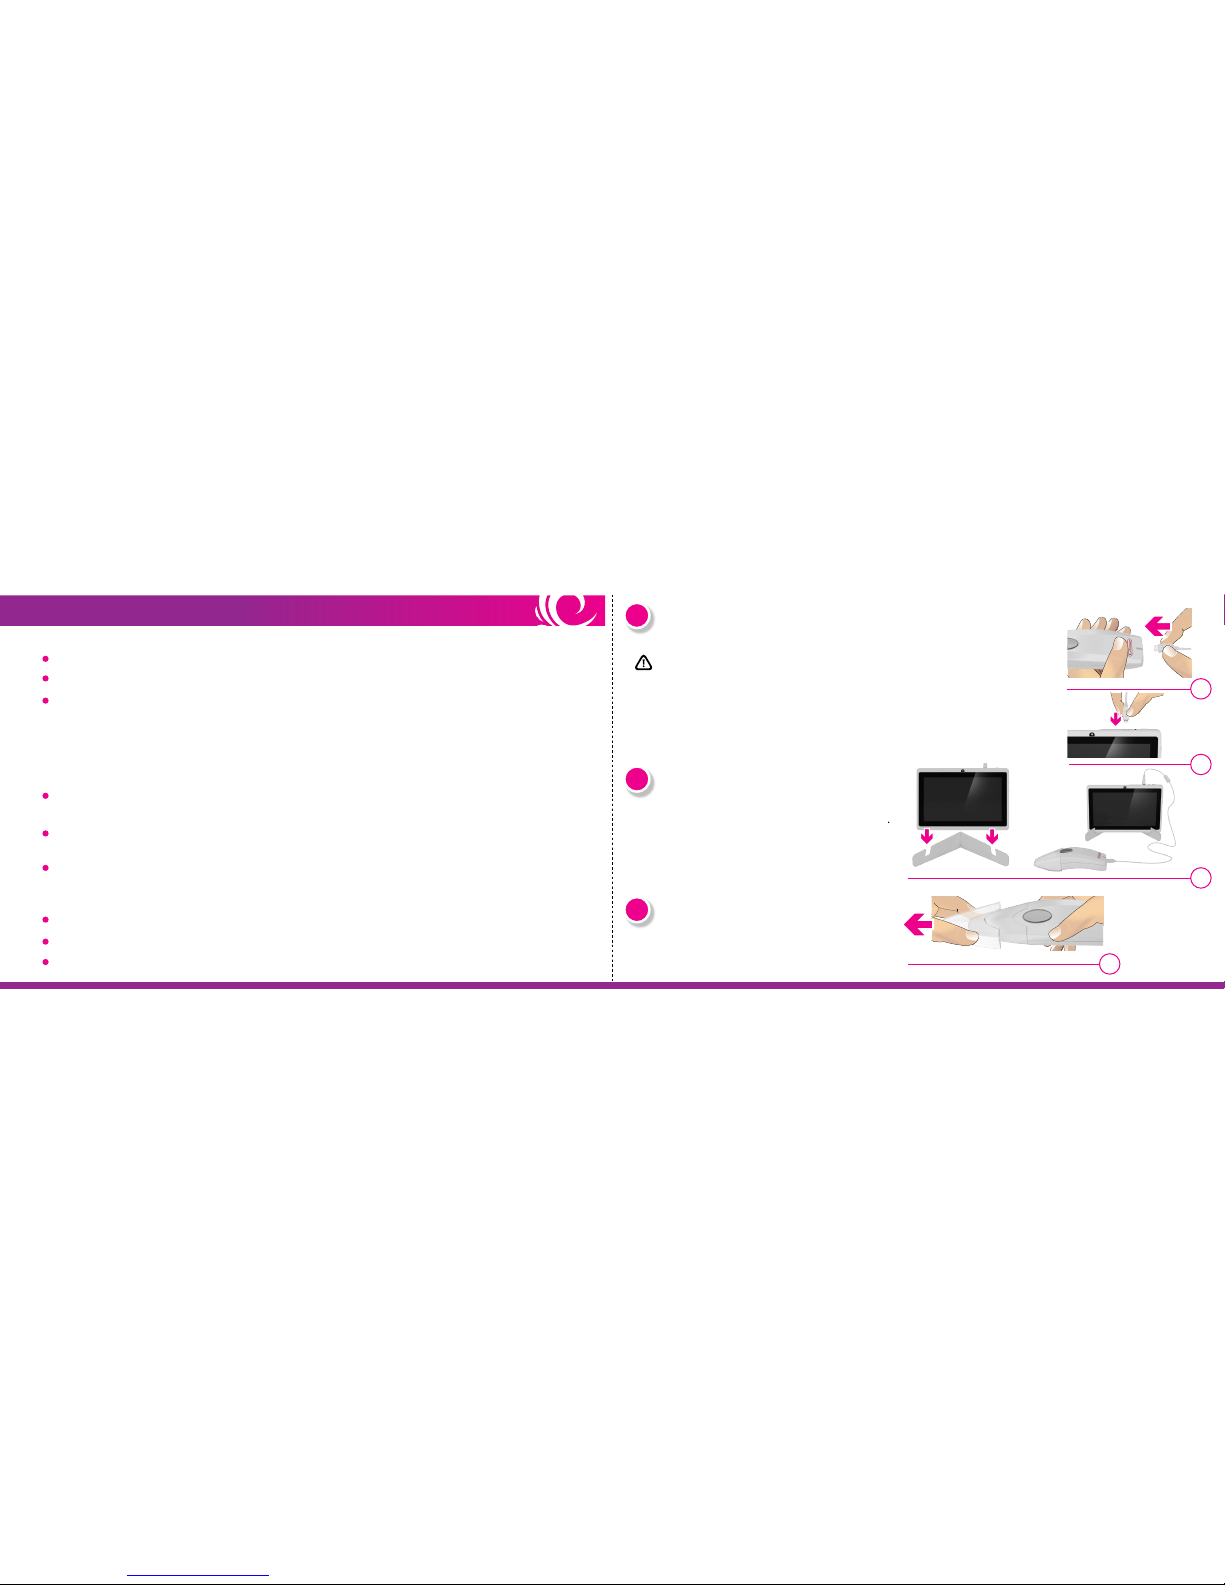
3a: If the screen is still connected to the power adaptor, disconnect it at this time.
3b: Connect the mini-USB end of the charger cable to the laser.
3c: Connect the other end (micro-USB) to the top of the screen as shown.
Connect Laser to Screen
DO NOT use the Epilaser while the screen is plugged into an
electrical outlet. 3b
4
5
15 20
3c
EPILASER TREATMENT OVERVIEW
Before your First Treatment
Between Treatments
4
Open up the stand and place the screen on the
stand with the power button on the top as shown.
Place Screen on Stand
5
Removethe clear protective cap from the laser.
Remove Clear Cap from Laser
6 weeks before your treatment, do not get a skin peel or other skin resurfacing procedure.
Fully charge the screen and the laser (see pages 17-18).
Perform 3 spot tests on the area you want to treat at least 1 day before treatment (see page 16).
During your First 3 Months
After your rst treatment there will be no visible change to the hair. Laser hair removal does not cause
hair to immediately fall out.
The treated hair will eventfully fall out on its own. You may also remove the treated hair with tweezers
after treatment, if desired.
With additional treatments there will be a gradual reduction in the number of hairs. The hair that does
regrow will also begin to lighten and become ner.
After your First 3 Months
Hair follicles that have been deactivated by the Epilaser will not grow back.
Perform occasional touch-ups or additional treatments if necessary.
For best results, treat every 2 weeks for 3 months or until you are satised with the amount of hair reduction.
Continue your normal hair removal routine (e.g., epilation, waxing, shaving) since the laser treatment does
not remove the hair immediately. This will not interfere with the laser’s functionality between treatments.
19 16
1
2
EPILASER TREATMENT INSTRUCTIONS
1
1a: Clean the treatment area. Remove all cosmetics, lotions, and
creams that may block the laser light.
1b: Dry the treatment area.
Prepare your Skin Spot Test Instructions
2
Insert the safety key into the laser by sliding it into place until it clicks.
Before your rst full treatment, we recommend doing 3 spot tests with the Epilaser on the area(s) you plan to
treat at least 1 day before.
1. Prepare your skin (see page 19).
2. Connect the Epilaser to the screen (see page 20).
3. Follow treatment instructions on pages 20-22 for treatment on one hair (rst laser pulse).
4. Shift the laser over within the treatment area and test with a second laser pulse.
5. Test up to 3 spots on the area you wish to treat.
6. Wait 24 hours and examine the tested spots:
If the skin appears normal, you may begin your rst treatment.
IMPORTANT: If you notice blistering, burns, changes in your skin tone, or any other side eects, DO
NOT USE your Epilaser. If needed, contact your doctor. If you are unsure about the outcome of the test,
do not use your Epilaser and contact EpiladyUSA Customer Support before continuing use.
If your skin tone changes dramatically retest the area.
Insert Safety Key into Laser
NOTE: Before every treatment check the charge of your Epilaser and screen. If the battery level is low, follow instructions on
pages 17-18 to charge the laser and screen.
NOTE: If the safety key is not inserted the laser will not operate. Always make
sure the safety key is inserted before continuing to step 3.
If the safety key is not inserted: You will still see your skin on the screen, but
will not see the white target treatment box, if you attempt to treat a hair
without the safety key inserted into the laser.
SPOT TEST INSTRUCTIONS

17 18
CHARGING THE SCREEN & LASER
IMPORTANT: The screen should never be connected to an electrical outlet while charging the laser.
Unplug the power cable from the screen (and electrical outlet) before charging the laser.
1.Connect the mini-USB end of the charger cable to the laser.
2. Connect the other end (micro-USB) to the top of the screen.
3. The laser will charge through the screen. The indicator light on
the bottom of the laser will blink red while the laser is
charging. When charged enough for use, but not fully
charged, the light will be solid red.
4. The charge is complete when the light at the bottom of the
laser turns orange. Once the laser is charged, unplug the
charger cable from the screen.
NOTE: It may take up to 4 hours for the screen to fully charge.
CHARGING NOTES:
Charging the Screen
Charging the Laser
Before your rst treatment and between treatments, charge the screen and laser.
1. Connect the included power adaptor to an
electrical outlet.
2. Connect the other end of the power adaptor
cable to the top of the screen.
3. A battery symbol will appear in the center of the
screen and will show it is“lling up”while the
screen is charging.
4. The screen will go into sleep mode while it is
charging. Push the power button on the top of the
screen for several seconds to wake up the screen and
check the battery level. Once fully charged, the
screen will stop charging and you will see the battery
icon lled green to let you know it is fully charged.
5. When fully charged, unplug the power adaptor from
the electrical outlet and the top of the screen.
The laser will begin to charge once connected to the screen.
If you have not used the Epilaser in several weeks, charge the screen
and laser. If you use the Epilaser frequently, charge as needed.
To prevent damage to your Epilaser, use only the included Epilaser
power adaptor, power cable, and charger cable. If you lose the
power adaptor, power cable, or charger cable, please contact
EpiladyUSA Customer Support.
Blinking Red = Charging
Orange = Charge complete
1
2
3
1
2
3
4
Table of contents
Other Epilady Measuring Instrument manuals


