epiphan Pearl-2 Rackmount User manual

Epiphan Pearl-2
Pearl-2 Rackmount
Pearl-2 Rackmount Twin
UserGuide
Release 4.8.0
April 22, 2019
UG115-14
© and ™ 2019, Epiphan Systems, Inc

ii
Terms and conditions
This document, the Epiphan web site, and the information contained therein, including but not limited to the text,
videos and images as well as Epiphan System Inc.’s trademarks, trade names and logos are the property of Epiphan
Systems Inc. and its affiliates and licensors, and are protected from unauthorized copying and dissemination by
Canadian copyright law, United States copyright law, trademark law, international conventions and other intellectual
property laws.
Epiphan, Epiphan Video, Epiphan Systems, Epiphan Systems Inc., and Epiphan logos are trademarks or registered
trademarks of Epiphan Systems Inc., in certain countries. All Epiphan product names and logos are trademarks or
registered trademarks of Epiphan. All other company and product names and logos may be trademarks or registered
trademarks of their respective owners in certain countries.
Copyright © 2019 Epiphan Systems Inc. All Rights Reserved.
THE SOFTWARE LICENSE AND LIMITED WARRANTY FOR THE ACCOMPANYING PRODUCT ARE SET FORTH IN THE
INFORMATION PACKET OR PRODUCT INSTALLATION SOFTWARE PACKAGE THAT SHIPPED WITH THE PRODUCT AND
ARE INCORPORATED HEREIN BY REFERENCE. IF YOU ARE UNABLE TO LOCATE THE SOFTWARE LICENSES OR LIMITED
WARRANTY, CONTACT YOUR EPIPHAN REPRESENTATIVE FOR A COPY.
PRODUCT DESCRIPTIONS AND SPECIFICATIONS REGARDING THE PRODUCTS IN THIS MANUAL ARE SUBJECT TO
CHANGE WITHOUT NOTICE. EPIPHAN PERIODICALLY ADDS OR UPDATES THE INFORMATION AND DOCUMENTS ON
ITS WEB SITE WITHOUT NOTICE. ALL STATEMENTS, INFORMATION AND RECOMMENDATIONS ARE BELIEVED TO BE
ACCURATE AT TIME OF WRITING BUT ARE PRESENTED WITHOUT WARRANTY OF ANY KIND, EXPRESS OR IMPLIED.
USERS MUST TAKE FULL RESPONSIBILITY FOR THEIR APPLICATION OF ANY PRODUCTS.
LIMITATION OF LIABILITY
UNDER NO CIRCUMSTANCES SHALL EPIPHAN BE LIABLE FOR ANY INCIDENTAL, SPECIAL, CONSEQUENTIAL,
EXEMPLARY OR OTHER INDIRECT DAMAGES THAT RESULT FROM THE USE OF, OR THE INABILITY TO USE, THIS
PRODUCT OR THE INFORMATION CONTAINED IN THIS DOCUMENT OR PROVIDED ON EPIPHAN’S WEB SITE, EVEN IF
EPIPHAN HAS BEEN ADVISED OF THE POSSIBILITY OF SUCH DAMAGES. IN NO EVENT SHALL EPIPHAN’S TOTAL
LIABILITY TO YOU FOR ALL DAMAGES, LOSSES, AND CAUSES OF ACTION RESULTING FROM YOUR USE OF THIS
PRODUCT, WHETHER IN CONTRACT, TORT (INCLUDING, BUT NOT LIMITED TO, NEGLIGENCE) OR OTHERWISE,
EXCEED THE AMOUNTS YOU PAID TO EPIPHAN DURING THE MOST RECENT THREE-MONTH PERIOD IN CONNECTION
WITH AMOUNTS WHICH YOU PAID FOR USING THIS PRODUCT.
INFORMATION AND DOCUMENTS, INCLUDING PRODUCT SPECIFICATIONS, PROVIDED IN THIS DOCUMENT OR THE
EPIPHAN WEB SITE ARE PROVIDED “AS IS”. SPECIFICALLY, BUT NOT WITHOUT LIMITATION, EPIPHAN DOES NOT
WARRANT THAT: (i) THE INFORMATION IS CORRECT, ACCURATE, RELIABLE OR COMPLETE; (ii) THE FUNCTIONS
CONTAINED ON THE EPIPHAN WEB SITE WILL BE UNINTERRUPTED OR ERROR-FREE; (iii) DEFECTS WILL BE
CORRECTED, OR (iv) THIS WEB SITE OR THE SERVER(S) THAT MAKES IT AVAILABLE ARE FREE OF VIRUSES OR OTHER
HARMFUL COMPONENTS. EPIPHAN SPECIFICALLY DISCLAIMS ALL REPRESENTATIONS, WARRANTIES, AND
CONDITIONS, EITHER EXPRESS, IMPLIED, STATUTORY, BY USAGE OF TRADE OR OTHERWISE INCLUDING BUT NOT
LIMITED TO ANY IMPLIED WARRANTIES OF MERCHANTABILITY, NON-INFRINGEMENT, TITLE, SATISFACTORY QUALITY
OR FITNESS FOR A PARTICULAR PURPOSE.
For additional terms and conditions, please refer to additional sections in this document.

iii
Thank you for choosing Epiphan!
At Epiphan Video (“Epiphan”), building reliable video systems with pro features that perform above your
expectations is our mission.
We value your feedback! Email us your suggestions and let us know how you think we're doing and where
you'd like to see our products improve: info@epiphan.com
Warranty
All Epiphan Systems products are provided with a 100% return to depot warranty for one year from the date
of purchase.
Technical support
Epiphan’s products are backed by our professional support team. You can reach our team several ways:
lEmail support@epiphan.com
lLive chat from our support site https://www.epiphan.com/support/
lPhone toll free at 1-877-599-6581 or call +1-613-599-6581
Gather as much information about your problem as you can before you contact us so we can help you better,
including:
lA description of the problem
lDetails about your video or audio source (type, connection, resolution, refresh rate, etc.)
lProduct serial number
lProduct firmware version (using the admin interface)
lProduct LED lights

iv
What's new in release 4.8.0?
Firmware 4.8.0 adds some exciting new features like NDI® support and a better live switching experience
using the touch screen. Important enhancements and changes like product registration for future update
eligibility are also included.
Firmware 4.8.0
NDI and NDI|HX support
NDI and NDI|HX support on Pearl-2 lets you receive multicast and unicast video from NDIsources over the
Gigabit Ethernet network. You can connect up to three 1920p@30 fps NDI inputs or one 4K NDI input if your
Pearl-2 system has the 4K feature add-on. Pearl-2 can unicast up to two 1920×1080 @ 30 fps NDI streams
simultaneously.
Hardware acceleration
A new hardware acceleration option improves the performance of RTSP inputs. Hardware acceleration is
enabled by default when you add a new RTSP input to Pearl-2.
Live switching improvement
The switching behavior has been improved when using the touch screen or Epiphan Live to switch between
different sources and layouts. When the standby feed is switched to go live, the feed that was live switches to
standby.
Audio inputs as playback audio sources for HDMI outputs
Now you can select an audio input as the audio source for playback on the HDMI outputs on Pearl-2, as well
as select audio from a configured channel.
Product registration
As of release 4.8.0, systems that are registered are eligible to receive firmware updates including great new
features and performance enhancements. You can register your Pearl-2 at any time from the Firmware
Upgrade page using the Admin panel.
Pairing to AV Studio changes
The procedure to pair Pearl-2 with AV Studio for remote login and control has changed.

v
Original Livestream and Wowza Cloud streaming presets
Integrated streaming presets for Original Livestream and the Wowza Cloud have been removed.

vi
Table of contents
What's new in release 4.8.0? iv
Table of contents vi
Start here 1
About this Guide 1
What is Pearl-2? 2
Feature add-ons 3
Front and back view Pearl-2 4
What's in the Box? 10
Quick start 12
Live video mixing / switching 18
Monitoring audio 19
Selecting an audio source 21
Connecting microphones to the XLR line level inputs 23
Specifications 24
AV inputs 24
Tech specs 25
Optimum CPU performance 28
User interfaces and remote access 30
The touch screen 31
About the touch screen 31
The Channel view 33
Record a channel using the touch screen 35
Stream a channel using the touch screen 36
Switching / mixing using the touch screen 37
One Touch streaming and recording control 39
Configure the touch screen 46
The Admin panel 54
About the Admin panel 54
Connect to the Admin panel 56
Connect using the Epiphan discovery utility 58
Connect using a DNS-based service discovery 59
Connect using persistent static IP address 60
Switching / mixing using the Admin panel 61
Epiphan Live 63
About Epiphan Live 63

vii
The Dashboard interface 64
Access Epiphan Live using a web browser or mobile device 66
Access Epiphan Live from the Admin panel 67
Stream, record, and monitor using the Dashboard interface 68
Switching / mixing using Epiphan Live 76
Your recordings 80
Remote login access 82
About remote login and control 82
Enable or disable AV Studio for remote login 83
Pair and unpair Pearl-2 from AV Studio 84
Access cloud versions of the Admin panel and Epiphan Live 86
Using AV Studio to control Pearl-2 88
About using AV Studio to control Pearl-2 88
Select channels for remote control 89
Control recording using AV Studio 90
View and download AV Studio recordings locally 92
Configure channel encoding using AV Studio 93
PART 1: Setup 96
Rackmount installation 97
Configure network settings 98
Network ports used by Pearl-2 98
Verify IP address and MAC address of Pearl-2 100
Configure a static IP address 101
Configure DHCP 104
Change the HTTP/HTTPS port values 106
Perform network diagnostics 106
Disable the network discovery utility 108
Configure network security 109
Configure 802.1x network security and manage user certificates 109
Manage CA and self-signed certificates 111
Configure HTTPS 112
Tether to a mobile network 113
Configure date and time 116
Audio input ports 120
Configure audio ports for stereo or mono 120
Assign audio sources to an input 121
Adjust audio gain and delay 122
Mute audio 124

viii
Video output ports 127
About video output ports 127
Video output port resolution 128
Show a channel or video source on the output port 129
Preview the video output port 132
Disable the video output port 132
Disable or enable audio and output port volume 133
Display and reposition the audio VU meter 135
Rename a video output port 136
Mirror the video output port display 137
Feature add-ons 139
4K feature add-on 142
Set up Kaltura CMS integration 144
Enable CMS and register with Kaltura 144
Disable or deregister the device from Kaltura 145
Change the resource name used for Kaltura 147
Reassign a registered resource 148
Configuration presets 150
About configuration presets 150
Configuration preset considerations 152
Configuration groups 156
The Factory default configuration preset 157
Create a configuration preset 159
Apply a configuration preset using the Admin panel 160
Apply a configuration preset using the touch screen 162
Export and import configuration presets 163
Update a configuration preset 165
Delete a configuration preset 166
User administration 168
User types and privileges 168
Set or change user passwords 172
Remove user passwords 173
Overcome lost passwords 174
Configure LDAP user authentication 175
Change the logged-in user 177
Restrict viewers by IP address 177
IP restriction examples 179
Status and monitoring 182

ix
PART 2: Capture 195
What is a channel? 196
Channel layout examples 197
About automatic channels Auto A and Auto B 200
Channel configuration 203
Configure auto channels 204
Create a channel 204
Add video sources or a channel as a source 208
Add an audio source to a layout 212
Duplicate a channel 213
Rename a channel 214
Delete a channel 215
Preview channel 216
Add or remove channel metadata 219
Configure encoding 220
Codecs and file format compatibility 220
Configure video encoding 222
Configure audio encoding 227
Multi-encoding and channel as a source 228
Custom layout configuration 230
About the custom layout editor 230
Resize and position items using percents or pixels 234
Open the custom layout editor for a channel 241
Add or edit a custom layout 242
Rename a layout 244
Delete, move, or duplicate a layout 245
Set the background color 247
Add an image to a layout 248
Upload or remove an image using the Media page 250
Add a text overlay 252
Custom system variables for text overlays 255
Crop a video source 255
Configure chroma keying 258
Performance considerations 259
What is upstream chroma keying? 259
What is downstream chroma keying? 260
Set up chroma key for a green screen video source 261
Add chroma key titler effects using Microsoft Powerpoint slides 267

x
Add external titler software effects to Pearl-2 272
Video and audio input sources 279
About connecting video and audio sources 279
Tested RTSP-based IP cameras 281
Supported web cameras 283
Connect an RTSP source 283
Connect an NDI source 286
Change an NDI input resource 288
Connect an AV.io video grabber 288
Preview a video source using the Admin Panel 289
Rename an input port 290
Configure a video input source 291
DVI and HDMI signals 292
USB signals 294
RTSP sources 297
Add a custom No Signal image 297
PART 3: Stream 299
What is streaming? 300
Secure streaming using RTMPS 300
Stream settings for video and slides 301
View supported streaming formats 302
Streaming a channel directly to viewers 303
Stream content using HTTP, HTTPS or RTSP 304
Stream content using HLS (HTTP/HTTPS) 305
Directly share stream URLs with viewers 306
View the live broadcast URL using a web browser 307
View the streaming URL using a media player 310
Restrict viewer access to channel streams 311
Restrict viewers by IP address 312
IP restriction examples 314
Change HTTP and RTSP streaming port values 316
Disable and enable direct channel streaming 318
Streaming to a server 319
Stream to a CDN 320
Start and stop streaming to a CDN 321
Set up a stream using RTMP or RTMPS push 323
Set up a stream using RTSP announce 325

xi
Stream to a CDN using an XML profile 326
Stream using multicast 328
MPEG-TS streams using RTP/UDP push 328
MPEG-TS streams using UDP push 330
Multicast streaming using RTP/UDP 332
Viewing with Session Announcement Protocol (SAP) 333
Stream NDI 334
About streaming NDI 334
Start and stop an NDI stream 335
Stream to Kaltura CMS 337
Set up a channel for a scheduled webcasting event 337
Use RTMPS for a Kaltura webcasting event 339
Stream to a media player or smart TV 340
Stream using UPnP 340
Enable UPnP 341
Disable UPnP 344
Viewing with UPnP 345
Play directly to a media player 347
Auto-restart playback to a UPnP device 347
Change UPnP device name 348
PART 4: Record 349
About recording 350
Record a channel 351
Record using One Touch control 353
Configure recording settings, file size and type 354
Restart recording 357
Recorders 359
Add a recorder 359
Select channels to record 360
Start and stop a recorder 361
Rename a recorder 362
Duplicate a recorder 363
Delete a recorder 363
Record to Kaltura CMS 365
About recording to Kaltura CMS 365
Select channels for VOD event views 368
Manually start/stop scheduled VOD events 369
Manually start/stop an ad hoc event 371

xii
Manage recorded files 374
View list of recorded files 374
Download recorded files manually 375
Join recorded files together 376
Extract tracks from a recording 377
Rename recorded files 379
Delete recorded files 379
FTP and automatic file transfers 381
About Automatic File Upload (AFU) 381
Choose files to include in AFU 382
Enable AFU and set parameters 384
Configure AFU to FTP server parameters 387
Configure AFU to RSync server parameters 388
Configure AFU to CIFS server parameters 390
Configure AFU to SCP client parameters 391
Configure AFU to SFTP server parameters 393
Configure AFU to AWS S3 parameters 396
Configure AFU to WebDav server parameters 397
AFU or copy to USB 399
AFU to a USB storage device 399
Do a one-time copy/move all recordings to USB storage device 400
Manually copy recordings to USB storage device 402
View available USB storage space 404
Safely eject USB storage device 404
View the AFU log 404
Manage the AFU queue 405
Local FTP server 408
PART 5: Maintenance 412
Power down and system restart 413
Backup your Pearl-2 setup 415
Perform a factory reset 416
Firmware upgrade 417
Support 422
Register Pearl-2 426
Storage space maintenance 428
Third party integration 431
Controlling Pearl-2 using RS-232 / serial port 432
Controlling Pearl-2 using HTTP/HTTPS commands 438

Pearl-2 User Guide Start here
Start here
Welcome, and thank you for buying Epiphan Pearl-2™, Pearl-2 Rackmount™ or Pearl-2 Rackmount Twin™.
You'll find information on how to set up and use all three models in this user guide. Whenyou see the name
Pearl-2 used in this guide, it means that the content applies to all three models. Differences are explicitly called
out. For a product description, see What is Pearl-2?.
See the Quick start for basic steps to get a single video source (and optional audio) set up so you can stream
and record some output right away. The rest of the guide shows you how to tweak the system exactly how
you want it so you can take advantage of the many advanced features.
About this Guide
After the introductory section and quick start, the next chapter describes the main user interfaces that are
used to operate and configure Pearl-2. You'll find everything that you need to use these interfaces and to
successfully access Pearl-2 locally as well as remotely:
lTouch screen
lAdmin Panel
lEpiphan Live
The rest of the user guide covers setting up and operating your system for a successful video switching,
recording, and live streaming experience. The chapters are organized in to these five categories: Setup,
Capture, Stream, Record and Maintenance.
1
Pearl-2 User Guide What is Pearl-2?
This guide assumes that all feature add-ons for Pearl-2 are activated. If a documented feature or task is only
available when a specific feature add-on is activated, it is indicated by a link to the activation page for that
feature add-on. For the 4K add-on, the link is 4K .
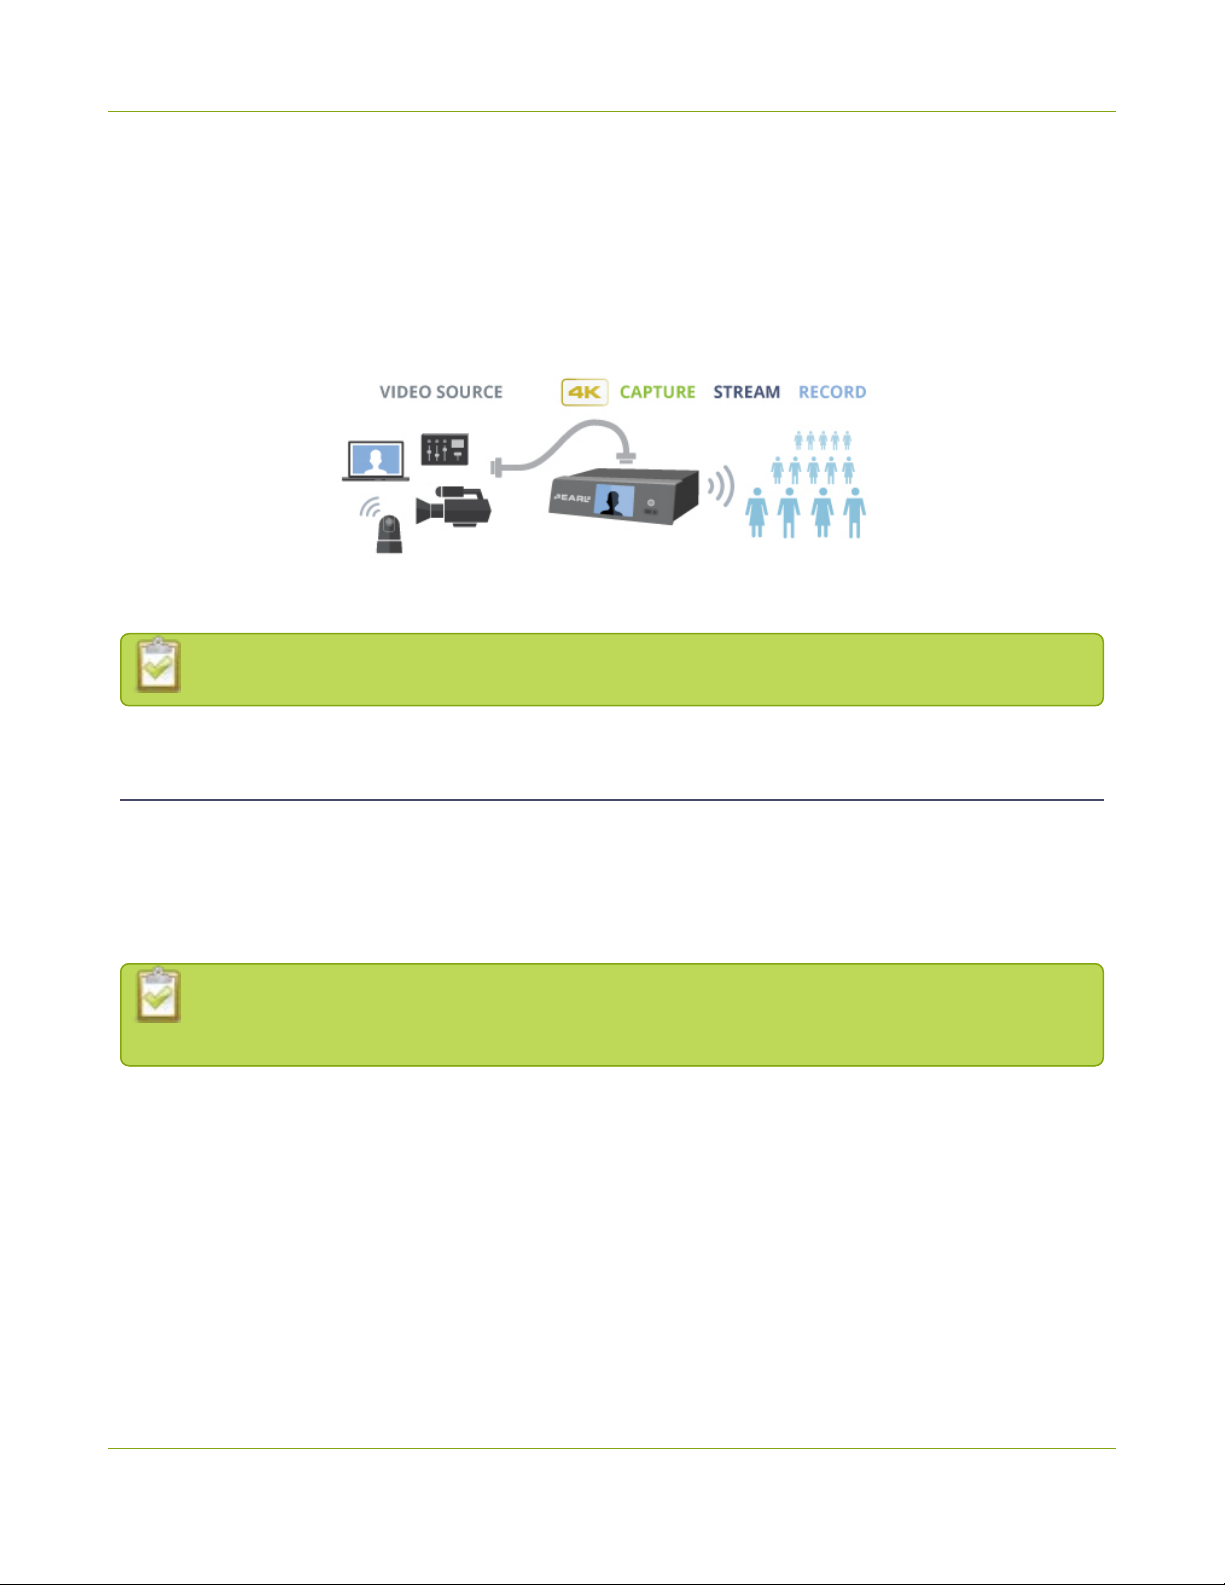
What is Pearl-2?
Pearl-2 is a versatile live video production device that's a video encoder, video streamer, live switcher, and
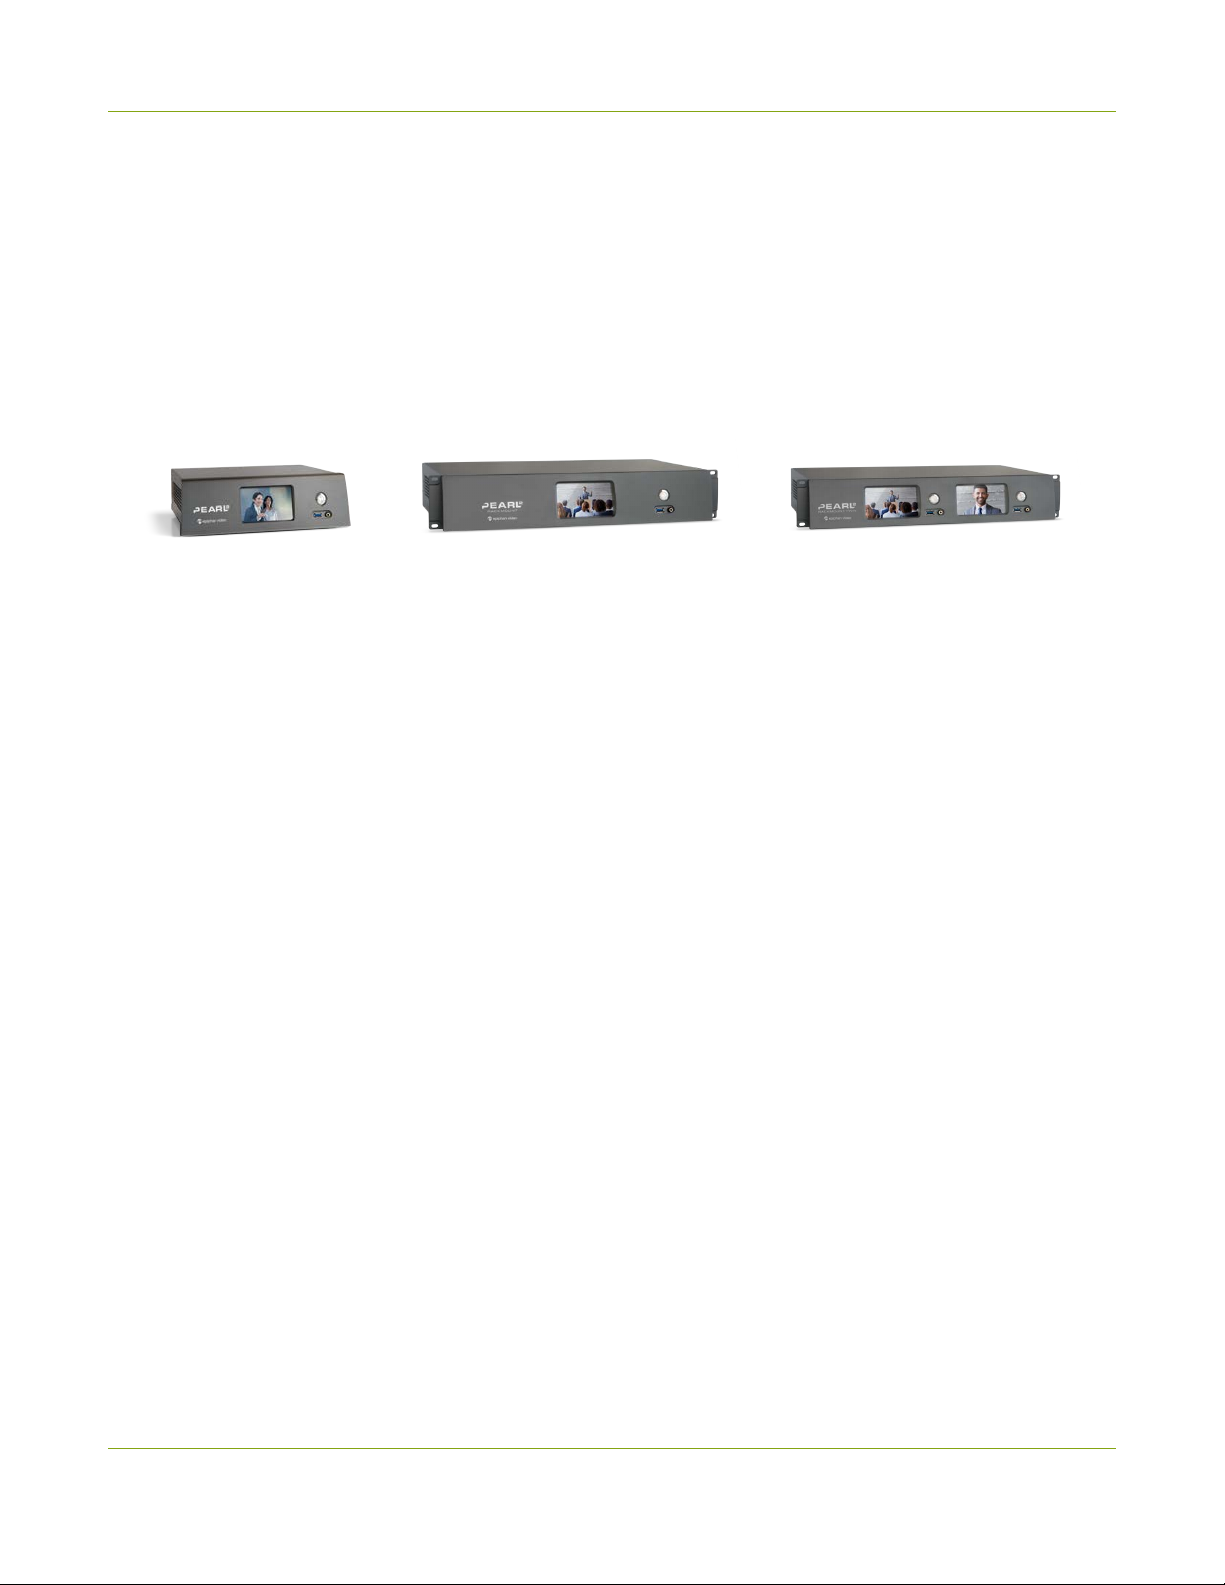
video recorder all in one. Pearl-2 comes in three models.
Pearl-2 Pearl-2 Rackmount Pearl-2 Rackmount Twin
A small, silent, portable
system that comes with a
hard-shell carry case.
A 2U rackmount system with all the
same functionality as the portable
Pearl-2, but designed for installation
and operation in a rack.
A high density 2U rack mount
variation that contains two complete
(and independent) Pearl-2 systems.
With Pearl-2, you can capture, record, and stream from computer monitors, radar displays, or almost or
anything with a wide variety of supported video input signals, including:
lSDI (up to 12G)
lHDMI™
lHDMI 4K4K
lDVI-I(single link)
lUSB
lRTSP
lNDI® and NDI|HX
Capture audio from XLR, RCA, USB, SDI, HDMI or NDI sources.
Simultaneously capture up to six full HD video sources or up to four 4K sources if you have the 4K feature
add on installed. You can create up to five simultaneous channels for live switching, or a single 4K channel.
Have separate ISOs or create custom layouts with multiple video sources and picture in picture. You can do all
that with Pearl-2.
Easily watch live streams using your favorite web browser or media player on mobile devices and computers
connected to the same private network as Pearl-2 or using Content Distribution Networks (CDNs). Recorded
files can be downloaded via FTPor set to automatically upload via FTP, RSYNC, or CIFS and can be integrated
2
Pearl-2 User Guide Feature add-ons
into your Content Management System (CMS). Pearl-2 is also fully integrated with Kaltura CMS and can be
registered as a video encoder resource for easy lecture capture.
Network security compliance with 802.1x protocols, passwords, and certificate authentication means an
easier setup for IT friendly live streaming over enterprise networks. HTTPS enabled for secure administration
and control over the LAN, and RTMPS support for secure, encrypted live streaming.
Pearl-2 does not capture from HDCP encrypted sources.
Feature add-ons
Pearl-2 offers add-on features so you can do even more with your system. Start from the base model of Pearl-
2 and add feature add-ons for extra functionality.
See Add-ons overview for details about the availability of add-ons for your system, as well as instructions to
purchase and install add-ons.
Where you see this symbol 4K in the guide, that means the feature or function applies only if you
have activated the 4K feature add-on.
3
Pearl-2 User Guide Front and back view Pearl-2
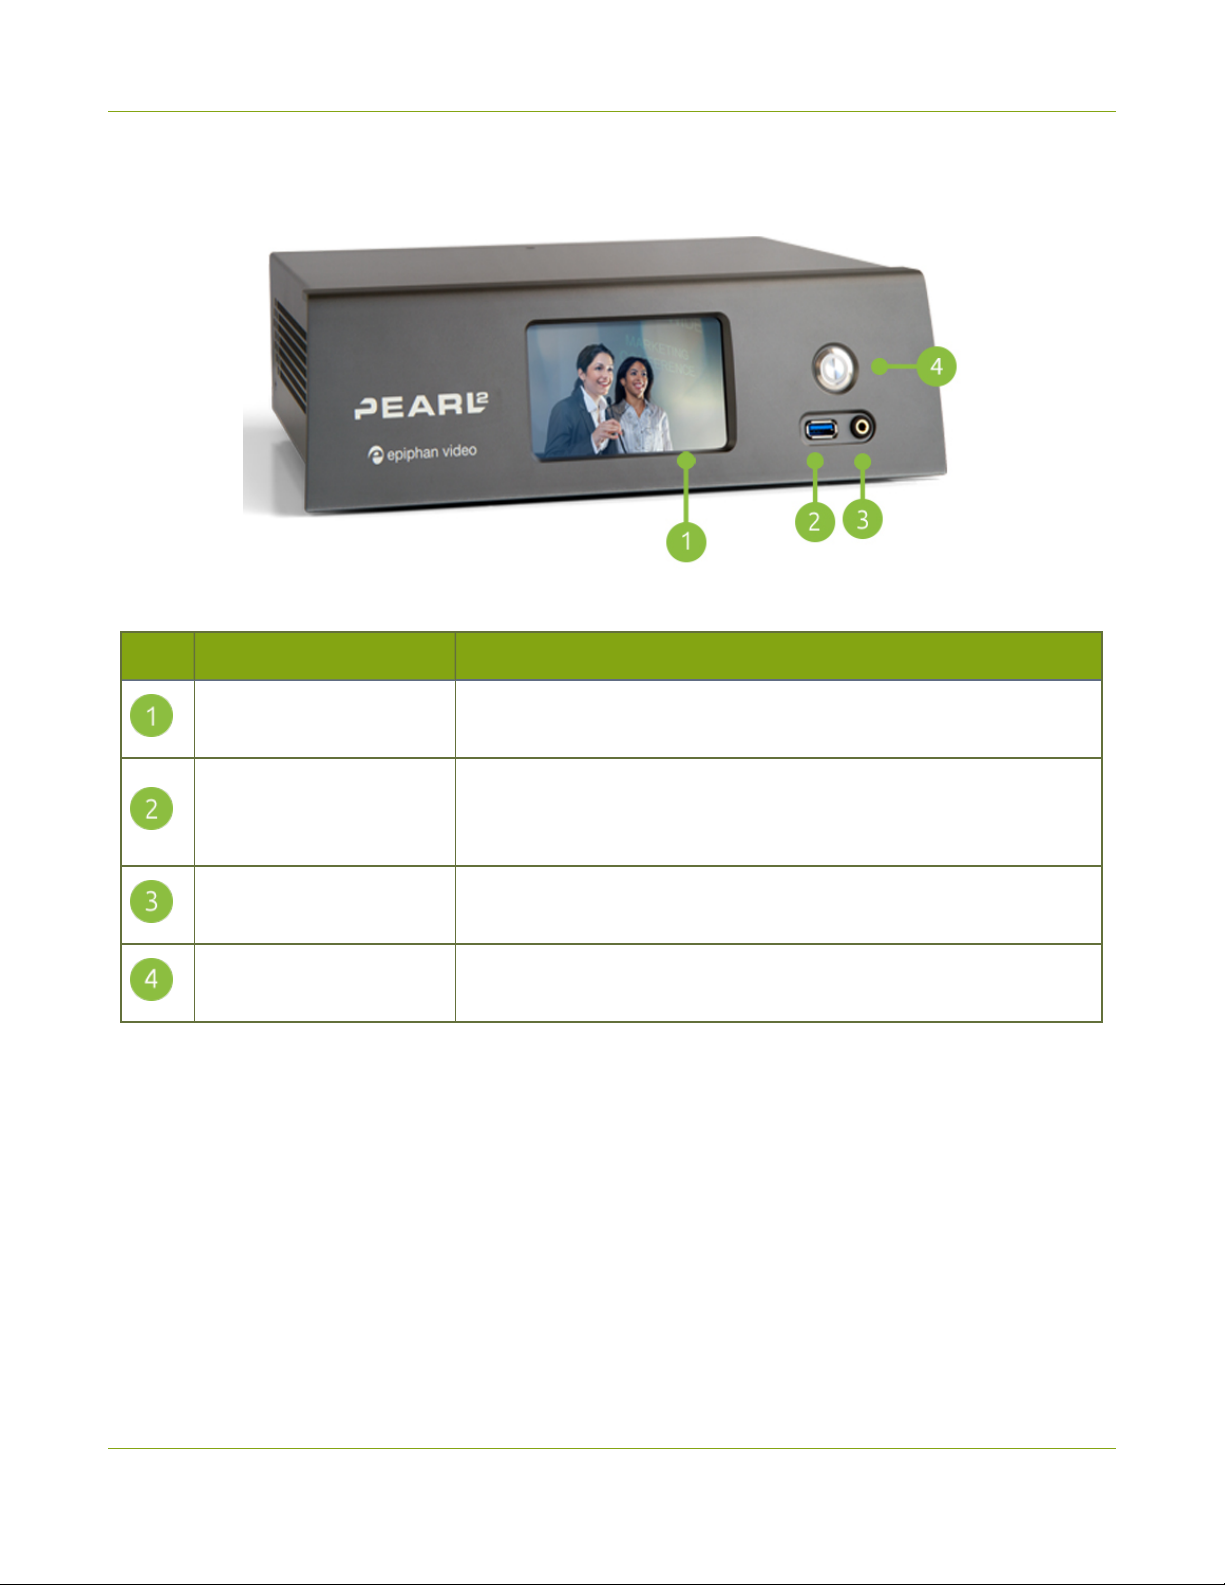
Front and back view Pearl-2
Table 1 Pearl-2 front panel descriptions
Label Name Description
Touch screen front panel
display
Used for confidence monitoring and simple configuration, obtaining
system information, and starting/stopping recordings and streams.
USB 3.0 port
For connection of external hard drives, flash drives or control
interfaces, see AFU or copy to USB. Web cameras cannot be
connected to this port, only to the ports on the rear panel.
3.5 mm audio jack For audio confidence monitoring. Plays the audio for the currently
visible channel.
Power button Press once to power on. Double-press to initiate a graceful system
shutdown.
4
Pearl-2 User Guide Front and back view Pearl-2
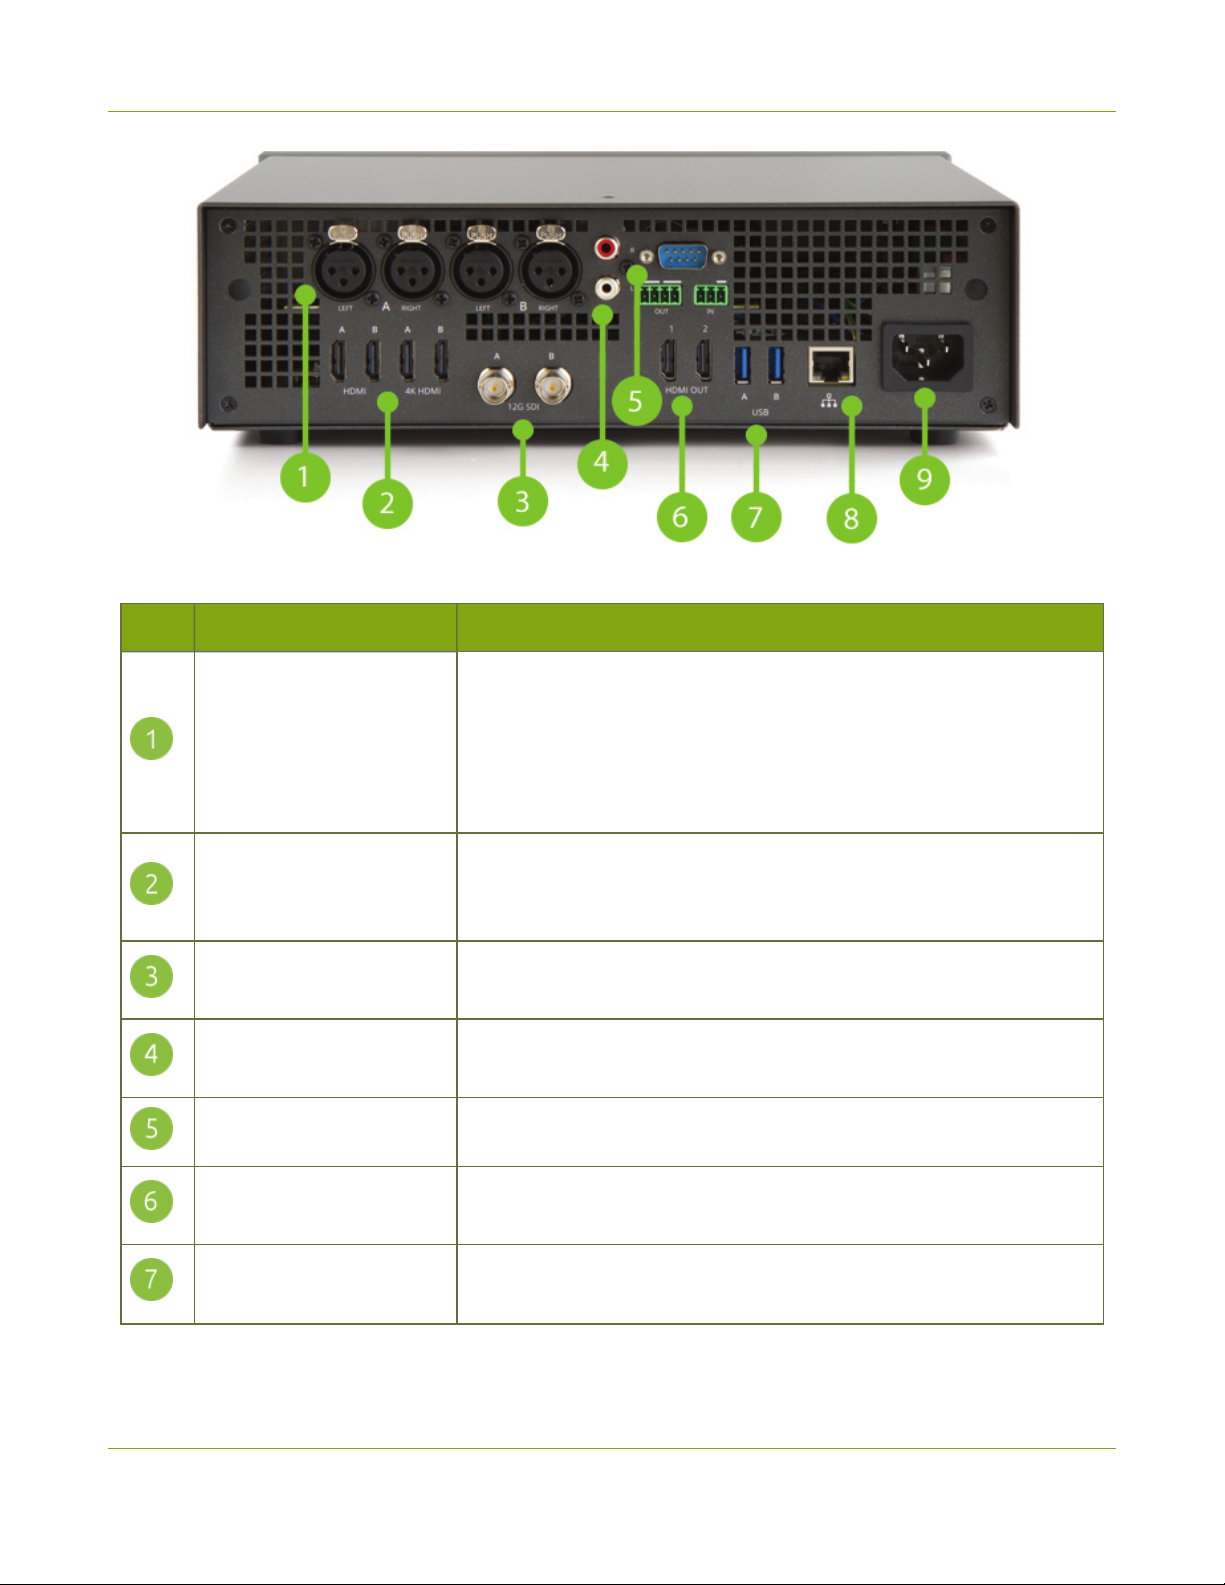
Table 2 Pearl-2 back panel descriptions
Label Name Description
XLR audio in
The four XLR ports can function as two, professional line level
left/right stereo pairs (XLR A pair and XLR B pair) or as four mono
inputs, see AV inputs.
The XLR ports are professional line-level inputs and are calibrated for
+ 4.0 dBu signals.
HDMIin
Four HDMI 1.4 ports that connect HDMI and DVIsignals to Pearl-2.
The first two ports allow for any signal up to full HD, and the second
two inputs allow for any input resolution up to 4K4K .
12G SDI in Connects SDIsignals toPearl-2, including 3G-SDI; 6G-SDI; 12G-SDI;
4K-SDI; HD-SDI; SD-SDI
RCA audio in The RCA ports are consumer line level, left/right stereo pair and are
calibrated for - 10 dBV signals.
RS-232 port For connection to a control computer terminal.
HDMIoutput ports HDMIoutput for connection to a display or projector (up to 4K1). Port
1 is HDMI 2.0, and Port 2 is HDMI 1.4, see Video output ports.
USB3.0 ports For connection of external hard drives, flash drives, USB web cameras,
USB microphones or control interfaces, see AFU or copy to USB.
5

Pearl-2 User Guide Front and back view Pearl-2
Label Name Description
RJ-45 Ethernet
Auto-sensing gigabit Ethernet 10/100/1000 Base-T network port and
support for NDI and NDI|HX (Tx/Rx). See Configure network settings
for setup instructions.
Power jack Plug the supplied 120/240 V AC power cable in here.
1Requires 4K feature add on
The SDI ports on the back of Pearl-2 can be delicate. Be careful to avoid sharp impacts or pressure
such as balancing the system on its back with the SDI ports against a hard surface. Rough
treatment of the SDI ports could result in loss of functionality for that port.
6

Pearl-2 User Guide Front and back view Pearl-2
Pearl-2 Rackmount and Pearl-2 Rackmount Twin
Pearl-2 Rackmount Twin consists of two completely independent Pearl-2 systems, each with identical sets of
controls and ports.
Table 3 Pearl-2 Rackmount front panel descriptions
Label Name Description
Touch screen front panel
display
Used for confidence monitoring and simple configuration, obtaining
system information, and starting/stopping recordings and streams.
USB3.0 port
Two other USB ports are located on the back. See Record for
information about recording to USBdrives. Web cameras cannot be
connected to this port, only to the ports on the rear panel.
3.5 mm audio jack For audio confidence monitoring. Plays the audio for the currently
visible channel.
7
Other manuals for Pearl-2 Rackmount
2
This manual suits for next models
1
Table of contents
Other epiphan Recording Equipment manuals


