epiphan DVI Broadcaster DL User manual

Epiphan Technical
Documentation
©2013
Epiphan Systems Inc.
All Rights Reserved
June 2013
DVI Broadcaster DL™
User Guide
www.epiphan.com

Thank you for choosing Epiphan!
At Epiphan Systems Inc. (“Epiphan”), product function and quality are our top
priority. We make every effort to make sure that our products exceed our
customers’expectations.
Product Feedback
We regularly contact our customers to ensure product performance and
reliability. We strive to continually enhance our products to accommodate your
needs. We welcome your feedback and suggestions for product improvements.
Specifications
You can go to the Broadcasting page of the Epiphan website to get information
about the DVI Broadcaster DL.
Warranty
All Epiphan Systems products are provided with a 100% return to depot
warranty for one year from the date of purchase.
Technical Support
Epiphan is staffed by a professional support team. If, after checking the FAQs
for your product on the Epiphan website and re-installing the Epiphan driver
software (where applicable), you continue to have outstanding issues, email a
problem report to support@epiphan.com. To help us solve the problem
efficiently, include the following info:
Your DVI Broadcaster DL serial number.
The behavior of your DVI Broadcaster DL LED indicators.
Technical description of the signal source including resolution, refresh
rate, synchronization, type of hardware.
Complete description of the problem you are experiencing.
Copyright © 2013 Epiphan Systems Inc. All Rights Reserved.

<Table of Contents
ii
DVI Broadcaster DL User Guide
Terms and Conditions
This document, the Epiphan web site, and the information contained therein,
including but not limited to the text, videos and images as well as Epiphan
Systems Inc's trademarks, trade names and logos are the property of Epiphan
Systems Inc and its affiliates and licensors, and are protected from
unauthorized copying and dissemination by Canadian copyright law, United
States copyright law, trademark law, international conventions and other
intellectual property laws.
Epiphan, Epiphan Systems, Epiphan Systems Inc., and Epiphan logos are
trademarks or registered trademarks of Epiphan Systems Inc., in certain
countries. All Epiphan product names and logos are trademarks or registered
trademarks of Epiphan. All other company and product names and logos may
be trademarks or registered trademarks of their respective owners in certain
countries.
Copyright ©2013 Epiphan Systems Inc. All Rights Reserved.
THE SOFTWARE LICENSE AND LIMITED WARRANTY FOR THE ACCOMPANYING
PRODUCT ARE SET FORTH IN THE INFORMATION PACKET OR PRODUCT
INSTALLATION SOFTWARE PACKAGE THAT SHIPPED WITH THE PRODUCT AND
ARE INCORPORATED HEREIN BY REFERENCE. IF YOU ARE UNABLE TO LOCATE
THE SOFTWARE LICENSE OR LIMITED WARRANTY, CONTACT YOUR EPIPHAN
REPRESENTATIVE FOR A COPY.
PRODUCT DESCRIPTIONS AND SPECIFICATIONS REGARDING THE PRODUCTS IN
THIS MANUAL ARE SUBJECT TO CHANGE WITHOUT NOTICE. EPIPHAN
PERIODICALLY ADDS OR UPDATES THE INFORMATION AND DOCUMENTS ON
ITS WEB SITE WITHOUT NOTICE. ALL STATEMENTS, INFORMATION AND
RECOMMENDATIONS ARE BELIEVED TO BE ACCURATE AT TIME OF WRITING
BUT ARE PRESENTED WITHOUT WARRANTY OF ANY KIND, EXPRESS OR
IMPLIED. USERS MUST TAKE FULL RESPONSIBILITY FOR THEIR APPLICATION OF
ANY PRODUCTS.
LIMITATION OF LIABILITY
UNDER NO CIRCUMSTANCES SHALL EPIPHAN BE LIABLE FOR ANY INCIDENTAL,
SPECIAL, CONSEQUENTIAL, EXEMPLARY OR OTHER INDIRECT DAMAGES THAT
RESULT FROM THE USE OF, OR THE INABILITY TO USE, THIS PRODUCT OR THE
INFORMATION CONTAINED ON THIS DOCUMENT OR PROVIDED ON EPIPHAN’S
WEB SITE, EVEN IF EPIPHAN HAS BEEN ADVISED OF THE POSSIBILITY OF SUCH
DAMAGES. IN NO EVENT SHALL EPIPHAN'S TOTAL LIABILITY TO YOU FOR ALL

<Table of Contents
iii
DVI Broadcaster DL User Guide
DAMAGES, LOSSES, AND CAUSES OF ACTION RESULTING FROM YOUR USE OF
THIS PRODUCT, WHETHER IN CONTRACT, TORT (INCLUDING, BUT NOT LIMITED
TO, NEGLIGENCE) OR OTHERWISE, EXCEED THE AMOUNTS YOU PAID TO
EPIPHAN DURING THE MOST RECENT THREE-MONTH PERIOD IN CONNECTION
WITH AMOUNTS WHICH YOU PAID FOR USING THIS PRODUCT.
INFORMATION AND DOCUMENTS, INCLUDING PRODUCT SPECIFICATIONS,
PROVIDED IN THIS DOCUMENT OR THE EPIPHAN WEB SITE ARE PROVIDED "AS
IS." SPECIFICALLY, BUT WITHOUT LIMITATION, EPIPHAN DOES NOT WARRANT
THAT: (i) THE INFORMATION IS CORRECT, ACCURATE, RELIABLE OR COMPLETE;
(ii) THE FUNCTIONS CONTAINED ON THE EPIPHAN WEB SITE WILL BE
UNINTERRUPTED OR ERROR-FREE; (iii) DEFECTS WILL BE CORRECTED, OR (iv)
THIS WEB SITE OR THE SERVER(S) THAT MAKES IT AVAILABLE ARE FREE OF
VIRUSES OR OTHER HARMFUL COMPNENTS. EPIPHAN SPECIFICALLY DISCLAIMS
ALL REPRESENTATIONS, WARRANTIES AND CONDITIONS, EITHER EXPRESS,
IMPLIED, STATUTORY, BY USAGE OF TRADE OR OTHERWISE INCLUDING BUT
NOT LIMITED TO ANY IMPLIED WARRANTIES OF MERCHANTABILITY, NON-
INFRINGEMENT, TITLE, SATISFACTORY QUALITY OR FITNESS FOR A PARTICULAR
PURPOSE.
For additional terms and conditions, please refer to additional sections in this
document.

1Table of Contents
1Table of Contents ........................................................................................1
2Overview .....................................................................................................4
2.1 Introduction............................................................................................ 4
3Physical Attributes ......................................................................................5
3.1 System Hardware Features .................................................................... 5
3.2 Cables, Connectors and Adapters .......................................................... 8
3.2.1 3.5 mm Mini-jack ................................................................................... 8
3.2.2 DVI to DVI Cable ..................................................................................... 8
3.2.3 HDMI to DVI Adapter ........................................................................... 10
3.2.4 RJ-45 Male............................................................................................ 10
3.2.5 Power over Ethernet (PoE) Injector ..................................................... 11
4Getting Started ..........................................................................................11
4.1 Supplying Power to the DVI Broadcaster DL ........................................ 11
4.2 Confirm Input Signal is Received .......................................................... 11
4.3 Network Connections........................................................................... 12
4.4 Logging into the Web Admin Interface ................................................ 12
4.4.1 Access through Service Discovery........................................................ 12
4.4.2 Epiphan’s Network Discovery Utility.................................................... 13
4.4.3 Logging into the Web Admin Interface Using a Web Browser and the IP
Address of the DVI Broadcaster DL .................................................................... 13
4.5 Users Logging ....................................................................................... 14
4.5.1 The Administrator User........................................................................ 14
4.5.2 The Operator User ............................................................................... 15
4.5.3 The Viewer User................................................................................... 15
4.6 Web Admin Interface ........................................................................... 15
5Video Formats and Standards....................................................................18
6Signal Capture ...........................................................................................19
6.1 Connecting Input Sources .................................................................... 19
6.1.1 Connecting DVI or HDMI Input Sources ............................................... 19
6.1.2 Connecting Audio Input Sources.......................................................... 19
6.2 Frame Grabber Adjustments ................................................................ 19
7Stream Setup.............................................................................................23
7.1 Select Video Codec ............................................................................... 23
7.2 Audio Configuration ............................................................................. 26
7.3 Common Settings ................................................................................. 27
7.4 Select Audio Format ............................................................................. 28
8Streaming ..................................................................................................29
8.1 HTTP or RTSP Streaming....................................................................... 31
8.2 Using a Content Distribution Network ................................................. 31
8.2.1 Using Epiphan.tv Portal for Streaming................................................. 33
8.2.2 Using Epiphan’s Partners as CDN Providers For Streaming ................. 37
8.2.3 Setting up Multicast from Publish Stream ........................................... 38
8.3 UPnP ..................................................................................................... 41
8.4 Viewing Streaming Video ..................................................................... 44
8.4.1 Retrieving the Stream’s URL for Broadcasting ..................................... 44

<Table of Contents
2
DVI Broadcaster DL User Guide
8.4.2 Using the Web Admin Interface’s Info Page ........................................ 44
8.4.3 Using the Web Admin Interface’s Live View Feature........................... 45
8.5 Viewing a Broadcast with a Browser .................................................... 46
8.6 Viewing a Broadcast with a Media Player ............................................ 47
8.7 Compatibility Information .................................................................... 48
9Recording ..................................................................................................50
9.1 Selecting Recording File Format........................................................... 50
9.2 Changing Time and Size Limits ............................................................. 50
9.3 Selecting File Prefix .............................................................................. 51
9.4 Starting and Stopping Recording.......................................................... 52
9.5 Viewing the Current Recording ............................................................ 52
9.6 Recording a Stream on iPad, iPhone and iTouch ................................. 53
9.7 Recorded Files ...................................................................................... 53
9.7.1 Downloading Recordings ..................................................................... 53
9.7.2 Deleting Files........................................................................................ 54
9.7.3 Renaming Files ..................................................................................... 54
9.7.4 Viewing Completed Recording Files..................................................... 55
9.8 File Transfer of Recorded Files ............................................................. 55
9.8.1 Copying Recorded Files to a USB Flash Drive ....................................... 55
9.9 Automatic File Upload .......................................................................... 57
9.9.1 Configuring Automatic File uploads ..................................................... 59
9.9.2 Configuring a CIFS Client ...................................................................... 60
9.9.3 Configuring an RSync Client ................................................................. 62
9.9.4 Configuring an FTP Client ..................................................................... 62
9.9.5 Testing the Automatic File Upload....................................................... 63
9.10 FTP Server............................................................................................. 64
10 Networking................................................................................................65
10.1 Connecting Directly to the System ....................................................... 65
10.1.1 Rescue Settings................................................................................ 66
10.1.2 Connecting Directly to the DVI Broadcaster DL ............................... 66
10.2 Network Discovery of the DVI Broadcaster DL..................................... 67
10.2.1 Epiphan’s Network Discovery Utility ............................................... 67
10.2.2 Epiphan’s EpiphanTouch App for iPad, iPhone, iTouch ................... 68
10.3 Setting IP Address................................................................................. 69
10.3.1 Set the DVI Broadcaster DL to use a static IP address ..................... 70
10.3.2 Set the DVI Broadcaster DL to use a DHCP server ........................... 71
10.3.3 Performing Network Diagnostics..................................................... 72
11 System Administration ..............................................................................73
11.1 Setting the Date and Time.................................................................... 73
11.2 Configuring Administrator Access ........................................................ 76
11.2.1 To add or change the Administrator password ............................... 76
11.2.2 Deleting the Administrator password ............................................. 77

<Table of Contents
3
DVI Broadcaster DL User Guide
11.3 Configuring Operator Access................................................................ 77
11.3.1 To add or change the Operator password....................................... 77
11.3.2 Delete the Operator Password ........................................................ 78
11.4 Configuring Viewer Access ................................................................... 78
11.4.1 To add or change the viewer password........................................... 78
11.4.2 Configuring IP-based Authentication for Viewers ........................... 79
11.4.3 Delete the Viewer Password ........................................................... 80
11.5 Upgrading the System Firmware.......................................................... 81
11.5.1 Installing new firmware ................................................................... 81
11.6 Maintenance Controls .......................................................................... 82
11.6.1 Restoring the DVI Broadcaster DL Default Factory Configuration... 83
11.6.2 Rebooting or Restarting DVI Broadcaster DL................................... 83
11.6.3 Backing up Current Configuration ................................................... 83
11.6.4 Restoring Configuration from File ................................................... 84
11.6.5 Shutting down the DVI Broadcaster DL ........................................... 84
11.7 DVI Broadcaster DL System Information .............................................. 84
12 Serial Port Configuring...............................................................................85
13 Customizing Presentation and Web Content .............................................86
14 Stream Branding........................................................................................87
15 Configuring Remote Support .....................................................................90
16 Disk Check .................................................................................................93
17 Disk Status Information .............................................................................94
18 Configuring using a Third-Party Application...............................................95
18.1 Serial Port Configuration ...................................................................... 95
18.2 RS-232 Commands ............................................................................... 95
18.3 Syntax for HTTP API Commands........................................................... 97
18.4 Keys for HTTP API Commands .............................................................. 98
18.5 Device Info Keys ................................................................................... 98
18.6 Broadcasting Setup Keys ...................................................................... 98
18.7 ASF Encoder Keys ............................................................................... 100
18.8 RTP Unicast Keys ................................................................................ 100
18.9 Recorder Keys..................................................................................... 100
18.10 Examples ............................................................................................ 101
19 Table of Figures .......................................................................................102
20 Configuration Worksheet ........................................................................107

Overview
4
DVI Broadcaster DL User Guide
2Overview
2.1 Introduction
The Epiphan DVI Broadcaster DL is an external device designed for streaming and/or
recording the video content from one connected source and optionally the audio
from one connected audio source. Its DVI In port can support any of the following
video sources:
- DVI (either single link or dual link)
- HDMI
- Other compatible sources with appropriate adapters and/or converters (e.g.
Thunderbolt, DisplayPort, and mini DisplayPort)
This compact external device captures DVI or HDMI video signals in resolutions up to
2048x2048 or2560x1600 for widescreen applications. The DVI Broadcaster DL then
streams the captured content in compatible formats allowing the broadcast to be
viewed with standard internet browsers and media players.
The DVI Broadcaster DL is an Ethernet network device that can be automatically
configured to connect to networks that support DHCP addressing or it can be
manually configured to use static IP addressing to connect to the network. It
supports a 100Mbps Ethernet connection. For more advanced users, the DVI
Broadcaster DL can also be configured prior to connecting it to the network. This is
done by connecting a workstation directly to the DVI Broadcaster DL using its
Ethernet port.
Upon connecting to an Ethernet network, the DVI Broadcaster DL can be configured
and operated through an easy to use web-based administration interface.
Once properly configured, the DVI Broadcaster DL device can broadcast the video
source and the optional audio source over a wired Ethernet cable connected to the
network.
Viewers are simply provided with a URL in order to watch the desired broadcast
stream. Additionally, the DVI Broadcaster DL allows content producers to also
record the broadcast to .AVI or .MOV formatted files.
The Epiphan DVI Broadcaster DL comes with a 4 GB internal solid-state memory for
recording broadcasts which provides buffering such that in the event the network is
experiencing slow transfer rates, no captured data will be lost. In addition to this

Physical Attributes
5
DVI Broadcaster DL User Guide
built in flash storage, recorded video files can be archived to a network storage
device such as a FTP server or copied to an inserted USB flash drive.
The DVI Broadcaster DL can support streaming over HTTP, RTSP, peer-to-peer RTP
connection, multicast RTP and a Content Distribution Network (CDN) broadcast
network. The decision on how to stream a broadcast will depend on the answers to
the following questions as well as other design decisions. What is the number of
expected viewers? How are the viewers going to stream the broadcast? What are
the network capabilities on the broadcast side and on the viewer side? Should a
Content Distribution Network be used? For further details on broadcasting
strategies, please refer to Streaming.
3Physical Attributes
3.1 System Hardware Features
The DVI Broadcaster DL device is a 202mmx105mmx35mm (7.95”x4.13”x1.38”) unit.
Figure 1 Rear View of the DVI Broadcaster DL
Below is a table summarizing the connectors and indicators found on the rear panel
of the DVI Broadcaster DL.
Table 1 Summary of the Rear Panel's connectors and Indicators
Number
Name
Description
1
USB
USB 2.0 port that also supports USB 1.1 and RS-232
Physical Attributes
6
DVI Broadcaster DL User Guide
port functionality.
You are enabled to integrate the DVI Broadcaster DL
with other equipment featuring an RS-232 port and
control your device over the RS-232 connection. Please
refer to Serial Port Configuring.
2
RJ45 Ethernet
Primary RJ-45 Ethernet network port to connect the
DVI Broadcaster DL device to an Ethernet network. The
DVI Broadcaster DL device Ethernet port is auto-
sensing.
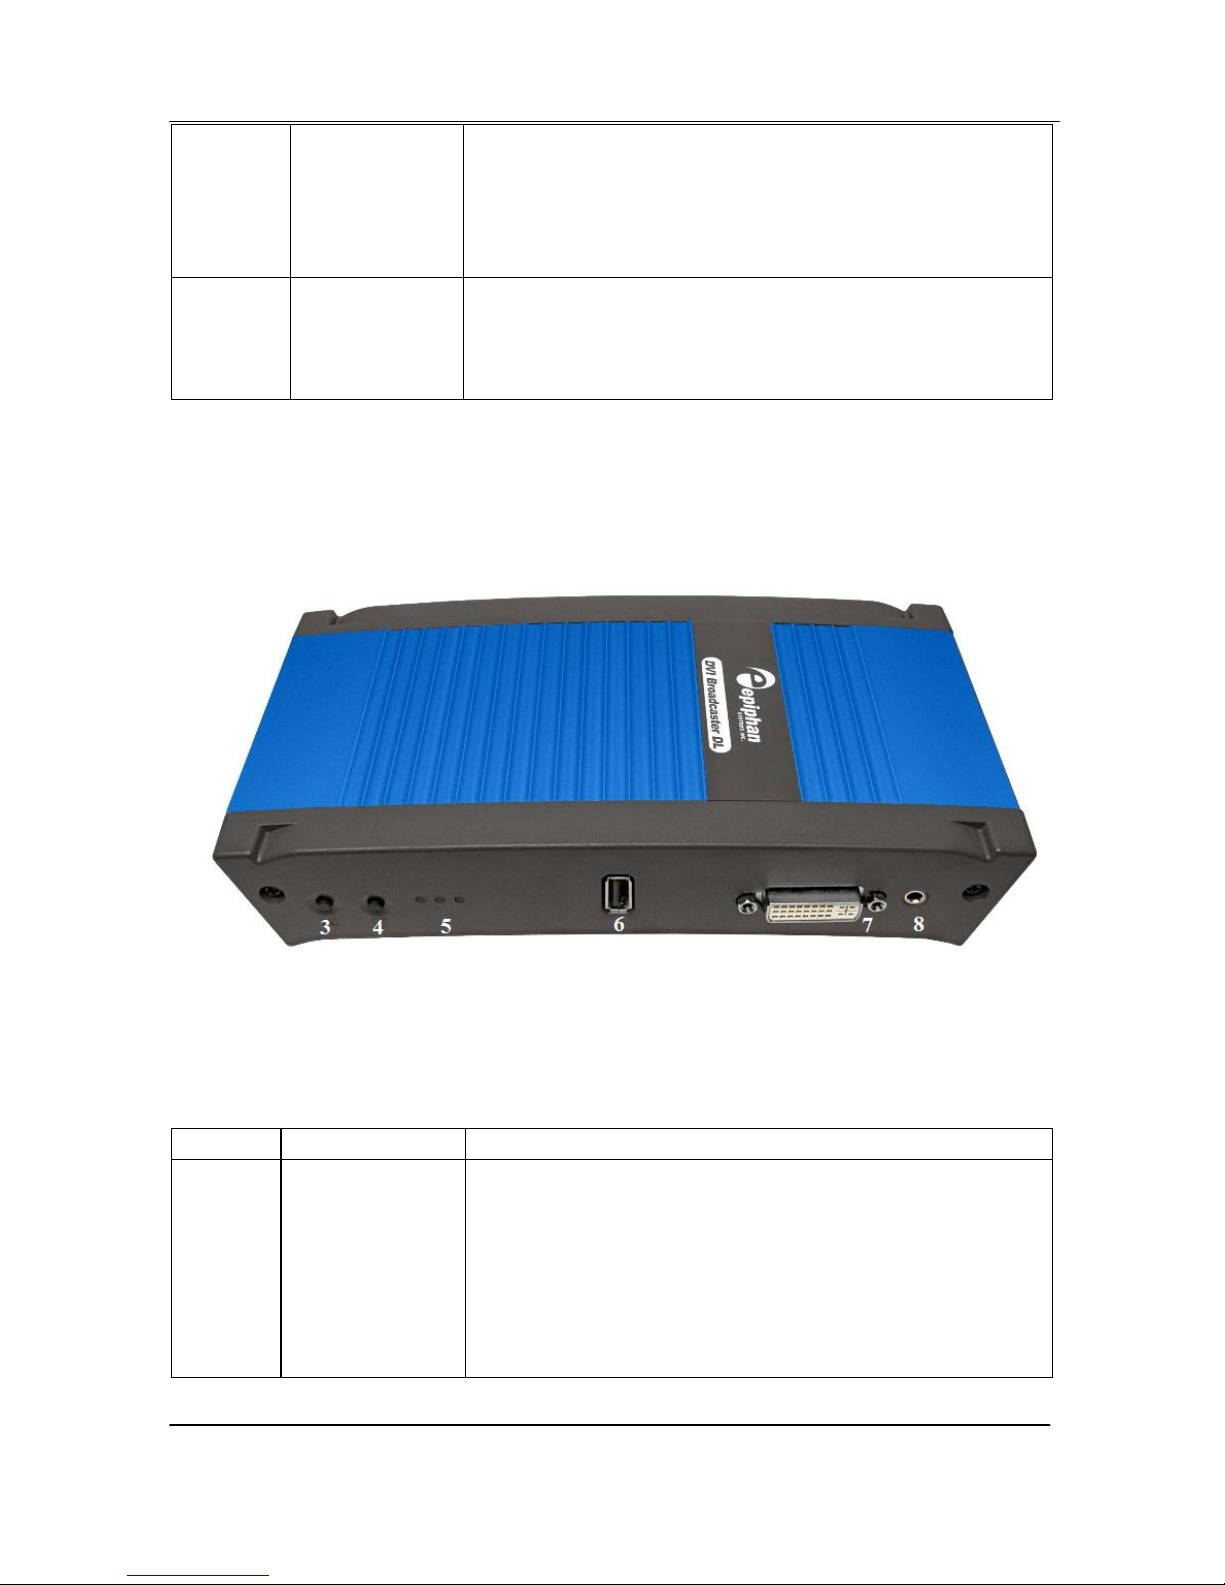
The front panel is illustrated below.
Figure 2 Front View of the DVI Broadcaster DL
Below is a chart detailing the connectors found on the front panel.
Table 2 Summary of Connectors on the Front Panel
Number
Connector
Description
3
Factory Reset
Button
Resets the DVI Broadcaster DL back to its factory
configuration defaults. In order to avoid accidentally
resetting the device, a special sequence is required:
disconnect power to the device,
press and hold the Reset button as you
reconnect the power.
the blue LED lights up.

Physical Attributes
7
DVI Broadcaster DL User Guide
keep pressing the Reset button until the blue
LED turns off and the green LED lights up.
release the Reset button.
4
Record
Stop/Start
Toggle
Record on/off: toggles the recording on/off status.
5
LEDs
Red LED: During operation the red LED blinks each time
the DVI Broadcaster DL captures an image. The red LED
can be used as an indicator that the DVI Broadcaster DL
is capturing images. When the input signal(s) stop(s)
sending images, the red LED stops blinking.
Green and blue LEDs: When the DVI Broadcaster DL
device first starts up, the blue LED lights up. A few
seconds later the green LED lights up. After about
another 20 seconds the blue LED turns off, leaving the
green LED on indicating that the DVI Broadcaster DL
has started up and can start capturing images. During
operation the blue LED blinks during video signal test
operation and when the system tunes video
parameters.
Blue LED: The blue LED blinks to indicate that the DVI
Broadcaster DL is recording received images. If the files
are not being recorded, the blue LED remains off.
Note: Sometimes it may take more than 20 minutes to
power up the device. During this time the blue LED is
on and the green LED is blinking. It means that the
Check disk function started automatically when the
device powered up.
6
USB port
This is an additional USB expansion port as described
above.
7
DVI In
Connect the incoming video source to the DVI
Broadcaster DL. For DVI video input, connect using the
included DVI cable. To connect unencrypted HDMI
video input, use the included HDMI to DVI adapter. For
other types of video sources use the appropriate
adapters and connectors to allow the video source to
be connected to the DVI input port. These adapter and
connectors are not included with the DVI Broadcaster
DL.
8
Audio In
Connect a microphone to broadcast an audio stream.

Physical Attributes
8
DVI Broadcaster DL User Guide
3.2 Cables, Connectors and Adapters
The DVI Broadcaster DL can be connected to a number of different types of
equipment using a variety of cables, and adapters. This section describes a subset of
connectors, cables and adapters that are known to be compatible with the DVI
Broadcaster DL.
3.2.1 3.5 mm Mini-jack
A 3.5mm mini jack connector is used to carry audio signals. It can be connected to
DVI Broadcaster DL to its Audio In port.
Figure 3 3.5mm Mini-jack
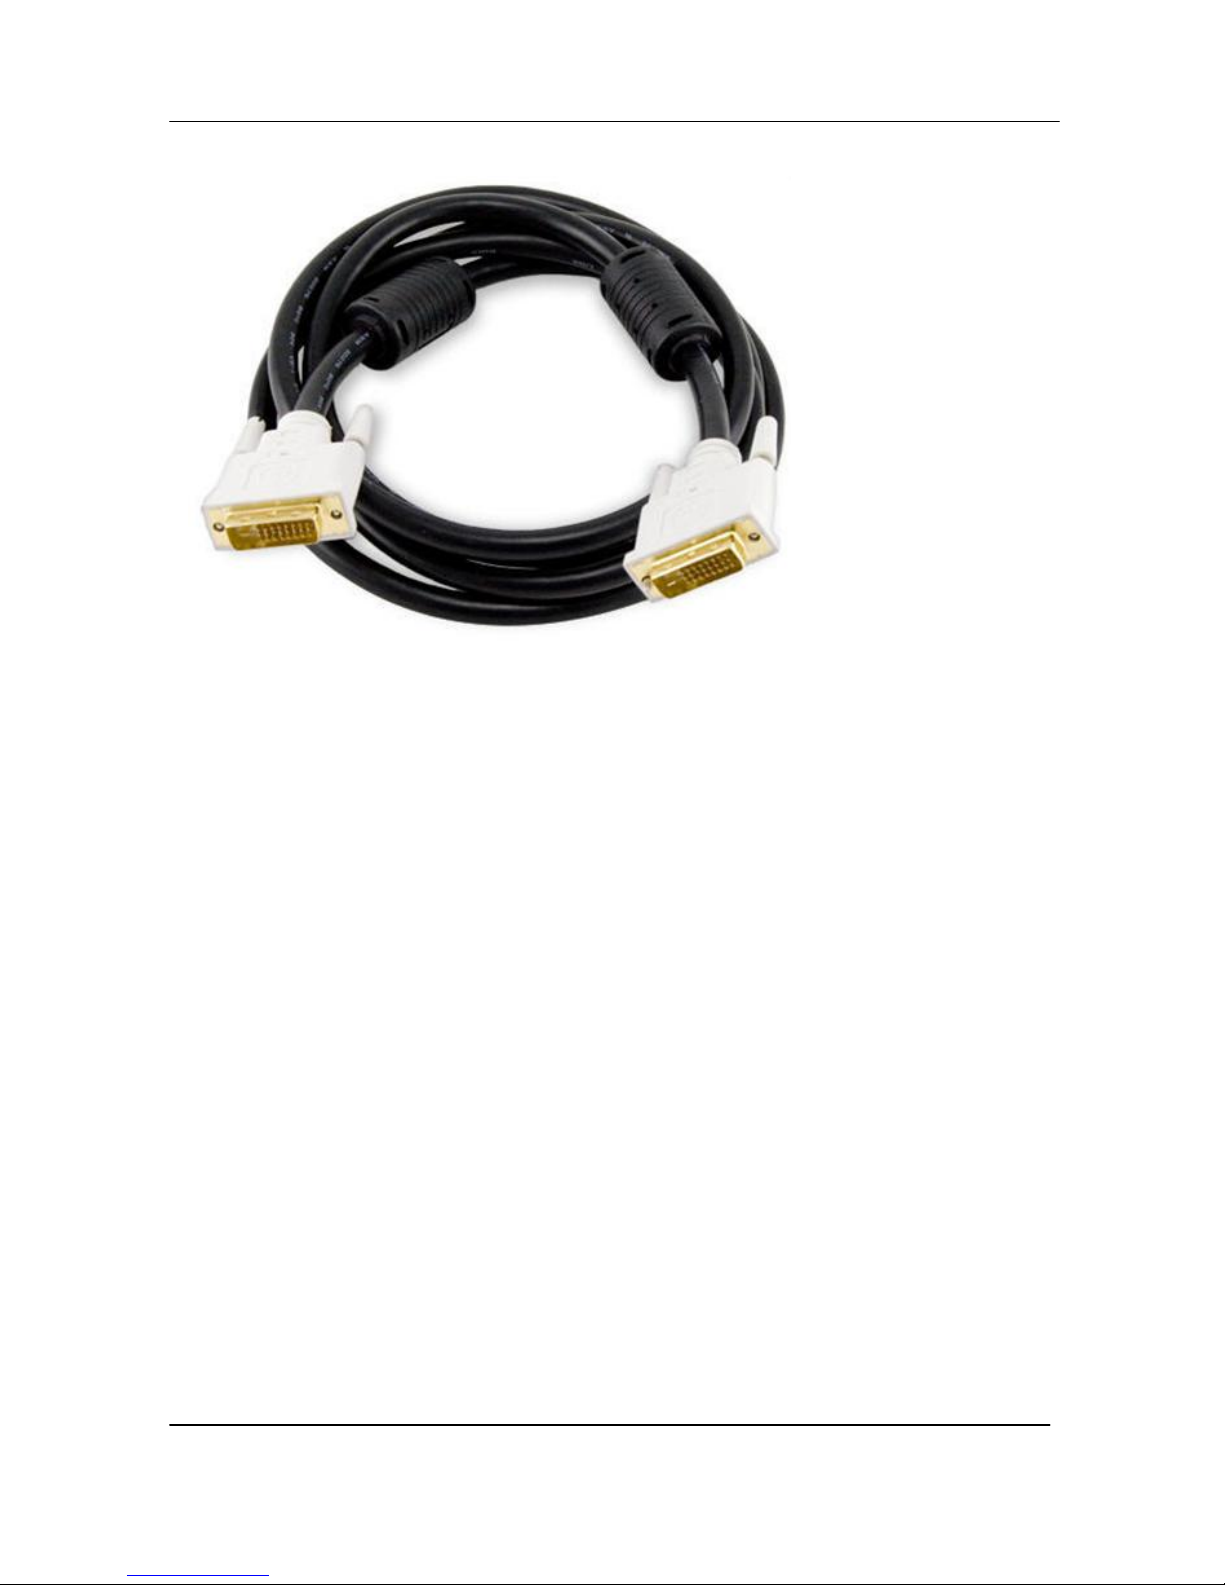
3.2.2 DVI to DVI Cable
Connects a DVI source to the DVI Broadcaster DL’s DVI port. This cable is included
with the DVI Broadcaster DL.
Physical Attributes
9
DVI Broadcaster DL User Guide
Figure 4 DVI to DVI Cable

Physical Attributes
10
DVI Broadcaster DL User Guide
3.2.3 HDMI to DVI Adapter
Connects an HDMI source to either of the DVI Broadcaster DL’s DVI ports. This
adapter is included with the DVI Broadcaster DL.
Figure 5 HDMI to DVI Adapter
3.2.4 RJ-45 Male
Connects the DVI Broadcaster DL to an Ethernet network.
Figure 6 RJ-45 Male Cable

Getting Started
11
DVI Broadcaster DL User Guide
3.2.5 Power over Ethernet (PoE) Injector
The DVI Broadcaster DL incorporates a Power over Ethernet (PoE) technology. PoE
delivers both data and electrical power to an Ethernet enabled device using a single
Ethernet cable. This eliminates the need for the DVI Broadcaster DL to be situated
close to a power outlet. This allows more freedom in its placement.
PoE injectors supply or inject direct current (DC) power through network cables to
power network devices.
4Getting Started
4.1 Supplying Power to the DVI Broadcaster DL
To provide power to the DVI Broadcaster DL, plug the provided PoE adapter into a
10/100Base-T Ethernet network using an Ethernet cable. This network must be
running the TCP/IP protocol.
If your network does not provide Power over Ethernet, connect the DVI Broadcaster
DL to an AC power outlet with the PoE adapter/injector connected to an Ethernet
cable and plugged into the DVI Broadcaster DL’s RJ45 Ethernet port.
Regardless of the power source once connected, the DVI Broadcaster DL now
powers up. Its power and activity LEDs will now light up following their start up
sequence.
4.2 Confirm Input Signal is Received
Confirming that the input signal is being received by the DVI Broadcaster DL can be
done once the DVI Broadcaster DL has been powered on and the input source has
been started.
First, check that the DVI Broadcaster DL’s red LED is blinking. A blinking LED
indicates that the DVI Broadcaster DL is capturing images. If the red LED does not
start flashing, check the input source to ensure that it is transmitting a signal.
Additionally, check that a cable from the input source to the DVI Broadcaster DL is
connected correctly.
Note that you can check whether the DVI Broadcaster DL is transmitting an audio
signal only in a live stream or when you open a recorded file.

Getting Started
12
DVI Broadcaster DL User Guide
4.3 Network Connections
Please to refer to the Networking chapter for the instructions on direct DVI
Broadcaster DL’s connection to the Ethernet, discovering the DVI Broadcaster DL on
the network, IP address settings and other details.
4.4 Logging into the Web Admin Interface
The Web admin Interface is accessible by logging into it using one of the following
methods.
4.4.1 Access through Service Discovery
The multicast Domain Name System (mDNS) is a zero configuration host name
resolution service. It allows a user to do without an IP address when performing
access to the device. Bonjour software installed on a Windows or Mac machine
supports mDNS.
To access the device through service discovery, the following conditions should be
met depending on your OS:
Microsoft Windows –you must install Bonjour Print Services as explained below.
To install Bonjour Print Services on a Windows machine:
1. Use the following URL - http://support.apple.com/kb/DL999
2. Click Download.
3. Follow the system prompts to download the application on your computer.
MacOS X –Bonjour software which is used for service discovery comes built-in with
Mac OS. Therefore DVI Broadcaster DL device can be accessed without any
additional installations.
Linux –the Avahi implementation used for service discovery is shipped with most
Linux distributions. Therefore most probably your device will be accessed without
any additional installations. However you are recommended to address your
administrator for the details first.
The simplest way to access Web Admin interface of your DVI Broadcaster DL in the
local network is to type the following string in the address bar of your web browser:

Getting Started
13
DVI Broadcaster DL User Guide
<serial>.local
where <serial> is the serial number of your DVI Broadcaster DL.
For example: http://92033.local
4.4.2 Epiphan’s Network Discovery Utility.
The Epiphan Network Discovery Utility can be installed and executed from a
workstation running Windows XP, Vista or Windows 7. Follow the following steps to
access the Web admin Interface through this utility:
1. Start the Epiphan Network Discovery Utility tool.
2. Click Search to find all of the Epiphan devices on the network and select the
desired DVI Broadcaster DL.
3. Click Web config.
4. A web browser starts and you are prompted for the DVI Broadcaster DL’s
administrator user name and password.
5. Enter the following information:
User Name: admin
Password: configured password<return>, there is no default password so unless
a password has been configured, just hit <return>
The Web admin interface opens.
Alternatively the Network Discovery Utility can be used to retrieve the DVI
Broadcaster DL’s IP address and access to the Web admin Interface will be done
using a browser.
4.4.3 Logging into the Web Admin Interface Using a Web Browser and the
IP Address of the DVI Broadcaster DL
The web browser can be running on Windows, Mac OS X, Linux or any other
operating system.
1. Start a web browser on any workstation connected to the same network as
the DVI Broadcaster DL.
2. Browse to the DVI Broadcaster DL.
http://<ip address of the DVI Broadcaster DL>/admin
The IP address of the DVI Broadcaster DL can be obtained using any of the
following methods:
a. The Epiphan Network Utility

Getting Started
14
DVI Broadcaster DL User Guide
b. The EpiphanTouch app
c. From the network administrator
d. Using the Factory Default static IP address. Only if the steps in
section, Connecting Directly to the DVI Broadcaster DL, are
followed
3. Log in as the DVI Broadcaster DL’s administrator user
User Name: admin
Password: configured password<return>, there is no factory default
password so unless a password has been configured, just hit <return>
The Web admin Interface opens.
4.5 Users Logging
The DVI Broadcaster DL comes with three pre-configured users which can log in the
control interface. The first is the administrator user, the user name is admin. The
second is the operator user, the user name is operator. The third is the viewer user,
the user name is viewer. Each can be assigned a password but their user names
cannot be altered. It is not possible to create new user names.
Important: When you install firmware for the first time after purchasing the device,
no default passwords are set.
4.5.1 The Administrator User
The administrator user is granted rights to log into the DVI Broadcaster DL and
perform any of the following functions:
1. Perform configuration changes to the DVI Broadcaster DL.
2. Manage the current broadcast. This can include the starting or stopping of the
recording of the broadcast.
3. Manage previously recorded broadcasts. Including the archiving of recordings.
4. System monitoring. This would involve retrieving any system statuses and
retrieving the solid state memory status.
5. Upgrading the System Firmware from Epiphan Support. New firmware is
released to fix known problems or to add new features.
6. Perform network diagnostics.

Getting Started
15
DVI Broadcaster DL User Guide
As a default factory setting, the administrator user does not come with a password
but it is recommended that a password is configured as early as possible for security
reasons.
4.5.2 The Operator User
The operator user is granted rights to log in to manage broadcast recordings,
configure audio and frame grabber settings, access the recorded files and perform
network diagnostics.
As a default, the operator user does not come with a factory configured password.
Configuring an operator password is optional.
4.5.3 The Viewer User
The viewer user is granted rights to log in to view broadcasts and does not have any
administrative ability.
As a default, the viewer user does not come with a factory configured password.
Configuring a viewer password is optional.
4.6 Web Admin Interface
In this section you can see a diagram showing the Web admin Interface’s main
menu. It is located on the left side of the screen.

Getting Started
16
DVI Broadcaster DL User Guide
Figure 7 Web Admin Interface's Main Menu
Table of contents
Other epiphan Recording Equipment manuals


