EPL GVISION v3 User manual
EPL Solutions, Inc.
GVISION v3 Smart Technology
Operator’s Manual

GVISION v3
Table of Contents
EPL Solutions, Inc.
READ BEFORE USING
Gvision Specifications
1-3
• Push/Pull connectors
• Push Button controls
• LED controls
Charging The Internal Battery
4
Important Recording Information
5
Recording onto iOS device and USB drive
6
Using Gplink
7-10
•Downloading
•Recording
•Renaming
•Sharing
Using YouTube from iOS device
11
Sharing through Gallery (Photo App)
12
How to Send Media using Dropbox
13
• Sign in DropBox Account
• Sharing Videos and Photos
Installation of Monitor Mount
14
WINDOWS XP® and APPLE® Burning Video onto an Optical Disc
15-16
Trouble Shooting
17
WARRANTY
18
NOTES

Introduction !
Congratulations on the purchase of your new Gvision V3 Monitor. The V3 is specially designed to provide
an All-in-One, Plug and Play industrial quality monitor/recording system that is portable, simple to use,
durable and can be used with multiple camera systems.!!
DISCLAIMER OF LIABILITY!
EPL SOLUTIONS, INC SHALL NOT BE LIABLE TO DISTRIBUTOR, RESELLER, OR ANY OTHER
PERSON FOR ANY INCIDENTAL, INDIRECT, SPE- CIAL, EXEMPLARY OR CONSEQUENTIAL
DAMAGES, OR INJURY OF ANY TYPE WHATSOEVER, AND CAUSED DIRECTLY OR INDIRECTLY BY
PRODUCTS SOLD OR SUPPLIED BY EPL SOLUTIONS, INC !
!
!
Prepare for Use!
Unpack your new Gvision V3 Monitor. Make sure there is no shipping damage and all the parts are
included.!
!
Locate power supply and plug into AC outlet. Plug the DC end into Gvision.!
!
Locate the camera connector on the right side of the monitor and connect to camera using interconnect
cord included with purchase.
GVISION v3
Electric shock hazard:!
•Follow appropriate safety procedure and your companies
policies.
•Do not expose tool to rain or moisture.
•Use tool only for intended purpose as described in this manual.
Failure to observe these warnings could result
in severe injury or death
WARNING
EPL Solutions, Inc.

GVISION v3
READ BEFORE USING.!
!
The use of electrical equipment in a wet environment can cause fatal shock if equipment is not
properly grounded or adequately maintained, and if care is not used by the operator. !
Wear personal protective equipment such as safety goggles or face shield and protective clothing
such as gloves, coveralls and rubber boots.!
Sewer and waste lines can carry bacteria and other infectious micro-organisms or chemicals
which can cause death or severe illness. Avoid exposing eyes, nose, mouth, ears, hands and
cuts and abrasions to waste water or other potentially infectious materials during sewer and
waste video inspections. To further help protect against exposure to infectious materials, wash
hands, arms and other areas of the body, as needed, with hot, soapy water and, if necessary,
flush mucous membranes with water. Also, disinfect potentially contaminated equipment by
washing such surfaces with a hot soapy wash using a strong detergent.!
“California Prop. 65: This product may contain an extremely small amount of lead internally. Lead is a material known
to the State of California to cause cancer or reproductive toxicity.” !
For any questions contact the company at the address shown below.
EPL Solutions, Inc.

GVISION v3
Gvision v3Specifications!
THE WORLDS FIRST SMART TECHNOLOGY VIDEO INSPECTION SYSTEM!
!
Monitor Specifications:!
•10.4” LCD Screen!
•1200nit for Sunlight Viewable !
•98% Anti-Glare Coating for 170º Sunlight Viewable!
!
Case Specifications:!
• Heavy Duty Aluminum Construction!
• Ruggedized Design!
• Multi-Purpose Cover/Stand for Positioning on Ground or Pitched Roof!
• Solid Aluminum Reel Mount Locking Knobs!
• Dimensions 11.25” x 9.75” x 4”!
•Weight 8.5lbs!
!
Power Specifications:!
• 90v-264v AC Switching Power Supply for 12v DC In!
• 12v DC Automobile Aux. Cord for charging optional battery!
!
Battery Specifications:!
• Up to 4 Hours Operation On A Fully Charged Battery!
• Battery can be charged in 4hrs or less from the 100v-240v AC Switching Power Supply!
• Battery can be charged in 4hrs or less from the 12v DC Automobile Aux. Cord!
!
Recording Specifications:!
• USB Thumb Drive H264 720 x 480 resolution .mp4 movie file!
• USB Hard Drive H264 720 x 480 resolution .mp4 movie file!
• iPhone® H264 320 x 240 resolution .mov movie file!
• iPod Touch®.H264 320 x 240 resolution .mov movie file!
• iPad®H264 320 x 240 resolution .mov movie file!
!
Sending Video Specifications:!
• SMS 1:50 minute video!
• EMAIL 1 minute video (5meg limit)!
• You Tube 10 minute video!
• Dropbox and others are limited to storage space
EPL Solutions, Inc.
1
GVISION v3
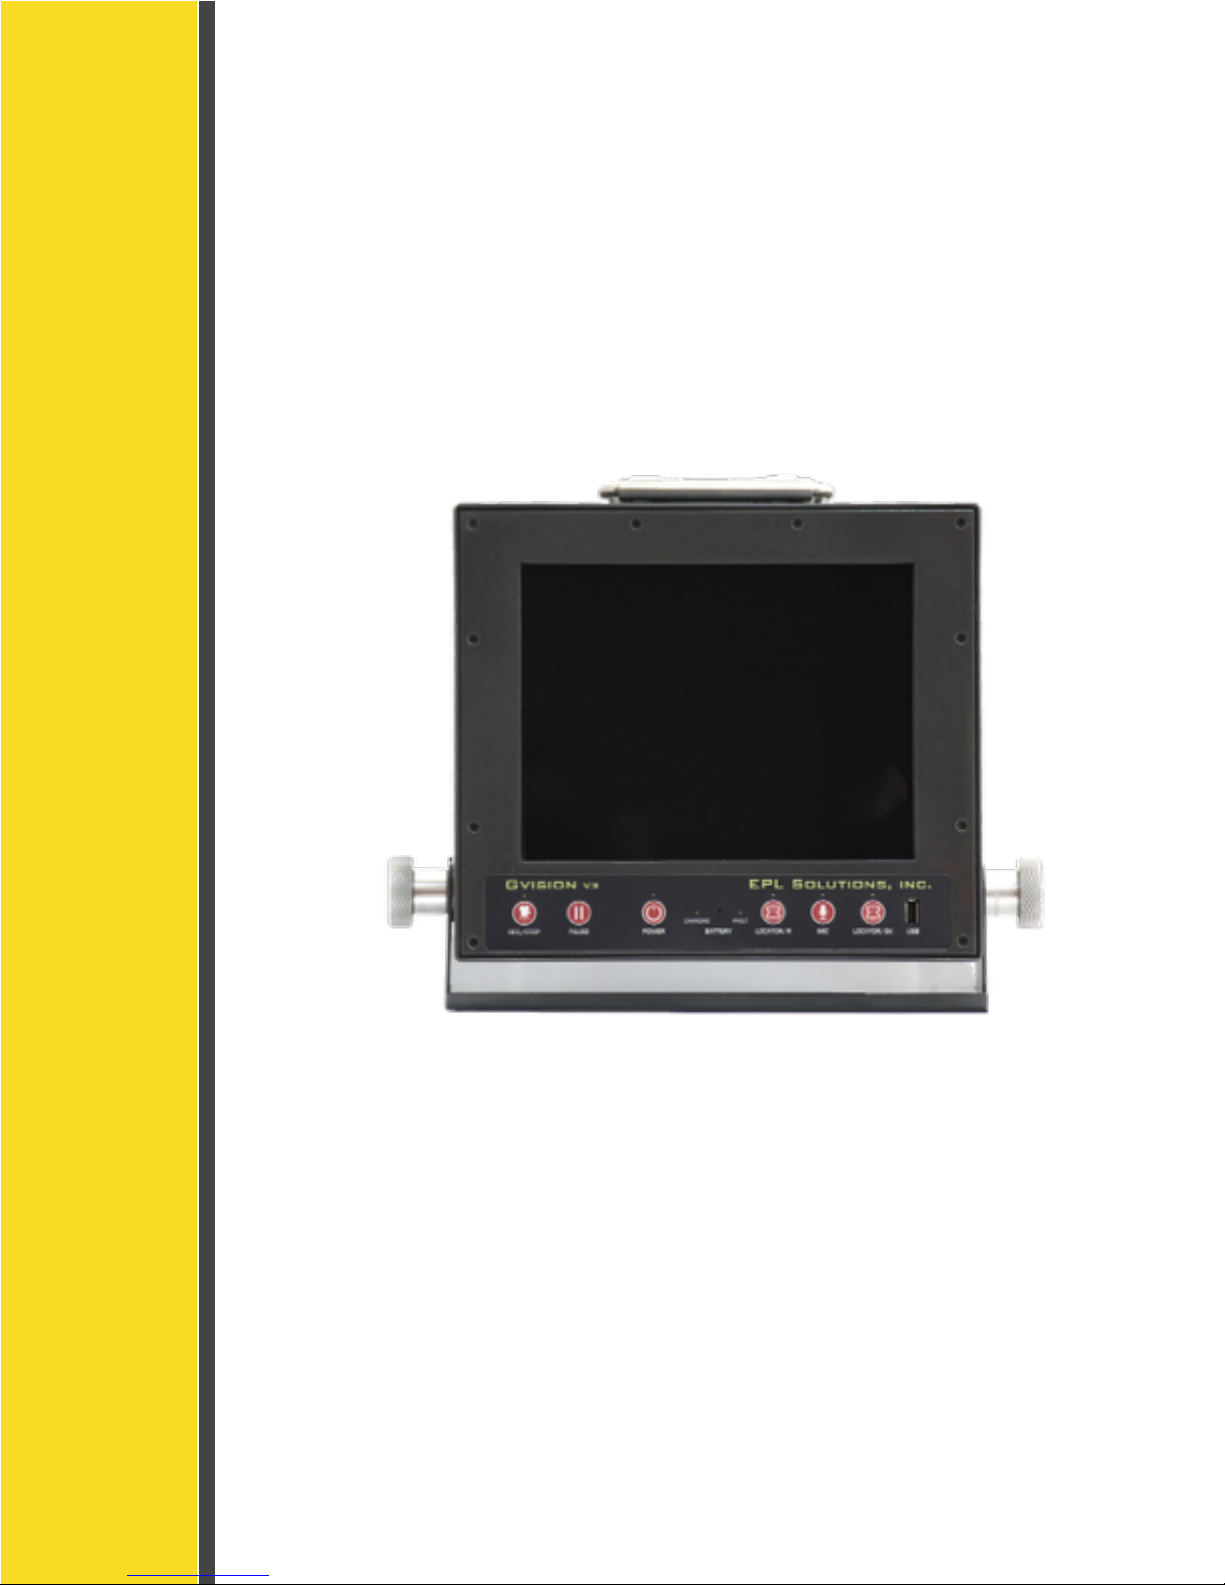
Thank you for purchasing the All-in-One Gvision v3
THE WORLD’S FIRST SMART TECHNOLOGY VIDEO INSPECTION SYSTEM
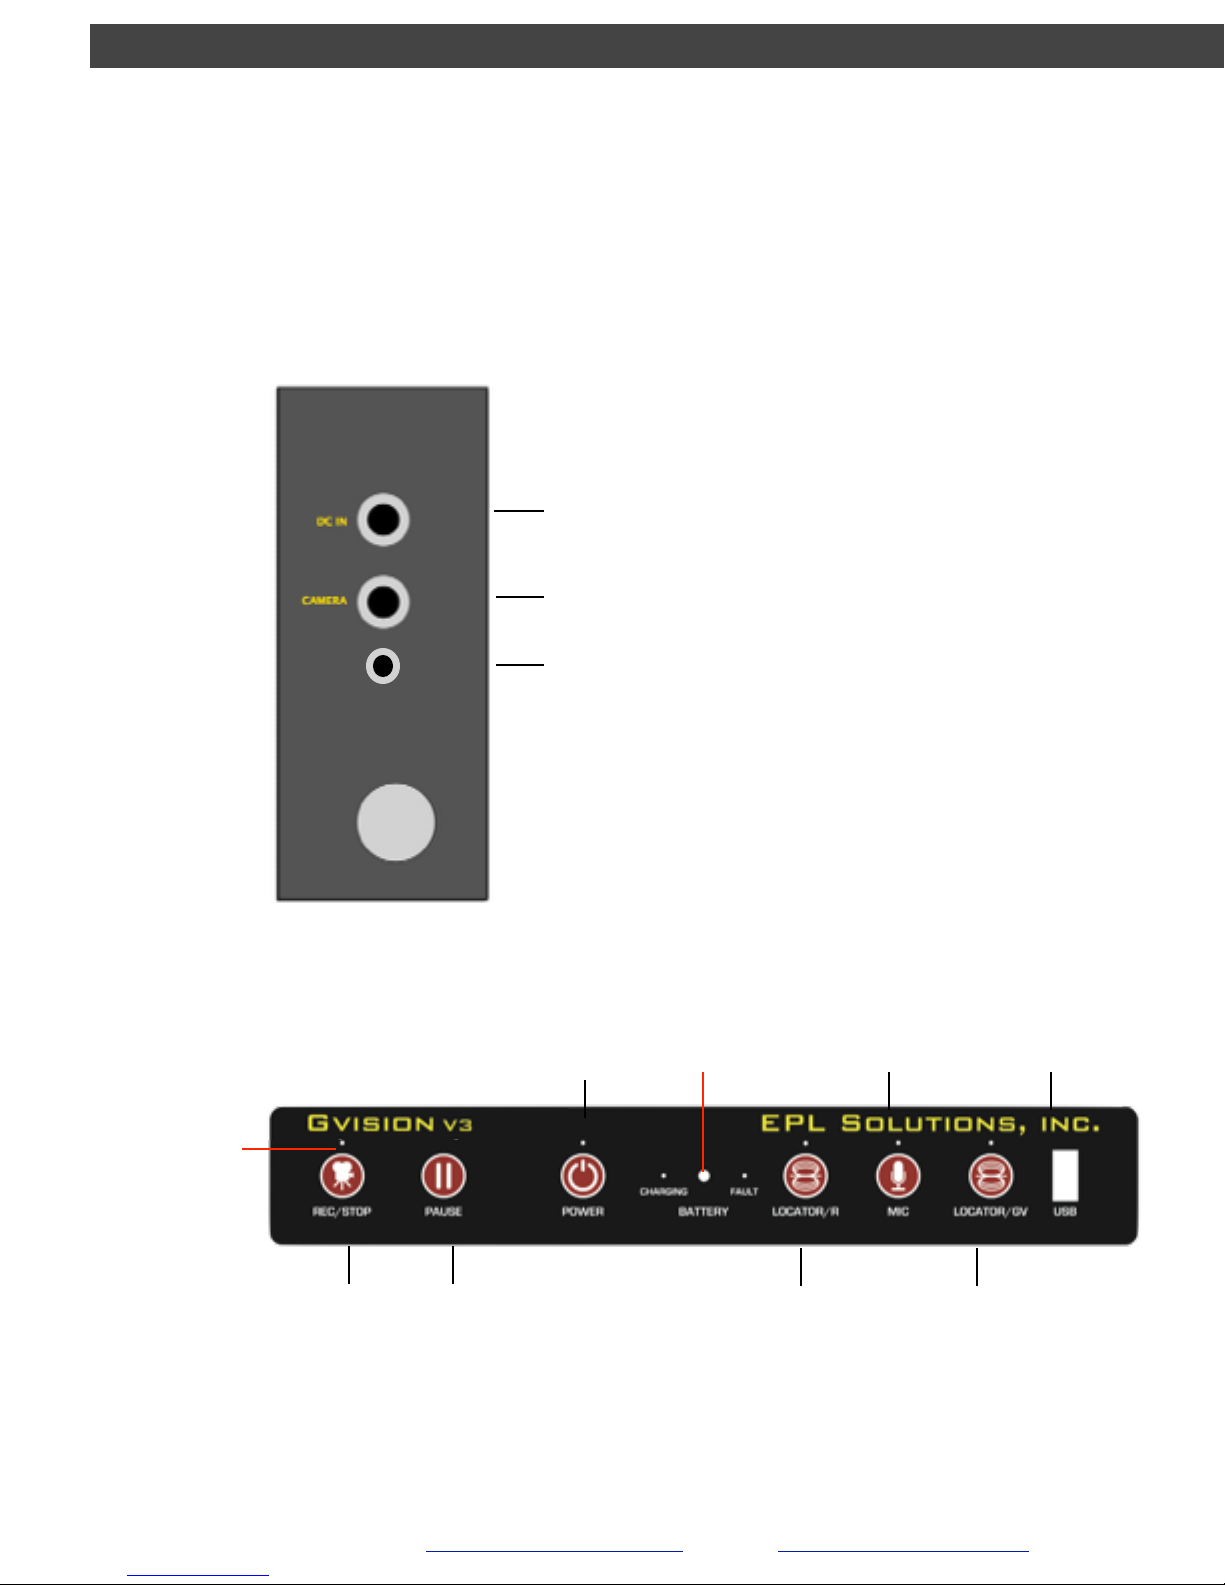
RECORD !
/ !
STOP
POWER!
ON/ OFF
SONDE ON/OFF!
&!
LIGHT CONTROL!
RIDGID SeeSnake®
MIC!
ON/OFF
FUTURE !
Gvision!
EQUIPMENT
USB
LED LIGHT!
INDICATOR
MIC
PUSH/PULL CONNECTIONS
PUSH BUTTON CONTROLS
12V DC IN (AC Power Supply)!
12V AUTOMOBILE AUX. IN FOR
BATTERY CHARGER ONLY.
UNIVERSAL CAMERA CORD
side view
EPL Solutions, Inc.
PAUSE!
RECORD
Video In/Out
AUDIO & VIDEO IN/OUT PORT
2

GVISION v3
LED CONTROLS
EPL Solutions, Inc.
• Solid GREEN indicates power is on.
• Flashing GREEN indicates low battery level. Gvision will self power-offin a few minutes. Plug
in AC to continue use.
• Press once to activate transmitter (green LED above the button is on)
• Press again to turn transmitter off(green LED above the button is off)
• Press and hold for 3 seconds to change light levels
• LED ash 3x light level High
• LED ash 2x lights level Medium
• LED ash 1x lights level Low
• Solid GREEN indicates sonde is on.
• Solid YELLOW indicates Mic is on.
• Solid BLUE indicates battery is charging.!
• Solid RED indicates battery charge fault. See next page.
• Solid AMBER indicates recorder power is on.
• Solid GREEN indicates USB device or iOS device is ready to record or can be safely
removed.
• Flashing RED indicates recording in progress.
• Flashing RED / GREEN indicates recording is paused.
3
GVISION v3
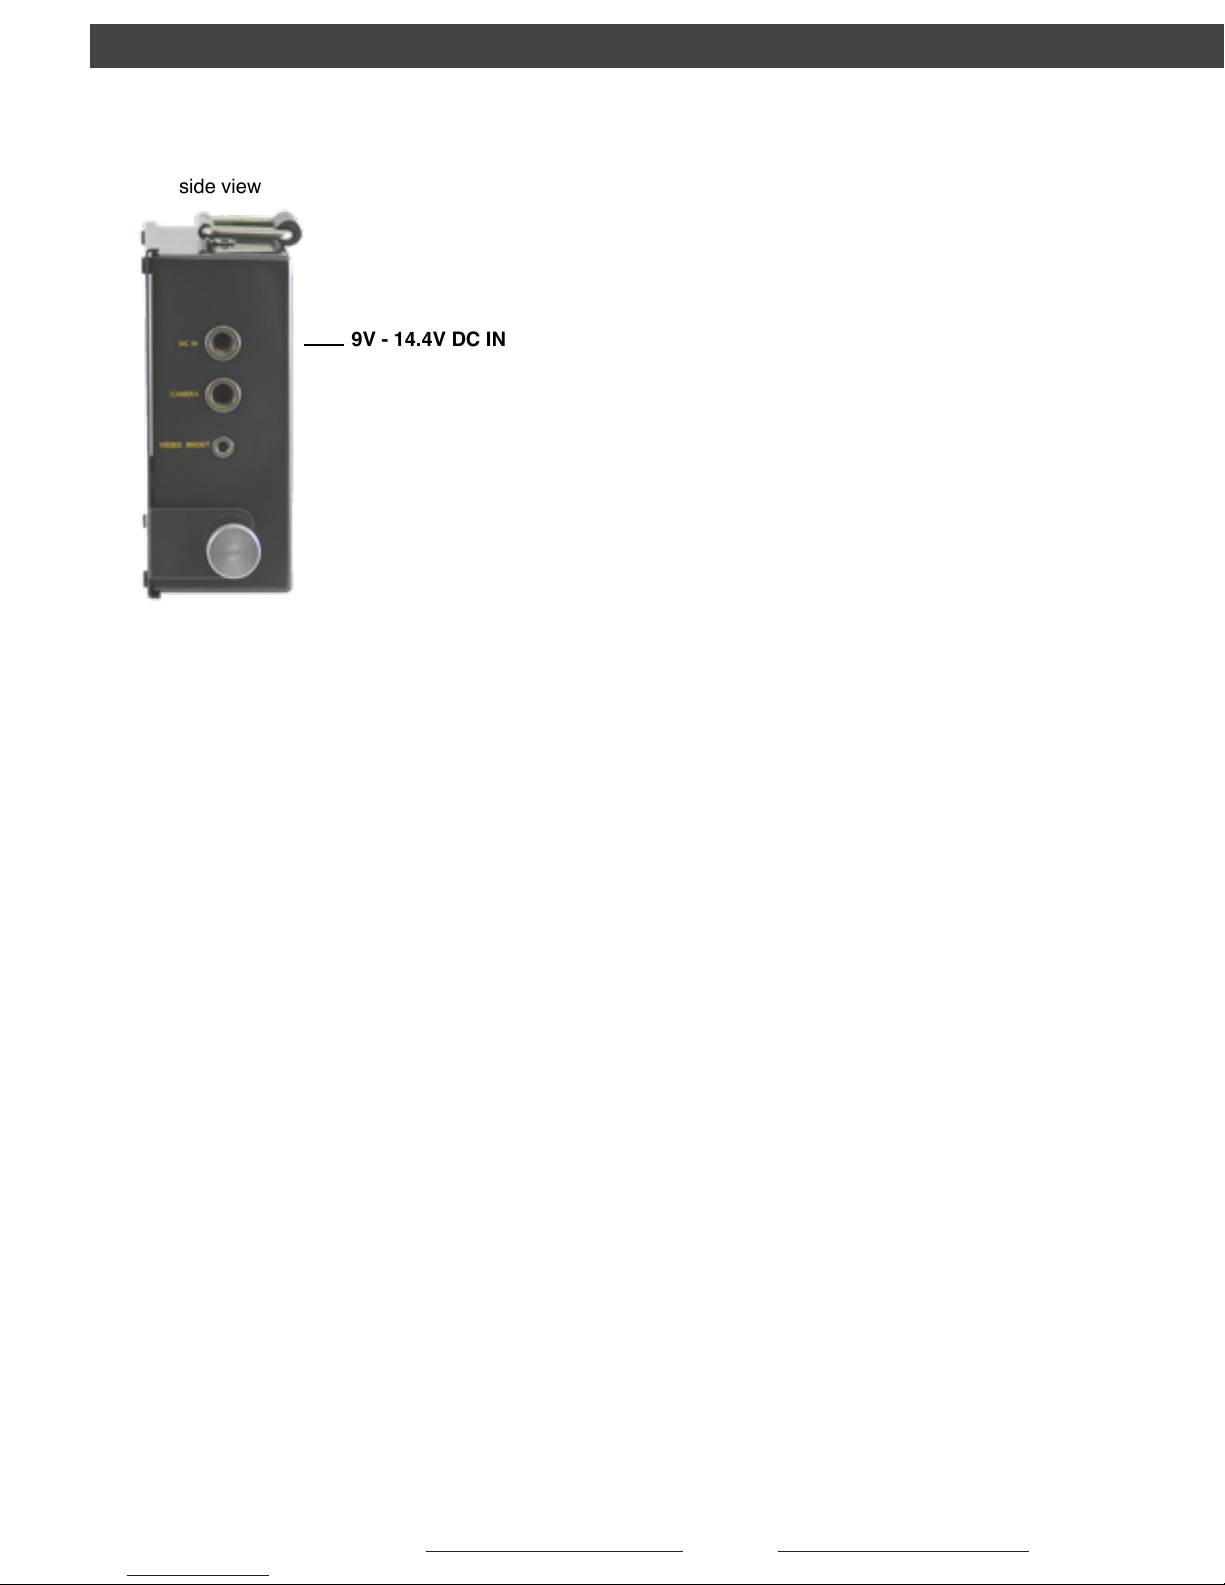
CHARGING THE INTERNAL BATTERY
9V - 14.4V DC IN
side view
The Gvision battery can be charged with the AC switching power supply or the DC
automobile auxiliary cord. A full recharge may take up to 4hrs. Gvision MUST BE OFF TO
CHARGE.!
!
Using the AC power supply:!
• Plug in the AC power supply cord into a wall outlet.!
• Plug in the DC connector into the Gvision v3.!
• The blue charging light will turn on.!
!
Using the DC automobile auxiliary cord:!
• Plug in the automobile auxiliary cord into your car or truck.!
• Plug in the DC connector into the Gvision v3.!
• The blue charging light will turn on.!
!
Fault light indicator. What to do:!
• Unplug the DC power from the DC IN connector.!
• Call EPL Solutions, Inc. (714) 453-9760!
!
Fault light indicator. Why is it on?!
• Battery temperature is above 60ºC/140ºF.!
• Smart charger ambient temperature is below 0ºC/32ºF or above 85ºC/185ºF.!
• The battery could be over charged or too low to be recharged.
EPL Solutions, Inc.
NOTE: S/3000 power supplies will not work with the V3.
4

GVISION v3
IMPORTANT !
RECORDING INFORMATION!
!
!
!
!
!When recording onto a USB drive, we recommend
using the GPlayer Flash for the best results. !
!A thumb drive’s performance depends on its controller
chip and NAND flash media quality. !
Gplayers are Grade “A” NAND flash drives are guaranteed for 3 years• to function
properly, and for this reason we suggest using the GPlayer for the finest results.
Other thumb drives may not work properly. !
EPL Solutions will not be held responsible if videos are lost due to !
1) User error !
2) Storage media failure.!
(I) Cell blocks go bad over time leading to data loss. It is a good practice to occasionally
format flash media when using one flash media as as storage device for long periods of
time. For more information see trouble shooting or visit http://eplsolutions.net/support.
EPL Solutions, Inc.
• The warranty does not cover the repair or exchange of products resulting from misuse, accident, modification,
unsuitable physical or operating environment, incorrect maintenance by yourself, or failure caused by a product for
which EPL Solutions, Inc. is not responsible. Damage caused by fair wear and tear is also excluded.
5
GVISION v3
Recording to an iPhone®, iPad®, iPod Touch®!
USB Thumb Drive / Hard Disc
Note: !
• When using an iPhone® or similar device, with iOS7 and Gplink downloaded, all recordings
are in the App Gplink.!
• When using an iPhone® or similar device, you can SMS or EMAIL a 1 minute video. Your iOS
device will tell you if your recording is too long but will allow you to select a 1 min. selection
from the recorded video.!
•When using an iPhone® or similar device, you can send a 10 minute video to your private
YouTube account and email your customer a web link.!
•When using an iPhone® or similar device, you can send video files to a DropBox account with
a private e-mail DropBox link.!
• We recommend using our CUSTOMIZED USB GPlayer to advertise your company with a built-
in media player for best professional results when not using your iPhone® or similar device.
EPL Solutions, Inc.
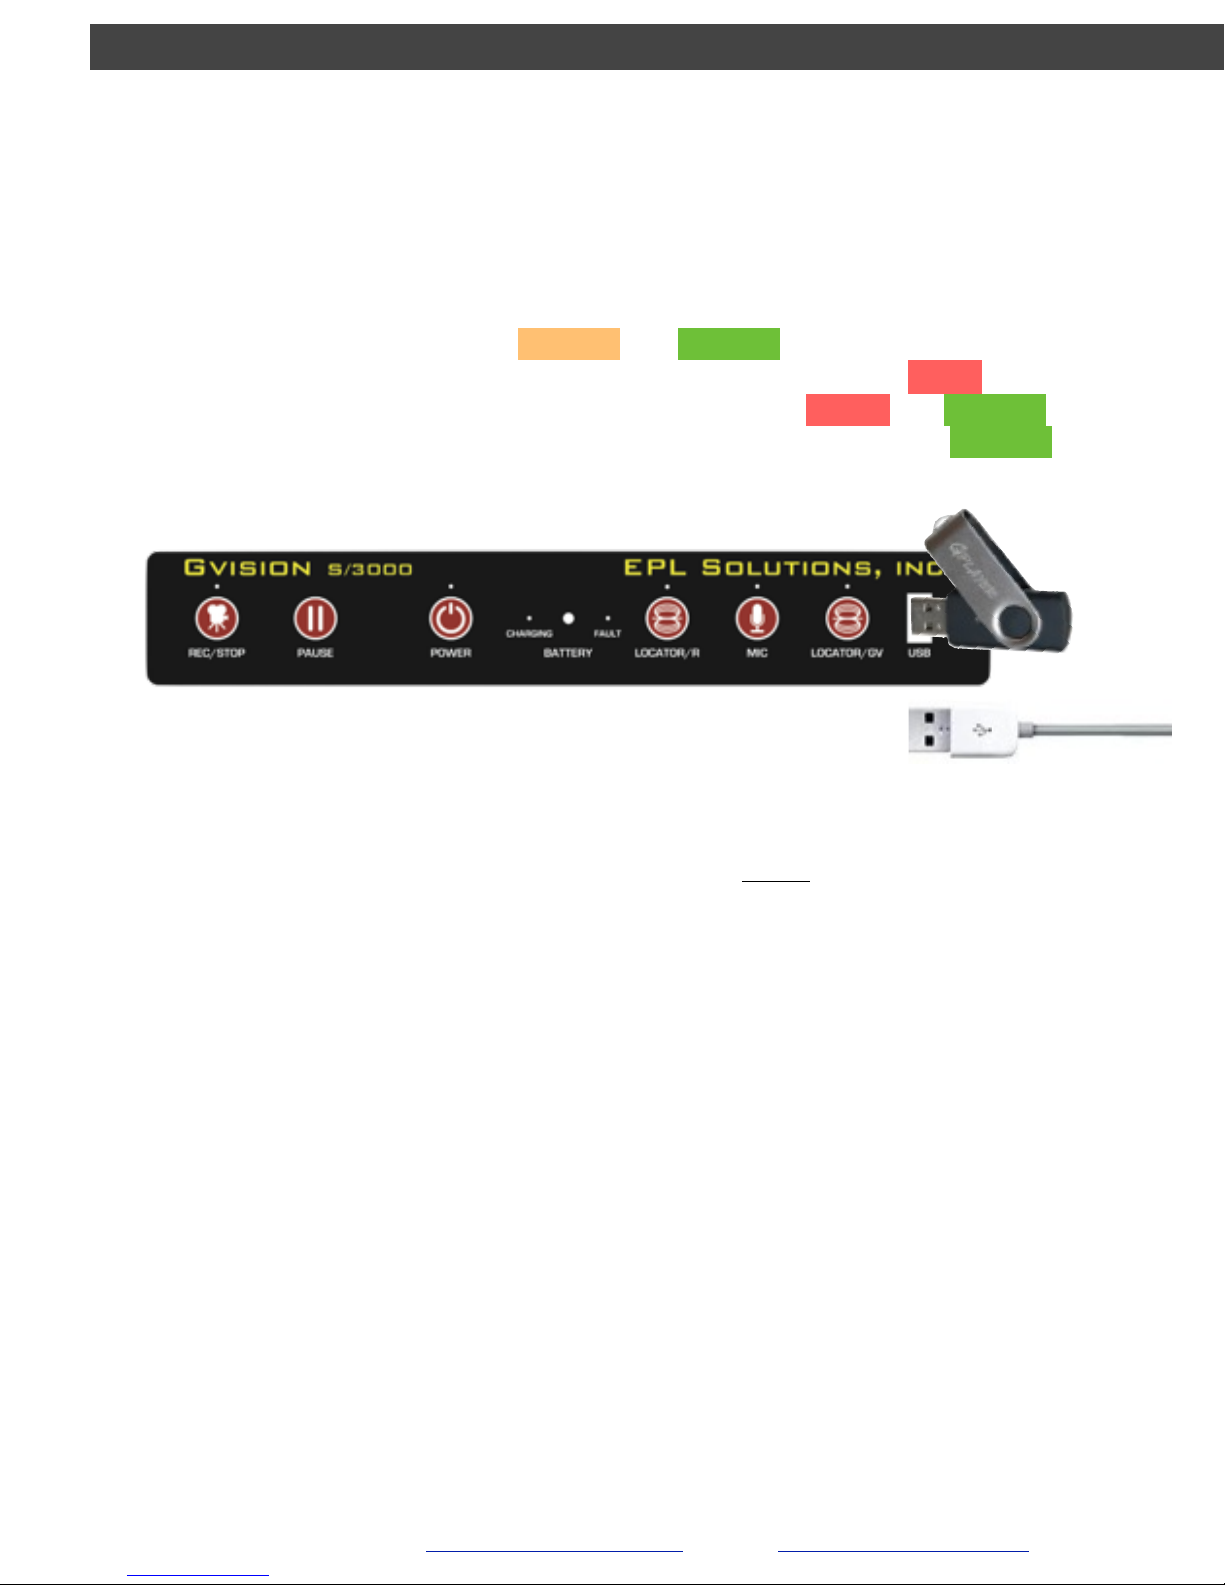
1. Insert your device into the USB port.!
2. When using a flash drive, the GPlayer Flash is highly recommended. See pg.4!
3. The REC/STOP light will change from AMBER to GREEN.!
4. Push the REC/STOP button to begin recording. The light will start blinking RED.!
5. Push the pause button to pause recording. The light will blink RED to GREEN!
6. To stop recording, push the REC/STOP button. The light will change to a solid GREEN.
6
GVISION v3
EPL Solutions, Inc.
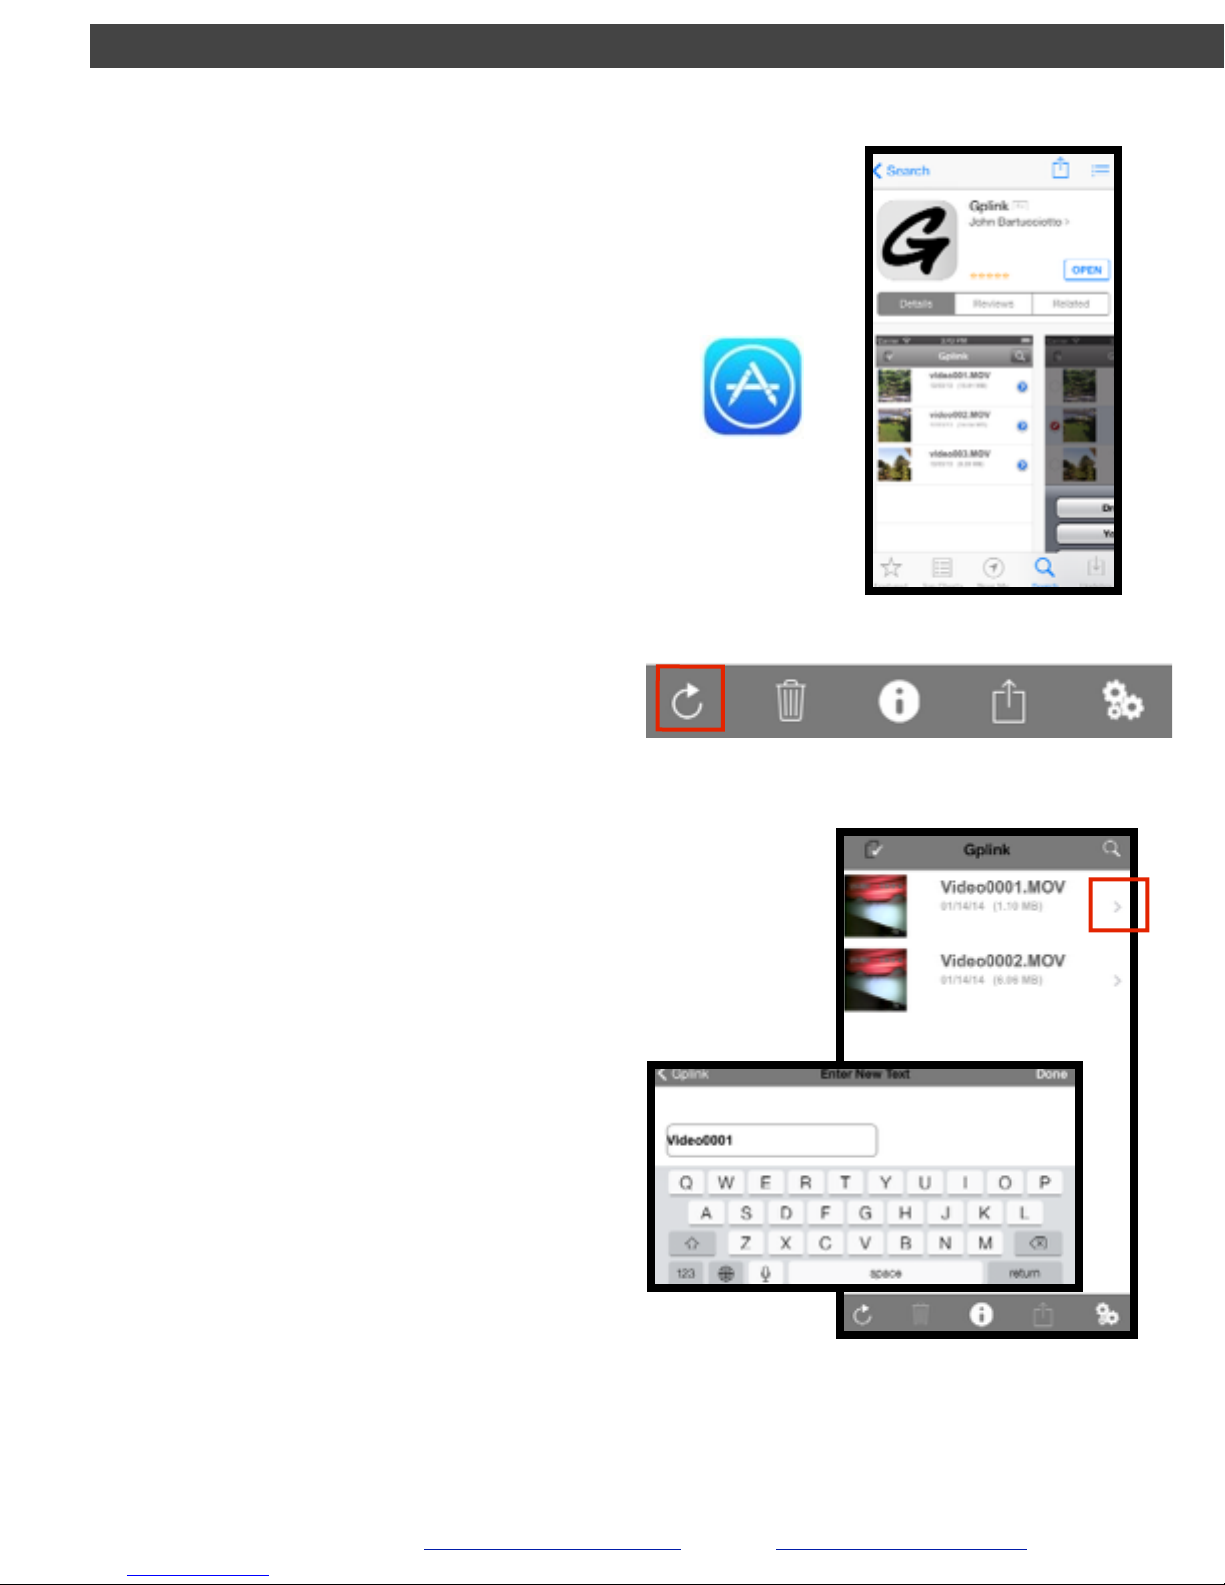
Using Gplink
Downloading
Renaming
1. You can download the Gplink App
from your mobile phone’s App Store or
the iTune’s App Store.
1. Tap the arrow (shown in red square).
2. Delete the video’s current name, and
input your new name for the video.
Recording
1. See Recording on Page 6
2. After recording with your iOS device,
open Gplink and tap the refresh button
on the bottom lefthand corner of your
screen.
7

Sharing
1. Tap the document icon located on the
top lefthand corner of your screen (hi-
lighted in red) and select the videos
you wish to share
2. Now tap the Share icon. A selection of
different share options will appear:
•DropBox This will share your video(s)
into the DropBox App. (See Page 11)!
!
•YouTube This will post your video(s)
on YouTube through your account!
!
•Gallery This will save your video(s)
into the Photo App, where you can
email or text message your video(s)
GVISION v3
EPL Solutions, Inc.
Using Gplink!
Continued
Before you can
share videos with
YouTube or
DropBox, you’ll need
Note: From this view you may also
delete videos. Choose the “Trash”
instead of the “Share” icon.
8

GVISION v3
EPL Solutions, Inc.
Using Gplink!
Continued
9
Uploading Videos
To load videos on your computer into the app, connect
your iOS device to your computer through an open USB
port.!
!
1. Launch the iTunes app on your computer.!
2. Select your device.!
3. Go to “Apps” from your device’s menu bar and scroll
to the bottom of the window.
4. See under File Sharing and select Gplink App (titled GLink)
5. Click the button “Add...”

GVISION v3
EPL Solutions, Inc.
Using Gplink!
Continued
10
6. Select a video from you finder and press “Add” when done.
Your video is now saved to the app.

GVISION v3
EPL Solutions, Inc.
Using YouTube from iOS Device
Create YouTube Account
1. Open YouTube on Web Browser, i.e.
Safari, etc.
1. Download YouTube App from the App
Store
If Safari fails:
2. Tap options button on top left corner
and select sign in. Choose Sign Up tab
on right corner
Through Web Browser:
2. Tap options button at top left corner
and select sign in. Choose Sign Up tab
on right corner.
Sharing Video
1. You can share a video to Youtube
using Gallery (Photo App) or
Gplink.
2. Fill in the fields: !
• title your video!
• add description!
• choose a quality (HD/SD) !
• category !
• and viewing options.
3. Publish !
!
(note: YouTube will post
videos up to 10 min. long)
11

GVISION v3
EPL Solutions, Inc.
Sharing through Gallery (Photo App)
1. After successfully sharing your
video(s) from Gplink to Gallery, open
the Photo App from your iOS home
screen.
iOS 6
iOS 7
2. Select the video you wish to share.
Tap the share icon on the bottom
lefthand corner of the screen.
3. From this view, you may select more
videos/photos to share before
choosing your method of sharing.
iOS 7 “share” iPhone screen
You can share via:!
!
•SMS!
•Email!
•YouTube!
•Facebook!
•Vimeo!
•AirDrop (see Apple Help)!
•AirPlay your video over an Apple TV
12
GVISION v3
EPL Solutions, Inc.
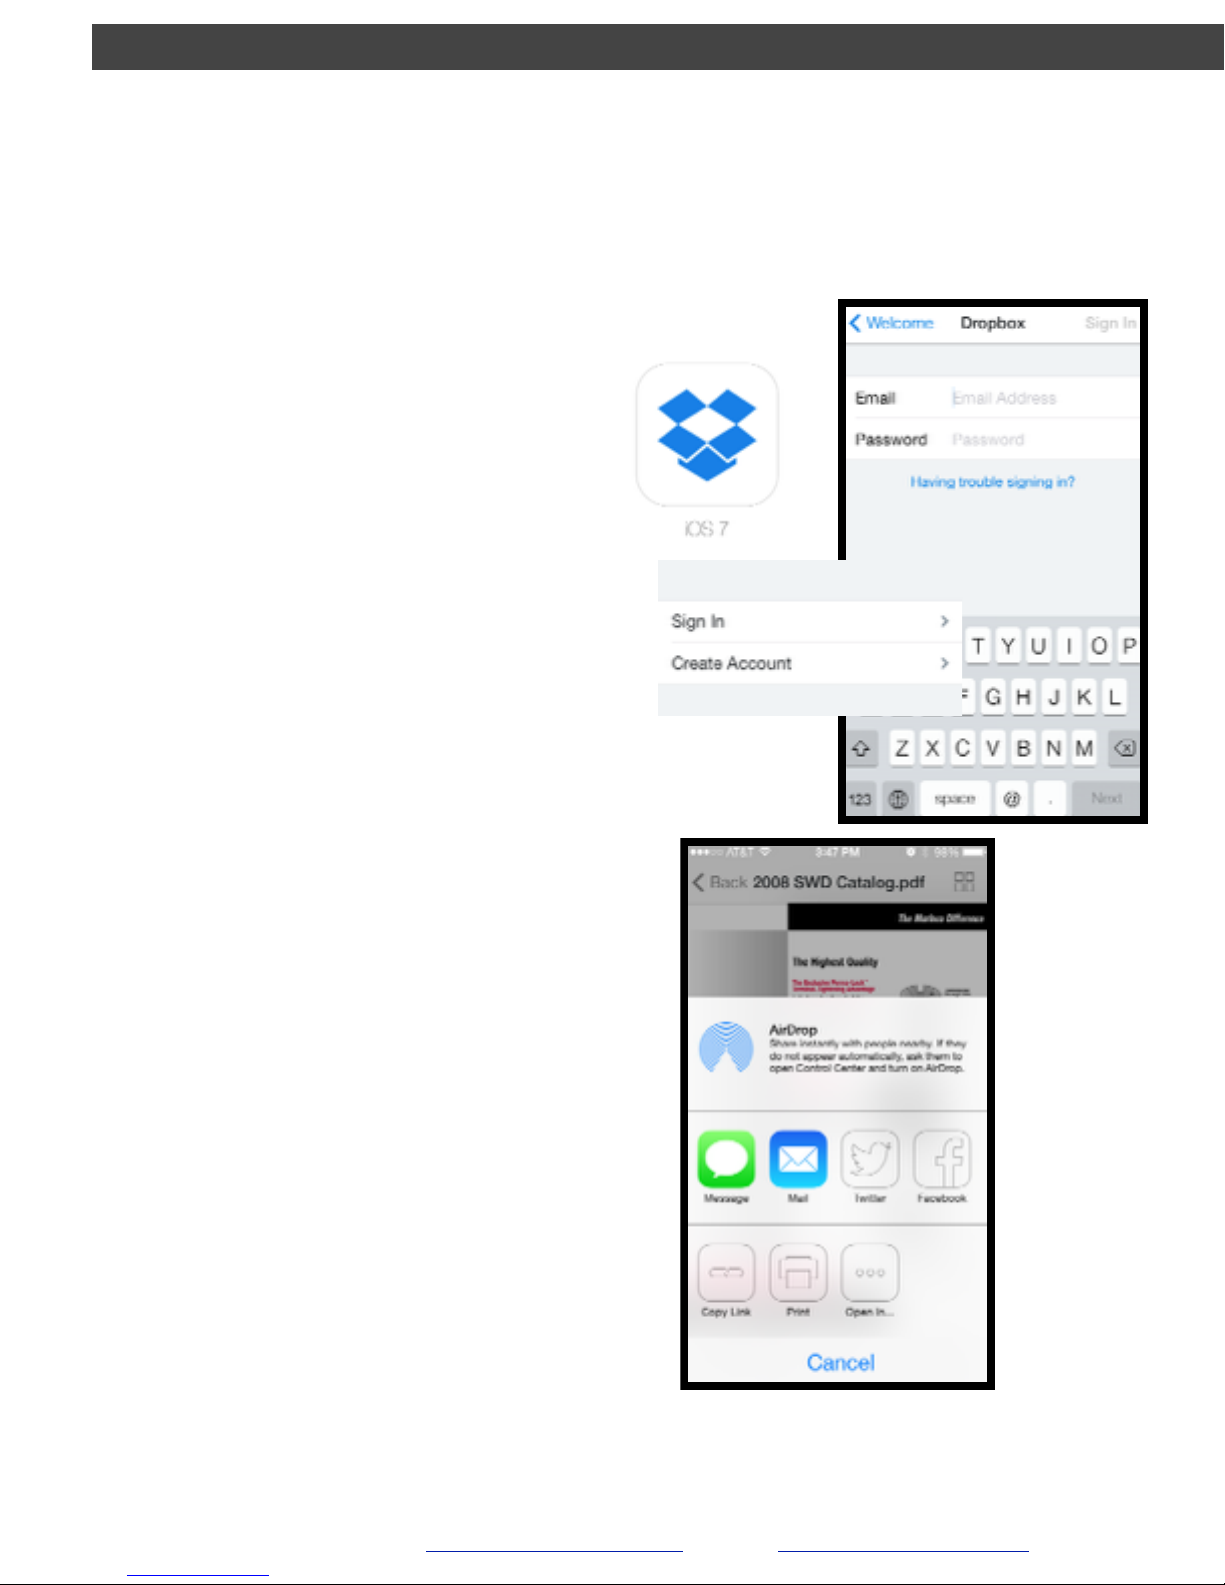
How To Send Media From DropBox Using!
iPhone®, iPad®, iPod Touch®
1. Download DropBox from the
App Store and open
2. Sign in to your account as
prompted, or create an account
1. View the file you wish to share
Sign in DropBox Account
Sharing Videos and Photos
2. Tap the share icon at the bottom
lefthand corner of the screen
3. Select your method of sharing,
such as email, text message, or
Facebook post.
For more info, view Dropbox Help
in DropBox App’s Settings
13

GVISION v3
Installation of Monitor Mount!
!
!
The GVISION S/3000 can be adapted to many
different camera reels but is not required to be mounted
on the handle in order to operate. The multi-purpose
protective face plate is a monitor stand.!
!!
1. Install the bracket directly onto the handle of the
camera (Images 10-12).!
2. Install the monitor onto the bracket (Image 13).!
!
!
NOTE: We recommend that the notch face toward the rear of
the camera system (refer to Image 12).!
EPL Solutions, Inc.
Image 10
Image 12
Image 11
Image 13
14

GVISION v3
3. Insert your CD into an Optical Drive. !
4. Select Open writable CD folder using
Windows Explorer and press OK
5. Select Copy all items to CD.
Note: You should include a media player i.e. the VLC
installer supplied on the free GPlayer USB Thumb
D r i v e o r Q u i c k Ti m e i n s t a l l e r f r o m http://
www.apple.com/quicktime/download/ at this time so
the client can view the file on their Windows®XP
client PC. Apple®and Windows®7
Windows®XP!
Burn Video onto an Optical
Disc (CD)!
!
1. Insert the Flash Drive into an open USB port
on your computer.!
2. Click on the Flash Drive under Devices with
Removable Storage.
EPL Solutions, Inc.
!
Video0001.MP4!
GPlayer (E:)
15

APPLE®!
Burn Video onto an Optical
Disc (CD)!
!
!
1. Insert the Flash Drive into an open USB port
on your computer.!
2. Click on the Flash Drive from your desktop
or a Finder window.
3. Insert a blank CD into the Optical Drive.
4. Hold down the alt/option key on the
keyboard and drag the file to the untitled
CD to be burned. Note: You should include
the Divx Codec installer (supplied) at this
time so the client can view the file on their
computer.!
5. Name the disk and click Burn.
PLEASE NOTE
The following section is not supported by EPL Solutions,
Inc. These are only recommendations as to how to make a
copy of your video onto an Optical Disk (CD).
GVISION v3
EPL Solutions, Inc.
arp -i en0 -a
16
Table of contents
Popular Industrial Monitor manuals by other brands

Enovation Controls
Enovation Controls MURPHY HelmView HV780 installation manual

Lumel
Lumel N20Z TYPE user manual

Siemens
Siemens SIMATIC Industrial Flat Panel IFP1500 quick start guide

Stone
Stone STAD150WT-15 Equipment manual

Max Machinery
Max Machinery MP370 user guide

3M
3M Dynapro ET 355 Monitor HL Installation Manual Addendum


Eaton
Eaton XV-152 Series operating instructions

Hope Industrial Systems
Hope Industrial Systems HIS-UM19-***H user manual

Bernecker + Rainer
Bernecker + Rainer MP181 user manual

Advantech
Advantech IDK-1115WP Series user manual

Synergy Global Technology
Synergy Global Technology LCDR7U19-08 user manual

EBN Technology
EBN Technology TM 120 quick guide