Epocal epoc User manual

51000623 Rev: 06
System
Manual
©2010 Epocal Inc. All rights reserved.
Epocal Inc.
2060 Walkley Road
Ottawa, Ontario,
Canada K1G 3P5
Tel: (613) 738-6192
Emergo Europe
Molenstraat 15, 2513 BH
The Hague, Netherlands
Tel: +31.70.345.8570
Fax: +31.70.346.7299
email: service@emergogroup.com
US Customer Support
Epocal Inc.
205 Witmer Road
Horsham, PA 19044
Tel:
(
215
)
956-9090

51000623 Rev: 06
Patents
CA D130757; CA 2,449,172; EP 1393052; IN 203566; IN 205670; IN 235316; JP 3863525;
JP 4119361; JP 4119361; JP 4498415; US 6,845,327; US 6,896,778; US 7,094,330; US
7,767,068 Patents pending
Trademarks
“Bluetooth” is a registered trademark of Bluetooth SIG, Inc
“Broadcom” is a registered trademark of Broadcom Corporation.
“epoc” is a registered trademark of Epocal Inc.
“SoMo 650” is a registered trademark of Socket Communications, Inc. dba Socket Mobile,
Inc..
“Liquicheck” is a registered trademark of Bio-Rad Laboratories.
“Mission Complete” is a registered trademark of Mission Diagnostics, a division of Diamond
Diagnostics.
“Mission Control” is a registered trademark of Mission Diagnostics, a division of Diamond
Diagnostics.
“Windows Mobile” is a registered trademark of Microsoft Corporation.
“Eurotrol” is a registered trademark of Eurotrol Inc.

51000624 Rev: 13 Table of Contents Page 1 of 5
SectionTitle Page
Table of Contents
1 Introduction
1.1 epoc System Manual ............................................................... 1-1
1.2 Cautions................................................................................ 1-2
1.3 Warranty............................................................................... 1-2
1.4 Warranty Limitations............................................................... 1-3
1.5 WEEE Compliance................................................................... 1-3
2 epoc Blood Analysis System
2.1 System Overview.................................................................... 2-1
2.2 Operation Overview ................................................................ 2-2
3 epoc System Operation
3.1 System Operation Overview ..................................................... 3-1
3.2 System Operating Instructions.................................................. 3-1
4 epoc Test Cards
4.1 General Test Card Information.................................................. 4-1
4.2 Test Card Packaging, Storage and Shelf Life ............................... 4-1
5 epoc Reader
5.1 Overview............................................................................... 5-1
5.2 Power Requirements ............................................................... 5-2
5.3 Rechargeable Battery .............................................................. 5-3
5.4 Reader Status and Firmware Version ......................................... 5-3
5.5 Test Status ............................................................................ 5-4
5.6 Audible Signals....................................................................... 5-4
5.7 Card Insertion Slot.................................................................. 5-5
5.8 Docking Pivot......................................................................... 5-5
5.9 USB Maintenance Port ............................................................. 5-6
5.10 Motorized Mechanism ............................................................ 5-6
5.11 Wireless Module.................................................................... 5-6
5.12 Bar Code Scanner ................................................................. 5-6
5.13 Thermal System.................................................................... 5-7
5.14 Operating Environment.......................................................... 5-7
Table of Contents

51000624 Rev: 13 Table of Contents Page 2 of 5
Section Title Page
6 epoc Host
6.1 Overview............................................................................... 6-1
6.2 Rechargeable Battery .............................................................. 6-2
6.3 Host Cradle Removal Instructions.............................................. 6-2
6.4 Barcode Scanner .................................................................... 6-4
6.5 Optional AC Adaptor for Host.................................................... 6-4
6.6 Power Button ......................................................................... 6-5
6.7 Soft and Hard Reset................................................................ 6-5
6.8 Navigation ............................................................................. 6-6
6.9 Entering Text ......................................................................... 6-6
6.10 Date/Time Clock ................................................................... 6-7
6.11 Status Indicators................................................................... 6-8
6.12 User Accounts ...................................................................... 6-8
6.13 epoc Host Application User Interface........................................ 6-9
6.14 User Interface Menu Trees.....................................................6-10
6.15 Start Up Screen ...................................................................6-14
6.16 Login Screen .......................................................................6-14
6.17 Operational Modes ...............................................................6-15
6.18 Testing Mode.......................................................................6-15
6.19 Main Reader Screen..............................................................6-16
6.20 Reader Screen.....................................................................6-17
6.21 Reader Screen Pages............................................................6-18
6.22 Test Results Page.................................................................6-19
6.23 Critical Values Actions...........................................................6-20
6.24 Test Information Page ..........................................................6-21
6.25 Test Selection Page ..............................................................6-21
6.26 Respiratory Therapy Parameters.............................................6-22
6.27 EDM Synchronization............................................................6-25
6.28 Viewing Tests Mode..............................................................6-26
6.29 Viewing Electronic QC Mode...................................................6-27
6.30 Personal Options Page ..........................................................6-28
7 epoc Host Administration
7.1 General ................................................................................. 7-1
7.2 First Time Administrator Log in ................................................. 7-1
7.3 Limitations For Use ................................................................. 7-1
7.4 Administrator Access............................................................... 7-2
7.5 Windows Mobile™ Operating System ......................................... 7-2
7.6 Administrator User Interface..................................................... 7-3
7.7 Administrator Options.............................................................. 7-4
7.8 Barcode Options Page.............................................................. 7-9
7.9 EDM Options Page..................................................................7-10
7.10 Card Option Pages................................................................7-11
7.11 Personal Options Page ..........................................................7-13
7.12 Software Upgrades...............................................................7-14
7.13 Set Date, Time and Time Zone...............................................7-16
7.14 Reader Identifiers ................................................................7-17
7.15 Reader Configuration and Reader Software Upgrade..................7-17
7.16 Dedicating Readers ..............................................................7-19
7.17 Test Record Administration....................................................7-19

51000624 Rev: 13 Table of Contents Page 3 of 5
Section Title Page
8 epoc Data Manager
8.1 Introduction........................................................................... 8-1
8.2 Deployment ........................................................................... 8-1
8.3 Hardware and Software Requirements ....................................... 8-1
8.4 Installation ............................................................................ 8-2
8.5 epoc Database........................................................................ 8-2
8.6 epoc Link Application............................................................... 8-2
8.7 Using EDM Web Application...................................................... 8-3
8.8 View / Update Tests Page......................................................... 8-4
8.9 Filtering Results In The View Test Page...................................... 8-6
8.10 Printing ............................................................................... 8-7
8.11 Exporting List of Tests to CSV File ........................................... 8-8
8.12 QA Tests.............................................................................. 8-8
8.13 Electronic QC Page ................................................................ 8-9
8.14 Usage Statistics Page............................................................8-10
8.15 Users Page..........................................................................8-11
8.16 Groups Page........................................................................8-12
8.17 Host Settings.......................................................................8-14
8.18 Host Settings – Units............................................................8-14
8.19 Host Settings – Ranges.........................................................8-15
8.20 Host Settings – Software Update............................................8-16
8.21 Host Settings – Global Host Settings.......................................8-17
8.22 Configurations .....................................................................8-18
8.23 Departments .......................................................................8-19
8.24 epoc Manager Settings..........................................................8-21
9 Quality Assurance
9.1 Overview............................................................................... 9-1
9.2 Recommended Quality Control for epoc System........................... 9-1
9.3 Additional Quality Control for epoc System ................................ 9-3
9.4 Aqueous Fluid Handling............................................................ 9-4
9.5 Value Assignment Datasheets................................................... 9-6
10 Care and Maintenance of epoc System
10.1 General Information .............................................................10-1
10.2 Care of the epoc System.......................................................10-1
10.3 Cleaning .............................................................................10-1
10.4 Maintenance........................................................................10-2
11 Theory of Operation
11.1 epoc Host ...........................................................................11-1
11.2 epoc Reader........................................................................11-2
11.3 epoc Test Card ....................................................................11-3
11.4 Sensor Module.....................................................................11-4
11.5 Sensor Electrodes ................................................................11-6
11.6 Quality Control and epoc System..........................................11-10
11.7 References........................................................................11-14

51000624 Rev: 13 Table of Contents Page 4 of 5
SectionTitle Page
12 BGEM Test Card Specifications
12.1 General BGEM Test Card Specifications ...................................12-1
12.2 Test Card Configuration ........................................................12-2
12.3 Sodium (Na+) .....................................................................12-6
12.4 Potassium (K+) .................................................................12-11
12.5 Ionized Calcium (Ca++)......................................................12-16
12.6 Hematocrit (Hct) and Calculated Hemoglobin (cHgb)...............12-21
12.7 pH ...................................................................................12-27
12.8 pCO2and Calculated cHCO3-, cTCO2and BE............................12-33
12.9 pO2and Calculated cSO2.....................................................12-39
12.10 Lactate (Lac) ...................................................................12-45
12.11 Glucose (Glu)...................................................................12-50
13 epoc Reader and Host Specifications
13.1 epoc Reader....................................................................... 13-1
13.2 epoc Reader Components..................................................... 13-2
13.3 epoc Host .......................................................................... 13-3
13.4 epoc Host Accessories...........................................................13-4
13.5 epoc System Compliance...................................................... 13-5
14 Troubleshooting and Error Messages
14.1 General ..............................................................................14-1
14.2 Out-Of Range Results on the Test Card for Liquid Quality Control
or Calibration Verification .....................................................14-1
14.3 Failed Reader Electronic QC...................................................14-2
14.4 Failed Thermal QA................................................................14-2
14.5 epoc Host Application Messages .............................................14-2
15 Glossary
15.1 Symbols .............................................................................15-1
15.2 Terminology and Abbreviations ..............................................15-2

51000624 Rev: 13 Table of Contents Page 5 of 5
Document / Revision List
Section—Title Document
Number Revision
Cover Page 51000623 06
Table of Contents 51000624 13
01 - Introduction 51000625 05
02 - epoc Blood Analysis System 51000627 05
03 - epoc System Operation 51000635 08
04 - epoc Test Cards 51000629 07
05 - epoc Reader 51000631 04
06 - epoc Host 51000632 08
07 - epoc Host Administration 51000634 08
08 - epoc Data Manager 51001364 04
09 - Quality Assurance 51000636 09
10 - Care and Maintenance of the epoc System 51000639 07
11 - Theory of Operation 51000628 05
12 - BGEM Test Card Specifications 51000630 09
13 - epoc Reader and Host Specifications 51000633 07
14 - Troubleshooting and Error Messages 51000638 07
15 - Glossary 51000626 07

51000625 Rev: 05 Introduction 1-1
1.1 epoc System Manual
General
The epoc System Manual describes the proper use and operation of the epoc Blood Analysis
System. System operators and the system administrator should familiarize themselves with the
applicable sections in the manual prior to conducting testing.
All operators and the system administrator require training by Epocal authorized personnel prior
to conducting patient testing. This training is based upon the information contained in this
manual. The System Manual should be made available to the administrator and operators at all
times while the epoc Blood Analysis System is in use.
Organization of System Manual
The System Manual is organized into sections corresponding with the Table of Contents at the
front of the manual. Each section is controlled and maintained separately by the document and
revision number at the bottom of each page.
Section 2 “epoc Blood Analysis System” provides a brief description of the epoc System and its
major components.
Section 3 “epoc System Operation” describes the steps and necessary information for
performing a test, including sample collection and interpretation of test results.
Sections 4, 5 and 6 “epoc Test Cards”, “epoc Reader” and “epoc Host” describe the function
and construction details of the major system components.
Section 7 “epoc System Administration” describes to the system administrator how to set up
and maintain key settings in the epoc Host application prior to releasing the system for patient
use. Requirements for ongoing administrative maintenance are also described.
Section 8 “epoc Data Manager” describes how to set up and operate the optional “epoc Data
Manager”.
Section 9 “Quality Assurance” describes recommended and additional Quality Control and
Calibration Verification procedures used to verify the performance of the epoc System. These
procedures include internal, liquid, whole blood, calibration verification, and proficiency testing
quality control procedures. The rationale for the epoc System quality control is described in the
“Theory of Operation” section of this manual
Section 10 “Care and Maintenance of the epoc System” section describes the cleaning and
maintenance procedures.
Section 11 “Theory of Operation” contains the methodology, principles of operation and the
special merits and limitations of the epoc System.
Section 12 “BGEM Test Card Specifications” contains performance characteristics and
specifications for the test cards, including measurement ranges, limitations and interferences for
each analyte.
Sections 13 “epoc Reader and Host Specifications” provides specifications for the entire system
and each of the major components as well as compliance information.
Section 14 “Troubleshooting and Error Messages” should be referenced if problems arise during
the use of the epoc System.
Section 15 “Glossary” defines terms and acronyms used in the system manual.
01 Introduction

51000625 Rev: 05 Introduction 1-2
1.2 Cautions
Cautions are identified throughout the manual using the “Caution risk of danger”
or “Caution, consult accompanying documents” symbol. The operator and
administrator need to pay special attention to the instructions accompanying this
symbol to ensure that the epoc Blood Analysis System is used properly, reliably
and safely.
The “Biological risks” symbol is used in the manual to identify potential biological
risks associated with the handling of blood samples. Precautions, as stipulated by
the facility where the epoc system is utilized, must be taken to ensure that the
risk of transmitting blood borne pathogens is minimized.
Other symbols may also be used in the Operator’s Manual. The correct interpretation of
these symbols is located in the Glossary Section.
1.3 Warranty
Epocal Inc. (“Epocal”) warrants to the original customer that the medical equipment
manufactured by Epocal is free from defects in materials and workmanship, and under
normal and proper use conditions, for a period of one (1) full year from the date of
shipment. Upon receiving notice from the customer of any defects within this warranty
period, Epocal shall, at its option and sole discretion, either repair, replace or modify this
medical equipment or part thereof, which proves to be defective. Epocal shall repair or
replace software media and firmware which does not execute as intended due to such
defects. These replacements, repairs, or alterations will in no case extend the specified
herein warranty period. Epocal does not warrant that the operating of the software,
firmware or hardware shall be uninterrupted or error free.
If Epocal is unable, within a reasonable time, to repair, replace or modify any product to a
condition as warranted, the customer shall be entitled to a refund of the purchase price upon
return of the product to Epocal, together with a copy of the dated itemized purchase receipt
and the original packaging.
The test card warranty is limited to, and prorated in accordance with the “use by” date
indicated on the test card labeling. The customer must inform Epocal immediately upon
receipt if it is evident that the test cards were improperly stored or handled during
shipment. Epocal is not responsible for test cards that have been handled and stored outside
the specified requirements stated in the System Manual after delivery to the customer.
The warranty does not cover these parts that deteriorate, or which are in any case
considered consumables, or those parts or items, which by their nature are normally
required to be replaced periodically consistent with normal maintenance .
Note: Warranty rights may vary from state to state, province to province and country to
country.

51000625 Rev: 05 Introduction 1-3
1.4 Warranty Limitations
The foregoing warranty shall not apply to defects resulting from:
1Improper, inadequate, insufficient or negligent storage, care or maintenance by the
customer or an unauthorized person,
2Misuse due to carelessness, negligence or inexperience,
3Using accessories and/or consumables that are not approved by Epocal,
4Unauthorized use of buyer-supplied hardware, software or interfacing,
5Unauthorized repairs, modifications, misuse, or damage caused by disposable batteries,
or rechargeable batteries not supplied by Epocal,
6Failure to use the device and accessories in accordance with operating instructions,
7Operating outside of the environmental specifications of the product,
8Improper site preparation or maintenance, or
9Expiration of test card “use by” date.
NO OTHER WARRANTIES, EXPRESS OR IMPLIED, ARE MADE. EPOCAL WILL NOT BE LIABLE
FOR ANY INCIDENTAL OR CONSEQUENTIAL DAMAGES RESULTING DIRECTLY OR
INDIRECTLY FROM THE FAILURE OF THE PRODUCT TO PERFORM IN ACCORDANCE WITH
SPECIFICATIONS.
Some states do not allow the exclusion or limitation of other express or implied warranties
or incidental or consequential damages, so the above limitations or exclusions may not
apply.
No agent or employee of Epocal is authorized to extend any other warranty or to assume for
Epocal any liability except as set forth above.
1.5 WEEE Compliance
Epocal Inc. complies with Directive 2002/96/EC of the European Parliament and of the
Council of 27 January 2003 on waste electrical and electronic equipment (WEEE).
Compliance is indicated on the epoc hardware using the Wheelie Bin symbol.
Customers should contact their epoc distributer or Epocal Inc., the manufactuer, to arrange
for disposal of their epoc electrical and electronic hardware at the end of product life.
Contact information is provided on the cover page of this instruction manual.

51000627 Rev: 05 epoc Blood Analysis System 2-1
2.1 System Overview
The epoc Blood Analysis System
oIs a Portable Blood Analyzer comprised
of 3 components:
•epoc Reader
•epoc Host
•epoc Test Card
epoc Reader
oBattery powered portable device
oHas an internal barcode scanner
oHas card slot for accepting test card
oReads epoc test cards during blood test
oHas status indicators to inform user of test progress
oMeasures electrical signals from test card sensors
oTransmits test results wirelessly via Bluetooth to the epoc Host
epoc Host
oDedicated use mobile computer with epoc Host software application installed
oCommunicates wirelessly via Bluetooth with epoc Reader
oCalculates analytical values from sensor data sent by epoc Reader
oDisplays test results
epoc Test Card
oSingle use device with port for blood sample introduction
oContains array of sensors on a Sensor Module
oContains calibration fluid within sealed reservoir
oGenerates electrical signals proportional to analyte concentrations in sample
oUses Barcode to identify Card Type, “Use By” Date, Serial and Lot Number
02 epoc Blood Analysis System

51000627 Rev: 05 epoc Blood Analysis System 2-2
2.2 Operation Overview
A single blood test is performed in the following way:
1Use epoc Host to establish wireless connection with an epoc Reader.
2Obtain a new Test Card and remove from pouch.
3Insert Test Card into Reader. The Reader reads the barcode on the card. “Use
By” date is checked and card serial number is linked to test result and any
related patient data that was entered.
4Internal motor of the Reader is actuated to start the calibration process. This
process releases a calibration fluid in the card that flows across sensors within
the card. User has time to prepare the patient and draw the blood sample.
5User introduces the sample into the Test Card upon completion of calibration.
6Reader sends test results to the Host. Results are calculated and displayed on
the Host in about half a minute.

51000635 Rev: 08 epoc System Operation 3-1
3.1 System Operation Overview
Follow set up instructions for the epoc Reader and epoc Host before conducting a
test.
Only use Test Cards that have been properly stored.
To complete a test the following steps are required:
1. Turn ‘ON’ epoc Reader and epoc Host.
2. Log in to epoc Host software application.
3. Discover epoc Reader by connecting wirelessly from epoc Host.
4. Begin test sequence.
5. Insert new test card into epoc Reader.
6. Enter patient information, select tests and sample type (if applicable).
7. Introduce blood sample into test card.
8. Observe results and possibly print test results.
9. Remove card and discard.
Once logged in and connected to an epoc Reader, steps 5 through 9 above are required to
perform another test.
3.2 System Operating Instructions
3.2.1 Turn ‘ON’ epoc Reader
Depress Power Switch to turn ‘ON’ epoc Reader. The
Power LED will turn green indicating the epoc Reader is
‘ON’ and ready for use.
Only epoc Readers that are switched ‘ON’ will be located
by the epoc Host.
Turn ‘OFF’ any epoc Readers not in active use to
conserve battery power.
03 epoc System Operation
Power
Switch

51000635 Rev: 08 epoc System Operation 3-2
3.2.2 Turn ‘ON’ epoc Host
Press the Power Switch (upper right) to wake up the epoc Host if
the screen is blank. The epoc Host Power Button starts and stops
the device.
Note:The Soft Reset Button always re-boots the epoc Host
application and displays the Login page.
3.2.3 Login to epoc Host Software Application
After a soft reset or logging out, the epoc Host software application
displays the Login Page.
Enter a valid User ID and Password and press the Login button.
Note:User ID and Password requirements may vary depending upon
how the Administrator has set up the login requirements.
3.2.4 Run a Test
Begin a test process by connecting epoc Host to an epoc Reader. If
epoc Host is already configured to connect with a single dedicated
epoc Reader, the epoc Host will automatically connect to that epoc
Reader to run a blood test and begin the Electronic QC Test.
A connection is cancelled by tapping the Cancel button.
Power
Button
Soft Reset Button

51000635 Rev: 08 epoc System Operation 3-3
3.2.5 Alternate Means to Run a Test
If the system administrator has configured the system for multiple dedicated epoc Readers,
all epoc Readers available for connection are listed. The Reader Icon displays the Reader
Alias and the serial number below.
The Discovery icon can also be tapped to find (“discover”)
more readers. Tapping the discovery icon when inactive will
initiate this discovery process. Tapping the discovery icon while
discovering will end the discovery process.
Once the desired Reader is displayed, press and hold its Reader Icon to select it for
testing. A drop down menu is displayed. For a blood test, select “Run blood test”. For a
QA test (if authorized), select “Run QA test”.
3.2.6 Reader Electronic Internal QC Test
Connecting to an epoc Reader displays a Reader Screen unique to the epoc Reader’s serial
number. The Reader Alias is displayed on the bottom tab, with the serial number in
parentheses.
Every time a Host and Reader connect, the Reader begins a 2 level Electronic QC Test.
Configuration data is sent by the Host to the Reader and preparations begin for a test. The
motorized mechanism inside the Reader can be heard as it resets. After completing the
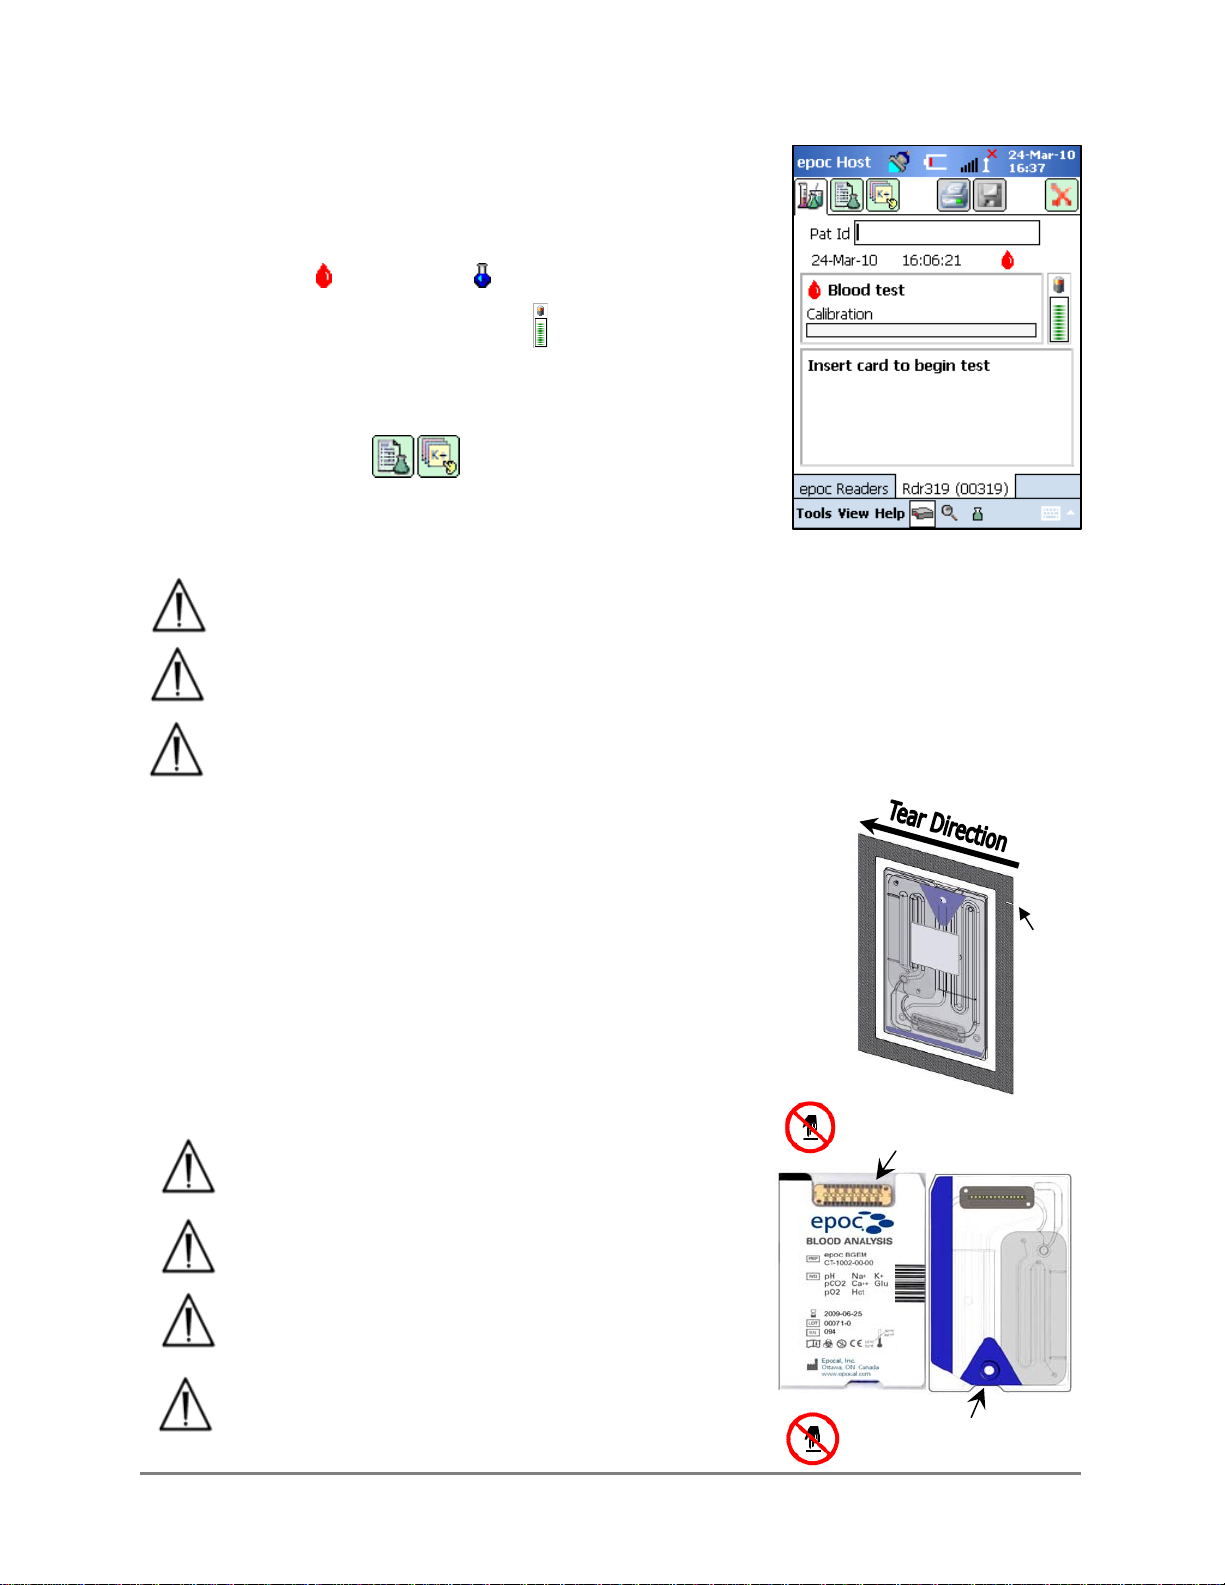
electronic QC test and configuration, the Reader Screen displays “Insert card to begin test”
and the Test Status Indicator of the Reader turns and stays green.
8 Hour Electronic QC Check: The epoc Host checks that an Electronic QC Test has been
run within the past 8 hours. If the epoc Host has been connected to the reader continuously
for 8 hours or more, when a new card inserted the Host will disconnect from the Reader and
inform the user they must reconnect to the Host to run another Electronic QC Test.
51000635 Rev: 08 epoc System Operation 3-4
3.2.7 Reader Screen
The epoc Host and epoc Reader are ready to begin a test by
inserting a Test Card.
The Reader Screen displays:
1. Type of test: Blood test or QA test.
2. Battery charge level of the Reader .
3. Current Date and Time.
4. Patient ID or Lot Number field.
5. Additional tabs for accessing other test
information entries that may be used to ensure a
complete test record. Requirements may vary according to
the policy of the healthcare institution.
Always verify that current date and time are correct before running a test. The
date and time displayed become part of the test record. Contact the administrator
prior to running a test if adjustment of the date and/or time is required.
The policy of the healthcare institution may require the user to select the
Analytes, Sample Type and/or Hemodilution Correction Factor for testing.
If running test cards on the “Use By” date, allow sufficient time to complete the
test before midnight. Test results do not display after midnight of the “Use By”
date.
3.2.8 Obtain Test Card
1. Select a properly stored Test Card.
2. Starting at Notch, tear open the Card Pouch as shown.
3. Carefully (read cautions below) remove the Test Card from the
card pouch.
4. Place the test card directly into the epoc Reader’s Card Insertion
Slot.
5. Discard the empty pouch.
Never touch Sensor Module’s contact surface, or
Blood Sample Entry Port.
Never place Test Card on any surface before
running a test
Always take the Test Card directly from the
Pouch before inserting into the Reader.
Card pouch should be opened only when
conducting blood or QA testing to assure a low
humidity environment for the test card.
Notch
Sensor Module
Contact Surface
Sample Entry
Port
51000635 Rev: 08 epoc System Operation 3-5
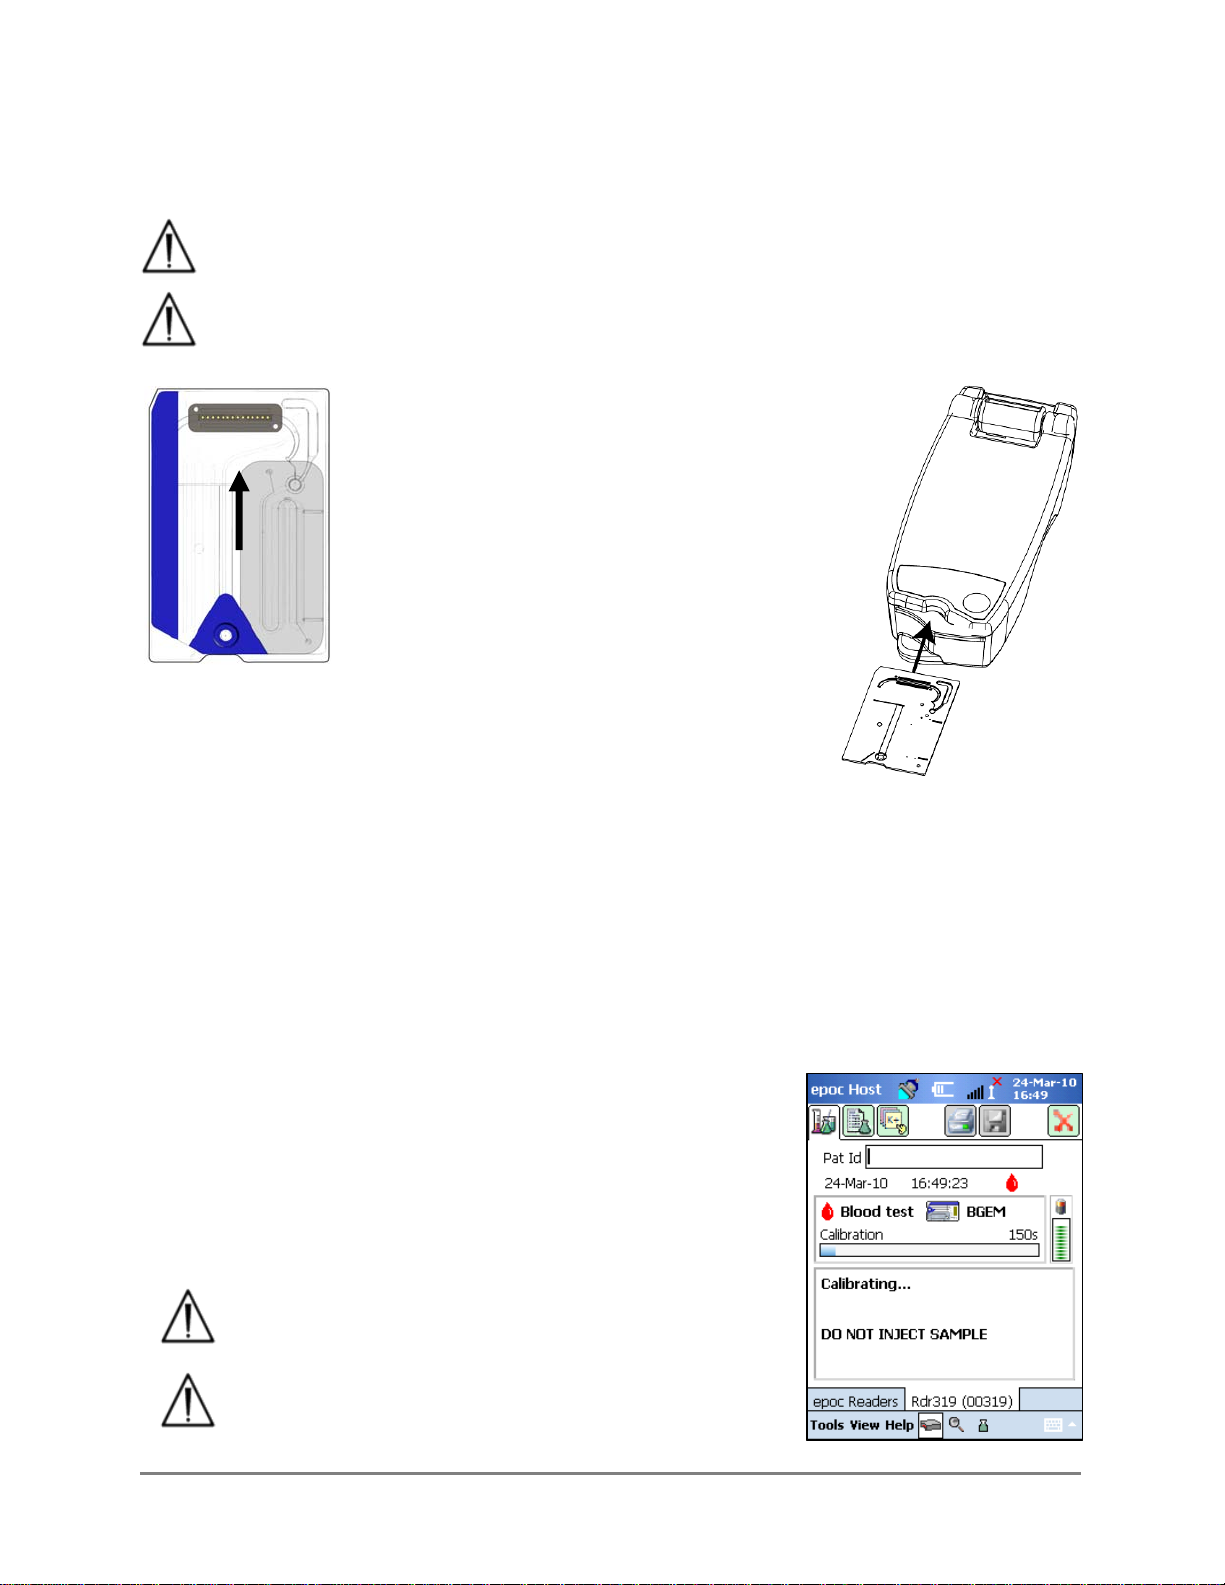
3.2.9 Insert Test Card
The epoc Reader must be placed on a stable horizontal surface, such as a tabletop,
prior to inserting the Test Card.
Never insert anything except a Test Card into the Reader’s Card Insertion Slot.
Position Test Card with Blue Label side facing
upwards and the Sensor Module towards the
Reader. Test Cards are “keyed” using a Notch
in the corner to ensure correct card
orientation during insertion. Insertion of a
Test Card causes the Barcode Reader in the
Reader to turn ‘ON’.
Insert Test Card into the Reader’s Card
Insertion Slot at front of Reader with a
smooth single motion to enable the Barcode
on the Card Label to be correctly read by the
Reader during insertion.
Continue inserting the Test Card until the slight resistance is felt.
Push the Test Card past this point to “lock” it into place. This is the
final Test Card position. Avoid abrupt stops or unevenness in speed
during Test Card insertion.
Upon correct Test Card insertion the Reader is configured for the card type indicated by the
Test Card Barcode. The Reader performs a series of card integrity checks. The Reader beeps
once and the Test Status Indicator will turn solid green to notify the user that the Test Card
has been successfully inserted.
Any problem reading the Barcode (or any other error) causes the test status indicator to
turn solid red. Check the Host for an error message and completely remove the Test Card
from the Reader. Re-insert the card for a successful insertion and a solid green test status
indicator.
3.2.10 Calibration Sequence
Once the Test Card is successfully inserted, a motorized
mechanism in the Reader can be heard as the calibration fluid
is released over the sensors within the Test Card. The Test
Status Indicator on the Reader flashes green to indicate the
start of the test calibration sequence. The Host confirms the
start of the test by entering calibration mode and displays the
calibration progress.
The calibration process takes approximately 165
seconds to complete. During this time, the user can
prepare the patient and obtain a blood sample.
The Reader must rest on a flat horizontal surface
without movement for the duration of the test.
This Side Up

51000635 Rev: 08 epoc System Operation 3-6
3.2.11 Entering Patient (or Lot Number) Information and Test Selection
The Patient ID and related information can be entered at any time during the test.
For a Blood Test, Patient ID number is entered to identify the test results for the card
under test.
For a QA Test (not shown), the QA fluid Lot Number is entered instead of Patient ID.
Select the Test Information Tab on the Reader Screen to enter
the patient information. System administrator may require Sample
Type or Hemodilution entries.
Using the arrow , additional settings related to respiratory therapy
may be entered.
Patient information entered prior to completion of the test is saved
automatically with the test results when the test is complete.
Patient information entered after the test is complete, but before the
next test starts, must be saved by tapping the Save button.
The Test Information Page for performing QA test contains only the Comments field (not
shown).
If the Patient ID is not entered prior to completion of the test, the user is prompted to enter
the Patient ID when the test results are displayed.
Exercise care when entering patient ID’s and other information. Ensure the correct
reader is selected by verifying that the Reader Alias corresponds with the reader
used to conduct the test.
Select the Test Selection Tab on the Reader Screen to select or
de-select analytes to display in the test results. The system
administrator settings may require analyte selection before results
are displayed. Additional analytes may be selected after test
completion. Once test results are displayed, analytes can no longer
be de-selected.

51000635 Rev: 08 epoc System Operation 3-7
3.2.12 Using Bar Code Scanner to Enter Patient Id
Press the stylus in the Patient ID field. A cursor appears.
Activate Barcode Scanner by pressing the Read Barcode Button at the left or right side of
the epoc Host. The Barcode Icon at the top of the screen indicates when the barcode
scanner is ready to scan. Point the light coming from the top of the scanner towards the
desired barcode until a beep is heard. The scanner turns off. The scanned text appears in
the field where the cursor was left.
Warning: Do not look directly at the laser light. Point the laser at a barcode and
away from the eyes at all times.
The Patient ID may also be entered using the stylus and Text input display accessible from
bottom of screen.
3.2.13 Collect Blood Sample
Read information on Sample Collection in BGEM Test Card Specifications Section of
this Manual to ensure that blood samples are properly collected and handled for
testing.
3.2.14 Timing of Sample Introduction
After about 165 seconds of calibration the test status indicator
starts flashing green indicating that the card is ready to receive a
test sample.
The epoc Host displays the message, “Inject sample….”
The screen has a bar indicating the time remaining to introduce a
sample. The blood sample must be introduced into the card
during this five (5) minute period.
Introducing the sample too soon or too late will cause an error and abort the test.
A new test card must be inserted and the test procedure started again.

51000635 Rev: 08 epoc System Operation 3-8
3.2.15 Sample Introduction
1. Hold the syringe barrel vertically between finger tips
and thumb (as shown in Figure 1).
Keep Syringe vertical and perpendicular to the Test
Card to avoid sample spillage.
Complete steps 2 and 3 below in one continuous motion to
ensure best performance of sample introduction.
2. Using slight downward pressure, secure the syringe’s
luer tip into the center recess of the blood sample
entry port of the Test Card. Rotate syringe up to 1/4
turn to ensure a good seal (as shown in Figure 2).
User should feel Syringe Tip engage with Rubber Seal of Test
Card Entry Port. Press Syringe with enough downward force to
engage Syringe Tip with Blue Rubber Seal.
3. While maintaining downward pressure, use index
finger of other hand to steadily depress Syringe
Plunger with a single, smooth, continuous motion
until prompted to stop (as shown in Figure 3).
Reader provides Audible Beep and Test Status Indicator flashes
green indicating enough sample for analysis was received. The
Host also displays sample acceptance.
Learn to use the audio and visual feedback to perform this step
easily and reliably. A normal dispense operation takes about 1
second or less.
Sample introduction should never exceed 2 seconds.
Failure to heed the audio or visual prompts may
cause the sample to flow from the vent hole at end
of the Test Card waste chamber and possibly into
the epoc Reader. Never attempt to clean inside the
Reader.
Avoid rapid sample introduction because it can cause fluid segmentation. This
condition is detected by the system. The test is aborted and the Host displays an
error message.
3.2.16 Sample Analysis
The Reader automatically analyzes the test sample.
The analysis process takes about half a minute.
Figure 1
Figure 2
Figure 3
Table of contents
Other Epocal Medical Equipment manuals

Popular Medical Equipment manuals by other brands

bort medical
bort medical 121 700 quick guide

Otto Bock
Otto Bock 1D35 Dynamic Motion Instructions for use

Ferno
Ferno Tirol Kit User and maintenance manual

Stryker
Stryker L10 Instructions for United States Users

Braun
Braun Aesculap Acculan 4 Instructions for use/Technical description

Steris
Steris CO2EFFICIENT 710302 Operator's manual


