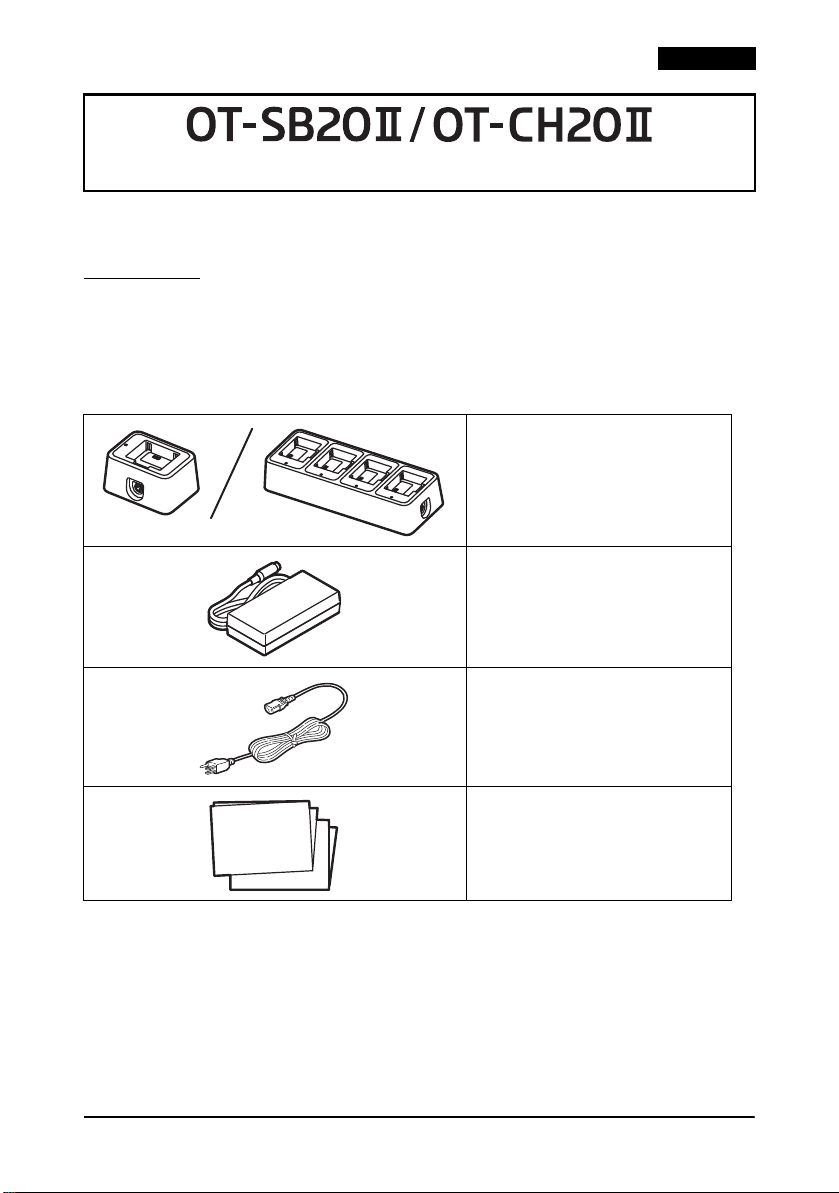
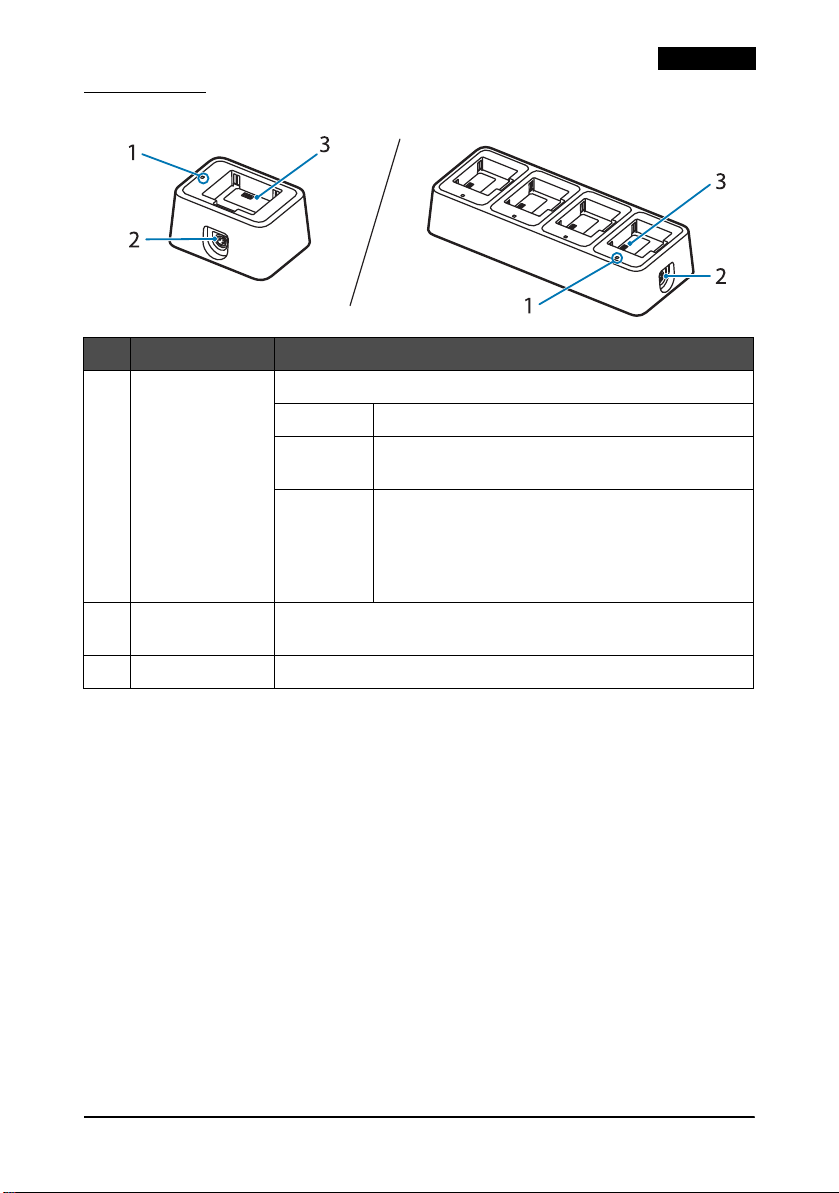
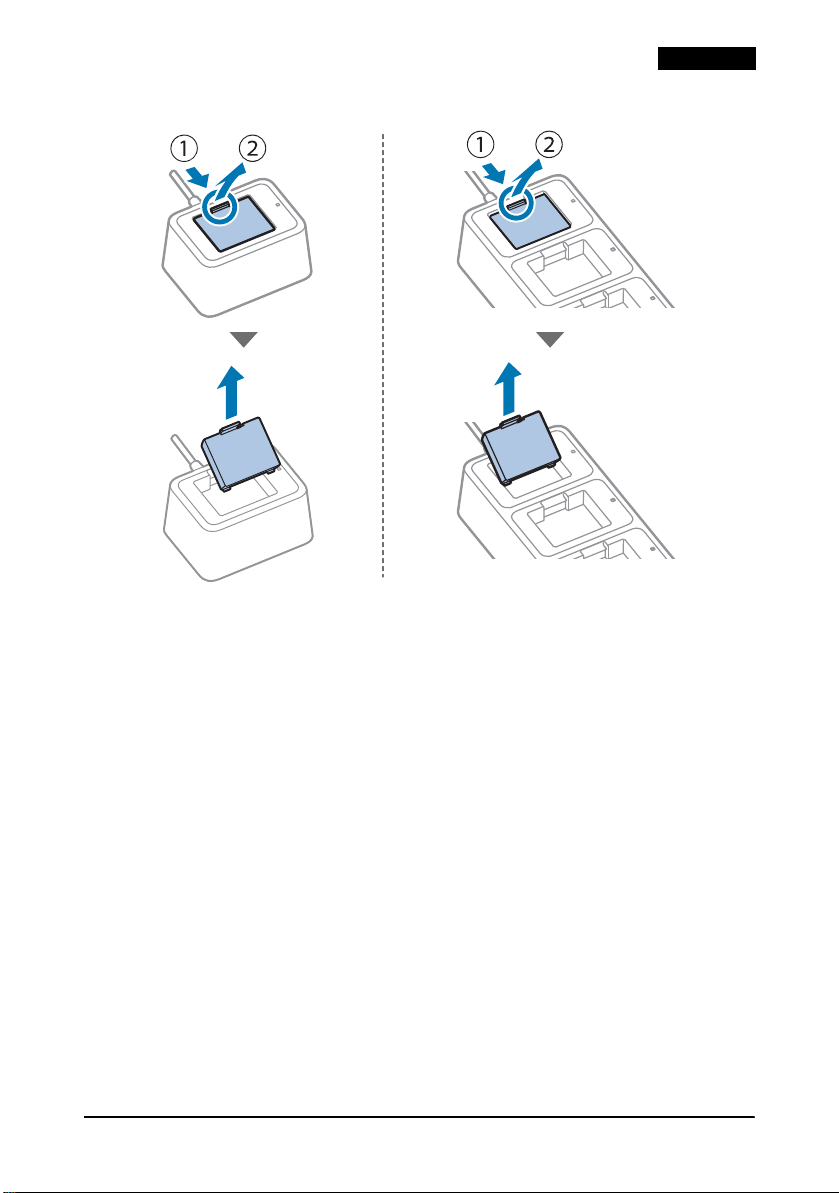
Epson OT-SB20II User manual

English
English . . . . . . . . . . . . . . . . . . . . . . 2
Français . . . . . . . . . . . . . . . . . . . .10
Deutsch . . . . . . . . . . . . . . . . . . . .18
Nederlands . . . . . . . . . . . . . . . . .26
Italiano . . . . . . . . . . . . . . . . . . . . .34
Español. . . . . . . . . . . . . . . . . . . . .42
Português . . . . . . . . . . . . . . . . . .50
Türkçe. . . . . . . . . . . . . . . . . . . . . .58
Ελληνικά . . . . . . . . . . . . . . . . . . .66
Slovenščina. . . . . . . . . . . . . . . . .74
Hrvatski . . . . . . . . . . . . . . . . . . . .82
Македонски. . . . . . . . . . . . . . . .90
Srpski . . . . . . . . . . . . . . . . . . . . . .98
Dansk . . . . . . . . . . . . . . . . . . . . .106
Suomi . . . . . . . . . . . . . . . . . . . . .114
Norsk. . . . . . . . . . . . . . . . . . . . . .122
Svenska . . . . . . . . . . . . . . . . . . .130
Polski . . . . . . . . . . . . . . . . . . . . .138
Česky . . . . . . . . . . . . . . . . . . . . . 146
Magyar . . . . . . . . . . . . . . . . . . . 154
Slovenčina . . . . . . . . . . . . . . . . 162
Română. . . . . . . . . . . . . . . . . . . 170
Български . . . . . . . . . . . . . . . . 178
Latviešu . . . . . . . . . . . . . . . . . . 186
Lietuvių. . . . . . . . . . . . . . . . . . . 194
Eesti . . . . . . . . . . . . . . . . . . . . . . 202
Русский. . . . . . . . . . . . . . . . . . . 210
Українська . . . . . . . . . . . . . . . 218
Қазақ. . . . . . . . . . . . . . . . . . . . . 226
. . . . . . . . . . . . . . . . . . . . . 234
Bahasa Indonesia. . . . . . . . . . 242
. . . . . . . . . . . . . . . . 250
Tiếng Việt. . . . . . . . . . . . . . . . . 258
简体中文 . . . . . . . . . . . . . . . . 266
繁體中文 . . . . . . . . . . . . . . . . . . 274
日本語 . . . . . . . . . . . . . . . . . . . . 282

OT-SB20II/OT-CH20II User’s Manual 2
English
User’s Manual
OT-SB20II/OT-CH20II is a battery charger exclusively for OT-BY20 battery.
This manual describes how to use and specifications of each battery charger.
Unpacking
After unpacking, make sure you have all the accessories and that the charger and accessories
are undamaged.
If any parts are missing or damaged, please contact your dealer for assistance.
The battery is not included with this product.
Charger
Left: OT-SB20II
Right: OT-CH20II
AC adapter
AC cable
*The AC cable may not be included
depending on the charger model.
Manual
English

OT-SB20II/OT-CH20II User’s Manual 3
English
Part Names
QNOTE
To check the battery charge level, attach the battery to the printer and see the battery LED on
the printer.
No. Part name Explanation
1 Charge LED Indicates whether the battery is charging or not.
On The battery is being charged.
Off The battery is not being charged.
The battery is not connected.
Flashing Flashes when there is an abnormality in charging. The
charger may be malfunctioning; disconnect the AC
adapter from the outlet.
U"What to do when the Charge LED Flashes" on
page 4
2 Power supply
connector
Connects the DC cable for the AC adapter.
3 Charging terminal Connects the battery.

OT-SB20II/OT-CH20II User’s Manual 4
English
What to do when the Charge LED Flashes
CAUTION
The charger may be malfunctioning; disconnect the AC adapter from the outlet.
There are multiple causes for the charge LED to flash, as shown in the table below.
It is not possible to determine from the charge LED alone whether the battery or the charger is
at fault.
Battery failure should be checked by attaching the battery to the printer. If the printer operates
normally, the charger may be faulty. In this case, please contact your dealer or qualified service
personnel.
Cause Explanation
Battery failure The battery is faulty.
Out of chargeable
temperature range
The chargeable temperature is approximately 0 to 40°C {32 to
104°F}. Charging is not possible at temperatures outside this
range.
Timer error Charging is not completed after 6 hours from the start of charging.
Check whether the battery is faulty or the charger is faulty.
Overvoltage error The charger is faulty.

OT-SB20II/OT-CH20II User’s Manual 5
English
How to Charge the Battery
1. Connect the AC adapter to the charger.
QNOTE
How to disconnect the DC cable
Make sure that the AC cable is not connected, and then hold the arrow-printed portion of the
connector to pull it straight out.

OT-SB20II/OT-CH20II User’s Manual 6
English
2. Attach the battery.
3. The charge LED lights up when charging is started. When charging
is completed, the charge LED turns off.
QNOTE
❏The battery should be charged under the guaranteed operating ambient
temperature of 0 to 40°C {32 to 104°F}.
❏Charging will be stopped if the ambient temperature is outside the chargeable
range. The charge LED flashes while charging is stopped.
❏If charging is performed when the ambient temperature is 35°C {95°F} or higher, the
charger will detect a rise in internal temperature and repeatedly stop and start
charging, which may extend the charging time.
OT-BY20 OT-BY20

OT-SB20II/OT-CH20II User’s Manual 7
English
4. Remove the battery.

OT-SB20II/OT-CH20II User’s Manual 8
English
Cleaning
If the exterior surface is noticeably dirty, follow the steps below to clean it.
CAUTION
Never clean the product with alcohol, benzine, thinner, or other such solvents.
Doing so may damage or break the parts made of plastic and rubber.
1. Disconnect the AC adapter from the power outlet.
2. Wipe off the dirt with a dry or slightly damp cloth.
QNOTE
Depending on the conditions during storage and shipping, some rust may form around the
bottom edges of the charger.

OT-SB20II/OT-CH20II User’s Manual 9
English
Specifications
Item Specifications
Power supply Power is supplied by AC adapter [AC Adapter,C1 (model: M235B)]
24 V DC, 1.5 A
Output voltage/current
Charging voltage Up to 8.2 V DC
Charging current Up to 0.84 A
Power consumption
Standby 0.3 W / 230 V
Charging 10 W / 230 V
Charging time* Approx. 3 hours at a temperature of 10 to 40°C {50 to 104°F}
Approx. 6 hours at a temperature of 0 to 10°C {32 to 50°F}
* Using a new battery, measured time from approximately 0%
remaining battery charge to full charge.
Temperature / Humidity
Operating 0 to 40°C {32 to 104°F}
10 to 90% RH
Storage No abnormality in charger operation even after it is left under the
following conditions and then left at 25°C {77˚F} and 60% RH for two
hours.
• Hot and humid: 120 hours at 50˚C {122˚F}, 90% RH
• High temperature: 120 hours at 70˚C {158˚F}
• Low temperature: 120 hours at -25˚C {-13˚F}
External dimensions
OT-SB20II Approx. 76 x 103 x 56 mm {3.0 x 4.1 x 2.2 in.} (W x D x H)
OT-CH20II Approx. 268 x 103 x 56 mm {10.6 x 4.1 x 2.2 in.} (W x D x H)
Weight
OT-SB20II Approx. 195 g {0.43 lb}
Excluding the battery and the AC adapter.
OT-CH20II Approx. 665 g {1.47 lb}
Excluding the battery and the AC adapter.
Designated battery OT-BY20 (model: D171A)
For information on the battery, refer to the battery manual.

OT-SB20II/OT-CH20II Manuel d’utilisation 10
Français
Manuel d’utilisation
Le chargeur OT-SB20II/OT-CH20II est un chargeur de batterie exclusivement destiné à la
batterie OT-BY20.
Le présent manuel décrit le mode de fonctionnement et les spécifications de chaque chargeur
de batterie.
Déballage
Une fois le déballage effectué, vérifiez que vous disposez bien de tous les accessoires et que le
chargeur et les accessoires ne sont pas endommagés.
Si des pièces sont manquantes ou endommagées, veuillez contacter votre revendeur pour
obtenir de l’aide.
La batterie n’est pas incluse avec ce produit.
Chargeur
Gauche : OT-SB20II
Droite : OT-CH20II
Adaptateur secteur
Câble secteur
*Il est possible que le câble secteur
ne soit pas inclus selon le modèle de
chargeur.
Manuel
Français

OT-SB20II/OT-CH20II Manuel d’utilisation 11
Français
Nom des pièces
QREMARQUE
Pour vérifier le niveau de charge de la batterie, raccordez la batterie à l’imprimante et
observez le voyant de la batterie sur l’imprimante.
N° Nom de la pièce Explications
1 Voyant de charge Indique si la batterie est en cours de chargement ou non.
Allumé La batterie est en cours de chargement.
Éteint La batterie n’est pas en cours de chargement.
La batterie n’est pas connectée.
Clignotant Clignote en cas d’anomalie lors du chargement. Il est
possible que le chargeur ne fonctionne pas
correctement ; débranchez l’adaptateur secteur de la
prise électrique.
U«Que faire si le voyant de charge clignote» à la
page 12
2 Connecteur de
l’alimentation
électrique
Permet de connecter le câble CC pour l’adaptateur secteur.
3Bornede
chargement
Permet de connecter la batterie.

OT-SB20II/OT-CH20II Manuel d’utilisation 12
Français
Que faire si le voyant de charge clignote
ATTENTION
Il est possible que le chargeur ne fonctionne pas correctement ; débranchez
l’adaptateur secteur de la prise électrique.
Les causes du clignotement du voyant de charge peuvent être multiples, comme indiqué dans
le tableau ci-dessous.
Il n’est pas possible de déterminer rien qu’avec le voyant de charge si l’anomalie de
fonctionnement provient de la batterie ou du chargeur.
Pour déterminer s’il s’agit d’une panne de la batterie, raccordez la batterie à l’imprimante. Si
l’imprimante fonctionne normalement, il est possible que le chargeur présente une anomalie.
Dans ce cas, veuillez contacter votre revendeur ou du personnel de réparation qualifié.
Cause Explications
Panne de la batterie La batterie présente une anomalie de fonctionnement.
Hors de la plage de
températures de chargement
La plage de températures de chargement est comprise entre 0 et
40 °C {entre 32 et 104 °F} environ. Le chargement n’est pas
possible lorsque les températures sont extérieures à cette plage.
Erreur de la minuterie Le chargement n’est pas terminé dans les 6 heures qui suivent le
début du chargement. Déterminez si c’est la batterie ou le
chargeur qui présente une anomalie de fonctionnement.
Erreur de surtension Le chargeur présente une anomalie de fonctionnement.

OT-SB20II/OT-CH20II Manuel d’utilisation 13
Français
Procédure de chargement de la batterie
1. Connectez l’adaptateur secteur au chargeur.
QREMARQUE
Procédure de déconnexion du câble CC
Assurez-vous que le câble secteur n’est pas connecté, puis maintenez la partie du connecteur
avec la flèche pour la débrancher.

OT-SB20II/OT-CH20II Manuel d’utilisation 14
Français
2. Fixez la batterie.
3. Le voyant de charge s’allume lorsque le chargement démarre. Le
voyant de charge s’éteint une fois le chargement terminé.
QREMARQUE
❏La batterie doit être chargée dans la plage de températures ambiantes pour
lesquelles le fonctionnement est garanti, à savoir entre 0 et 40 °C {entre 32 et 104 °F}.
❏Le chargement s’arrête si la température ambiante ne correspond pas à la plage de
chargement. Le voyant de charge clignote lorsque le chargement est interrompu.
❏Si le chargement est effectué alors que la température ambiante est de 35 °C {95 °F}
ou plus, le chargeur détecte une augmentation de la température interne et arrête et
redémarre le chargement de manière répétée, ce qui peut prolonger la durée de
chargement.
OT-BY20 OT-BY20

OT-SB20II/OT-CH20II Manuel d’utilisation 15
Français
4. Retirez la batterie.

OT-SB20II/OT-CH20II Manuel d’utilisation 16
Français
Nettoyage
Procédez comme suit pour nettoyer la surface extérieure si elle est sale.
ATTENTION
Ne nettoyez jamais le produit avec de l’alcool, de l’essence, du diluant ou
d’autres solvants du même type. Cela peut endommager ou casser les pièces en
plastique et en caoutchouc.
1. Débranchez l’adaptateur secteur de la prise de courant.
2. Essuyez la saleté à l’aide d’un chiffon sec ou légèrement humide.
QREMARQUE
Selon les conditions lors du stockage et de l’expédition, de la rouille peut se former autour des
bords inférieurs du chargeur.

OT-SB20II/OT-CH20II Manuel d’utilisation 17
Français
Spécifications
Élément Spécifications
Alimentation électrique Alimentation électrique fournie par l’adaptateur secteur
[AC Adapter,C1 (modèle : M235B)]
24 V CC, 1,5 A
Tension/courant de sortie
Tension de chargement Jusqu’à 8,2 V CC
Courant de chargement Jusqu’à 0,84 A
Consommation électrique
Veille 0,3 W / 230 V
Chargement 10 W / 230 V
Durée de chargement* Environ 3 heures lorsque la température est comprise entre
10 et 40 °C {entre 50 et 104 °F}
Environ 6 heures lorsque la température est comprise entre
0 et 10 °C {entre 32 et 50 °F}
* Durée mesurée pour recharger une batterie neuve d’environ
0 % de charge restante à la pleine charge.
Température / humidité
Fonctionnement Entre 0 et 40 °C {entre 32 et 104 °F}
Entre 10 et 90 % d’humidité relative
Stockage Aucune anomalie de fonctionnement du chargeur, même lorsqu’il
est laissé dans les conditions suivantes, puis à 25 °C {77 ˚F} et 60 %
d’humidité relative pendant deux heures.
• Chaud et humide : 120 heures à 50 ˚C {122 ˚F},
90 % d’humidité relative
• Température élevée : 120 heures à 70 ˚C {158 ˚F}
• Basse température : 120 heures à -25 ˚C {-13 ˚F}
Dimensions externes
OT-SB20II Environ 76 x 103 x 56 mm {3,0 x 4,1 x 2,2 pouces} (L x P x H)
OT-CH20II Environ 268 x 103 x 56 mm {10,6 x 4,1 x 2,2 pouces} (L x P x H)
Poids
OT-SB20II Environ 195 g {0,43 lb}
Batterie et adaptateur secteur non inclus.
OT-CH20II Environ 665 g {1,47 lb}
Batterie et adaptateur secteur non inclus.
Batterie désignée OT-BY20 (modèle : D171A)
Pour plus d’informations sur la batterie, reportez-vous au manuel de
la batterie.

OT-SB20II/OT-CH20II Benutzerhandbuch 18
Deutsch
Benutzerhandbuch
OT-SB20II/OT-CH20II ist ein Ladegerät ausschließlich für den Akku OT-BY20.
Dieses Handbuch enthält die Spezifikationen der einzelnen Ladegeräte und erklärt, wie Sie das
Ladegerät benutzen.
Auspacken
Vergewissern Sie sich nach dem Auspacken, dass das gesamte Zubehör vorliegt, und dass
sowohl das Ladegerät wie auch das Zubehör unbeschädigt sind.
Sollten irgendwelche Komponenten fehlen oder beschädigt sein, wenden Sie sich bitte an
Ihren Händler.
Der Akku ist in diesem Produkt nicht enthalten.
Ladegerät
Links: OT-SB20II
Rechts: OT-CH20II
Netzadapter
Netzkabel
* Je nach Ladegerätmodell kann es
sein, dass kein Netzkabel beiliegt.
Handbuch
Deutsch

OT-SB20II/OT-CH20II Benutzerhandbuch 19
Deutsch
Bezeichnung
QHINWEIS
Sie können den Ladestatus des Akku überprüfen, indem Sie den Akku an den Drucker
anschließen und die Akku-LED am Drucker beobachten.
Nr. Bezeichnung Beschreibung
1 Lade-LED Zeigt an, ob der Akku geladen wird oder nicht.
An Der Akku wird geladen.
Aus Der Akku wird nicht geladen.
Der Akku ist nicht angeschlossen.
Blinken Ein Blinken zeigt eine beim Ladevorgang aufgetretene
Störung an. Das Ladegerät funktioniert
möglicherweise nicht richtig. Trennen Sie den
Netzadapter von der Steckdose.
U„Wenn die Lade-LED blinkt“ auf Seite 20
2 Stromanschluss Für den Anschluss des Gleichstromkabels, das zum Netzadapter führt.
3 Ladeanschluss Stellt den Anschluss zum Akku her.

OT-SB20II/OT-CH20II Benutzerhandbuch 20
Deutsch
Wenn die Lade-LED blinkt
VORSICHT
Das Ladegerät funktioniert möglicherweise nicht richtig. Trennen Sie den
Netzadapter von der Steckdose.
Es gibt verschiedene Gründe dafür, dass die Lade-LED blinkt. Diese sind in der folgenden
Tabelle aufgeführt.
Es ist nicht möglich, allein anhand der Lade-LED zu beurteilen, ob der Fehler beim Akku oder
beim Ladegerät liegt.
Ein Akku-Fehler kann überprüft werden, indem der Akku an den Drucker angeschlossen wird.
Wenn der Drucker normal funktioniert, liegt der Fehler möglicherweise beim Ladegerät.
Wenden Sie sich in diesem Fall an Ihren Händler oder an qualifiziertes Fachpersonal.
Ursache Beschreibung
Akku-Fehler Der Akku ist fehlerhaft.
Außerhalb des
Lade-Temperaturbereichs
Der Temperaturbereich, bei dem ein Laden möglich ist, liegt bei
ca. 0 bis 40 °C {32 bis 104 °F}. Außerhalb dieses Bereichs ist das
Laden nicht möglich.
Timer-Fehler Das Laden wurde auch 6 Stunden nach dem Beginn des
Ladevorgangs nicht abgeschlossen. Prüfen Sie, ob der Akku oder
das Ladegerät fehlerhaft ist.
Überspannungsfehler Das Ladegerät ist fehlerhaft.
This manual suits for next models
1
Table of contents
Languages:
Other Epson Batteries Charger manuals