manuals.online logo
Brands
  1. Home
  2. •
  3. Brands
  4. •
  5. Epson
  6. •
  7. Scanner
  8. •
  9. Epson Perfection 1270 Instruction Manual

Epson Perfection 1270 Instruction Manual

4052495-00 Rev.0
1-F BK
4052495-00 Rev.0
1-F Y
4052495-00 Rev.0
1-F M
4052495-00 Rev.0
1-F C
Epson Perfection 1270
Please read these instructions before using the product.
Unpack Your Scanner
1Make sure you have everything for your Epson scanner:
2Remove all packing tape, but leave the large sticker in place.
Install the Software
Wait! Install your software before connecting the scanner to your computer.
1Insert the scanner software CD-ROM in the CD-ROM or DVD drive.
If the installer does not start automatically, do the following:
•Windows XP: Start > My Computer > Epson.
•Windows 98, Me or 2000: My Computer > Epson > Epson.
2Follow the on-screen instructions to install the scanner software and
Reference Guide. Note that EPSON Smart Panel™installs in several steps.
Note: If you’re using Windows 98 and you see a message asking if you’d like
to restart your system, select No, I will restart my system later.
3At the end of the installation, click Exit.
4When you see the Product Registration screen, register your scanner on-line
as instructed.
Connect the Scanner
1Remove the sticker covering the transportation lock on the bottom of the
scanner. Then slide the lock to the unlock position, as shown below.
Caution: Do not turn the scanner over; this may damage the scanner.
2Remove the yellow
sticker.
3Connect the power cord and AC adapter, as shown. Then connect the AC
adapter to the scanner and plug the other end of the power cord into a
grounded electrical outlet.
Caution:
•It is not possible to change the AC adapter’s input or output voltage. If the
label on the AC adapter does not show the correct voltage, contact your
dealer. Do not plug in the power cord.
•Whenever you unplug the scanner, wait at least 10 seconds before
plugging it back in to avoid damaging it.
The scanner turns on and the ]Start button light flashes green. It stops
flashing and turns green when the scanner is ready.
4Plug the USB cable to the scanner, then to your computer as shown below.
Note: Your scanner may not work correctly if you use a USB cable other than
the one supplied by Epson or if you connect your scanner to a hub system.
5Restart your system, then remove the CD-ROM.
Scanner Basics
Your First Scan
The ]Start button on your scanner opens
Smart Panel. Here’s how you can use this
button and Smart Panel to scan photos
and save them as files.
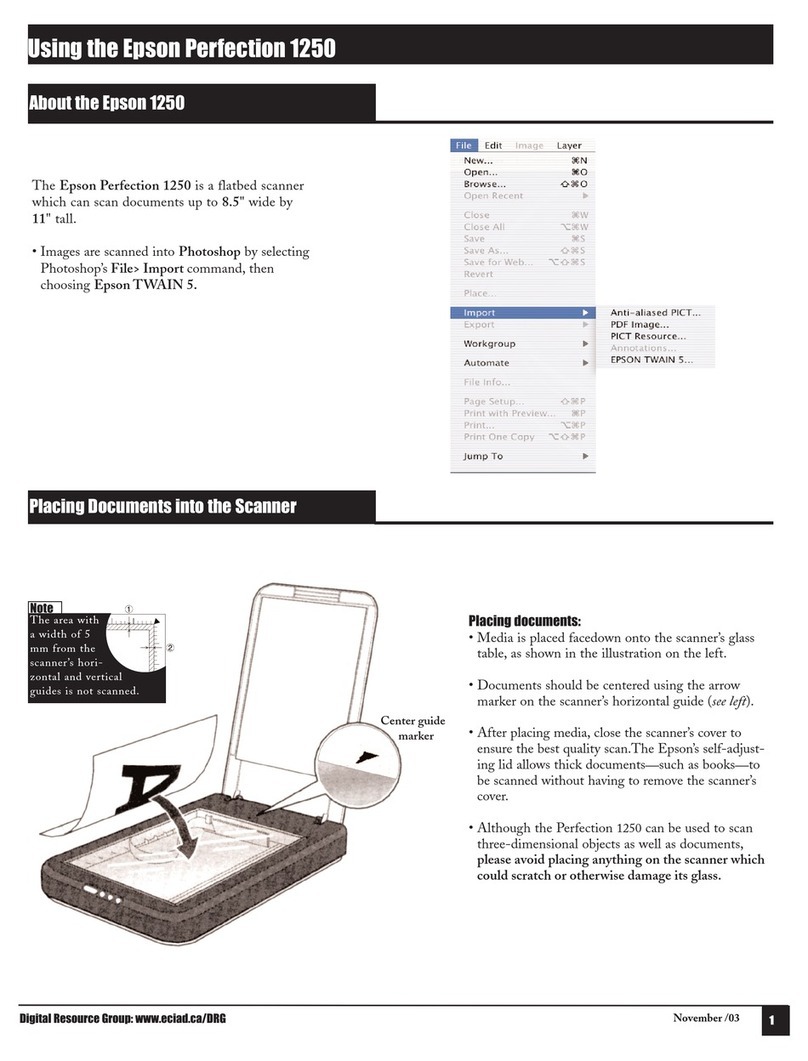
1Raise the scanner cover and place
your photo face down on the glass.
Place the document against the
front edge of the scanner glass
and center it on the arrow,
as shown.
Then close the cover.
2Press the ]Start button on your
scanner.
Note: If you see a message the
first time you press the ]Start
button, select EPSON Smart
Panel for Scanner, click Always
use this program for this
action, then click OK.
EPSON Smart Panel opens on your computer.
3Click the Scan and Save icon.
Your document is automatically scanned.
4Click Next in the Save File dialog box.
5In the following screen, select a location and file type for your scanned
image, then click Save.
Scanner Buttons
The scanner buttons make scanning easy. Just place your document face down
on the scanner, as described in the previous section, and press the button for the
type of scan you want. Follow the on-screen instructions to finish your task.
}Scan your photos to the Epson PhotoCenterSM site
1If you use AOL®for the Internet, log on first.
2Press the }button on the scanner.
3Follow the on-screen instructions.
|Attach your photo to an e-mail
1Press the |button on the scanner. You see your photo on the screen.
2Click Finish.
3Select your e-mail program and click Launch (AOL is not supported).
4Enter the address where you want to send the photo, type in a message, and
click Send.
{Scan and automatically print a document—just like a
photocopier
1Make sure your printer is turned on.
2Press the {button on the scanner.
]Automatically scan your file and open Smart Panel or a
Smart Panel application
1Place your document or photo on the scanner glass.
2Press the scanner’s ]Start button and follow the on-screen instructions.
Problems?
First, check the ]Start button light on the scanner.
If your problem is listed here, try these suggestions.
Questions?
Here’s where to look for more answers:
Electronic Reference Guide
•Double-click the Perf1270_1670 Reference Guide icon on your desktop.
On-screen Help for EPSON Smart Panel and EPSON Scan:
•Click the Help button or question mark that appears on the screen when
you’re using these programs.
Epson technical support
•Online support
http://www.latin.epson.com
•Telephone support
* If your country is not listed, contact your distributor or the nearest Epson office.
Before you call, please have the following information ready:
•Product name (Perfection 1270)
•Product serial number (located on the bottom of the scanner)
•Proof of purchase (such as a store receipt) and date of purchase
•Computer configuration
•Description of the problem
Epson is a registered trademark and EPSON Smart Panel is a trademark of Seiko Epson Corporation. Perfection is
a registered trademark and Epson PhotoCenter is a service mark of Epson America, Inc.
General Notice: Other product names used herein are for identification purposes only and may be trademarks of their
respective owners. Epson disclaims any and all rights in those marks.
®®
USB cable
Power cord and AC adapter
Perfection 1270
Software
IMPORTANT!
Leave the sticker in
place until you are
instructed to remove it
Remove
Select a file format
Specify the path to
the folder where you
want to save your
scanned image
Click Save
Scan to
Web
CopyScan to
E-mail
Start
Flashing green Warming up or scanning.
Green Ready to scan.
Flashing red Make sure the transportation lock is unlocked.
Restart your computer and unplug the scanner. Wait
10 seconds, then plug the scanner back in.
If the red light still flashes, contact your dealer or
Epson.
Off Make sure your scanner is connected to your
computer and plugged into a power source.
The New Hardware
Wizard appears on your
screen.
Click Cancel and follow the steps in section 2 to
install your software. Disconnect the scanner before
you install.
The scanner makes a
grinding noise when it is
plugged into a power
source.
Make sure the transportation lock is unlocked.
You see an error
message when you try
to scan or the scanner
doesn’t scan.
Make sure your scanner is connected to your
computer and plugged into a power source.
Make sure the transportation lock is unlocked.
Uninstall and reinstall EPSON Scan. See your
on-screen Reference Guide for instructions.
Country* Telephone number Country* Telephone number
Argentina
Chile
Colombia
Costa Rica
(54-11) 4346-0300
(56-2) 200-3400
(57-1) 523-5000
(50-6) 210-9555
(1-800) 377-6627
Mexico
Mexico City
Other Cities
Peru
Venezuela
(52-55) 1323-2000
01-800-087-1080
(51-1) 224-2336
(58-212) 240-1111
Start Here
4052495-00 Rev.0
1-F BK
4052495-00 Rev.0
1-F Y
4052495-00 Rev.0
1-F M
4052495-00 Rev.0
1-F C
Epson Perfection 1270
Please read these instructions before using the product.
Unpack Your Scanner
1Make sure you have everything for your Epson scanner:
2Remove all packing tape, but leave the large sticker in place.
Install the Software
Wait! Install your software before connecting the scanner to your computer.
1Insert the scanner software CD-ROM in the CD-ROM or DVD drive.
If the installer does not start automatically, do the following:
•Windows XP: Start > My Computer > Epson.
•Windows 98, Me or 2000: My Computer > Epson > Epson.
2Follow the on-screen instructions to install the scanner software and
Reference Guide. Note that EPSON Smart Panel™installs in several steps.
Note: If you’re using Windows 98 and you see a message asking if you’d like
to restart your system, select No, I will restart my system later.
3At the end of the installation, click Exit.
4When you see the Product Registration screen, register your scanner on-line
as instructed.
Connect the Scanner
1Remove the sticker covering the transportation lock on the bottom of the
scanner. Then slide the lock to the unlock position, as shown below.
Caution: Do not turn the scanner over; this may damage the scanner.
2Remove the yellow
sticker.
3Connect the power cord and AC adapter, as shown. Then connect the AC
adapter to the scanner and plug the other end of the power cord into a
grounded electrical outlet.
Caution:
•It is not possible to change the AC adapter’s input or output voltage. If the
label on the AC adapter does not show the correct voltage, contact your
dealer. Do not plug in the power cord.
•Whenever you unplug the scanner, wait at least 10 seconds before
plugging it back in to avoid damaging it.
The scanner turns on and the ]Start button light flashes green. It stops
flashing and turns green when the scanner is ready.
4Plug the USB cable to the scanner, then to your computer as shown below.
Note: Your scanner may not work correctly if you use a USB cable other than
the one supplied by Epson or if you connect your scanner to a hub system.
5Restart your system, then remove the CD-ROM.
Scanner Basics
Your First Scan
The ]Start button on your scanner opens
Smart Panel. Here’s how you can use this
button and Smart Panel to scan photos
and save them as files.
1Raise the scanner cover and place
your photo face down on the glass.
Place the document against the
front edge of the scanner glass
and center it on the arrow,
as shown.
Then close the cover.
2Press the ]Start button on your
scanner.
Note: If you see a message the
first time you press the ]Start
button, select EPSON Smart
Panel for Scanner, click Always
use this program for this
action, then click OK.
EPSON Smart Panel opens on your computer.
3Click the Scan and Save icon.
Your document is automatically scanned.
4Click Next in the Save File dialog box.
5In the following screen, select a location and file type for your scanned
image, then click Save.
Scanner Buttons
The scanner buttons make scanning easy. Just place your document face down
on the scanner, as described in the previous section, and press the button for the
type of scan you want. Follow the on-screen instructions to finish your task.
}Scan your photos to the Epson PhotoCenterSM site
1If you use AOL®for the Internet, log on first.
2Press the }button on the scanner.
3Follow the on-screen instructions.
|Attach your photo to an e-mail
1Press the |button on the scanner. You see your photo on the screen.
2Click Finish.
3Select your e-mail program and click Launch (AOL is not supported).
4Enter the address where you want to send the photo, type in a message, and
click Send.
{Scan and automatically print a document—just like a
photocopier
1Make sure your printer is turned on.
2Press the {button on the scanner.
]Automatically scan your file and open Smart Panel or a
Smart Panel application
1Place your document or photo on the scanner glass.
2Press the scanner’s ]Start button and follow the on-screen instructions.
Problems?
First, check the ]Start button light on the scanner.
If your problem is listed here, try these suggestions.
Questions?
Here’s where to look for more answers:
Electronic Reference Guide
•Double-click the Perf1270_1670 Reference Guide icon on your desktop.
On-screen Help for EPSON Smart Panel and EPSON Scan:
•Click the Help button or question mark that appears on the screen when
you’re using these programs.
Epson technical support
•Online support
http://www.latin.epson.com
•Telephone support
* If your country is not listed, contact your distributor or the nearest Epson office.
Before you call, please have the following information ready:
•Product name (Perfection 1270)
•Product serial number (located on the bottom of the scanner)
•Proof of purchase (such as a store receipt) and date of purchase
•Computer configuration
•Description of the problem
Epson is a registered trademark and EPSON Smart Panel is a trademark of Seiko Epson Corporation. Perfection is
a registered trademark and Epson PhotoCenter is a service mark of Epson America, Inc.
General Notice: Other product names used herein are for identification purposes only and may be trademarks of their
respective owners. Epson disclaims any and all rights in those marks.
®®
USB cable
Power cord and AC adapter
Perfection 1270
Software
IMPORTANT!
Leave the sticker in
place until you are
instructed to remove it
Remove
Select a file format
Specify the path to
the folder where you
want to save your
scanned image
Click Save
Scan to
Web
CopyScan to
E-mail
Start
Flashing green Warming up or scanning.
Green Ready to scan.
Flashing red Make sure the transportation lock is unlocked.
Restart your computer and unplug the scanner. Wait
10 seconds, then plug the scanner back in.
If the red light still flashes, contact your dealer or
Epson.
Off Make sure your scanner is connected to your
computer and plugged into a power source.
The New Hardware
Wizard appears on your
screen.
Click Cancel and follow the steps in section 2 to
install your software. Disconnect the scanner before
you install.
The scanner makes a
grinding noise when it is
plugged into a power
source.
Make sure the transportation lock is unlocked.
You see an error
message when you try
to scan or the scanner
doesn’t scan.
Make sure your scanner is connected to your
computer and plugged into a power source.
Make sure the transportation lock is unlocked.
Uninstall and reinstall EPSON Scan. See your
on-screen Reference Guide for instructions.
Country* Telephone number Country* Telephone number
Argentina
Chile
Colombia
Costa Rica
(54-11) 4346-0300
(56-2) 200-3400
(57-1) 523-5000
(50-6) 210-9555
(1-800) 377-6627
Mexico
Mexico City
Other Cities
Peru
Venezuela
(52-55) 1323-2000
01-800-087-1080
(51-1) 224-2336
(58-212) 240-1111
Start Here

Other manuals for Perfection 1270

2

Other Epson Scanner manuals

Epson Perfection V33 Photo Instruction Manual

Epson

Epson Perfection V33 Photo Instruction Manual

Epson Expression 636 User manual

Epson

Epson Expression 636 User manual

Epson 1250 - Perfection Photo Flatbed Scanner Reference guide

Epson

Epson 1250 - Perfection Photo Flatbed Scanner Reference guide

Epson Perfection 2400 Photo User manual

Epson

Epson Perfection 2400 Photo User manual

Epson DS-510 User manual

Epson

Epson DS-510 User manual

Epson ES-C220 Instruction Manual

Epson

Epson ES-C220 Instruction Manual

Epson Perfection V370 Photo User manual

Epson

Epson Perfection V370 Photo User manual

Epson Perfection 1200s User manual

Epson

Epson Perfection 1200s User manual

Epson Perfection V700 Series Dimensions

Epson

Epson Perfection V700 Series Dimensions

Epson GT-2500 Series Instruction Manual

Epson

Epson GT-2500 Series Instruction Manual

Epson DS-30 WorkForce DS-30 Instruction Manual

Epson

Epson DS-30 WorkForce DS-30 Instruction Manual

Epson DS Series User manual

Epson

Epson DS Series User manual

Epson Perfection V300 Photo User manual

Epson

Epson Perfection V300 Photo User manual

Epson DS-870 User manual

Epson

Epson DS-870 User manual

Epson FF-680W Instruction Manual

Epson

Epson FF-680W Instruction Manual

Epson 1260 - Perfection Scanner User manual

Epson

Epson 1260 - Perfection Scanner User manual

Epson 2450 - Perfection Photo Scanner User manual

Epson

Epson 2450 - Perfection Photo Scanner User manual

Epson Perfection 4870 Photo User manual

Epson

Epson Perfection 4870 Photo User manual

Epson Perfection V300 Photo Dimensions

Epson

Epson Perfection V300 Photo Dimensions

Epson B81306 series User manual

Epson

Epson B81306 series User manual

Epson Perfection V350 Series Operation and maintenance manual

Epson

Epson Perfection V350 Series Operation and maintenance manual

Epson 1640SU - Perfection Photo Scanner User guide

Epson

Epson 1640SU - Perfection Photo Scanner User guide

Epson V500 Instruction Manual

Epson

Epson V500 Instruction Manual

Epson GT-30000 Series User manual

Epson

Epson GT-30000 Series User manual

Popular Scanner manuals by other brands

otometrics AccuScreen OAE user manual

otometrics

otometrics AccuScreen OAE user manual

Radio Shack PRO-433 quick start guide

Radio Shack

Radio Shack PRO-433 quick start guide

Infinite Peripherals INFINEA TAB M user manual

Infinite Peripherals

Infinite Peripherals INFINEA TAB M user manual

GeoSlam ZEB Horizon Hardware guide

GeoSlam

GeoSlam ZEB Horizon Hardware guide

Autonics LSE-4A5R2 product manual

Autonics

Autonics LSE-4A5R2 product manual

Ametek CREAFORM peel 3 user manual

Ametek

Ametek CREAFORM peel 3 user manual

Doxie DX250 user manual

Doxie

Doxie DX250 user manual

Canon imageFORMULA CR-135i II instructions

Canon

Canon imageFORMULA CR-135i II instructions

Batavia Auto Scan FDS-5200 instruction manual

Batavia

Batavia Auto Scan FDS-5200 instruction manual

Canon DR-X10C - imageFORMULA - Document Scanner Brochure & specs

Canon

Canon DR-X10C - imageFORMULA - Document Scanner Brochure & specs

Jireh Rotix user manual

Jireh

Jireh Rotix user manual

Kodak SLIDE N SCAN user manual

Kodak

Kodak SLIDE N SCAN user manual

Xerox Duplex user guide

Xerox

Xerox Duplex user guide

Uniden BC345CRS owner's manual

Uniden

Uniden BC345CRS owner's manual

Microtek 2010 Specifications

Microtek

Microtek 2010 Specifications

Microtek ScanMaker i450 Supplement

Microtek

Microtek ScanMaker i450 Supplement

Adesso NuScan 3000 Programming manual

Adesso

Adesso NuScan 3000 Programming manual

Fujitsu ScanSnap S500 Brochure & specs

Fujitsu

Fujitsu ScanSnap S500 Brochure & specs

manuals.online logo
manuals.online logoBrands
  • About & Mission
  • Contact us
  • Privacy Policy
  • Terms and Conditions

Copyright 2025 Manuals.Online. All Rights Reserved.