ERA HOMECAM IP116 Plus User manual

USER
MANUAL
THE ONE TOUCH KEYLESS SMARTLOCK
HD WIFI CAMERA

Page 1
Standards: Control Unit EN 301 489-1 V2.1.1:2017
EN 301 489-17 V3.1.1:2017
EN 300 328 V2.1.1:2016
EN 62479:2010
EN 62368-1:2014
EC DECLARATION
OF CONFORMITY
ERA Home Security Ltd
Valiant Way
Wolverhampton
WV9 5GB
United Kingdom
Tel: +44(0) 1922 490 000
Fax: +44(0) 1922 494 420
IP116 WiFi Security Camera+
The products described above are in conformity with the Radio Equipment
Directive 2014/53/EU.
Applicable Products:
DoP N°: EM0028
Signed for and on behalf of ERA Home Security Ltd:
Ben Penson:
Technical & Quality Director

INTRODUCTION
Thank you for choosing the ERA HD WiFi Camera+
This camera is easy to set up; just follow the instructions enclosed in this manual
to install the camera efficiently. It is important you do not skip ahead to other
parts within the manual, as some of the steps do need to be completed in the
correct order.
We hope that this camera will exceed your expectations but should you have
any questions or concerns, please contact our Customer Helpline on:
0345 257 2500
Page 2

Page 3
TABLE OF
CONTENT
1. What’s inside the box 4
2. HD WiFi Camera+Overview 4
3. Getting Started 5
3.1 Download the ‘ERA IP116 PLUS CAMERA’ App 5
3.2 Sign Up/In 6
4. App Control and Settings
6
4.1 Menu Page 6
4.2 App Settings 12
5. Installation 16
6. Restoring to factory Settings 17
ERA Product Guarantee 18
7. Specifications 17

Page 4
2. HD WIFI CAMERA+
OVERVIEW
HD WiFi Camera+x 1
(Wall Mount included)
LED Indicators
Day/Night
Sensor
Microphone
Camera
MicroSD
Card Slot
Reset
Button
Night
Vision
IR LEDs
AC Adapter x 1
Fixing Kit
(Image is a representation,
Tools not incuded)
Instruction
Manual x 1
Reset Pin x 1
Back ViewSide ViewFront View
Power
Jack
1. WHAT’S INSIDE
Page 5
Status Indication Table
Solid
Solid
Blinking
Blinks Twice Per Second
Blinks Once Per Second
Red & Blue LED Indicator
Blue LED Indicator
Blue LED Indicator
Red LED Indicator
Red LED Indicator
Privacy Mode
Network Connected
Searching Network
Real-time View
Enter WiFi Pairing State
Download the App by searching for
‘ERA IP116 PLUS CAMERA’ from App
Store or Google Play.
If you have also purchased an ERA
Alarm System which supports the
HD WiFi Camera+, you can also to set
up the camera within the alarm App.
3.1 Download the ‘ERA IP116 PLUS CAMERA’ App
3. GETTING STARTED
MicroSD™ Card (Optional - not included)
Insert a MicroSD™ Card* when the camera is powered OFF. DO NOT insert an
SD Card when the camera is powered ON. *maximum 32GB.
This camera automatically records and saves video if a MicroSD™ card has been
inserted; when the MicroSD card reaches full capacity the latest recordings will
over-write the earliest recordings.
NOTE: Please ensure your MicroSD card has sufficient space prior to inserting
the card into slot.
ERA IP116 PLUS CAMERA

Page 6
If you have not previously registered an account with ERA, please press ‘Sign Up’
found just below the ‘Sign In’ icon on the App, and follow the instructions to
create your account first.
If you do not receive an account verification code in your email inbox during the
registration process, please remember to check your spam/junk folder and make
sure the email has not been blocked by your service provider.
Once registered, please select the ‘Sign In’ icon and enter your email address
and password to login.
3.2 Sign Up/In
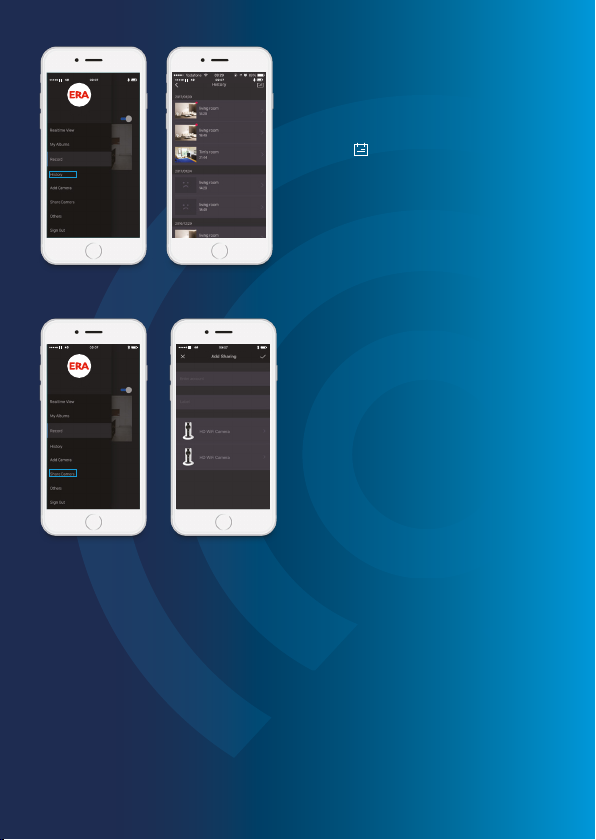
To add a new camera select
'Add Camera' from the side menu.
If you want to change your account
name, tap on [ ] and enter a new
name.
You can change your password from
this screen.
Edit Account
4. APP CONTROL
AND SETTINGS
4.1 Menu Page

Page 7
1. Wait for the HD WiFi Camera+
Boot up:
Plug the power adapter into a wall
socket and the camera will boot up
after a few seconds.
You can enter the ‘Add Camera’
interface by tapping [ + ] or choosing
[Add Camera] from the side menu.
Add Camera
2.
Connecting the HD WiFi Camera+
to your smartphone:
Exit the 'ERA IP116 PLUS CAMERA'
App and go to your smartphone's
WiFi list. Select 'WiFi Cam' to connect
to the camera. Your smartphone is
now the control centre for your HD
WiFi Camera+.
Entering the HD WiFi Camera+into WiFi
Configuration Mode:
Using the Reset Pin, press the Reset Button on the
side for 3 seconds; you will hear a beep and see the
red light start to blink every second which indicates
that the camera is in WiFi configuration mode.
3.

Page 8
NOTE: ONLY 2.4GHz WiFi is supported.
4. Enter the WiFi Details for your HD WiFi Camera+
Return to your ‘ERA IP116 PLUS CAMERA’ App. Select
your 2.4GHz WiFi network from the choices listed and
enter the WiFi network’s password. The HD WiFi
Camera+will connect to the selected WiFi network.
This pairing process should take about one minute..
Privacy Mode
When the Privacy Mode is turned on, all users will see real time video.
Only the Master account and shared Admin (users with full access) have
permission to turn the camera off. No recordings (to the MicroSD™ card)
will take place during this time.
Real-time View
Setup completed
When a successful connection is established, the App
will show ‘congratulations’ and the indicator will
become solid blue.
5.

Page 9
Snapshot (left) / Video Recording
(right)
Real time screenshots and video
clips can be recorded directly to
your smartphone. Tap on ‘My
Albums’ to view them.
Microphone (left) / Listen in (right)
Press and hold the Microphone
button to talk, release the button
to exit 'talk'.
To listen in to the area covered by your HD WiFi Camera+tap on the
'Listen in' Button.
App Settings
Please refer to page 15 for details.
IMPORTANT
In order to record 24/7, a memory card must be inserted and the camera must
be connected to the WiFi.
My Albums
Manually saved video clips and snapshots can be viewed, edited and shared in
'My Albums'.

Page 10
Select recording date
Motion red line: motion was detected
in this interval
Pause Button
Fast Forward Button
Snapshot
You can save snapshots and/or video
clips of interest directly to 'My Albums'
whilst reviewing the 24/7 continuous
recording* saved to the Memory Card.
24/7 Recording
Deleting Video(s) or Snapshot(s)
Tap on the edit icon [ ] and then press [ ] to delete the video clip or snapshot.
Sharing Video(s) or Snapshot(s)
Click on the camera menu, select ‘My Albums’ and select either photo or video tab.
Share by selecting your chosen video or picture and clicking on the share icon [ ].
Share using your preferred method.
Records Colour Reference:
Grey: No Record
Blue: Normal Record
Red: Motion Detected
IMPORTANT
In order to record 24/7, a memory card must be inserted and the camera must
be connected to the WiFi.
Page 11
History
Motion-triggered alerts can be reviewed
in the History Page.
Tap on [ ] to pick a specific date to
search an alert.
NOTE: Only the most recent 300 alerts
will be shown. New alerts will overwrite
the oldest ones.
My Shares
Device sharing with family or friends:
By choosing ‘My Shares’ on the menu
and pressing the [+] Add Button, you
can share access to your device(s) with
other registered ERA Account holders.
Enter the email address and label the
account you want to share with, and
then select the device(s).
When you share a camera and alerts with another user, they can view, but they
do not have access to share with anyone else.
It is highly recommended that you set access limits to those who you may share
your camera with. By not doing so, you grant your family members or friends
continued access to your camera you have shared.

Page 12
Device Name
The new name will
be shown on the Device
List on the Real-time
View Page.
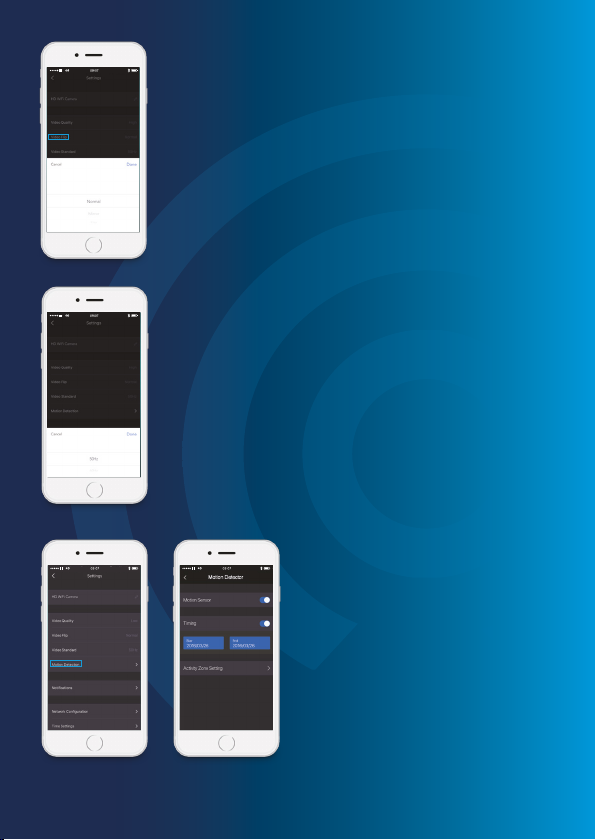
Video Quality
This setting enables you to
choose the video quality
that’s right for you and
your network.
Click here to enter
the Settings Page.
4.2. App Settings
Video Quality
NOTE: If you have a slower network speed you may need to adjust the video
quality to a lower setting to avoid interruption.
Access Settings
By Week Days
Select the day and specific times/settings that you
wish to share.
By Dates
Select the date period you would like to share access
to your cameras.
Page 13
Video Flip
This setting enables you to flip, mirror and mirror flip
your view of the real time play without adjusting the
positioning of the HD WiFi Camera+.
Video Standard
This selectable setting enables you to choose the most
suitable frequency for your video.
Motion Detector
The Motion Detector settings can be
set to meet your personal require-
ments. When motion detection is
turned on on, you will receive a push
notification whenever motion is
detected.
You can name cameras relevant to
home areas, such as 'Kitchen' and also
3. Switching between Available Networks
This setting enables you to connect your HD WiFi Camera+with another
nearby WiFi network, without repeating the camera-phone pairing process.
Page 14
select areas within the camera view to detect motion from and others to ignore
- a kitchen camera may ignore the window area for example so motion of
'passers by' within camera view are ignored but anything moving within the
kitchen is detected.
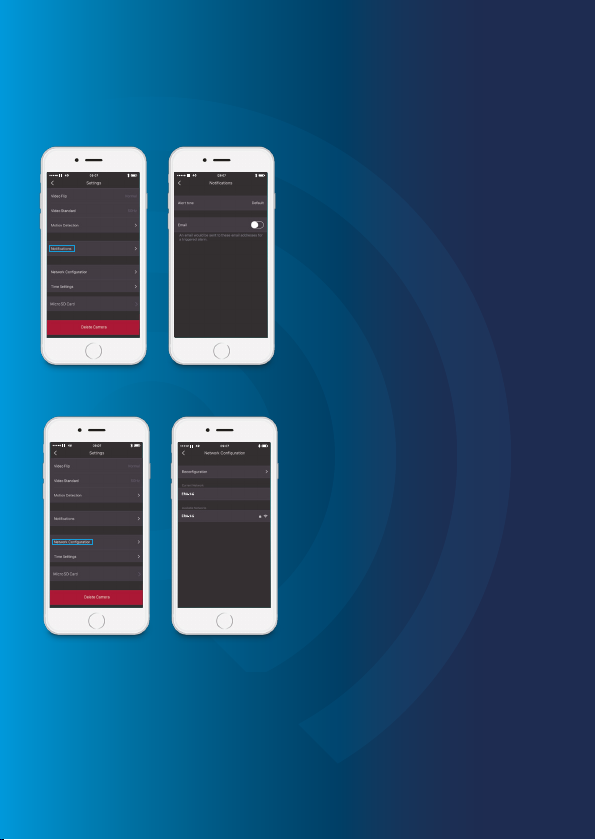
Notifications
This setting enables you to:
1. Change the alert time of your push
notifications.
2. To receive email notifications
whenever motion is detected, turn on
the 'Email' function and input the
receiving email addresses.
Network Configuration
1. Reconfiguration
This setting enables you to reconfigure
your HD WiFi Camera+when a network
issue has arisen. All settings and records
will NOT be erased.
2. Current Network
This setting indicates your current
network and the signal strength.
Page 15
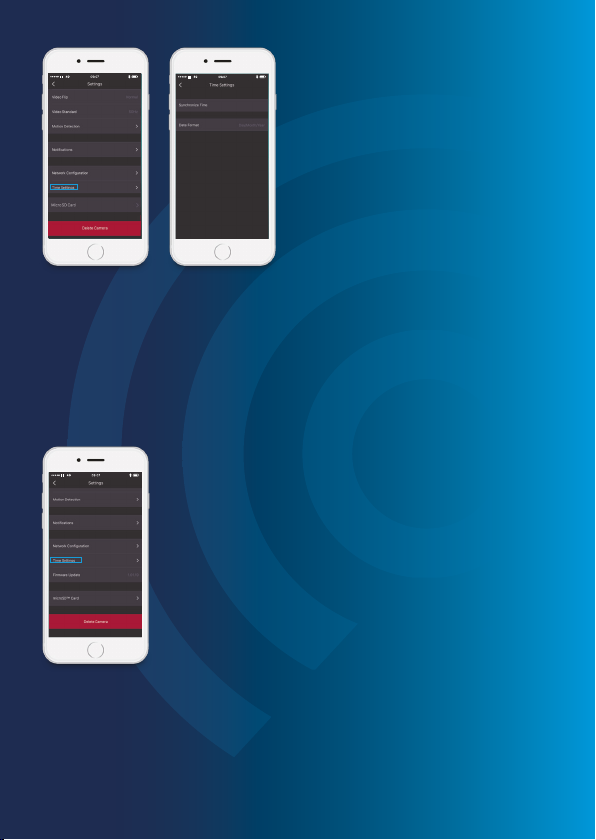
Time Settings
1. Synchronize Time
Set the correct time zone for your
region to ensure the time-stamp on the
recorded video is accurate.
When motion is detected, you will
receive a push notification, for example:
Activity detected by HD WiFi Camera
Name at 8:20 GMT
2. Date Format
This setting enables you to change the
format of the date shown on the
History Page.
Firmware Update
This function allows you to check for firmware updates.
IMPORTANT
Do not switch off your camera or force the update to
stop if it’s in progress as this can damage your camera.
Update steps: tap on [Firmware Update]. Alternating
Red and Blue lights will flash during the UPDATE
process.

Page 16
MicroSD™ Card
1. Auto Cover
New videos will overwrite older ones
automatically when the memory card
is full.
2. MicroSD™ Card Format
This setting erases all the recordings
stored on your memory card.
This process is irreversible, so please do
proceed with caution.
IMPORTANT: This camera should be placed where the WiFi signal is strongest
for optimal performance.
5. INSTALLATION

Page 17
Please read the steps below carefully before restoring to factory settings.
NOTE: To save the recordings on your memory card, remove the card from the
camera before restoring to factory settings.
Use Reset Pin to press the Reset Button (refer to page 5) for 10 seconds, during
which time, the camera will beep for 3 seconds, continue to hold the Reset Button
until two beeps are heard. After that, the camera will be restored to factory setting.
Restoring to factory setting will clear the connection between your camera and
smartphone, therefore you should add the camera to your App again.
6. RESTORING TO
FACTORY SETTINGS
1/4’ CMOS Sensor
0.02Lux @ (F2.0,AGG ON)
0 Lux with IR
1/50s to 1/100,000s
2.4mm F2.0
95°
H.264
Self-adaption
1280 x 720
20fps (1280 x 720)
Built-in MicroSD card slot, up to 32GB
IEEE802.11b/g/n
2.4GHz ~ 2.435GHz
20/40MHz Support
Temperature 0C - 60C (32F - 140F)
Humidity < 90% (non-condensing)
DC 5V 1A
5W MAX
91mm x 78mm x 155mm
Image Sensor
Min. Illumination
Shutter time
Lens
Angle of View
Video Compression
Bit Rate
Max. Image Resolution
Frame Rate
Storage
Wireless Standards
Frequency Range
Channel Bandwidth
Operating Conditions
Power Supply
Power Consumption
Dimensions (L x W x H)
7. SPECIFICATIONS

Page 18
ERA PRODUCT GUARANTEE
We at ERA firmly believe in the quality of our goods. Our technology achieves outstanding performance
and durability and we can therefore offer, in addition to your statutory rights, an additional limited
guarantee. In the event of any material defects in any product manufactured by us due to faulty design,
materials and/or workmanship, and which arise following correct installation and during normal use in
accordance with our instructions, as included in the product packaging, within the period of two years from
the date of purchase, we will either repair, provide a replacement, substitute with an equivalent product
free of charge from our then current range or refund in full the amount paid for the product at point of
purchase.
Conditions
In order to take advantage of our guarantee, you must comply with the following conditions:-
This limited guarantee is not transferable and is extended only to, and is solely or the benefit
of, the original purchaser of the product. Please retain your dated sales invoice as proof of purchase
and forward this to us if you wish to make a claim under this guarantee.
Products must be installed, used and maintained in accordance with our instructions
otherwise the guarantee will be invalidated.
The product must not be damaged or modified in any way nor must it have been subjected
to any unauthorised repairs.
1.
2.
3.
Exclusions
This guarantee does not cover:-
Periodic maintenance, repair and replacement of parts due to fair wear and tear.
Abuse or misuse, including but not solely limited to the failure to use this product for its normal
purposes or in accordance with ERA’s instructions on usage and maintenance.
Failure of the product arising from incorrect installation or use not consistent with the instructions
supplied and the cost of any removal or installation of products.
Accidents, Acts of God, lightning, water, fire, public disturbances, improper ventilation, voltage
fluctuations or any cause beyond the control of ERA (Force Majeure).
Unauthorised modifications carried out to the product.
Damage caused by incorrect/improper use of supplied batteries.
Alteration to, deletion, removal or illegibility of the Serial Number as shown on the Product Label.
Consumables: any damages so caused by the use of batteries not supplied by ERA.
Repair or attempted repairing by bodies who are not ERA authorised repairers.
Neglect.
The loss of any stored data on your product.
1.
2.
3.
4.
5.
6.
7.
8.
9.
10.
11.
This guarantee is in addition to your contractual and statutory rights and does not affect your statutory
rights.
To make a claim:
Please contact Customer Support either by telephone on 0345 257 2500 or email
not subject to any of our Exclusions, we will agree with you the repair, replacement, substitution or refund
of payment of goods. For product returns you will be issued with a Return Authorisation Number (RAN).
Please note: Returns will not be accepted unless accompanied by a RAN.
*Terms and conditions apply.

Customer Helpline:
0345 257 2500
www.erahomesecurity.com
ERA Home Security Ltd
Valiant Way, Wolverhampton,
West Midlands, WV9 5GB
email: [email protected]
Table of contents
Other ERA Security Camera manuals


