Model ECT1 Cleaning Tool
OPERATINGINSTRUCTIONS
Set-Up
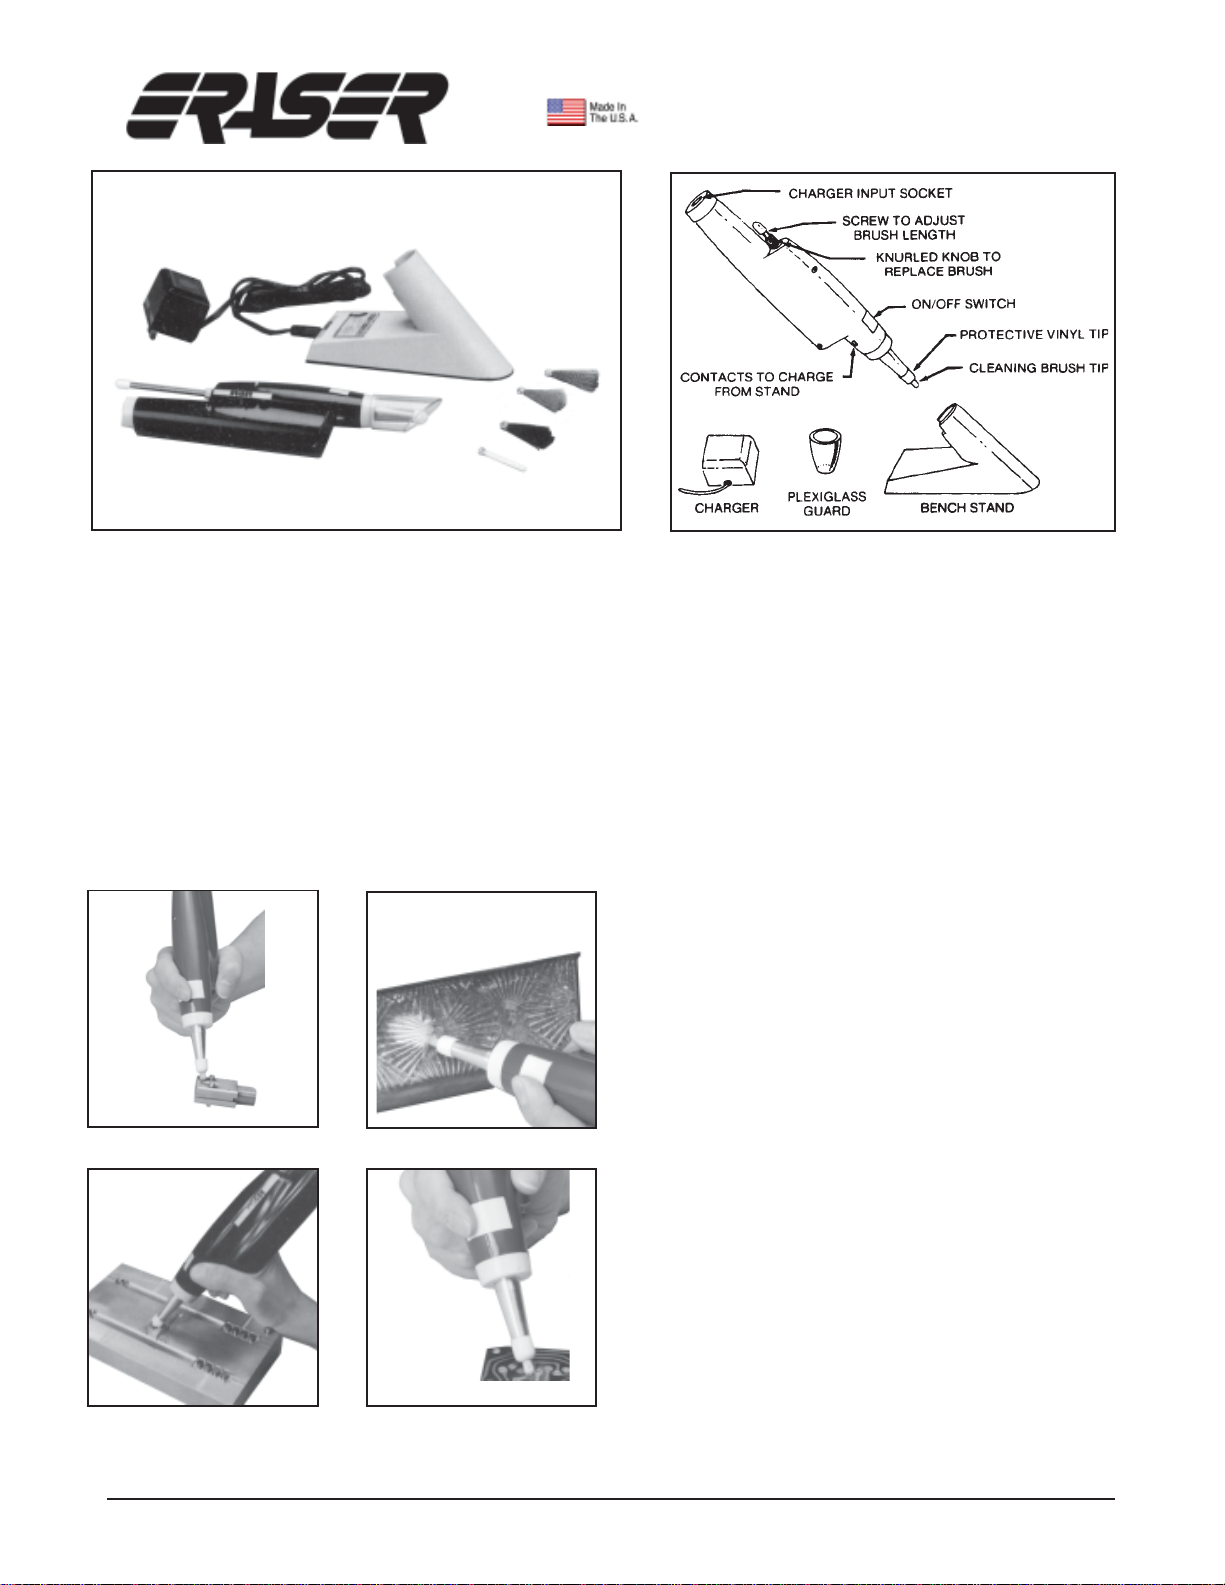
The ECT1 ships complete with:
Handpiece with one coarse fybrglass refill
Plexiglass guard
Bench stand
Battery charger
Fine grade fybrglass refills (6)
Coarse grade fybrglass refills (6)
Brass refill
Stainless steel refill
Nylonrefill.
Thehand unitcontains rechargeablebatteries that
should be charged for 8 hours before the unit is
operated.
Connectthecharger to the appropriate powersup-
ply (110V 60Hz) and insert charger plug into the
bench stand. The unit draws power from the
charger via contacts on the handpiece and in the
stand. Alternatively the unit may be charged by
inserting the charger plug directly into the socket
located in the end of the handpiece.
The unit is now ready for operation.
Operation
Beforeoperationplexiglassguardmustbeinplace.
Hold the unit in any convenient position. The pho-
tographsontheoppositepageshowthemostcom-
fortableand least fatiguing.Press the whitebutton
to switch the unit on.
When cleaning surfaces use the least possible
pressure to provide an adequate cleaning or pol-
ishingaction. The highspeed rotationof the brush
provides the cleaning action.
Thelessofthebrushtipthatisexposedtheharsher
the cleaning action and the longer the brush will
last. Generally select brush material so tht only
theminimumlength of brush needstobeexposed.
As the brush wears out propel more out by turning
the threaded rod assembly clockwise. When a
brush is worn out do not force the threaded rod
assemblybutreplacethe refill as described above.
The unit will charge when not being used if the
plexiglass guard is removed and the handpiece is
placed in the bench stand.
If the handpiece is used continously the charger
plug may be inserted directly into the handpiece
end and the batteries will be constantly charged.
The unit may be used with the charger plug in-
serted into the handpiece.
Maintenance
Routine
1. Periodic charging of batteries as re-
quired.
2. Cleaning of charger contacts on hand-
piece and in charger stand to prevent dirt
build up and remove corrosion.
3. Clean out periodically.
To change or replace brush
1. Undo knurled nut by turning counter
clockwise.
2. Remove threaded rod assembly into
which refill is clipped.
3. Remove worn out refill and replace with
refill of your choice.
4. Replace threaded rod assembly and
tightenknurled nut.
5. Turning the threaded rod assembly pro-
pels an retracts the refill. Turn the rod until
approximately 1/8” (3.2mm) of refill is ex-
posed at the end of the tool.
6. Check that the protective cap is in place
on the nosepiece.
To replace or change the nosepiece
1. Remove threaded rod assembly and refill as
described above.
2. Grasp motor shaft end and nosepiece and turn
nosepiece counter clockwise. Nosepiece will un-
screw from motor shaft.
3.Replace new nosepiece byreversingprocedure
in step 2.
4 Replace refill as above. Be sure to check that
the protective cap on the end of the nosepiece is
in place.
IMPORTANT: No liability will be incurred by The
Eraser Company for injury, death, or property dam-
age caused by a product which has been set up,
operated, and/or installed contrary to Eraser’s writ-
ten operating manual, or which has been subjected
to misuse, negligence, or accident, or which has
been repaired or altered by anyone other than
Eraser, or which has been used in a manner or for
a purpose for which the product was not designed.
EraserCompanyInc.•Syracuse,NYUSA•Ph: 315-454-3237 • info@eraser.com • www.eraser.com• Fax 315-454-3090