ES&S AutoMARK User manual

1
ES&S AutoMARK™
Pre-Election Day Checklist
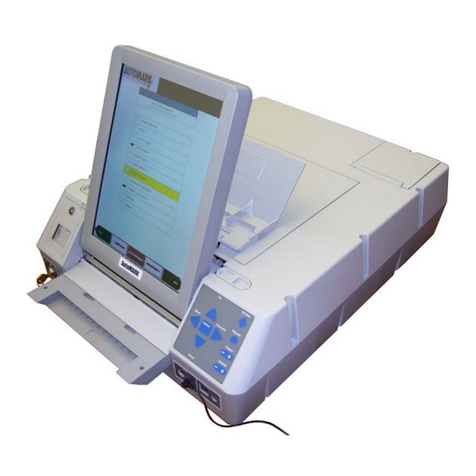
RearAccessDoor
TouchScreenMonitor Lid
CompactFlash LidLatches
AccessDoor
Key-Operated
Mode Switch Keypad
BallotFeedTray ADAPort
Headphone Jacks

2
Checking Supplies and the Equipment
1. 1 set of headphones
2. 1 compact flash card with election definition
3. 1 power cord
4. 1 pack of blank ballot stock
5. 1 mode switch key
6. 1 compact flash access door key
7. 1 container of alcohol wipes
Preparing the ES&S AutoMARK™ for Use
8. First, Remove the ES&S AutoMARK™, power cord,
Access Door Key, Mode Switch Key, and the headphones from
the carrying/ storage case.
9. Position the ES&S AutoMARK™ in front of you. The
Keypad is located on the front of the terminal.
10. Inspect the power cord for damage. If the cord is damaged,
discard it and contact ES&S for a new cord.
11. Plug the female end of the power into the slot on the back
of the ES&S AutoMARK™.
12. Plug the male end of the power cord into the wall outlet.
13. Move the lid latches towards the outer edge to open the lid.
14. Lift the lid flap and rotate it back until it rests on top of the
lid.

3
15. Lift the entire lid away from you into a vertical position.
The Touch Screen Monitor under the lid is now visible.
16. Lift the Touch Screen Monitor towards you into a vertical
position.
17. Adjust the angle of the Touch Screen Monitor for viewing
comfort.
18. Close the lid, leaving the Touch Screen Monitor in the
upright position. The Touch Screen Monitor is held in place by
tension bearings which allows it to remain in the upright
position.
19. Pull up on the Ballot Feed Tray, then pull it towards you
and lower it into position.
20. Plug the headphones into the appropriate headphone jack in front of the
terminal.
Cleaning the ES&S AutoMARK™
21. Use alcohol wipes to clean the outside panels and screen of the ES&S
AutoMARK™ unit. Ensure the unit is dry before turning it on.
Installing The Compact Flash Card
Compact Flash
Card
Compact Flash
Access Door
Compact Flash
Access Door
Ke
y

4
22. Using the Access Door key provided, unlock the Access
Door containing the compact flash card.
23. Remove the current compact flash card from the slot,
replacing it with the compact flash card containing your new
election files. The back of the card has a tab on it. When
inserting the compact flash card, ensure the tab is pointing
towards the right of the unit.
NOTE: The compact flash card must be installed before
ballots can be processed using the ES&S AutoMARK™.
24. Close and lock the Compact Flash Access Door.
Installing the Test Ink Cartridge
The Test Ink Cartridge is a regular inkjet cartridge that is used only for
testing prior to election day. This ink cartridge must be replaced on election
day before the unit is turned on. The test ink cartridge may be replaced with
another regular Inkjet cartridge or an Infrared Ink Cartridge depending upon
which tabulator is being used in conjunction with the ES&S AutoMARK™.
Ink
Cartridge
Rear Access Door

5
25. Remove the screw or snap that secures the Rear Access Door. Open the
Door.
26. Insert the new ink cartridge and using the screw or snap, re-secure the
Rear Access Door.
27. Insert the mode switch key into the Key-Operated Mode Switch and
turn to the Test Position to access the Test Menu.
NOTE: The screen will remain blank for approximately one minute after
the key is turned to the Test position. The screen will display the Main
Menu once the unit is finished downloading the data from the compact flash
card.
28. Select Service Print Cartridge and when prompted select Yes to the
question, “Have you changed your printer cartridge?” Answering yes to this
question resets the Ink Remaining percentage to 100%. The Ink Remaining
percentage is displayed in the lower left corner of the Test Menu.
Conducting the Ballot Print Test
Conducting the Ballot Print Test is done to test the accuracy of the election
definition and the accuracy of the print on the ballot once it is marked. All
ovals/arrows are filled in and the candidate names are printed on the ballot.
If the ovals are not filled in properly, adjustments should be made
accordingly.
29. Press Test Ballot Print on the screen.
30. Select the Enable Calibration Suggestions box.
31. Insert an unmarked ballot being used in this election into the ballot feed
tray.
32. Once the ES&S AutoMARK™ prints and ejects the ballot, confirm the
ES&S AutoMARK™ filled all ovals/arrows and printed the name of each
candidate next to the oval/arrow. Press Yes to recalibrate the printer.

6
33. Repeat steps 31 and 32 inserting the ballot in all possible orientations
(right-side up, upside down, inserted front-wards, inserted backwards).
Confirm the ES&S AutoMARK™ filled all ovals/arrows and printed the
name of each candidate next to the oval/arrow.
34. Press Done.
Checking the Battery Status
Check the battery status to ensure that the battery is fully charged.
35. Press the Battery Status button.
36. Confirm the Power source is External and the battery strength is Good.
The power source is External when the unit is operating on power from the
wall outlet. The power source is Battery when the unit is operating on
power from the internal battery.
37. Press Done.
Note: If the battery needs to be charged, refer to steps 93-98.
Calibrating the Touch Screen
The Touch Screen must be calibrated before every election to ensure it is
functioning properly. If the Touch Screen is not functioning properly,
ballots could be marked incorrectly.
38. Select Calibrate Touch Screen.
39. Press the Calibrate button to start the calibration.
40. Carefully press and briefly hold the stylus on the center of the target
then release. Repeat as the target moves around the screen.
41. Tap the screen to save your calibration settings. If you make a mistake,
just wait 30 seconds and your settings will not be saved.

7
42. Press Done after you complete the calibration. If you skip this step, the
settings may not be remembered when the system is re-booted.
Setting Date and Time
43. Select System Maintenance
44. Enter the System Password and press OK.
45. Select Set Date/Time.
46. Confirm Date is selected from the menu.
47. If the Date is NOT correct, press CLEAR.
48. Using the Keypad enter the correct Date in the MM-DD-YY format and
press Apply. A message will state “Change was successfully applied.” If
you enter the date in the wrong format and press Apply this error message
will appear “ERROR! Format: MM-DD-YY”. Press CLEAR and re-enter
the Date in the correct format.
49. Select Time from the menu.
50. If the Time is NOT correct, press CLEAR.
51. Using the Keypad enter the correct Time in the HH:MM
AM or PM format and press Apply. A message will state
“Change was successfully applied.” If you don’t select AM or
PM, the system will automatically select AM.
52. Press Done to exit and return to the System Maintenance
screen. Press Done again to return to the Main Menu screen.

8
Testing the ES&S AutoMARK™
Perform thorough testing to ensure everything is in working order before the
election. The sooner the tests are performed, the sooner an issue that may arise
can be resolved. You will need multiple blank copies of your current election’s
ballot to test the printer. Please ensure you are using ballots for precincts stored
on your compact flash card.
53. Turn the mode switch key to the ON mode position.
54. The Insert Your Ballot screen should be displayed.
55. Using a ballot from your current election, insert an unmarked ballot into
the ballot feed tray.
56. Select Language.
57. Test all buttons at the bottom of the touch screen to ensure proper
operation (Back, Zoom In/ Out, High Contrast, Exit Return Ballot,
Next).
58. Proceed and Vote Ballot Using Touch Screen (Only)
To write-in a candidate using the Touch Screen
59. On the Contest Screen, select Write-In.
Note: Press the Cancel button to close the write-in screen
without entering a candidate and return to the contest screen.
60. On the Write-In Pop-Up Screen, type the name of your
write-in.
61. Confirm your write-in on the top of the write-in screen.

9
62. Press OK to accept your write in and return to the previous
screen.
63. Review Summary Screen once all races are voted. Press NEXT.
64. Press the MARK BALLOT button.
65. Remove marked ballot. The “Insert Your Ballot” screen will appear.
66. Proceed and Vote Ballot Using Keypad (Only)
Forward/Next
Scroll Up
Select
Back
Scroll Down
To write-in a candidate using the Keypad
67. On the Contest Screen, select Write-In.
Note: Press the LEFT Arrow on the Keypad to close the write-
in screen without entering a candidate and return to the contest
screen.
68. On the Write-In Pop-Up Screen, using your Keypad, press
UP and DOWN to hear each letter read. Once you hear the
letter you want, press Select.
69. Confirm your write-in on the top of the write-in screen.
Screen On
Audio Re
p
eat
Audio Speed
- Decrease
+ Increase
Volume
- Decrease
+ Increase

10
70. Using your keypad press the RIGHT Arrow Key to accept your write
in and return to the previous screen.
71. Review Summary Screen once all races are voted.
72. Mark ballot.
73. Remove marked ballot. The “Insert Your Ballot” screen will appear.
Conducting the Ballot Read Test
74. Insert the marked ballot into the ES&S AutoMARK™ paper tray.
75. The paper feed mechanism should feed your ballot into the ES&S
AutoMARK™. If the test is successful, the ES&S AutoMARK™ scans the
ballot and displays the Language Selection or Voter Instruction screen
followed by the Verification Summary Screen. If the test is not successful,
the ES&S AutoMARK™ will eject the ballot or displays an error message.
If this happens, continue on to the troubleshooting section at the end of the
maintenance manual.
76. After reviewing the ballot, Press Next.
Printing the Operation Log (System Log File)
77. Turn the mode switch key to TEST.
78. Select Operations Log from the menu.
79. Review the operations log and press Print. Press the Up and Down
buttons to review all the pages of the operations log. To view a specific
page of the operations log, touch the white space under “Go to page:” and
enter the page number using the on-screen keypad and press Done. Press
Go and the page that you entered will be displayed on the screen.

11
80. When the screen displays Insert a blank ballot stock paper, place
completely blank ballot stock into the Ballot Feed Tray. After inserting the
paper, the machine automatically begins printing the operation log, printing
66 lines per page.
Note: Use only ballot stock paper in the ES&S AutoMARK™, any other
paper will greatly increase the risk of paper jams.
81. If there are more than 132 entries in the operation log, you will need
several pages. After a page has been ejected from the ES&S AutoMARK™,
if the message “insert a bank ballot stock paper” appears, insert another
blank ballot stock into the Ballot Feed Tray. Repeat this process until the
message printing done appears.
82. Press Done to return to the main menu.
83. Turn the mode switch key to the Off position, remove, and store in a
secure location.
Note: The Operations Log File is stored on the Compact Flash Card, not the
unit itself.
Remove the Test Ink Cartridge
84. Remove the screw or snap that secures the Rear Access Door. Open the
Door.
85. Remove the Test Ink Cartridge and using the screw or snap, re-secure the
Rear Access Door.
Note: The Test Ink Cartridge must be replaced on election day prior to the
ES&S AutoMARK™ being turned on. If the unit is turned on without the ink
cartridge installed, this message will appear “Alert! A problem has occurred.
Please notify an election official. The print cartridge is missing.”

12
Closing the Touch Screen and Storing the ES&S AutoMARK™
86. Unplug the headphones.
87. Lift under the front of the ballot feed tray and fold it inwards.
88. Open the lid and fold the Touch Screen Monitor back into the recessed
area.
89. Lower the lid over the Touch Screen Monitor.
90. Lower the lid flap over the ballot feed tray.
91. Move the lid latches inwards to secure the lid.
92. Unplug the power cord from the wall outlet.
93. Remove the power cord from the ES&S AutoMARK™.
94. Place the ES&S AutoMARK™, power cord, Access Door Key, Security
Key, and the headphones into the carrying/ storage case.
Charging the Battery
95. Plug the power cord into the rear panel of the ES&S
AutoMARK™ VAT
96. Plug other end of power cord into your local power outlet.
97. The power meter on the rear panel of the ES&S
AutoMARK™ indicates the battery power level. The battery
can be fully charged in approximately 2-3 hours.

13
98. Once the battery is charged: turn the mode switch key to
Test Position.
99. From the main menu, select Battery Status.
100. Confirm the Strength is Good and that the power source is
External.
Note: The power source indicating External when the ES&S
AutoMARK™ is plugged into an outlet confirms the power
supply cord is in good working condition.
Other manuals for AutoMARK
1
Table of contents
Other ES&S Data Logger manuals
