ES&S AutoMARK User manual

1
ES&S AutoMARK™
Election Day Checklist
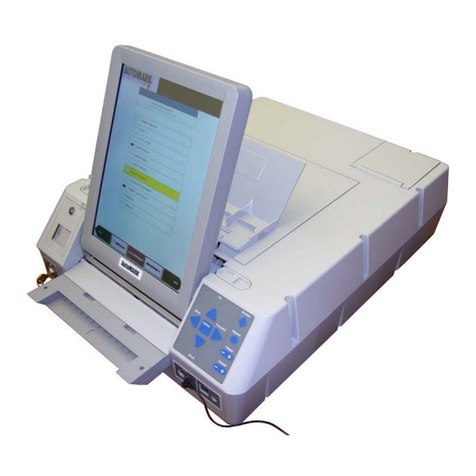
RearAccessDoor
TouchScreenMonitor Lid
Compact Flash
AccessDoor LidLatches
Key-Operated
Mode Switch Keypad
BallotFeedTray ADAPort
Headphone Jacks

2
Preparing the ES&S AutoMARK™ for Use
1. First, Remove the ES&S AutoMARK™, power cord,
Access Door Key, Mode Switch Key, and the headphones from
the carrying/ storage case.
2. Position the ES&S AutoMARK™ in front of you. The
Keypad is located on the front of the terminal.
3. Inspect the power cord for damage. If the cord is damaged,
discard it and contact ES&S for a new cord.
4. Plug the female end of the power cord into the slot on the
back of the ES&S AutoMARK™.
5. Plug the male end of the power cord into the wall outlet.
6. Move the lid latches towards the outer edge to open the lid.
7. Lift the lid flap and rotate it back until it rests on top of the
lid.
8. Lift the entire lid away from you into a vertical position.
The Touch Screen Monitor under the lid is now visible.
9. Lift the Touch Screen Monitor towards you into a vertical
position.
10. Adjust the angle of the Touch Screen Monitor for viewing
comfort.
11. Close the lid, leaving the Touch Screen Monitor in the
upright position. The Touch Screen Monitor is held in place by
tension bearings which allows it to remain in the upright
position.

3
12. Pull up on the Ballot Feed Tray, then pull it towards you
and lower it into position.
13. Plug the headphones into the appropriate headphone jack in front of the
terminal.
Installing The Compact Flash Card
14. Using the Access Door key provided, unlock the Access
Door containing the compact flash card.
15. Remove the current compact flash card from the slot,
replacing it with the compact flash card containing your new
election files. The back of the card has a tab on it. When
inserting the compact flash card, ensure the tab is pointing
towards the right of the unit.
NOTE: The compact flash card must be installed before
ballots can be processed using the ES&S AutoMARK™.
16. Close and lock the Compact Flash Access Door.
Installing the Ink Cartridge
The test ink cartridge may be replaced with another regular Inkjet cartridge
or an Infrared Ink Cartridge depending upon which tabulator is being used in
conjunction with the ES&S AutoMARK™. Once the ink cartridge is
Compact Flash
Card
Compact Flash
Access Door
Compact Flash
Access Door
Ke
y

4
installed, the unit must remain on for the duration of the election day. If the
unit is turned off for more than four minutes, the ink cartridge must be
replaced.
17. Remove the screw or snap that secures the Rear Access Door. Open the
Door.
18. Insert the new ink cartridge and using the screw or snap, re-secure the
Rear Access Door.
19. Insert the mode switch key into the Key-Operated Mode Switch and
turn to the Test Position to access the Test Menu.
NOTE: The screen will remain blank for approximately one minute after
the key is turned to the Test position. The screen will display the Main
Menu once the unit is finished downloading the data from the compact flash
card.
20. Select Service Print Cartridge and when prompted select Yes to the
question, “Have you changed your printer cartridge?” Answering yes to this
Ink
Cartridge
Rear Access Door

5
question resets the Ink Remaining percentage to 100%. The Ink Remaining
percentage is displayed in the lower left corner of the Test Menu.
Start the ES&S AutoMARK™
Ensure the Compact Flash Card containing the current election
definition is installed before the ES&S AutoMARK™ is turned
on. The ES&S AutoMARK™ will not function if the card is
not installed.
21. Turn the mode switch key to the middle or ON position.
22. Once the “Insert Your Ballot” screen appears, remove the
mode key and secure it in a safe place.
Voting with the ES&S AutoMARK™ During an Election
The Poll worker needs to understand how the voting process works using the
ES&S AutoMARK™ so they may answer questions. The poll worker should
NOT be involved in the vote selection process.
INTERACTING WITH THE ES&S AUTOMARK™
There are three ways to interact with the ES&S AutoMARK™.
• Directly on the Touch Screen
• The Keypad – includes Braille
• The Sip-N-Puff – A personal ADA Device

6
How Do I Vote Using the Keypad or Touchscreen?
23. When the Touch Screen Monitor displays Please Insert Your Ballot or
you hear Please Insert Your Ballot through the headphones, feed the blank
ballot into the Ballot Feed Tray.
24. If applicable, select the appropriate language for your ballot to be
displayed on the ES&S AutoMARK™.
Note: If English is the only language programmed to work for your
election, the Language Selection Screen will not display. The Voting
Instructions Screen appears after inserting your ballot.
25. Read or listen to the Instructions for voting on the Voting Instructions
Screen, then press Next.
26. The Contest Screen displays the first office listed on the ballot and is
read for your consideration. Select either the candidate name or the oval
next to their name to indicate your selection or if using the keypad, press
the Select key. Your selection displays a filled in oval next to the name of
your choice or if using the keypad, your selection will be read to you. Press

7
Next or the Right Arrow key if using the keypad and repeat this process
until you consider all contests and questions for the ballot.
27. The Summary Screen appears when you have considered all contests
and questions for your ballot. Review this screen to confirm your
selections. Press the Down Arrow key to listen to your contests and
selections if using the keypad.
Note: No selections have been marked on your ballot at this point.
To change any selection
28. Press the Contest or Question you wish to change on the Summary
Screen or press the Down Arrow key to hear the contest and selection read,
then press the Select key to return to that contest.
29. Touch your original selection to de-select your choice. If you are using
the keypad, press the Down Arrow until you reach your previous selection
and press the Select key to de-select your choice.
30. Touch your new response and press Next to return to the Summary
Screen. If you are using the keypad press the Up or Down Arrow to find
your new response and press the Select key, then the Right Arrow key to
make your selection and return to the summary screen.
31. Press Next when the selections are correct or the Right Arrow key if
using the keypad.
32. Press Mark Ballot on the Mark Ballot Selection Screen to print your
selections onto the ballot. If using the keypad, press the Select key to print
your selections onto the ballot.
33. When the screen displays Remove Ballot or when the instructions are
read,remove your ballot from the Ballot Feed Tray.
34. Submit your marked ballot to the ballot box for tabulation or follow
instructions for verification.

8
How Do I Write In A Candidate?
To print a Write-In Candidate on your ballot
35. Under the Contest screen, select Write-In
Note: Press the Cancel button or the LEFT Arrow on the Keypad to close
the write-in screen without entering a candidate and return to the contest
screen.
36. Under the Write-In Pop-Up screen, use your Touch Screen Monitor to
type the name of your write-in. If using your Keypad, use the UP and
DOWN arrows to hear each letter read. Once you hear the letter you want,
press SELECT.
37. Confirm your write-in on the top of the write-in screen.
38. Press OK, or if using the keypad, press the RIGHT Arrow Key to
accept your write in. and return to the previous screen.
How To Vote Using the Sip-N-Puff
The ES&S AutoMARK™ has a port located on the front of the terminal that an
election official can plug an ADA device in for the voter. The ADA device
supported by the AutoMARK™ is the Puff-Sip. The voter supplies this
device.
Sip-N-Puff refers to the interface device commonly used by persons with
disabilities, generally in a wheel chair, using his/her mouth on a straw to send
inputs to the ES&S AutoMARK™. The voter puffs or sips on the straw to
indicate a "yes" or "no."
Using only yes/no, the voter can negotiate all screens. When the voter arrives at
any screen, they choose "yes" to deal with that screen or "no" to bypass the
screen. If they choose "yes," then the first selection on that screen will be
highlighted. They then choose "yes" to make that selection or "no" to move to
the next selection.
For example, if there is a race screen with two candidates the user selects "yes"
when they arrive at the screen to indicate they want to vote in this race. ("No"
would skip the race). The first candidate will be highlighted in yellow. If they
say "yes" then the first candidate will be selected and the highlight will move to
the next candidate. Now the voter selects "no," to move to the bottom of the list

9
and highlight the "NEXT" button. If he/she says "no" again, the highlight will
move left along the button bar through "ZOOM", "EXIT", "HIGH
CONTRAST" and "PREVIOUS." If he/she keeps saying "no", the highlight
will cycle back to the first selection on the page. The highlight moves in a
clockwise fashion around the page giving the voter the chance to select anything
on the screen just as you would with your finger.
How do I Verify my Ballot?
The ES&S AutoMARK™ allows the voter to insert their marked ballot into the
ballot feed tray and to verify their vote. Note that no changes can be made
from this verification step and you will only be able to view and hear the
summary screen. If you want to make changes, please ask for a new ballot and
begin the voting process over.
To verify your ballot
39. Insert your marked ballot into the ballot feed tray.
Note: A screen appears with instructions on how to verify the votes.
40. Press Next to make the Verification Summary screen appear.
41. Review the selections that are marked on your ballot.
42. Review your selections and when done, press Exit.
43. When the screen displays Remove Ballot, remove your ballot from the
Ballot Feed Tray.
44. Submit your marked ballot to the ballot box for tabulation.
How Do I Zoom In/Out?
ES&S AutoMARK™ options are available to make the text on the screen
easier to see.
45. Zoom In/Out makes the text on the screen appear larger than the system
default. Press ZOOM IN/OUT once to enlarge text, press ZOOM IN/OUT
again to return text to the default size.

10
46. High Contrast changes the default colors on the screen to black and
white. When you select HIGH CONTRAST, the background becomes
black and text becomes white. Press HIGH CONTRAST again to return to
the default colors.
How Do I Change the Volume/ Change the Tempo?
The following ES&S AutoMARK™ options on the keypad make the audio
easier to hear:
47. Press REPEAT on the keypad to repeat the text just read through the
headphones.
48. Press on the right side of the TEMPO button to speed up the audio or
the left side of the TEMPO button to slow down the audio being read
through the headphones. .
49. Press on the right side of the VOLUME button to increase the audio or
the left side of the VOLUME to decrease the volume being read through the
headphones.
50. If you are not using the screen, you may use the SCREEN button to
turn off your display. You will still hear all options through your
headphones. Touch the SCREEN button once to turn off the display, touch
it again to turn the display back on.
Remove The Compact Flash Card
51. Turn the ES&S AutoMARK™ OFF.
52. Using the access door key provided, unlock the Access Door containing
the compact flash card.
53. Remove the compact flash card.
54. Close and lock the Access Door.

11
Remove the Ink Cartridge
Always remove the used ink cartridge from the ES&S AutoMARK™ and
discard it before storing the ES&S AutoMARK™ between elections. Spare ink
cartridges should be purchased prior to the next election and stored separately
from the ES&S AutoMARK™.
55. Remove the screw or snap that secures the Rear Access
Door. Open the Door.
56. Remove the ink cartridge and using the screw or snap, re-
secure the Rear Access Door.
Cleaning the ES&S AutoMARK™
57. Before storing the ES&S AutoMARK™, use alcohol wipes to clean the
outside panels and screen of the ES&S AutoMARK™ unit. Ensure the unit is
dry before storing it.
Closing the Touch Screen and Storing the ES&S AutoMARK™
58. Unplug the headphones.
59. Lift under the front of the ballot feed tray and fold it inwards.
60. Open the lid and fold the Touch Screen Monitor back into the recessed
area.
61. Lower the lid over the Touch Screen Monitor.
62. Lower the lid flap over the ballot feed tray.
63. Move the lid latches inwards to secure the lid.
64. Unplug the power cord from the wall outlet.

12
65. Remove the power cord from the ES&S AutoMARK™.
66. Place the ES&S AutoMARK™, power cord, Access Door Key, Security
Key, and the headphones into the carrying/ storage case.
Other manuals for AutoMARK
1
Table of contents
Other ES&S Data Logger manuals





![Lambrecht Ser[LOG] Operator's manual Lambrecht Ser[LOG] Operator's manual](/data/manuals/zq/a/zqaq/sources/lambrecht-ser-log-data-loggers-manual.jpg)