Escape M1 Air User manual

Quick Start Guide
ENG
Content
Thank you for your purchase!
Connecting the M1 Air to an existing HiFi
installation or active speakers.
Connecting the M1Air to the AUX 2 input of
an Escape™ P9
Important information for correct operation of the M1 Air
The M1 Air creates a wireless connection with your WiFi router. Ensure that you have a sufficiently
strong WiFi signal in locations where you wish to use the M1 Air.
Escape Remote app
Use of the dedicated Escape Remote application for the M1 Air is strongly recommended. It can be
downloaded free from the Apple App Store (iOS) and the Google Play Store (Android).
Airable radio
Using the Escape Remote app you can select the airable catalogue, with more than 30,000 radio
stations around the world and 25,000 podcasts. This enormous catalogue can be sorted by region,
genre, popularity and quality. The internet radio stations are managed by airable GmbH, with a
team ensuring that new content is constantly added, creating an unlimited source of freely
accessible music, news and entertainment. This service falls outside the responsibility of
Escape bv.
Thank you for purchasing the ESCAPE M1 Air, a Hi-Res audio streaming module
with a sample rate of 192KHz/24 bit, supporting Chromecast Audio, AirPlay2,
Spotify Connect and Roon.
Carefully read all safety precautions in the attached document
or on the website www.escapespeakers.com before using this product.
M1 Air QSG ENG (V2021.07)
STEP 1
• Connect the 5.0 Volt/1A AC power adaptor with interchangeable plugs (EU/UK/US)
to the mains supply and use the supplied 1.5 meter USB type A to micro USB cable to
provide power to the M1 Air via the micro USB input.
STEP 2
• Connect the 1 meter 3.5 mm stereo mini-jack to RCA cable via de M1 Air audio output
to the LINE IN of your HiFi installation or active speakers. The red RCA plug is the right
channel output.
• If your HiFi installation is provided with an optical input you can use the supplied mini
Toslink adapter, which is to be connected to the 3.5 mm output of the M1 Air module,
with the 1 meter optical cable used to connect the M1 Air and the HiFi installation.
1
2
Note:Avoid placing the M1 Air receiver completely behind your HiFi equipment as this may
screen off the WiFi signal, preventing proper operation.
Note:When using the M1 Air connected to the P9 AUX 2 input, the main volume and track
controls (skip, pause, play) must be controlled via the M1 Air app, an element of the Escape
Remote application or the music app (Spotify - Tydal - Apple Music etc) on your phone or
tablet.
STEP 1
• Open the keypad cover over the USB input to the right of the keypad and push the
locking mechanism to remove the keypad from its compartment (see 1 and 2 on the
drawing).
STEP 3
• To reinstall the keypad, you should slide it into the locking hook next to the AUX 1 input
and gently press it into the snap-lock mechanism (3 and 4 on the drawing). You should
now wait until the configuration of the M1 Air is complete.
STEP 4
• Turn on the P9 with the on/off button.
• Important: ensure that the latest version of the P9 firmware is installed on the device
(minimum 3.1.8). For further details see the P9 product page in the Escape Remote app
section.
• Connect the short (15 cm) 3.5mm – 3.5mm aux cable to the M1 Air Aux output and
connect the short (4.5 cm) right angle USB type A to USB micro cable to the M1 Air
power input.
• Use the Velcro strips to secure the M1 Air to the far right of the bottom, with the
Escape™ logo reading in the same direction as on the hand grip. Now connect the 3.5
mm cable to the AUX 2 input of the P9. This is located to the left in the side wall of the
compartment (don’t confuse this with the AUX 1 input above). Next connect the short
USB cable to the P9’s USB power output. This is located to the right in the side wall of
the compartment (don’t confuse this with the USB Audio input at the top).
1
3
4
STEP 2
• Remove the keypad completely. Do not disconnect it from the cable connector.
• Stick one strip of the supplied Velcro tape to the far left of the bottom of the P9
compartment located below the keypad. Place the other Velcro strip centrally on the
underside of the M1 Air.
2
STEP 1/2
Unlock keypad
STEP 3/4
Lock keypad
DC 5V_1A INPUT
Optical / AUX OUT
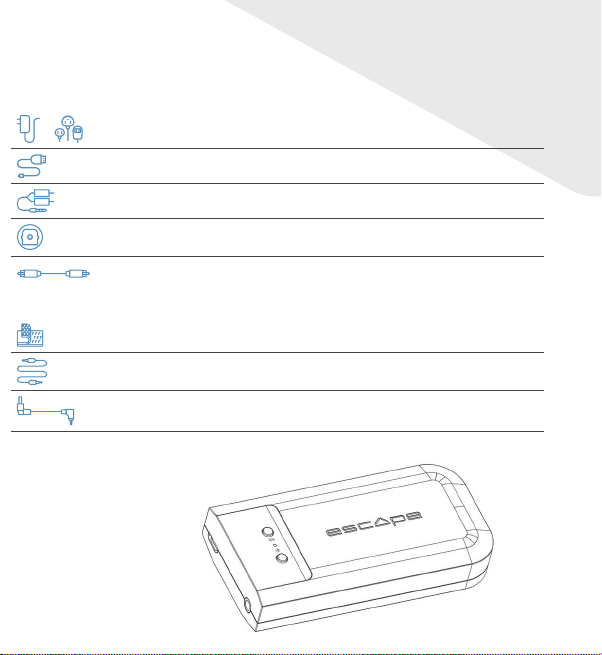
ACCESSORIES FOR CONNECTING TO A HIFI SYSTEM
+ Power supply + 3 adapters
USB power cable (1.5 meters)
3.5mm stereo mini-jack to RCA cable (1 meter)
Toslink adapter
Optical cable
ACCESSORIES FOR CONNECTING TO THE AUX 2 INPUT ON A P9
Velcro x 2
Short 3.5mm - 3.5mm aux cable (length 15 cm)
Short angled USB type A to USB micro cable (length 4.5 cm)

Quick Start Guide
ENG
Content
Thank you for your purchase!
Connecting the M1 Air to an existing HiFi
installation or active speakers.
Connecting the M1Air to the AUX 2 input of
an Escape™ P9
Important information for correct operation of the M1 Air
The M1 Air creates a wireless connection with your WiFi router. Ensure that you have a sufficiently
strong WiFi signal in locations where you wish to use the M1 Air.
Escape Remote app
Use of the dedicated Escape Remote application for the M1 Air is strongly recommended. It can be
downloaded free from the Apple App Store (iOS) and the Google Play Store (Android).
Airable radio
Using the Escape Remote app you can select the airable catalogue, with more than 30,000 radio
stations around the world and 25,000 podcasts. This enormous catalogue can be sorted by region,
genre, popularity and quality. The internet radio stations are managed by airable GmbH, with a
team ensuring that new content is constantly added, creating an unlimited source of freely
accessible music, news and entertainment. This service falls outside the responsibility of
Escape bv.
Thank you for purchasing the ESCAPE M1 Air, a Hi-Res audio streaming module
with a sample rate of 192KHz/24 bit, supporting Chromecast Audio, AirPlay2,
Spotify Connect and Roon.
Carefully read all safety precautions in the attached document
or on the website www.escapespeakers.com before using this product.
M1 Air QSG ENG (V2021.07)
STEP 1
• Connect the 5.0 Volt/1A AC power adaptor with interchangeable plugs (EU/UK/US)
to the mains supply and use the supplied 1.5 meter USB type A to micro USB cable to
provide power to the M1 Air via the micro USB input.
STEP 2
• Connect the 1 meter 3.5 mm stereo mini-jack to RCA cable via de M1 Air audio output
to the LINE IN of your HiFi installation or active speakers. The red RCA plug is the right
channel output.
• If your HiFi installation is provided with an optical input you can use the supplied mini
Toslink adapter, which is to be connected to the 3.5 mm output of the M1 Air module,
with the 1 meter optical cable used to connect the M1 Air and the HiFi installation.
1
2
Note:Avoid placing the M1 Air receiver completely behind your HiFi equipment as this may
screen off the WiFi signal, preventing proper operation.
Note:When using the M1 Air connected to the P9 AUX 2 input, the main volume and track
controls (skip, pause, play) must be controlled via the M1 Air app, an element of the Escape
Remote application or the music app (Spotify - Tydal - Apple Music etc) on your phone or
tablet.
STEP 1
• Open the keypad cover over the USB input to the right of the keypad and push the
locking mechanism to remove the keypad from its compartment (see 1 and 2 on the
drawing).
STEP 3
• To reinstall the keypad, you should slide it into the locking hook next to the AUX 1 input
and gently press it into the snap-lock mechanism (3 and 4 on the drawing). You should
now wait until the configuration of the M1 Air is complete.
STEP 4
• Turn on the P9 with the on/off button.
• Important: ensure that the latest version of the P9 firmware is installed on the device
(minimum 3.1.8). For further details see the P9 product page in the Escape Remote app
section.
• Connect the short (15 cm) 3.5mm – 3.5mm aux cable to the M1 Air Aux output and
connect the short (4.5 cm) right angle USB type A to USB micro cable to the M1 Air
power input.
• Use the Velcro strips to secure the M1 Air to the far right of the bottom, with the
Escape™ logo reading in the same direction as on the hand grip. Now connect the 3.5
mm cable to the AUX 2 input of the P9. This is located to the left in the side wall of the
compartment (don’t confuse this with the AUX 1 input above). Next connect the short
USB cable to the P9’s USB power output. This is located to the right in the side wall of
the compartment (don’t confuse this with the USB Audio input at the top).
1
3
4
STEP 2
• Remove the keypad completely. Do not disconnect it from the cable connector.
• Stick one strip of the supplied Velcro tape to the far left of the bottom of the P9
compartment located below the keypad. Place the other Velcro strip centrally on the
underside of the M1 Air.
2
STEP 1/2
Unlock keypad
STEP 3/4
Lock keypad
DC 5V_1A INPUT
Optical / AUX OUT
ACCESSORIES FOR CONNECTING TO A HIFI SYSTEM
+ Power supply + 3 adapters
USB power cable (1.5 meters)
3.5mm stereo mini-jack to RCA cable (1 meter)
Toslink adapter
Optical cable
ACCESSORIES FOR CONNECTING TO THE AUX 2 INPUT ON A P9
Velcro x 2
Short 3.5mm - 3.5mm aux cable (length 15 cm)
Short angled USB type A to USB micro cable (length 4.5 cm)
Table of contents
Popular Media Converter manuals by other brands


H&B
H&B TX-100 Installation and instruction manual

Bolin Technology
Bolin Technology D Series user manual

IFM Electronic
IFM Electronic Efector 400 RN30 Series Device manual

GRASS VALLEY
GRASS VALLEY KUDOSPRO ULC2000 user manual

Linear Technology
Linear Technology DC1523A Demo Manual

Lika
Lika ROTAPULS I28 Series quick start guide

Weidmuller
Weidmuller IE-MC-VL Series Hardware installation guide

Optical Systems Design
Optical Systems Design OSD2139 Series Operator's manual

Tema Telecomunicazioni
Tema Telecomunicazioni AD615/S product manual

KTI Networks
KTI Networks KGC-352 Series installation guide

Gira
Gira 0588 Series operating instructions

Lika
Lika SFA-5000-FD user guide