manuals.online logo
Brands
  1. Home
  2. •
  3. Brands
  4. •
  5. esotec
  6. •
  7. Water Pump
  8. •
  9. esotec Palermo User manual

esotec Palermo User manual

Operating manual
waterpump “Palermo”
1. Introduction
Dear Costumer, thank you for purchasing the solar pump kit.
With this solar pump kit you purchased a product manufactured according to the
current state of technology.
This product fulfils all requirements of the valid European and nati-
onal regulations. The conformity was proved. The relevant declara-
tions and documentation are deposited with the manufacturer.
To maintain this state and guarantee a safe operation, you as the user will have to
follow this operating manual!
2. Safety Instructions
- In case of damages caused by not following
this operating manual, the warranty rights will expire!
We exclude liability for any consequential damages!
- We exclude liability for property or personal damages
caused by inappropriate handling or not following the
safety instructions.
- In these cases any guarantee rights will expire.
Due to safety and admission reasons (CE) it is not allowed to arbitrarily reconstruct
and/or change the solar pump kit.
Therefore, please keep to the operating manual.
The accident prevention rules of the association of the industrial trade cooperative
association for electric plants and working material are to be considered in industrial
environments
3. Intended use
This submersible pump is designed for pumping water in garden ponds, fountains,
water dishes, etc. It can pump water through a hose connection or can be operated
through attached lifting tubes with water sprinklers.
A solar module or a power pack with a voltage of 6 to 9 volts can be used as the
energy source. When used with a solar module, the pump works only if enough solar
radiation strikes the solar module.
The delivery rate of the pump can be adjusted using the regulator on the front side of
the pump. The water pump has no On/Off switch. As soon as the pump is connected
to its power supply, it starts pumping water.
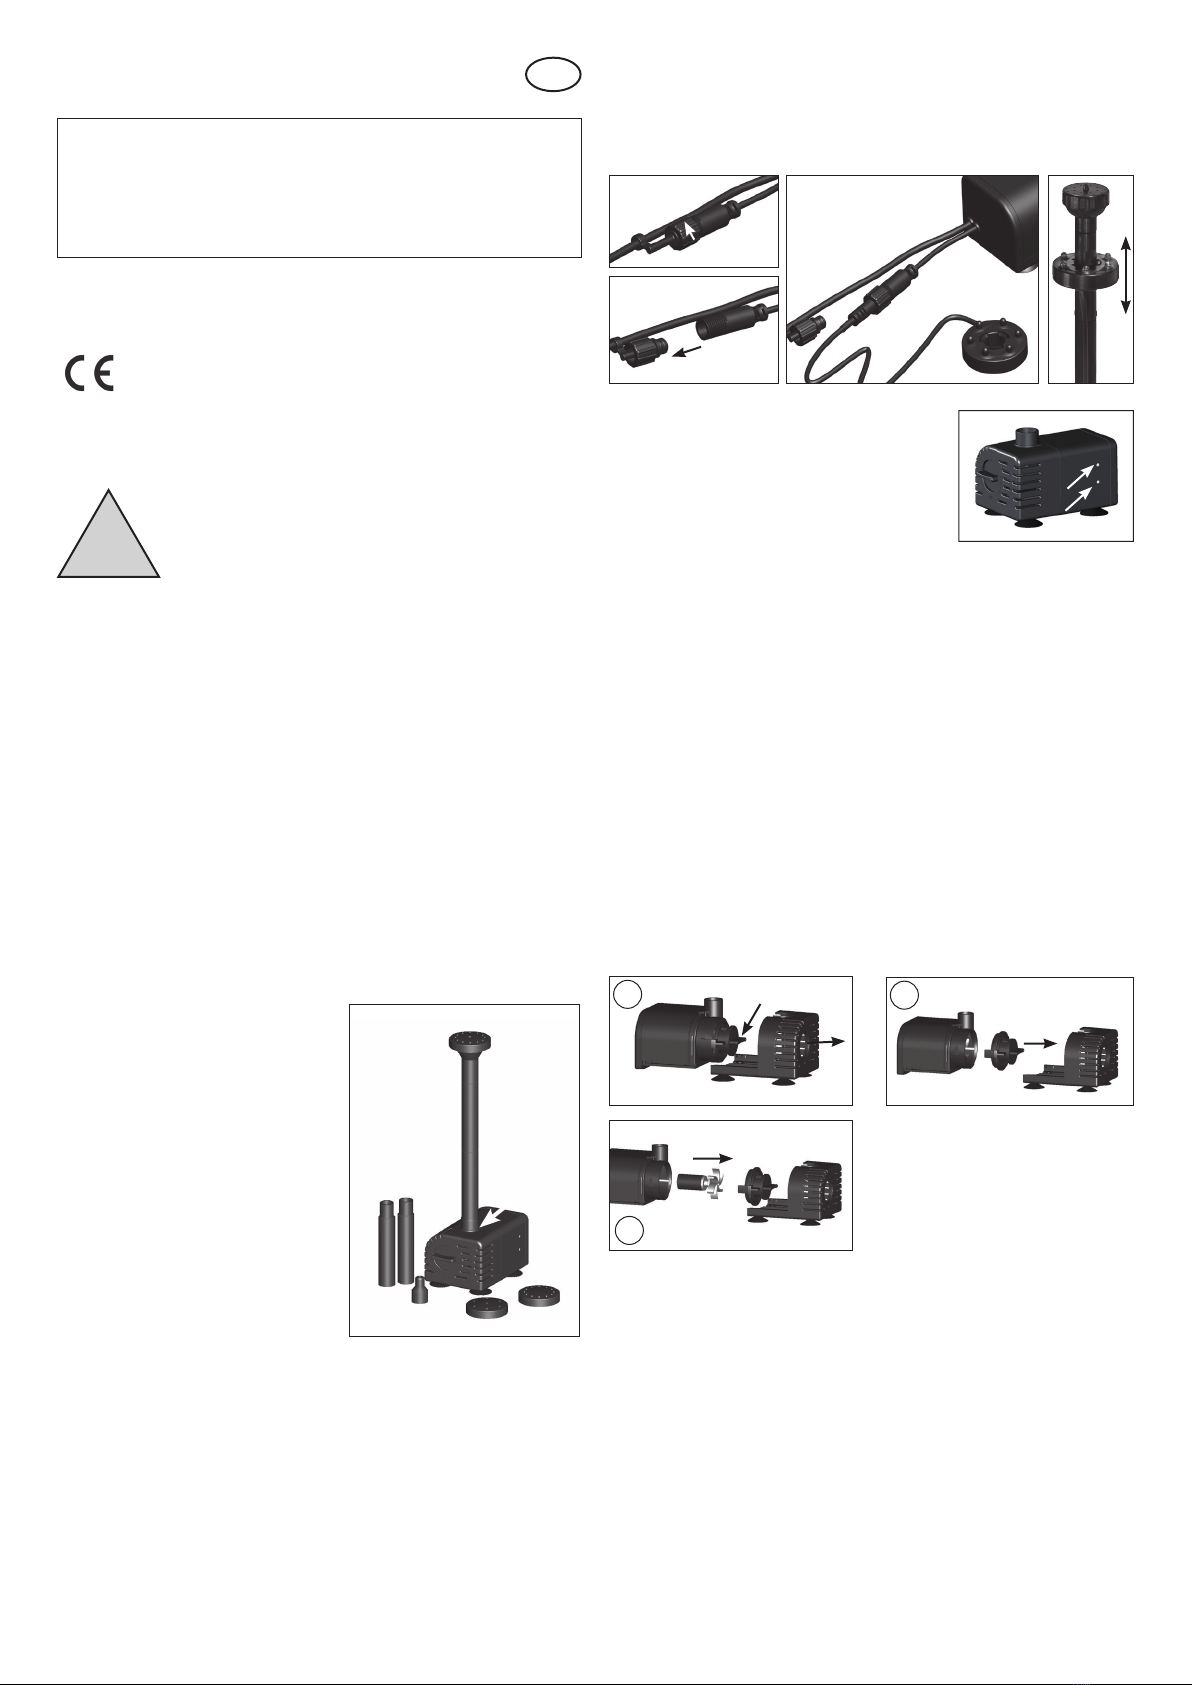
4.1 Installation and commissioning
1. Roll out the connecting cable of the
pump completely.
2. Place the pump in water (please note
Point 5 here).
3. Connect the lifting tubes till they project
out of the water surface. For this, first
attach the reducer to the pump.
4. You can now choose from 3 different
water nozzles or a single jet nozzle.
The multiple jet nozzle attachments are
always snapped onto the nozzle cup.
5. Alternatively, the pump can also be used
for pumping water through a hose. For
this, you just have to attach a hose to the
pump’s pipe.
6. Now supply power to the water pump
through a solar module. Use the enclo-
sed plug with cable (red = positive pole,
black = negative pole) for this. If you
have purchased this pump as a comple-
te solar power system, then the approp-
riate plug is already attached to the solar module.
Note: The plug has reverse-polarity protection, no force should be used while inser-
ting. The glass of the solar module is fragile.
Caution! Risk of injury! A broken module cannot be repaired again and must be
disposed off in an environmental-friendly way.
7. If the pumping capacity is too high, you can reduce the amount of water. Simply
turn the regulator on the front side of the pump in clockwise direction. Please do
not use force while adjusting. The adjustment range is 45°.
4.2 Operation with LED light ring
The accessories include a LED light ring. This light ring can be easily slipped onto
the lifting tube.
Electrical connection is established via the socket on the pump. For this, remove
the drain plug, insert the light ring plug in the socket and tighten the cap nut firmly.
Depending on the model, the lighting is activated via a twilight sensor.
5. Dry run protection
The pump is equipped as standard with a dry run pro-
tection. Two sensor points are provided on the side of
the housing for this. The pump works if these points
are under water. If a point projects out of the water, the
pump does not work.
6. Care and maintenance
For optimum performance of the pump, it must be washed occasionally with warm
water depending on the water contamination. To wash the pump, open the housing
as follows:
Note: Please do not use force while dismantling or assembling the pump. The parts
are very fragile and can break easily.
1. Disconnect the pump’s plug.
2. Pull the front cover of the pump forward like a slide gently (Figure 1).
3. Turn the front cover of the pump by about 45° clockwise (Figure 1) and carefully
pull the cover forward (Figure 2). Watch out for the plastic shaft and the seal while
doing this.
4. Carefully drag the impeller out of the pump (if necessary, use pliers). (Figure 3).
5. Now clean all the parts carefully with warm water.
6. Then plug the shaft with the impeller carefully into the hole of the pump. Ensure
that the shaft is fitted firmly.
7. Now place the cover carefully over the pump. Ensure that the seal is fitted proper-
ly.
8. Turn the front cover again by 45 degrees counter-clockwise into the starting posi-
tion.
9. Slide the lower part of the pump completely into the pump housing.
The pump is ready to use again.
7. Malfunction
Pump is not pumping water
- Is the pump completely submerged in water? Dry run protection (Point 5)
- Is the polarity of the supply voltage reversed? Cable colour brown = + pole,
blue = negative pole
- Is the pump dirty? Cleaning the pump, see Point 6.
!
GB
Sensorpoints
lifting tubes
water nozzles
water nozzle
reducer
lifting tubes
turn 45°
12
3
Customer support:
If you have problems or questions regarding this product, simply contact us!
Monday to Friday 9 am to 12 noon and 1 pm to 4 pm.
By phone: +49 9605-92206-0
By e-mail for ordering spare parts: [email protected]
By e-mail for questions about the product: [email protected]
Product: Manufacturer Item No. pump: 101756
Drain plug
Light ring
connection
8. Technical data
Operating voltage: 6 - 9 V DC
Degree of protection: IP 68
Power consumption: 1.2 W - 3.3 W
Pump lift: 0,7 m - 0,9 m
Delivery rate: 240 l/h - 330 l/h
Operating temp. range: +4 to +40°C
9. Spare parts
1. White ceramic shaft: Item No.: 911002
2. Pump impeller: Item No.: 911003
3. Internal rubber bush: Item No.: 911004
4. Front cover: Item No.: 911005
5. Seal for cover: Item No.: 911006
6. Sliding carriages with suction bases: Item No.: 911007
7. Suction bases (4 pieces) Item No.: 911008
8. Complete nozzle set: Item No.: 911009
Manufacturer/Importer
esotec GmbH - Gewerbegebiet Weberschlag 9 - D-92729 Weiherhammer
Tel.-Nr: +49 9605-92206-0 - Fax.-Nr: +49 9605-92206-10
Internet: www.esotec.de
Disposal:
Dear customer,
please cooperate in avoiding waste. When you intend to dispose
of the product in future, please consider that it contains valuable
raw materials suited for recycling.
Therefore, do not dispose it of with domestic waste but bring
it to a collection point for the recycling of waste electrical and
electronic equipment.
Thank you very much for your cooperation!
Copyright, esotec GmbH
12
3inside 4+5 6
77
10. Safety information:
DANGEROUS for children! Children could easily swallow the small parts that come with
this pump and its packaging material. Please keep at a safe distance. These parts could
otherwise lead to choking or suffocation!
WARNING against danger of stumbling! Lay out the connection cable such that it does
not create the threat of tripping or stumbling!
CAREFUL: material damage! If you set up the solar module without a module holder,
you must make sure that it is sturdy enough to retain its position. If the module falls down
or a foreign object hits against it, the solar module can be damaged.

This manual suits for next models

1

Other esotec Water Pump manuals

esotec Palermo plus Parts list manual

esotec

esotec Palermo plus Parts list manual

esotec Milano User manual

esotec

esotec Milano User manual

esotec 101018 User manual

esotec

esotec 101018 User manual

esotec Marino User manual

esotec

esotec Marino User manual

esotec Garda User manual

esotec

esotec Garda User manual

esotec Water Splash 2/175 Parts list manual

esotec

esotec Water Splash 2/175 Parts list manual

esotec Napoli User manual

esotec

esotec Napoli User manual

esotec Turin User manual

esotec

esotec Turin User manual

esotec 101018 User manual

esotec

esotec 101018 User manual

esotec Fontana 101714 User manual

esotec

esotec Fontana 101714 User manual

esotec Solar Island User manual

esotec

esotec Solar Island User manual

esotec Water Splash 2/ 175 Parts list manual

esotec

esotec Water Splash 2/ 175 Parts list manual

esotec Rimini LED User manual

esotec

esotec Rimini LED User manual

esotec Rimini Plus User manual

esotec

esotec Rimini Plus User manual

esotec Garda User manual

esotec

esotec Garda User manual

esotec Napoli LED User manual

esotec

esotec Napoli LED User manual

esotec pro Fountain 300-LED User manual

esotec

esotec pro Fountain 300-LED User manual

esotec Genova User manual

esotec

esotec Genova User manual

esotec Garda User manual

esotec

esotec Garda User manual

esotec Fountain 1,5/140 Parts list manual

esotec

esotec Fountain 1,5/140 Parts list manual

esotec 5/130 Pro plus Parts list manual

esotec

esotec 5/130 Pro plus Parts list manual

esotec Fountain 8/300-LED User manual

esotec

esotec Fountain 8/300-LED User manual

esotec Rimini-S Parts list manual

esotec

esotec Rimini-S Parts list manual

esotec Napoli LED User manual

esotec

esotec Napoli LED User manual

Popular Water Pump manuals by other brands

Watershed Innovations HYDRAPUMP SMART FLEX Instructional manual

Watershed Innovations

Watershed Innovations HYDRAPUMP SMART FLEX Instructional manual

Graco Modu-Flo AL-5M instructions

Graco

Graco Modu-Flo AL-5M instructions

Messner MultiSystem MPF 3000 operating instructions

Messner

Messner MultiSystem MPF 3000 operating instructions

Xylem Bell & Gossett WEHT0311M Installation, operation and maintenance instructions

Xylem

Xylem Bell & Gossett WEHT0311M Installation, operation and maintenance instructions

WilTec 50739 Operation manual

WilTec

WilTec 50739 Operation manual

Franklin Electric Little Giant 555702 HRK-360S instruction sheet

Franklin Electric

Franklin Electric Little Giant 555702 HRK-360S instruction sheet

Ingersoll-Rand PD02P Series Operator's manual

Ingersoll-Rand

Ingersoll-Rand PD02P Series Operator's manual

VS ZJ Series Operating	 instruction

VS

VS ZJ Series Operating instruction

Flotec FPZS50RP owner's manual

Flotec

Flotec FPZS50RP owner's manual

SKF Lincoln FlowMaster II User and maintenance instructions

SKF

SKF Lincoln FlowMaster II User and maintenance instructions

Xylem Lowara LSB Series Installation, operation and maintenance instructions

Xylem

Xylem Lowara LSB Series Installation, operation and maintenance instructions

Water Duro Pumps DCJ500 Operating & installation instructions

Water

Water Duro Pumps DCJ500 Operating & installation instructions

Action P490 Operating instructions & parts manual

Action

Action P490 Operating instructions & parts manual

Flo King Permacore Reusable Carbon Bag Disassembly. & Cleaning Instructions

Flo King

Flo King Permacore Reusable Carbon Bag Disassembly. & Cleaning Instructions

ARO ARO PD15P-X Operator's manual

ARO

ARO ARO PD15P-X Operator's manual

Pumptec 112V Series Operating instructions and parts manual

Pumptec

Pumptec 112V Series Operating instructions and parts manual

Virax 262070 user manual

Virax

Virax 262070 user manual

Neptun NPHW 5500 operating instructions

Neptun

Neptun NPHW 5500 operating instructions

manuals.online logo
manuals.online logoBrands
  • About & Mission
  • Contact us
  • Privacy Policy
  • Terms and Conditions

Copyright 2025 Manuals.Online. All Rights Reserved.