manuals.online logo
Brands
  1. Home
  2. •
  3. Brands
  4. •
  5. esotec
  6. •
  7. Water Pump
  8. •
  9. esotec Fountain 8/300-LED User manual

esotec Fountain 8/300-LED User manual

Operating manual
solar waterpump system
“Fountain 8/300-LED”
These instructions relate ONLY to this product and contain important infor-
mation for using the product for the first time. Please keep these instructions
for later reference and should always accompany the product in the event of
transference to a new user.
1. Introduction
Dear Costumer,
Thank you for purchasing the solar light. With this solar light you purchased a product
manufactured according to the current state of technology.
This product fulfils all requirements of the valid European and national regula-
tions. The conformity was proved. The relevant declarations and documentati-
on are deposited with the manufacturer.
To maintain this state and guarantee a safe operation, you as the user will have to
follow this operating manual!
2. Safety Instructions
- In case of damages caused by not
following this operating manual, the
warranty rights will expire! We exclude
liability for any consequential damages!
- We exclude liability for property or
personal damages caused by inappropriate
handling or not following the safety instructions.
- In these cases any guarantee rights will expire.
Due to safety and admission reasons (CE) it is not allowed to arbitrarily reconstruct
and/or change the solar light.
Therefore, please keep to the operating manual.
The accident prevention rules of the association of the industrial trade cooperative
association for electric plants and working material are to be considered in industrial
environments.
3. Intended Use
- The pump system is designed for the outdoor use in garden ponds. The
integrated accumulator is charged depending on the solar radiation to the
solar module and the pump will produce water correspondingly.
- A direct and shadow-free solar radiation is required for the function of the
pump.
- When starting the pump, the integrated accumulator may be partially
discharged and the pump will not produce/lift any water. Please charge the
accumulator in the accumulator station for one day with solar radiation and
leave the pump switched-off while charging (switch in position “OFF”). For
more details, please see the manual of the accumulator box.
- On days with little sunshine, we recommend to operate of the pump in inter-
val mode (pump runs for approx. 15 minutes every hour) and to control the
operating voltage to 6 V (see manual of the accumulator box).
- The pump system is particularly characterized by its ease of installation and
assembly. No tools are required for the assembly.
- The pump must not be used for the production/lifting of drinking water.
- The power (operating voltage) of the pump may be adjusted by means of a
controller on the accumulator station.
- In order to avoid any disturbing gurgling, simply shorten the standpipe.
- In order to safely interrupt the production (of water) and protect the system
against unauthorized activation, you will have to switch-off the pump system
and disconnect the cable between accumulator box and pump.
4. Assembly and commissioning
The pump system consists of the following components:
1. 8 Wp solar module with ground spike.
2. Submerged pump in a plastic housing with a 5 m connection cable.
3. Accumulator box with a 6 V/ 3,2 Ah accumulator.
4. Standpipes and 4 water nozzles.
5. LED Light ring with twilight sensor mounted on an adapter.
Note: Before assembly, please carefully read the manual of the accumu-
lator box. It contains important information and notes!
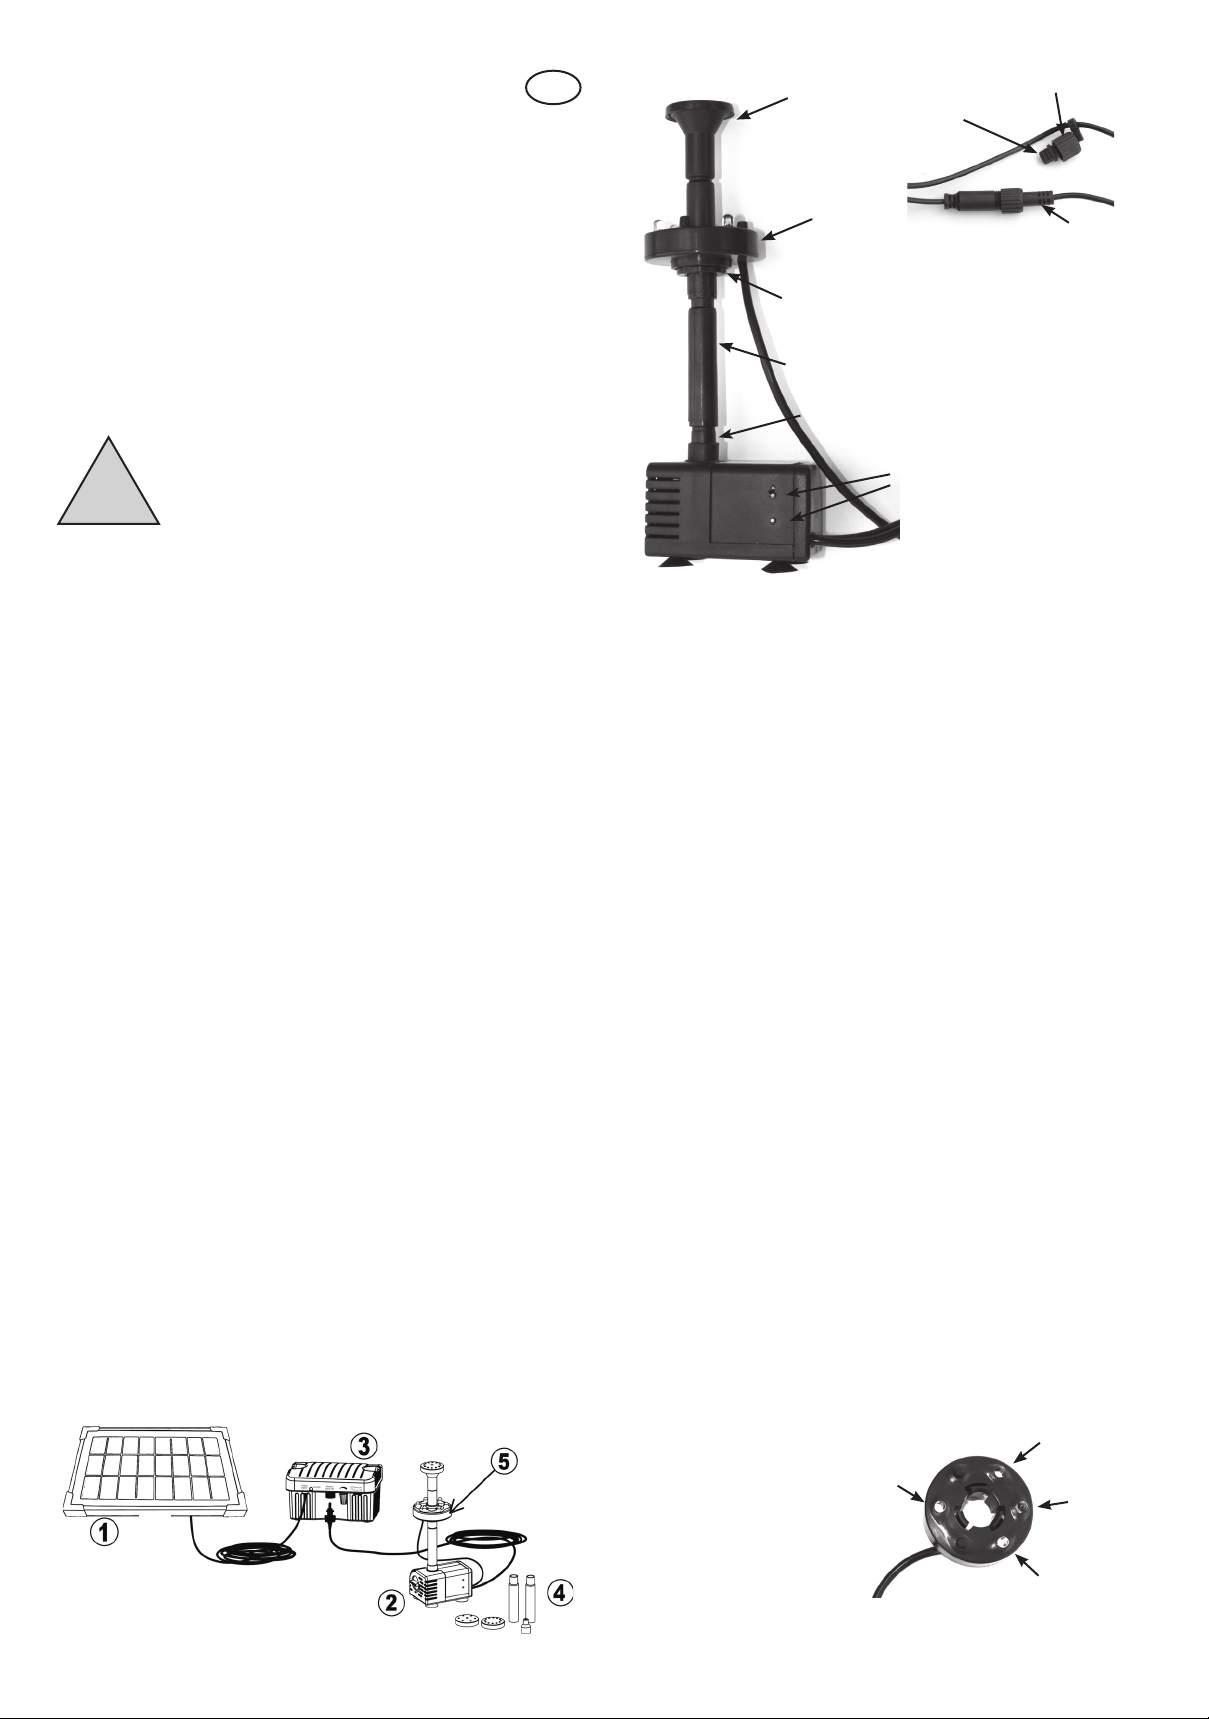
1. Completely unroll the connection cable at the pump.
2. Attach the adapter to the pump and then the standpipes onto the adapter.
Then, insert the LED light ring onto the standpipe by means of the included
adapter. Now, attach the desired sprinkler onto the standpipe (illustration
above on the left).
3. Now, release the cap at the cable of the pump, pull out the sealing plug and
insert the plug of the LED light ring into the socket. Screw the cap nut tight
(illustration above on the right).
4. Put the pump onto a stone in the pond. Please avoid placing the pump
directly at the ground of the pond because here, a particularly high amount
of dirt is sucked in by the pump and the nozzles will be clogged quickly.
Note: This pump is equipped with a dry run protection function. At the side
of the pump, there are two sensor points. Those sensor points shall be
completely under water. If one of the sensor points rises from the water, the
pump is automatically switched-off in order to protect the pump. Please also
see the pump manual.
5. Please make sure that the accumulator box is switched-off and now connect
the plug of the pump with the socket at the accumulator box.
6. Completely unroll the cable at the accumulator box and insert the plug into
the back side of the solar module.
7. Now, screw the ground spike tight at the back side of the solar module by
means of the cap nut and insert the solar module at a sunny and shadow-
free place.
Note: Before switching on the system, please carefully read the manual of the
accumulator box. It contains important information and notes!
Note: Do not apply force when inserting the solar module. The front side of the
solar module is fragile.
Attention: Risk of injury! A broken may not be repaired anymore and has to be
disposed of it in an environmentally sound manner.
5 m extension cable for the pump: item no: 101740
5 m extension cable for the solar panel: item-no: 101740
Available on www.esotec.de
5. LED Illumination
The LED illumination of the light ring is automatically activated at dusk. Apart
from the 3 LEDs, a twilight sensor is installed as light sensor. This sensor looks
like an LED but is not illuminated.
!
GB
LED light ring
adapter
standpipe
adapter
sprinkler cap
LED light
LED light
LED light
twilight sensor
no light!
cable light ring
sealing plug
sensors dry run
protection
10. Safety Notes:
DANGER for children! Keep your children away from small parts which may
present a choking hazard (standpipe and sprinkler) and the packing material
fern. There is danger of suffocation!
WARNING of trip hazards! Please lay the connection cable so that it won’t
constitute a tripping hazard!
CAUTION material damages! If you set up the solar module without any
module mounting you will have to pay attention to an adequate stability. The
solar module may be damaged due to toggling or impact by foreign bodies.
Disposal:
Dear customer,
please cooperate in avoiding waste. When you intend to dis-
pose of the product in future, please consider that it contains
valuable raw materials suited for recycling.
Therefore, do not dispose it of with domestic waste but bring
it to a collection point for the recycling of waste electrical and
electronic equipment.
Thank you very much for your cooperation!
Copyright, esotec GmbH
6. Dry run protection
The pump is equipped as standard with a dry run
protection. Two sensor points are provided on the
side of the housing for this. The pump works if these
points are under water. If a point projects out of the
water, the pump does not work.
7. Malfunctions
Solar pump does not work:
- Accumulator box switched-on?
- Pump not under water (dry run protection, see manual of the pump)
- After a long standstill in winter, it is required to charge the accumulator via
the solar module. The accumulator should be exchanged every 2 - 3 years.
- Accumulator is discharged. Wait for sunshine and, if required, switch-off the
accumulator box for one day and have it recharged.
- Pump clogged. Cleaning according to the manual of the pump!
- Check plug connection at the cable.
8. Storage during the winter
In case of sub-zero temperatures, i.e. during the winter, the pump and the accumu-
lator box have to be stored at a warm place. Before storing it, clean the pump with
lukewarm water as described in the manual of the pump. Switch-off the accumulator
box (position “OFF”, for further notes, see manual of the accumulator box).
9. Technical Data
Solar pump system: Fountain 8/300
- System voltage: 6 - 9 VDC
Solar module
- Cell type: polycrystalline
- Number of cells: 16 pieces
- Nominal power: 8 Wp
- Nominal voltage: 8,64 V
- Nominal current: 926 mA
- Protection class: IP 65
- Temperature range: -30°C to +75°C
Water pump:
- Operating voltage: 6 to 9 V DC
- Power consumption (6V/ 9 V): approx. 1,2 W/ 2,8 W
- Max. lift (6V/ 9 V): approx. 0,5 m/ 1,1 m
- Flow rate (6V/ 9 V): approx. 220 l/h/ 300 l/h
- Protection class: IP 68
- Operating temperature range: +4 to +40°C
- Dry running: dry run protection
Accumulator box:
- Max. pump runtime with fully
charged accumulator: approx. 4 h
- Accumulator voltage: 6 V
- Accumulator capacity: 3,2 Ah
- Overcharge protection: approx. 6,7 V
- Depth discharge protection: approx. 5,6 V
- Voltage threshold for restart: approx. 6,2 V
- Output voltage: : 6 - 9 V DC (adjustable)
- Max. load current (output): 3 W
- Max. connectable module capacity (input): 8 Wp
- Protection class: IP 44
- Protection grade: III
Sensorpoints
Customer support:
If you have problems or questions regarding this product, simply contact us!
Monday to Friday 9 am to 12 noon and 1 pm to 4 pm.
By phone: +49 9605-92206-0
By e-mail for ordering spare parts: [email protected]
By e-mail for questions about the product: [email protected]
Product: Manufacturer Item No.: 101923
Battery take-back
- Batteries must not be discarded into domestic waste.
- The consumer is legally required to return batteries after
use, e.g. to public collecting centers or to battery distribu-
tors.
- Contaminant-containing batteries are labeled with the sign
“crossed-out trashcan“ and one of the chemical symbols.
Used batteries should be disposed environmentally friendly
and should not be discarded into domestic waste. Your
dealer is legally required to take back old batteries. Pb

Other esotec Water Pump manuals

esotec Garda User manual

esotec

esotec Garda User manual

esotec Water Splash 2/175 Parts list manual

esotec

esotec Water Splash 2/175 Parts list manual

esotec Water Splash 2/ 175 Parts list manual

esotec

esotec Water Splash 2/ 175 Parts list manual

esotec Napoli LED User manual

esotec

esotec Napoli LED User manual

esotec Napoli LED User manual

esotec

esotec Napoli LED User manual

esotec Turin User manual

esotec

esotec Turin User manual

esotec Garda User manual

esotec

esotec Garda User manual

esotec Napoli LED User manual

esotec

esotec Napoli LED User manual

esotec Genova User manual

esotec

esotec Genova User manual

esotec 5/130 Pro plus Parts list manual

esotec

esotec 5/130 Pro plus Parts list manual

esotec Milano User manual

esotec

esotec Milano User manual

esotec Napoli User manual

esotec

esotec Napoli User manual

esotec pro Fountain 300-LED User manual

esotec

esotec pro Fountain 300-LED User manual

esotec Rimini LED User manual

esotec

esotec Rimini LED User manual

esotec 101018 User manual

esotec

esotec 101018 User manual

esotec Palermo User manual

esotec

esotec Palermo User manual

esotec Rimini-S Parts list manual

esotec

esotec Rimini-S Parts list manual

esotec Rimini Plus User manual

esotec

esotec Rimini Plus User manual

esotec 101018 User manual

esotec

esotec 101018 User manual

esotec Garda User manual

esotec

esotec Garda User manual

esotec Marino User manual

esotec

esotec Marino User manual

esotec Fontana 101714 User manual

esotec

esotec Fontana 101714 User manual

esotec Palermo plus Parts list manual

esotec

esotec Palermo plus Parts list manual

esotec Solar Island User manual

esotec

esotec Solar Island User manual

Popular Water Pump manuals by other brands

Hyundai power products HBP1300 Original instructions

Hyundai power products

Hyundai power products HBP1300 Original instructions

Kessel 80888 quick start guide

Kessel

Kessel 80888 quick start guide

Nordson cp product manual

Nordson

Nordson cp product manual

VERDER JEC JRZLF Series Operation and maintenance manual

VERDER

VERDER JEC JRZLF Series Operation and maintenance manual

jurop HELIX 140 TRANSLATION OF ORIGINAL INSTRUCTIONS

jurop

jurop HELIX 140 TRANSLATION OF ORIGINAL INSTRUCTIONS

Pentair myers aplex Series Installation and service manual

Pentair

Pentair myers aplex Series Installation and service manual

SPIDO BMX 4/24 Care and maintenance

SPIDO

SPIDO BMX 4/24 Care and maintenance

EBARA GSD Series Translation of the original instructions

EBARA

EBARA GSD Series Translation of the original instructions

AME 15925 Instruction manual & parts breakdown

AME

AME 15925 Instruction manual & parts breakdown

EBARA COMPACT Operating and maintenance manual

EBARA

EBARA COMPACT Operating and maintenance manual

Prio Prio Jet X845 user guide

Prio

Prio Prio Jet X845 user guide

Outbound 076-5583-2 operating instructions

Outbound

Outbound 076-5583-2 operating instructions

Barracuda PUMPS 6913867 Installation and operating instructions

Barracuda PUMPS

Barracuda PUMPS 6913867 Installation and operating instructions

Nordson EP2 manual

Nordson

Nordson EP2 manual

Lincoln 83167 installation instructions

Lincoln

Lincoln 83167 installation instructions

TOHATSU VF53AS owner's manual

TOHATSU

TOHATSU VF53AS owner's manual

Sagola TB270 instruction manual

Sagola

Sagola TB270 instruction manual

K2 Pumps Contractor Series owner's manual

K2 Pumps

K2 Pumps Contractor Series owner's manual

manuals.online logo
manuals.online logoBrands
  • About & Mission
  • Contact us
  • Privacy Policy
  • Terms and Conditions

Copyright 2025 Manuals.Online. All Rights Reserved.