manuals.online logo
Brands
  1. Home
  2. •
  3. Brands
  4. •
  5. esotec
  6. •
  7. Water Pump
  8. •
  9. esotec Genova User manual

esotec Genova User manual

Operating manual Water pump
„Genova“
These instructions relate ONLY to this product and contain important infor-
mation for using the product for the first time. Please keep these instructions
for later reference and should always accompany the product in the event of
transference to a new user.
1. Introduction
Dear Costumer,
Thank you for purchasing the water pump. With this water pump you purchased
a product manufactured according to the current state of technology.
This product fulfils all requirements of the valid European and
national regulations. The conformity was proved. The relevant
declarations and documentation are deposited with the manu-
facturer.
To maintain this state and guarantee a safe operation, you as the user will have
to follow this operating manual!
2. Safety Instructions
- In case of damages caused by not
following this operating manual, the
warranty rights will expire! We exclude
liability for any consequential damages!
- We exclude liability for property or
personal damages caused by inappropriate
handling or not following the safety instructions.
- In these cases any guarantee rights will expire.
Due to safety and admission reasons (CE) it is not allowed to arbitrarily recon-
struct and/or change the water pump.
Therefore, please keep to the operating manual.
The accident prevention rules of the association of the industrial trade coope-
rative association for electric plants and working material are to be considered
in industrial environments.
3. Intended Use
This submergible pump is designed for the pumping of water in the garden
pond, fountain, water trays or similar. It can pump water via a gland or it may be
operated via enclosed ascending pipes with water sprinklers.
A solar module or a power supply unit with a voltage of 12 - 24 Volts can be used
as energy source. If used in combination with a solar module the pump will only
work if the solar module is exposed to sufcient solar radiation.
The delivery rate of the pump can be adjusted via the controller on the front side
of the pump. The water pump does not have any ON/OFF-switch. The pump
starts pumping water as soon as it is connected to the power supply.
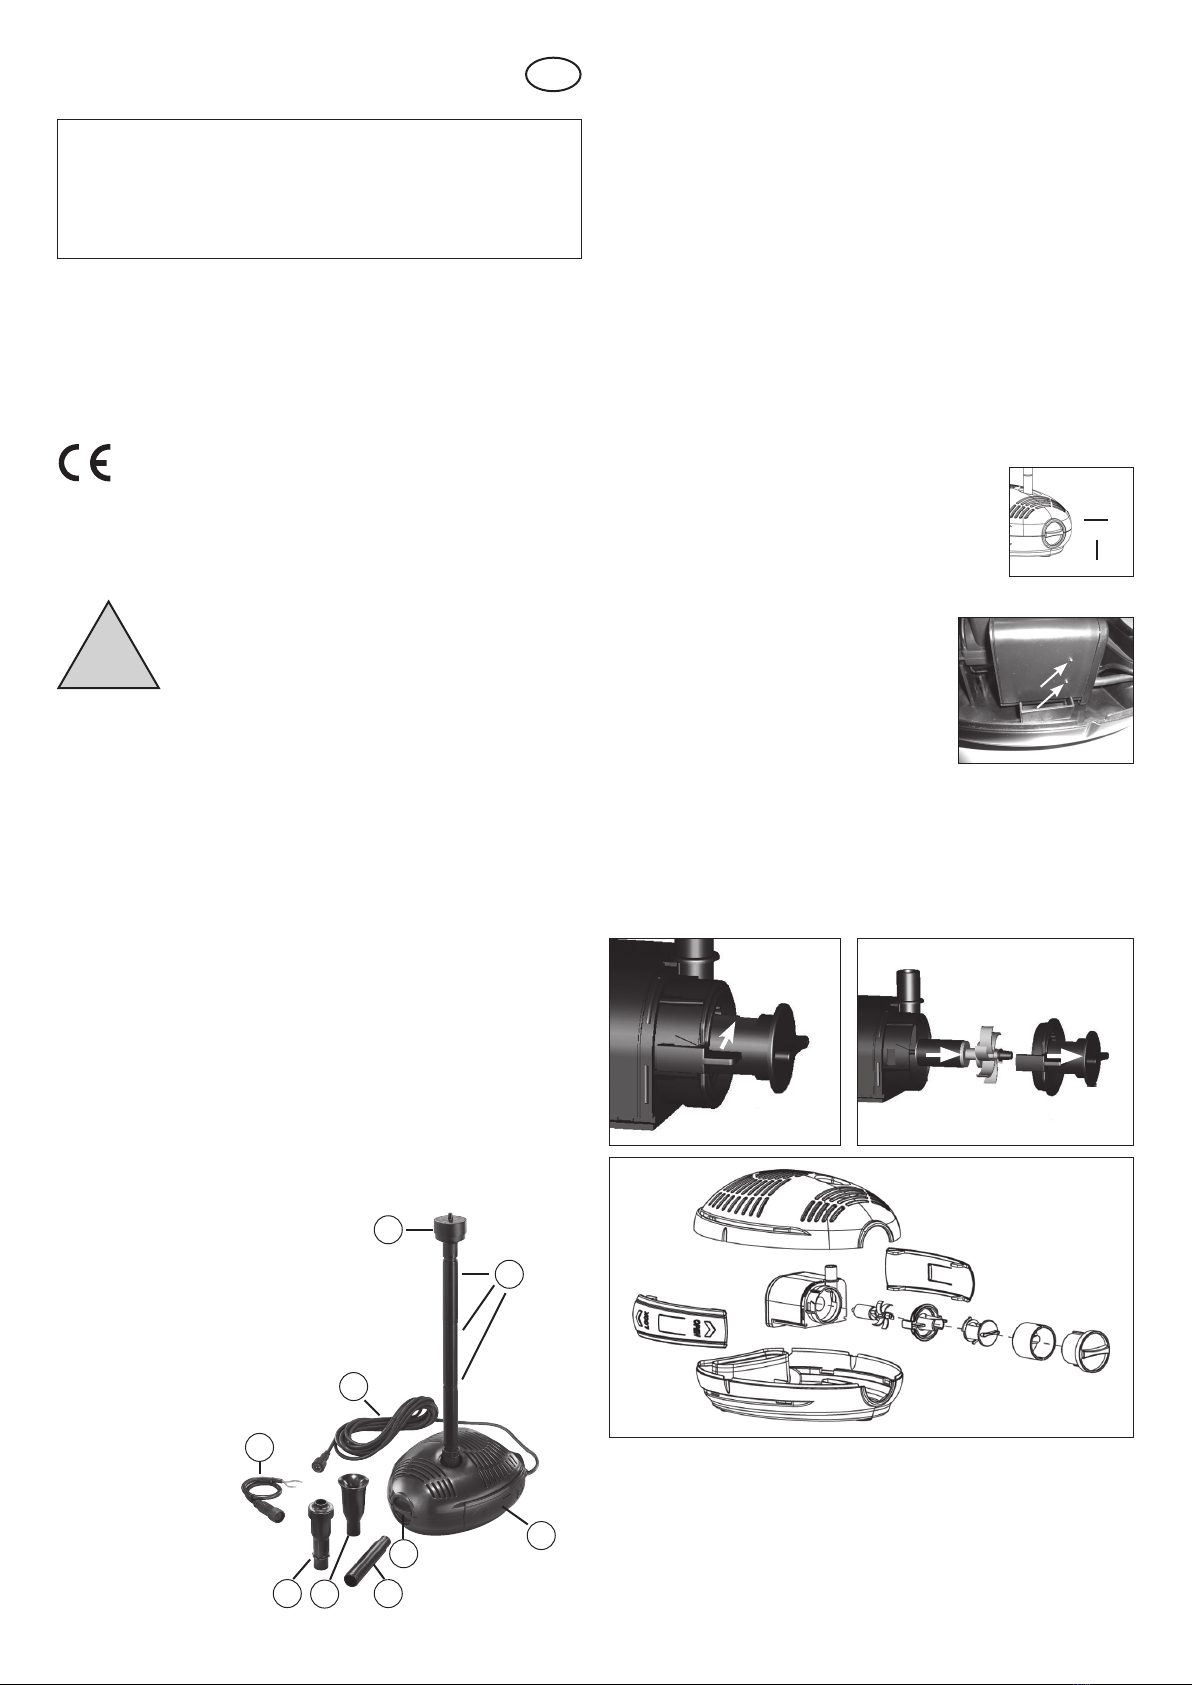
4. Overview
1. Ascending pipes
2. Water nozzle with a 3-stage sprinkler
3. Water nozzle for the water bell
4. Water-Air nozzle
5. Controller for the delivery rate
6. 5 m Connecting cable including plug
7. Locking for the pump case
8. Connecting cable with open ends
(only included in single pumps and not in sets)
5. Assembly and Start-up
1. Completely unroll the connecting cable on the pump.
2. Measure the depth of water of your garden pond.
3. Firmly connect the individual ascending pipes until the pipe protrudes from the
water surface. In case the enclosed ascending pipes should not be sufcient,
you may also order those pipes as spare parts from the manufacturer. Now
attach the sprinkler you want to use.
• Note: When using the water bell it is possible to adjust the diameter of the bell
by screwing in or out of the upper part.
• Note: Please make sure that the pump is not directly placed on the pond
bottom. A particularly high amount of dirt is sucked in here which would lead to
a fast clogging of the nozzles. Therefore, please place the pump approximately
20 cm above the pond bottom onto stones.
4. Depending on the use, the pump may be operated directly via a solar module, a
battery box or a DC power supply unit (12 to 24 VDC) and or a solar battery. Now
connect the plug with the socket on the solar module or the battery box. A cable
piece with open ends is included in the scope of delivery for the connection to a
power supply unit or battery. Please note that, in this case, the brown cable is
the positive pole and the blue cable is the negative pole.
• Note: The plug is protected against reverse polarity; please do not apply force
when plugging it in.
5. If the delivery rate of the pump should be too high, you
may reduce the amount of water. For this purpose, simply
rotate the controller at the front side of the pump clockwise.
Do not apply force when adjusting. The adjustment range
amounts to 45°.
6. Protection against dry Running
The pump is standard-equipped with a protection
against dry running. 2 sensor points at the side of the
case are installed for this purpose. The pump will work
if those points are under water. The pump won’t work
if one point should protrude from the water!
Those points have to be cleaned with a sponge and
water when servicing or cleaning the pump.
7. Service and Maintenance
In order to maintain the performance of the pump it is required to
occasionally, depending on the water contamination, rinse the pump with
warm water. For this purpose, open the case as follows:
Note: Please do not apply force when assembling and disassembling the
pump. The parts are very delicate and may break easily.
1. Disconnect the power supply of the pump
2. Remove the ascending pipe from the pump.
3. Push the two lateral locks into the position „OPEN“ and take if off to
the side.
4. Carefully open the pump case.
5. Take the pump out of the case.
6. Rotate the front cover of the pump by approx. 45° clockwise (illustration
1) and carefully pull the cover to the front (illustration 2). In doing so,
please pay attention to the ceramic shaft and the seal.
!
GB
Customer support:
If you have problems or questions regarding this product, simply contact us!
Monday to Friday 9 am to 12 noon and 1 pm to 4 pm.
By phone: 09605-92206-0
By e-mail for ordering spare parts: [email protected]
By e-mail for questions about the product: [email protected]
Product: Manufacturer Item No.: 101735
ow rate
100%
0%
sensorpoints
1
2
3
5
6
7
14
8
Pic. 1 Pic. 2
Pic. 3
7. Carefully pull the impeller wheel out of the pump (possibly use small
tongs as an aid). (illustration 3).
8. Now carefully clean all parts with warm water.
9. Now carefully insert the shaft with the impeller wheel into the hole of
the pump. In doing so, pay attention to the tight t of the shaft and
brackets on both sides of the shaft.
10. Now carefully attach the cover onto the pump. In doing so, pay
attention to the tight t of the seal.
11. Now rotate the front cover by 45° anticlockwise into its initial position.
12. Now reassemble the pump in reverse order.
13. Pay attention to the correct t of the connecting cable through the
case.
The pump is now again ready for operation.
8. Malfunctions
The pump does not pump any water
• Is the pump completely immersed in the water? Protection against dry
running (item 5)
• Is the supply voltage connected with reverse polarity? Cable color
brown = positive pole, blue = negative pole.
• Pump contaminated? Cleaning of the pump, see item 6.
• Sensor points of the protection against dry running dirty? Clean the
points!
• When the pump is freshly immersed in the water, there may still be air
in the area of the pump wheel. This is why no water can be pumped.
Remedial action: ll water into the ascending pipe with a watering can
when the pump is applied.
9. Technical Data
• Operating voltage: 12 - 24 V DC
• degree of protection: IP 68
• Protection class: III
• Max. water depth: 2 m
• Discharge head/ow rate 12V/17V/24V: max. 1 m / 2,4 m / 3,5 m
• Discharge 12V/17V/24V: max. 1200 l/h / 1700 l/h / 2000 l/h
• Power consumption 12V/17V/24V: approx. 8 W / 20 W / 35 W
• Operating temperature range: +4 to +40°C
• 5 m extension cable: 101736
Note: The pump is only suitable for the delivery of water.
Note: Protect the pump against frost!
During cold winter months, it is required to take the pump out of the water and store it
at a frost-free place. The solar module may be left outside during the winter.
10. Safety Information:
DANGER for children! Keep children away from the swallowable small parts
(ascending pipe and sprinkler) and the packaging material. Danger of suffocation!
WARNING tripping hazard! Lay the connecting cable so that it won’t become a
tripping hazard!
CAUTION Material damage! If you set up the solar module without the module
retainer, please pay attention to an adequate stability. The solar module may be
damaged if the module should tilt or in case of an impact by a foreign body.
11. Spare Parts
Type Milano
1. Ceramic shaft white: Art.-No.: 911060
2. Pump wheel: Art.-No.: 911061
3. Rubber socket inside: Art.-No.: 911062
4. Cover front: Art.-No.: 911063
5. Seal for cover: Art.-No.: 911064
6. Pump trays complete: Art.-No.: 911075
7. Flow controller: Art.-No.: 911076
8. Nozzle set complete: Art.-No.: 911067
Manufacturer/Importer
esotec GmbH - Gewerbegebiet Weberschlag 9 - D-92729 Weiherhammer
Tel.-Nr: 09605-92206-0 - Fax.-Nr: 09605-92206-10 - Internet: www.esotec.de
Disposal:
Dear customer,
please cooperate in avoiding waste. When you intend to dispose
of the product in future, please consider that it contains valuable
raw materials suited for recycling.
Therefore, do not dispose it of with domestic waste but bring it to
a collection point for the recycling of waste electrical and electro-
nic equipment.
Thank you very much for your cooperation!
Copyright, esotec GmbH
1
2
3
4/5
6
6
7
7
7
6
6

This manual suits for next models

1

Other esotec Water Pump manuals

esotec 101018 User manual

esotec

esotec 101018 User manual

esotec pro Fountain 300-LED User manual

esotec

esotec pro Fountain 300-LED User manual

esotec Garda User manual

esotec

esotec Garda User manual

esotec Garda User manual

esotec

esotec Garda User manual

esotec Fountain 1,5/140 Parts list manual

esotec

esotec Fountain 1,5/140 Parts list manual

esotec Water Splash 2/ 175 Parts list manual

esotec

esotec Water Splash 2/ 175 Parts list manual

esotec Palermo plus Parts list manual

esotec

esotec Palermo plus Parts list manual

esotec Fontana 101714 User manual

esotec

esotec Fontana 101714 User manual

esotec Milano User manual

esotec

esotec Milano User manual

esotec Garda User manual

esotec

esotec Garda User manual

esotec Napoli LED User manual

esotec

esotec Napoli LED User manual

esotec Palermo User manual

esotec

esotec Palermo User manual

esotec Napoli User manual

esotec

esotec Napoli User manual

esotec Turin User manual

esotec

esotec Turin User manual

esotec Napoli LED User manual

esotec

esotec Napoli LED User manual

esotec Solar Island User manual

esotec

esotec Solar Island User manual

esotec Fountain 8/300-LED User manual

esotec

esotec Fountain 8/300-LED User manual

esotec Water Splash 2/175 Parts list manual

esotec

esotec Water Splash 2/175 Parts list manual

esotec Rimini LED User manual

esotec

esotec Rimini LED User manual

esotec 5/130 Pro plus Parts list manual

esotec

esotec 5/130 Pro plus Parts list manual

esotec 101018 User manual

esotec

esotec 101018 User manual

esotec Rimini-S Parts list manual

esotec

esotec Rimini-S Parts list manual

esotec Marino User manual

esotec

esotec Marino User manual

esotec Rimini Plus User manual

esotec

esotec Rimini Plus User manual

Popular Water Pump manuals by other brands

ABNOX 3095500 operating manual

ABNOX

ABNOX 3095500 operating manual

PEDROLLO FLUID SOLAR Original instructions for use

PEDROLLO

PEDROLLO FLUID SOLAR Original instructions for use

Armstrong AGE4D Installation and operating instructions

Armstrong

Armstrong AGE4D Installation and operating instructions

Stanley SCE520 Original instruction

Stanley

Stanley SCE520 Original instruction

Speck pumpen BADU Spyder I operating instructions

Speck pumpen

Speck pumpen BADU Spyder I operating instructions

Wilo COR MHIE Series Installation and operating instructions

Wilo

Wilo COR MHIE Series Installation and operating instructions

wiwa 300 Operation manual

wiwa

wiwa 300 Operation manual

Wilo Wilo-Rexa PRO-S Installation and operating instructions

Wilo

Wilo Wilo-Rexa PRO-S Installation and operating instructions

ProMinent gamma XL operating instructions

ProMinent

ProMinent gamma XL operating instructions

Sealey WPW9355 instructions

Sealey

Sealey WPW9355 instructions

Dover PSG WILDEN Pro-Flo SHIFT PS1 Engineering, operation & maintenance

Dover

Dover PSG WILDEN Pro-Flo SHIFT PS1 Engineering, operation & maintenance

GORMAN-RUPP PUMPS J Series Installation, operation, and maintenance manual with parts list

GORMAN-RUPP PUMPS

GORMAN-RUPP PUMPS J Series Installation, operation, and maintenance manual with parts list

Senci SCWP-25 operation instruction

Senci

Senci SCWP-25 operation instruction

Shenchen Precision Pump YZ35-PPS manual

Shenchen Precision Pump

Shenchen Precision Pump YZ35-PPS manual

Pentair SN Series owner's manual

Pentair

Pentair SN Series owner's manual

Renkforce 2302374 operating instructions

Renkforce

Renkforce 2302374 operating instructions

ITT Jabsco 18580-0000 manual

ITT

ITT Jabsco 18580-0000 manual

Industrial Scientific Ventis MX4 product manual

Industrial Scientific

Industrial Scientific Ventis MX4 product manual

manuals.online logo
manuals.online logoBrands
  • About & Mission
  • Contact us
  • Privacy Policy
  • Terms and Conditions

Copyright 2025 Manuals.Online. All Rights Reserved.