User manual water fall pump
“Garda“ and „Adria“
These instructions relate ONLY to this product and contain important infor-
mation for using the product for the first time. Please keep these instructions
for later reference and should always accompany the product in the event of
transference to a new user.
1. Introduction
Dear Costumer,
Thank you for purchasing the solar light. With this solar light you purchased a product
manufactured according to the current state of technology.
This product fulfils all requirements of the valid European and natio-
nal regulations. The conformity was proved. The relevant declarations
and documentation are deposited with the manufacturer.
To maintain this state and guarantee a safe operation, you as the user will have to
follow this operating manual!
2. Safety Instructions
- In case of damages caused by not
following this operating manual, the
warranty rights will expire! We exclude
liability for any consequential damages!
- We exclude liability for property or
personal damages caused by inappropriate
handling or not following the safety instructions.
- In these cases any guarantee rights will expire.
Due to safety and admission reasons (CE) it is not allowed to arbitrarily reconstruct
and/or change the solar light.
Therefore, please keep to the operating manual.
The accident prevention rules of the association of the industrial trade cooperative
association for electric plants and working material are to be considered in industrial
environments.
3. Intended use
This submersible pump is designed for the delivery/feeding of water in a garden
stream, fountain or similar. Via a hose connection, this pump is able to deliver water
and is particularly suited for the feeding of streams.
This pump is only suited for the delivery of water!
A solar module, a rechargeable battery with an operating voltage of 12 V or a power
supply unit with a voltage of 12 Volt may be used as energy sources. In case the
pump is used with a solar module, the pump will only work if the solar module is
exposed to sufficient solar radiation.
The water pump does not have an on/off switch. The pump starts delivering water as
soon as it is connected to the power supply.
4. Assembly and activation
1. Completely unroll the connecting cable on the stream pump.
2. The hose connection is suitable for various hose diameters (inside diameter 25,
32 or 38 mm). Cut the connection according to the diameter of your hose by
means of a saw. Attach the hose onto the outlet and secure it by means of a
matching hose clamp (not included in the delivery).
3. Mount the hose connection to the pump outlet by means of the enclosed gland
nut. Via the ball joint, the hose outlet may, according to the circumstances, be
adjusted under water.
4. Completely immerse the stream pump into the water (in doing so, please pay
attention to point 5.).
5. Now supply the stream pump with energy.
For this purpose, please use the enclosed connector and cable (brown = positive
pole, blue = negative pole). In case you bought the pump as a complete solar
system, then the solar module is already equipped with the matching connector.
Note: The connector is reverse polarity protected; please do not apply force when
plugging it in.
5. Protection against dry running
By standard, the pump is equipped with a protection against dry running. For this pur-
pose, there are two sensor points attached to the side of the pump body (not visible
from the outside). The pump will work if those points are underwater. The pump does
not work of one of the points protrudes from the water!
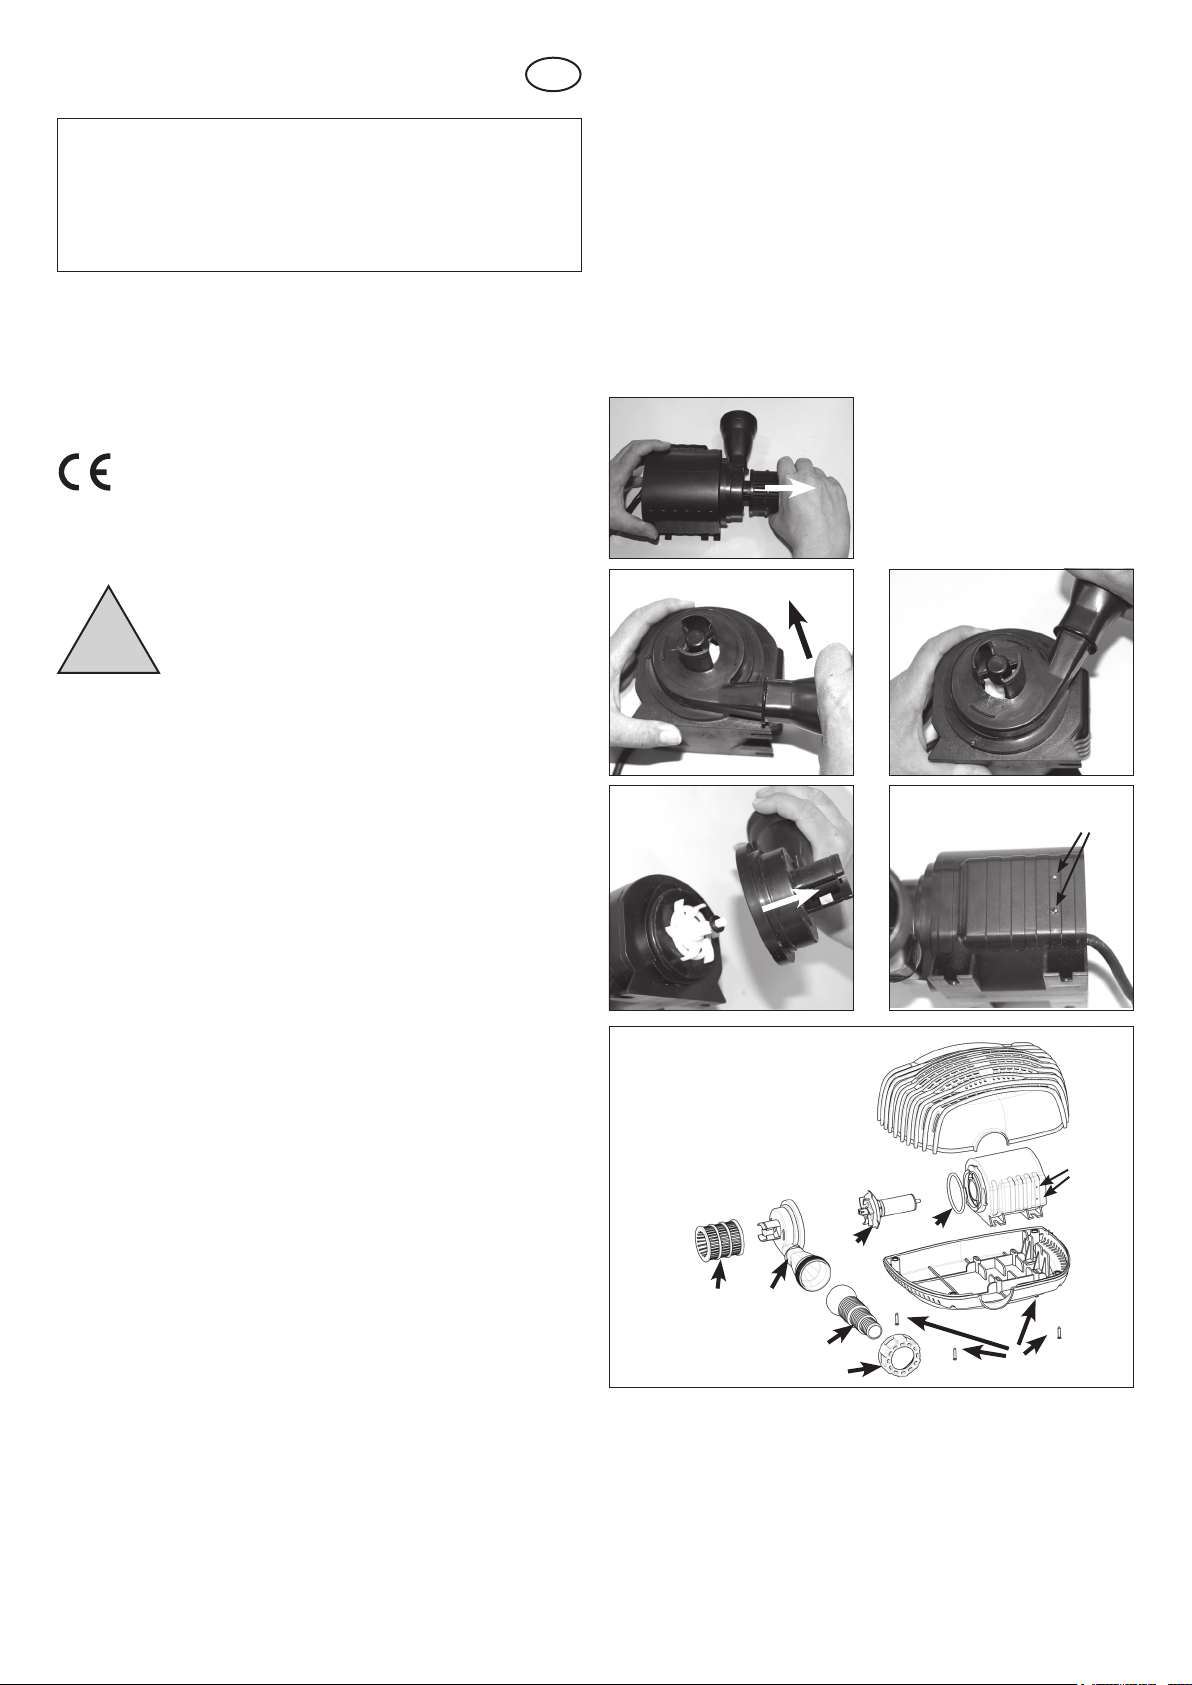
6. Maintenance and care
In order to maintain the performance of the pump it is from time to time, depending
on the water contamination, required to wash out the pump with warm water. For this
purpose, open the body as follows:
Note: Please do not apply force when assembling and disassembling the pump. The
parts are were delicate and may break easily.
1. Unplug the connector of the pump.
2. Take the pump out of the water and twist off the hose connection.
3. Loosen the 4 screws on the bottom side of the pump.
4. Carefully open the body and take the pump out of the body.
5. Take off the plastic pre-filter and clean it with warm water.
6. Rotate the water outlet anticlockwise by approx. 90° and take it off carefully.
7. Remove the impeller wheel.
8. Now, carefully clean all parts with warm water.
9. Clean the contacts at the side of the pump with a soft brush.
10. After the cleaning, assemble the pump in reverse order.
The pump is ready to use again.
7. Malfunctions
The pump does not deliver any water
- Is the pump completely immersed in the water? protection against dry running.
(point 5)
- Was the supply voltage connected with reverse polarity? Cable color brown = +
(positive) pole, blue = - (negative pole).
- Pump dirty? For the cleaning of the pump see point 6.
- Capacity of the connected solar module or power supply unit sufficient?
!
GB
Customer support:
If you have problems or questions regarding this product, simply contact us!
Internet: www.esotec.de
By phone: +49 9605-92206-0
Garda pump: Manufacturer Item No.: 101760
Adria pump: Manufacturer Item No.: 101761
Sensors for dry run protection
1. Plastic pre-filter
2. Water outlet
3. Impeller wheel
4. Seal
5. Sensors for the protection
against dry running
6. Hose connection
7. Gland nut
8. Screws
12
3
4
5
6
78


