Usage instructions
Solar pump kit „Fountain 1,5/140“
These instructions relate ONLY to this product and contain important infor-
mation for using the product for the first time. Please keep these instructions
for later reference and should always accompany the product in the event of
transference to a new user.
1. Introduction
Dear Costumer, thank you for purchasing the solar pump kit.
With this solar pump kit you purchased a product manufactured according to the
current state of technology.
This product fulfils all requirements of the valid European and nati-
onal regulations. The conformity was proved. The relevant declara-
tions and documentation are deposited with the manufacturer.
To maintain this state and guarantee a safe operation, you as the user will have to
follow this operating manual!
2. Safety Instructions
- In case of damages caused by not following
this operating manual, the warranty rights
will expire! We exclude liability for any
consequential damages!
- We exclude liability for property or
personal damages caused by inappropriate
handling or not following the safety instructions.
- In these cases any guarantee rights will expire.
Due to safety and admission reasons (CE) it is not allowed to arbitrarily reconstruct and/or
change the solar pump kit.
Therefore, please keep to the operating manual.
The accident prevention rules of the association of the industrial trade cooperative associa-
tion for electric plants and working material are to be considered in industrial environments.
3. Proper use according to manufacturer
specifications
- The pump system is conceived for outdoor use in garden ponds. The pump
pumps water depending on the sunlight exposure falling on the solar module.
- Direct sunlight is required for the pump to function.
- The pump system is extremely easy to install. No tool is required to install it. The
system requires full sunlight exposure on the solar module for the pump to start.
- The pump should not be used to pump drinking water.
- The device does not have any On and Off switch. The pump can start pumping
water as soon as it is connected to the solar module (appropriate sunlight is a
precondition).
- The size of the rising pipe can be reduced to avoid a possible disturbing gurgling.
- To stop the pump safely, you must either disconnect the cable connection bet-
ween the solar module and the pump.
4. Installation and start-up
The pump system consists of the following components:
1 piece solar module with earth spike, 1 piece submersible pump in plastic housing
with 3 m connecting cable, 4 rising pipes and 4 water nozzles.
1. Unwind the connecting cable of the pump fully.
2. Insert the rising pipes in the pump and then set
one of the desired sprinklers on the rising pipe.
3. Place the pump in the pool on a few stones.
Avoid a location that is directly on the pond
floor, as far too much dirt is sucked in through
the pump here and it gets polluted very fast.
4. Now insert the plug of the pump into the socket
of the solar module and screw the cap tightly.
Place the solar module in a sunny, shade-free
place facing the south.
Note: Do not use force while inserting the plug into the socket. The front side of the
solar module can break.
Caution: Risk of injury! A broken module cannot be repaired and must be disposed
of in an environment-friendly manner
5. Care and maintenance
To maintain efficiency, the pump and its components must be washed with warm
water, depending on the level of water pollution.
Wipe the solar module clean with a soft, light, slightly wet cloth occasionally.
Note: Before starting work on the pump, disconnect the plug of the pump from the
socket of the solar module.
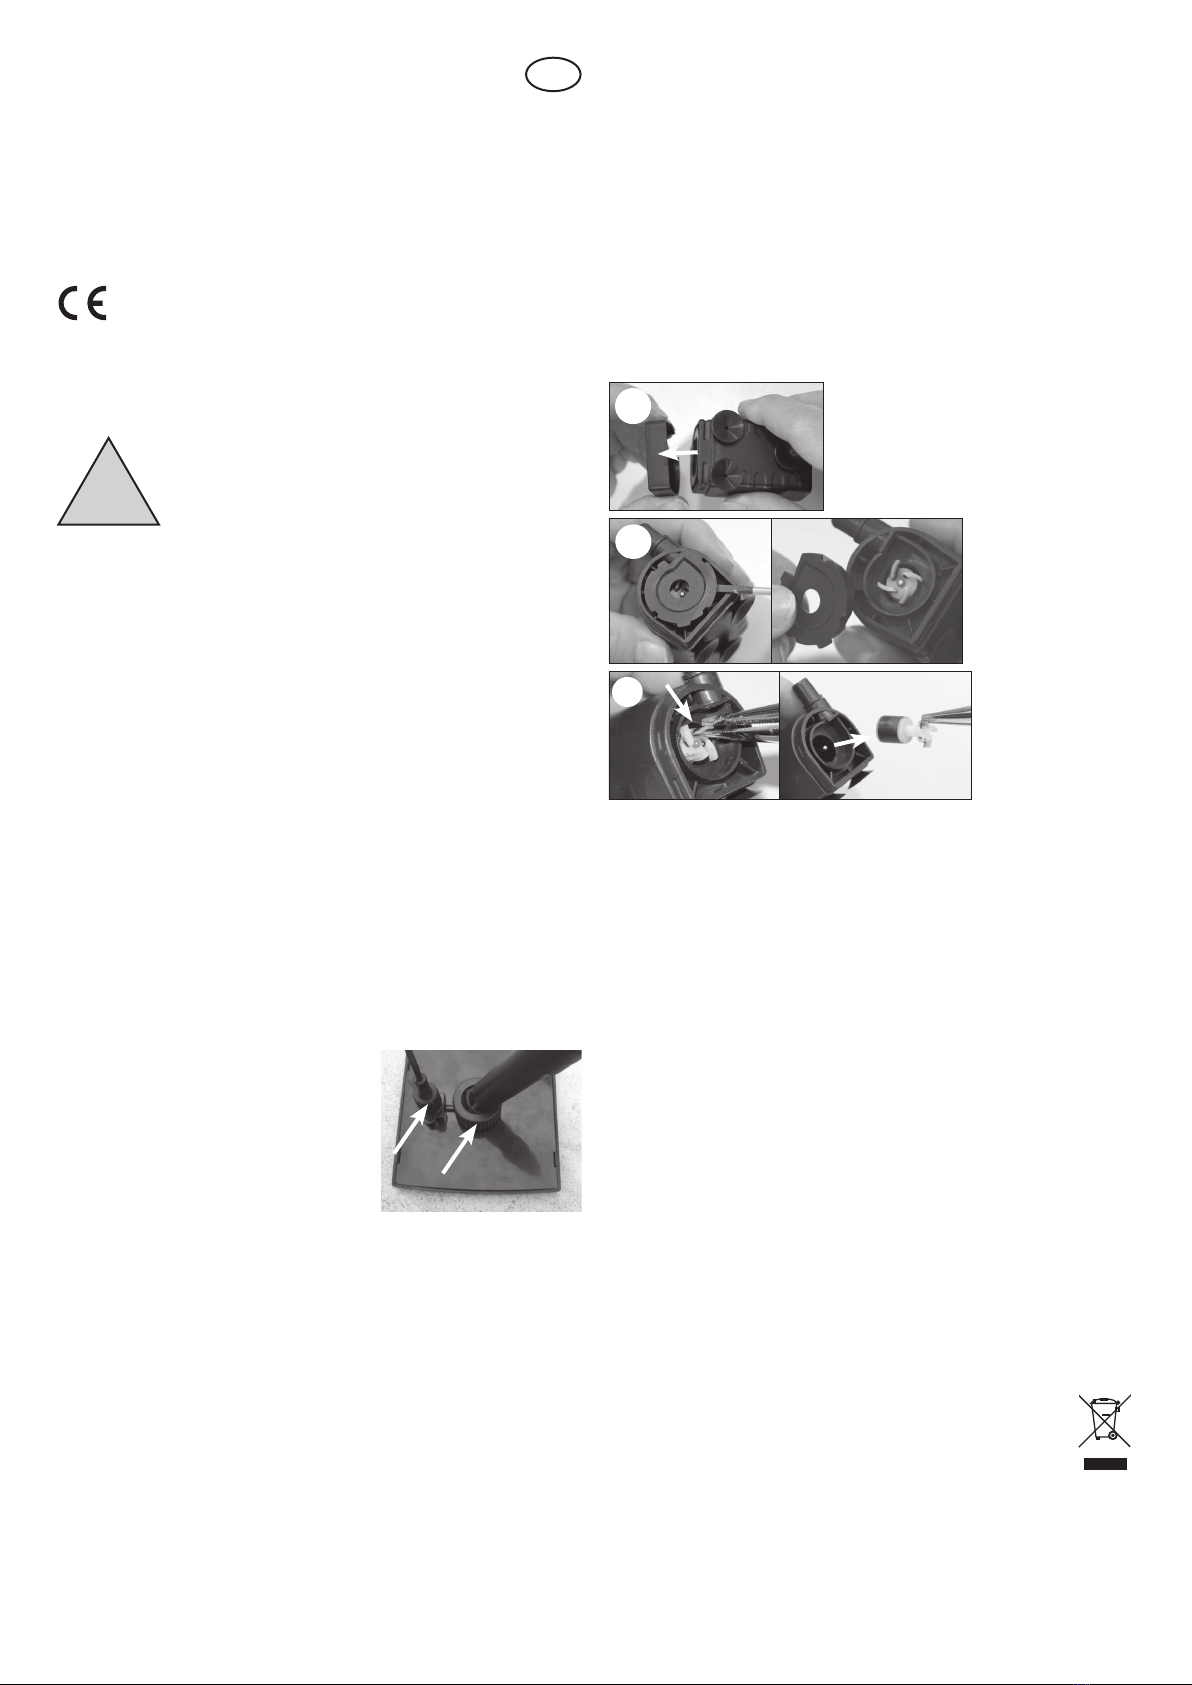
5.1 Cleaning pump:
To ensure the performance of the pump, the pump must be washed out with warm
water from time to time, depending on the rate of water contamination. For this, open
the filter encasement:
Note: Please do not use unnecessary force to assemble or disassemble the pump.
The parts are very delicate and can easily be broken.
1. Pullupthepump’sconnector.
2. Remove the rising pipe from the pump.
3. Remove the cover from the front side of the pump (figure 1).
4. Pull the cover from the pump wheel forwards (figure 2). Use a suitable screwdriver
to help you.
5. Pull the wheel out using a small pair of pliers (figure 3).
6. Clean the parts carefully with warm water. Also make sure that the outlet from the
pump is free from any contamination.
7. Now reassemble the pump and the housing using these instructions in the reverse
order.
The pump is again ready for operation.
6. Technical data
Solar module
- Nominal capacity: 1,5 Wp
- Nominal voltage: 6,72 V
- Nominal current: 223 mA
- Protection type: IP 44
- Temperature range: -30°C to +75°C
Water pump:
- Operating voltage: 6 to 9 V DC
- Max. pump lift: max. 0,8 m
- Delivery rate: max. 140 l/h
- Protection type: IP 68
- Operating temperature range: +4 to +40°C
- Dry run: No
Note: Protect the pump against frost!
In the cold winter months, the pump must be taken out of water and kept at a warm
place along with the solar module.
7. Safety instructions:
DANGER for children! Keep children away from the small components (rising pipe
and sprinkler) that can be swallowed and from the packaging material. Danger of
suffocation exists!
WARNING against the danger of tripping! Lay the connecting cable in such a way
that it does not cause people to trip!
CAUTION material damages! If you setup the solar module without the holder,
please ensure that it is stable. The solar module can be damaged if it topples over or
a foreign body collides with it.
Disposal instruction for electronic devices:
Dear customer, if you do not want to use the article any more, please
dispense with it in accordance with the current provisions.
Information is available at the community office.
Manufacturer, Spare Parts Service, Consulting:
esotec GmbH
Gewerbegebiet Weberschlag 9, D-92729 Weiherhammer
Tel.-Nr: +49 (0)9605-92206-0 - Fax.-Nr: +49 (0)9605-92206-10
Manufacturer item no: 101905
!
GB
2
3
1


