manuals.online logo
Brands
  1. Home
  2. •
  3. Brands
  4. •
  5. ESP
  6. •
  7. Lantern
  8. •
  9. ESP Duceri EMDLED3WMBULK2 User manual

ESP Duceri EMDLED3WMBULK2 User manual

Popular Lantern manuals by other brands

Stahl ECOLUX 6610 Series operating instructions

Stahl

Stahl ECOLUX 6610 Series operating instructions

SNOWJOE SUNJOE 24V-LGT500-CT Operator's manual

SNOWJOE

SNOWJOE SUNJOE 24V-LGT500-CT Operator's manual

PRG VARI LITE VL5 Service manual

PRG

PRG VARI LITE VL5 Service manual

Raytec VARIO2 series installation guide

Raytec

Raytec VARIO2 series installation guide

ENSA LEDBT18WS2 installation instructions

ENSA

ENSA LEDBT18WS2 installation instructions

LUG OFFICE LB LED N/T Installation instruction

LUG

LUG OFFICE LB LED N/T Installation instruction

GE Wallighter 250 instructions

GE

GE Wallighter 250 instructions

Draper RLEDL19/B instructions

Draper

Draper RLEDL19/B instructions

Green Lighting TRI-SENSOR GL4612LU Assembly & fitting instructions

Green Lighting

Green Lighting TRI-SENSOR GL4612LU Assembly & fitting instructions

Panasonic EY3741B57 operating instructions

Panasonic

Panasonic EY3741B57 operating instructions

Clas Ohlson LCC8T instruction manual

Clas Ohlson

Clas Ohlson LCC8T instruction manual

Coolon WDN-140 manual

Coolon

Coolon WDN-140 manual

Holiday Travel 834873 manual

Holiday Travel

Holiday Travel 834873 manual

BEGA 84 036 Instructions for use

BEGA

BEGA 84 036 Instructions for use

BEGA 33 596 Instructions for use

BEGA

BEGA 33 596 Instructions for use

Dale Tiffany GT701162 Assembly instructions

Dale Tiffany

Dale Tiffany GT701162 Assembly instructions

Wagan Brite Nite Pop-Up USB Lantern user manual

Wagan

Wagan Brite Nite Pop-Up USB Lantern user manual

shada 1000436 instruction manual

shada

shada 1000436 instruction manual

manuals.online logo
manuals.online logoBrands
  • About & Mission
  • Contact us
  • Privacy Policy
  • Terms and Conditions

Copyright 2025 Manuals.Online. All Rights Reserved.

www.espuk.com
Month Test
Sign Date Sign Date Sign Date Sign Date Sign Date
1 Functional
2 Functional
3 Functional
4 Functional
5 Functional
6 1 hour
7 Functional
8 Functional
9 Functional
10 Functional
11 Functional
12 3 Hour
1st year 2nd Year 3rd Year 4th Year 5th year
LuminaireType/Ref: Date of Installation: Location:
TEST RECORD SHEET
Rated input supply: AC 240V 50Hz
Rated output power: 8 x SMD 2835 LED
Operating Environmental: Temperature:- 0-40 °C
Operating relative humidity: Less than 90%
Emergency Duration: More than 3 Hours.
Change over time: Less than 1 second.
EMDLED3WMBULK2
3W LED IP65 Maintained Emergency Bulkhead
GENERAL INFORMATION
Our products are designed to comply with the recommended codes of practice
for emergency lighting of premises and be installed by competent person in
accordance with the relevant wiring regulations.
LUMINAIRE INFORMATION
Battery Specification: 3.6v 1200mAh NI-CAD Batteries
MONITORING
Green indicator lamp (LED) normally continuously ‘on’. Indicator lamp goes
out if A.C. supply or charger fails.
For additional product information please visit the ESP website
www.espuk.com/technical_support/product_manuals/?cat=5
G20
IP65
WARNING
• This product must be disconnected from the circuit if subjected to any high
voltage or insulation resistance testing. Irreparable damage will occur if this
instruction is not followed
• Recommended routine test procedure in accordance with BS 5266
• Daily check - check that the status GREEN LED indicator is illuminated
• Monthly functional test - simulate a mains supply failure for approx. 30 secs by
operation of a key switch or circuit breaker.Ensure normal supply
is restored after test and the indicator status LED is illuminated.
• Twice yearly conduct a one hour duration test - simulate a mains supply failure
breaker. Ensure normal supply is restored after test and the indicator status LED
is illuminated
• Annual full three hour duration test - conduct a three hour continuous
duration test. Simulate a mains supply failure for three hour continuous test by
r. Ensure normal supply is
restored after test and the indicator status LED is illuminated
•
GENERAL
the correct manner when it reaches the end of its life. Check local authorities for
where facilities exist. Clean with a soft dry cloth only , do not use aggressive cleaning
GENERAL INSTRUCTIONS
These instructions should be read carefully and retained after installation by the end
user for future reference and maintenance.
SAFETY
•
or competent person to the current IEE Wiring Regulations
• Please isolate mains prior to installation/maintenance
•
not exceed the rating of the circuit cable, fuse or circuit breaker
• Please note the IP (Ingress of Protection) rating of this luminaire when deciding
the location for installation
electrician. See overleaf for test record sheet
INSTALLATION
• Provide power to the required point of installation. Suitable IP rated junctions
boxes should be used where required
•
with any joists, gas or water pipes or electrical cables
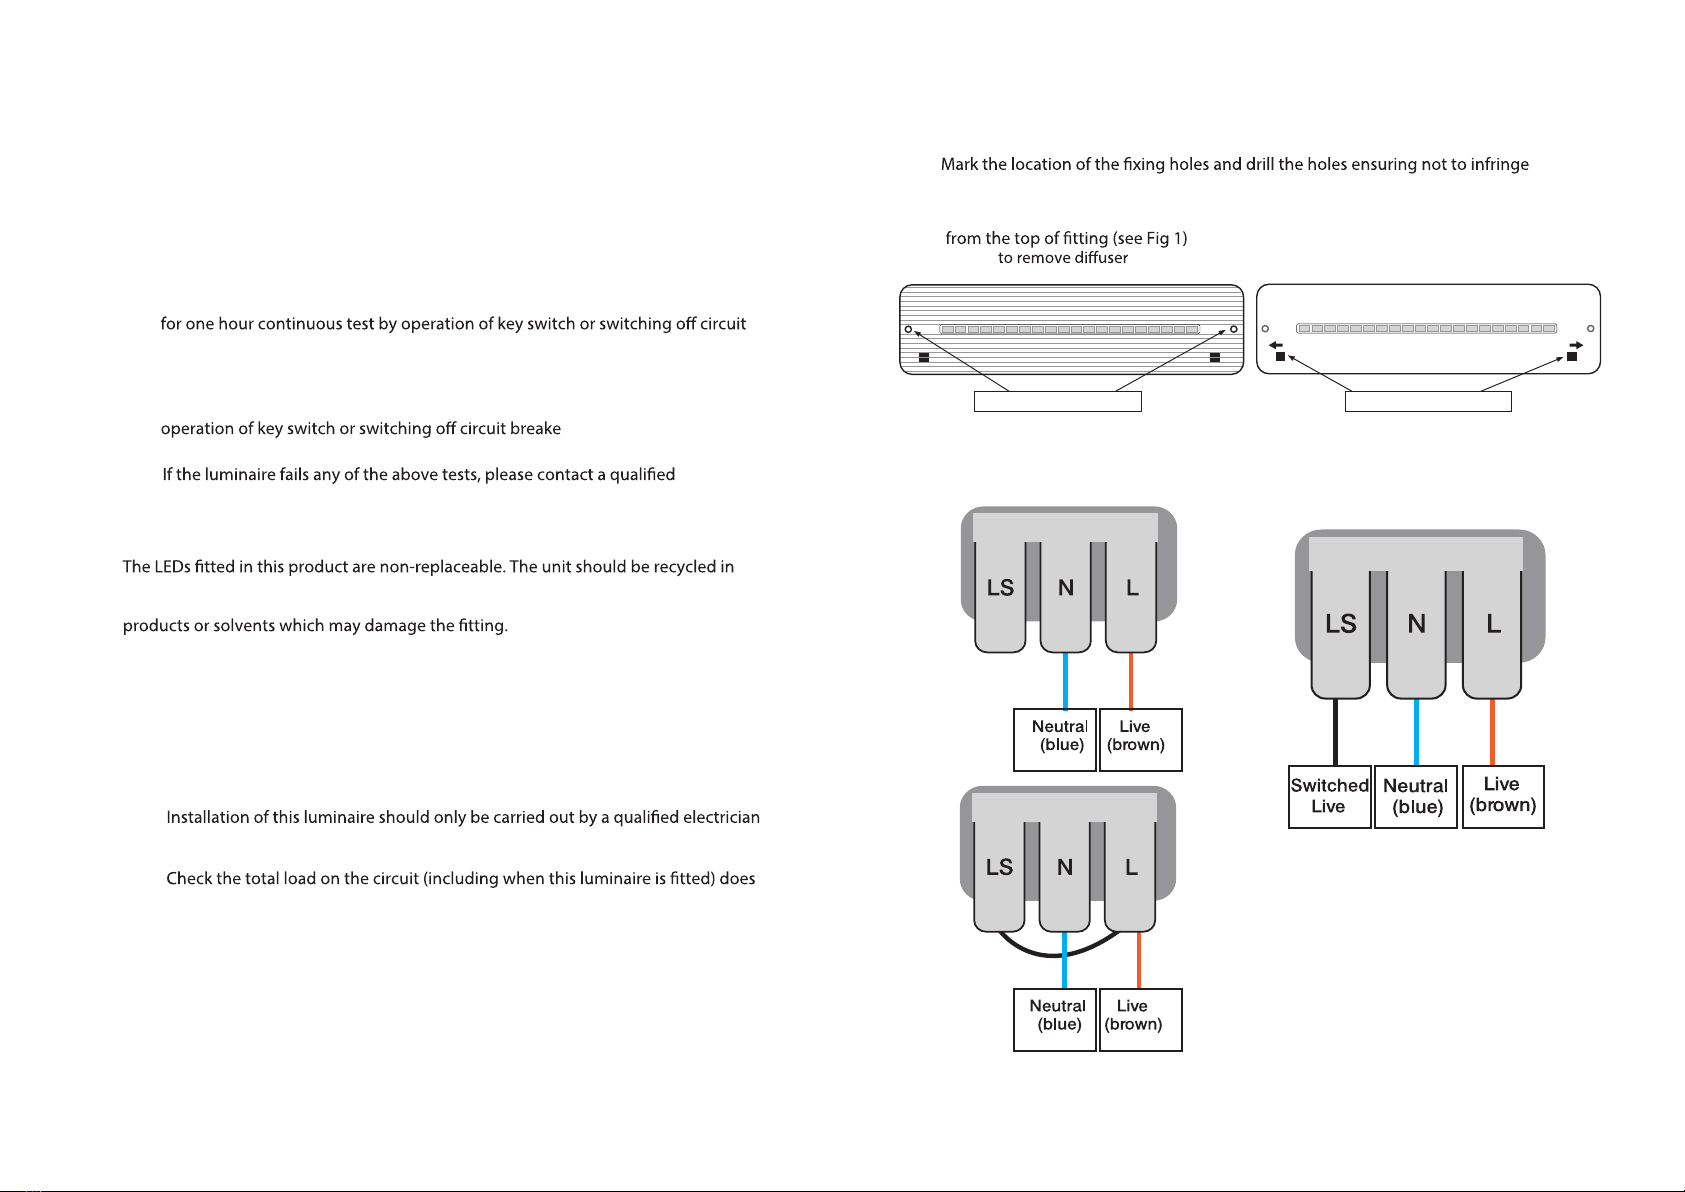
• For non-maintained operation please wire up connector block as shown in Fig 3
• For maintained operation (luminaire always on) please see Fig 4
• For switchable maintained operation
see Fig 5
• Connect the battery via the plug and
socket on the PCB
• Switch on the power supply and ensure
the LED indicator is illuminated Green
• Remove two screws
• Pull apart tabs (see Fig 2) to
gain access to the connections
Fig 1 Fig 2
Fig 3
Fig 4
Fig 5
Insert link
cable
Remove screws Pull apart tabs
• Switch on the power supply and ensure the LED status indicator is illuminated
green to ensure the battery and supply are functioning.
After 36 hours on continuous charge a mains failure should be simulated to ensure
successful operation.