ESYLUX CDS-A/T User manual

• •CDS-A/T
FIG. 4 FIG. 5 FIG. 6
Congratulations on your purchase of this high-quality ESYLUX product. To ensure
proper operation, please read these user instructions carefully and keep them for
future reference.
1 • SAFETY INFORMATION
CAUTION: Work on the 230 V power system must be carried out by
authorised personnel only with due regard to the applicable installation
regulations. Switch off the power supply before installing the system.
Use this product only as intended (as described in the user
instructions). Changes or modifications to the product or painting it
will result in loss of warranty. You should check the device for
damage immediately after unpacking it. If there is any damage,
you should not install the device under any circumstances. If you
suspect that safe operation of the device cannot be guaranteed,
you should turn the device off immediately and make sure that it
cannot be operated unintentionally.
2 • DESCRIPTION
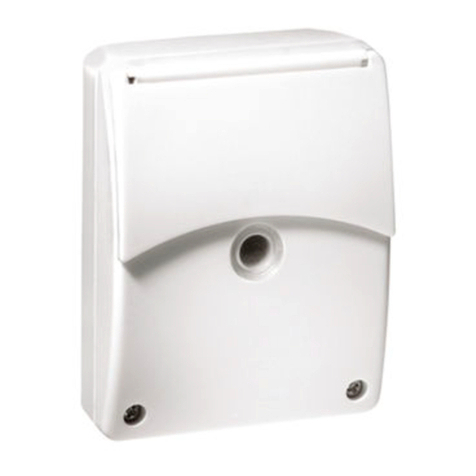
The ESYLUX CDS-A/T is a surface-mounted twilight switch with an
integrated timer feature to allow lighting equipment to be
automatically switched on and off (fig. 1). A light sensor detects the
surrounding light intensity. If this falls below the set lighting value
the CDS-A/T automatically switches the light on and then off again
if the surrounding light intensity exceeds the threshold value. The
lighting can also be individually switched on and off again using
the integrated time feature. You can, for example, set the CDS-A/T
so that this switches the lighting on according to the set lighting
value (Lux) – for example at dusk. After 10.15 p.m. the light is,
however, no longer required. To program this, set the OFF
activation value to 22.15 and the light is then switched off at this
time. At 5.00 a.m. light is required again and so you set the ON
activation value to 05.00 and the lighting is switched on again.
When the set lighting value is exceeded – e.g. at dawn, the
lighting is automatically switched off. This also saves energy costs
in the time when the lighting is not required.
3 • INSTALLATION / MOUNTING / CONNECTION
Switch off the mains supply before installing the product.
The CDS-A/T should only be installed on flat, vertical surfaces
(wall of a house) facing north. If possible, the device should not
be exposed to direct sunlight. Please note that an override of the
CDS-A/T is connected via the switched lighting (fig.1). Remove
casing lid and fit the base to the selected surface with the cable
insert point facing down. The cable must be environmentally sealed
(water resistant cable connection). Connect the twilight Switch as
shown in the circuit diagram (fig. 3). There is a bridge of 1.5 mm2
between L(mains voltage) and L(floating output contact). If the
relay contact is to be used for low voltage, this bridge has to be
removed.
4 • STARTING UP AND SETTING
4.1 Back-up battery
The battery is used to ensure that programmed times are not lost in
the event of a power cut, allowing the settings to be stored for up to
30 days. The life of the battery supplied is between about 3 and
4 years.
Remove the protective strip between the battery and the contact (fig. 4c).
Switch on the mains voltage.
230 V ~ 50 Hz
230 V ~/10 A (cos ϕ= 1),
3 A (cos ϕ= 0,5)
12 V/24 V DC/5 A
Dry Contact
Art.-Nr.: RK39500010040
PE LNLL´
3 V BATTERY
15 m
30 m
1 h
2 h
4 h
8 h
16 h
IP 54
CDS-A/T
LLL´
3 V BATTERY
+
15 m
30 m
1 h
2 h
4 h
8 h
16 h
15 m
30 m
1 h
2 h
4 h
8 h
16 h
15 m
30 m
1 h
2 h
4 h
8 h
16 h
15 m
30 m
1 h
2 h
4 h
8 h
16 h
PE N L L´
N
L
L
114
80 51
15
15 47
80
15
FIG. 1 FIG. 2 FIG. 3
5a
4a
4d
4c
4e
4b
5b
5c 5d
6a
6b
PLEASE NOTE: When the timer (fig. 4d) is in one setting for over
20 minutes the LED lights switch off. They are only used as
programming aids. This does not mean that the device is not working
properly. When the timer (fig. 4d) is moved again they light up and
you can change the settings.
5 • CHANGING BATTERIES
The battery is used to ensure that time settings are not lost in the
event of a power cut, allowing the settings to be stored for up to
30 days. The life of the battery supplied is between about 3 and
4 years. To change the batteries remove the screw (fig. 6b) and
insert the new battery in the battery compartment as shown in
fig. 6a and screw it into the correct position in the device.
Always ensure that the battery is suitable.
NB: The end user must recycle all used batteries.
Disposing of the batteries in household waste is strictly forbidden
(Directive 91/157 EEC).
6 • PRACTICAL ADVICE
CR2032
TWILIGHT SWITCH
GB
www.esylux.com
GB TWILIGHT SWITCH
4.2 Setting the light value (LUX)
The selected light value is set via the potentiometer (fig. 4a).
The red LED is used to help with the settings (fig. 4b). When the
activation time is reached (e.g. dusk) slowly turn the potentiometer
towards the “moon symbol” until the red LED lights up. The set
lighting level now corresponds to the actual surrounding light
intensity and the CDS-A/T is aligned.
NB: Please note that the connected lighting only comes on about 60
seconds after the LED lights up, as it is on a time delay. This switch
delay of about 60 seconds prevents unintentional activation for
example by car headlights or a dark cloud.
4.3 Setting the time functions
NB: The ON and OFF times must be set before the current time is set,
as the CDS-A/T will otherwise take 24 hours to adjust. During this
time the connected lighting would not switch on and off as defined in
the program.
4.3.1 Basic setting
When the mains current is switched on, all LEDs light up (fig. 5a).
The CDS-A/T switches on when the lighting level falls below the set
light value and then switches off again when this lighting level is
exceeded. In this setting the CDS-A/T works without the time
feature. If you have already programmed the times or the ON/OFF
times and would like to return to the basic setting, disconnect the
device from the power supply for at least 30 seconds and remove
the batteries while it is disconnected.
4.3.2 Setting the OFF time
Set the time switch to for the OFF time (fig. 4d). Now press
the button “timer” (fig. 4e) once and the LEDs cease to light
up. Each time you press this button the time is advanced by
15 minutes. To advance the time more quickly hold the button
down. Now set your selected OFF time.
Example: To set the OFF time for 10:15 p.m., the LED display would be as shown
in fig. 5b.
4.3.3. Setting the ON time
Set the timer to for the ON time (fig. 4d). Now press the
“time adjustment” button (fig. 4e) and set the selected
activation time.
Example: To set the activation time for 5:00 a.m. the LED is as shown in fig. 5c.
4.3.4. Setting the time
Set the timer (fig. 4d) to “ “. Before setting the current time hold
the “time adjustment” button until all LEDs (11.45 p.m.)
except LED 8 h (fig. 5d) light up. Then set the current time. This
process is necessary to ensure that the CDS-A/T is in the set mode.
When the time is set turn the timer (fig. 4d) to the “ “ setting.
The CDS-A/T is now programmed.
If you need to change the on/off times again you will need to
reprogram the current time.
Close the lid and screw tight.
1. None or only some of the
LEDs (clock light up when
the device is connected to
the power supply or during
programming.
Disconnect the device from the
mains power supply and remove
the battery. Check the wiring.
Wait 30 seconds and then
reconnect to the power supply
and replace the batteries.
2. The LED (Lux) does not light
up although the lighting
value is set to max and the
light sensor has been
covered.
Ensure that the light sensor is
covered with a non-transparent
material. Check the wiring.
The power must be
disconnected for at least 15
minutes. Using the LEDs you
can then check if the correct
time is displayed. (time display
every 15 minutes) Check to
ensure that the battery is fitted
correctly.
3. The lighting is not switched
on and off according to
the programmed on/off
times.
4. The clock timer does not
switch on again if the power
is disconnected and then
reconnected.
When the on/off times are set
there is a 24 hour cycle to run
through for the auto-adjustment
feature of the CDS-A/T. Press
the “time adjustment” button to
run through the time. Check to
ensure whether the timer for
ON, OFF and the current time
have been properly selected
and whether the times are
correctly set. The values should
be as exact as possible,
particularly for the time.
Fault Cause

Technical and design features may be subject to change.
MAINS VOLTAGE 230 V ~ 50 Hz
approx. 5 - 300 Lux
LIGHT EXPOSURE RANGE
approx. 60 seconds
ON / OFF SWITCH DELAY
BREAKING CAPACITY
SWITCHING OUTPUT floating output, 1 normally open contact
BATTERY Lithium CR 2032, 3 V
MEMORY CAPACITY 1 x ON / 1 x OFF
TIME SETTING approx. 15 min. - approx. 23 hours 45 min.
PROGRAMMING STEPS every 15 minutes
OPERATING TEMPERATURE RANGE -25 °C…+55 °C
PROTECTION TYPE IP 54
PROTECTION CLASS II
TEST SYMBOL TÜV
COLOUR white, similar to RAL 9010
APPROX. DIMENSIONS width 80 mm
height 114 mm
depth 51 mm
TECHNICAL DATA
230 V ~, 10 A cos ϕ= 1,
3 A cos ϕ= 0,5,
12/24 V DC/5 A,
no safety low voltage
7 • ESYLUX GUARANTEE
ESYLUX products are tested in accordance with applicable
regulations and manufactured with the utmost care. The duration
of the warranty is based on statutory guidelines. The warranty can
only be honoured if the appliance is sent back with the receipt,
unchanged, packed and with sufficient postage to ESYLUX GmbH
or to the relevant distributor in your country. (Visit www.esylux.com
for a complete overview.) Please include a brief written description
of the fault with any device you send back. If the warranty claim
proves justified, ESYLUX GmbH will, within a reasonable period,
either repair the device or replace it. If a claim is unfounded
(e.g. because the warranty has expired or the fault is not covered
by the warranty), then ESYLUX GmbH will attempt to repair the
device for you in a cost-effective manner. The warranty does not
apply to natural wear and tear, changes caused by environmental
factors or damage in transit, nor to damage caused as a result of
failure to follow the installation or user instructions. Any batteries or
bulbs supplied with the device are not covered by the warranty.
ESYLUX GmbH shall not be liable for any indirect, consequential or
financial losses.
ESYLUX GmbH
Postfach 1834, 22908 Ahrensburg/Germany
Internet: www.esylux.com
WA 04/2009
Other ESYLUX Switch manuals
Popular Switch manuals by other brands
D-Link
D-Link DES-F1010P-E Getting started guide
Intellitec
Intellitec 00-00571-000 Service manual
Switchcraft
Switchcraft StudioPatch Series Operation manual

Mellanox Technologies
Mellanox Technologies MIS5600Q-10DNC installation guide
Triton
Triton TTN-HDS-1602 installation manual
Bircher
Bircher AirMission 2.W2 Translation of the original operating instruction
