Etaluma LS720 Installation and operation manual

IMPORTANT: This Manual describes how to set up LS Microscopes (Section I) and
start using Lu aview software (Section II). It is i portant that you follow this Guide.
Steps described for LS620 also apply to LS600.
For assistance, please call 760-298-2355 or e ail support@etalu a.co .
LS620 (with Phase Contrast Accessory
and Manual XY Stage, both optional
and ordered separately)
LS560/LS460 (with Phase Contrast
Accessory and Manual XY Stage, both
optional and ordered separately)
LS720 (with Phase Contrast
Accessory, optional and ordered
separately)
Etalu a, Inc.
www.etalu a.co
Lu aview™ is the trade ark of Etalu a, Inc.
™2009-2018 All rights reserved.
LS720, LS620, LS600, LS560, LS460 Microscopes
Startup Manual
with
Etalu a’s Lu aview Software

2
LS Microscope Startup Manual 2018.7.25
Table of Contents
I. Setting Up the LS Microscope
A. Ite s Included With Each LS Microscope
B. Optional Accessories (purchased separately)
C. Reco ended Co puter Specifications
D. Placing the LS Microscope
E. Re oving the Shipping Lock (LS720 only)
F. Connecting the Cables
G. LED Power
H. Phase Contrast
I. Brightfield
J. Installing Objectives
K. About Lu aview
L. Downloading and Installing Lu aview
M. Connecting the LS Microscope
N. Live Cell I aging with LS Microscope in an Incubator
II. Software: Getting Started with Lu aview
A. Starting Conditions
B. Launching Lu aview
C. Initialization and Calibration (LS720 only)
D. Instru ent Setup
E. Finding a Live I age With Manual Focus
F. Focusing (Manual on LS720)
G. Snapping I ages
H. Generating Auto Co posite I ages
I. Videos Fro Ti e-Lapse and Live Video
J. Setting Up Autofocus (LS720 only)
K. Writing and Using Protocols
L. Creating a Z-Map
M. Editing a Z-Map
N. Tiling Across Locations
O. Live Video
P. Run Protocol
III. Appendices
A. Red Shipping Lock for LS720
B. Uninstalling a Different Version of Lu aview
C. Disinfecting the LS Microscope Before Place ent into an Incubator
D. Resolving Lu aview Driver Conflicts
E. Lu aview Folder File Organization
F. Capturing and Co piling Live Video Using AviSynth and MeGUI
G. Setting up Windows 10 for Uninterrupted Ti e-Lapse

3
LS Microscope Startup Manual 2018.7.25
This docu ent is available for download at http://etalu a.co /products/downloads. Any steps specific for a
particular LS odel are noted in italics.
I. Setting Up the LS Microscope
A. Items Included With Each LS Microscope
1. LS720
•USB co unication cable
•External power supply/cord with country-specific plug
•Hex wrench (3 ) for re oving/replacing shipping lock
•Fluorescence shroud
•Calibration 1536 well icroplate
•Calibration 4x objective
2. LS620 and LS600
•Brightfield Illu inator LS620/LS560/LS460
•USB power/co unication cable
•Fluorescence shroud
•External power supply/cord with country-specific plug LS620/LS560
3. LS560 and LS460
•Brightfield Illu inator LS620/LS560/LS460
•USB power/co unication cable
•Fluorescence shroud (LS560 only)
•External power supply/cord with country-specific plug LS620/LS560 (LS560 only)
B. ptional Accessories (purchased separately)
•Phase Contrast Accessory LS720 (Oly pus)
•Phase Contrast Accessory LS620/LS560/LS460 (Oly pus)
•Manual XY Stage LS620/LS560/LS460
•Labware Holders
Holder for 35 Petri dishes, fits inside Holder for 60 Petri dishes
Holder for 60 Petri dishes & Terasaki plates, SBS outer di ensions
Holder for icroscope slides & 50 Petri dishes, SBS outer di ensions
Holder for 4 icroscope slides in parallel, SBS outer di ensions
•Light Hood
•Lu aquant, i age analysis software
•Microvolution, deconvolution software
C. Recommended Computer Specifications
All LS Microscopes: Windows 7, 8, 8.1, or 10; Core i5 or better processor; 500 GB to 1 TB hard drive, 4 GB
ini u RAM; single 4K onitor or two with 1080p HD resolution. Windows ust have Service Pack 2.0
with .NET version 4.5.2.

4
LS Microscope Startup Manual 2018.7.25
LS720 only: Due to autofocus, Z-stacking, and tiling, a solid-state hard drive (SSD) is required.
Microvolution deconvolution software: A GPU is required; the ost powerful NVidia chip running CUDA
that can be afforded is reco ended for best perfor ance.
D. Placing the LS Microscope
1. Re ove LS Microscope fro the shipping box (save box and packing aterials) and place on a sturdy
bench or counter.
2. If the LS Microscope will be used in an incubator or environ ental cha ber, it is reco ended that
the initial setup be carried out in a roo with a bient conditions before place ent into the
specialized environ ent. See Section I.O. for infor ation about live cell i aging in a specialized
environ ent.
E. Removing the Shipping Lock (LS720 only)
WARNING: You must re ove red shipping lock before plugging the LS720 into
power! If not re oved, the LS720 will be da aged! (See Appendix A for full
details.)
1. Using the supplied 3 hex wrench, loosen the 2 set screws on top of the
installed shipping lock. Loosen the 2 set screws (s aller and ore internal) on
botto of the lock.
2. Unscrew co pletely the 2 larger 1-inch screws on botto of the shipping lock.
Slide the shipping lock toward you to re ove.
3. Keep the 4 set screws screwed into the shipping lock and place in a secure place along with the two 1-
inch screws and 3 hex wrench.
WARNING: If packing the LS720 for ship ent, you must install the red shipping lock before placing into
the shipping carton! If not installed, the LS720 can be da aged! See Appendix A for instructions.
F. Connecting the Cables
1. Wait to connect the USB cable fro the LS Microscope to the co puter until Lu aview is installed
(see Sections I.M-N. below).
2. (LS720 Only). Plug the external power supply/cord into the left side port (when viewing fro the
front) and the plug into an AC outlet.
G. LED Power
1. (LS720 only). The external power supply/cord also supple ents power co ing fro the co puter via
the USB cable to power the LEDs at a higher level than if connected by the USB cable only.
LS720 Shipping lock

5
LS Microscope Startup Manual 2018.7.25
3. (LS620 and LS560 only). For al ost all fluorescence i aging applications, power fro the co puter
via the USB cable to the LS Microscope will be sufficient. If higher levels of illu ination are required,
e.g., with very di sa ples, insert the s all round plug of the external power supply/cord into the
round port labeled SUPPLEMENTAL P WER on the back of the LS Microscope and the electrical plug
into an AC outlet. You should see a oderate increase in the Illu ination level.
H. Phase Contrast
1. LS720 only
a. If using the Phase Contrast Accessory LS720 (Phase
Accessory), re ove fro its shipping box (save box
and packing aterials). Attach Phase Accessory by
placing the holes on the botto of the Phase
Accessory ar over the pegs on the upper surface
(right rear) of the LS720. Make sure pegs are fully
seated and ar is totally flush with the LS720
surface. Tighten the large thu b screw at the back
of the Phase Accessory ar .
b. Connect the free end of the Phase Accessory co unication cable to the round port on the LS720
back panel (left side) labeled External La p Power Out. This allows the Phase Accessory to be
controlled by Lu aview.
2. (LS620, LS560, LS460 only)
a. If using the Phase Contrast Accessory LS620/560/460 (Phase Accessory),
re ove fro its shipping box (save box and packing aterials). Ensure that
the Phase Accessory adaptor is attached to the rear tab of the LS
Microscope Deck. Attach Phase Accessory by inserting the base of the ar
into the Phase Accessory adaptor. Ensure it is fully seated and tighten the
thu b screw on the botto of the adaptor.
b. Connect the free end of the Phase Accessory co unication cable to the
round port on the LS Microscope back panel (left side) labeled External La p
Power Out. This allows the Phase Accessory to be controlled by Lu aview.
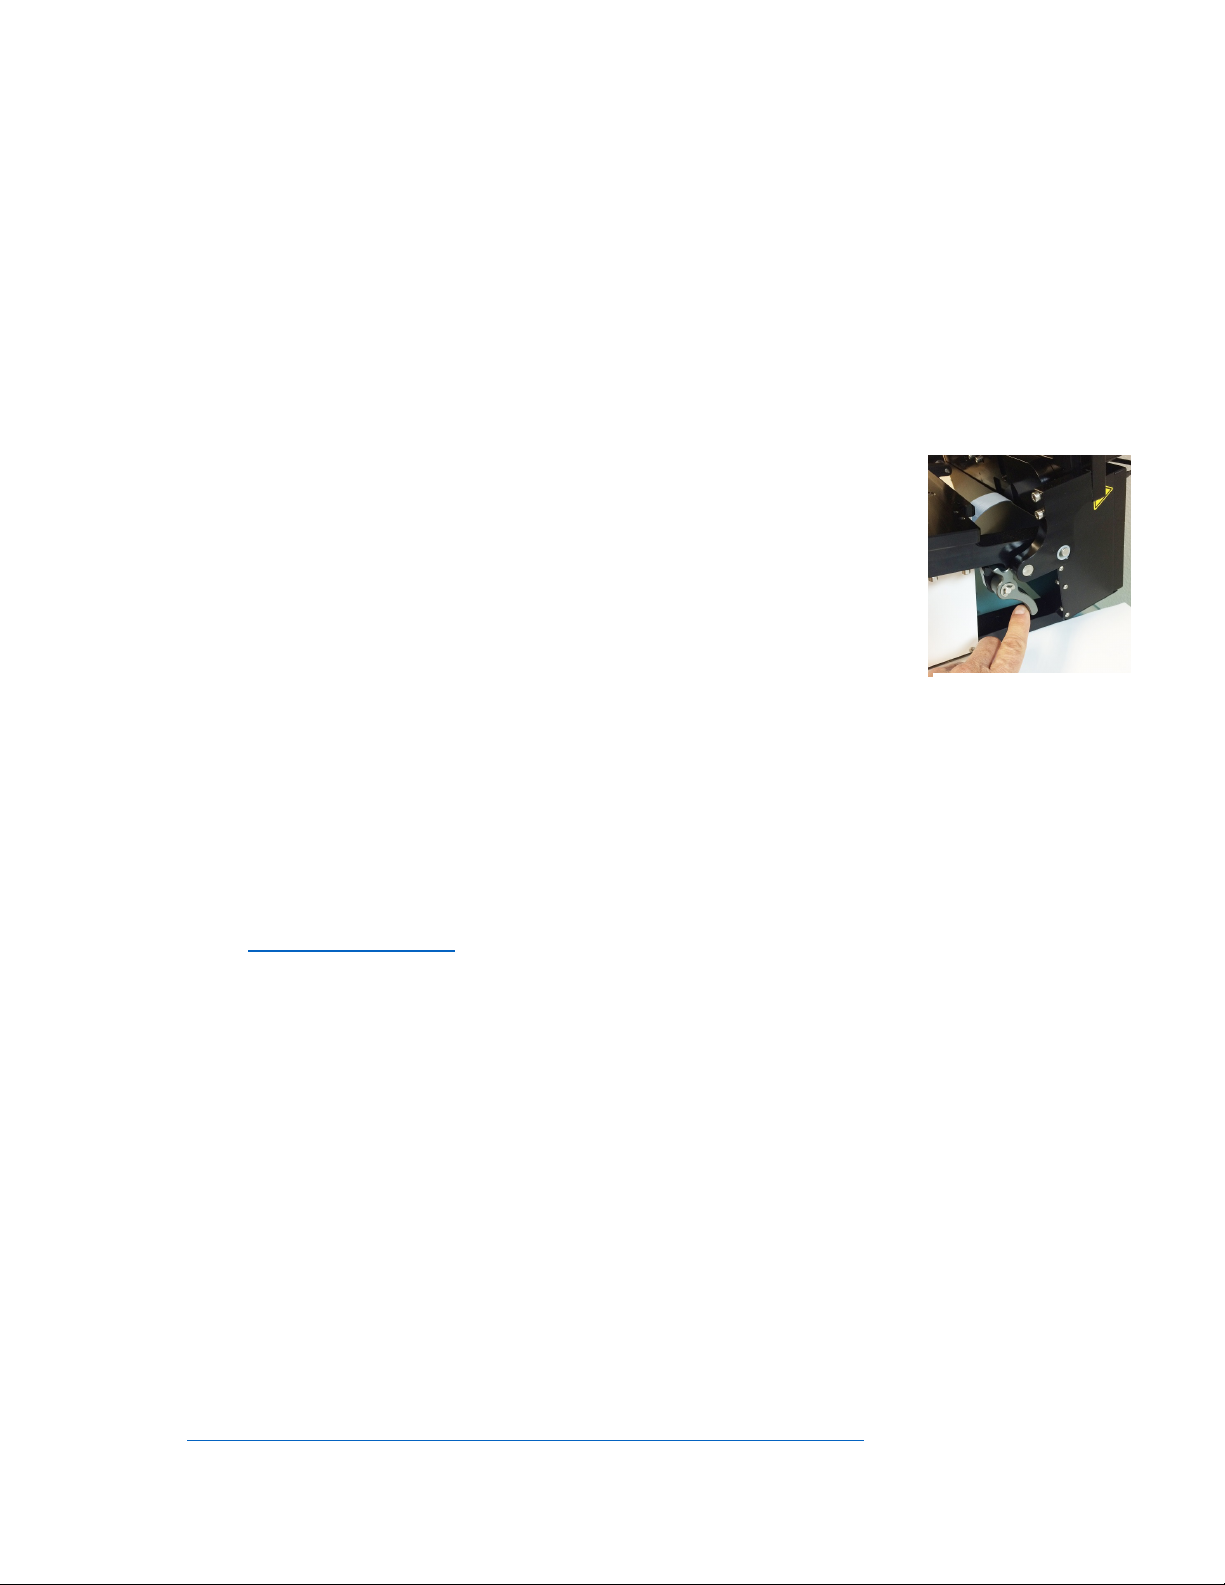
3. Insert the phase contrast Slider (pre-centered version included with Phase
Accessory) into the slot going through the condenser. Of the 3 positions in the
Slider, the phase ring is visible and typically present in the iddle position. Any
open positions can be used for Brightfield.
I. Brightfield
1. For opti al brightfield, use of the Phase Accessory (Section I.H. above) with the included Slider in an
open position (no phase ring) is reco ended. The Phase Accessory, which provides colli ated light,
Phase Accessory cable
Phase Accessory ar
attach ent
Inserting Slider
Phase Accessory adapter
6
LS Microscope Startup Manual 2018.7.25
is directly connected to the LS Microscope, allowing it to be controlled by Lu aview. It should also be
used when i aging in a dark environ ent such as an incubator. To ount the Phase Accessory on an
LS Microscope, see Sections I.H. above. Brightfield i ages will be in gray scale due to the
onochro atic CMOS ca era.
2. If the Phase Contrast Accessory is not available, a bient light in a typically lit area can often be used.
The light should be as unifor as possible to prevent shadows or other dark or light areas. Overhead
fluorescent lighting can cause uneven brightness including a striped pattern on the i age; if observed,
ove the LS Microscope or partially shade the light to reduce unevenness across the sa ple.
J. Installing bjectives
1. LS720 only
a. Unscrew the deck knob at the front of the instru ent (side with LS720 logo)
and raise the top deck (the top layer of the hinged 2-layer deck). Tipping the
top deck backward will latch it into place. Unscrew the black cap (or
previously installed objective) on top of the optics block and screw in the
objective. Do not overtighten. To lower the top deck, activate the release
lever, lower the deck, and tighten the white deck knob.
2. LS620, LS560, LS460 only
a. Manually re ove the insert of the top accessible deck. Unscrew the black cap (or previously
installed objective) on top of the inside optics block and screw in the new objective. Do not
overtighten. Return the re ovable insert to the deck.
3. When installing or changing an objective, carry out the insertion quickly to ini ize dust falling onto
the irrored dichroic filter. A s all a ount of dust will not affect i aging. However if dust is
significant and it appears to affect quality of the live i age or snapped i ages, contact Etalu a by
e ail (support@etalu a.co ) or telephone (760-298-2355) to discuss possible ethods for cleaning.
IMPORTANT: Using co pressed air can result in an oily liquid being sprayed onto the dichroic, which
ay da age it. Si ilarly use of physical ethods such as swabs or lens paper ay also da age the
dichroic and ust NOT be used.
K. About Lumaview
1. LS Microscopes LS720, LS620, LS600, LS560, and LS460 are controlled by the Lu aview software
progra . The latest Lu aview version is downloadable fro Etalu a’s website and must be installed
prior to connecting your computer for the first time to the LS Microscope (due to the need for two
drivers that are installed on the co puter at the sa e ti e).
2. Lu aview will run on Windows 7, 8, 8.1, and 10. Both desktop co puters and laptops can be used,
but the best visualization correlates with onitor resolution equal to the sensor resolution (up to 1900
x 1900 pixels). Note: The onitor does not affect i age resolution unless the onitor is low quality
and affects your ability to judge focus.
The co puter should have Windows .NET Fra ework 4.5.2 or higher installed; see
https:// sdn. icrosoft.co /en-us/library/bb822049%28v=vs.110%29.aspx for ore infor ation. If
Deck release lever

7
LS Microscope Startup Manual 2018.7.25
your co puter does not have .NET Fra ework 4.5.2 or higher installed, downloading Lu aview ay
auto atically take you to the Microsoft .NET download page. Scroll down the page to find the correct
download. This should not require a purchase. Contact Etalu a with any questions.
L. Downloading and Installing Lumaview
1. To download Lu aview, go to http://etalu a.co /products/downloads (under the Resources tab).
Click on Lu aview - ZIP link to start the download and save the folder when pro pted. Go to your
downloads location and click to open the Lu aview_v(version#).zip file.
Alternatively, the sa e Lu aview_v(version#).zip file can be copied fro the flash drive that co es
with the LS Microscope. Verify that this file is the latest version as posted on the Etalu a website.
2. Lu aview will not run on a co puter with Lu aview 500/400 installed. To uninstall, use the
procedure described in Appendix B.
If your co puter has an older version of Lu aview or Lu aview 720/600-Series (latter no longer
used), installing the newest Lu aview will overwrite the older versions.
If there is a need to revert to an older version Lu aview, it will be necessary to first uninstall the
current version using the procedure described in Appendix B.
3. To install Lu aview, right click on the .zip file and Open with Windows Explorer. Double click on the
. si installer file to start the installation. If a Windows warning box about an unrecognized App
appears, click Run anyway.
You will be asked about the location; note that the default is a new Etalu a folder inside the Progra
Files (x86) folder. During installation, a Device Driver Installation Wizard will open. Click to continue
(twice) and finish installing the two drivers. Installation of Lu aview will then finish. After installation,
a Lu aview shortcut (orange circle icon) convenient for launching the software will be present on the
desktop.
M. Connecting the LS Microscope
1. If connecting with a co puter that has been off, turn co puter on. Make sure co puter is connected
to its onitor(s). Insert the standard USB-A end of the supplied USB cable into a USB port on your
co puter and the other square USB-B end into the square port on the LS720 left side or the square
port labeled T C MPUTER on the back of the LS620, LS560 and LS460. The sa e USB port on your
co puter should be used every ti e you connect to the LS Microscope. It is also i portant to connect
the LS Microscope directly to the co puter USB port and not use a USB hub.
2. If Lu aview has not been run previously, it is i portant that the LS Microscope and co puter be
connected using the USB cable before launching Lu aview. This is because Windows needs to load
the USB drivers before Lu aview can run. After the first ti e, the progra can be launched before
connecting the LS Microscope and co puter. In the latter case, only the Outer Main Window will
open (see Section II.B. below). Connecting the LS Microscope and co puter with the USB cable will
result in opening of the Live I age Window as well.
N. Live Cell Imaging with LS Microscope in an Incubator

8
LS Microscope Startup Manual 2018.7.25
1. Prior to i aging in an incubator, place the LS Microscope inside for at least 6 hr and preferably
overnight to allow ther al equilibration. Before transferring to the incubator, disinfect the LS
Microscope using any of the suggested procedures in Appendix C. Condensation on the icroscope,
including on the objective, will for in the first inutes but will evaporate as ther al equilibriu is
achieved. Focus levels ay change during this equilibration as aterials expand.
2. Pass the co unication and optional power cable through the incubator port, which is often located
in the upper back wall. A plug or filtered stopper ay be present. Every LS Microscope now co es
with a foa plug that can be used to seal around the cable(s) going through the port. Or the existing
plug can be adapted as well. Make sure there is enough slack in the cables inside the incubator for
sliding out the shelf. Place the co puter to be used on a flat and stable surface near to the incubator
and within the 3 M USB cable provided.
WARNING: Do not extend the USB cable or use another USB cable other than that supplied,
particularly a longer one, as co unication issues will arise.
3. LS620, LS560 and LS460: Place the sa ple on the icroscope, adjust focus and close the incubator
door. Check the focus after 60 in to confir it is still good. If the focus has changed, refocus and
repeat. For higher agnification objectives (40x and above), a focus drop of a few icrons ay occur,
which can be co pensated for by over focusing to a height above the focal plane equal to the
expected drop. In this case, the focus will drop to the correct level within a few inutes.
4. LS720 only: Place the sa ple in the labware carrier and ensure it is seated flat with the upper left
corner fir ly pushed into the fra e. Close the incubator and return to Lu aview to focus. The
otorized Z axis will aintain focus level and autofocus can be used to adjust any change in focus over
ti e.
5. The syste is now ready for live cell i aging.

LS Microscope Startup Manual 2018.7.25
9
II. Software: Getting Started with Lumaview
The following sections give instructions for getting started with Lu aview on the LS720, LS620, LS560 and
LS460 and are intended as a Startup Manual only. Not all options are given and not all features ay be
explained in any particular section. The co plete User Guide for Lu aview is contained in the Help Section
after Lu aview is opened. Click on Help in the Title Bar to open the pulldown enu and click Contents, or
si ply Click F1 to open the Help Section. Becoming familiar with the complete Help Section is a must for
using LS Microscopes optimally and taking advantage of the many features of these Microscopes and
accompanying software.
. Starting Conditions
1. Lu aview has been downloaded and installed on the co puter.
2. The LS Microscope is connected to the co puter via the UBS cable.
3. LS620, LS560, or LS460: Sa ple to be i aged is present on the LS Microscope stage.
4. LS620 or LS560: Fluorescence shroud is over sa ple if i aging involves fluorescence.
5. LS720: Red shipping lock MUST be off, power cable is plugged into a standard AC outlet, and fluorescence
shroud is available if i aging involves fluorescence.
B. Launching Lumaview
1. Launch the Lu aview software fro the desktop icon (or other chosen location) and allow the LS
Microscope to be discovered. This ay take a inute or so the first ti e. Two windows will open on
your onitor:
a. Live I age Window inside the larger Main Window. “Live I age Window” will be in the title bar
when the Window is not axi ized. When Live I age Window is axi ized, [Live I age
Window] transfers to the end of the Main Window title bar.
The Live I age Window status bar at the botto shows co unication with the ca era sensor
via continuous display of several useful etrics: current fra e rate, data transfer rate, nu ber of
fra es collected thus far in the session, fra e size, and session date and ti e start.
b. Main Window with Lu aview v(version nu ber) in the title bar. When Live I age Window is
axi ized, the title bar beco es Lu aview v(version nu ber) – [Live I age Window].
Note: If Live Image Window is not present, there is likely a Driver issue. Follow procedure on
Driver Resolution in ppendix D.
2. The Live I age Window includes a Left Toolbar with the axi u following co ands:
a. Manual I age
b. Manual XYZ (LS720 only)
c. Snap I age
d. Co posite (LS720 and LS620 only)
e. Video Record (toggles on and off)
f. Protocol
g. Zoo

LS Microscope Startup Manual 2018.7.25
10
h. Last File
When Lu aview is open, the icon that resides in your co puter dock appears as a docu ent with an
arrow.
C. Initialization and Calibration (LS720 only)
1. The LS720 auto atically initializes every ti e Lu aview is started by oving the icroplate carrier to
the Ho e position. The Ho e Position consists of the left front corner of the icroplate carrier fra e
being positioned over the objective and the objective retracted to the lowest Z level. No i age can be
obtained at the Ho e position because it is under the icroplate carrier fra e.
2. If this is the first ti e the LS720 has been connected to the current co puter, it is first necessary to do
a Calibration. Once co pleted, calibration is not needed unless a different co puter
is connected or the XY position appears to be different fro the expected position,
e.g., center of icroplate wells.
a. To calibrate the LS720, install the provided Calibration Motic EFN 4x Objective.
Place the provided Calibration 1536 well icroplate into the icroplate carrier.
b. Click Utilities in the File Menu bar and in the drop-down enu click Calibrate to
open its dialog box. A co unication dialog box will open asking if a 4x objective
has been installed. Click Yes and the co unication dialog box will close.
c. The Live I age Window will now show red crosshairs, and the icroplate carrier
will ove so well A1 is close to being over the objective.
d. Click the Manual I age icon in the left tool bar (top icon) to open its dialog box.
e. To use a bient light for calibration (reco ended; see Section I.I.), check
Brightfield in Manual I age to activate Gain and Exposure sliders. Start with
Gain as low as possible and adjust Exposure until a id-gray tone is shown in
the Live I age Window.
f. If using the Phase Contrast Accessory for brightfield illu ination (Section I.I.),
ove the phase slider to an open position (without phase ring) and ove the phase condenser
aperture (s all lever on condenser front above slider) so only a low level of light
is trans itted. In Manual I age, check Brightfield, set Gain to ini u ,
Illu ination (%) to ini u , and adjust Exposure until a id-gray tone is seen in
Live I age Window.
g. In Calibration, ove the Focus slider up while watching the Live I age Window
to detect when the well outline can be seen and is in sharp focus. The Focus
slider area beco es green whenever the Focus slider is active. Using the X/Y
Move arrows (and Step size arrows if needed), ove the icroplate carrier until
the A1 well is centered in the Live I age Window. Make sure the centered well
Red crosshairs in Live
I age Window

LS Microscope Startup Manual 2018.7.25
11
is A1 by oving to the left and up using the X/Y Move arrows, and then re-center the A1 well.
h. In Calibration, click Accept Calibration. The Calibration
dialog box will now convert to the Manual XYZ dialog
box.
i. Test the calibration on other wells by clicking the
Select Labware button in Manual XYZ to opens its
dialog box. (If Manual XYZ is not already open, click its
icon in the left tool bar (second fro top).
j. Click on Generic1536WellMicroplate.elf to highlight it
and then click OK. The appropriate Labware Map
dialog box (1536 well in this case) will open. Click on
any well and the icroplate carrier will ove to center
that well over the objective. Test the icroplate
corners and other wells distant fro each other. If any
wells are not centered, repeat the Calibration procedure described above
in this Section.
D. Instrument Setup
1. Click on Configuration in the File Menu bar to open the drop-down
enu and select Instru ent Setup to open its dialog box.
2. Check the Lu aview version to ake sure it is the ost recently
posted version on the Etalu a website
(www.etalu a.co /products/downloads/). Ensure that the LS
Microscope being used is checked. If it is necessary to change the
LS Microscope odel nu ber that is checked, you will be
pro pted to restart the progra . Be sure to restart so that all
functions work correctly.
3. Click the Objective button to open its dialog box (called Objective
Lens Selection). Select the desired objective to highlight it. Note
that other fields about the objective and i age auto atically fill
based on agnification and a fra e size of 1200 x 1200 pixels (LS720
and LS620) or 1200 x 1200 pixels (LS560 and LS460). Click OK. Once selected, the sa e infor ation
auto atically fills in Instru ent Setup.
4. Click the Fra e Size button to open its dialog box. Using the pull-down enu,
select fra e size desired (fra e size will be the nu ber ti es itself because it is
square). While the axi u is 1900 x 1900 pixels, the default is set to 1600 x
1600 pixels for LS720 and LS620, and 1200 x 1200 pixels for LS560 and LS460.
Note: If larger Fra e Sizes are used, there will be so e darkening in the corners. If faster fra e rates
are needed, use s aller fra e sizes, e.g., 800 x 800 pixels.)

LS Microscope Startup Manual 2018.7.25
12
If the Fra e Size is changed, there will be a pro pt to restart
Lu aview. Click OK to close the pro pt and then shut down
Lu aview. Upon restarting Lu aview, the fra e size in the lower
status bar will be the new size. If not restarted, the new fra e size
ay show in Instru ent Setup but it ay not actually be different. Always check the lower left status
bar of Live I age Window to see the actual fra e size.
5. Continue to review and adjust the various settings in Instru ent Setup. For Root, enter desired file
na e root for all i ages in this i aging session. Select the file for at desired (Tiff is reco ended).
6. The Ti e-lapse folder path default is given but can be changed if desired. Ti e-lapse is set up under
Protocol as described in Section II.K. below. Note that the folder na e Lu aview720 is the current
default na e and is used for i ages snapped on the other LS Microscopes as well unless a different
folder is chosen.
7. Select the ti e in seconds for each LED to be on before i age snap. Reco ended ti e for
fluorescence is 0.6 seconds (do not go below this ti e). Check Auto Co posite (LS720 and LS620 only)
to have i ages in ultiple channels auto atically co posited and saved in the Co posites folder.
Check Individual Channel Folders to have i ages fro ultiple channels in a Protocol saved in
separate folders (e.g., for co piling ti e-lapse videos in single channels).
8. Of the next 6 features listed on the left, check those desired:
a. Ti e/date label will be displayed in the lower left corner of each i age.
b. Hot pixel re oval. Check if desired and then co plete Instru ent Setup. (To start this feature,
click Utilities in the title bar and fro the pull-down enu select Detect Hot Pixels to open its
dialog box. Infor ation on next steps is available in the Help section.)
c. Pseudo color FL channels (all LS Microscopes except LS460) results in live and snapped fluorescent
i ages colored with the channel color and according to signal intensity.
d. “Click” sound for anual i age snap results in a “ca era shutter-like” sound whenever a anual
i age is snapped.
e. Manual i age autosave results in i ages being saved
auto atically without the Save As dialog box opening each ti e.
When checked, each i age is nu bered according to
DOYHHMMSS where DOY is day of year, HH is hour in 24
hour ti e, MM is inutes, SS is seconds, and is illiseconds.
Thus each i age nu ber is unique and in nu erical order.
Not checking Manual i age autosave will result in the Save As
dialog box opening every ti e the ca era icon is clicked and the
i age has been snapped. In this case, the i age file na e
desired ust be entered before clicking Save.

LS Microscope Startup Manual 2018.7.25
13
9. On the right side of Instru ent Setup, checking Display scale bar results in a scale bar in the lower right
corner of live and snapped i ages. If checked, click Select Color to choose color, check Display
objective power if desired, and select Scale bar width.
10. fter all settings have been selected, be sure to click OK to save the settings before exiting
Instrument Setup.
E. Finding a Live Image for Manual Focus
1. Install the desired objective and sa ple labware. LS620, LS560, and LS460 only:
Manual XY ove ent of SBS labware ( icroplate footprint) is facilitated by
Etalu a’s Manual XY Stage (optional). For labware that is not SBS, use a labware
holder such as the Multi-Slide Holder for 1-4 icroplate slides. Update Objective in
Instru ent Setup as needed (Section II.D above) and click OK.
2. Click on the Manual I age icon in the Left Toolbar (top icon) to open its dialog box.
LS560 dialog box contains only the Green and Brightfield controls; LS460 dialog box
contains only the Brightfield controls. LS720 only: Click the Manual XYZ icon in the
Left Toolbar (second icon fro top) to open its dialog box; Manual I age and Manual
XYZ are used together to find and focus on sa ples in the labware. If desired, ove
dialog boxes to the sides of the Live I age Window. If closed and then reopened,
they will open in the sa e locations prior to closing. However, when Lu aview is
closed, the dialog box positions will not be saved.
3. LS720 only: Select a desired XY location in a sa ple labware using one of two options
in Manual XYZ:
a. Use the X/Y Move arrows (and Step size arrows if needed) to ove to different
locations or wells in the sa ple labware, or
b. Click on Select Labware to open its dialog box. Click on the labware type
desired to highlight it and click OK. The appropriate Labware Map will
then open. Click on a location and the icroplate carrier will ove so the
location is centered over the objective. For further ove ent fro the
location, use the X/Y Move arrows (and Step size arrows if needed) in
Manual XYZ. Clicking again on the original location in Labware Map will re-
center on that location.
c. I age orientation: The live i age displayed on the onitor is as viewed
fro the botto as for all inverted icroscopes. To see the live i age as
viewed fro the top, check Horz. Flip i age in Manual XYZ. However, all
i ages are captured as viewed fro the botto .
d. XY ove ent: In Manual XYZ, when a directional arrow in XY Move is clicked,
the live i age on the onitor oves in that direction. However, the labware
oves in the opposite direction in order to place the new location over the

LS Microscope Startup Manual 2018.7.25
14
objective. For exa ple, to i age a location to the right of the current location, the labware ust
ove to the left for the new location to be over the objective. To have the live i age and labware
ove in the sa e direction, check either or both Reverse X dir. And Reverse Y dir. This feature is
particularly helpful when oving across labware, e.g., going well to well in a icroplate.
4. In Manual I age, select the channel(s) to use. For fluorescence, the included Shroud (or other
protection fro light) ust be placed over the labware. Start with Exposure at axi u and Gain as
low as possible. Increase Illu ination gradually to the desired brightness. For di sa ples, if
Illu ination is at axi u , increasing the Gain can be used to increase signal but it will also increase
the background. LS620 and LS560: Illu ination can also be increased by using the external power
supply/cord (See Section I.G.).
5. For brightfield using a bient light, start with Gain as low as possible and adjust Exposure until a id-
gray tone is seen in the Live I age Window.
For brightfield using the Phase Contrast Accessory (use open position in Slider, see Section I.I.), check
Brightfield in Manual I age and turn phase condenser iris (on front of condenser) so only a low level
of light is trans itted. Set Gain to ini u , Illu ination (%) to ini u , and adjust Exposure until a
id-gray tone is seen in Live I age Window.
6. For phase contrast using the Phase Contrast Accessory (use appropriate Slider phase ring for objective,
Section I.H.), check Brightfield in Manual I age and turn the phase condenser iris (on front of
condenser) to the left to the fully open position. Turn Exposure and Gain to very low. Increase
Illu ination (%) until a id-gray tone is seen in the Live I age Window.
F. Manual Focusing
1. LS720 only:
a. In Manual XYZ, ove the Focus slider up while watching the Live I age Window to
detect the sa ple co ing into focus. The Focus slider area beco es green
whenever the Focus slider is active. Clicking on the slider vertical line above or
below the current focus level causes the focus level to ju p up or down,
respectively, by 100 u . Continue to adjust the focus using the Focus Z up and
down arrows (and Step size arrows if needed) until a sharp i age is achieved.
Adjust Illu ination and Gain settings in Manual I age during the focus process as
needed. Click the Set Book ark button to record the focus level for easier return
to this level.
b. To facilitate the focusing process, click on the Zoo icon on the Left Tool Bar (fifth
fro top). The Zoo feature toggles between displaying the entire i age fitted to
the Live I age Window and displaying the i age atched 1:1 with the onitor
resolution (pixel: pixel). If the onitor resolution in pixels is less than the fra e
size, which is typical, the i age will be enlarged (zoo ed). The Live I age Window will now show
a center portion of the entire i age. Click the Zoo icon again to fit the i age to the Live I age
Window.

LS Microscope Startup Manual 2018.7.25
15
2. LS620, LS560, LS460 only
a. Unless approxi ate sa ple focus level is known, it is best to initially raise objective to axi u
height (without hitting sa ple) and then turn focus knob counter-clockwise until sa ple co es
into focus. Ensure you are focusing on correct sa ple plane and not another surface, for exa ple,
back side of a icroscope slide. If uncertain, place a si ilar but easy to focus sa ple on stage,
focus, and then switch to new sa ple.
b. To facilitate the focusing process, click on the Zoo icon on the Left Tool Bar (fifth fro top). The
Zoo feature toggles between displaying the entire i age fitted to the Live I age Window and
displaying the i age atched 1:1 with the onitor resolution (pixel: pixel). If the onitor
resolution in pixels is less than the fra e size, the i age will be enlarged (zoo ed). The Live
I age Window will now show a center portion of the entire i age. Click the Zoo icon again to fit
the i age to the Live I age Window.
c. If necessary, adjust Illu ination and/or Gain as needed.
G. Snapping Images
1. When the desired field has been illu inated and focused in Live I age Window (Section II.F. above),
click the Ca era icon in the Left Tool Bar (third fro the top) to snap the i age. If the Zoo function
was used to focus, the i age captured will include the entire field of view (FOV) observable with the
Zoo off. If “Click” sound for anual i age snap was checked in Instru ent Setup (Section II.D.), a
shutter-like sound occurs when each i age is snapped.
2. If Manual i age autosave was checked in Instru ent Setup, i ages will be saved auto atically using
the ti e-based nu bering syste (Section II.D.8.e.). If Manual i age autosave was not checked, a
Save As dialog box will open after the i age was snapped. I ages will be saved in the Etalu a folder
for ed auto atically whenever Lu aview is downloaded and installed. See Appendix E for the
auto atic subfolder directory that appears within the Etalu a folder.
3. I ages are captured and saved as seen by the ca era, i.e., fro the botto . LS720 only: If desired,
i ages can be flipped horizontally to show how they would appear fro the top. To acco plish this,
check “Horz flip i age” in the Manual XYZ dialog box. The essage “The i age is flipped horizontally
and so appears as if viewed fro above” is then displayed at the top of the dialog box.
4. To view the last i age snapped, click the Folder icon in the Left Tool Bar (botto icon) to launch
Windows Explorer and open the ost recently used Destination Folder.
H. uto-Generation of Single Composite Images
1. Fluorescence co posites (LS720 and LS620 only)
a. In Instru ent Setup (Section II.D.), ake sure Auto Co posite is
checked.

LS Microscope Startup Manual 2018.7.25
16
b. Click the Co posite icon in the Left Tool Bar (fourth fro the top) to open its dialog box. Check the
channels desired. To use values opti ized previously in Manual I age (Section II.E-F. above), click
Use Manual Settings to upload the settings. Values can also be entered anually.
c. Click OK to start the snapping of individual i ages in progression. Each LED will turn on for the
pre-snap interval and then flash when the i age is snapped. If “Click” sound for anual i age
snap was checked in Instru ent Setup, the shutter-like sound will be heard for each i age.
d. The fluorescence co posite i age will appear auto atically in the Main Window atched 1:1
with the onitor resolution (pixel:pixel) and with its Title Bar showing the full path where it is
located.
2. Co posites including phase contrast or brightfield (LS720, LS620, LS560)
a. In Instru ent Setup, ake sure Auto Co posite is checked.
b. Configure a Protocol with the channels desired (See Section II.K. below). In the Acquisition tab,
select Ti e-Lapse and set both Interval and Duration to 1 sec. Click Run and after the i ages are
snapped, click the Last File icon in the Left Tool Bar (lowest icon). The folder containing the
individual i ages plus the Co posite i age will open.
I. Live Video (Manual)
1. When a desired field has been illu inated and focused in Live I age Window, click the Video Record
icon in the Left Tool Bar (fifth fro the top) to open its dialog box. Select para eters requested and
also those in Instru ent Setup such as file for at (Section II.D.). I ages captured will be saved to the
Video folder inside the Manual folder shown in Appendix E.
2. Click OK and i age capture will begin. To stop i age capture, click the Record Video icon in the Left
Tool Bar again.
J. Videos from Time-Lapse and Live Video
Several options are available for co piling videos fro sets of ti e-lapse (see Section II.L.) and live video
i ages:
1. Lu aquant software offered by Etalu a (see Lu aquant Startup Guide for co piling i ages into
video). The Lu aquant Startup Guide can be downloaded fro Etalu a’s website
(www.etalu a.co /products/downloads/).
2. Other video co piling software such as I ageJ, Fiji, MSMovie aker, iMovie.
3. Two freeware software progra s used together, i.e., AviSynth and MeGUI (instructions described in
Appendix F). If using this option, be sure to read the instructions first because the two progra s ust
be downloaded before i age capture.
LS Microscope Startup Manual 2018.7.25
17
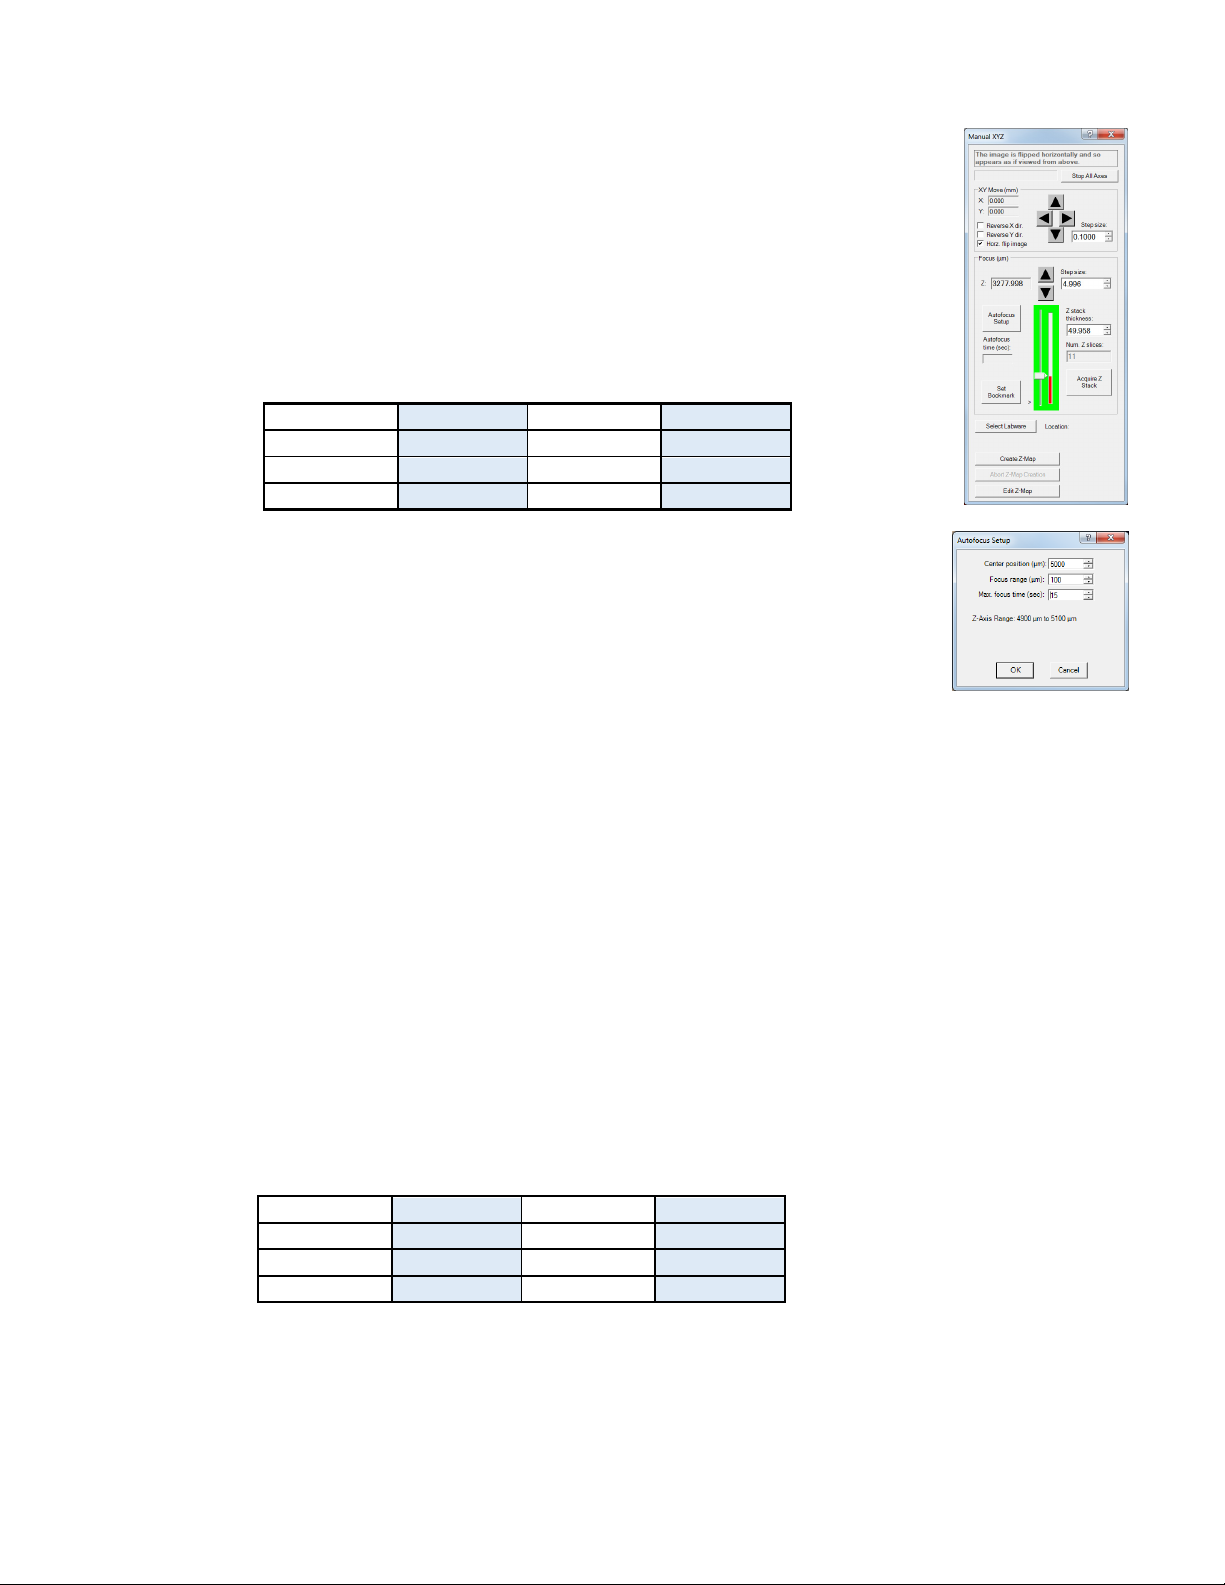
K. Setting Up utofocus (LS720 only)
1. Use Manual I age and Manual XYZ to find a focused live i age in a desired XY
position as described in Section II.F. above. In Manual XYZ, click the Autofocus Setup
button to open its dialog box.
2. Transfer the anually deter ined Focus Z level in Manual XYZ to the Center position
field of Autofocus Setup. The Focus range will be set to a default value of 200 u .
Change this to the reco ended Range for each objective agnification according
to the following table:
3. The Max focus ti e will be set to the default of 15 sec. This can be reduced as
perfor ance of the autofocus is confir ed. The Max focus ti e should be at least
that required for successful autofocus but opti ally only a few seconds longer.
Autofocus of 3 seconds should be possible in flat labware with 2D sa ples.
4. Click OK and autofocus will occur. The Focus Z level in Manual XYZ will now be
updated to the new autofocused Z level. The actual ti e taken to reach autofocus, i.e., the Autofocus
ti e (sec), will also be shown.
5. If autofocus did not result in a sharp live i age, ake sure the Center position transferred was correct.
In general, if autofocus consistently uses the full Max focus ti e, the range is too great for the ti e
entered or the ti e is insufficient. It ay be necessary to decrease the Focus range and/or increase
the Max focus ti e.
6. Upon successful autofocus, ove to other locations distant fro the initial location. Click Select
Labware in Manual XYZ and the appropriate Labware Map will open (see Section II.E.3. above). Select
a location and repeat Steps 1-4 above.
7. Continue to ove to other locations far away fro the initial ones and repeat autofocus. It ay be
necessary to re-enter the Center position and/or adjust the range. To deter ine the final para eters,
review the upper and lower Z levels obtained and use the approxi ate ean for the Center position.
For the range, deter ine the spread between the highest and lowest Z values and add the suggested
buffer listed in the following table:
L. Writing and Using Protocols
Magnification Range (u ) Magnification
Range (u )
4x 350 40x 45
10x 200 60x 30
20x 100 100x 20
Magnification Buffer (u ) Magnification
Buffer (u )
4x 400 40x 50
10x 200 60x 36
20x 120 100x 24

LS Microscope Startup Manual 2018.7.25
18
1. To configure an auto ated icroscopy run, including ti e-
lapse on the anual LS620, LS560, and LS460, the Protocol
feature is utilized. Click the “P” icon in the Left Tool Bar.
a. LS720 only. P icon is sixth fro the top and there are five
tabs.
b. LS620 only. P icon is sixth fro the top and there are
three tabs.
c. LS 560 and LS460 only. P icon is fifth fro the top and
there are three tabs.
2. Infor ation and values will be added on the various tabs. Be sure to click Save before leaving any
Protocol.
3. In the first tab na ed Infor ation, click the Load Existing button to bring up a
previously saved Protocol. If the desired Protocol is present, click OK. Click the
Clear Existing button if values have been entered on any of the tabs and saving
is not desired or a previous Protocol is displayed and you want to start a new
one. If unsaved entries are being cleared, a Save Protocol File dialog box will
open asking if you want to save the current Protocol. If Yes, click OK.
4. If not previously saved, enter the new desired Protocol na e in the Filena e
field and click OK. Or click on an existing File na e to overwrite and a File
Overwrite Alert will open; click Yes. You are now ready to create a new Protocol.
5. On the Infor ation tab, if you enter User Notes, they will beco e part of the new Protocol. You can
also enter User Notes for a previously saved Protocol in this tab.
6. Click on the Acquisition tab to select the acquisition ode:
Single I age, Ti e-Lapse, Video, or Ti e-Lapse Video. LS720
has all 4 odes and LS620, LS560 and LS460 have only Ti e-
Lapse Mode.
a. Single I age ode will snap an i age of each location
selected.
b. For Ti e-Lapse, enter the Interval and Duration
infor ation.
IMPORT NT: Before initiating a time-lapse run, it is critical to change your computer power and
Windows update settings so they cannot automatically turn on and interfere with scheduled image
captures. See ppendix G for details. (After ti e-lapse is co pleted, be sure to change the settings
back.)
c. Live Video
d. Video Ti e-Lapse

LS Microscope Startup Manual 2018.7.25
19
7. Click on the I age tab to select the channels to be used in
the Protocol and adjust their settings. If settings were
previously deter ined in Manual I age (Section II.E above),
transfer the values into the current Protocol by clicking the
Use Manual Settings button. The desired values can also be
entered anually. Note that this dialog box cannot be used
to opti ize the i age settings because it is not interactive
with Live I age Window.
If opti ization of any of the Channel settings has not been done or is still needed, click on the Manual
I age icon on the Left Toolbar (top icon) to open its dialog box and fine tune the settings with a
representative sa ple (Section II.E above). When settings are satisfactory, click the Use Manual
Settings button in the I age tab to upload the into the Protocol.
8. LS720 only. Click the fourth tab X Y Z to define the locations in
the labware to be i aged. Click Enable Stage to adjust the
settings. Click the Select Labware button to choose a labware
type. Locations can be selected by clicking on the
individually or clicking on the na e of any row (A, B, etc) or
colu n (1, 2, etc).
9. LS720 only. I ages can be saved to individual folders for each
location. Check “Save to folders na ed for wells”. If you prefer i ages to go to one folder, uncheck
the box. In Instru ent Setup you ay also choose the setting that saves i ages according to channel
(Section II.D.).
10. LS720 only. Click on the Focus Settings button to open its dialog
box. There are 4 options to set up focus in a Protocol:
a. Manual Focus. Uncheck both Use Auto-Focus and Use Z-
Map. Under Manual Focus Control, click the up and down
arrows to deter ine the desired focus level. This will be the
focus level for all locations in the Protocol.
b. Autofocus. Check Use Auto-Focus and uncheck Use Z-Map.
Under Autofocus Para eters, click on Use Manual Settings to
load focus settings previously deter ined in Autofocus Setup launched fro Manual XYZ (Section
II.J.). To use the anually deter ined focus position in this dialog box (Z-axis position in the upper
left), enter the Z-axis position into the Center position. Also enter the desired Focus range (u )
and Max focus ti e (sec). To test autofocus in other locations, click the Manual XYZ icon (second
fro top) in the Left Toolbar and follow the steps described in Section II.K.
c. Z-Map. Uncheck Use Auto-Focus and check Use Z-Map. Follow steps described below in Section
II.L. below to create a Z-Map for each location to be i aged in the Protocol. To use an existing Z-
Map, select the file under Z-Map File Selection.
LS Microscope Startup Manual 2018.7.25
20
d. Autofocus plus Z-Map. Check both Use Auto-Focus and Use Z-Map. Set Autofocus Para eters as
described above in Step b, this Section. Follow steps described below in Section II.L. to create a Z-
Map for each location to be i aged in Protocol. To use an existing Z-Map, select the file under Z-
Map File Selection.
e. Under Select Focusing LED Channel(s), check the channels desired for autofocusing. Currently,
channels are acquired in a fixed sequence of BF, Blue, Green, Red. Any selected autofocus will also
occur in this sequence. If using autofocus, you must select the first LED channel to be i aged as
an autofocusing channel per the listed order above. The subsequent channels in your protocol
channel sequence are optional for autofocusing. If the subsequent channels are not chosen, the
focus will stay at the level deter ined for the first channel in the sequence. For exa ple, if you
are snapping brightfield and red channel i ages, select at least the brightfield channel for focus.
Autofocus will occur in the brightfield channel and then re ain at that level to capture the red
channel i age. If you want the red channel to also be focusing, select both the brightfield and red
channels.
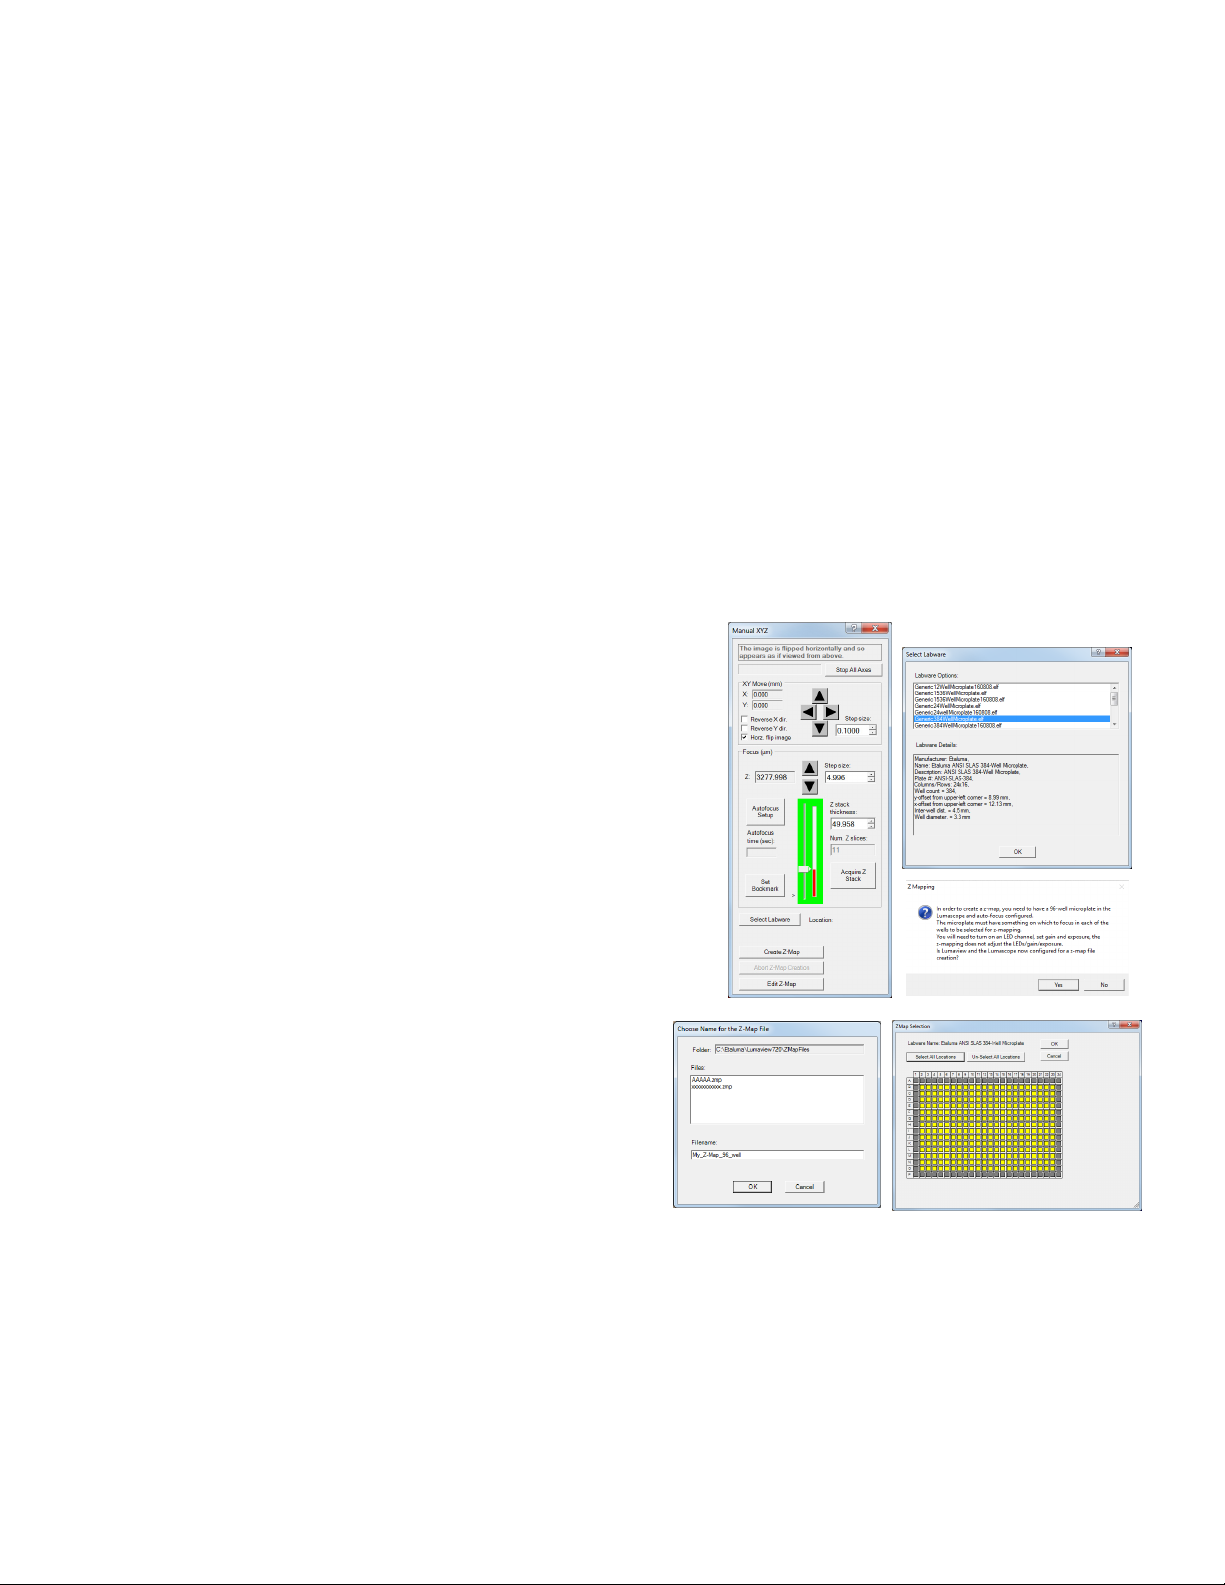
M. Creating a Z-Map
1. Load desired labware with sa ples into labware carrier.
2. Find a Live I age in a location as described in Section II.E.
above.
3. Set up Autofocus using steps in Section II.J. above.
4. In Manual XYZ, click the Create Z-Map button near the
botto . The Select Labware dialog box will open. Click
on the labware type desired to highlight it and then click
OK.
5. A Z-Mapping instruction dialog box will now open. Click
Yes.
6. The Choose Na e for the Z-Map File dialog box will
now open. Choose the Filena e for your Z-Map file
and click OK.
7. The Z-Map Selection dialog box will now open. Select
the locations in the labware to be Z-Mapped. Locations can be selected by clicking on the individually,
clicking on the na e of any row (A, B, etc) or colu n (1, 2, etc), or clicking on Select All.
8. Click OK and Z-Mapping will begin.
N. Editing a Z-Map
Other manuals for LS720
1
This manual suits for next models
4
Table of contents
Other Etaluma Microscope manuals


