Etatron eSelect B2 Instructions for use

eSelect B2/B3


ESPANOL
3

(IT) DIRETTIVA "RAEE" 2002/96/CE E SUCCESSIVA MODIFICA 2003/108/CE SUI RIFIUTI DI APPARECCHIATURE ELETTRICHE
ED ELETTRONICHE
Il simbolo sotto riportato indica che il prodotto non può essere smaltito come normale rifiuto urbano. Le Apparecchiature Elettriche ed
Elettroniche (AEE) possono contenere materiali nocivi per l'ambiente e la salute e pertanto devono essere oggetto di raccolta
differenziata: smaltite quindi presso apposite discariche o riconsegnate al distributore a fronte dell'acquisto di una nuova, di tipo
equivalente o facente le stesse funzioni. La normativa sopracitata, alla quale rimandiamo per ulteriori particolari e approfondimenti,
prevede sanzioni per lo smaltimento abusivo di detti rifiuti.
(UK) WASTE OF ELECTRICAL AND ELECTRONIC EQUIPMENT DIRECTIVE (WEEE, RAEE in Italy) 2002/96/EC AND
SUBSEQUENT AMENDMENT 2003/108/EC
The marking shown below indicates that the product cannot be disposed of as part of normal household waste. Electrical and
Electronic Equipment (EEE) can contain materials harmful to health and the environment, and therefore is subject to separate waste
collection: it must be disposed of at appropriate waste collection points or returned to the distributor against purchase of new equipment
of similar type or having the same functions. The directive mentioned above, to which make reference for further details, provides for
punitive actions in case of illegal disposal of such waste.
(FR) DIRECTIVE "RAEE" 2002/96/CE ET MODIFICATION SUCCESSIVE 2003/108/CE CONCERNANT LES REBUTS
D'APPAREILLAGES ÉLECTRIQUES ET ÉLECTRONIQUES
Le symbole ci-dessous indique que le produit ne pas être éliminé comme un normal déchet urbain. Les Appareillages Électriques et
Électroniques (AEE) peuvent contenir des matériaux nocifs pour l'environnement et la santé et doivent donc faire l'objet de collecte
différenciée: éliminés donc auprès de décharges prévues à cet effet ou rendus au distributeur pour l'achat d'un nouveau, de type
équivalent ou ayant les mêmes fonctions. La réglementation susmentionnée, à laquelle nous vous renvoyons pour les détails et les
approfondissements ultérieurs, prévoit des sanctions pour la mise en décharge abusive desdits rebus.
(ES) DIRECTIVA "RAEE" 2002/96/CE Y MODIFICACIÓ N SUCESIVA 2003/108/CE SOBRE RESIDUOS DE APARATOS ELÉ
CTRICOS Y ELECTRÓ NICOS
El símbolo que se muestra abajo indica que el producto no puede eliminarse como un residuo urbano normal. Los Aparatos Eléctricos y
Electrónicos (AEE) pueden contener materiales nocivos para el medio ambiente y la salud y por tanto tienen que ser objeto de
recogida selectiva: por consiguiente tienen que eliminarse en vertederos apropiados o entregarse al distribuidor cuando se adquiera
uno nuevo, del mismo tipo o con las mismas funciones. La normativa mencionada arriba, a la que remitimos para más detalles y
profundizaciones, prevé sanciones por la eliminación clandestina de dichos residuos.

1
Table of contents
1. GENERAL INFORMATIONS 2
2. TECHNICAL DATA 2
3. CONNECTIONS 3
3.1.eSelect B2 POWER SUPPLY CARD CONNECTIONS 3
3.2.eSelect B2 TTL OUTPUT CONNECTIONS 4
3.3.eSelect B3 POWER SUPPLY CARD CONNECTIONS 5
3.4.eSelect B3 TTL OUTPUT CONNECTIONS 6
3.5.eSelect B2/B3 PROBES CONNECTION 7
4. CONTROL PANEL DESCRIPTION 8
4.1. eSelect B2 CONTROL PANEL 8
4.2. eSelect B3 CONTROL PANEL 8
4.3. LIGHT SIGNS 9
4.4. KEYBOARD 9
5. DIMENSIONS 10
6. PARAMETER DEFAULTS 11
7. PROGRAMMING THE CONTROLLER 12
7.1. STARTING CONTROLLER OPERATION 12
7.2. THE DISPLAY IN THE VARIOUS OPERATION MODES (PH – RX – CL) 14
7.3. PROGRAMMING PROCEDURE 14
7.3.1. SIMPLE MENU MODE 14
7.3.2. EXPERT MENU MODE 15
7.4. PROGRAMMING MENU SETUP 16
7.4.1 MENU MODE 16
7.4.2. MENU METER TYPE 17
7.4.3. T SENSOR 17
7.4.4. SET TEMPERATURE 18
7.4.5. CALIBRATION MENU TIMEOUT 18
7.4.6. DELAY AT STARTUP 18
7.4.7. AUX OUTPUT MODE 19
7.4.8. YEAR, MONTH, DAY, HOUR, MINUTE 20
7.4.9. SET PASSWORD 20
7.4.10. SET DEFAULTS 20
7.5. MENU SETPOINT1, SETPOINT2 21
7.5.1. SETPOINT 22
7.5.2. MODE 22
7.5.3. HYSTERESIS 22
7.5.4. SETPOINT DELAY 22
7.5.5. TTL MODE 23
7.5.6. METER READING @4mA 23
7.5.7. METER READING @20mA 23
7.6. MENU CALIBRATION 24
7.6.1. CALIBRATE pH 7/REF.POINT 25
7.7. MENU ALARM 25
7.7.1. MENU ALARM SETTINGS 26
8. INPUT/OUTPUT CONNECTIONS 26
8.1. PROXIMITY SENSORS 26
8.2. PT100 CONNECTION 27
8.3. PRIMING OF THE PUMPS 27

2
Parameter Value
Input Voltage
90-240 Vac 50/60Hz, 12-24 Vdc, 24Vac
Power Consumption
15 W (1 A peak current)
Operating temperature range 0 – 40°C
SETPOINT relay output
terminals max current
16 ampere with resistive load
3 ampere with inductive load 2 setpoints
Auxiliary relay output
terminals max current
5 ampere with resistive load
0.7 ampere with inductive load
1 auxiliary output
Alarm relay output
terminals max current
5 ampere with resistive load
0.7 ampere with inductive load 1 alarm output
Current output 4 - 20 mA (dynamic 0..500 Ω) 2 current outputs
TTL output 0 – 999 pulse/min 2 open collector TTL outputs
pH range 0 … 14 0.01 pH resolution
Rx range (mV)
-1000 ….+1400 ± 1 mV Rx resolution
Chlorine range
0÷2; 0÷20; 0÷200; 0÷2000 ppm 0,001/0,01/0,1/1 ppm
Temperature range
0 – 100°C 0.1°C
Level control – PT100 connection – Relay output 6A (resistive load) 1A (inductive load)
1. GENERAL INFORMATIONS
Electronic instruments controlling electrochemical parameters such as pH, Redox or Chlorine are
widely used in swimming pools, waterworks and water treatment plants.
The eSelect Series Controllers stand out for the following features:
Capability of performing the most possible measurements with just one type of electronic
board: pH, Redox (mV), Cl (ppm).
Simple and easy to learn programming procedure providing two types of menu: a SIMPLE
menu allowing the user to control indispensable functions, and a EXPERT menu giving the
user the full capability of setting all functions.
Galvanically isolated electronics providing a high level of immunity to disturbances.
2. TECHNICAL DATA
3
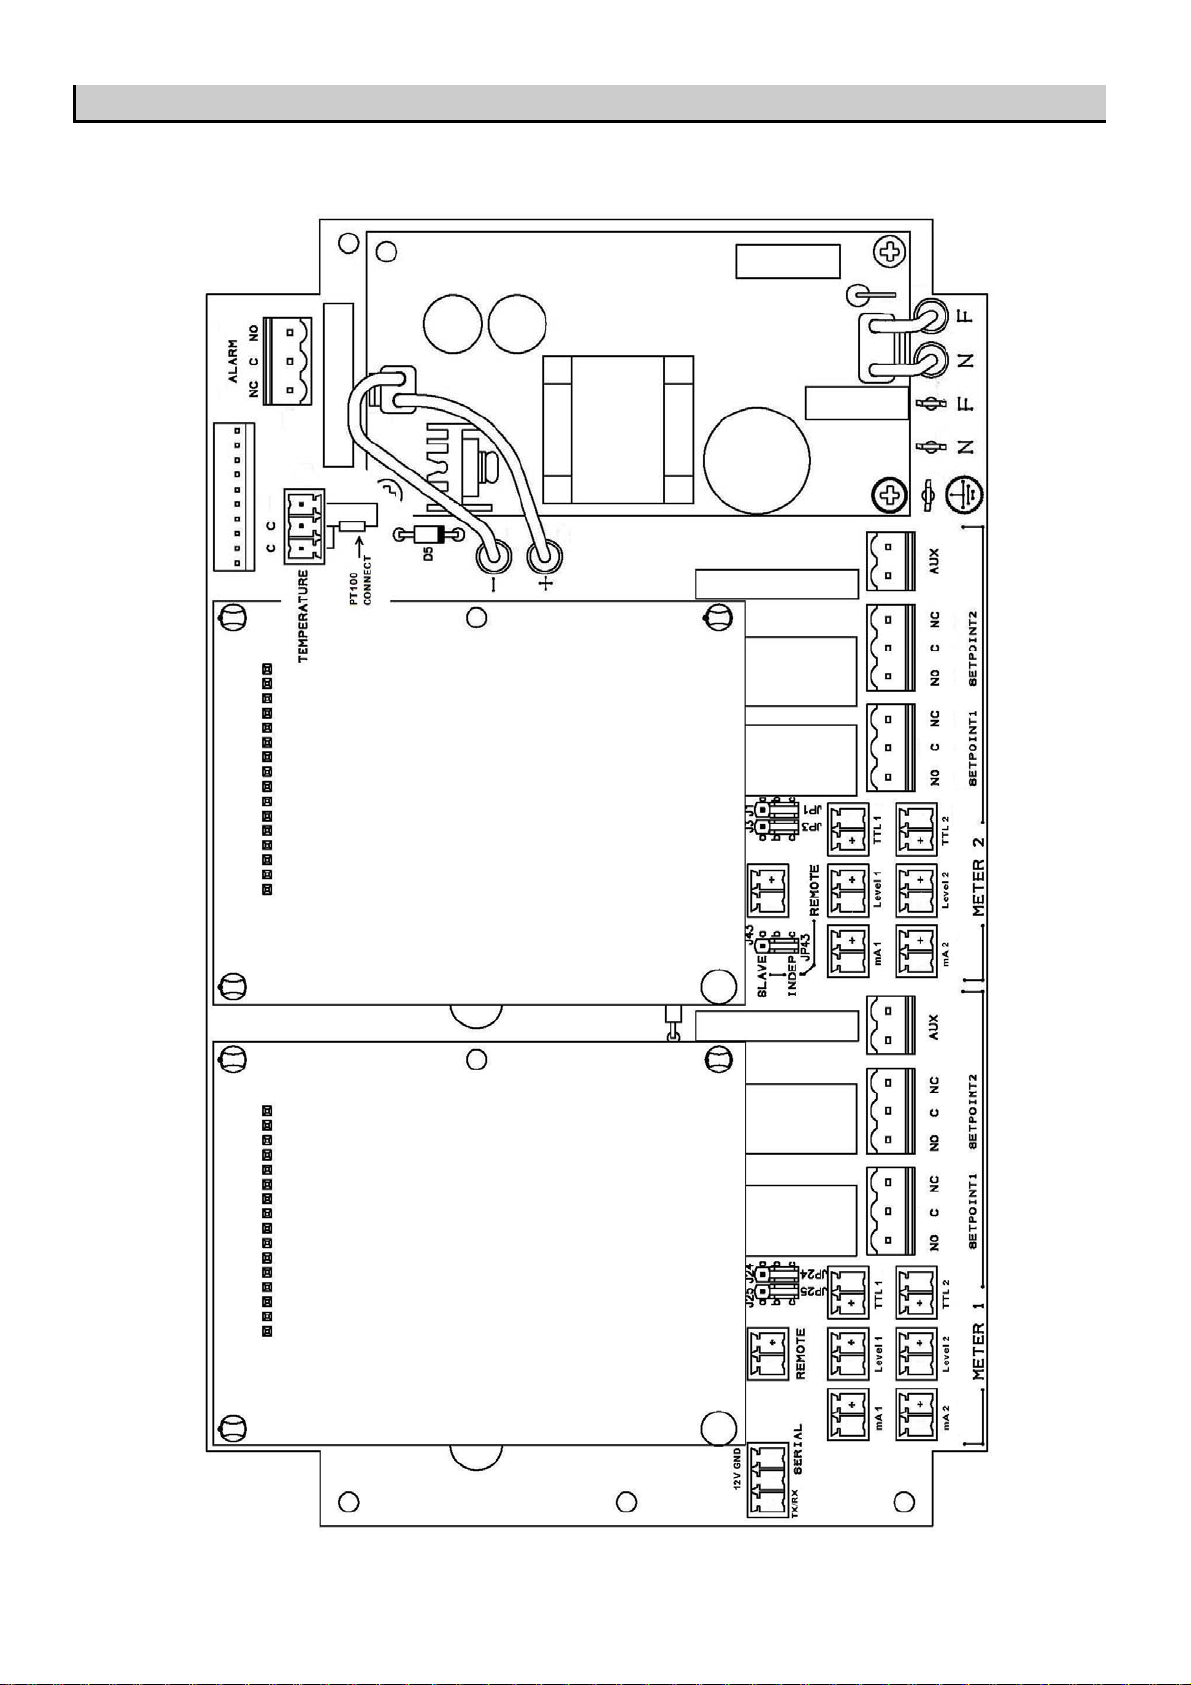
3. CONNECTIONS
3.1.eSelect B2 POWER SUPPLY CARD CONNECTIONS
4
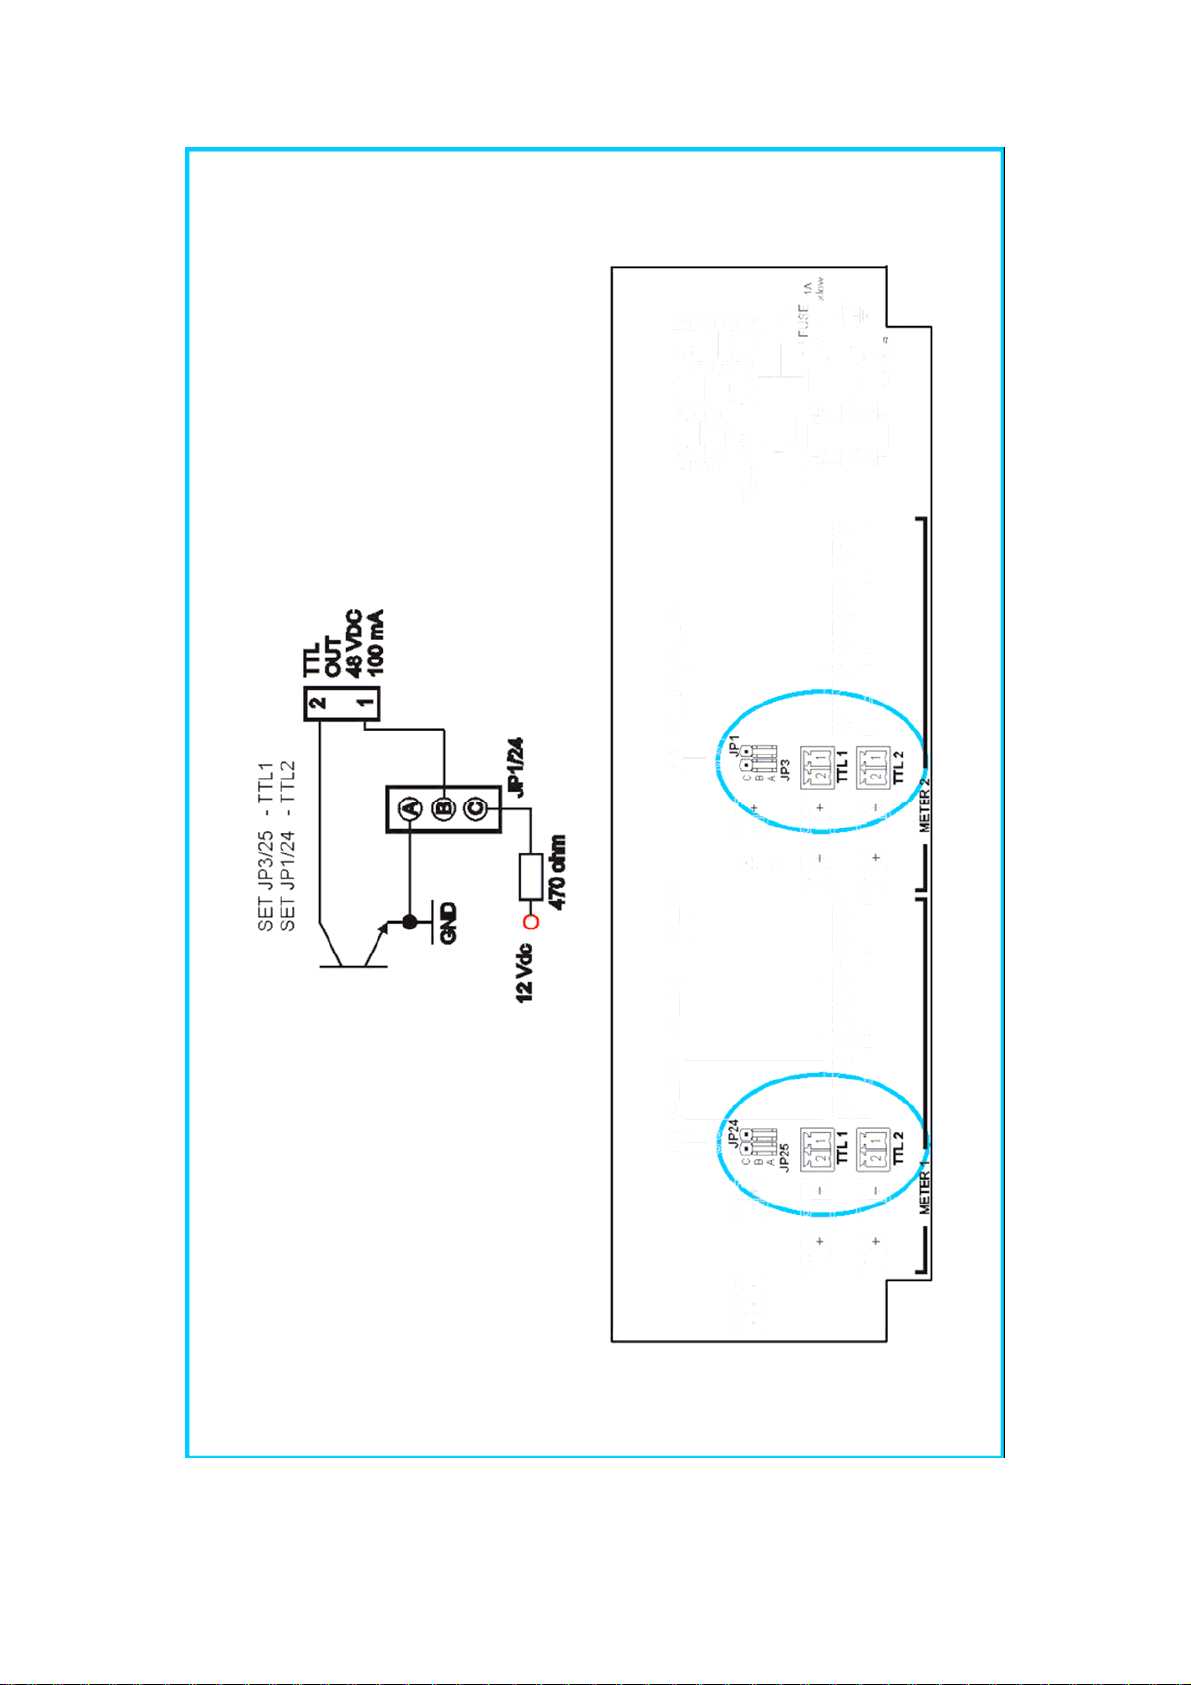
3.2.eSelect B2 TTL OUTPUT CONNECTIONS

5
3.3.eSelect B3 POWER SUPPLY CARD CONNECTIONS
6
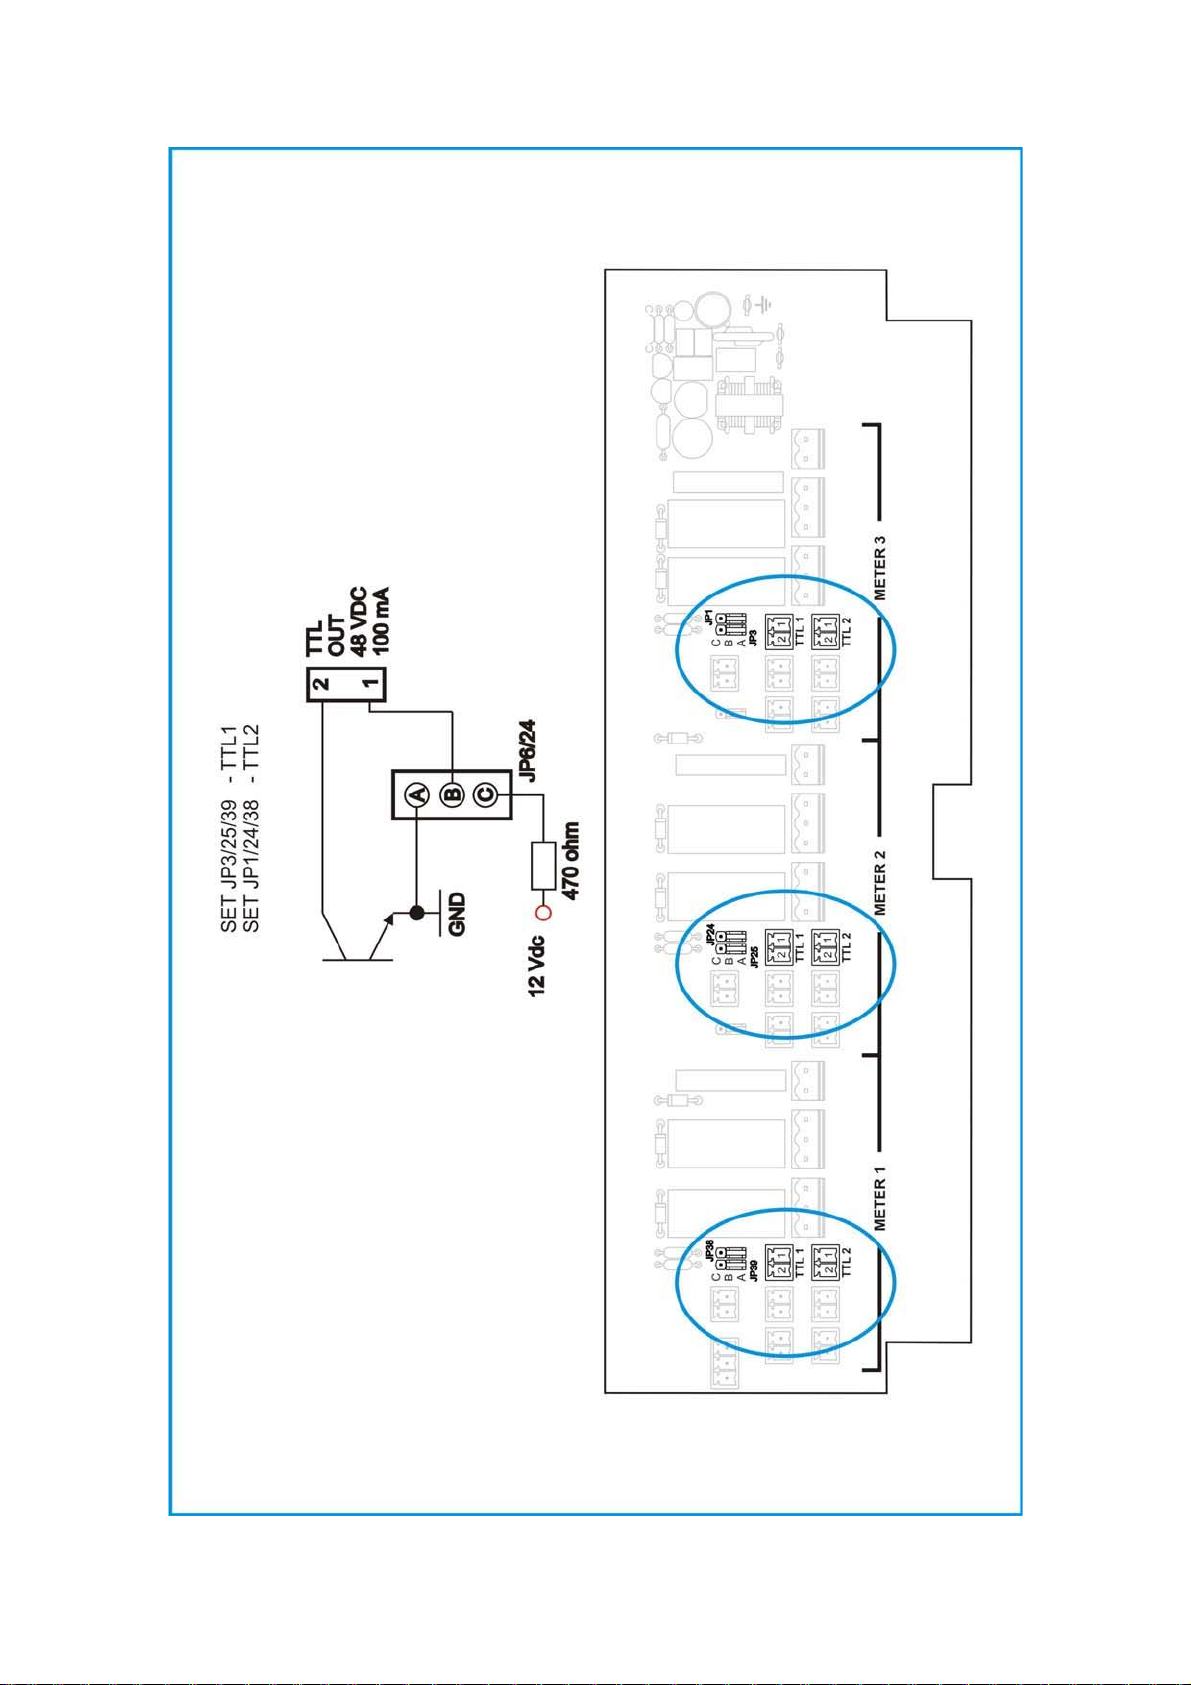
3.4.eSelect B3 TTL OUTPUT CONNECTIONS
7
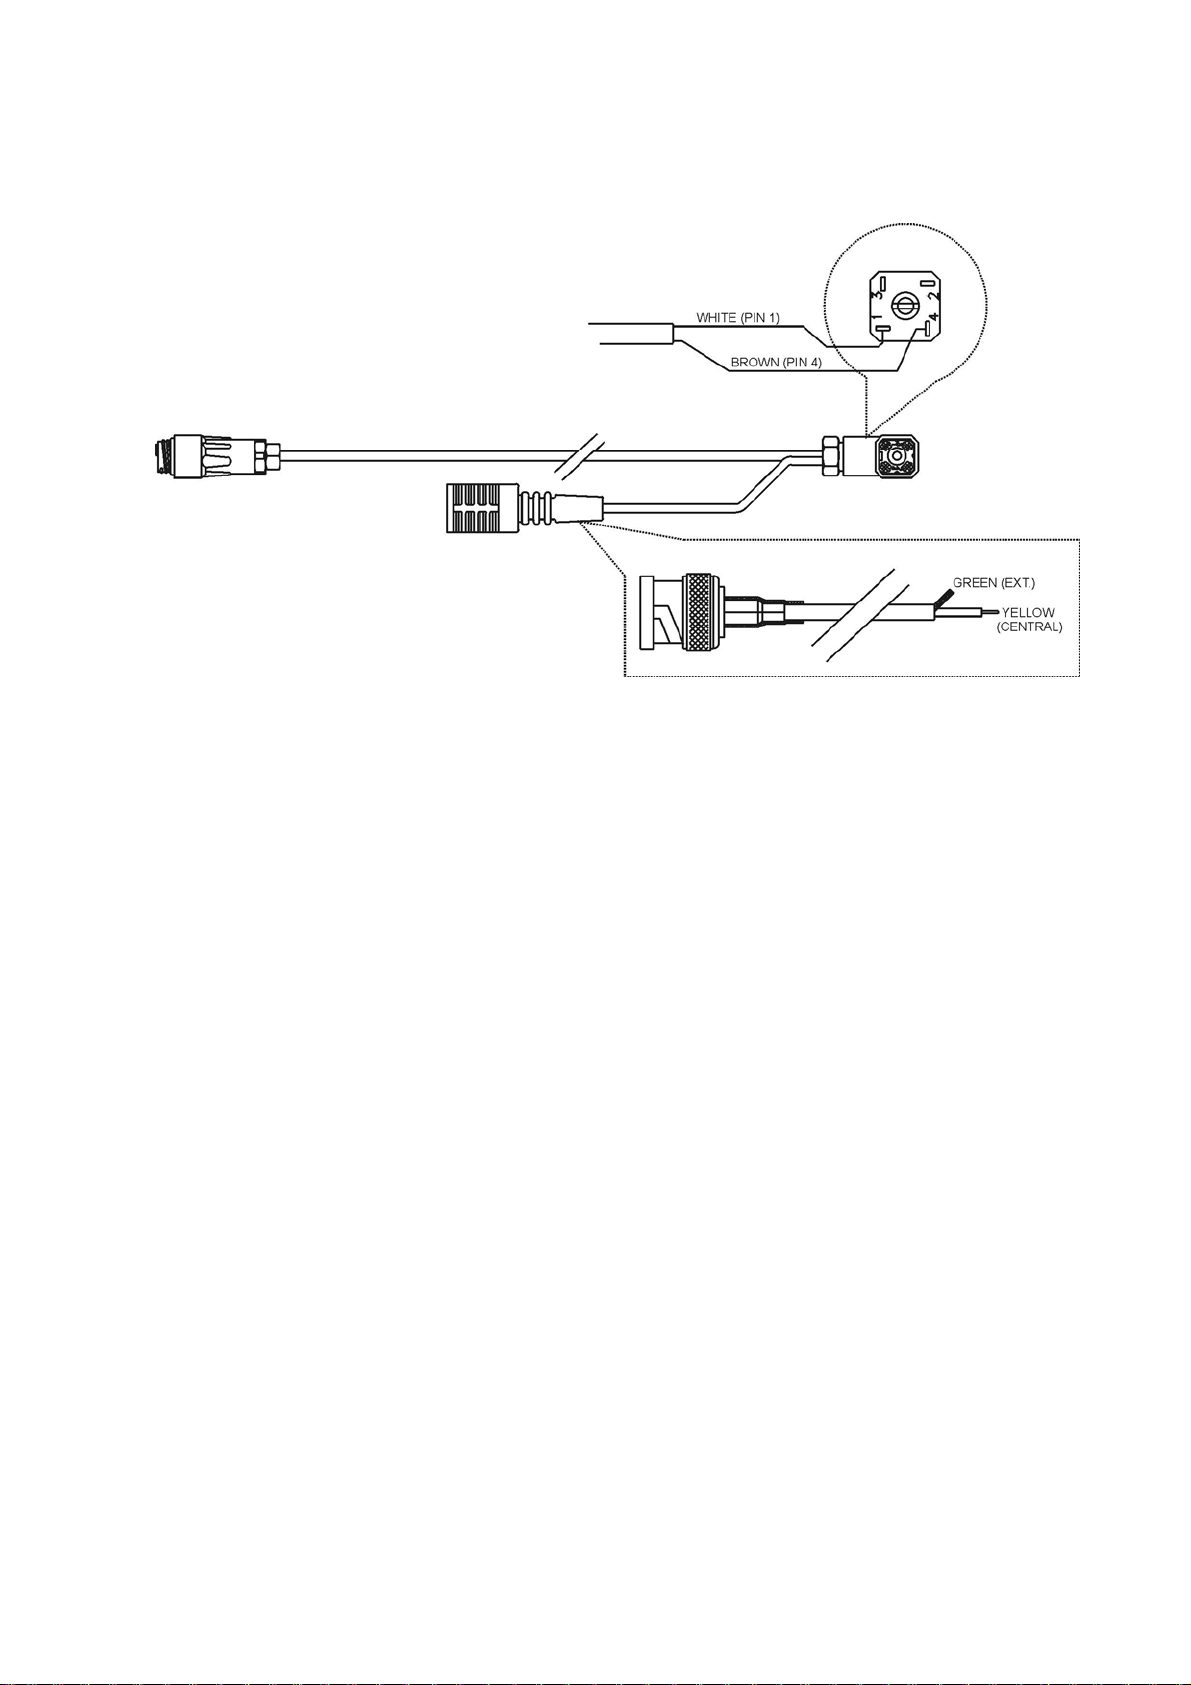
3.5.eSelect B2/B3 PROBES CONNECTION
A BNC connector for connecting pH or Redox probes, plus a 4-pin connector for connecting a Chlorine
probe, are provided in the bottom of the instrument. The connection diagram is as follows:
Power supply 4 pins connector:
Pin 1 : White (+5V)
Pin 2 : Not connected
Pin 3 : Not connected
Pin 4 : Brown (-5V)

8
4. CONTROL PANEL DESCRIPTION
4.1. eSelect B2 CONTROL PANEL
4.2. eSelect B3 CONTROL PANEL

9
SET 1 active
SET 2 active
4.3. LIGHT SIGNS
4.4. KEYBOARD
Meter : Used to select the type of measurement “METER 1, 2 or 3”
ESC : Comes one step back in the programming procedure.
Minus symbol : Decreases numbers and defines functions within specific
programming menus. E.g.: when selecting the type of measurement allows the
user to shift between pH, Rx and Chlorine.
Plus symbol : Increases numbers and defines functions within specific
programming menus. E.g.: when selecting the type of measurement allows the
user to shift between pH, Rx and Chlorine.
Shift right : Used to select the digit to modify when setting passwords.
Used to change Language also.
OK : Allows the user to proceed by confirming the selections made.
10
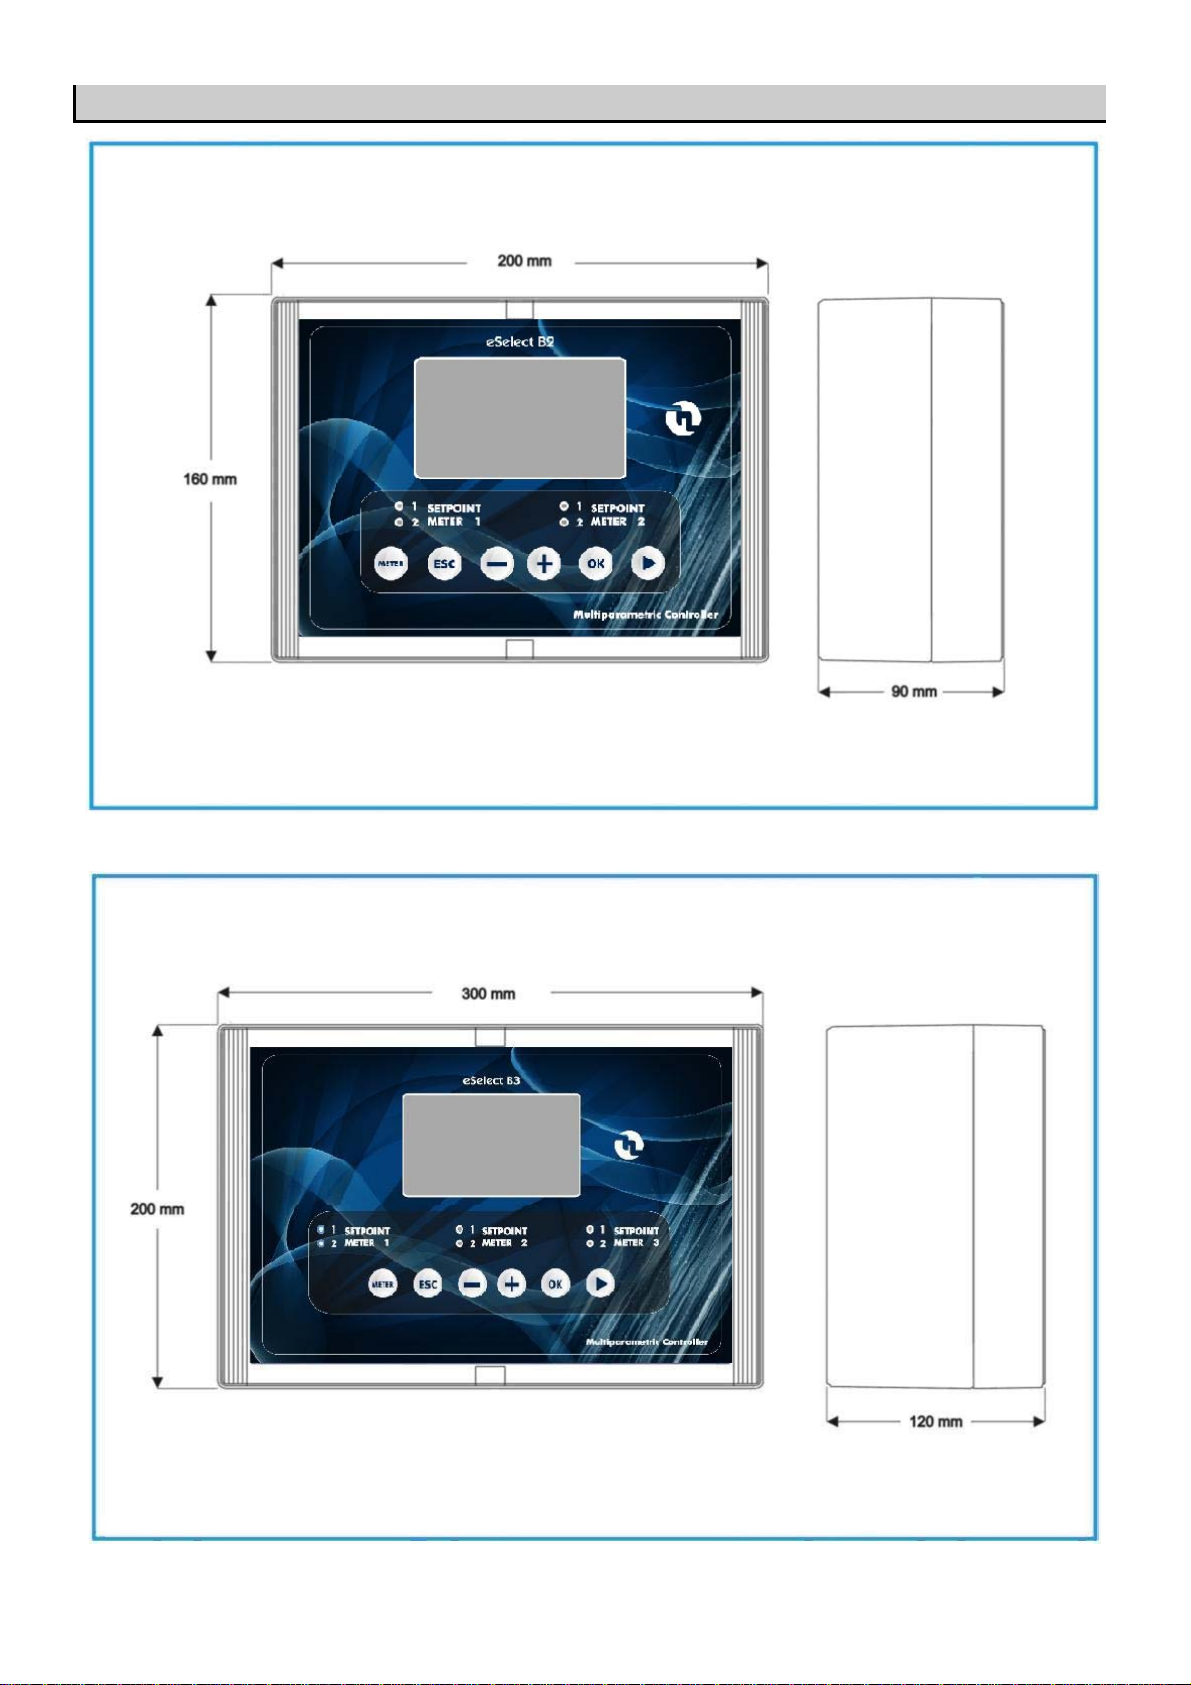
5. DIMENSIONS

11
Rx default
Cl default
1
Setpoint 1
7.2
650
0.1
2
Setpoint 2
6.8
400
0.1
3
Type of action
Acid
Oxidising
Direct
4
Hysteresis
0.10
10
0.005
5
SETPOINT 1 and 2 actuation delay
00:03 m:s
00:03 m:s
00:03 m:s
6
TTL 1 and 2 outputs max frequency
120
120
120
7
Measurement at TTL 1 and 2 max
frequency 14.00
1400
1
8
mA output 1 and 2, measurement at
4 mA 0.00
0
0.000
9
mA output 1 and 2, measurement at
20 mA 14.00
1000
1.000
10
Alarm – high threshold
14.00
1000
10
11
Alarm – low threshold
0.00
0
0.000
12
Alarm – overdosage (OVER)
99:59 h:m
99:59 h:m
99:59 h:m
13
Menu mode
SIMPLE
SIMPLE
SIMPLE
14
Password
OFF
OFF
OFF
15
Temperature unit
°C
°C
°C
16
Temperature compensation mode
Manual 25°C
Manual 25°C
Manual 25°C
17
Calibration menu delay
5”
5”
5”
18
Actuation delay when switching on
5”
5”
5”
m
V
pH
default
FunctionNo.
6. PARAMETER DEFAULTS
12
2013/05/15 04:52 WEDNESDAY T=25
MENU SETUP
MENU SETPOINT1
MENU SETPOINT2
MENU CALIBRAZTION
MENU ALARM
MENU SETUP
MENU MODE SIMPLE
YEAR 2013
MONTH 5
DAY 15
HOUR 4
MINUTE 52
7. PROGRAMMING THE CONTROLLER
All programming parameters and modes of operation of the instrument can be set using its keyboard and
dedicated display.
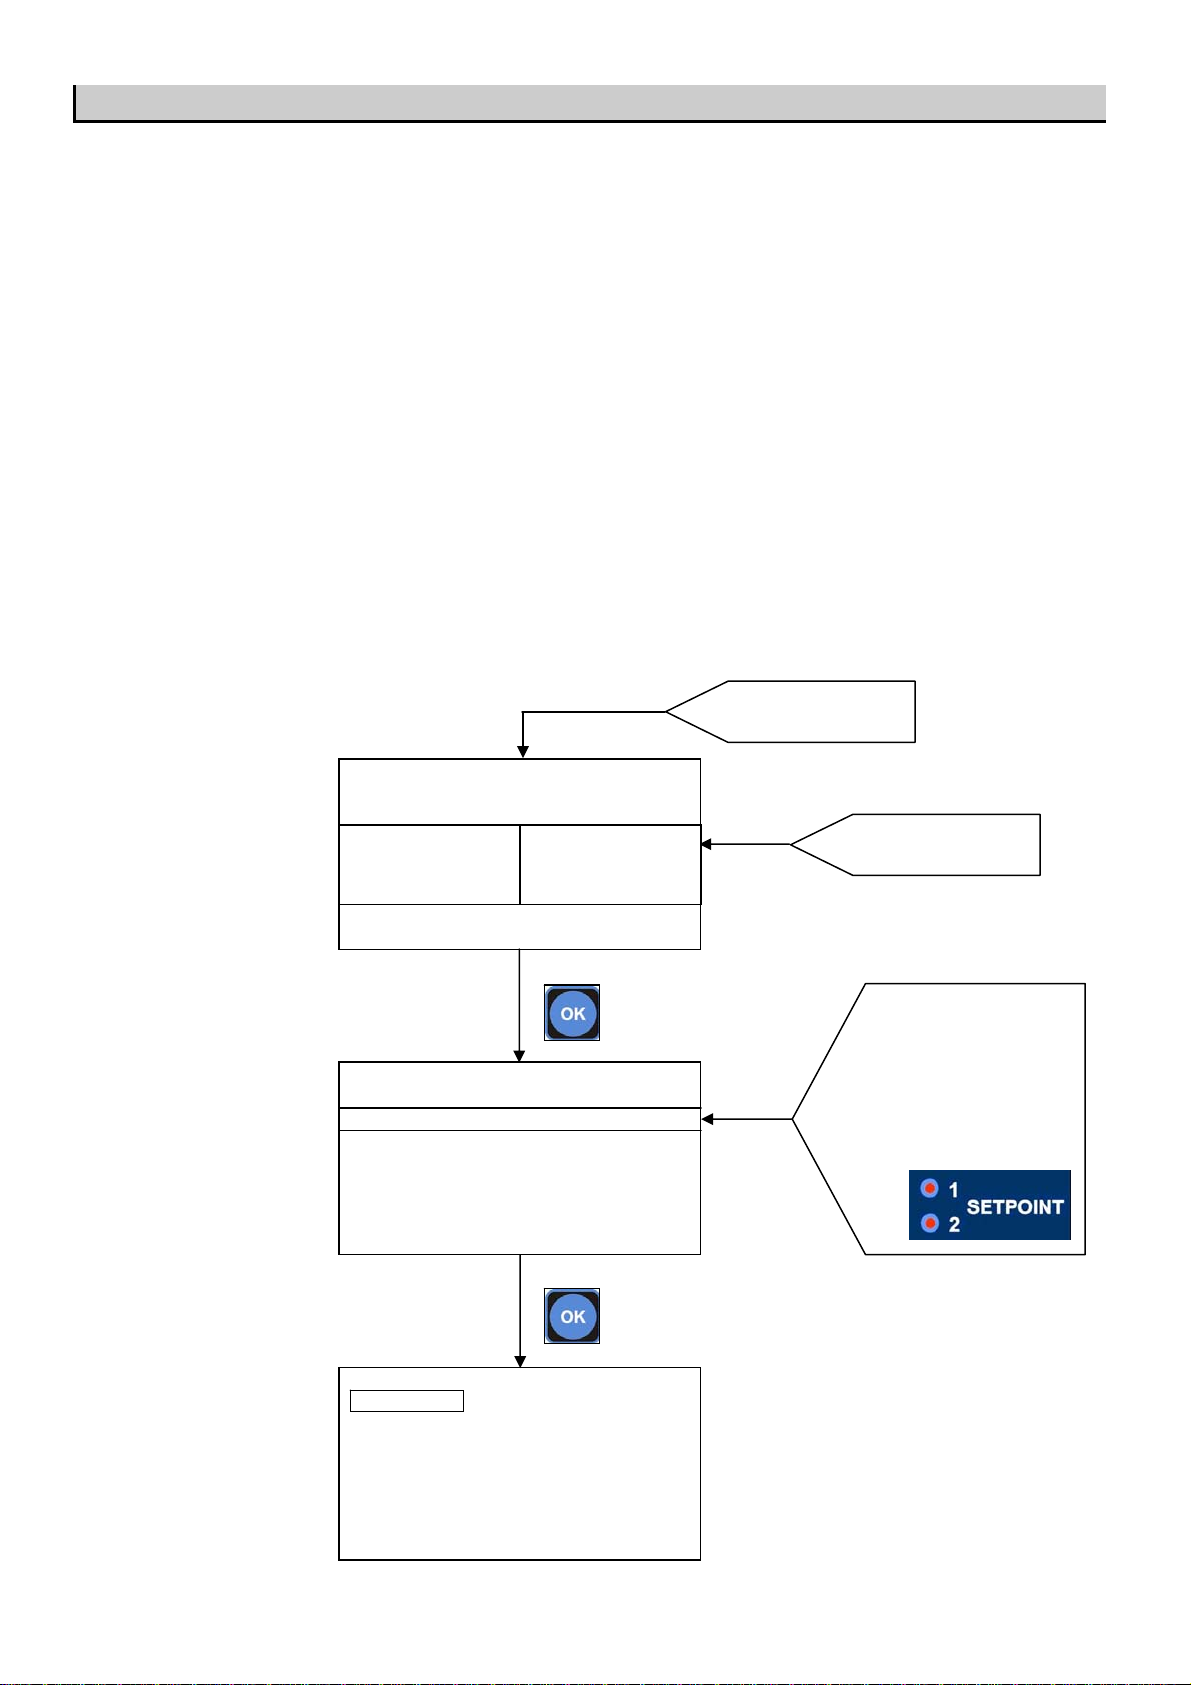
7.1. STARTING CONTROLLER OPERATION
The instrument, according to its initial configuration, can be set to control three distinct types of measurements:
pH, Rx or Chlorine.
To perform that, when switching on the controller for the first time, the operator have to select the intended type
of measurement by operating as follows:
Upon switching on the instrument, press OK key to enter in the MENU SETUP.
Than press OK to enter in MENU MODE and change SIMPLE with EXPERT by press + or –key.
Than change the METER TYPE in the complete MENU SETUP.
Press OK key to enter
into MENU
MAIN SCREEN
620mV
SET1:OFF mA1:10,4
SET1:ON mA2:10,4
7.47 pH
SET1:ON mA1:12,4
SET1:OFF mA2:12,4
Press METER key to
choose METER 1, METER 2
or METER 3.
When METER key is pressed
the two red lamp associated to
the setpoint of the METER
choosed will light-on.

13
MENU SETUP 1/2
MENU MODE EXPERT
METER TYPE pH
T SENSOR NONE
SET TEMPERATURE 25.0
CALIBRATION MENU TIMEOUT 05:00
DELAY AT STARTUP 00:05
AUX OUTPUT MODE OFF
YEAR 2013
MONTH 5
DAY 15
HOUR 14
MENU SETUP
MENU MODE SIMPLE
YEAR 2013
MONTH 5
DAY 15
HOUR 5
MINUTE 55
MENU SETUP 1/2
MENU MODE EXPERT
METER TYPE pH
T SENSOR NONE
SET TEMPERATURE 25.0
CALIBRATION MENU TIMEOUT 05:00
DELAY AT STARTUP 00:05
AUX OUTPUT MODE OFF
YEAR 2013
MONTH 5
DAY 15
MENU SETUP 1/2
MENU MODE EXPERT
METER TYPE pH
T SENSOR NONE
SET TEMPERATURE 25.0
CALIBRATION MENU TIMEOUT 05:00
DELAY AT STARTUP 00:05
AUX OUTPUT MODE OFF
YEAR 2013
MONTH 5
DAY 15
After choose the METER TYPE press ESC key until see the main screen.
Please note the ESC key permits to return to previous screen.
Press + or – to change
SIMPLE to EXPERT
Press + or – to change
PARAMETER on left arrow
Press + or – to change
PARAMETER on left arrow
Press + or – to choose
pH, Rx,Cl

14
MENU SETUP
MENU MODE SIMPLE
YEAR 2013
MONTH 5
DAY 15
HOUR 4
MINUTE 52
2013/05/15 04:52 WEDNESDAY T=25
METER 2: STANDBY
2013/05/15 04:52 WEDNESDAY T=25
METER 3: ALARM: MAX
7.2. THE DISPLAY IN THE VARIOUS OPERATION MODES (PH – RX – CL)
When the instrument is switched on, the display shows the measurement value and the type of
measurement.
eSelect B2 main screen
eSelect B3 main screen
7.3. PROGRAMMING PROCEDURE
When installing the controller for the first time, the user must configure it depending on the intended type of
measurement or control.
The first action for the user to carry out is setting the operation modes for every measurement outlet: METER
1 and METER 2 for B2 controller, and METER 1, METER 2 and METER 3 for B3 controller.
When setting the instrument, it is advisable to follow the programming procedure outlined below. Conversely, if
only a single parameter must be changed, it is advisable to go directly to the menu comprising the concerned
function, and perform the necessary changes or settings.
Please note there are two different MENU MODE: SIMPLE and EXPERT and they allow to change different
parameters. EXPERT MENU allow to change all parameters but it is recommended to modify its parameters
from qualified personnel.
7.3.1. SIMPLE MENU MODE
It permits to set the following parameters:
620mV
SET1:OFF mA1:4.0
SET1:OFF mA2:4.0
7.47 pH
SET1:ON mA1:12.4
SET1:OFF mA2:12.4
620mV
SET1:OFF mA1:10.4
SET1:ON mA2:10.4
7.47 pH
SET1:ON mA1:12.4
SET1:OFF mA2:12.4
11.63 Cl ppm
SET1:OFF mA1:10.4
SET1:ON mA2:10.4

15
MENU SETUP
1/2
MENU MODE EXPERT
METER TYPE pH
T SENSOR NONE
SET TEMPERATURE 25
CALIBRATION MENU TIMEOUT 05:00
DELAY AT STARTUP 00:05
AUX OUTPUT MODE OFF
YEAR 2013
MONTH 5
DAY 15
HOUR 14
MENU SETUP
2/2
MINUTE 52
SET PASSWORD 0 0 0 0 0 0
SET DEFAULTS NO
MENU MODE: SIMPLE or EXPERT
YEAR: put the current YEAR
MONTH: put the current MONTH
DAY: put the current DAY
HOUR: put the current HOUR
MINUTE: put the current MINUTE
7.3.2. EXPERT MENU MODE
It permits to set the following parameters by use :
MENU MODE: SIMPLE or EXPERT
METER TYPE: pH, Rx, Cl 20ppm,Cl 2ppm, Cl 200ppm, Cl 2000ppm
TSENSOR: NONE or PT100
SET TEMPERATURE: put the current TEMPERATURE is PT100 is not setted
CALIBRATION MENU TIMEOUT: set the TIMEOUT time for CALIBRATION procedure
DELAY STARTUP: set the startup DELAY TIME for the instrument
AUX OUTPUT MODE: set OFF or CLEANING or FLOCCULANT
YEAR: put the current YEAR
MONTH: put the current MONTH
DAY: put the current DAY
HOUR: put the current HOUR
MINUTE: put the current MINUTE
SET PASSWORD: put the password if it is necessary to have it
SET DEFAULTS: set NO or MAINTAIN CALIBRATION or RESTORE ALL

16
MENU SETUP
MENU MODE SIMPLE
YEAR 2013
MONTH 5
DAY 15
HOUR 5
MINUTE 55
MENU SETUP 1/2
MENU MODE EXPERT
METER TYPE pH
T SENSOR NONE
SET TEMPERATURE 25
CALIBRATION MENU TIMEOUT 05:00
DELAY AT STARTUP 00:05
AUX OUTPUT MODE OFF
YEAR 2013
MONTH 5
DAY 15
MENU SETUP
1/2
MENU MODE EXPERT
METER TYPE pH
T SENSOR NONE
SET TEMPERATURE 25
CALIBRATION MENU TIMEOUT 05:00
DELAY AT STARTUP 00:05
AUX OUTPUT MODE OFF
YEAR 2013
MONTH 5
DAY 15
7.4. PROGRAMMING MENU SETUP
7.4.1 MENU MODE
Starting from the MAIN SCREEN press OK key until enter in MENU MODE.
Than change SIMPLE to EXPERT by pressing +key or – key.
Change SIMPLE in EXPERT
by press + or -key
Chose the parameter by press +or –key.
Press OKkey to confirm the choice and set
the value for the parameter on right column.
Modify the value for the parameter by press +or –
key. Press OK
ke
y
to confirm the choice and return
on left column to set an other parameters.
This manual suits for next models
1
Table of contents
Other Etatron Measuring Instrument manuals


