eTrikeCo ETRiTANGO User manual

OWNER’S MANUAL
ETRiTANGO
Go Where There Are No Limits
DO GOOD WHILE YOU GO

General Warning
Technical parameters:
10. Maintenance and repair
11. Vehicles Storage
2
3
3-6
7
8
9
9
10
13
16
17
18
19

INTRODUCTION
Congratula�ons on the purchase of your new eTrike. This manual is designed to give you
the informa�on that you need for the safe opera�on and maintenance of your eTrike.
Please read it thoroughly before riding your eTrike. Your eTrike’s serial number is adhered
underneath the VIN cap in the front interior panel.
Please record it below in the event that your eTrike is lost or stolen. You may also want to
register your serial number with your local police department. Please retain your sales
receipt as proof of purchase and keep with the informa�on below.
MODEL NO:
SERIAL NO:
COLOR:
DATE OF PURCHASE:

Dear iTango users, please detail read the user manual carefully in order to ensure safety
of you and others, to ensure high performance and stable driving of iTango before
driving.
1.Instructions
Please comply with the city traffic laws and regulations, you are not allowed to carry
people; Driving slowly on rain and snow days, slow down on slippery road; to increase
the brake distance in order to ensure safety when braking.
Do not disassemble spare parts by yourself. Otherwise, our company is not responsible
for any loss caused thereby.
2. Technical parameters:
GENERAL WARNING
Dimension
Main performance
74kg(not including
attery)
48 V
Top
speed
DH-05-10 25km/h
DH-05-12 45km/h
Length
Height
Front track
1648mm
460mm
1110mm
Width
Wheelbase
651mm
1150mm
Width
Rated Oltage

Mainperformance
200kg
2 people
4KWh/100km(20km/h)
Max loading weight
Capacity
Standard power
consumption
Front shock absorber
Rear shock absorbar
Front Tyre
Rear Tyre
Frame
Braking
distance (Dry ground)
Braking
distance (Dry ground)
≤2m(20km/h)
≤3.5m(30km/h)
≤3m(20km/h)
≤4m(30km/h)
Front tire pressure
Rear tire pressure
Rim type(Aluminum)
Rear Motor
Rated Power
DH-05-10
DH-05-12
225±10
225±10
Front:1.4-12 Aluminum rim
2.15-12 BOSCH motor
1000W 580r/min BOSCH MOTOR
1200W 580r/min BOSCH MOTOR
Disc brake
142mm
740mm
≤30⁰
Brake mode
Minimum ground clearance
Seat Height
Max tilt angle

Maximum steering angle
Turning radius
Maximum drop height of
front wheel
DH-05-10
DH-05-12
≤32⁰
2.50m
180mm
Battery type
Voltage
Capacity
Charge Input voltage
Charge output voltage
18650 lithium batter
48V
20AH
26AH
AC 220V or 110V(optional)
58V
Battery
Standard charge current
Standard charge time
Max range
DH-05-10
DH-05-12
3A (iTango Classic)
5A (iTango HO)
6H
50KM (25km/h)
50KM (45km/h), 70KM (25km/h)
8KG
500 times
-20⁰C to 50⁰C
-20⁰C to 50⁰C
Battery weight
Battery charge and
discharge times
Ambient temperature
range, battery using

range, battery storage
Ambient temperature
range, battery charging
Battery protection system
0⁰C to 45⁰C
Over discharge protection, short-circuit
protection, temperature protection, overcharge
protection, over current protection, balance
protection of battery
Others
5V 1A
LCD
5A
12V LED
USB charge
Speed meter
Fuse specifications(A)
Headlamp sepecification
Front position lamp
specification
Front steering lamp
specification
Rear steering lamp
specification
Tail lamp specification
Licence plate lamp
specification
Rear Mirror
G.W
12V LED
12V LED
12V LED
12V LED
12V LED
Non-circular paint mirror, MB mirror road
84Kg(including 1 battery)

3. Parts Description
Rear mirror
Left combination switch
Cushion
Tail light
Cushion keyhole
Main stand
Right combination switch
Anti-theft keyhole
Rear handrail
Side reflector
Rear reflector
Wind board
Head light

4. Rear mirror & wind board installation
1. Tighten the rear view mirror as clockwish
2. Tighten the bolt with 14# wrench
1. Install the wind board
2. Put the screws into the rubber flat gasket
3. Tighte the screws as clockwish
by screwdriver
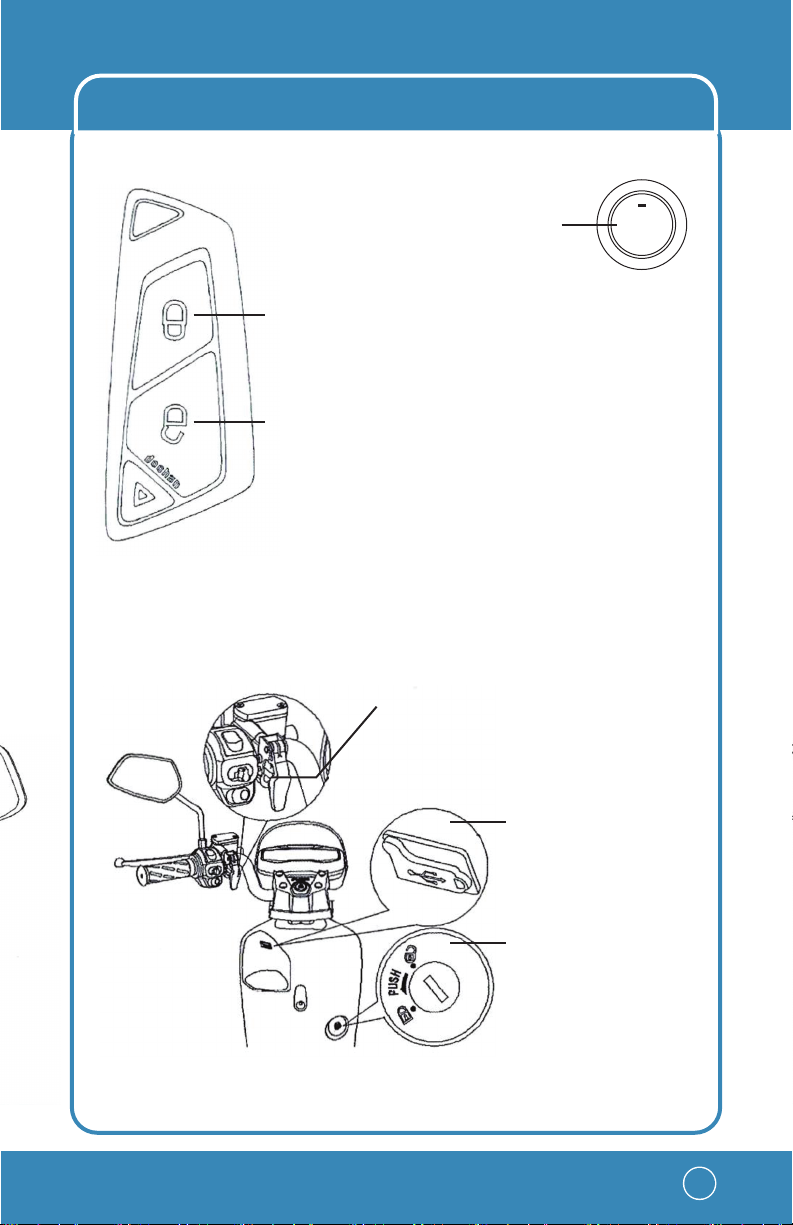
ENGINE
START
STOP
Keyless start button
5. Remote control and keyless start button
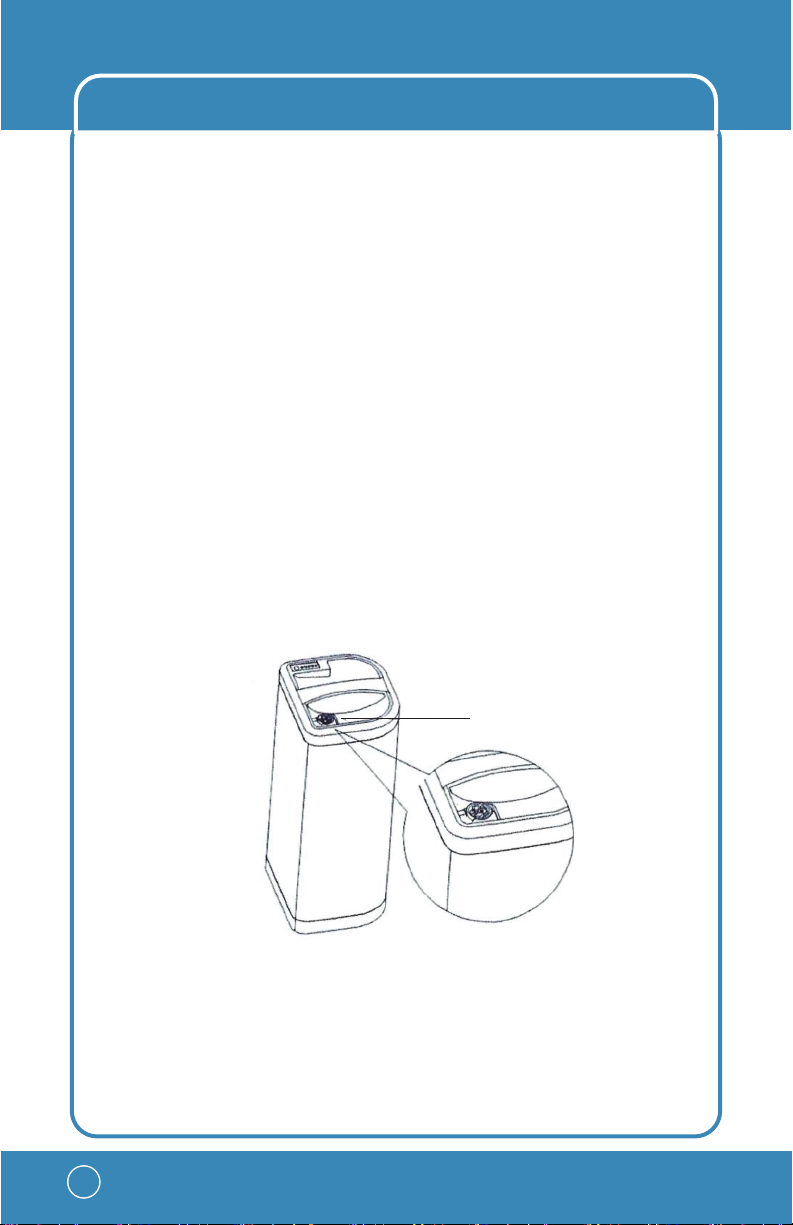
6. Roll-lock and anti theft lock
Locking button
1. When you stop driving. Press the keyless start
button, the vehicle is locked, and iTango will automatically
enter into the primary mode of anti-theft;
2. Press the locking button again, and iTango goes into the
advanced mode of anti-theft.
Locking button
When you press the unlocking button, turning light is
flashing and remind that vehicles has been started with
voice prompts;
2 Press the keyless start button to start iTango.
Roll-lock switch
1. When power off, the vehicle will not fall after
turn on the roll-lock switch upward;
2 Just turn off the roll-lock switch to normal operation.
USB charging port
It can provide 5V power supply
for charging mobile phones.
Anti-theft lock
1. Turn the handlebar to the left,
then press the key to the bottom,
turn left, and lock the handlebar;
2. Reverse operation can unlock
the anti-theft device.
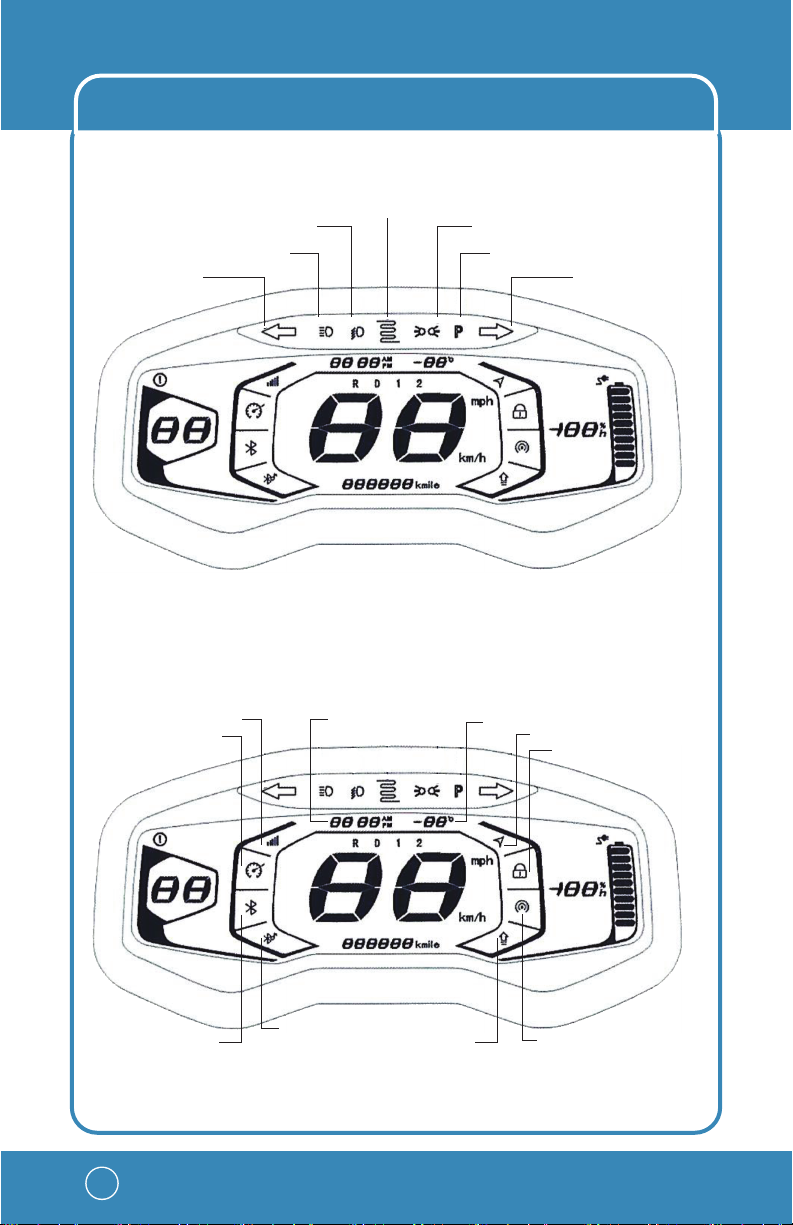
7. Dashboard and combination switch
Light se nsor
Low beam indicator light
the low beam light is on-slate
High beam indicator light
the high beam light is on-state
Left-turning indicator light
the left-turning light is on-state
Width indicator light
Always on when startup
Parking indicator light
On when parking
Right-turning indicator light
Light up right-turning light
GPRS signal strength current time
Cruise control on-state
Audio Bluetooth
Upgrade Mode Recreation Mode
Date Bluetooth
current temperature
Device normal localization
Anti-theft mode

Current Speed Accumulated mileage
Remeining electricity / Remaining charging time
Fault code
Current gear
reverse gear, Forward gear 1, forward gear 2 Charging state
Battery power display
F: Full charge/ E: power empty
Left combination switch:
1 headlamp high switch:
Press the “ ” button, high beam;
Press the “ ” button Low beam
2 Passing light switch:
Press this button, passing light is on-state.
3. Turn signal light switch:
Push to ”, the left turning light: on,
Push to ”, the right turning light: on,
Push switch to the middle position and press, the turn signal light: off,
4. Horn switch button:
Press this button, whistle warning to the other vehicles.
High beam
Low beam
Passing lamp
Turn light
Horn
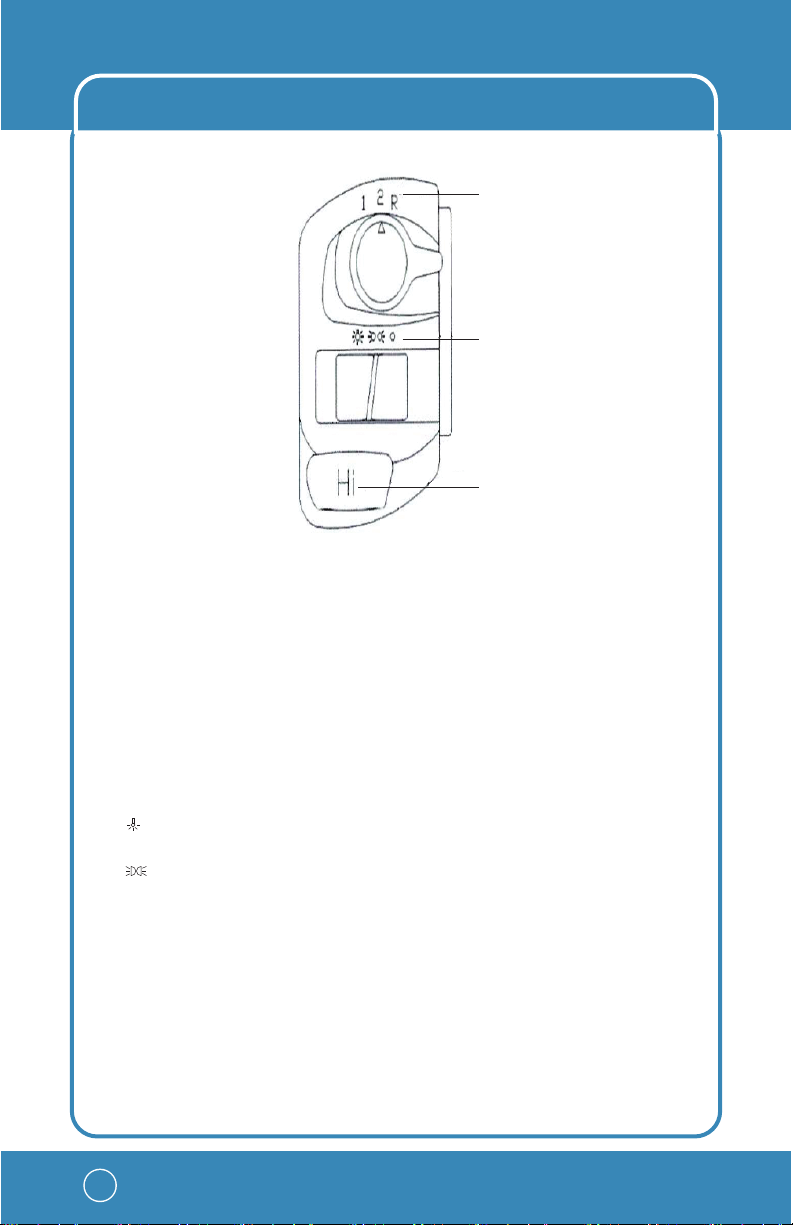
Gear switch
Headlight switch
Smart button ‘Hi’
1. gear switch
Smooth to functions interchange for Gear 1, 2 and reverse gear.
Right combination switch:
2 headlight switch:
There are three positions in the headlight switch:
: On this position, turn on the headlamp,
position lights, taillights and instrument lights.
: On this position, turn on the position lights,
Taillights and instrument lights.
0: On this position, turn off the headlamp,
Taillights, position lights and instrument lights.
3. Hi key:
Smart button "Hi" is smart button of Tango for man-machine interaction.
the function can be customized by yourself. You can define the smart
button "Hi" function in software by using APP of Smart management.
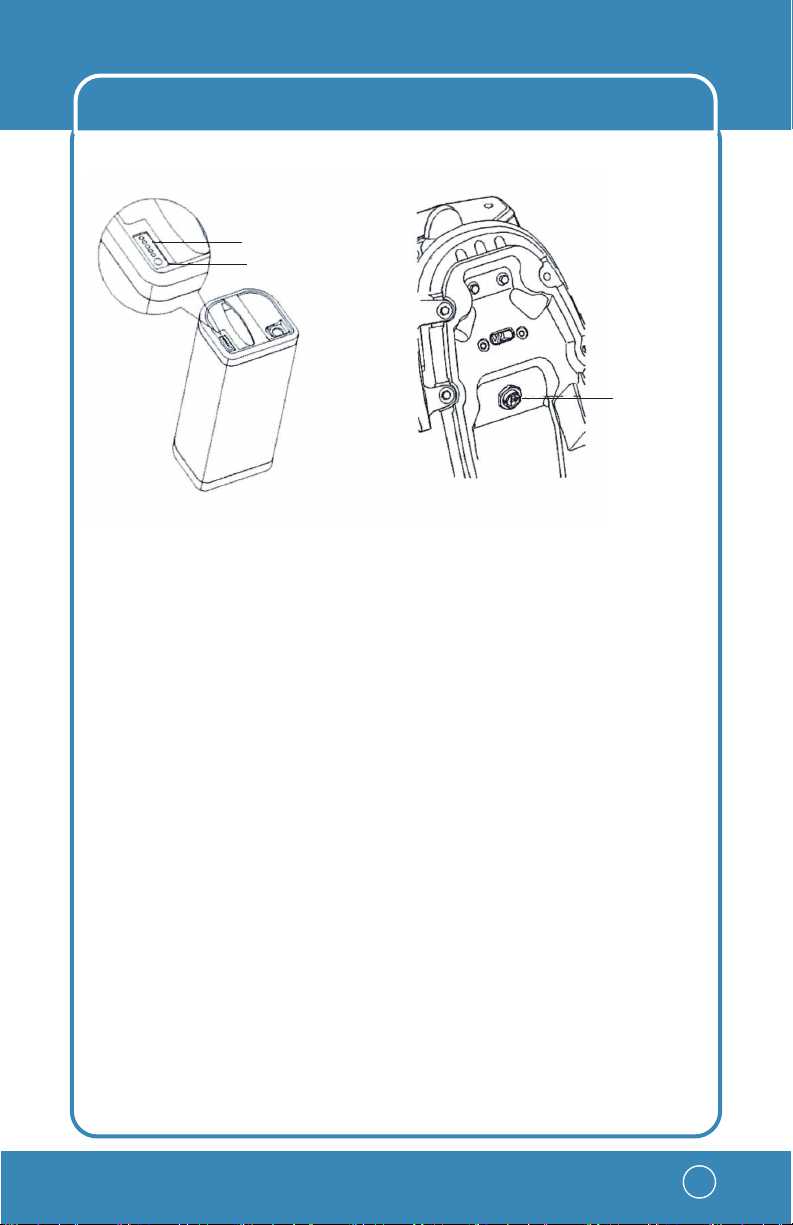
8.Battery using instruction
Indicator light
Power display button
Charge connector
Battery power indicator light :
1. Charging state, the indicator light flashes and shows current power
level
All lights on and no longer flash if full charging.
2. Uncharged state, press the button of power display:
• The indicator light shows the battery power, one green light means
25% power.
• The indicator light is red, it indicates low power.
• If all the indicators are on or off, it indicates battery malfunction.
• Please use the corresponding battery capacity according to the
standard configuration of vehicles.
Vehicle charging mode
Rotate and open the charging connector of vehicles, first insert the
charger plug into the charging connector of vehicles, when you hear
"ka", it means that the charger plug is connected with the connector.
•Then connect the charger plug with power socket of room, it begins
charging when the indicator light turns green to red.
•When the charger indicator light changed from red to green, it means
charging finished.
When you turn on the key switch, the dashboard will display the
current power level.
External charging mode
• Lift the battery from the vehicle body and handle it carefully.
• Insert the charging plug into the battery charging connector for
external charging
Charge connector

Battery service environment
• Please use battery under ambient temperature between -10 and
45 degrees centigrade
• Please avoid water, beverage and corrosive liquid into the battery
• Please avoid the battery near the heat source, open flame,
flammable and explosive gas, liquid.
• Please avoid metal foreign matter into the battery box
• If the battery has peculiar smell, heat and deformation, please stop
using it immediately
This may cause battery leakage, heat, smoke, fire or explosion.
Battery service environment
• Battery charging environment
• Please battery charging at the ambient temperature between 0
degrees to 35 degrees centigrade.
• Please do not exceed 10 hours in Charging time, overcharge will
shorten the service life of battery.
• Do not put other articles covered on the charger or battery box for
ventilation and heat dissipation when charging.
• Do not disassemble the charger. If you need to change it, please
replace it in our authorized service points.
Attention :
1. Battery is prohibited to maintain by users. Otherwise, Lead to
leakage, heating, smoking, fire or explosion if disassemble battery or
maintain it personally
Battery service environment
2. When the ambient temperature is below 0 degrees centigrade, the
charging function is turned off. Please battery charging above 0
degrees centigrade
3. Lead to leakage, heat, smoking, fire or explosion if didn't use the
genuine charger.
4. lf not full charged more than 10 hours, Please stop charging and
contact the after-sales department.
5. To maximize extend the battery life, keep battery power between
20%-80% if possible for cycle use.
6. Do not store the battery in the environment if temperature is higher
than 40 degrees Celsius, otherwise it will cause irreversible capacity
fading of the battery.

7. At low temperatures, the capacity of lithium batteries will capacity
fading in varying degrees: the available capacity for reference: -10 °C is
70%, 0°C is 85%, and 25 °C is 100%.
8. The most suitable storage capacity of the battery is 50%., long-term
storage will lead to irreversible capacity fading of the battery if less than
10% or higher than 90% of the power, If long-term storage of batteries,
please keep the battery at -10°C-to 30°C, and to minimize capacity
fading of the battery inventory with fully charge and discharge in every 2 month.
9. I don't keep the battery in the risk place of falling avoid to battery
falling. Lead to leakage, heat, smoking, fire or explosion if battery
9. Troubleshooting
Troubleshooting list
Fault
phenomen
on
Turn on the
power
supply. but no
power output
Turn the
power on
and twist
the
accelerator,
engine is
not start
fault cause
1. the battery plug is not well
connected
2. Dead Battery
battery damaged
3. Battery voltage is too low
2. Half grip the brake
handle lead to start the
power-off switch
3. Vehicle unstart
4. Accelerator handle is not
restoration
5. Dashboard fault indicator
flashing
1. low battery.
2. tire pressure is not enough
3. Freequent brake to start.
4. Aging of normal decay of
batteries
5. The ambient
Solutions
1. Battery charge
2. Replace Battery
3. Replace fuse
1. Battery charge
2. Do not hold the brake
handle when starting
3. Randle restoration
4. According to the fault
code of APP to solve
1. Charger damage
2. check tire pressure befor
use
3. develop good driving habits
4. replace the battery
5. It’s normal

Fault code show on the Dashboard
Enter the App of Doohan smart management, check the fault reminding, check and
understand the cause of the trouble, or to the service point for professional
maintenance.
10. Maintenance and repair
In order to extend the service life of iTango, to safe and comfortable driving. Please
regularly checking and maintenance the vehicle. If the vehicles disused with long
time, also need to regular checking.
Daily inspection and adjustment
Routine check the iTango before driving in every day, don't ignore the importance of
routine check. In order to ensure that the performance and safety driving, so, the
following checking items must be completed before driving.
The battery is
not charged
Stop
during
driving
temperature is too low. and
the charge-discharge of the
battery capacity is
weaken
The charger plug is not well
connect with the battery
socket, and the charger is
damaged
Run out of battery
phenomenon
Check whether the plug is
loose, and replace the
charger
Battery charging
Checking Items
Handlebar
Braking system
Tyre
Electric Quantity
Lamps
Horn
Check points
1. stable 2. smooth turning and loosening 3. No axial float
10-20mm travel for brake handle.
1 normal tire pressure 2 tyre wear 3 no cracks or wound
Enough electric quantity to support your driving based on
travel planning.
Operate all lamps: High beam, low beam, brake light,
turn light
Checking whether the horn is normal working.

Regular maintenance
The first maintenance should be implemented after one month or 500km based on
sales date After that, complete inspection and maintenance should be implemented
with every six months or 3000km in order to keep your vehicles in the best security
state and ensure safety of driver.
11. Vehicles Storage
Short period storage:
1) Store the vehicle in the flat and stable position where it is a well-ventilated and dry
location;
2) The battery should charge to 50% when storage in order to ensure the battery life;
3) Try to avoid vehicles exposed to sun and rain in order to avoid parts damage or
aging; 4) After long-term storage, please fully charge the battery before use;
5) When the battery is installed and store in the room, the exhibition hall, the
warehouse and other safe place, or transport with the freight vehicle in short
distance, please turn off and pull out the key, then pull out the battery plug in order
to eliminate electrical troubles.
Long-term storage:
1) For long-term storage, please turn off and pull out the key, and then pull out the
battery plug, disconnect the battery power supply circuit to prevent the battery over
discharge;
2) For long-term storage, the battery should do a complete charge and discharge
cycle every two months, and charge the battery to 50% electric quantity to ensure the
battery life;
3) After long-term storage, please fully charge the battery before using.
4) Before driving, please check the all parts, if any abnormal, please return to the
dealer for maintenance or repair.
Routine
safety and
performance
checking
Structural
inspection
Brake
Lamp
Horn
Electric parts
Fuse
Tyre
lubrication
Structural
inspection
important
parts
Wheel bearings
Shock absorbers
Main stander
Steering bearings
Battery
Main harness
Control system
Regular maintenance and inspection items

Table of contents
Other eTrikeCo Scooter manuals


