manuals.online logo
Brands
  1. Home
  2. •
  3. Brands
  4. •
  5. EtroVISION
  6. •
  7. Security Camera
  8. •
  9. EtroVISION EV8582U-BL User manual

EtroVISION EV8582U-BL User manual

A. Unscrew to loosen lens mount
B. Adjust Lens
N52
EV8582
Series
Quick
Installation
Guide
www.etrovision.com
+886-2-2655-1518
Technical Support: [email protected]
Sales Contact: etrosales@etrovision.com
Install EtroScan on a Windows PC
-EtroScan™ is a utility is used to configure network
settings for cameras & video servers. EtroScan™ is
available on the CD-ROM or can be downloaded at
http://www.etrovision.com/Support/.
-Run Setup.exe to install EtroScan.
Physical installation
Please review the steps before starting. The steps outlined
below are the suggested installation path, but certain steps
may need to be switched depending on the installation
environment.
1. Remove the cover from the camera. Leave the plastic
covering on the lens cover until installation complete.
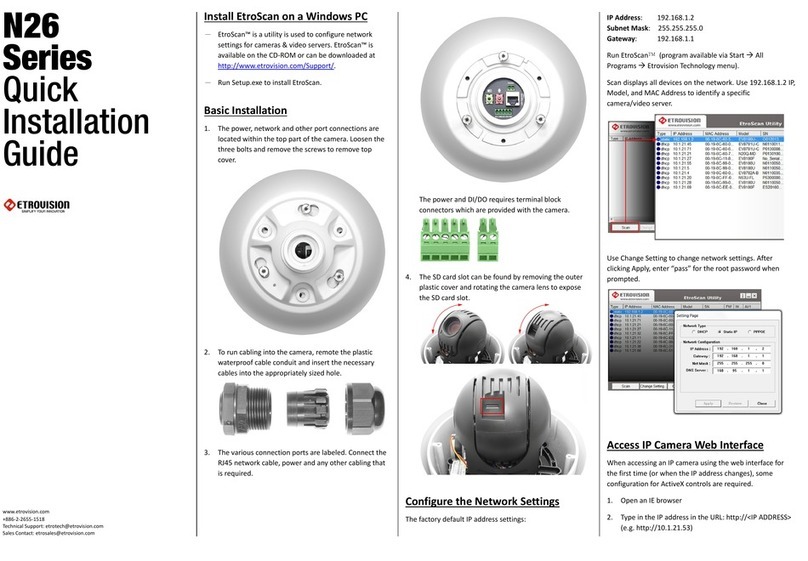
2. Mount the camera to the surface with 4 screws in the
holes highlighted below. Drill pilot holes if necessary.
3. Connect network and power cable; if using audio in/out
and DI/DO, then run cabling and connect to the DI/DO
block terminal. (DIO cable is optional accessory)
DIO cable (Optional accessory)
Power cable (Included accessory)
4. Power can be connected directly to the power terminal
block (8~24Vdc, 24Vac) or via the DC power adapter
included with the camera.
If using the power adapter, then connect the adapter
plug (see below) to the power terminal block.
5. To adjust the lens, loosen the lens mount.
6. Replace the camera cover and remove the plastic from
the lens cover.
Configure the Network Settings
The factory default IP address settings:
IP Address: 192.168.1.2
Subnet Mask: 255.255.255.0
Gateway: 192.168.1.1
Run EtroScan™(program available via Start All
Programs Etrovision Technology menu).
Scan displays all devices on the network. Use 192.168.1.2 IP,
Model, and MAC Address to identify a specific
camera/video server.
Use Change Setting to change network settings. After
clicking Apply, enter “pass” for the root password when
prompted.
Access IP Camera Web Interface
When accessing an IP camera using the web interface for
the first time (or when the IP address changes), some
configuration for ActiveX controls are required.
1. Open an IE browser
2. Type in the IP address in the URL: http://<IP
Audio Out
Audio In
DI/DO Terminal Block
RJ45 Network
Power Terminal Block
ADDRESS> (e.g. http://10.1.21.53)
3. On first connecting to a camera, IE will probably
prompt to install Active X components which are used
in the camera web UI. Click Install to continue.
Following this step, a User Access Control window will
also appear to confirm installation.
4. Once the process is complete, the Live View will be
displayed.
Restoring Factory Default Settings
There are 2 methods for restoring the factory default
settings:
1. Power on the camera, push and hold down the reset
button for 6 seconds. The camera will revert to factory
default settings (e.g. IP will reset to 192.168.1.2).
2. The web UI Setup (System -> Factory Default) ;
network and user account data can be saved if desired.
Please refer to the User’s Manual for more
information on the web UI Factory Default
functionality.
Video Out Using BNC Adapter
Using the supplied BNC adapter, connect the adapter to the
2-pin port shown below
Enable the TV output in the camera’s web UI settings (refer
to the Video/Audio – Video Setting section of the firmware
users manual for more detail)
Reset
Button.
Video
Output
port

Other EtroVISION Security Camera manuals

EtroVISION EV8180F User manual

EtroVISION

EtroVISION EV8180F User manual

EtroVISION N50 User manual

EtroVISION

EtroVISION N50 User manual

EtroVISION M23 Series User manual

EtroVISION

EtroVISION M23 Series User manual

EtroVISION N26 Series User manual

EtroVISION

EtroVISION N26 Series User manual

EtroVISION N73 User manual

EtroVISION

EtroVISION N73 User manual

EtroVISION EV8781 Series User manual

EtroVISION

EtroVISION EV8781 Series User manual

EtroVISION N10 EV8180 Series User manual

EtroVISION

EtroVISION N10 EV8180 Series User manual

EtroVISION EV8580F User manual

EtroVISION

EtroVISION EV8580F User manual

EtroVISION N58 Series User manual

EtroVISION

EtroVISION N58 Series User manual

Popular Security Camera manuals by other brands

COP-USA IPCAM AJ Series user manual

COP-USA

COP-USA IPCAM AJ Series user manual

Truen TCAM-570-X18H user manual

Truen

Truen TCAM-570-X18H user manual

Honeywell ACM574TPX Specifications

Honeywell

Honeywell ACM574TPX Specifications

JAI CV-S3200 Operation manual

JAI

JAI CV-S3200 Operation manual

urmet domus THERA 5 Ref.1092/602 Installation and user manual

urmet domus

urmet domus THERA 5 Ref.1092/602 Installation and user manual

Samsung SCC-130B Specification sheet

Samsung

Samsung SCC-130B Specification sheet

Aventura CAM-IPR-2BS-3F-IR quick start guide

Aventura

Aventura CAM-IPR-2BS-3F-IR quick start guide

Axon Body 2 quick tips guide

Axon

Axon Body 2 quick tips guide

Dahua HAC-HDW1200M-0280B-S4 user manual

Dahua

Dahua HAC-HDW1200M-0280B-S4 user manual

SAB SABIP1300 user manual

SAB

SAB SABIP1300 user manual

Amcrest IP2M-850EW user manual

Amcrest

Amcrest IP2M-850EW user manual

Wisenet XNP-6321H quick guide

Wisenet

Wisenet XNP-6321H quick guide

HAWK-I Security HAWK-701ZXIRCB Specifications

HAWK-I Security

HAWK-I Security HAWK-701ZXIRCB Specifications

nest Cam IQ installation guide

nest

nest Cam IQ installation guide

Toshiba IK-WB80A Specifications

Toshiba

Toshiba IK-WB80A Specifications

Pulnix TM-7CN Operation manual

Pulnix

Pulnix TM-7CN Operation manual

Bosch VG5-161-PT0 Specifications

Bosch

Bosch VG5-161-PT0 Specifications

Eneo HDC-2080Z03 Installation and operation manual

Eneo

Eneo HDC-2080Z03 Installation and operation manual

manuals.online logo
manuals.online logoBrands
  • About & Mission
  • Contact us
  • Privacy Policy
  • Terms and Conditions

Copyright 2025 Manuals.Online. All Rights Reserved.