ETVAX 46226.212 User manual
Manuale per l’installazione e l’uso
Installation and operation manual
46226.212
Telecamera Dome IR IP Full HD, obiettivo 2,8-12 mm, PoE
IR IP Full HD Dome camera, 2.8-12 mm lens, PoE

2
I
Avvertenze
- Prima di utilizzare il prodotto si raccomanda vivamente di leggere il manuale e di conservarlo in un luogo sicuro per consulta-
zione futura.
- Utilizzarel'alimentazionespecicataperilcollegamento.
- Evitare di azionare il prodotto in modo improprio, sottoporlo a urti o vibrazioni, forti pressioni che possono danneggiarlo.
- Non utilizzare detergenti corrosivi per pulire il corpo principale della telecamera. Se necessario, utilizzare un panno morbido
e asciutto per pulirla; in caso di sporco resistente utilizzare un detergente neutro. È possibile utilizzare detergenti per mobili
di qualità.
- Non puntare la telecamera direttamente verso oggetti estremamente luminosi, ad esempio il sole, in quanto si potrebbe dan-
neggiare il sensore d'immagine.
- Seguire le istruzioni per installare la telecamera. Non rovesciare la telecamera, altrimenti riceverà un'immagine rovesciata.
- Nonazionarlasetemperatura,umiditàealimentazionenoncorrispondonoailimitiovalorispecicati.
- Tenere lontano da fonti di calore quali radiatori, bocchette dell'aria calda, stufe e simili.
- Il presente documento contiene le istruzioni per l'uso del prodotto. Non è la garanzia di qualità. Ci riserviamo il diritto di correg-
gere errori di stampa, incongruenze con la versione più recente, aggiornamenti del software e miglioramenti, interpretazione
emodichealprodotto.Talicambiamentisarannopubblicatinellaversionepiùrecentesenzaprevianotica.
- Quando il prodotto è in uso, sono applicabili i contenuti di Microsoft, Apple e Google. Le immagini e le schermate di questo
manuale hanno lo scopo di spiegare l'utilizzo del prodotto. La proprietà dei marchi commerciali, dei logo e altre proprietà
intellettuali relative a Microsoft, Apple e Google appartengono alle suddette aziende.
1 Introduzione
1.1 Panoramica
Questa TELECAMERA IP (abbreviato in IP-CAM) è stata progettata per fornire prestazioni elevate nell'uso con soluzioni di
TVCC.Adottachipdielaborazionevideoallostatodell'arte.Utilizzaletecnologiepiùavanzate,qualilatecnologiadicodicae
decodicavideoedèconformealprotocolloTCP/IP,SoC.ecc.perassicurarelastabilitàel'afdabilitàdelsistema.L'unitàcom-
prende due parti: il dispositivo IP-CAM e il software di gestione centrale (abbreviato in CMS). Il CMS consente di centralizzare
tuttiidispositiviviaInternetoLANecreareunimpiantodisorveglianzaafdabilecheoffregestioneunicataeattivazionein
remoto di tutti i dispositivi in rete.
Questo prodotto è ampiamente utilizzato nelle banche, nei sistemi di telecomunicazione, siti di fornitura elettrica, enti statali,
fabbriche, magazzini, centri urbani ecc. È inoltre la scelta ideale per aree di sorveglianza a medio e alto rischio.
1.2 Confezione
Le illustrazioni sotto riportate hanno solo funzione di riferimento. La regolazione della messa a fuoco può essere eseguita solo
in alcuni dei nostri prodotti. Far riferimento all'apparecchiatura in dotazione.
Accessori Descrizione
TELECAMERA IP Il dispositivo senza obiettivo
Guida di riferimento rapido Versione breve della guida con le istruzioni per l'utilizzo del prodotto
CD CD-ROM contenente il software e il manuale
Cacciavite Da utilizzare per l'installazione del prodotto
Viti e tassello Per l'installazione del prodotto
)RFXV
=RRP
Manuale per l’installazione e l’uso
Installation and operation manual
46226.212
Telecamera Dome IR IP full HD, obiettivo 2,8-12 mm
Camera Dome IR IP full HD, Lens 2,8-12 mm
Camera IP
Manuale istruzioni
CD
CacciaviteViti e tasselli
1
I
1.3 Installazione
La procedura di installazione è la seguente:
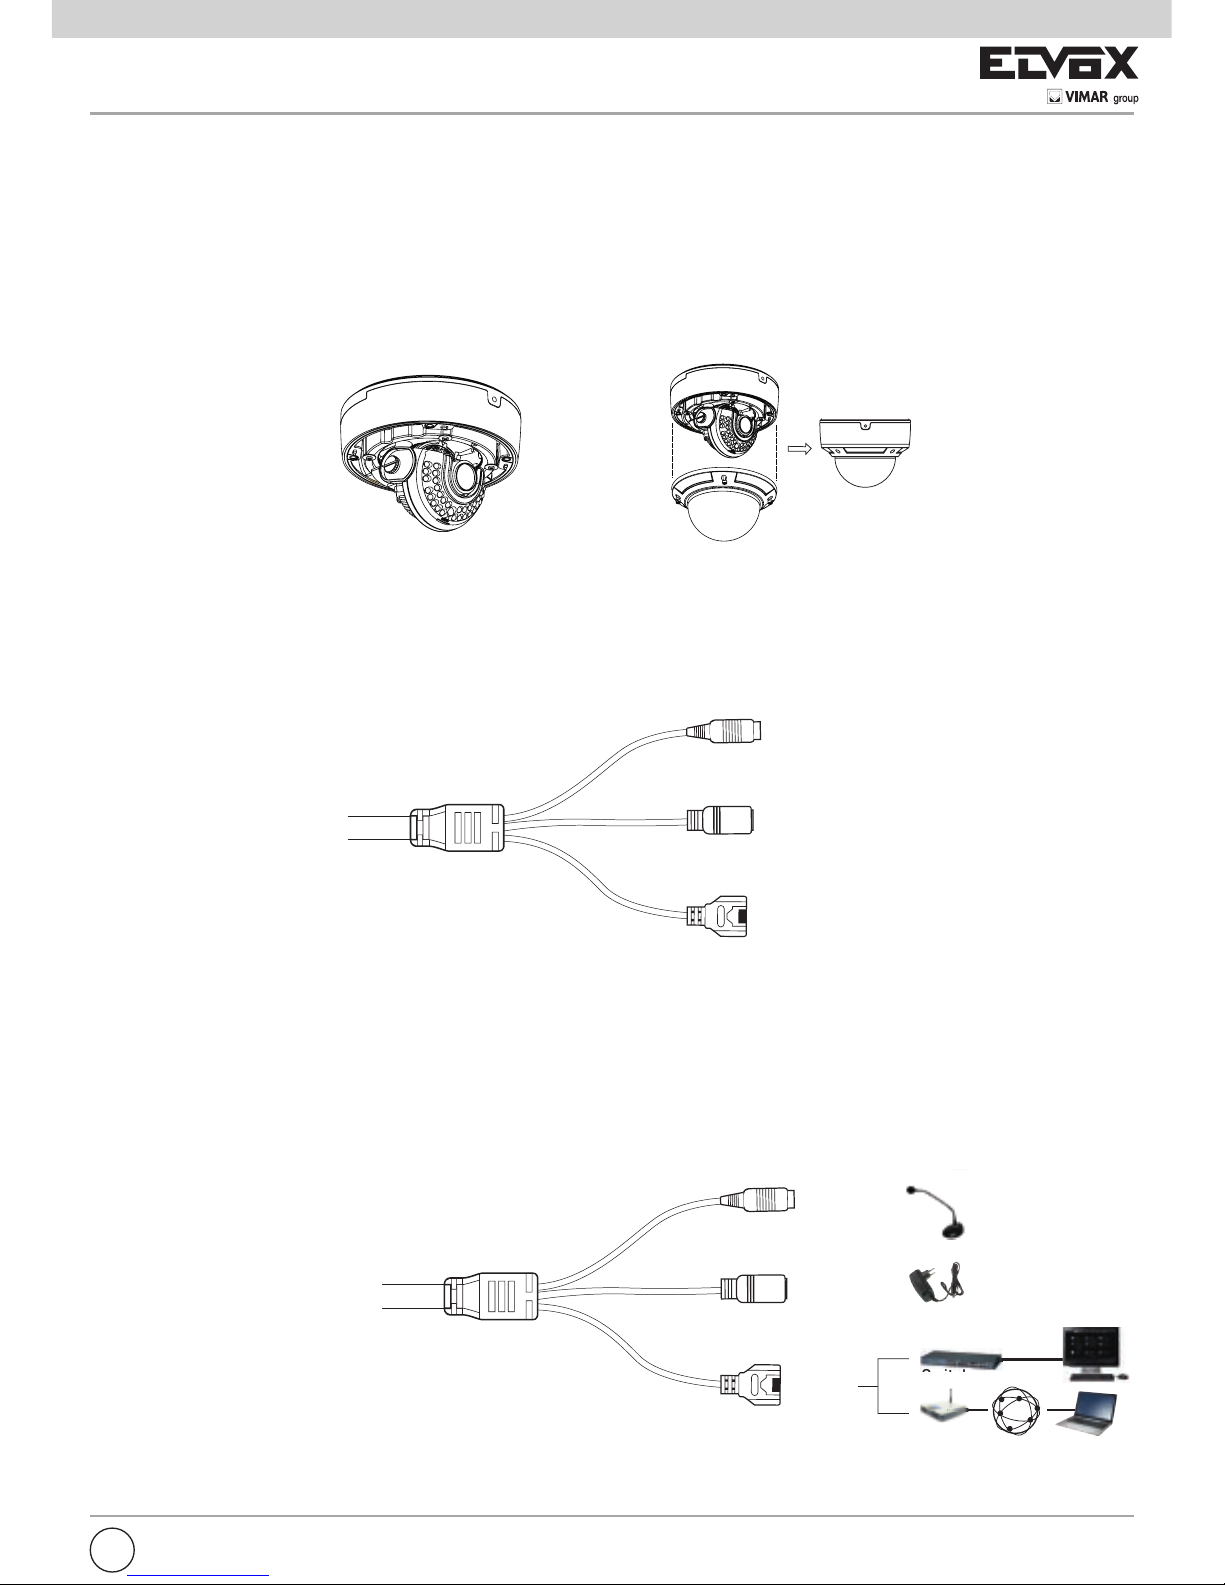
Fase 1: Allentare le viti in fondo alla telecamera dome e togliere la piastra di installazione. Allentare quindi le quattro viti sul retro
dellatelecameradomepertoglierelascatolaposteriorecomeillustratonellaseguenteguraasinistra.
Fase2:Montarelapiastradiinstallazionesulsofttoquindimontarelatelecameradomesullapiastradiinstallazioneserrando
levitisulfondodellatelecameracomeillustratonellaguraadestra.
Fase 3: Regolare l’angolo di visualizzazione in base alle proprie esigenze quando si visualizza il video sul monitor. Se il disposi-
tivo in uso non supporta la funzione di messa a fuoco, saltare questo passaggio.
Fase 4: Serrare le viti e installare la scatola posteriore.
1.4 Interfacce e connessioni
- Connessioni alle porte esterne:
LAN
MIC
Alimentazione
LAN
MIC
Alimentazione
Modem
Switch LAN
S
i
t
h
Internet
Computer
Monitor
MIC: Collegare al microfono.
DC12V: Porta alimentazione
LAN: Porta di rete. Supporta l'alimentazione PoE.
Zoom:Allentarelevitieruotarel'obiettivoasinistraoadestrapereseguirelozoomavanti/indietrosull'immagine.
Messaafuoco:Allentarelevitieruotarel'obiettivoasinistraoadestraperregolareladenizionedell'immagine.
PercollegareilPCelatelecamera-IPfareriferimentoallagurasopra.Primadieseguireilcollegamento,collegareidispositivi
esterni, quindi collegare l'alimentazione.
2 Installazione
2.1 Collegare la telecamera-IP alla rete
La connessione della telecamera-IP è illustrata di seguito:
LAN
MIC
Alimentazione
LAN
MIC
Alimentazione
Modem
Switch LAN
S
i
t
h
Internet
Computer
Monitor
Regolazione Zoom e Focus
2
I
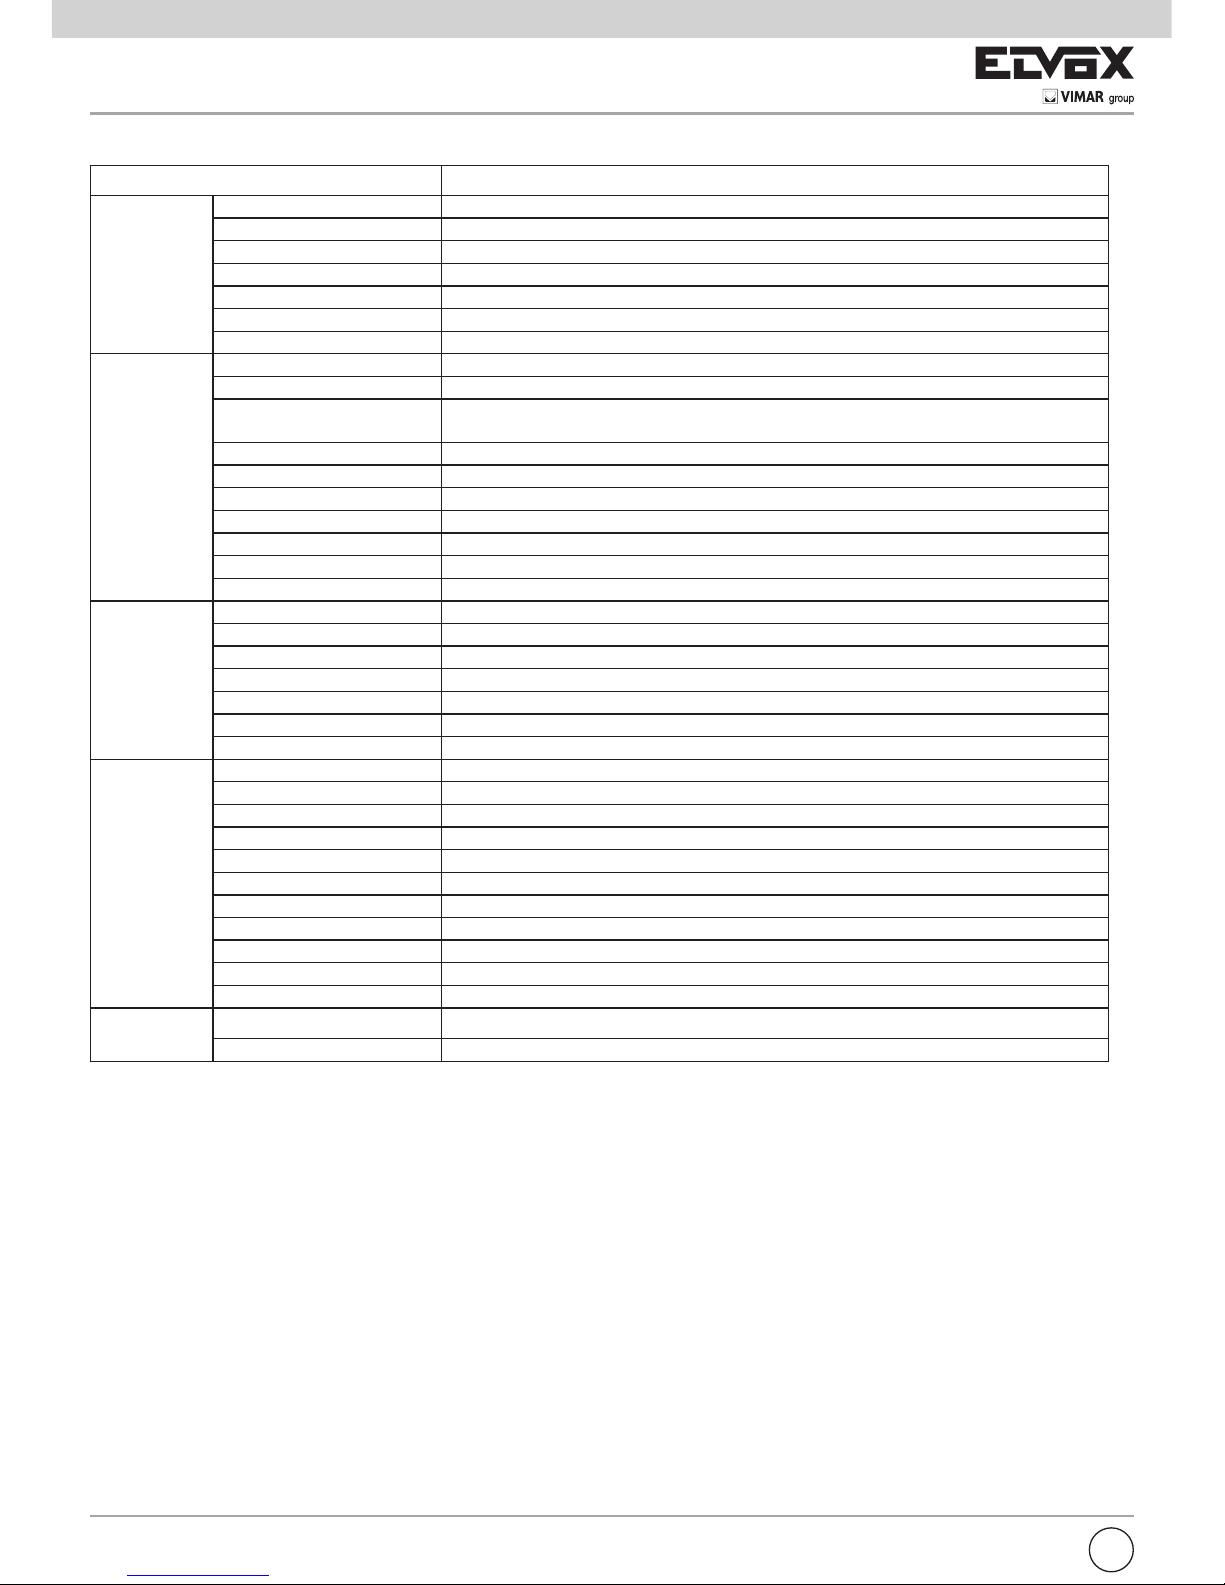
3. Speciche:
Modello 46226.212
Telecamera Sensore di immagine 1/2,7"CMOS
Pixel immagine 1920×1080
Otturatore elettronico 1/25s~1/100000s
Diaframma automatico Diaframmasso
Illuminazione minima 0 Lux (con LED IR attivo)
Obiettivo 2,8-12 mm
Tipo di attacco AttaccoΦ14
Immagine Compressione H.264
Risoluzione: 1080P(1920×1080),720P(1280×720),VGA(640×480),QVGA(320×240)
Frame rate: 1920×1080(1~30fps)/1280x720(1~30fps)/1280x720(1~10fps)/640×480
(1~30fps)/320x240(1~30fps)
Bit-rate: 64Kbps~8Mbps
Codica VBR/CBR
Qualità LivelloVBR5,CBRillimitato
Cong.immagine Saturazione, Luminosità, Contrasto, WDR (Via IE e client end)
Compressione audio G711A
WDR Digitale
Riduzione del rumore 3D
Interfaccia Internet RJ45
Uscita video No
Audio MIC×1
Archiviazione No
RS485 No
Ingresso allarme No
Uscita allarme No
Funzione Sorveglianza remota Browser IE, Controllo remoto CMS
Utenti online 6utenti,supportalatrasmissionesupiùussiintemporeale
Protocollo di rete TCP/IP,UDP,DHCP,NTP,RTSP,PPPoE,DDNS,SMTP,FTP
Protocollo interfaccia ONVIF,GB-T/28181-2011
Archiviazione Archiviazione remota
Allarme intelligente Movimento, sensore
Giorno/Notte ICR
PTZ No
PoE Sì
Range di visione notturna 20-30m
Impermeabilità IP66
Altri 12Vdc/POE
Ambiente di esercizio -20°C~50°Cconumidità10%~90%

3
EN
Cautions
- Before operation, we strongly advise users to read this manual and keep it properly for using later.
- Pleaseusethespeciedpowersupplytoconnect.
- Avoid from in correct operation, shock vibration, heavy pressing which can cause damage to product.
- Do not use corrosive detergent to clean main body of the camera. If necessary, please use soft dry cloth to wipe dirt; for hard
contamination, use neutral detergent. Any cleanser for high grade furniture is applicable.
- Avoid aiming the camera directly towards extremely bright objects, such as, sun, as this may damage the image sensor.
- Please follow the instructions to install the camera. Do not reverse the camera, or the reversing image will be received.
- Do not operate it incase temperature, humidity and power supply are beyond the limited stipulations.
- Keep away from heat sources such as radiators, heat registers, stove., etc.
- This is product instructions not quality warranty. We may reserve the rights of amending the typographical errors, inconsisten-
cieswiththelatestversion,softwareupgradesandproductimprovements,interpretationandmodication.Thesechangeswill
bepublishedinthelatestversionwithoutspecialnotication.
- When this product is in use, the relevant contents of Microsoft, Apple and Google will be involved in. The pictures and scre-
enshots in this manual are only used to explain the usage of our product. The ownerships of trademarks, logos and other
intellectual properties related to Microsoft, Apple and Google belong to the above-mentioned companies.
1 Introduction
1.1 Overview
This IP-CAMERA (short for IP-CAM) is designed for high performance CCTV solutions. It adopts state of the art video proces-
singchips.Itutilizesmostadvancedtechnologies,suchasvideoencodinganddecodingtechnology,complieswiththeTCP/IP
protocol, SoC, etc to ensure this system more stable and reliable. This unit consists of two parts: the IP-CAM device and central
management software (short for CMS). The CMS centralizes all devices together via internet or LAN and establishes a sound
surveillancesystemtorealizeuniedmanagementandremoteoperationtoalldevicesinonenetwork.
This product is widely used in banks, telecommunication systems, electricity power departments, law systems, factories, sto-
rehouses, uptowns, etc. In addition, it is also an ideal choice for surveillance sites with middle or high risks.
1.2 Package
The pictures below are only for reference. Only part of our products can adjust focus. Please make the object as the standard.
Accessories Description
IP-CAMERA The device without Lens
Quick Start Guide The Brief instructions of the product
CD CD-ROM with software and manual
Screwdriver A tool for installation
Screws & Spile For installation
)RFXV
=RRP
Manuale per l’installazione e l’uso
Installation and operation manual
46226.212
Telecamera Dome IR IP full HD, obiettivo 2,8-12 mm
Camera Dome IR IP full HD, Lens 2,8-12 mm
IP Camera
Quick Start Guide
CD
Screwdriver
Screws & Spile
4
EN
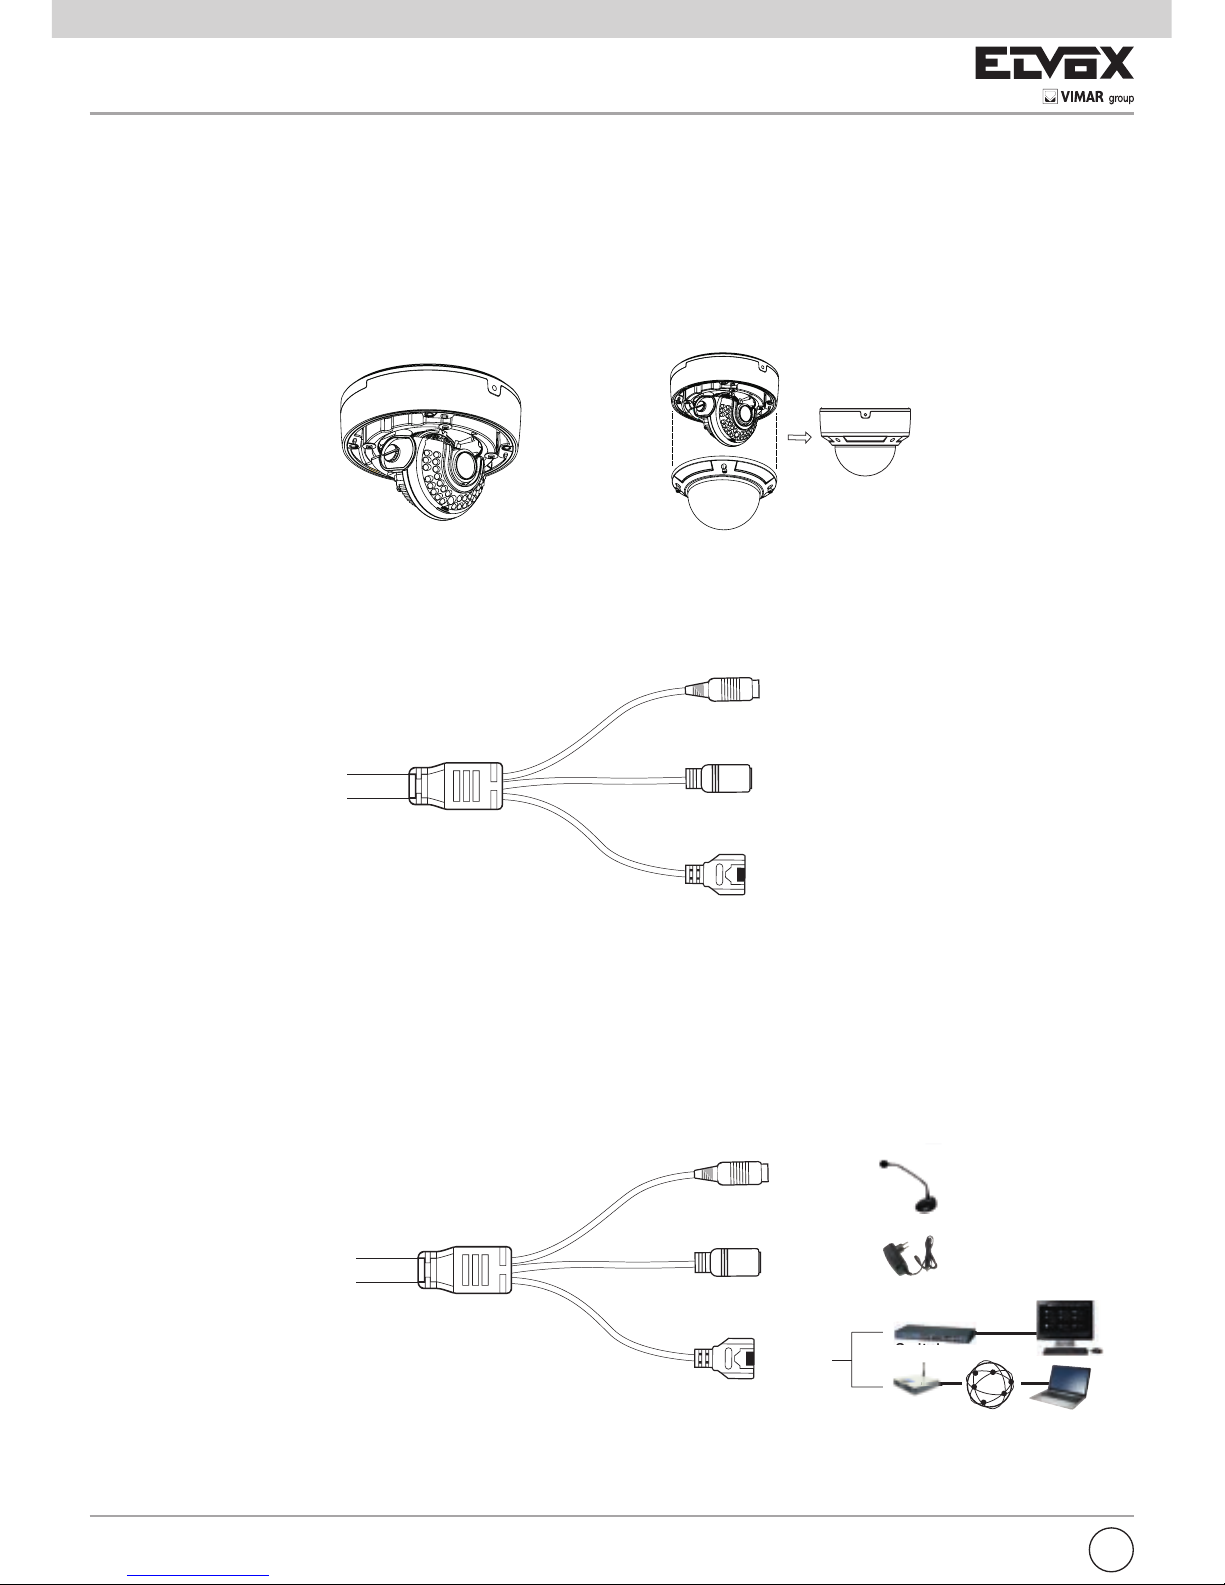
1.4 Interfaces and Connections
- Connections of the external ports:
MIC: Connect to microphone.
DC12V: Power supply port.
LAN: Network port. It supports PoE power supply.
User can connect the PC and IP-CAMERA in accordance with the above picture. Before connecting, please connect external
devices, and then connect the power.
Zoom:Loosenthescrewandrotatethelensleftorrighttozoomin/outtheimage.
Focus:Loosenthescrewandrotatethelensleftorrighttoadjustthedenitionoftheimage.
2 Installation
2.1 Connect IP-CAMERA to Network
The connection of IP-CAM is shown below:
LAN
MIC
Alimentazione
LAN
MIC
Alimentazione
Modem
Switch LAN
S
i
t
h
Internet
Computer
Monitor
Power supply
LAN
MIC
Alimentazione
LAN
MIC
Alimentazione
Modem
Switch LAN
S
i
t
h
Internet
Computer
Monitor
Power supply
1.3 Installation
The setting steps are as follows:
Step 1: Loosen the screws at the bottom of the dome camera and then take down the installation dish. After that, loosen four
screwsinthebackboxofthedometotakedownthebackboxasshowninthefollowinggureontheleft.
Step 2: Install the installation dish on the ceiling and then mount the dome on the installation dish by tightening the screws at the
bottomofthedomecameraasshowninthefollowinggureontheright.
Step 3: Adjust the view angle for your need when you view the video on the monitor (If your device cannot support focusing
function, please skip this step).
Step 4: Tighten the screws and install the back box.
Zoom and Focus adjustment

5
EN
3. Specication
Modello 46226.212
Camera Image sensor 1/2.7"CMOS
Image pixels 1920×1080
Electronic shutter 1/25s~1/100000s
Auto iris Fixed iris
Min. illumination 0lux (IR LED ON)
Lens 2.8-12mm
Mount type Φ14mount
Image Compression H.264
Resolution: 1080P(1920×1080),720P(1280×720),VGA(640×480),QVGA(320×240)
Frame rate: 1920×1080(1~30fps)/1280x720(1~30fps)/1280x720(1~10fps)/640×480
(1~30fps)/320x240(1~30fps)
Bit rate: 64Kbps~8Mbps
Encode VBR/CBR
Quality VBR5level,CBRnolimit
Imagecong. Saturation, Brightness, Contrast, WDR (Via IE and client end)
Audio compression G711A
WDR Digital
Noise Reduction 3D
Interface Internet RJ45
Video out No
Audio MIC ×1
Storage No
RS485 No
Alarm in No
Alarm out No
Function Remote surveillance IE browser, CMS remote control
Online user 6 users, support multi-stream real time transmission.
Network protocal TCP/IP,UDP,DHCP,NTP,RTSP,PPPoE,DDNS,SMTP,FTP
Interface protocal ONVIF,GB-T/28181-2011
Storage Remote storage
Smart alarm Motion , sensor
Day/night ICR
PTZ No
PoE Yes
Night vision range 20-30m
Water proof IP66
Others 12Vdc/POE
Working environment -20°C~50°C10%~90%humidity

Vimar SpA: Viale Vicenza, 14
36063 Marostica VI - Italy
Tel. +39 0424 488 600 - Fax (Italia) 0424 488 188
Fax(Export)0424488709
www.vimar.com
49400744A0011602
VIMAR - Marostica - Italy
Table of contents
Languages:
Other ETVAX Security Camera manuals


Popular Security Camera manuals by other brands

Stealth Cam
Stealth Cam STC-P8XT series instruction manual

Hunt Electronic
Hunt Electronic HTZ-1200ISWBH instruction manual

Digital Watchdog
Digital Watchdog MegaPix DWC-MB421TIR user manual

Siqura
Siqura CD820 Series installation manual

TRASSIR
TRASSIR TR-D3121IR2 quick start guide

Digital Watchdog
Digital Watchdog Star-Light Plus DWC-V6563WTIR user manual


