EUCHIPS DMX-E02L User manual

This panel supports 4 DMX zones, 2 channels for each zone, namely zone 1 is channel 1~2,
zone 2 is channel 2~4, zone 3 is channel 5~6, zone 4 is channel 7~8. Each area has a
corresponding indicator light.
Click the zone1/2/3/4 area button to select the corresponding area respectively. The
luminaire in the area will be lit according to the last turn off color/brightness, and the
corresponding area selection indicator will be lit at the same time, indicating that the
luminaire in the area can be adjusted color temperature/brightness. By selecting "color
ring" or "color temperature mode" corresponding lamp effect editing. The lighting effect in
other areas remains unchanged.
Click to select another area button to switch areas. At this time the effect of lamps and
lanterns of other area does not change. Only the selected area has a light indicating that
the area can be edited.
When a certain area is selected, click the area icon again to turn off the light in the area
and turn off the area light.
Long press the button of a certain area for 2 seconds, then 4 areas are selected at the
same time, 4 areas indicator lights are on at the same time, and 4 areas can be operated
synchronously at the same time.
Click "ALL" button to select 4 areas at the same time, but 4 areas indicator lights go out at
the same time, at this time, 4 areas can be synchronized operation.
After a region or all regions are selected.
Click the Scene1/2/3/4 button to invoke each of the four scenarios saved by the user. Only
one scenario can be invoked at a time. Brightness/color temperature cannot be adjusted
in scene call mode.
After adjusting the light and color of lamps in one or more areas, press the scene button
for a long time for 3 seconds and hear the "di-di-di" sound, indicating that the lighting
effect in the current area has been successfully saved into the scene.
Each area can hold 4 user-defined scenarios. The new scene effect can be saved again on
the scene button of a scene that has been saved (note: the previously saved scene will be
overwritten).
DMX-E02L
Touch Panel
Function Description
Dimension(mm)
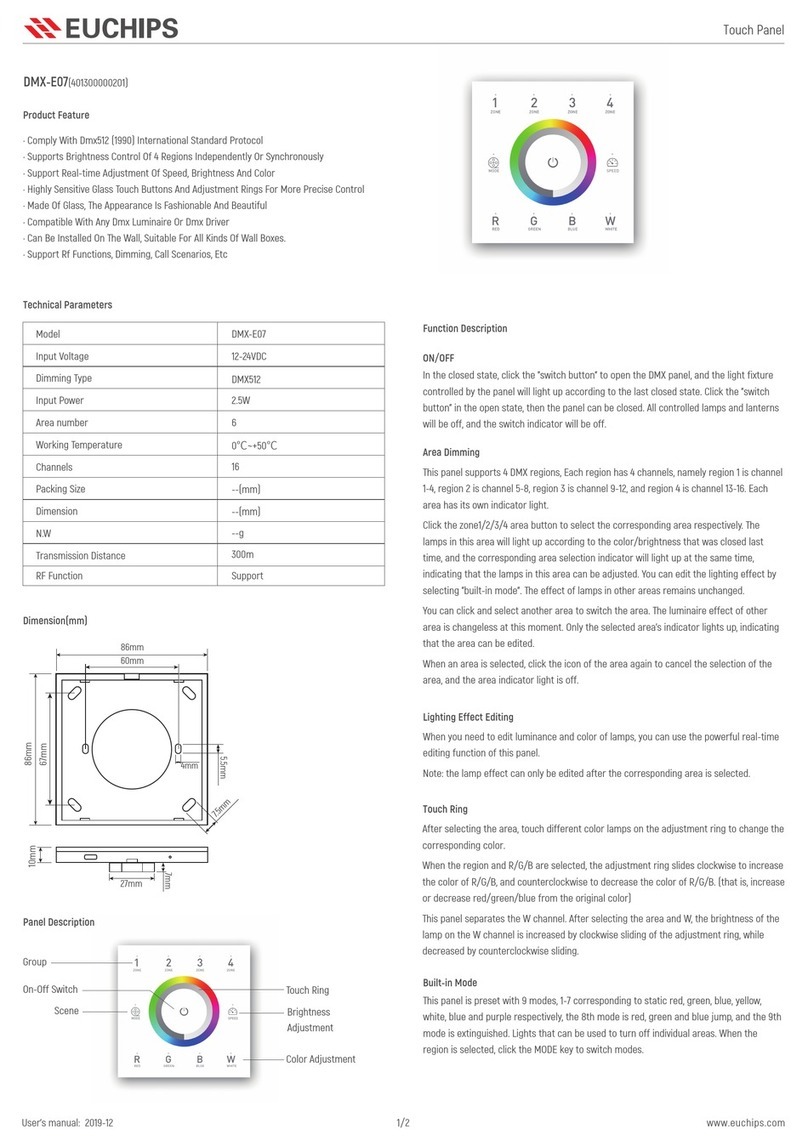
Panel Description
Technical Parameters
Product Feature
1/3
User’s manual: 2019-9 www.euchips.com
Model DMX-E02L
Input Voltage 5VDC
Dimming Type
Input Power
Area number
Working Temperature
Channels
Packing Size
N.W
DMX512
3-3.5W
4
200g
Transmission Distance 300m
RF Function Support
0℃~+50℃
8
140x106x11(mm)
·Compliance with DMX512 (1990) International Standard Agreement
·Supporting independent or synchronous color temperature control for four regions
·Support real-time adjustment of brightness and color temperature
·High sensitivity glass touch button and adjusting ring, more fine control
·Using glass material, fashionable and beautiful appearance
·Compatible with any DMX lamp or DMX driver
·It can be installed in the wall body, suitable for all kinds of wall boxes.
·The saved scene saves the new scene again, and the original saved scene will be overwritten.
·Support RF function, dimming, color temperature, calling scene, etc.
In the closed state, click on the "switch button" to open the DMX panel. The lamp
controlled by the panel lights up according to the last closed state. When you click on the
"switch button" in the open state, you can close the panel. All the lights under control are
turned off. The switch indicator light is slightly lit. It can be used to indicate the switch
position in darkness.
Night light modeAll Selection
On-Off Switch
Brightness Regulation
Group
Touch Ring
Color Temperature Regulation
Scene
ON/OFF
Area Dimming
Scene Setting

Touch Panel
2/3
User’s manual: 2019-9 www.euchips.com
RF Connection Description
When you need to edit luminance and color temperature of lamps, you can use the
powerful real-time editing function of this panel. Note: only when the corresponding area
is selected can the lighting effect be edited, and only the brightness/color temperature
can be adjusted in the scene mode. Operation "guide for the selection of areas.
Lighting Effect Editing
The adjustment loop is used for different functions in different editing modes.
Under the color temperature mode, the light fixture color in the selected area can be
adjusted by finger sliding adjustment ring.
In luminance mode, the finger slide adjustment ring can adjust the luminance of the
selected area.
Touch Ring
Click the Night key, and the lights in the four areas will reach the brightness of 1% warm
light. Exit the mode by ALL and group.
Night Mode Regulation
After selecting the corresponding area (or all of them), the user clicks the "brightness"
button and enters the state of "brightness adjustment". Under the state, the luminance of
the selected area can be adjusted, or the luminance of the current scene can be adjusted
as a whole. Use your finger to slide the "color ring" to adjust the brightness. A maximum
brightness of 5%.
Brightness Regulation
After the user selects the corresponding area, click the color board button to enter the
"color adjustment" mode, and slide the color ring with the finger to adjust the color of
lamps and lanterns in the selected area.
Color Temperature Regulation
ALL button is pressed, indicating that ALL four areas are selected, and brightness and
color temperature can be adjusted, as well as scene call.
All Selection
Setting by dialing switch 1. When the dial switch is on, there is a key tone; conversely,
there is no key tone.
Press Key Sound
Setting by dial switch 2. When the dial switch is on, the indicator lights on; otherwise, it
does not.
1. Check the code: select the receiver that needs to check the code, cut off the power for
10 seconds and turn on the power again. Click the "group on 1" button for 3 times within 5
seconds after the power on.
2. Clear the code: select the receiver that needs to clear the code, cut off the power for 10
seconds and then switch on the power again. Click the "group on 1" button for 6 times
during the 5 seconds when the power is on. The Zone1 button on the panel can be seen to
switch continuously.
Press key Indicator light
For Non-corresponding Panels:
Proportional Brightness Adjustment Key
CW/WW Key:
Select a single area or all areas and press the 25% brightness key to turn the lights in that
area to 25% brightness. Press the 50% luminance key to turn the lights in the area to 50%
luminance. Press the 75% brightness button to change the area light to 75% brightness.
Press the 100 luminance key to change the area light to 100 luminance.
Short press the WW key to increase the warm color in the selected area and the CW key
to increase the cool color in the selected area.
Brightness Adjustment Key:
Short press + to increase the brightness of the selected area, short press - to decrease
the brightness of the selected area.
Touch Ring:
After selecting the corresponding area, the user can adjust the lighting color of the
selected area by sliding the color ring with his finger (not available in scene mode).
Scene key calls the four scenes saved in the panel, and groups Zone1, 2, 3 and 4
corresponding to the four areas on the panel. (no long press function).
Whether The Panel Corresponds To The Remote Control Is Shown In The Right Picture:
Group 1
Group 2
Group 3
Group 4
25% brightness
50% brightness
75% brightness
100% brightness
ALL key, realize four groups at the
same time control
B key, brightness adjustment plus
Color key, Color temperature
adjustment minus
The Night key performs a low-light
scene
Brightness plus, divided into ten levels
Brightness reduction, divided into
ten levels
Color Temperature Plus
Color Temperature Reduction
Turn ON/OFF
Non-corresponding
Panel
Non-corresponding
Panel
Non-corresponding
Panel
Non-corresponding
Panel
Non-corresponding
Panel
Non-corresponding
Panel
Non-corresponding
Panel
Non-corresponding
Panel
Corresponding Panel
Corresponding Panel
Corresponding Panel
Corresponding Panel
Corresponding Panel
Corresponding Panel
Corresponding Panel
Corresponding Panel
Corresponding Panel

Touch Panel
3/3
User’s manual: 2019-9 www.euchips.com
※The contents of this manual are updated without prior notice. If the function of the product you are using is inconsistent with the instructions, the function of the product shall prevail.Please contact us if you have any questions.
2. Fix the bottom cover on the electrical box with screws to ensure a firm installation.
3. Connection: DMX: connect the signal line of DMX port; Power: ensure that the positive
and negative poles are not connected to the reverse;
4. Fix the glass panel on the bottom cover and fix the glass panel and the bottom cover
with screws from the bottom.
1.The product shall be tested and installed by qualified personnel.
2.This product cannot be waterproof, so it needs to avoid the sun and rain. If it is installed
outdoors, please use the waterproof water tank.
3.Before power-on debugging, ensure all wiring is correct to avoid lamp damage caused
by wrong wiring. Power supply should be within the voltage range, exceeding the voltage
range may burn out the controller.
4.Before electrification, please ensure that all wiring positive and negative poles
correspond correctly. Please check that there is no short circuit between the input and
output wires.
5.Good heat dissipation will prolong the service life of the controller. Please install the
product in a well-ventilated environment.
6.The size of the wires used must be sufficient to load the connected lamps and ensure
the wiring is firm.
7.In case of failure, please do not repair without permission. If you have any questions,
please contact the supplier.
1.Purchase ochase LED controller for technical support and warranty.
·Free warranty; Ochase will provide repair or replacement service if any product quality
problem occurs within 5 years from the date of purchase
·Paid insurance: appropriate maintenance material costs will be charged for products
beyond the free warranty period.
2.The following circumstances are not covered by the free warranty or replacement
service.
·Over high pressure, over load, improper operation and other man-made damages
·Product appearance is seriously damaged or deformed
·Product warranty label and product unique bar code are damaged
·Products have been updated
3.Repair or replacement is ochs 'only remedy to the customer and ochs shall not be liable
for any incidental damages.
4.Only ochase has the right to modify or adjust this warranty, and shall issue a written
confirmation.
Caution
Warranty Agreement
PIN1: DMX+
PIN2: DMX-
PIN7: GND
PIN8: GND
Port 1: power interface V+
Port 2: power interface V-
Port 3: signal interface GND
Port 4: signal interface DMX
Dial code switch 2: control indicator light on/off
Dial code switch 1: control the button tone on/off
Port 5: signal interface DMX+
1. Install the electrical box on the wall (dmx-e02l can be installed in the standard electrical
box, and the power adapter can be installed inside or outside the electrical box).
interface introduced
Installation instructions

触控面板
1/3
用户手册: 2019-9 www.euchips.cn
本面板支持4个DMX区域, 每个区域2个通道, 即区域1为通道1~2, 区域2为通道
2~4,区 域 3为通道5~6,区 域 4为通道7~8。每个区域都有相应的指示灯。
点击Zone1/2/3/4区域按钮可分别选中相应的区域,该区域的灯具按照最后一次
关闭的色彩/亮度亮起,同时相应的区域选择指示灯亮起,表示可对该区域的
灯具进行调色温/亮度操作。可通过选择“色环”或“色温模式”进行相应的灯具效
果编辑。其他区域的灯具效果保持不变。
可点击选中另外一个区域按键来切换区域。此时其他区域的灯具效果不变。只
有选中的区域的指示灯亮起,表示该区域可进行编辑操作。
当某个区域被选中时,再次点击该区域图标,则可关闭该区域的灯具,同时区
域指示灯灭。
长按某个区域按钮2秒 钟 ,则 4个区域同时选中,4个区域指示灯同时亮起,此时
可同时对4个区域进行同步操作。
点击”ALL”键也可以同时选中4个区域,但是4个区域指示灯同时灭掉,此时可同
时对4个区域进行同步操作。
选中某个区域或全部区域后。
点击Scene1/2/3/4按钮,可分别调用用户保存的4种场景。每次只能调用1种场景。
在场景调用模式下,不能进行亮度/色温的调节。
对1个或多个区域的灯具进行调光调色后,可长按场景按钮3秒钟,听到“嘀-嘀-
嘀”提示音,则表示当前区域的灯光效果被成功保存进该场景中。
每个区域可保存4个用户自定义的场景。可在已保存过的某个场景的场景按钮
上再次保存新的场景效果(注意:原来保存的场景将被覆盖)。
DMX-E02L
功能描述
尺寸(mm)
面板描述
技术参数
产品特点
型号 DMX-E02L
输入电压 5VDC
调光方式
输入功率
区域数
工作温度
通道数
包装尺寸
净重
DMX512
3-3.5W
4
200g
传输距离 300米(具体视情况而定)
RF功能 支持
0℃~+50℃
8
171x145x48(mm)
产品尺寸 146x106x11(mm)
·符合DMX512(1990)国际标准协议
·支持4个区域独立或同步的色温控制
·支持亮度,色温的实时调节
·高灵敏度玻璃触摸按键及调节环,更精细控制
·采用玻璃材质,外观时尚美观
·兼容任何DMX灯具或DMX驱动器
·可安装在墙体,适合各类墙盒。
·已经保存过的场景再次保存新的场景,原来保存的场景将被覆盖
·支持RF功能,调光、调色温、调用场景等
在关闭状态下点击“开关按钮”开启DMX面板,面板控制的灯具按照上次关闭的
状态亮起。开启状态下点击“开关按钮”,则可关闭面板,所有控制的灯具熄灭,
开关指示灯微亮,用于黑暗中指示开关位置。
夜灯模式键全选键
开关键
亮度调节键
分组Z
滑轮
色温调节键
场景键S
开/关
区域调光
场景设置
当您需要对灯具进行亮度、色温进行编辑时,可使用本面板强大的实时编辑功
能。注意:只有选中相应的区域后才可进行灯具效果的编辑,在场景模式下只
能进行亮度/色温的调节。操作”指南进行区域的选择。
灯具效果编辑
调节环在不同的编辑模式下,用于不同的功能。
色温模式下,手指滑动调节环可调节选中区域的灯具颜色。
亮度模式下,手指滑动调节环可调节选中区域的灯具亮度。
调节环
点击Night键,4个区域的灯达到暖光1%的亮度。按ALL和分组退出该模式。
夜间模式调节

PIN1: DMX+
PIN2: DMX-
PIN7: GND
PIN8: GND
端口1:电源接口V+
端口2:电源接口 V-
端口3:信号接口GND
端口4:信号接口DMX
拨码开关2:控制指示灯的开/关
拨码开关1:控制按键音的开/关
端口5:信号接口DMX+
1.在墙体上安装电气盒(DMX-E02L可以安装在标准的电气盒内, 电源适配器可以
安装在电气盒的内部或者外部)。
接口介绍
安装说明
触控面板
2/3
用户手册: 2019-9 www.euchips.cn
RF 连接说明
面板与遥控是否对应如右图所示:
对于不对应面板的:
比例亮度调节键
CW/WW键:
选中单个区域或所有区域,按25%亮度键则该区域的灯变为25%的亮度。按
50%亮度键则该区域的灯变为50%的亮度。按75%亮度键则该区域的灯变为7
5%的亮度。按100亮度键则该区域的灯变为100的亮度。
短按WW键进行所选区域的暖色增加调节,短按CW键进行所选区域冷色增加
调节。
亮度调节键:
短按+键进行所选区域的亮度增加调节,短按-键进行所选区域的亮度的减少
调节。
色环:
用户选中相应区域后,用手指滑动色环可调节选定区域的灯具颜色(在场景模
式下不可用)。
场景按键调用面板保存的4个场景,分组Zone1、2、3、4分别对应面板上的4
个区域。(无长按功能)。
用户选中相应区域(或全选)后,点击“亮度”按钮,进入“亮度调节”状态,在状态
下可进行选中区域的灯具的亮度调节,或者进行当前的场景的亮度整体调节。
用手指滑动“色环”进行亮度的调节,顺时针变亮,逆时针变暗;最暗为5%的亮度.
亮度调节
用户选中相应区域后,点击色板按钮进入“色彩调节”模式,用手指滑动色环可
调节选定区域的灯具颜色。
色温调节
ALL键按下,表示4个区域全选,可进行亮度以及色温的调节,以及场景的调用。
All键
通过拨码开关1进行设置。当拨码开关在“ON”端时,有按键音;反之,则没有按键
音。
按键音设置
通过拨码开关2进行设置。当拨码开关在“ON”端时,指示灯亮;反之,则不亮
1. 对码: 选定需要对码的接收器,切断电源10秒钟后重新接通电源,在接通电源
的5秒钟内点击“组开1”键3次 ,等 5秒后,用电源开关键测试是否可以控制,如果
可以控制,确认对码成功。
2. 清码: 选定需要清码的接收器,切断电源10秒钟后重新接通电源,在接通电源
的5秒钟内点击“组开1”键6次,可以看到面板的Zone1按键再不断的切换,用电源
开关键测试是否可以控制,如果不可以控制,确认清码成功
按键指示灯设置
分组1
分组2
分组3
分组4
25%亮度
50%亮度
75%亮度
100%亮度
ALL键,实现四个分组同时控制
B键,亮度调节加
Color键,色温调节减
Night键,执行一个低亮度的场景
亮度加,分为十级
亮度减,分为十级
色温加
色温减
总开关键
对应面板
对应面板
对应面板
对应面板
不对应面板
不对应面板
不对应面板
不对应面板
对应面板
对应面板
对应面板
对应面板
不对应面板
不对应面板
不对应面板
不对应面板
对应面板

触控面板
3/3
用户手册: 2019-9 www.euchips.cn
※本说明书内容如有更新,恕不另行通知。若您使用的产品功能与说明书不一致时,请以产品为准。如有疑问请与我们联系。
1.本产品请由具有专业资格的人员进行调试安装
2.本产品不能防水,需要避免日晒雨淋,如安装在户外,请用防水箱。
3.通电调试前,应确保所有接线正确,以避免因接线错误而导致灯具损坏,电源
供电要在电压范围内,超过电压范围可能会烧坏控制器。
4.通电之前要确保所有的接线正负极对应正确,.请检查输入输出连接线之间无
短路现象,电压是否符合产品电压方面要求。
5.良好的散热条件会延长控制器的使用寿命,请把产品安装在通风良好的环境.
6.使用的电线大小必须能足够负载连接的灯具,并确保接线牢固。
7如果发生故障,请勿私自维修,如果有疑问,请联系供应商。
1.购买欧切斯LED控制器享受技术支持和保修服务。
·免费保修;自购买之日起5年内出现产品质量问题欧切斯给予维修或更换服务
·有偿保险:超过免费保修期的产品收取适当的维修材料成本费用.
2.以下情况不在免费保修或更换服务范围之内。
·过高压,超负载,操作不当等人为造成的损坏
·产品外形严重损坏或变形
·产品保修标签和产品唯一条形码损坏
·产品已经更新换代
3.修理或更换是欧切斯对客户的唯一补救措施,欧切斯不承担任何附带引起的
损害赔偿责任。
4.只有欧切斯享有修正或调整本保修条款的权利,并以书面形式发布认定为准.
注意事项
保修协议
2. 用螺钉将底盖固定在电气盒上,以确保安装牢固。
3.连线:DMX:连接DMX端口信号线;Power:确保正负极没有接反;
4. 将玻璃面板固定在底盖上,并从底部用螺钉将玻璃面板和底盖固定。
Other EUCHIPS Touch Panel manuals
