Eurocave INOA Series User manual
Operating instructions - INOA cellar conditioners
115 V - 60 Hz
Mode d’emploi - Climatiseurs de cave INOA
115 V - 60 Hz


Our greatest wish is to accompany your enthusiasm for wine throughout the years…
To do so, EuroCave puts all of its know-how into action to bring together the essential factors in optimal wine maturing:
Temperature:
The two worst enemies of your wine are extreme temperatures and sudden fluctuations in temperature.
A constant temperature of 10°C /50°F to 14°C /57°F is considered to be ideal for your wine to reach its full potential.
Owing to its electronic regulation system, your EuroCave NOA conditioner is activated as soon as the cellar
temperature rises one degree above the programmed temperature. Furthermore, the presence of a heater built into the
air distributor protects your wine from any significant fall in temperature.
Humidity:
This is an essential factor, enabling corks to retain their sealing qualities. The level of humidity must be higher than 50%
(ideally between 60 and 75 %).
By maintaining a constant evaporation temperature, above 0°C / 32°F your EuroCave NOA conditioner ensures minimal
drying out of the air of your cellar and an ideal level of humidity.
Protection from light:
Light, and more especially its ultra-violet component, will rapidly prove noxious to your wine by irreversible oxidation of
its tannins. For this reason we strongly advise that wines be stored in the dark, far from U.V. light.
Protection from vibration:
Vibration disturbs the slow process of your wine’s biochemical evolution, and is often fatal for the finest wines.
The housing of your EuroCave conditioner is fully sound-proofed (by 20 mm / 3”1/6 polyethylene foam) and the
compressor and fans are fitted with silent blocks to absorb any residual vibration.
Natural aeration:
A constant supply of air from the outside is also indispensable.
We thank you for the confidence you have placed in us.
WELCOME TO THE WORLD OF EROCAVE
3
GB
French Wines
Alsace 10°C / 50°F
Beaujolais 13°C / 55°F
Sweet white Bordeaux 6°C / 43°F
Dry white Bordeaux 8°C / 46°F
Bordeaux reds 17°C / 63°F
White Burgundy 11°C / 52°F
Burgundy reds 18°C / 64°F
Champagne 6°C / 43°F
Jura 10°C / 50°F
Languedoc-Roussillon 13°C / 55°F
Provence Rosé 12°C / 54°F
Savoie 9°C / 48°F
Dry white Loire wines 10°C / 50°F
Sweet white Loire wines 7°C / 45°F
Loire reds 14°C / 57°F
Rhône wines 15°C / 59°F
Sweet wines from the South-West 7°C / 45°F
Reds from the South-West 15°C / 59°F
Australian Wines
Cabernet franc 16°C / 61°F
Cabernet sauvignon 17°C / 63°F
Chardonnay 10°C / 50°F
Merlot 17°C / 63°F
Muscat à petit grain 6°C / 43°F
Pinot noir 15°C / 59°F
Sauvignon blanc 8°C / 46°F
Semillon 8°C / 46°F
Shiraz 18°C / 64°F
Verdhelo 7°C / 45°F
Other wines
Californian 16°C / 61°F
Chile 15°C / 59°F
Spanish 17°C / 63°F
talian 16°C / 61°F
Standard wine service temperatures
4
CONTENTS
1 • CONDITIONER DE CRIPTION p. 5
2 • IMPORTANT AFETY RECOMMENDATION p. 6
3 • ELECTRICAL POWER UPPLY p. 6
4 • CARE FOR THE ENVIRONMENT AND ENERGY AVING p. 6
5 • IN TALLING YOUR CONDITIONER p. 7
6 • CONDITIONER OPERATION p. 8
7 • COMMI IONING YOUR CONDITIONER
- Connection p. 9
- Switching on p. 9
- Remote control description p. 9
V- nstalling the remote control p. 10
V- Setting the temperature p. 11
V - Silent function p. 11
V - “Heating” function p. 12
V - Changing the remote control batteries p. 12
X- Discharging condensate p. 12
8 • EVERYDAY MAINTENANCE p. 12
9 • TECHNICAL PECIFICATION p. 12
5
GB
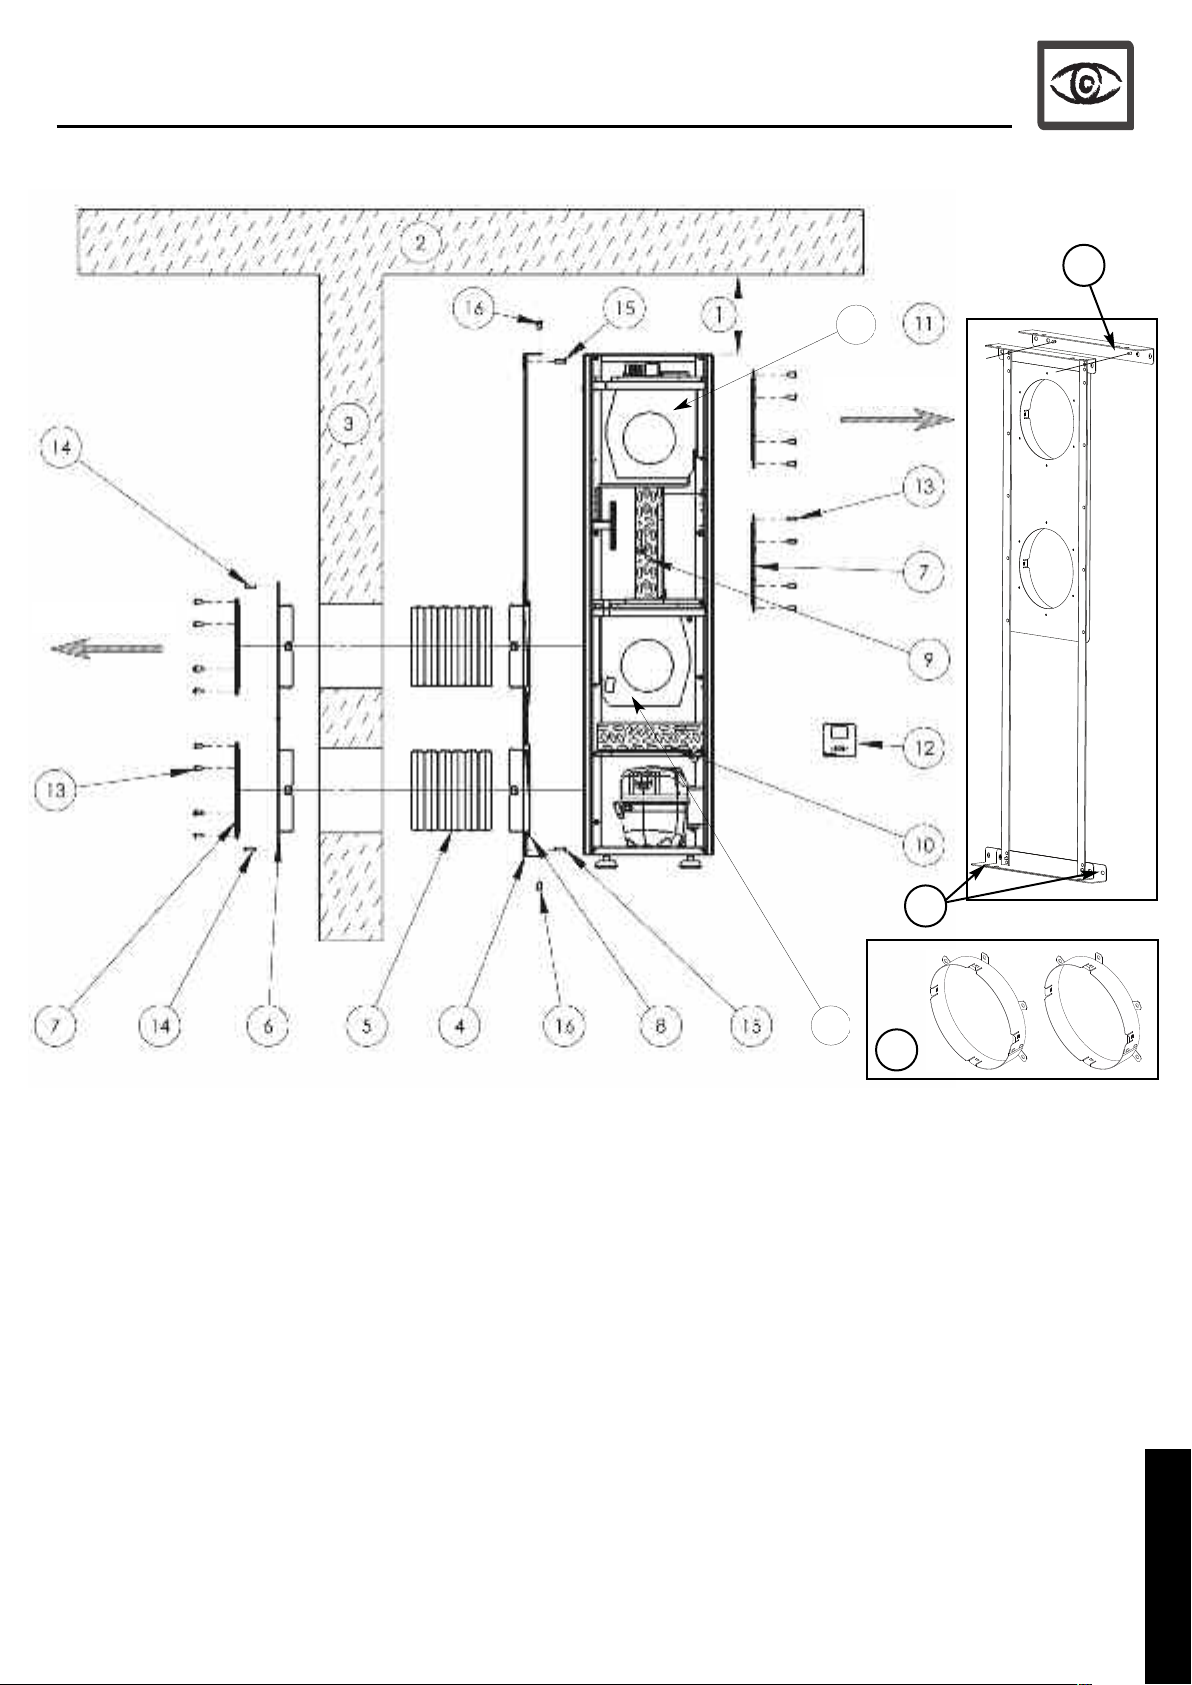
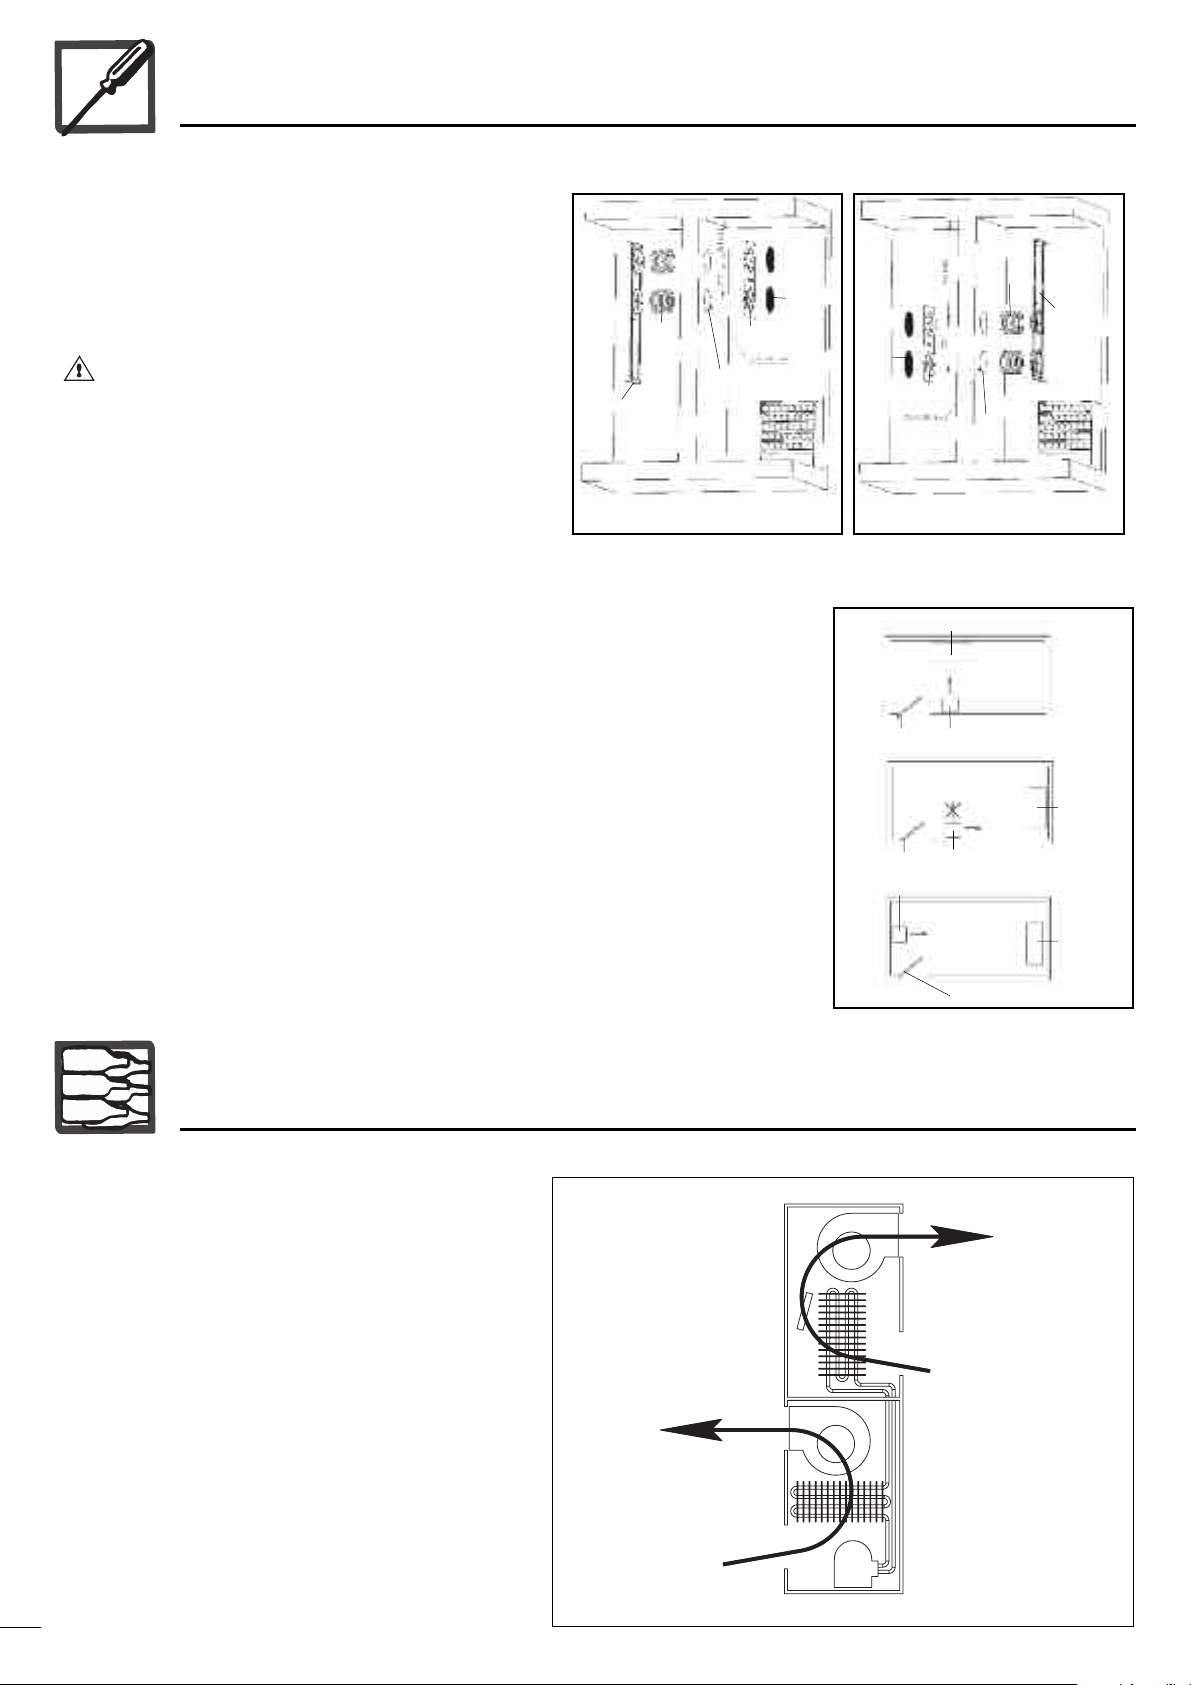
1 - Distance between ceiling / conditioner:
8 inches /200 mm min.
2 - Ceiling
3 - Cellar wall
4 - Metal mounting frame
5 - Flexible ducting
6 - Aesthetic front panel
7 - Grid, to be cleaned regularly (see p.12)
8 - Mounting frame / conditioner seal
9 - Evaporator, to be cleaned regularly (see p.12)
10 - Condenser, to be cleaned regularly (see p.12)
11 - nside of cellar
12 - Remote control
13 - Grid securing screws (quantity: 24) (supplied)
14 - Aesthetic front panel securing screws
(quantity: 4) (not supplied)
15 - Screws to fix frame to the wall (quantity: 4)
(not supplied)
16 - Screws to fix conditioner to the frame
(quantity: 4) (supplied)
17 - ron corner (quantity: 2)
18 - Flange (quantity: 2)
19 - Evaporator fan
20 - Condenser fan
1 - CONDITIONER DESCRIPTION
HOT A R
COLD A R
17
17
18
20
19
2 - IMPORTANT SAFETY RECOMMENDATIONS
Your conditioner’s power lead is supplied with a plug. nstallation of a power plug or connection of the conditioner to a junction box must be carried out
by a qualified electrician.
n all cases, the connection of your conditioner must be carried out on an earthed socket to prevent any risk of electric shock.
Have an electrician carry out the installation. He will tell you whether or not the socket is correctly earthed and, if necessary, will perform any work required
to bring your installation in line with standards.
IMPORTANT: any electrical work must be carried out by a qualified electrician.
Electric connection must be carried out by means of a device to ensure isolation from the mains system. Disconnection means must be carried out in
compliance with national installation regulations.
Should you move to another country, check that the conditioner’s electrical rating (see grey identification label) complies with the country (voltage,
frequency).
Ensure that the plug (115 V) is correctly earthed and that your installation
is protected by a differential circuit breaker (30 mA*).
*not valid for some countries
3 - ELECTRICAL POWER S PPLY
For your personal safety, the conditioner must be correctly earthed.
4 - CARE FOR THE ENVIRONMENT
AND ENERGY SAVING
6
Never use your conditioner for anything other than its specific purpose as described in this guide.
Never unplug the conditioner by pulling on the supply lead. Take a firm hold on the plug and pull out smoothly in a straight
line from the wall socket.
f the power lead is damaged, it must be replaced by a qualified electrician.
Do not allow children to climb, sit, stand on or hang from the conditioner. They could damage the conditioner, as well as badly
hurting themselves.
This appliance was not designed to be used by people (including children) with reduced mental, sensory or physical abilities
or people lacking experience or knowledge unless somebody responsible for their safety supervises them or has given them
prior instructions on how to use the appliance. Children should be supervised to ensure that they do
not play with the appliance.
Product exclusively designed for cellars or rooms which are not lived in (storeroom, garage).
Never damage your appliance’s refrigeration unit.
When using your
conditioner, you should
always observe certain basic
precautions, especially:
Warning
Disposal of packaging:
The packaging used by EuroCave is made of recyclable materials.
After unpacking your conditioner, take the packaging to a waste disposal centre. For the most part it will be recycled.
Recycling: A caring gesture
Electrical and electronic equipment have potentially hazardous effects on the environment and public health due to the presence of
noxious substances.
You should therefore never dispose of electrical or electronic equipment with unsorted municipal waste.
When buying a new EuroCave product (wine cabinet, cellar conditioner, Vin au Verre), you can take advice about the recycling of your old appliance from
your EuroCave dealer.
n compliance with legal provisions covering respect and care for the environment, your conditioner does not contain CFCs.
Energy saving:
- nstall your conditioner in an appropriate place and within the recommended temperature ranges.
- Keep the door open for as short a time as possible.
N.B.: Care for the environment: when replacing your conditioner, consult your local municipal refuse department in order to observe the appropriate
recycling procedure.
For refrigerant gases, substances and some parts contained in the conditioner, EuroCave uses recyclable materials which require a special packaging disposal
procedure to be followed.
Place unusable appliances out of use by unplugging them.
7
GB
5 - INSTALLING YO R CONDITIONER
- When your appliance is delivered, ensure, after unpacking, that your conditioner shows no apparent damage to exterior appearance (impacts, buckling, etc.).
- n the event of a problem, contact your EuroCave dealer.
- Important: insulation of your cellar is crucial for your conditioner to perform at its best. The quality of your insulation will determine the stability of the
programmed temperature. Do not use fibrous insulation, such as glass wool or rock wool.
We recommend that you use extruded polystyrene, at least 3”1/6 / 80 mm thick.
• Positioning your conditioner:
The conditioner produces cold air inside the cellar and expels hot air outside (see diagram A).
- Do not install the conditioner facing the door of the room (risk of condensation on the door seal).
- Do not place the external section of the conditioner above a source of heat.
- For insulation reasons, there must be no windows or bay windows in the room to be conditioned.
- No piped hot water must pass through the room to be conditioned (e.g. under-floor heating).
- The exterior of the conditioner must not be located in an area subject to atmospheric exposure.
- No heat-producing appliance must be located in the area to be conditioned (e.g. refrigerator, radiator, boiler).
- Do not obstruct the air entry and exit points.
- Never place an object or container containing liquid on top of the conditioner.
- The room where the hot air is expelled must, ideally, be approximately twice as large as the wine cellar and
well ventilated so that the hot air can be properly expelled.
- Wait 48 hrs before plugging in so that the internal circuit fluids can settle.
- Never connect several conditioners to a multi-socket.
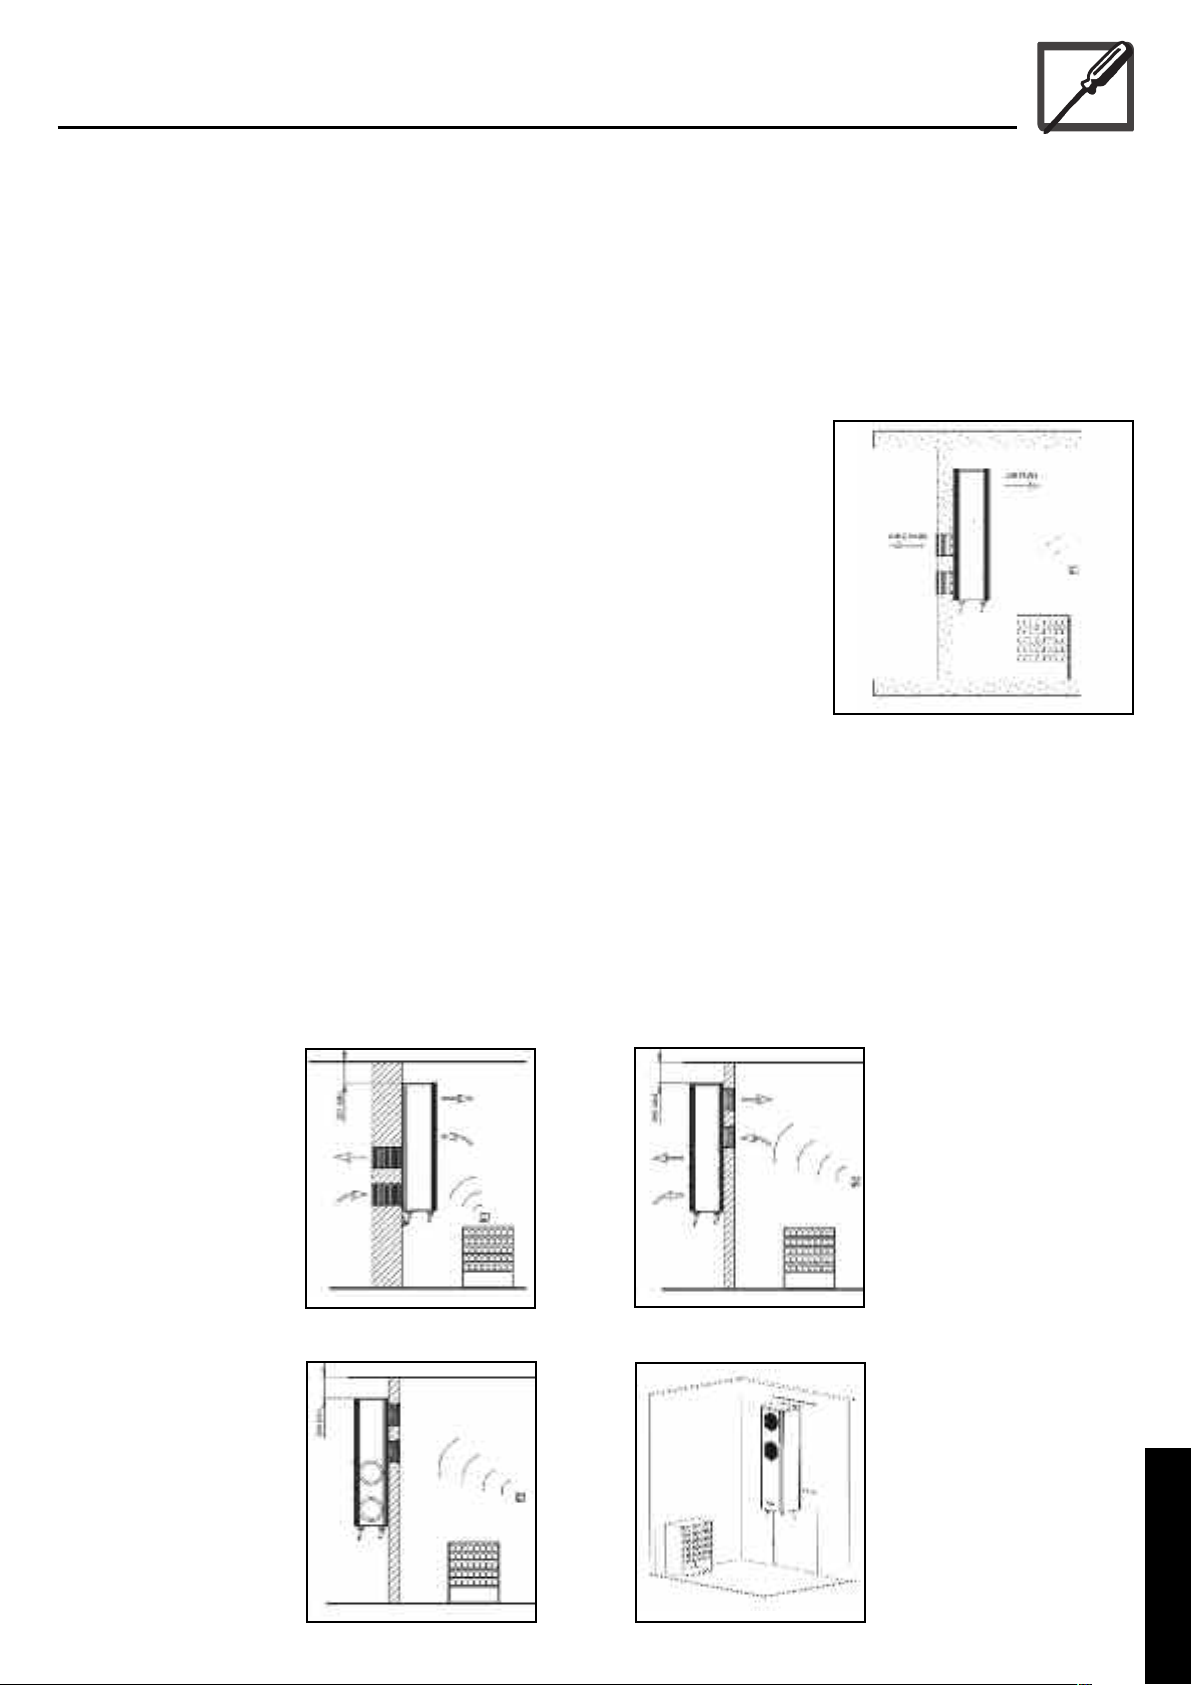
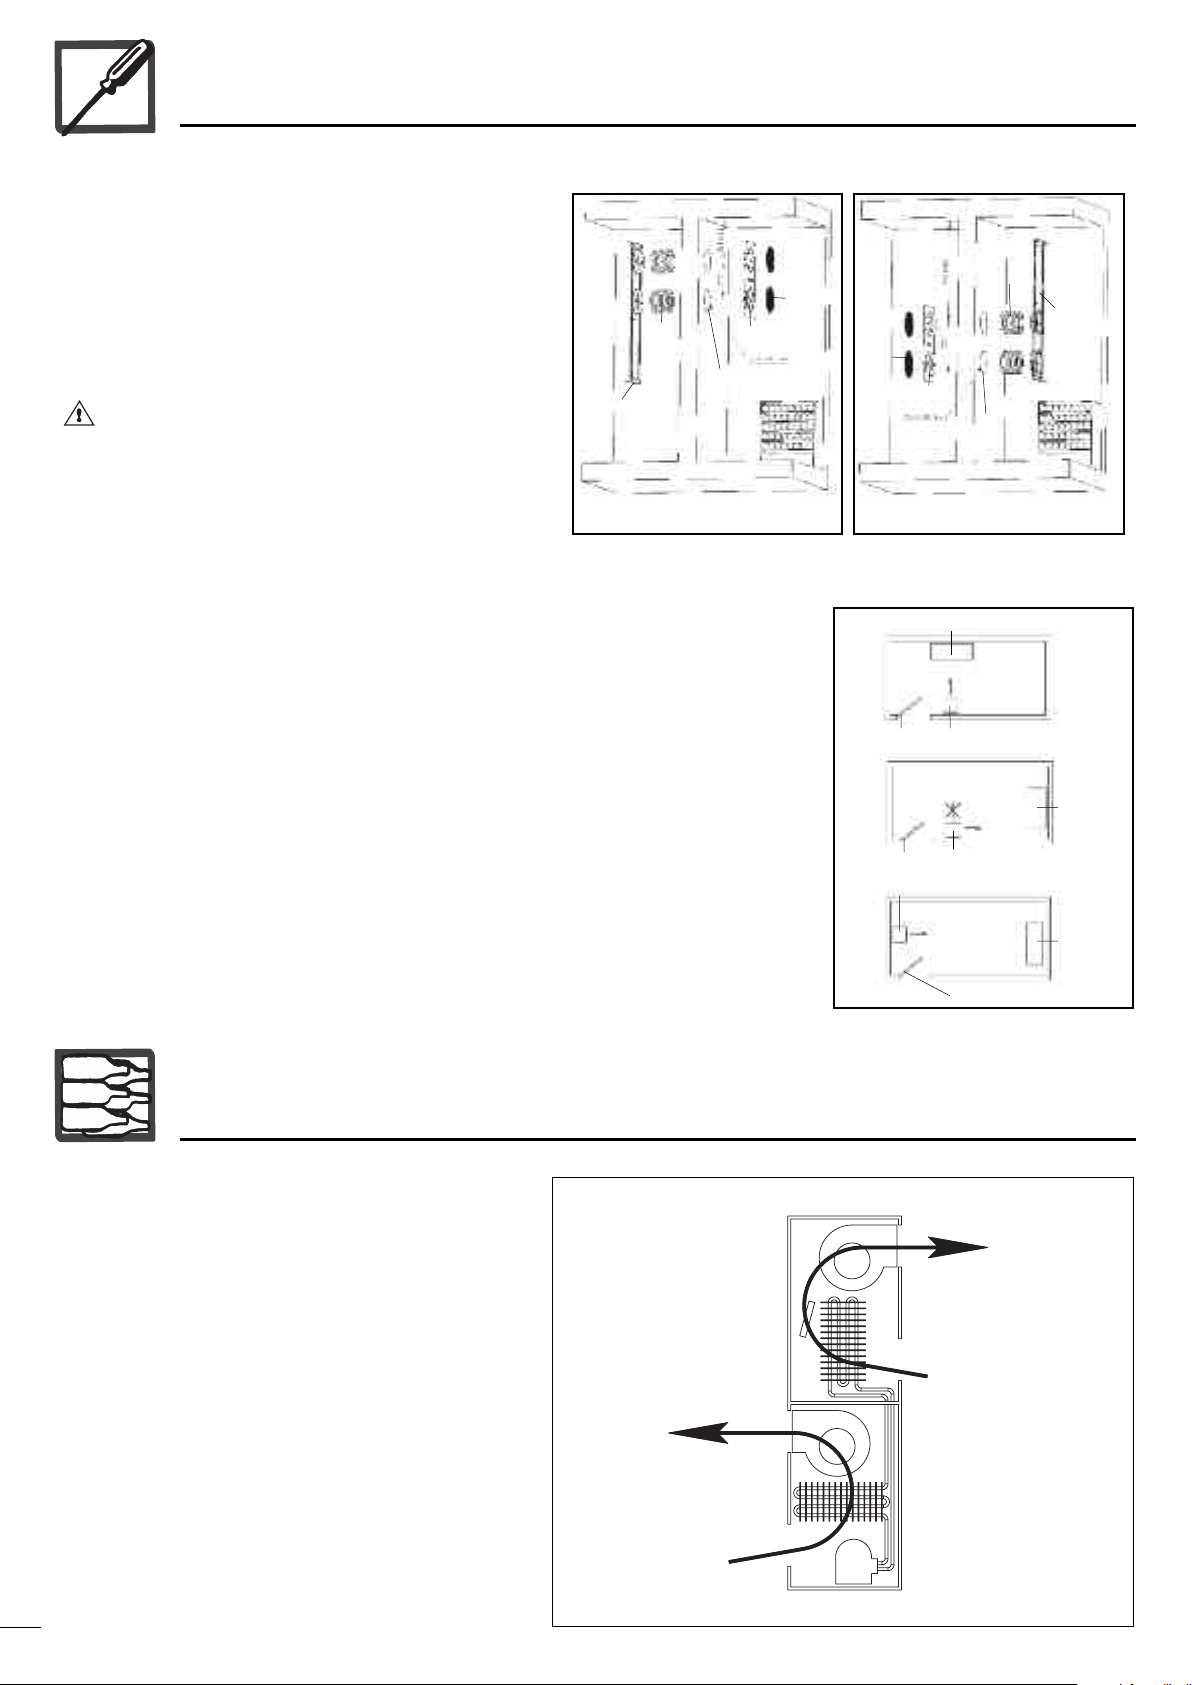
• Installation: (see B diagrams)
Your conditioner was designed to be completely modular and adapt to any type of cellar.
You can, amongst other options, install it either outside or inside your cellar, position it close to the floor (fixed to the wall) or at a height (we recommend,
however, installation at a height for improved air convection).
Additionally, hot air can be expelled from different angles (to be specified when ordering): facing forwards, right or left.
You also have the option of expelling hot air outside the room by way of extractor piping (standard piping, 6”1/3 / 160 mm in diameter, not supplied).
Finally, you can choose to fit the conditioner onto a door. n this case, get your fitter to check that the door is able to support a weight of 100 pounds / 46
kgs and that it does not produce vibration.
Ventilated
room
Temperature:
Max.: 95°F
Min.: 23°F
CELLAR
Diagram A
Hot air
expelled
Cold air
discharged
Conditioner housed inside the
cellar with extraction facing
forwards / aesthetic front panel on
the outside
Diagram B
Hot air
expelled
Cold air
discharged
Diagram B
Conditioner housed outside the
cellar with extraction facing
forwards / aesthetic front panel on
the inside
Conditioner housed outside the
cellar with extraction on the left
side / aesthetic front panel on the
inside. chéma B Conditioner housed inside the cellar,
fitted onto an adapted door.
chéma B
5 - INSTALLING YO R CONDITIONER
8
6 - CONDITIONER OPERATION
Cold air
Hot air
(heated if necessary)
Hot air
Evaporator
Condenser
Compressor
Fan
Turbine
Heater
The NOA conditioner is fitted with a refrigerating unit:
• an evaporator forces cold air inside the room,
• a condenser expels the hot air outside.
The evaporator fan operates continuously to ensure that air is
constantly mixed and that temperatures are as uniform as possible,
in accordance with speeds automatically adjusted according to
requirements.
• Fitting: (see C diagrams)
Your conditioner comes supplied with a metal mounting frame which
simplifies the process of drilling air entry and exit holes.
t also has 2 flexible ducts to be cut to length (30”each) in order to
install the conditioner whatever the thickness of the wall.
Finally, your conditioner is supplied with an aesthetic front panel and 4
grids for an aesthetic appearance.
t is possible to replace the flexible ducting with a 7”5/6 diameter
external rigid pipe. Fit the 2 angle brackets onto the metal frame (see
diagram).
• Recommendations:
- Fit your conditioner as close as possible to the ceiling in order to ensure uniform dispersal of cold air in the
cellar.
- We recommend that you leave a space of 8” / 200 mm between the ceiling and your conditioner to make it
easier to fit the appliance on its base.
- The air outlets (hot and cold) must not be obstructed by any obstacle (minimum distance: 59” / 1500 mm).
Direct the cold air outlet so it is facing the bottles (see diagram D).
The installation (wall drilling and fitting) of your conditioner must be carried out by a EuroCave approved fitter.
bottles
bottles
bottles
door
door
door
conditioner
conditioner
conditioner
CELLAR
CELLAR
CELLAR
Diagram D
metallic
mounting
frame
ducting
wall
drill holes
aesthetic front
panel
aesthetic front
panel
grid
grid
wall
drill holes
ducting
metallic
mounting
frame
Diagram C Diagram C
nstallation with conditioner housed
inside the cellar
nstallation with conditioner housed
outside the cellar

9
GB
7 - COMMISSIONING YO R CONDITIONER
- Connection
Check that the plug is connected to a power supply (presence of correct amp fuses, functioning 30 mA* differential circuit breaker - not applicable to certain
countries). Wait 48 hours before plugging in your conditioner.
- Switching on
- Place the switch, located under the conditioner, in position 1.
- Press and hold down the key on your remote control for about 8 seconds, until the indicator goes off.
To put your conditioner on standby, press and hold down the key on your remote control for about 5 seconds and release it before the indicator
goes off.
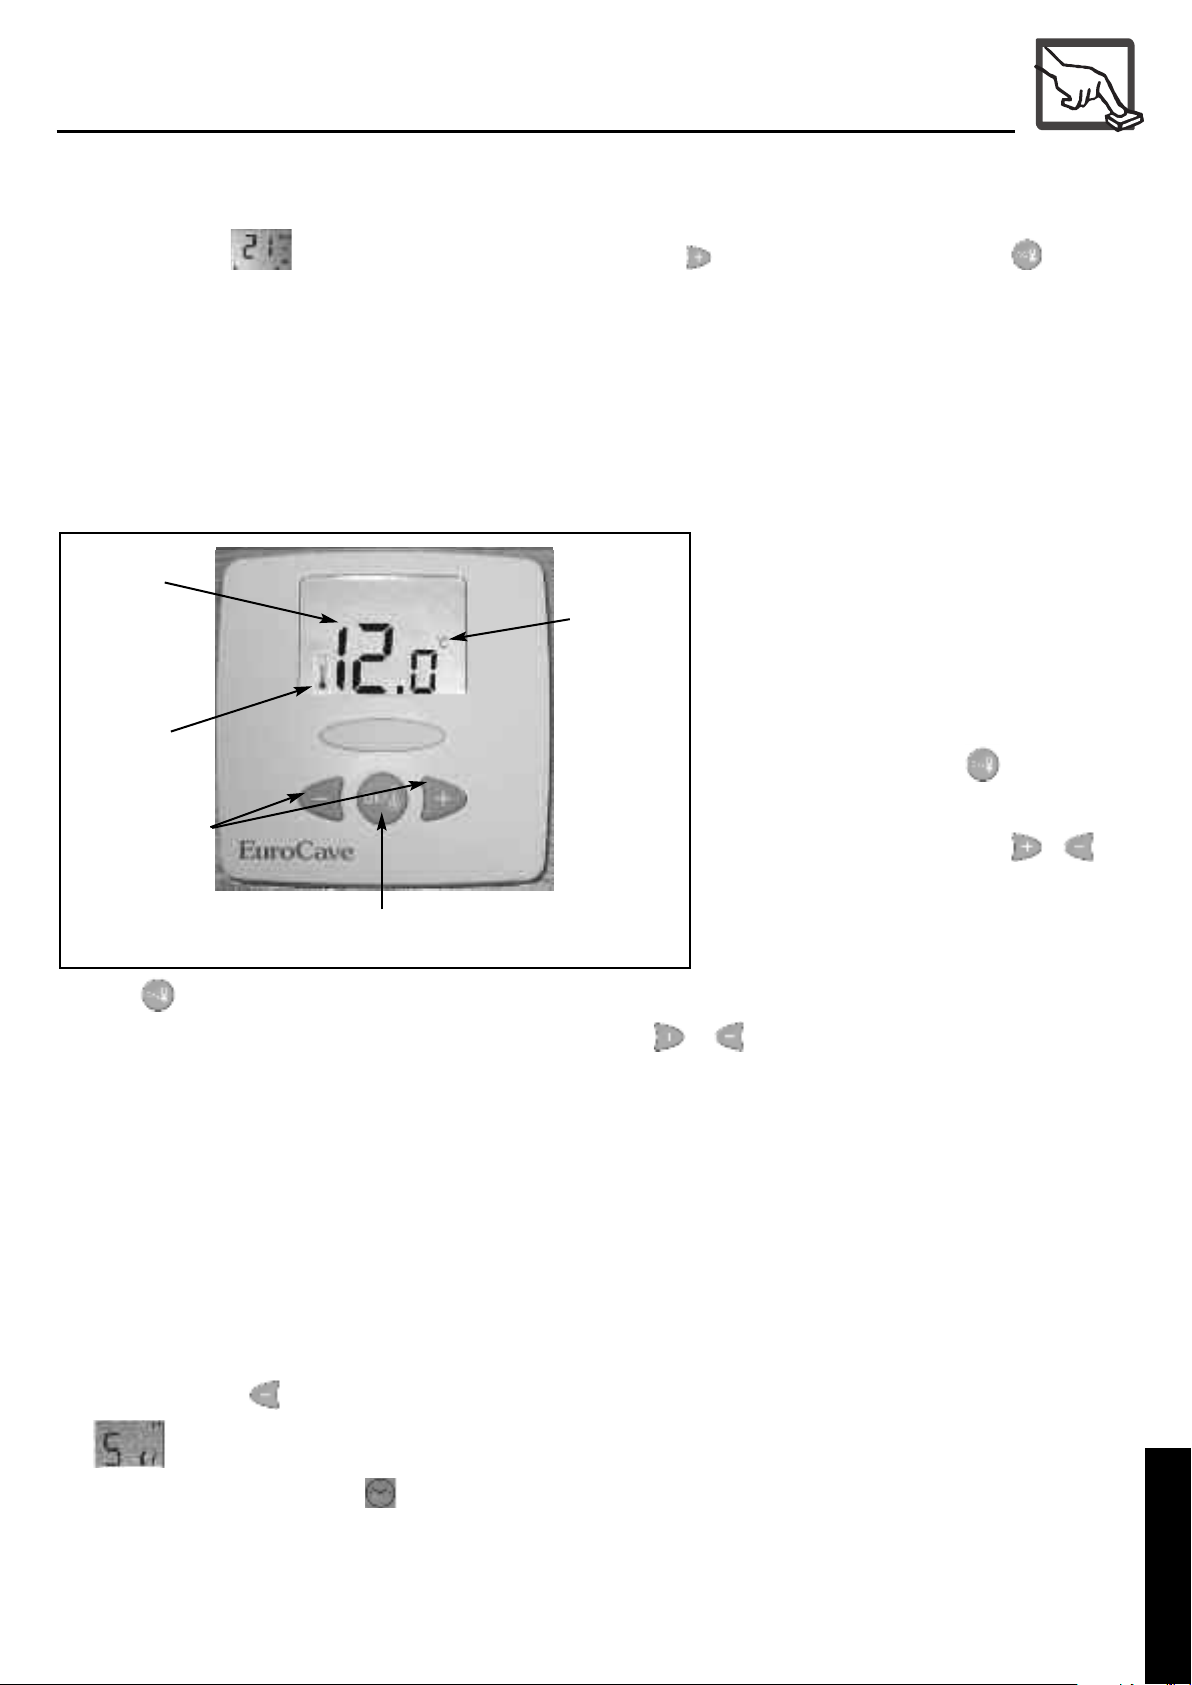
- Remote control description
Radio frequency remote control (433.92 Mhz).
Each remote control has a personalised code matched to the conditioner.
Temperature
indicator
Low battery
indicator
Knob
Temperature units
(according to the
country)
Confirmation and on/off key
Temperature and
setting display
Adjustment keys
On / off indicator
*
* 54°F

7 - COMMISSIONING YO R CONDITIONER
10
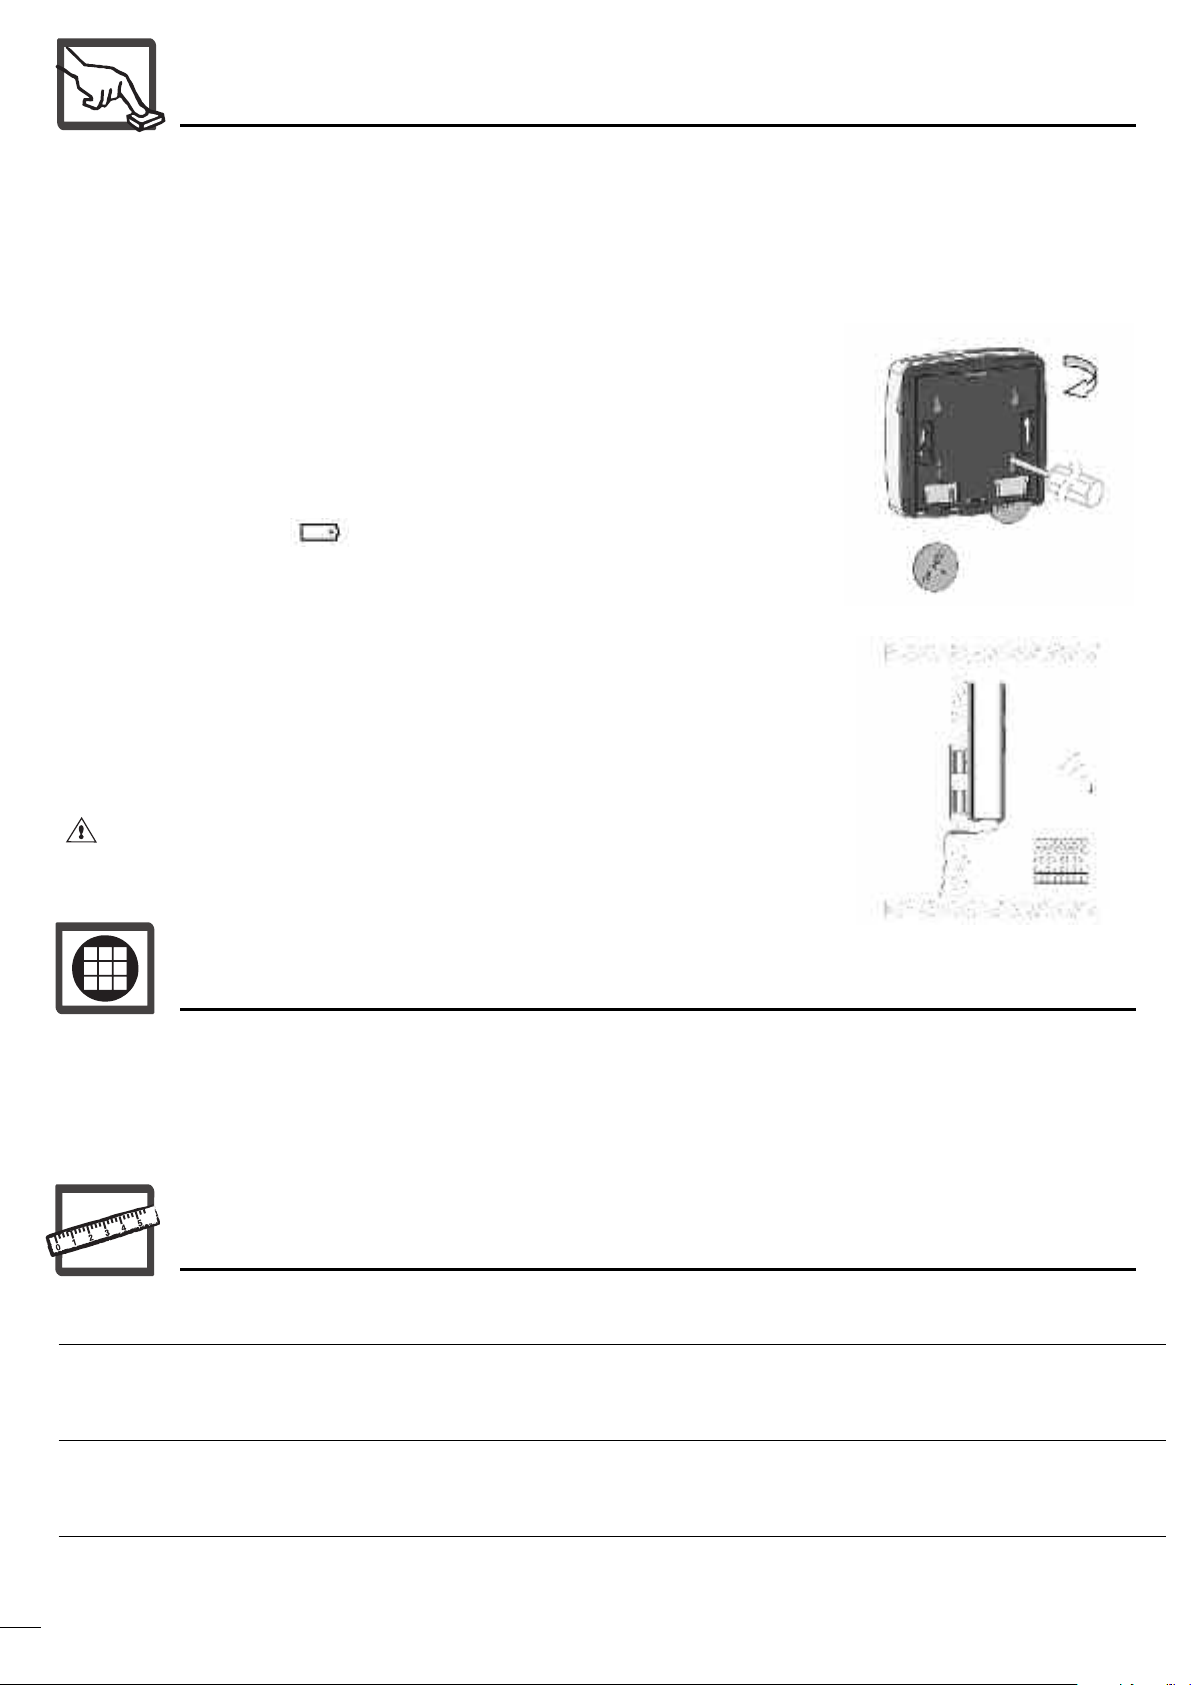
V- nstalling the remote control
You can install the remote control inside your cellar.
We recommend that you place it as close as possible to the bottles.
Fix the unit close to your bottles using the supplied pegs and screws (see diagram below)
N.B.: Do not place the remote control in the path of the conditioner’s cold air flow.
Installing the remote control outside the cellar
t is also possible to place the remote control outside the cellar.
n this case, it is essential to connect a sensor (supplied with the appliance) to the remote control before installing it.
a- Connecting the sensor to the remote control
- On the back of the remote control, push the 2 batteries downwards using a screwdriver (diagram 1).
- Remove the central knob, unscrew the screw with a small screwdriver and open the unit (diagram 2)
- On the back, connect the sensor’s 2 wires (blue and red) to the circuit connector using a small flat screwdriver (diagram 3).
You can connect either the blue wire or the red wire to the circuit connector.
Pass the wires through the recess on the top of the unit.
- Close the unit, ensuring that the wires pass through the recess and are not jammed
- Rescrew and replace the central knob
- Replace the batteries. One in use and the other as a spare with plastic insulator.
b- Programming the remote control
Where placing the remote control outside the cellar, having connected the external sensor, it is essential to reprogramme the unit
- To turn on the remote control, press and hold down the key for about 8 seconds until the indicator goes off.
- First press and continuously hold down the key, at the same time press and continuously hold down the key for several seconds until three lines
appear. The model number is then displayed and flashes. .
- Press .
- The
*
screen appears indicating N ( N= internal installation). Press the key to change to OUT external mode.
- The
*
display appears indicating OUT (OUT= external installation). Press to confirm.
- The
*
pictogram appears. Press .
- The screen appears. Press .
- The pictogram appears. Press .
- .appears. Press .
- The pictogram appears. Press .
- The screen appears, then
*
.
1 2 3
* 70°F (Temperature unit, according to the country)
f you wish to reprogramme the remote control for an internal sensor, disconnect the wired sensor and reprogramme the remote control in internal mode
( N) by repeating the first two steps described in the paragraph above (see 5- -b p.11):
The 2nd screen displays indicating OUT (OUT= external installation). Press the key to change to N internal mode. Press to confirm.
Then repeat the same steps, as indicated in the above paragraph (see 5- -b)
c- Fitting
- Fit the remote control and sensor using the screws and pegs supplied.
- Place the sensor inside the cellar.
- Place the sensor as close as possible to the bottles
N.B.: the sensor has a range of 3 metres.
V- Setting the temperature
Setting the temperature of your conditioner is carried out
entirely from the remote control which has the following
layout:
- Temperature display: displays the actual temperature inside
your cellar.
- Setting keys: allow you to select the desired temperature
inside the cellar.
To adjust the temperature:
- Press then immediately release the key.
The setting then appears (the temperature flashes).
- When the temperature flashes, you have 7 seconds to
change the setting by pressing the or keys,
otherwise the display automatically returns to the previous
setting.
The recommended setting range for maturing wine: 50 to
57°F / 10 à 14°C.
- Press the key to confirm the new setting, the display then returns to the new setting.
The setting can be adjusted between 48 and 59°F / 9 et 15°C. Beyond this range, the and keys do not work.
WARNING: to operate correctly, your conditioner must be in a location where the ambient
temperature is between 23°F is 95°F / -5°C et 35°C.
When making significant modifications to temperature settings, it can take several hours for the temperature in your cellar to stabilise and for the conditioner
to display the desired temperature.
V - Silent function
Your EuroCave conditioner is fitted with a silent function which allows the sound level to be reduced when you enter the cellar.
When the conditioner is on:
- Press and hold down the key for 3 seconds.
The display then appears. Next the current temperature is displayed.
You will be able to see this function via the pictogram which flashes for 15 minutes.
The compressor then remains in operation and the fans change to slow speed for 15 minutes.
After this, the conditioner returns to the default operating speed.
7 - COMMISSIONING YO R CONDITIONER
11
GB
Temperature
units (according
to the country)
Selection and confirmation key
Cellar
temperature
display
Cellar temperature
setting keys
Temperature
indicator
*
* 54°F
12
9 - TECHNICAL SPECIFICATIONS
Dimensions Power Sample Cooling Weight Electrical Heating Refrigerant External Consumption
in mm supply volume m3capacity W Kg power W resistance W temperatures per 24h***
noa 25 L385 x P322 115 V jusqu'à 600 W 43 Kg 580 W** 650 W R134a -5°C à 35°C 3,1 kwh
x H1250 / 60 Hz 25 m3(sansCFC)
L15 1/2” 900 cu.Ft.* 2050 Btu/h** 95 pounds 23°F to 95°F
x P12 3/4” x H 50”
noa 50 L385 x P322 115 V jusqu'à 1200 W** 46 Kg 820 W** 650 W R134a -5°C à 35°C 4,1 kwh
x H1250 / 60 Hz 50 m3(sansCFC)
L15 1/2” 1800 cu.Ft.* 4100 Btu/h** 101,5 pounds 23°F to 95°F
x P12 3/4” x H 50”
* in a very well insulated room - ** for an internal temperature of 54 °F / 12° and an external temperature of 90 °F / 32° C.
*** for an internal temperature of 54 °F / 12° C and an external temperature of 77 °F / 25° C.
Supplied with 10 Feet / 3,50 m power lead without plug.
7 - COMMISSIONING YO R CONDITIONER
V - Heating function
The EuroCave NOA conditioner has a heater (650 W) allowing the internal temperature in your cellar to be maintained at an optimal level.
As soon as the temperature drops below the programmed temperature, the heating function is automatically activated.
V - Changing the remote control batteries
Remote control power supply: 1 x 3 V (CR 2430 battery) (2 batteries supplied)
Battery lifespan: 2 years approx
The remote control is supplied with 2 batteries. Only one battery is required (pull off the plastic strip to make it
useable). The other battery is a spare.
- When the battery runs out, the pictogram flashes on the remote control’s display.
- Take the remote control off the wall.
- On the back of the remote control, push the used battery down using a screwdriver (see diagram opposite).
- Pull the strip from the spare battery, which will then be ready for use.
- Remember to buy a replacement for the spare battery.
X- Discharging condensate
Your conditioner was designed to allow condensate to be discharged (discharge pipe located under the conditioner’s
housing) either inside the cellar, if the humidity level is too low, or outside the cellar.
Simply pass the pipe through the wall to discharge the condensate into the room next to the conditioner housing.
Ensure that the piping is not kinked.
8 - EVERYDAY MAINTENANCE
Vacuum the 4 air entry and exit grids at least twice a year, ensuring that you first unplug the conditioner. Please
note that a refrigeration engineer must be employed for a more thorough cleaning of your appliance’s internal
elements (every two years).

Notre unique volonté est d’accompagner au mieux votre passion du vin tout au long des années… Pour cela, EuroCave
déploie tout son savoir-faire pour réunir les critères essentiels à un vieillissement optimal des vins :
La température :
Les deux ennemis du vin sont les températures extrêmes et les fluctuations brutales de températures. Une température
constante comprise entre 10° /50°F et 14°C /57°F est considérée comme idéale pour le plein épanouissement du vin.
Grâce à son système de régulation électronique, votre climatiseur EuroCave NOA s’enclenche dès que la température
de la cave s’élève d’un degré par rapport à la température programmée. De plus, la présence d’un chauffage intégré dans
le distributeur d’air met votre vin à l’abri de toute chute importante de température.
L’hygrométrie :
C’est un facteur essentiel, permettant aux bouchons de conserver leurs caractéristiques d’étanchéité. Le taux
d’hygrométrie doit être supérieur à 50% (idéalement situé entre 60 et 75 %). En maintenant une température
d’évaporation constante, au dessus de 0°C / 32°F, votre climatiseur Eurocave NOA dessèche peu l’air de votre cave et
assure un niveau d’hygrométrie idéal.
L’obscurité :
La lumière et en particulier sa composante ultraviolette dégrade très rapidement le vin par oxydation irréversible des
tanins. Ainsi, il est fortement conseillé de stocker le vin dans l’obscurité ou à l’abri des U.V.
L’absence de vibration :
Les vibrations perturbent le lent processus d’évolution biochimique du vin et sont souvent fatales aux meilleurs crus. Le
caisson de votre climatiseur EuroCave est entièrement insonorisé (mousse polyéthylène de 20 mm / 3”1/6) et des
silentblocs équipent le compresseur ainsi que les ventilateurs pour absorber toutes les vibrations résiduelles.
L’aération naturelle :
Un apport constant d’air extérieur s’avère également indispensable.
Nous vous remercions de la confiance que vous nous accordez.
Vins français
Alsace 10°C / 50°F
Beaujolais 13°C / 55°F
Bordeaux Blanc Liquoreux 6°C / 43°F
Bordeaux Blanc Sec 8°C / 46°F
Bordeaux Rouge 17°C / 63°F
Bourgogne Blanc 11°C / 52°F
Bourgogne Rouge 18°C / 64°F
Champagne 6°C / 43°F
Jura 10°C / 50°F
Languedoc-Roussillon 13°C / 55°F
Provence Rosé 12°C / 54°F
Savoie 9°C / 48°F
Vins de Loire Blanc Sec 10°C / 50°F
Vins de Loire Liquoreux 7°C / 45°F
Vins de Loire Rouge 14°C / 57°F
Vins du Rhône 15°C / 59°F
Vins du Sud Ouest Liquoreux 7°C / 45°F
Vins du Sud Ouest Rouge 15°C / 59°F
Vins australiens
Cabernet franc 16°C / 61°F
Cabernet sauvignon 17°C / 63°F
Chardonnay 10°C / 50°F
Merlot 17°C / 63°F
Muscat à petit grain 6°C / 43°F
Pinot noir 15°C / 59°F
Sauvignon blanc 8°C / 46°F
Semillon 8°C / 46°F
Shiraz 18°C / 64°F
Verdhelo 7°C / 45°F
Autres vins
Californie 16°C / 61°F
Chili 15°C / 59°F
Espagne 17°C / 63°F
talie 16°C / 61°F
Températures usuelles de service des vins
BIENVEN E DANS L’NIVERS EROCAVE
3
FR

4
SOMMAIRE
1 • DE CRIPTIF DE VOTRE CLIMATI EUR p. 5
2 • CON IGNE DE ÉCURITÉ IMPORTANTE p. 6
3 • ALIMENTATION ÉLECTRIQUE p. 6
4 • PROTECTION DE L’ENVIRONNEMENT ET ÉCONOMIE D’ÉNERGIE p. 6
5 • IN TALLATION DE VOTRE CLIMATI EUR p. 7
6 • FONCTIONNEMENT DE VOTRE CLIMATI EUR p. 8
7 • MIE EN ERVICE DE VOTRE CLIMATI EUR
- Branchement p. 9
- Mise en fonction p. 9
- Descriptif de la télécommande p. 9
V- nstallation de la télécommande p. 10
V- Réglage de la température p. 11
V - Fonction silence p. 11
V - Fonction "réchauffeur" p. 12
V - Changement des piles de la télécommande p. 12
X- Evacuation des condensats p. 12
8 • ENTRETIEN COURANT p. 12
9 • CARACTÉRI TIQUE TECHNIQUE p. 12

5
FR
1 - Espace plafond/climatiseur : 8 inches /200 mm min
2 - Plafond
3 - Mur de la cave
4 - Cadre métallique de montage
5 - Gaine flexible
6 - Façade esthétique
7 - Grille à nettoyer régulièrement (voir p. 12)
8 - Joint étanchéité climatiseur/cadre de montage
9 - Évaporateur à nettoyer régulièrement (voir p. 12)
10 - Condenseur à nettoyer régulièrement (voir p. 12)
11 - ntérieur de la cave
12 - Télécommande
13 - Vis de fixations de la grille (qté : 24) (fournies)
14 - Vis de fixation de la façade esthétique (qté : 4)
(non fournies)
15 - Vis de fixation du cadre sur le mur (qté : 4)
(non fournies)
16 - Vis de fixation du climatiseur sur le cadre
(qté : 4) (fournies)
17 - Cornière (quantity: 2)
18 - Collerette (quantity: 2)
19 - Ventilateur évaporateur
20 - Ventilateur condensateur
1 - DESCRIPTIF DE VOTRE CLIMATISE R
HOT A R
COLD A R
17
17
18
20
19
2 - CONSIGNES DE SÉC RITÉ IMPORTANTES
Le cordon d’alimentation de votre climatiseur est livré sans fiche à brancher. L'installation d'une fiche électrique ou le branchement du climatiseur à un boîtier
de dérivation doit être faite par un électricien qualifié.
Dans tous les cas, le branchement de votre climatiseur doit être effectué sur une prise mise à la terre pour prévenir tout risque de choc électrique.
Faites réaliser l’installation par un électricien qui vous assurera qu'elle est bien mise à la terre et qui effectuera, si nécessaire, les travaux de mise
en conformité.
IMPORTANT : toute intervention doit être effectuée par un électricien qualifié.
Un moyen de déconnexion doit être prévu dans les canalisations fixes conformément aux règles d’installation nationales.
En cas de déménagement dans un pays étranger, vérifiez si les caractéristiques électriques du climatiseur (voir étiquette d'identification grise) correspondent
au pays (tension/fréquence).
Assurez-vous que la prise (115 V) est bien mise à la terre et que votre installation est
protégée par un disjoncteur différentiel (30 mA*).
*non valable dans certains pays
3 - ALIMENTATION ÉLECTRIQ E
Pour votre sécurité personnelle, le climatiseur doit être correctement mis à la terre.
4 - PROTECTION DE L’ENVIRONNEMENT
ET ECONOMIES D’ENERGIE
6
N’utilisez le climatiseur que pour l’usage prévu, comme décrit dans le présent guide.
Ne débranchez jamais l'appareil en tirant sur le cordon d’alimentation. Saisissez fermement la fiche du cordon et tirez droit
pour la retirer de la prise murale.
Si le cordon d’alimentation est endommagé, il doit être remplacé par un électricien qualifié.
Ne laissez pas les enfants grimper, s’asseoir, se tenir debout ni se suspendre au climatiseur. ls pourraient endommager le
climatiseur et se blesser gravement.
Cet appareil n’est pas prévu pour être utilisé par des personnes (y compris les enfants) dont les capacités physiques,
sensorielles ou mentales sont réduites, ou des personnes dénuées d’expérience ou de connaissance, sauf si elles ont pu
bénéficier, par l’intermédiaire d’une personne responsable de leur sécurité, d’une surveillance ou d’instructions préalables
concernant l’utilisation de l’appareil. l convient de surveiller les enfants pour s’assurer qu’ils ne jouent pas avec l’appareil.
Produit exclusivement destiné pour les caves à vin ou pièces cachées (cellier, garage).
Ne jamais endommager le circuit frigorifique de votre appareil.
Lorsque vous utilisez votre
climatiseur, observez toujours
certaines précautions de base,
notamment :
Avertissement
Mise au rebut de l’emballage :
Les pièces d’emballage utilisées par EuroCave sont fabriquées en matériaux recyclables.
Après le déballage de votre climatiseur, apportez les pièces d’emballage dans une déchetterie. Elles seront, pour la plupart, recyclées.
Recyclage : un geste citoyen
Les équipements électriques et électroniques ont des effets potentiellement nocifs sur l'environnement et la santé humaine du fait de la
présence de substances dangereuses.
Vous ne devez donc pas vous débarrasser des déchets d'équipements électriques et électroniques avec les déchets municipaux non triés.
Lors de l'achat d'un nouveau produit EuroCave (Armoire à vin, climatiseur de cave, Vin au Verre), vous pouvez confier le recyclage de votre ancien appareil
à votre distributeur EuroCave.
Parlez-en à votre distributeur EuroCave, il vous précisera les modalités d'enlèvement et de collecte mis en place au sein du réseau EuroCave.
En conformité avec les dispositions législatives en matière de protection et respect de l’environnement, votre climatiseur ne contient pas de C.F.C..
Pour économiser de l’énergie :
- nstallez votre climatiseur dans un endroit adapté et dans le respect des plages de températures données.
- Gardez la porte ouverte de votre cave le moins de temps possible.
N. B. : Respect de l’environnement : lors du renouvellement de votre climatiseur, renseignez-vous auprès des services techniques de votre ville afin de
respecter la procédure de recyclage adaptée.
Pour les gaz réfrigérants, les substances et certaines pièces contenues dans les climatiseurs, EuroCave utilise des matériaux recyclables qui nécessitent en
effet une procédure particulière de mise au rebut.
Mettez hors d’usage les appareils inutilisables en les débranchant.

7
FR
5 - INSTALLATION DE VOTRE CLIMATISE R
- Lors de la livraison de votre appareil, assurez-vous, après déballage, que votre climatiseur ne présente aucun défaut d’aspect extérieur (choc, déformation,...).
- En cas de problème, contactez votre revendeur.
- Important : l’isolation de votre cave est déterminante pour le bon fonctionnement de votre climatiseur. La qualité de votre isolation déterminera la
stabilité de la température programmée. Ne pas utiliser d’isolant fibreux de type laine de verre ou laine de roche.
Nous vous conseillons d’utiliser un polystyrène extrudé d’une épaisseur de 3”1/6 / 80 mm minimum.
• Emplacement du climatiseur :
Le climatiseur produit de l’air frais à l’intérieur de la cave et rejette l’air chaud à l’extérieur (voir schéma A).
- Ne pas installer le climatiseur en face de la porte du local (risque de condensation sur les joints de la porte).
- Ne pas placer la partie extérieure du climatiseur au-dessus d’une source de chaleur.
- Pour des questions d’isolation, la présence de fenêtres ou de baies vitrées dans le local à climatiser est à proscrire.
- Aucune canalisation d’eau chaude ne doit passer dans le local à climatiser (Ex. : chauffage au sol).
- La partie extérieure du climatiseur ne doit pas se trouver dans une zone soumise aux intempéries.
- Aucun appareil produisant de la chaleur ne doit se trouver dans le local à climatiser (Ex.: Frigo, Radiateur,
Chaudière…).
- Ne pas obstruer les entrées et les sorties d'air.
- Ne jamais poser d’objet ou de récipient contenant du liquide sur le dessus du climatiseur.
- La pièce où est rejeté l’air chaud doit, idéalement, être environ 2 fois plus grande que le cellier et bien ventilée
afin que l’air chaud s’évacue correctement.
- Attendre 48 h avant tout branchement afin de laisser reposer les fluides du circuit interne.
- Ne brancher pas plusieurs climatiseurs sur une multiprise.
• Installation : (voir schémas B)
Votre climatiseur a été conçu pour être entièrement modulaire et s’adapter à tous les types de caves.
Vous pouvez entre autres, l’installer soit à l’extérieur ou au contraire à l’intérieur de votre cave, le disposer près du sol (avec fixation au mur) ou en hauteur
(nous recommandons cependant une fixation en hauteur pour une meilleure convection de l’air).
De plus, l’évacuation d’air chaud peut s’orienter de différentes façons (à définir à la commande) : de face, à droite ou à gauche.
Vous avez également la possibilité de rejeter l’air chaud à l’extérieur de votre habitation par des tuyaux d’extraction (tuyaux standards de 6”1/3 / 160 mm
de diamètre, non fournis).
Enfin, vous pouvez choisir d’installer le climatiseur sur une porte. Dans ce cas, faites vérifier par votre installateur que la porte est habilitée à recevoir une
charge de 100 pounds / 46 kg et qu’elle ne génère pas de vibration.
local ventilé
Température :
Maxi : 35°C
Mini : -5°C
CAVE
chéma A
Rejet air
chaud
Sortie
air froid
Climatiseur installé en configuration
caisson à l’extérieur de la cave
avec extraction de face / façade
esthétique à l’intérieur
chéma B
Rejet air
chaud
Sortie
air froid
chéma B
Climatiseur installé en configuration
caisson à l’intérieur de la cave avec
extraction de face / façade
esthétique à l’extérieur
Climatiseur installé en configuration
caisson à l’extérieur de la cave
avec extraction de côté gauche /
façade esthétique à l’intérieur. chéma B
Climatiseur installé en configuration
caisson à l’intérieur de la cave,
positionné sur une porte adaptée.
chéma B
5 - INSTALLATION DE VOTRE CLIMATISE R
8
6 - FONCTIONNEMENT D CLIMATISE R
Air Froid
Air Chaud
(si réchauffeur en fonction)
Air Chaud
Evaporateur
Condenseur
Compresseur
Turbine
Turbine
Réchauffeur
Le climatiseur EuroCave NOA est équipé d’un groupe frigorifique :
• un évaporateur pulse du froid à l’intérieur de la pièce,
• un condenseur rejette l’air chaud à l’extérieur.
Le ventilateur de l’évaporateur fonctionne en continu pour assurer
un brassage permanent de l’air et une bonne homogénéité des
températures, selon des vitesses ajustées automatiquement en
fonction du besoin.
• Pose : (voir schémas C)
Votre climatiseur est fourni avec un cadre métallique de montage pour
simplifier le perçage des trous d’entrée et de sortie d’air.
l est également équipé de 2 gaines extensibles à découper (de 30” / 75
cm chacune) afin d’installer le climatiseur quelle que soit l’épaisseur du
mur.
Enfin, votre climatiseur est livré avec une façade esthétique et 4 grilles
pour un rendu parfait.
t is possible to replace the flexible ducting with a 7”5/6 diameter
external rigid pipe. Fit the 2 angle brackets onto the metal frame (see
diagram).
• Conseils :
- nstallez votre climatiseur le plus près possible du plafond afin d’homogénéiser au mieux la diffusion d’air froid
dans la cave.
- Nous vous conseillons de laisser un espace de 8” / 200 mm entre le plafond et votre caisson pour fixer
aisément l’appareil sur son support.
- La sortie d’air (froid et chaud) ne doit pas être perturbée par un obstacle, (distance minimum : 59” / 1500
mm). Orientez la sortie d'air froid en direction des bouteilles (voir schéma D).
L’installation (perçage du mur et pose) de votre climatiseur doit être effectuée par un installateur agréé par
EuroCave.
bouteilles
bouteilles
bouteilles
porte
porte
porte
climatiseur
climatiseur
climatiseur
CAVE
CAVE
CAVE
chéma D
cadre
métallique
de montage
gaine
extensible
trous de
perçage
du mur
façade
esthétique
façade
esthétique
grille
grille
trous de
perçage
du mur
gaine
extensible
cadre
métallique
de montage
Schéma C Schéma C
nstallation avec caisson à l'intérieur
de la cave
nstallation avec caisson à l'extérieur
de la cave

9
FR
7 - MISE EN SERVICE DE VOTRE CLIMATISE R
- Branchement
Faites vérifier que votre prise est bien alimentée (présence des fusibles et leurs ampérages, disjoncteur différentiel 30 mA en état (non valable dans certains
pays)). Après avoir attendu 48 heures, raccordez votre climatiseur sur le secteur.
- Mise en fonction
- Mettez l’interrupteur qui se trouve sous le climatiseur sur position 1.
- Appuyez sur la touche de votre télécommande pendant environ 8 secondes, jusqu’à ce que le voyant s’éteigne.
Pour mettre en veille votre climatiseur, appuyez sur la touche de votre télécommande pendant environ 5 secondes et relâchez avant que le voyant
ne s’éteigne.
- Descriptif de la télécommande
Télécommande radio fréquence (433.92 Mhz).
Chaque télécommande possède un code personnalisé
apéré à votre climatiseur.
ndicateur de
température
Témoin
batterie faible
Capuchon
Unités de
température
(selon le pays)
Touche marche / arrêt
et de validation
Affichage de
la température
et de la consigne
Touches de
réglages
Témoin marche / arrêt
*
* 68°F

7 - MISE EN SERVICE DE VOTRE CLIMATISE R
10
V- nstallation de la télécommande
Vous pouvez installer votre télécommande à l’intérieur de votre cave.
Nous vous conseillons de la placer au plus près des bouteilles.
Fixez le boîtier à proximité de vos bouteilles à l’aide des vis et des chevilles fournies (voir schéma ci-
dessous)
NB : Ne positionnez pas la télécommande dans le flux d’air froid du climatiseur.
Installation de la télécommande à l’extérieur de la cave
La télécommande peut également se placer à l’extérieur de la cave.
Dans ce cas, il faut impérativement brancher une sonde (fournie avec l’appareil) sur la télécommande avant de la fixer.
a- Branchement de la sonde à la télécommande
- Sur la partie arrière de la télécommande, poussez les 2 piles vers le bas à l’aide d’un tournevis (schéma 1)
- Enlevez le capuchon central, dévissez la vis avec un petit tournevis cruciforme et ouvrez le boîtier (schéma 2)
- Sur la partie arrière, branchez les 2 fils (bleu et rouge) de la sonde sur le connecteur à l’aide d’un petit tournevis plat (schéma 3).
Vous pouvez brancher indifféremment le fil bleu et le fil rouge sur le connecteur.
Faites passer les fils dans l’encoche sur le haut du boîtier.
- Refermez le boîtier en veillant bien à ce que les fils passent dans l’encoche et ne soient pas coincés
- Revissez et remettez le capuchon central
- Remettre les piles. Une en fonction et l’autre en secours avec isolant plastique
b- Programmation de la télécommande
Pour un emplacement de la télécommande à l’extérieur de la cave, après avoir branché la sonde externe, il est impératif de reprogrammer le boîtier
- Pour mettre en fonction la télécommande, appuyez sur la touche pendant environ 8 secondes jusqu’à ce que le voyant s’éteigne.
- Appuyez d’abord sur la touche , sans relâcher, appuyez simultanément et en continu pendant plusieurs secondes sur la touche jusqu’à l’apparition
de trois traits , puis le numéro de la version s’affiche alors clignotant .
- Appuyez sur .
- L’écran
*
s’afficheindiquant N ( N= installation intérieure). Appuyez sur la touche pour basculer sur en mode extérieur OUT.
- L’afficheur
*
apparaît indiquant OUT (OUT= installation extérieure). Appuyez sur pour valider.
- Le pictogramme
*
s’affiche. Appuyez sur .
- L’écran s’affiche. Appuyez sur .
- Le pictogramme s’affiche. Appuyez sur
- Apparaît . Appuyez sur .
- Le pictogramme s’affiche. Appuyez sur .
1 2 3
* 70°F
This manual suits for next models
2
Table of contents
Languages:
Other Eurocave Air Conditioner manuals


