Eurofins Kippy User manual

COMPLETE MANUAL version 2.0
YOU, YOUR PET, YOUR KIPPY
1
CONTENTS OF THE PACKAGE 2
SAFETY 2
BEFORE TURNING KIPPY ON 3
• battery
• application
• activation
NOW YOU CAN TURN KIPPY ON 5
• turn on/off
• signal
• attaching to the collar
START USING KIPPY 7
• Smartphone application
• PC and Tablet application
NOTIFICATIONS 16
RESET 17
CONTACTS 17

Hello!
A warm welcome to the world of Kippy to you and your pet.
Before using Kippy for the rst time, read this instruction manual carefully: it will show you
how to get the best and most appropriate use from your device.
CONTENTS OF THE PACKAGE
Kippy
Base to hook to collar
Fixer for medium/large animals
Fixer for medium/small animals
Battery charger: micro USB cord and transformer
Quick Start Guide
Terms & Conditions and Safety
Kippy ID Code (on the back of Kippy) EF G
B CA
A
B
C
D
E
F
G
H
H
D
X000000
ELECTROMAGNETIC COMPATIBILITY
Magnetic elds in the vicinity of Kippy may cause disturbances in data transmission and should be avoided to prevent
malfunction or damage to the device.
RISK TO CHILDREN OR VULNERABLE PEOPLE
Kippy is not suitable for use by children or individuals with physical, mental or sensory difculties. In these cases supervision is
recommended by a responsible carer who is familiar with the device and its functioning.
NOTE – NATIONAL LAWS ON GPS TRACKING
Certain states may have legislation which restricts the GPS tracking of people, animals or objects. The user is wholly responsible for
complying with local laws in this respect.
SAFETY ADVICE
Although Kippy is compact and extremely lightweight, it may not be suitable for very small animals (less than 5 kg in weight) or animals
with health problems. If in doubt, please consult your vet.
THE BATTERY AND ITS USE
Kippy is powered by a rechargeable lithium polymer battery. To prevent malfunction or damage, it is advisable to follow these
recommendations for the use of rechargeable batteries:
• Do not remove or replace the original battery
• To avoid irreparable damage to the battery and circuits, do not expose the device to heat sources.
DISPOSAL
Batteries are a source of pollution. When you decide to dispose of your Kippy, please follow local guidelines; ask your town
hall for information.
www.kippy.eu •fb.com/kippypet
2
TEMPERATURES
While charging, Kippy should not be exposed to temperatures below 0°C or above 45°C. During normal use, Kippy should not be
exposed to temperatures below -20°C or above 60°C. Kippy should not be exposed to direct sunlight for long periods (for example,
on the car dashboard), and should be stored at temperatures between -10°C and 40°C.
Exposing Kippy to excessively cold or hot temperatures could compromise the battery’s performance or cause distortion of its
components.
WATER RESISTANCE
Kippy is resistant to rain, puddles and brief immersion in shallow water, as long as the USB port is fully closed. However, it is not
advisable to leave Kippy in contact with water or other liquids for prolonged periods.
SAFETY

CHARGE YOUR BATTERY
DOWNLOAD APP OR ACCESS ON LINE
ACTIVATE KIPPY
The device should be charged fully before it is turned on for the rst time. Plug the micro USB cord into Kippy and connect
it to a USB port or an electrical outlet using the transformer. For best results it is preferable to charge Kippy from a normal
socket rather than connection to a PC. When possible, the battery should be charged at high voltage (from a socket) and to
full capacity (100%); otherwise the battery level indicator may be inaccurate.
When charging, the button will show a red light until it charges up to halfway (<50%) and then an orange light while it charges
the remainder (>50%). The battery is fully charged when the button displays a green light.
Kippy’s battery life depends on use and the quality of the GPRS signal. If using Fast Tracking frequently, the battery will last
6-8 hours; if the device is simply switched on without Fast Tracking, the battery can last up to 14 days.
NB: Let Kippy charge for at least 8 hours when charging for the rst time from a normal socket.
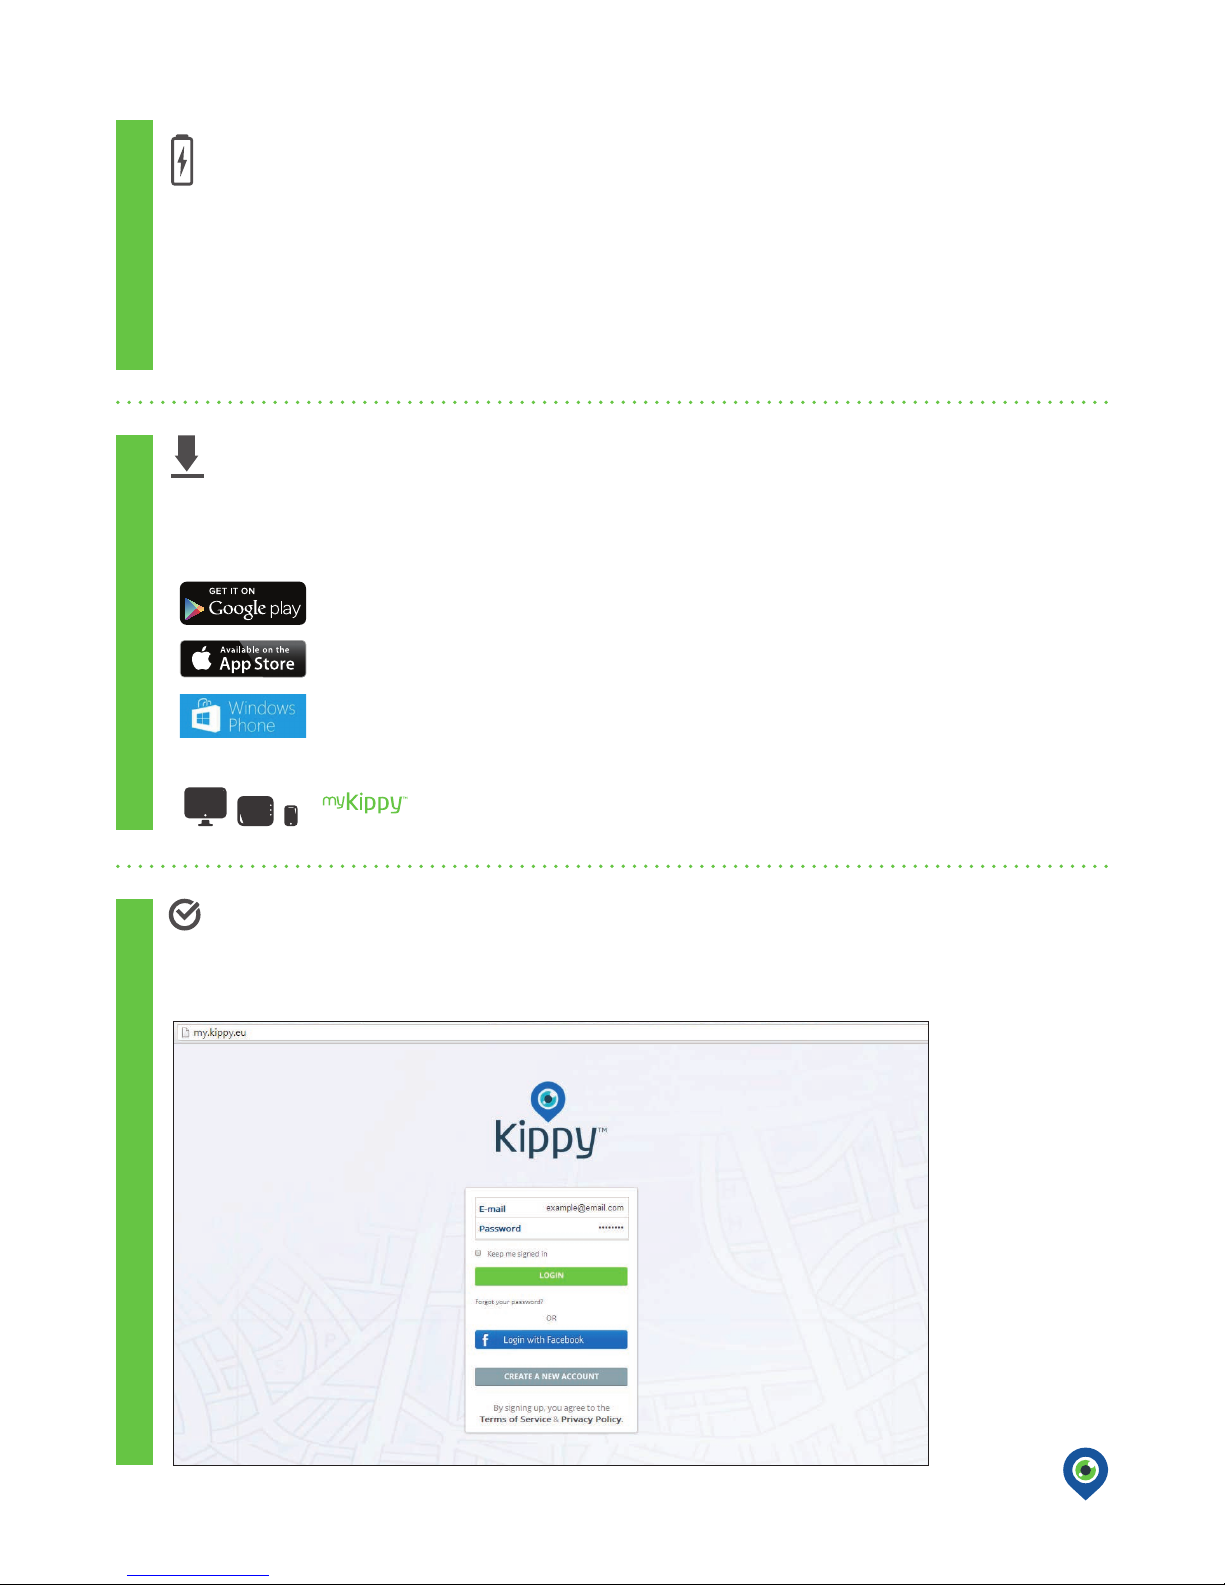
For iPhone and iPad, Windows or Android, download the specic app
1. Access the Kippy app you just downloaded or the my.kippy.eu website
2. Register or login
Go to my.kippy.eu
For iPhone and iPad Apple:
go to App Store, search for Kippy and follow the instructions.
For other Smartphones, Tablets and Computers, access online
For Smartphone and Tablet AndroidTM:
go to Google Play, search for Kippy and follow the instructions.
AndroidTM and Google Play are brands of Google Inc.
BEFORE TURNING KIPPY ON
The Kippy app allows you to track your pet using your smartphone, tablet or PC.
www.kippy.eu •fb.com/kippypet
3
Windows Smartphones:
go to Windows Store, search for Kippy and follow the instructions.
CHARGE YOUR BATTERYDOWNLOAD APP OR ACCESS ON LINEACTIVATE KIPPY

www.kippy.eu •fb.com/kippypet
4
HX000000
3. Click on ADD A KIPPY
4. Click on ADD A NEW KIPPY PET
5. Insert the Kippy ID CODE (H) on the back
of your Kippy, complete the form with
the requested information, and click
“ADD NEW KIPPY”
ACTIVATE KIPPY

NOW YOU CAN TURN KIPPY ON
TURN KIPPY ON/OFF
HOOK TO THE COLLAR
To turn Kippy on, press the switch on back with your nail for at least 2
seconds until you see the green light blink three times in the corner
indicated on the diagram. (Be careful not to cover the switch with your
nger while turning Kippy on).
There are two ways to hook Kippy:
• for large collars
• for small collars
To turn Kippy off, press the switch on the back with your nail for at least
3 seconds until you see the red light blink three times in the corner
indicated on the diagram. (Be careful not to cover the switch with your
nger while turning Kippy off).
To check whether Kippy is on or off, briey press the switch: if on, it will blink green three times; if off,
it will blink red three times.
SIGNAL
• When you turn Kippy on, the switch will blink green 3 times. It will then blink green
every 5 seconds until it connects to the network and gives an estimated position.
• If you choose Fast Tracking mode, the switch will blink orange every 5 seconds: this
indicates that the device is searching for a GPS signal.
• In the complete absence of a signal, the switch will blink red every 5 seconds.
www.kippy.eu •fb.com/kippypet
5
Type of light/blinking Description
3 Green blinks Kippy is on
3 Red blinks Kippy is off
Green led blinking slowly Connecting to GPRS network
Green led blinking rapidly Transferring data to server
Blinking orange every 5 seconds Searching for GPS signal
Constant green light (when connected to power supply) Battery fully charged
Constant red light (when connected to power supply) Battery less than 50% charged
Blinking red every 5 seconds GSM network unavailable
For best results it is advisable to turn Kippy on in an open space and wait 1-2 minutes to make sure it has located a
GPS signal. The rst time you use Kippy, it will take several minutes to obtain a GPS position. It is advisable to carry
out the rst xing in a completely open space, with the Kippy logo on the device facing upwards.
TURN KIPPY ON/OFF
HOOK TO THE COLLAR
Blinking red rapidly Connected to low-voltage power source

LARGE COLLARS: collars up to 2.5 cm – for medium / large animals
What you
will need COLLAR
(up to 2.5 cm)
FIXER C
BASE
KIPPY
BCA
Slide Kippy (A) onto the base (B)
as shown in the diagram, until it clicks into place.
Note: Kippy must be placed in the base on the side with the USB port.
To remove Kippy, pull it out while holding
down the tab on base 1.
STEP 2/2
STEP 1/2
COLLAR
AB
1
Place the back of the base (B) on the outer rim of the collar
and fasten it with the xer (C) onto hook 1and then onto hook 2.
Note: make sure the fastening is inserted precisely into the attachments.
www.kippy.eu •fb.com/kippypet
6
Slide the collar into the xer (D) as illustrated, holding the outer rim
of the collar towards you.
SMALL COLLARS: collars up to 1.5 cm – for small / medium animals
STEP 1/2
COLLAR
(up to 1,5 cm)
FIXER D
D
D
Hook the xer (D) to the back of
Kippy (A), onto hook 1and then
onto hook 2, keeping the outer rim
of the collar in contact with Kippy.
Note: make sure the fastening is inserted
precisely into the attachments.
STEP 2/2
KIPPY
A
12
B
C
(BACK)
COLLAR
21
(BACK)
A
D
COLLAR
LARGE COLLARSSMALL COLLARS
What you
will need

On this page you will nd all the information you need to start using the Kippy application. In the following pages you will nd two
sections: one for using Kippy on a smartphone (Windows, Android, Apple), the other for use on a PC or tablet. The former is an app
for your smartphone, the latter is a web platform accessed from my.kippy.eu
START USING KIPPY
When you rst go to the KIPPY APP:
- IF KIPPY IS TURNED OFF, you will see the last location shown, from the previous use of the app. Locations more than 24 hours old
will be indicated by a black and white pin.
- IF KIPPY HAS JUST BEEN TURNED ON, the app will tell you its location within a few seconds.
The position of Kippy is identied by default using GPS technology (rmware 50 or higher). To reduce the battery usage, you can
disable the GPS in default mode, from the “UPDATE FREQUENCY” menu.
www.kippy.eu •fb.com/kippypet
7
KIPPY APP
THE FIRST TIME YOU OPEN THE KIPPY APP
IF YOU NEED A MORE PRECISE LOCATION IN REAL TIME, USE THE FAST TRACKING BUTTON. (this is activated by default
when the app is opened).
“Fast Tracking” lets you know your animal’s position every few seconds: click on it for use in an emergency.
This function uses GPS technology to show Kippy’s location. You’ll need to wait 1 or 2 minutes for Kippy to connect to the
satellite.
Warning! When you open the app or click on the button to activate Fast Tracking, if the button turns orange, Kippy
is connecting to GPS.
Once the signal has been found, the button will turn green.
If the button stays orange, it means Kippy is in an enclosed space or an area with insufcient GPS coverage. After
5 minutes searching for a signal, you will receive a NO GPS notication, and an LBS search will be activated (using
triangulation of cellphones). LBS positions are indicated by a green circle with the message “Your pet is in this
area”, showing the area where Kippy is 95% likely to be found.
To turn off “Fast Tracking”, press the “FAST TRACKING ON” button: it will turn grey and the message “FAST TRACKING
OFF” will appear.
Warning! When you open the app or click on the button to activate Fast Tracking, if the button turns orange, Kippy
is connecting to GPS.
Once the signal has been found, the button will turn green.
If the button stays orange, it means Kippy is in an enclosed space or an area with insufcient GPS coverage. After
5 minutes searching for a signal, you will receive a NO GPS notication, and an LBS search will be activated (using
triangulation of cellphones). LBS positions are indicated by a green circle with the message “Your pet is in this
To turn off “Fast Tracking”, press the “FAST TRACKING ON” button: it will turn grey and the message “FAST TRACKING
OFF” will appear.

MAP
SMARTPHONE APPLICATION
www.kippy.eu •fb.com/kippypet
8
KIPPY CURSOR
This shows the latest position of your animal.
When you open the Kippy App, you will immediately go to the map page: here you will see your position and that of your animal.
On opening the app, Fast Tracking will be activated automatically, and Kippy will search for the GPS position.
SMARTPHONE - MAP
BLUE DOT
This shows your location.
ARROW CURSOR / KIPPY ICON
Using this frame you can centre the map on your location and
that of your animal. Clicking on the cursor puts your position at
the centre of the map. Clicking on it a second time shows your
animal’s position.
MAP MODE
By clicking here, you can change from map mode to satellite
mode and back again.
HISTORY
Clicking on this icon will open the History mode showing you
the past positions for your pet. To hide this information, click on
the icon again.
FAST TRACKING
On / off button for Fast Tracking.
In MAP mode you can switch from one animal to another by simply performing a sliding movement to the left
or to the right on the box below the map.
MAP MODE
By clicking here, you can change from map mode to satellite
mode and back again.

HISTORY
www.kippy.eu •fb.com/kippypet
9
In this section of the app it is possible to check all the device’s GPS positions detected. You can select the date from the
calendar to view Kippy’s movements, either as a line or as a series of points.
SMARTPHONE - HISTORY
Clicking on the light blue points will show the time and all available data of the position.
1. To access the History mode, click on the icon at top right of the map.
2. Select from the toggle bar the date you want to check. If GPS or LBS data is saved from that date, the app will automatically
display it. Otherwise you will see the message “No data available”.
3. Display with track (default): you will be shown the start and end points of the track, while the others will be hidden and
placed in track. N.B. To appear in a track, the GPS points must be at a maximum of 5 minutes’ interval. You can switch from
one track to another by clicking on the button at bottom right of the map. Some points may be single, unconnected to any
track.
4. Display with single points: clicking on “hide” in the toggle bar, will hide the tracks and all points generated in that single day
will be visible in the track. The points will no longer be indicated by letters but by consecutive numbers. Points which overlap
or are less than 1 metre apart will be combined and shown as a single point. You can move from one point to the next,
starting from point 1, using the button at bottom right of the map.
5. LBS positions will be displayed as a circle of probability, shown as almost transparent so as not to obstruct reading.

www.kippy.eu •fb.com/kippypet
10
SMARTPHONE - CONSTANT ICONS
CONSTANT ICONS
On your app screen you will see these icons frequently. Here’s what they mean:
Your animal’s name and photo, last update, location and
relative distance.
Indication of the strength of the GPRS signal (not
to be confused with the GPS signal) (green: strong
signal; red: weak signal)
Kippy battery level indicator (green: battery charged;
red: battery needs charging)
Map, Proximity and Geofence: these icons show the mode
in which the Kippy app is functioning. The selected mode is
shown in blue.
SMARTPHONE - SETTINGS / LIST
SETTINGS / LIST
In this section, you will nd all the information you need on the basic settings for your Kippy and your user prole.
SETTINGS: When you click on Settings,
you will be directed to a screen where
you can complete or modify your
personal information and your prole
(PROFILE), read your notications
(NOTIFICATION HISTORY), get
clarication on the use of your Kippy
(TUTORIAL), ask Kippy Customer Care
for help (HELP) or disconnect the app
(SIGN OUT).
Here you can view all
the devices linked to the
app (if you have more
than one Kippy): you can
modify data, add more
devices and select which
one to view on the map.
SETTINGS
Select the Kippy
you want to see,
and click on
SETTINGS to view
all available data
and modify as
required.
SETTINGS
Select the Kippy
you want to see,
and click on
personal information and your prole
clarication on the use of your Kippy
(TUTORIAL), ask Kippy Customer Care
for help (HELP) or disconnect the app

www.kippy.eu •fb.com/kippypet
11
SMARTPHONE - SETTINGS / LIST
By clicking on the space for your animal’s photo, you can upload
an image from an album or take a photo directly.
On the screen you can also see your pet’s Kippy ID code, insert
his name and see which version of rmware your Kippy is using.
The rmware will automatically update to the latest version
immediately after the battery has been charged.
The more frequently Kippy connects to the app to send data
(including information about your pet’s position, signal strength
and battery status), the higher the battery use.
To adjust the frequency of data transmission, use your nger
to drag the cursor to the left (for less frequent) or the right (for
more frequent). The range varies from a minimum interval of one
hour to a maximum of 24 hours.
On GPS ACTIVATION (default), you can activate or disable the
GPS even in default mode. When active, xing will be quicker
and the history will be more complete, but battery use will be
higher.
SMARTPHONE - PROXIMITY
PROXIMITY
In this section of the app you can see, with the aid of a compass, the direction your pet is moving in and its position relative to
yours, without using the maps.
BLUE ARROW
Indicates your pet’s latest position shown
by Kippy. The arrow is updated every few
seconds, to show the exact direction your
pet has taken. N.B. if the position of your
mobile phone has an accuracy of less than
10 metres, the Proximity arrow will blink
orange and you will see the message
“Kippy needs a more precsie localization
from your mobile device, please wait”.
This reduces distortions and errors caused
by inaccuracy or approximate position
(LBS) of your phone.
BLUE ARROW CENTRE
The bars inside the blue arrow show the
distance between you and your pet. The
more bars are lled in, the closer you are
to his location.
Each bar represents 100 m.
DISTANCE
Shows the most recent distance between
you and your pet.
PET DIRECTION
Indicates the direction in degrees of your animal’s location.
“Kippy needs a more precsie localization
This reduces distortions and errors caused

www.kippy.eu •fb.com/kippypet
12
SMARTPHONE - GEOFENCE
GEOFENCE
The GEOFENCE function allows you to create virtual limits around your animal. In the park, on the beach, in the garden at home or at
a friend’s, you will always know whether your pet is inside the area you have set. If your animal leaves the virtual fenced area, you
will rapidly receive a notication on your mobile and the Geofence function deactivates automatically: the Fast Tracking function
comes on. By opening the app you can immediately start tracking your pet.
Remember that when you have a Geofence activated, you cannot use the MAP (and Fast Tracking) and PROXIMITY functions. To
return to normal use of Fast Tracking or PROXIMITY, deactivate the Geofence.
1. To create your Geofence, click on “NEW GEOFENCE”.
2. Click on one of the dark blue dots and drag it to the required position, then let go. Repeat with the remaining dots to complete
the Geofence. If you hold down a dot for more than 3 seconds, you will see the message “Keep push and drag”, allowing you
to move the dot. If you make a mistake or wish to begin again, click on “DELETE GEOFENCE”.
3. Activate the Geofence by clicking on the grey button in the top left-hand corner.
4. The button will turn green.
Warning! When you click to activate the Geofence, the button may turn orange for a few seconds: this means the Geofence
is being activated. N.B.: if the button stays orange for longer, or if it suddenly goes orange after the Geofence has
been successfully activated, it means that the GPS signal is weak and so the Geofence is not entirely reliable.
A Geofence which is too limited in size may cause false alarms due to inherent inaccuracies in GPS technology.

KIPPY ON MAP
By clicking here, the map centres on the
selected Kippy.
VIEW ALL
This shows all your Kippys simultaneously.
ME ON MAP
Shows your position on the map. To see
your location, give your consent when
myKippy asks your permission to show
your position.
FAST TRACKING BUTTON
www.kippy.eu •fb.com/kippypet
13
MAP
VIEW MODE
By clicking here, you can
choose between MAP or
SATELLITE mode.
When you open myKippy, you immediately go to the map page: here you will see your position and that of your animal.
myKippy - MAP
PERMANENT SCREEN /
WHITE ARROW ON GREY
Here you can see all your
Kippys. By clicking on the
grey arrow, you can opt
to have them all on-screen
or to hide them. The Kippy
selected is highlighted with
a vertical green band to
one side. When a Kippy is
selected, all notications,
settings and the Geofence
relate to that device.
KIPPY CURSOR
This shows the latest
position of your animal.
SATELLITE mode.
APPLICATION FOR PC AND TABLET - myKippy AREA
In the top right-hand
corner you will see your
name and photo: by
clicking on the arrow next
to it, you can access your
personal settings and sign
out of myKippy.
BLUE DOT
Shows your position (if you have
given myKippy permission to use
the location of your computer).
LEFT-HAND MENU
To the left is your control menu;
from here you can access the main
functions (MAP and GEOFENCE),
read your notications history
(NOTIFICATIONS), get clarication
on the use of your Kippy or ask for
help from Kippy Customer Care
(HELP CENTER), complete or modify
your personal data and prole
(USER SETTINGS).
LEFT-HAND MENU
relate to that device.
KIPPY ON MAP
Default settings for the Geofence, History and GPS functions in the web app will be activated in 2015.

www.kippy.eu •fb.com/kippypet
14
myKippy - CONSTANT ICONS
CONSTANT ICONS
In the myKippy area you will often see these icons. Here’s what they mean:
myKippy - SETTINGS
By clicking on the space for your animal’s photo, you
can upload an image from an album or take a photo
directly.
The more frequently Kippy connects to the app to
send data (including information about your pet’s
position, signal strength and battery status), the
higher the battery use.
To adjust the frequency of data transmission, use
your nger to drag the cursor to the left (for less
frequent) or the right (for more frequent). The
range varies from a minimum interval of one hour
to a maximum of 24 hours.
KIPPY SETTINGS
In this section, you will nd all the information you need on the basic settings for your Kippy and your user prole.
KIPPY SETTINGS:
Here you can see all the data concerning your pet
and modify it as required.
Your animal’s name and photo, last update, location
and relative distance.
Indication of the strength of the GPRS signal
(green: strong signal; red: weak signal)
Kippy battery level indicator (green: battery charged;
red: battery needs charging)
Geofence status indicator (grey: deactivated;
green: activated; orange: activation ongoing)
On the screen you can also see your pet’s Kippy
ID code, insert his name and see which version
of rmware your Kippy is using. The rmware will
automatically update to the latest version immediately
after the battery has been charged.

www.kippy.eu •fb.com/kippypet
15
myKippy - GEOFENCE
GEOFENCE
1. To create your Geofence, click on “NEW GEOFENCE”.
2. Click on one of the dark blue dots and drag it to the required position, then let go. Repeat with the remaining dots to complete
the Geofence. If you make a mistake or wish to begin again, click on “DELETE GEOFENCE”.
3. Activate the Geofence by clicking on the grey button in the centre top.
4.
The button will turn green.
Warning! When you click to activate the Geofence, the button may turn orange for a few seconds: this means the Geofence
is being activated. N.B. if the button stays orange for longer, or if it suddenly goes orange after the Geofence has been
successfully activated, it means that the GPS signal is weak and so the Geofence is not entirely reliable.
The GEOFENCE function allows you to create virtual limits around your animal. In the park, on the beach, in the garden at home or at
a friend’s, you will always know whether your pet is inside the area you have set. If your animal leaves the virtual fenced area, you
will rapidly receive a notication on your mobile and the Geofence function deactivates automatically: the Fast Tracking function
comes on. By opening the app you can immediately start tracking your pet.
Remember that when you have a Geofence activated, you cannot use the MAP (and Fast Tracking) and PROXIMITY functions. To
return to normal use of Fast Tracking or PROXIMITY, deactivate the Geofence.
A Geofence which is too limited in size may cause false alarms due to inherent inaccuracies in GPS
technology.

NOTIFICATIONS
On the web platform (my.kippy.eu) you can see your notication history by clicking on “Notications” in
the left-hand menu.
In the smartphone app you can see your notication history by clicking on “Settings” and then “Notication
History” in the left-hand menu.
NOTIFICATIONS
List of the notications which may appear in your history (some may appear as push notications):
Kippy has been turned on
Kippy has been turned off
At the moment Kippy is unable to locate a GPS signal; this may be because Kippy is in an enclosed space
or an area with a weak signal
Kippy’s rmware has just been updated
Kippy is inside the Geofence
Kippy is outside the Geofence
Kippy is in an area where the temperature is below -15°C and may not function correctly
Kippy’s battery needs charging
Kippy’s location is (address)
Kippy is no longer in Fast Tracking mode. Updating frequency is therefore as selected in the settings
www.kippy.eu •fb.com/kippypet
16

KIPPY srl
KIPPY® - 05/2014
All rigths reserved
For Terms & Conditions, Security and Privacy, go to www.kippy.eu
RESET
RESET
To reset Kippy in the event of malfunction, press the switch on the
back with your nail for a minimum of 10 seconds, until an orange
light appears: release the switch and the light will blink red three
times.
CONTACT US WITH YOUR QUESTIONS OR FEEDBACK
WE WILL REPLY IN 5 LANGUAGES
5 LANGUAGES
ITALIANO 02-23345 320
ENGLISH 02-23345 321
FRANÇAIS 02-23345 322
ESPAÑOL 02-23345 323
DEUTSCH 02-23345 324
FAQ, CONTACT FORM AND SOCIAL MEDIA
FAQ, FORM AND SOCIAL MEDIA
Visit our FB page for all the latest news, interesting facts and direct contact with our team:
ITALIANO www.kippy.eu/it/help
ENGLISH www.kippy.eu/en/help
FRANÇAIS www.kippy.eu/fr/help
ESPAÑOL www.kippy.eu/es/help
DEUTSCH www.kippy.eu/de/help
fb.com/kippypet
17

NOTES
www.kippy.eu •fb.com/kippypet
NOTE


Table of contents
Popular Pet Care Product manuals by other brands

Aqua Medic
Aqua Medic SP 3000 Niveaumat Operation manual

Aqua One
Aqua One moray 480 user manual

Midwest
Midwest Feline Nuvo Fine & Fun Feline Furniture 139C-TN... Assembly instructions

Ddog
Ddog DC-001 operating guide

Pet Gear
Pet Gear PG1020 instruction manual

Aqua One
Aqua One AquaStyle 850 Assembly instructions

Omlet
Omlet Omlet Fido/Maya Pet Sofa instruction manual

VEVOR
VEVOR W3312 manual

Avian Adventures
Avian Adventures Mediana Assembly instructions

Petlibro
Petlibro PLAF203 user manual

DogWatch
DogWatch System 1200 operating instructions

Assisi Animal Health
Assisi Animal Health Assisi Loop 150 Instructions for use