EUROPRO X-PRO 50 User manual
EUROPE PROJECTION - 228, avenue Olivier Perroy 13790 ROUSSET - Tél : +33 (0)4 42 29 08 96 – Fax : +33 (0)4 42 53 44 36
SAS au capital de 400 000 € - RCS Aix-en-Provence B 394 961 510 - NAF 2892 Z - Intracom : FR 54 394 961 510
X-PRO 50 & X-PRO 100
Réf. 40070 / 40080
User manual
Edition of 10/02/2021
More information on www.euromair.com

User manual - X-PRO 50 & X-PRO 100 202102-507-ENGP2
You just acquired one of our
machines and all the team
of Europe Projection thanks
you for the condence
you have granted us.
Manufacturer of professional
equipments for paint and
llers, we have put our
know-how for 25 years
at the service of the
users of our machines.
Our technical & commercial
team is at your disposal
for any further information
you may need about the
machine you just acquired.
EUROPE PROJECTION
228, avenue Olivier Perroy
13790 ROUSSET
Tél : +33 (0)4 42 29 08 96
contact@euromair.com
SUMMARY
1. USER MANUAL............................................................. p. 3
1.1. Importance of the manual .........................................p. 3
1.2. Receivers of the manual............................................p. 3
2. WARNING .................................................................... p. 4
2.1. Safety .....................................................................p. 4
2.2. Electric connection ...................................................p. 6
2.3. End-of-life of the product ..........................................p. 6
3. YOUR MACHINE ........................................................... p. 7
3.1. Description..............................................................p. 7
3.2. Technical characteristics ...........................................p. 7
3.3. Identication of the components X-Pro 50...................p. 8
3.4. Identication of the components X-Pro 100.................p. 9
4. USE OF THE MACHINE ................................................. p.10
4.1. Prerequisites............................................................p.10
4.2. Starting up for spraying.............................................p.11
4.3. Starting up for oor-screed ........................................p.11
5. DEFECTS AND REMEDIES............................................. p.12
6. MAINTENANCE............................................................. p.13
6.1. Cleaning procedure...................................................p.13
6.2. Check-up ................................................................p.13
7. DECLARATION OF CONFORMITY ................................... p.14
8. WARRANTY CONDITIONS.............................................. p.15

202102-507-ENG User manual - X-PRO 50 & X-PRO 100 P3
1. USER MANUAL
1.1. IMPORTANCE OF THE MANUAL
This manual is a key part for the use of your machine. It summarizes the procedures of starting-up, cleaning
and maintenance of the device and also the safety instructions you need to observe.
Read carefully all the working and safety instructions and the warnings included in this manual before
starting your machine.
Most of the accidents are caused by the non-compliance of the safety standards and rules.
This manual must be kept near the machine, within reach of the user and held in good condition until the
nal destruction of the machine.
In case of loss or deterioration of the manual, you can ask the machine manufacturer mentioned on page
4 for a copy at any moment.
1.2. RECEIVERS OF THE MANUAL
This manual is intended to any staff which will manipulate the machine :
- people in charge of the transport of the machine
- people in charge of the use of the machine
- people in charge of the cleaning and maintenance of the machine
- people in charge of the nal destruction of the machine

User manual - X-PRO 50 & X-PRO 100 202102-507-ENGP4
2. WARNING
2.1. SAFETY
Using the machine in an incorrect way or in non-compliance of the safety instructions indicated in
this manual can cause death or serious injuries.
Read carefully all the working and safety instructions and the warnings contained in this manual
before starting your machine.
• Respect all the safety standards before running the equipment.
• Use the equipment only for the applications specied in the manual.
• Always remain alert when using the equipment.
• Transport the machine using the handles or the appropriate grips.
• During the breaks, disconnect electrically the machine.
• Run the equipment to its nominal voltage.
• Let at least 50 cm of free space between the equipment and any obstacle so that the air ow
is not blocked.
• Know how to quickly stop the equipment in case of necessity.
• Never use the equipment while it is running abnormally or it is defective.
• Do not direct a water jet or ammable liquid on the machine.
• Never direct an air jet or product jet on a person or an animal.
• Do not touch warm surfaces of the equipment.
• Always wear adequate body protections (glasses, gloves, overall and mask) and pay attention
to long hair.
• Never touch moving parts.
• Do not insert any object or the hands inside the protection grids to avoid any accident or
damage to the machine.
• For any outside job, only use appropriate extension cords.
• Maintain the equipment carefully and clean it properly after every use.
• Disconnect the equipment before any intervention.
• Avoid absolutely to unscrew any connection while the machine is under pressure.
• Check the damaged parts.
• Do not clean the plastic parts with solvant.
• In case of damage of the electric cable or the plug, do not run the machine and contact a
licensed After-Sale Service to put genuine parts instead of the defective ones.
• In case of needed After-Sale Service, always specify the machine model and its serial number.
• For any replacement of parts, only use genuine parts.
• Do not modify the machine.
• Do not cut or dismantle the protection grids.
• Do not open the electric box.

202102-507-ENG User manual - X-PRO 50 & X-PRO 100 P5
IN CASE OF NECESSITY, WE SAVE OURSELVES THE RIGHT TO MAKE ANY USEFUL
MODIFICATION WITHOUT ADVANCED NOTICE.
2. WARNING (continued)
2.1. SAFETY (continued)
WORKSPACE
• Maintain the workspace clean and clear.
• Ambient operating temperature must be from 5°C and 35°C.
• Do not use the equipment in a potentially explosive area.
• Do not place any potentially inammable objects in close proximity to the machine.
• Take away every not qualied person from the working area of the machine, as well as children and
animals.
• In case of installation of the machine on scaffolding or a plan above ground level, attach the machine
to avoid any fall while operating.
• Do not install the equipment on an inclined surface to avoid the risks of unexpected moves or falls.
HOSES
• Always use hoses and connections adapted to the used product (genuine parts), do not try to x it.
• Do not walk on the hoses, do not bend them.
• Do not use the hoses to pull the machine.
STORAGE
• Keep the equipment in a clean and clear area in which the temperature does not exceed +35°C.
• After every use, necessarily grease the pump with a mixture of water + storage liquid to avoid it blocking
up. The storage of a not greased pump can damage it seriously.

User manual - X-PRO 50 & X-PRO 100 202102-507-ENGP6
2. WARNING (continued)
2.2. ELECTRIC CONNECTION
The electric connection of the machine must be on a 32A - 400V plug with a differential circuit
breaker.
Before any intervention on the machine, make sure that every energy supply is cut (air and
electricity).
GROUND CONNECTOR
All the machines must be connected to the ground when they work to protect the operator from electric
shocks. Our machines are all equipped with standardized connection plugs.
Electric connection must be made by a qualied technician. It is fobidden to modify or dismantle the
machine, especially the electric box.
Repairs must be made by an authorized center or our After-sale Service.
During any intervention on the machine, make sure that the ground is well reconnected.
EXTENSION CORDS
During the use of an extension cord, make sure that it is not crushed or damaged and that it contains a
ground. Check that the section of the used extension cord is sufcient to support the machine when it is
working. A too thin extension cord can cause voltage drops or overheating of the machine.
In case of use of a cable reel, it is imperative to unwind it entirely, otherwise, the equipment can be
damaged. The section must be proportional to the length of the cord.
2.3. END OF LIFE OF THE PRODUCT
At its end-of-life, the machine must not be eliminated with the other household waste. The
uncontrolled elimination of waste can harm the environment or human health. Individuals are
invited to contact the distributor which sold them the product or to inquire with their city hall
to know where and how to get rid of the product so it can be recycled while respecting the
environment.
Under the regulation of Waste of Electrical and Electronic Equipments (WEEE), we undertake to
process the used EEEs according to the following provisions: applicable only to products on the
market since 08/13/05, under the brands EUROPE PROJECTION or VOLUMAIR, products of other
brands sold by our company (upon presentation of the corresponding invoices), products that
operate using electrical energy (for example, thermal washers or compressors do not fall into this
category).
Treatment modality
WEEE returns collected by our clients/distributors at their own expense to our collection points in
Antony (92) or Rousset sur Arc (13). Upon receipt, the products are sorted by our employees and
directed to the most appropriate processing channels.
For any further information, please contact our hotline +33 4 42 29 08 96 or conseil@euromair.com.

202102-507-ENG User manual - X-PRO 50 & X-PRO 100 P7
3. YOUR MACHINE
3.1. DESCRIPTION
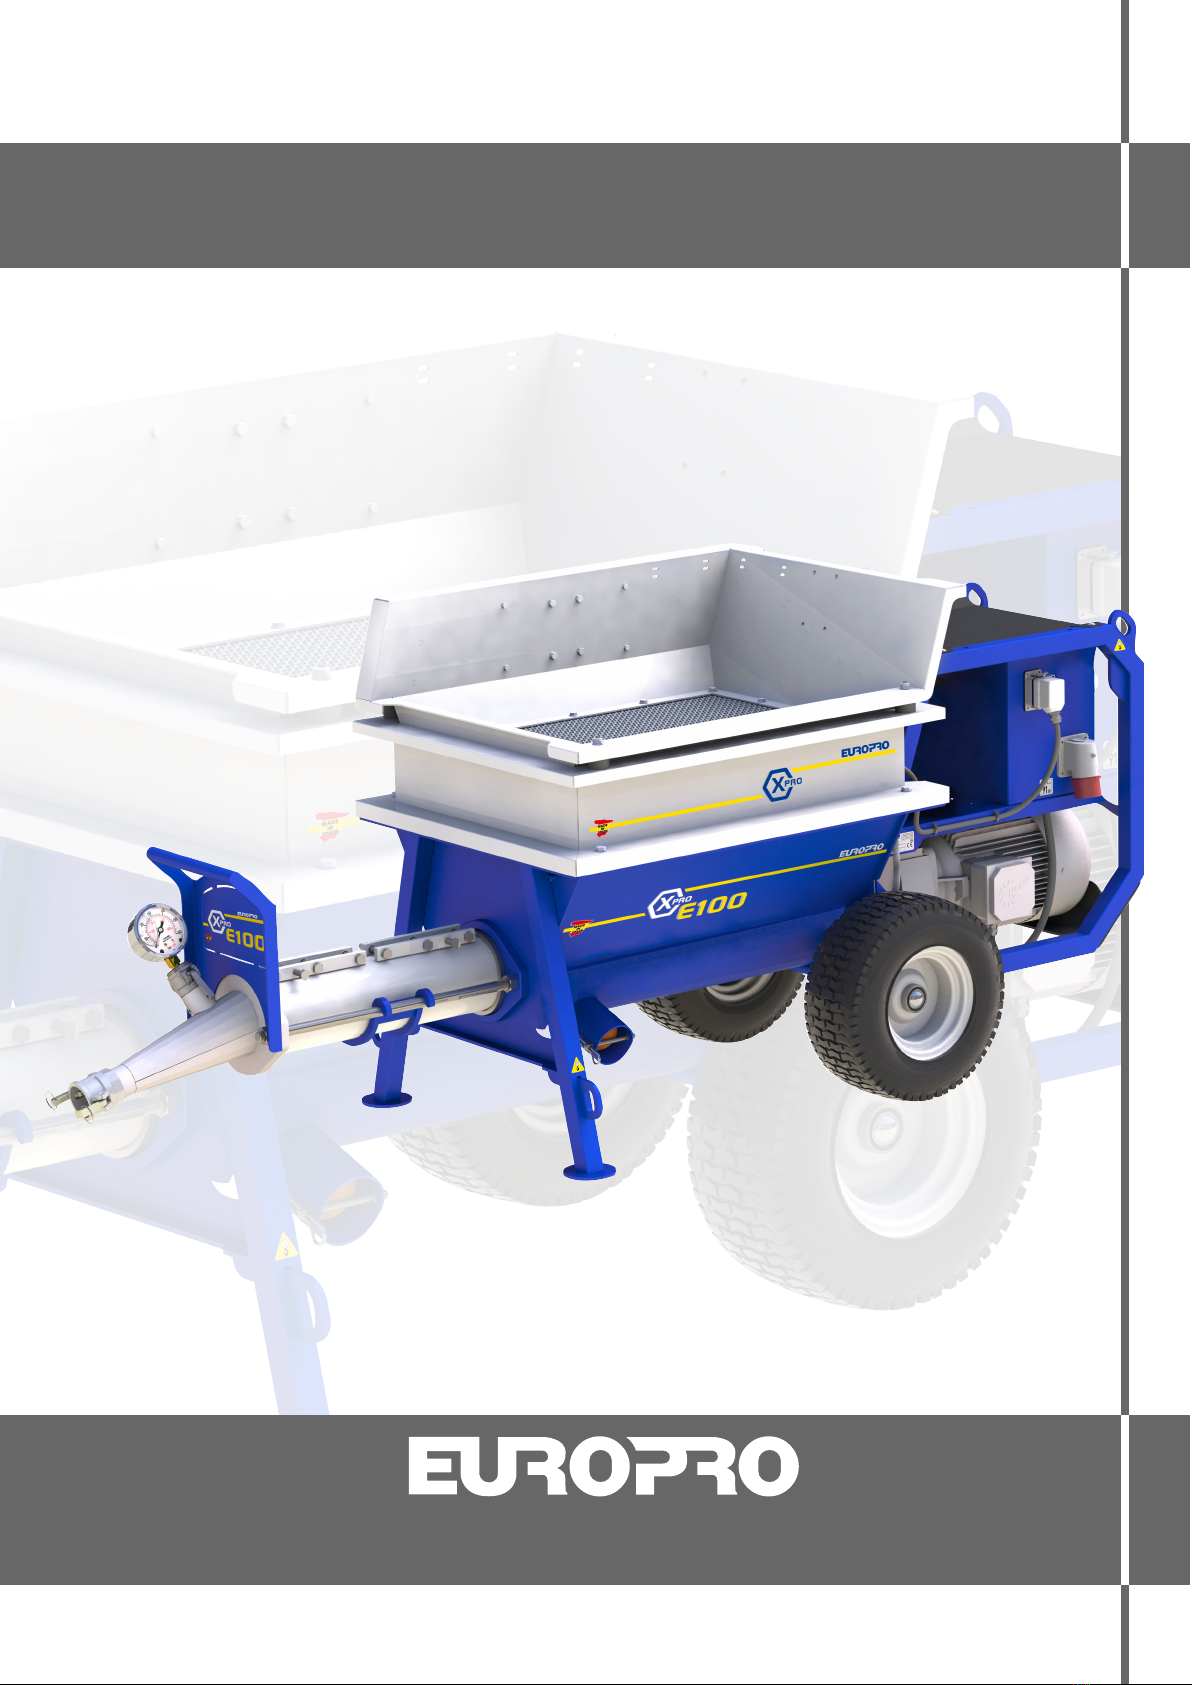
Versatile spraying machines, equipped with a steel tank and a button control panel.
X-Pro 50 is also equipped with a mono-cylinder compressor.
APPLICATIONS
X-Pro 50: mortars, E.W.I., hydraulic coatings.
X-Pro 100: liquid oor-screed, shotcrete (with projection option).
3.2. TECHNICAL CHARACTERISTICS
X-PRO 50 X-PRO 100
Product pressure 0 to 40 bar 0 to 30 bar
Product ow-rate 0 to 50 L/min 0 to 160 L/min
Machine motor power 7,5 kW 7,5 kW
Compressor yes no
Comp. absorbed air ow-rate 366 L/min -
Compressor power 2,2 kW -
Maximum air pressure 40 bar 30 bar
Power supply Three-phase 400 V - 32 A Three-phase 400 V - 32 A
Tank capacity 120 L 120 L + 75 L
Maximum grain size 6 mm 8 mm
Pump MAP 11 60R12
Tank extension no yes
Vibrating strainer no yes
Dimensions (L x w x h) 244 x 77 x 88 cm 244 x 86 x 104 cm
Weight 340 kg 340 kg
Noise level 95 Lwa 91 Lwa
Delivered with
- a 20 m hose Ø35
- a MAP 11 pump
- a spraying lance
- eight nozzles (Ø8, 10, 12,
14, 16, 18, 20 & 22)
- three grouting nozzles (Ø10,
12 & 14)
- a storage carry-case
- a 20 m hose Ø50
- a 60R12 pump
- a storage carry-case
Do not use corrosive products, acid products, powder products or products with a too large
grain size.
B
J
A
C
G
ID
M
K
F
L
N
AU
E
E
H
User manual - X-PRO 50 & X-PRO 100 202102-507-ENGP8
3. YOUR MACHINE (continued)
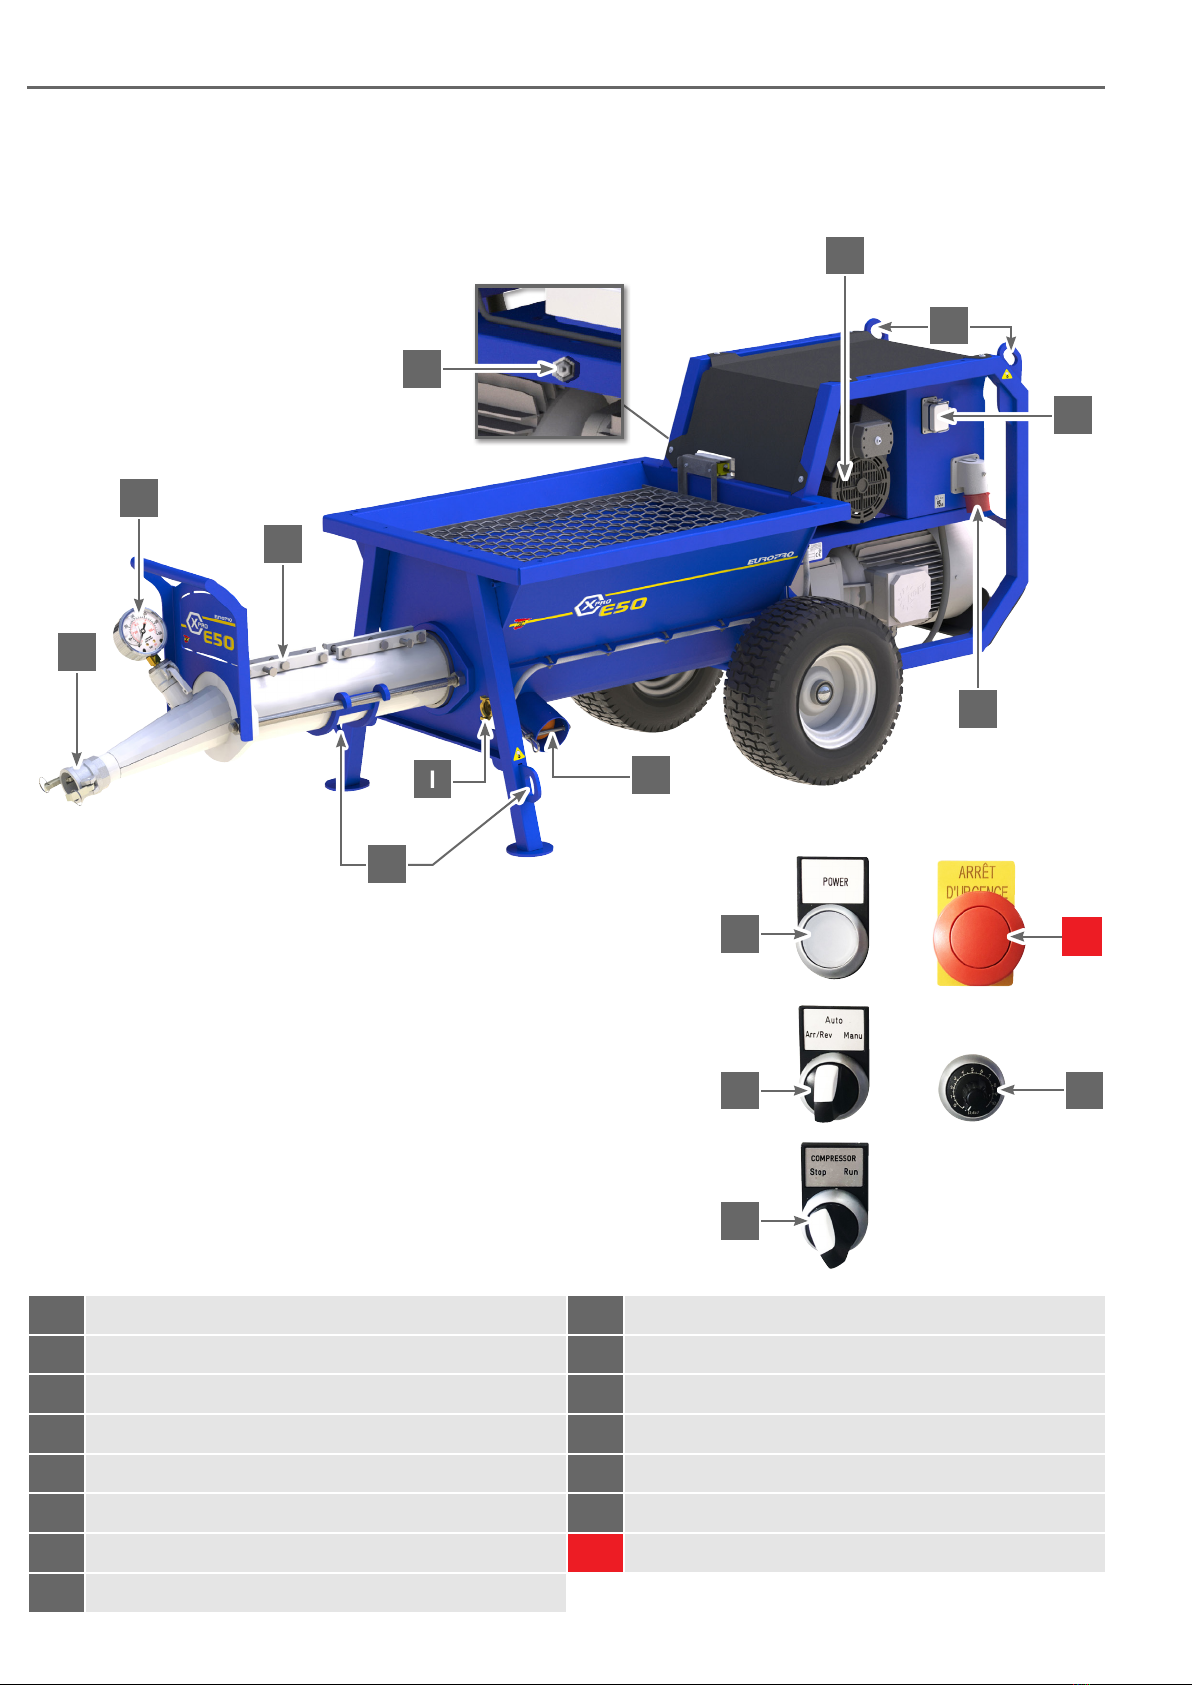
3.3. IDENTIFICATION OF THE COMPONENTS X-PRO 50
AProduct outlet IAir outlet
BPressure manometer JCompressor
CRotor / stator pump KStart / Stop of the machine
DDrain plug LManual / Auto / Reverse mode
ELifting rings MPotentiometer
FLubricator NStart / Stop of the compressor
GPower socket AU Emergency stop
HVibrating strainer socket
B
A
C
G
D
M
P
K
L
AU
E
E
H
F
202102-507-ENG User manual - X-PRO 50 & X-PRO 100 P9
3. YOUR MACHINE (continued)
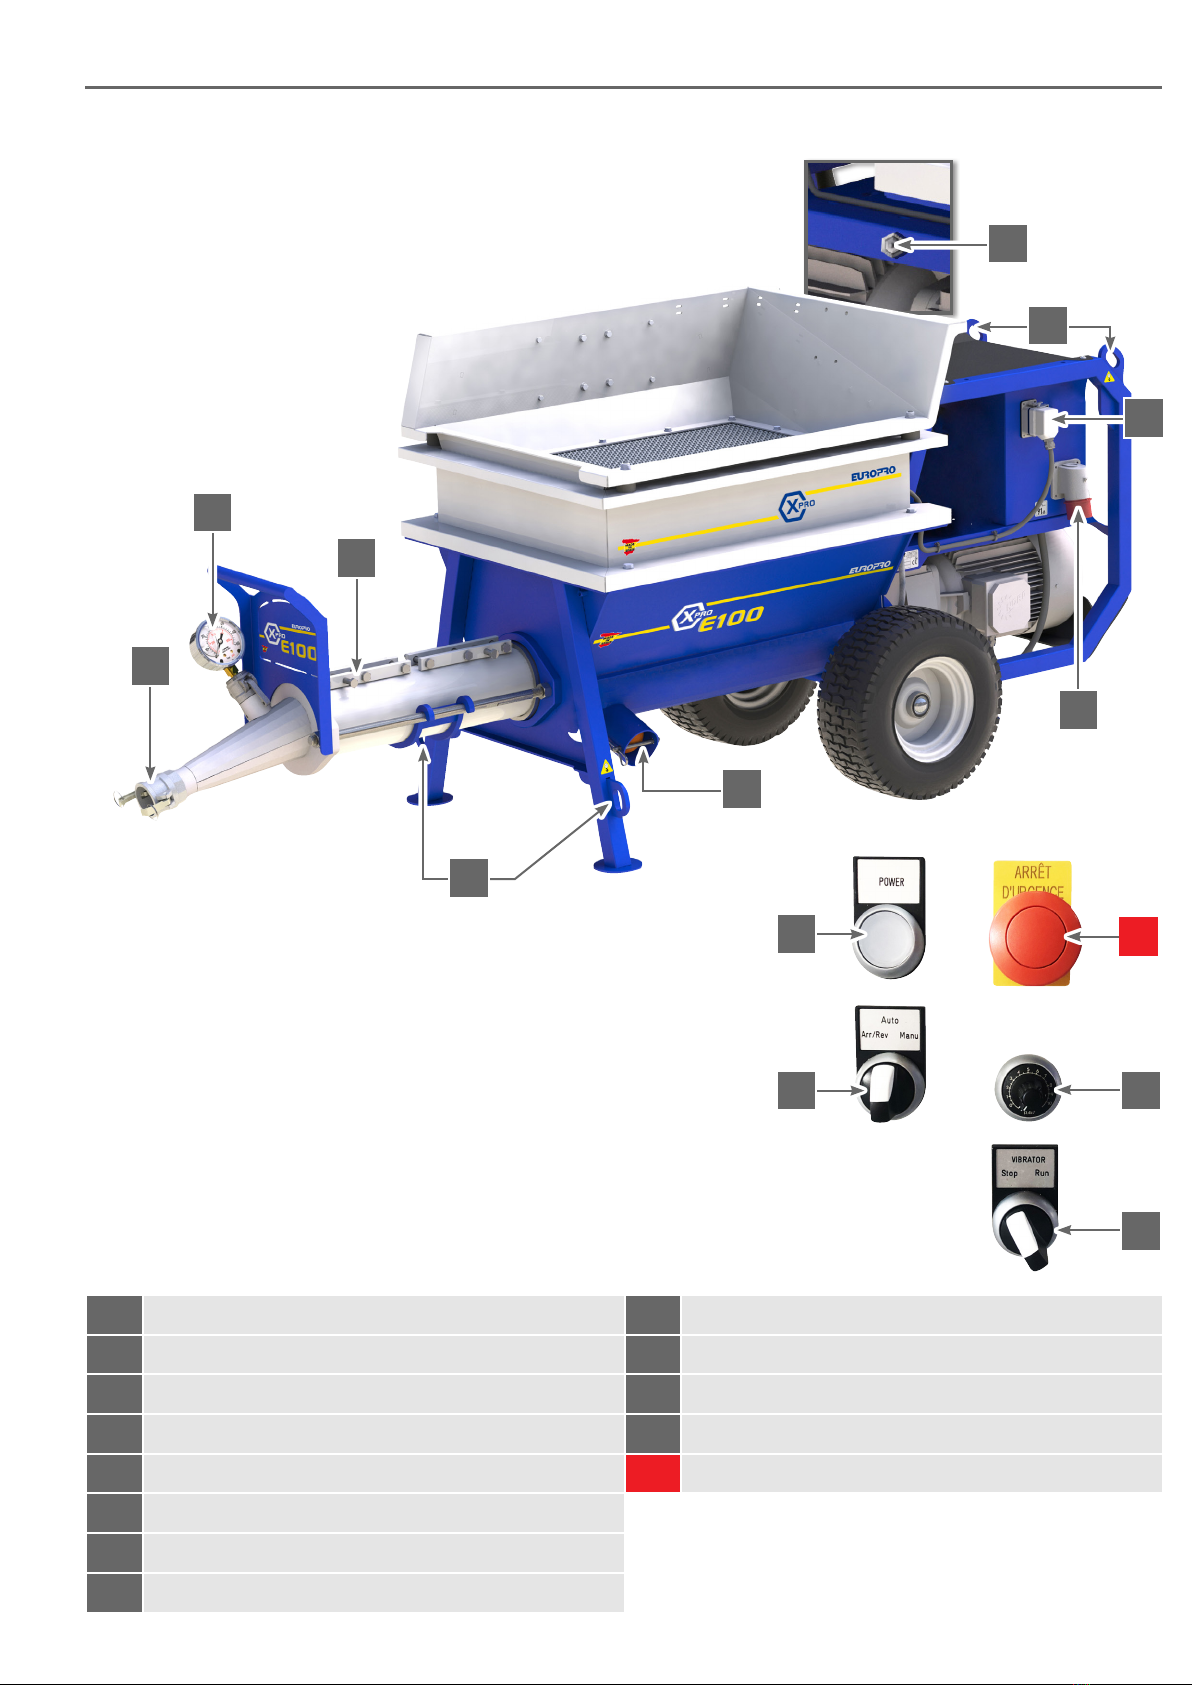
3.4. IDENTIFICATION OF THE COMPONENTS X-PRO 100
AProduct outlet KStart / Stop of the machine
BPressure manometer LManual / Auto / Reverse mode
CRotor / stator pump MPotentiometer
DDrain plug PStart / Stop of the strainer
ELifting rings AU Emergency stop
FLubricator
GPower socket
HVibrating strainer socket

User manual - X-PRO 50 & X-PRO 100 202102-507-ENGP10
4. USE OF THE MACHINE
4.1. PREREQUISITES
• The electric connection has to be 400 V - 32 A - 50 or 60 Hz with a 4 x 4 mm² cable reel of 40m
maximum, completely unreeled.
• Place the (L) button onto MANU position makes the pump start working.
• Hold the (L) button onto ARR/REV position makes the pump turn in reverse mode.
• X-Pro 50: in AUTO mode, the pump starts only at the opening of the lance (when the compressor
in running).
• X-Pro 100: in AUTO mode, the pump starts only when the button on the remote control is
pressed.
• In MANU mode, the pump works continuously.
• After a prolonged standstill, it is possible that the pump might be blocked. If this is the case, alternately
turn the pump forwards and backwards for 5 second sequences. As soon as the engine starts to turn
normally, the pump is unblocked.
• Every month, grease the lubricator using a grease pump. The absence of grease can seriously damage
the machine.
PRESSURE VALUES (depending on rotor/stator):
- Ready-to-use product: from 12 to 15 bars
- Traditional product: from 5 to 8 bars
- E.W.I. products (glue / Thick Plastic Coating) : from 40 to 60 bars (MAP 7 rotor/stator kit)
PRESSURE CONTROL AND ADJUSTMENT: (at least once a week)
• Connect the hose to the product outlet (A) with the lance in open position.
• Put water in the tank.
• Switch the machine on (button (K)).
• Set the potentiometer (M) to 100%.
• Place the (L) button onto MANU position, the machine starts.
• Close the lance and read the value on the manometer (B).
• Adjust the desired value with the 3 pump screws (tighten from the external screw to the screw on the
tank side, equally).
• Adjust by closing the lance and reading the manometer (repeat the adjustment operation until the
correct pressure is obtained).
Never use petroleum-based products in the pump, as they may damage it.
Never run the pump without water or product.

202102-507-ENG User manual - X-PRO 50 & X-PRO 100 P11
4. USE OF THE MACHINE (continued)
4.2. STARTING UP FOR SPRAYING
1. Install the machine on a at oor and connect it electrically (32 A minimum plug, extension cable
40m maximum in 4 x 4 mm² minimum).
2. Connect the hose to the product outlet (A) and mount the lance, opened, without the nozzle.
3. Switch the machine on (button (K)).
4. Place the (L) button onto MANU position, the mixing shaft shall turn.
5. Use the potentiometer (M) to set the mixing shaft speed. Start at a slow speed and increase progressively
up to 40%. Let the machine run for a few seconds.
6. Place the (L) button onto AUTO position, the mixing shaft will stop.
7. Prepare a mixture of water and liquid cement and pour it into the machine tank.
8. Place the (L) button onto MANU position, the machine starts running.
9. Wait for the mixture to ow regularly to the lance and then pour it into a bucket.
10. Before the tank is completely empty, move the button (L) to the AUTO position to stop the machine.
11. Pour the mortar into the tank. Close the lance and place the nozzle.
12. Connect the air hose to the (I) outlet on the machine and on the lance side.
13. Start the compressor (button (N) to the RUN position).
14. The machine will start when the lance is opened.
15. Spray the rest of the mixture into the bucket, then start spraying when the mortar comes to the lance.
4.3. STARTING UP FOR FLOOR-SCREED
1. Install the machine on a at oor and connect it electrically (32 A minimum plug, extension cable
40m maximum in 4 x 4 mm² minimum).
2. Connect the hose to the product outlet (A).
3. Switch the machine on (button (K)).
4. Place the (L) button onto MANU position, the mixing shaft shall turn.
5. Use the potentiometer (M) to set the mixing shaft speed. Start at a slow speed and increase progressively
up to 40%. Let the machine run for a few seconds.
6. Place the (L) button onto AUTO position, the mixing shaft will stop.
7. Prepare a mixture of water and liquid cement and pour it into the machine tank.
8. Place the (L) button onto MANU position, the machine starts running.
9. Wait for the mixture to ow regularly to the end of the hose and then pour it into a bucket.
10. Before the tank is completely empty, move the button (L) to the AUTO position to stop the machine.
11. Pour the mortar into the tank.
12. Connect the wired remote control.
13. Start the vibrator (button (P) to the RUN position).
14. The machine will start when the button on the remote control is pressed.
15. Spray the rest of the mixture into the bucket, then start spraying or pouring when the mortar comes
to the hose.

User manual - X-PRO 50 & X-PRO 100 202102-507-ENGP12
5. DEFECTS AND REMEDIES
Defect Remedy
• The machine runs but the product does not
come out at the lance.
• Check that the product is not too dry and that
it sinks to the bottom of the tank, dilute it and
mix it well if necessary.
• Check the condition of the pump with a pressure
controller.
• Change the stator and/or the rotor.
• The grain changes without changing the setting. • Unclog the air holes of the nozzle.
• In AUTO mode, air supply connected, lance
open, the machine does not start.
• Check that the air inlet and outlet connections
are properly connected. Clean them if necessary.
• Remove the ow meter cap attached to the
frame next to the compressor. Pull out the spring
and piston and clean them thoroughly. Do the
reverse operation to reassemble them.
• The machine does not stop when the lance is
closed.
In case of an unknown defect or a doubt on the good running of the machine, do not try to
repair it by yourself or to dismantle it.
Contact an authorized After-Sale Service or our hotline : +33 4 42 29 08 96.

202102-507-ENG User manual - X-PRO 50 & X-PRO 100 P13
6. MAINTENANCE
6.1. CLEANING PROCEDURE
1. Empty the tank to the maximum without adding water inside.
2. Open the lance to relieve pressure from the product hose and hold (L) button onto ARR/REV position
for 10 to 20 seconds.
3. Clean the accessories (lance, nozzle, etc.).
4. Clean the tank (unpin the plug (D) to allow water to drain, never run water through the full product
hose).
5. Replace the ball and the pin of the plug and ll the tank with clean water.
6. Disconnect the product hose, place the (L) button to MANU position to discharge any product
remaining into the pump, then switch back to AUTO mode to stop the machine.
7. Place the cleaning ball in the product outlet (A) and replace the hose.
8. Set machine speed to 40% using the potentiometer (M).
9. Start the machine by placing the (L) button to MANU position.
10. When the ball comes out of the hose, switch to AUTO mode again to stop the machine.
11. Repeat operations 7 to 11 until water comes out of the hose clean.
6.2. CHECK-UP
• Every 50 hours of operation, remove the suction lter from the compressor and clean the lter element
by blowing compressed air.
• Replace the lter element once a year (more often if the machine is used intensively).
The direct projection of water under pressure onto the control panel has to be stopped at
the risk of water inltration into the electric box. Proceed by simply cleaning with a humid
sponge.
Disconnect the machine from the power supply before any intervention.
Before unscrewing the hose, make sure it is not under pressure anymore.

User manual - X-PRO 50 & X-PRO 100 202102-507-ENGP14
7. DECLARATION OF CONFORMITY
THE MANUFACTURER : EUROPE PROJECTION
228, avenue Olivier Perroy
13790 ROUSSET
DECLARES THAT THE EQUIPMENT DESIGNATED BELOW :
Trademark : EUROPE PROJECTION
Type : Spraying machine
Model : X-PRO 50 / X-PRO 100
COMPLIES WITH THE DIRECTIVES :
• Machines 2006/42/CE
• Low voltage 2014/35/UE
• CEM 2014/30/UE
• ROHS 2011/65/UE
• Noise emissions 2005/88/CE
ROUSSET, JANUARY 20th 2021
Patrick BOREL
President
EUROPE PROJECTION - 228, avenue Olivier Perroy 13790 ROUSSET
Tél : +33 (0)4 42 29 08 96 – Fax : +33 (0)4 42 53 44 36
SAS au capital de 400 000 € - RCS Aix-en-Provence B 394 961 510 - NAF 2892 Z - Intracom : FR 54 394 961 510

202102-507-ENG User manual - X-PRO 50 & X-PRO 100 P15
8. WARRANTY CONDITIONS
Each product is delivered inspected and tested.
We exclude any warranty for visible defects for which the customer did not claim within 48 hours.
The equipments sold are covered by the warranty during the period dened by the manufacturer from
the date of purchase, the date on the original proof of purchase being authentic and under the conditions
dened by the manufacturer.
This warranty covers any equipment against any manufacturing or material defect of for normal use and
service. Insofar as the customer is presumed to be a professional of the same specialty, the guarantee
covers only the lack of realization of the equipment rendering it unt for its use not likely to be detected by
a professional buyer.
The defects or deteriorations caused by natural wear, external accident or a modication, use, storage or
treatment of equipments not planned by the manufacturer, nor specied by ourselves, are excluded from
any warranty.
Are expressly excluded from the warranty the defects coming from: a bad use, the application of abrasive
or corrosive products, an inappropriate installation, the negligence, an insufcient maintenance or cleaning
chemical, electrochemical or electric inuences, any change in the normal process of use.
The following wearing parts are not covered by the warranty: rotors, stators, driving shafts, connecting rods,
seals, cleaning balls, spray guns, lance, nozzle, hose, needle kits, cylinders, piston rods, prime/spray valve
assy, seal kits, membranes, suction and delivery valves, carding machine vanes, lters, oils.
The warranty also excludes the equipments: on which the serial number was erased or made illegible, on
which unauthorized people made attempts of repair which were totally or partially dismantled.
Defective equipment will be removed by us. Any shipment of equipment by the customer will be at its own
expense. The guarantee will be subject to the presentation of the purchase invoice. We will then be able to
perform an equipment analysis to determine if the defect is covered by the warranty.
If the defective equipment is covered by the warranty, it will be repaired or replaced free of charge. Repaired
equipment (under warranty) will be delivered to the customer free of charge.
If the defective equipment is not covered by the warranty, we will issue a quote for the repair that we will
submit to the customer’s agreement. The costs of removal and shipping of equipment not covered by the
warranty will be charged to the customer, whether or not the latter accepts the repair estimate.
Except as otherwise required by law, this warranty is exclusive of all other warranties, including the statutory
warranty of hidden defects.
In case of intervention of our services on a breakdown caused by the customer or an outage excluded in the
conditions referred to above, the costs of repair and transport will be billed to the customer.
We exclude all liability for indirect damages suffered by the customer, such as, but not limited to, loss of
income, turnover, loss of prots, loss of image, of any kind whatever.
In all cases, our liability shall be limited to the amount paid by the customer for non-compliant equipment.
Any action of the customer against us relating to the guarantee of the equipments will be prescribed within
the period of 1 year as from the day of the discovery of the defect. It is up to the customer to prove the day
of this discovery.
Our equipments are covered by a warranty (parts and labour) of 12 months following the purchase.
The duration of this warranty can be extended by 6 months by completing the warranty extension
form within 4 weeks after purchasing on our website www.euromair.com (section Warranty).

EUROPE PROJECTION - 228, avenue Olivier Perroy 13790 ROUSSET - Tél : +33 (0)4 42 29 08 96 – Fax : +33 (0)4 42 53 44 36
SAS au capital de 400 000 € - RCS Aix-en-Provence B 394 961 510 - NAF 2892 Z - Intracom : FR 54 394 961 510
User manual - X-PRO 50 & X-PRO 100 202102-507-ENGP16
More information on www.euromair.com
This manual suits for next models
3
Table of contents
Other EUROPRO Construction Equipment manuals

EUROPRO
EUROPRO 50TH User manual

EUROPRO
EUROPRO MIXPRO 70 User manual

EUROPRO
EUROPRO COMPACT-PRO 60 User manual

EUROPRO
EUROPRO Compact-Pro 30 BASIC User manual

EUROPRO
EUROPRO MINIJET 80 User manual

EUROPRO
EUROPRO Compact-Pro 15 User manual

EUROPRO
EUROPRO MIXPRO 14 User manual

EUROPRO
EUROPRO X-Screed D60 User manual
Popular Construction Equipment manuals by other brands


Loglift
Loglift 125Z CE Operator's manual

Manitowoc
Manitowoc 18000 quick start guide

TUBESCA-COMABI
TUBESCA-COMABI SPEEDY + Assembly manual

Smiley Lifting Solutions
Smiley Lifting Solutions SPYDERCRANE PC094 Operator's manual

Zoomlion
Zoomlion ZA14J Service and maintenance manual

icopal
icopal Monarplan Series installation manual