EUROSTER 2026TXRX User manual
EUROSTER 2026TXRX –INSTALLATION AND OPERATION MANUAL 1
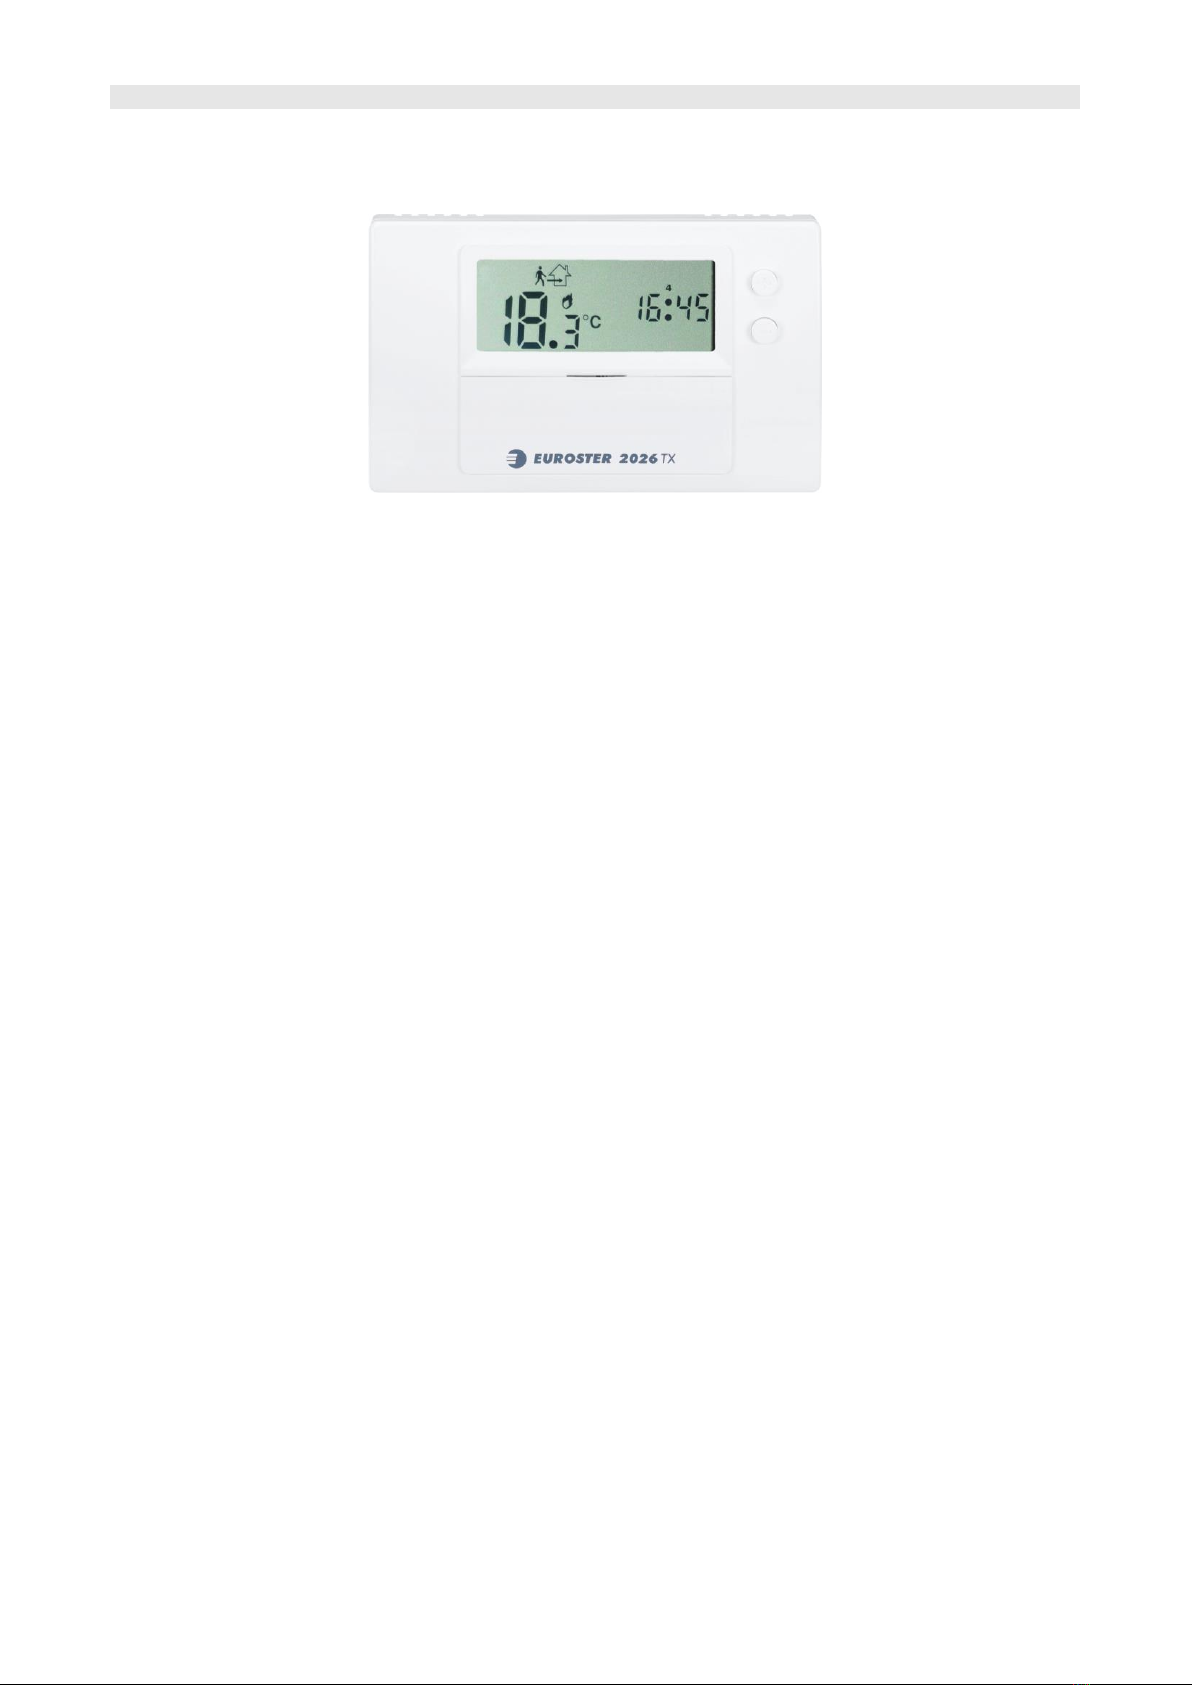
EUROSTER 2026TXRX
Wireless, programmable thermostat for all types of heating and air conditioning devices.
MANUFACTURER: P.H.P.U. AS, Chumiętki 4, 63-840 Krobia, Poland
In order to take full advantage of thermostat capabilities please read this installation and
operation manual carefully.
This manual is intended for the v8 07.2020 version of the thermostat
1. DESCRIPTION OF DEVICE
The Euroster 2026TXRX wireless thermostat allows you to control the indoor temperature in a
very simple and efficient way, without the need for labor-intensive wiring between the
thermostat and the heating device.
It is used to control the operation of the CH boiler and other heating system components. It
controls electrical equipment, floor heating, and air-conditioning systems. The thermostat
allows you to program 4 different temperature levels for each day of the week. Each
temperature is modifiable within the range of 5 °C...35 °C.
2. BASIC FUNCTIONS OF THE THERMOSTAT
•Does not require leading cable connections between the thermostat and the controlled
device
•Bidirectional communication ensures high operational reliability and resistance to
interference
•4 different temperature levels for each day of the week
•Intuitive, weekly programming in 10-minute increments with a program copying
function
•Up to 6 RX receivers can be used
•Radio signal strength information
•Operating time counter for the heating/air-conditioning device
•Legible, backlit LCD
•Temperature setting with the accuracy of 0.2 °C
•Numerous useful functions: temporary temperature setting, vacation mode, discharged
batteries indication, keypad interlock
•Temperature read-out accuracy of 0.1 °C
•Temperature reading correction
•Surface mounting

EUROSTER 2026TXRX –INSTALLATION AND OPERATION MANUAL 2
3. THERMOSTAT VISIBLE ELEMENTS
BODY
•and increase/decrease; press and hold to increase the rate of change
•press to read the current date; press and hold for 3 seconds to set the date and
time
•switches the thermostat on and off (5 °C frost protection mode)
•press to read the operating time; press and hold for 3 seconds to clear, confirm
using
•turns the vacation mode on/off
•press to select the program to be copied
•confirming
Notice: Changing any value causes the corresponding field on the display to flash. It
should be understood as a confirmation request. If the user confirms the change with
, the change is stored. If the change is not confirmed within 15 seconds, the ther-
mostat cancels the change and restores normal operation.
DISPLAY
Program no. 1
Program no. 2
Program no. 3
Program no. 4
Heating on
Air conditioning on
Heating/air-conditioning device operating time counter
Switching the thermostat off –5 °C frost protection mode
Copy function is active

EUROSTER 2026TXRX –INSTALLATION AND OPERATION MANUAL 3
Batteries are flat
Vacation mode
Thermostat is locked
Manual mode (the set temperature is maintained up to the next change of
program)
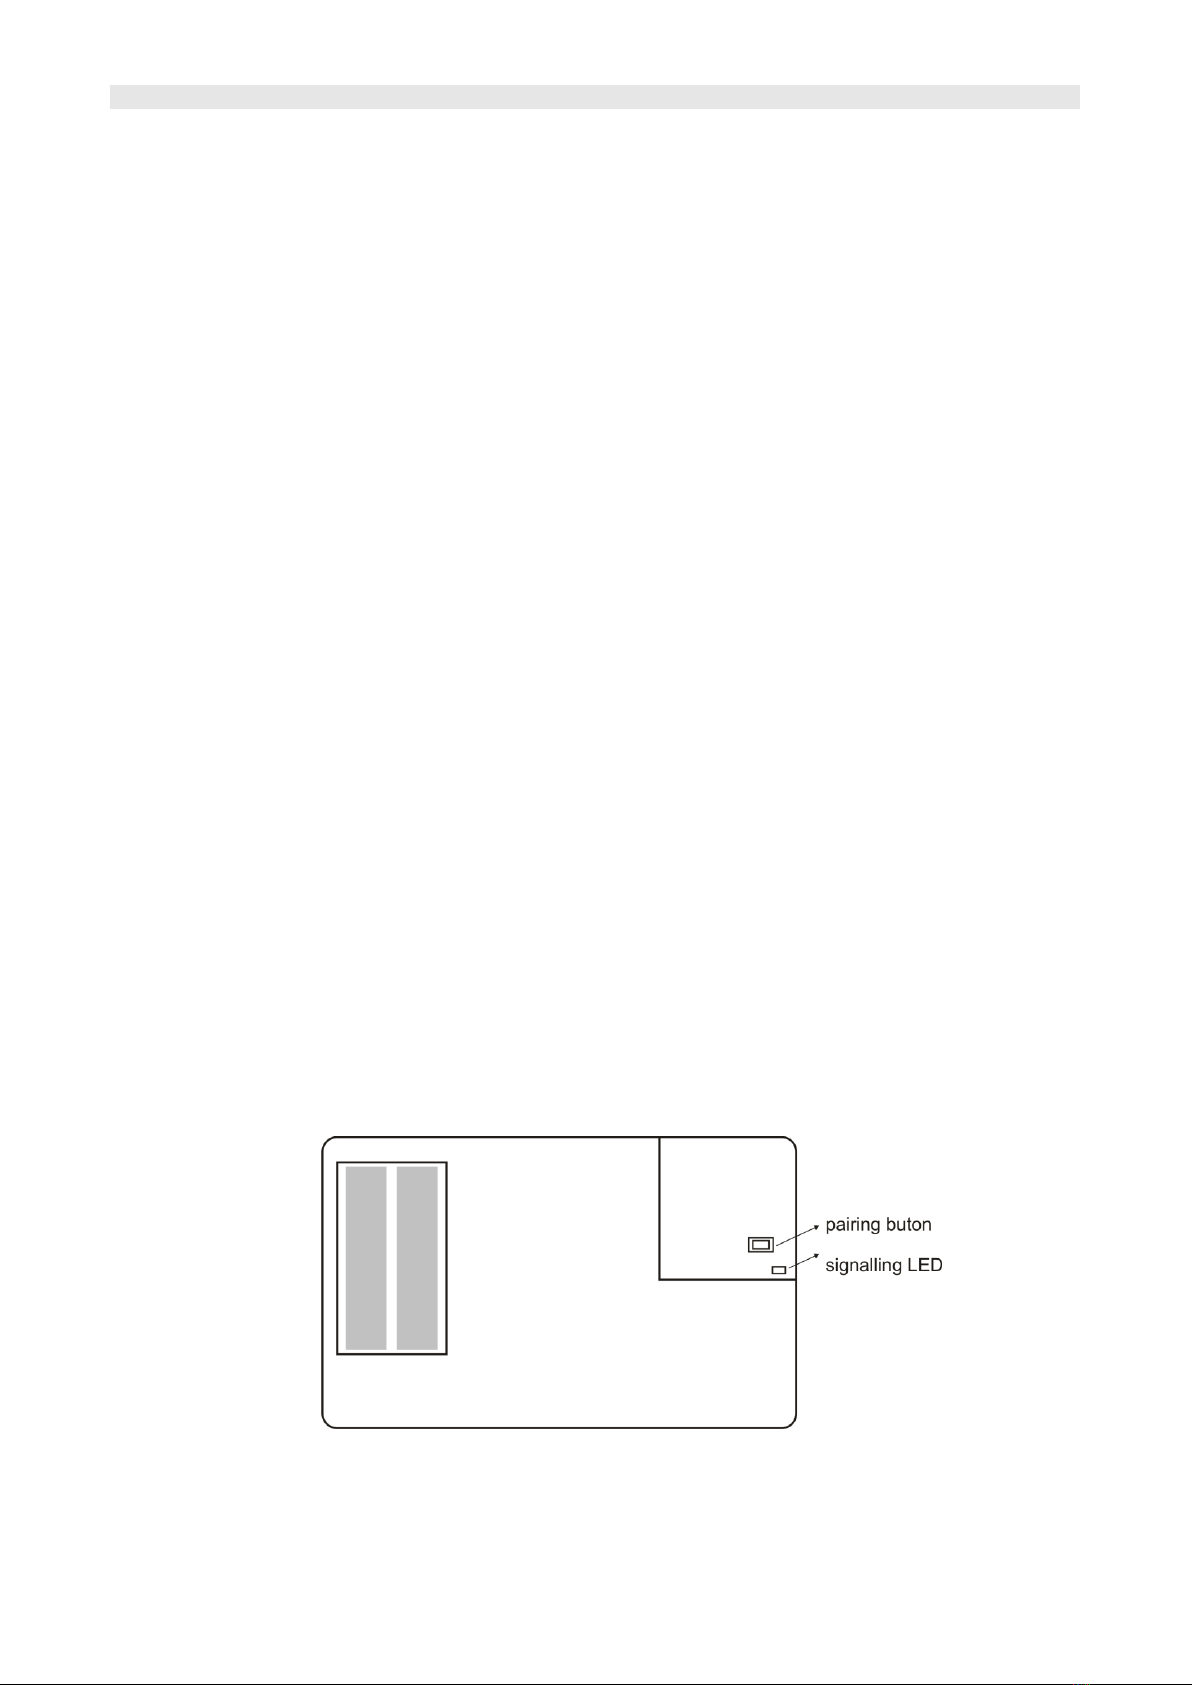
4. VISIBLE ELEMENTS OF RX RECEIVER
A. On/off switch for continuous operation
of the heating device
B. Button used to enter settings,
signaling LEDs
C. Output cable
5. INSTALLATION
SAFETY RULES
CAUTION!
•Prior to the commencement of any installation works read this manual
carefully! Incorrect installation and improper use may lead to serious hazards
to users or other persons and result in property damage!
•Prior to mounting or dismantling the set make sure that the heating/cooling
system is de-energized!
•Voltages hazardous to life may be present on receiver output cables (power
supply phase voltage), therefore only qualified technicians may install the
thermostat!
•The electric connections performed and cables used shall be adequate to the
applied loads and must conform to all requirements!
•Do not install the set in rooms with increased humidity; protect it against
water and other liquids!
•Do not install any unit showing signs of mechanical damage!
•The thermostat is not a safety component. Additional protection devices must
be used in systems prone to the risk of damage due to the failure of control
systems!
•The device is not intended for use by children!
•Should there be any problem with the proper operation of the thermostat,
please contact your technician or the manufacturer!
PROPER PLACE OF INSTALLATION
The thermostat is designed for indoor installation. No cables are connected to the thermostat,
thus it can be placed anywhere. In order to ensure fully efficient operation of the thermostat,
please make sure that the following recommendations regarding the location of the thermostat
are observed:
•Locate the thermostat at the height of approximately 1.5 m above the floor
EUROSTER 2026TXRX –INSTALLATION AND OPERATION MANUAL 4
•Avoid places with strong sunlight, near heating or cooling devices, situated directly by
doors, windows, and other similar locations, where the temperature measurement could
be easily disturbed by external conditions.
•Avoid places with poor air circulation, e.g. behind furniture.
•Avoid moist places due to the negative effect of moisture on the service life of the
device.
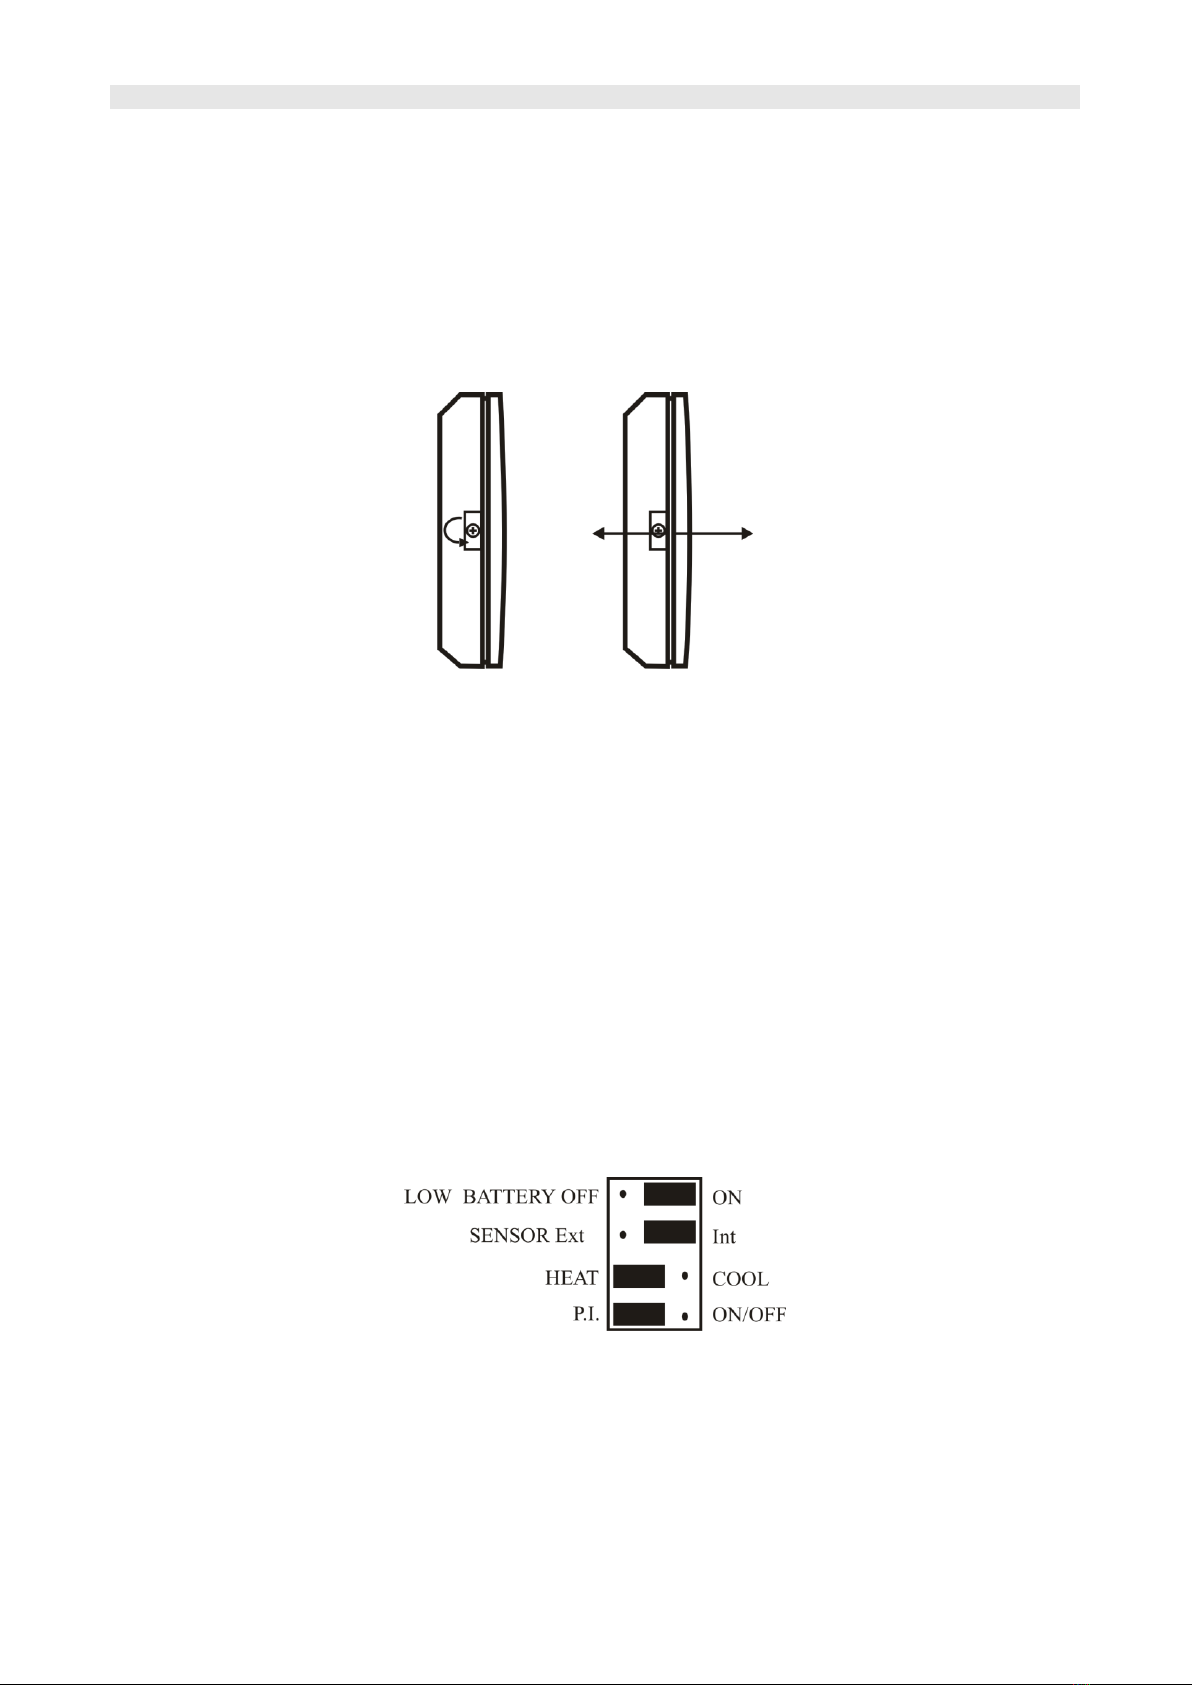
OPENING THE THERMOSTAT
Using a cross-head screwdriver to loosen the housing locking screw. Separate the panel from
the base, while being cautious about the hinges on the right-hand side of the controller.
SELECTION OF THE THERMOSTAT OPERATING MODE
Euroster 2026 is equipped with 4 configuration jumpers. Factory settings are shown in italics:
•Protection against overheating due to flat batteries: YES/NO
If the batteries are flat, the thermostat can perform an emergency switch-off of the re-
lay (protection against the uncontrolled operation of the heating device). When this
function is off, the thermostat operates without any change until the battery is com-
pletely flat (risk of switching the heating permanently on).
•Selection of sensor: Internal/External
The jumper is used to a sensor: internal (measures the air temperature at the location
of the thermostat) or external (requires connecting an external sensor).
•Type of system: Air conditioning / Heating
The jumper is used to select the type of system in which the regulator operates.
•Type of algorithm: ON-OFF / P.I.
The thermostat can operate in on-off mode, in which it turns on the heating device
when the temperature drops by the value of hysteresis (refer to p. 6) or in P.I. mode, in
which it calculates the number of switch-ons per hour, depending on the temperature
changes that have been made up to that moment.
EUROSTER 2026TXRX –INSTALLATION AND OPERATION MANUAL 5
INSERTION AND REPLACEMENT OF BATTERIES
Place the batteries in the thermostat while observing the correct polarity. There are installation
markings in the battery compartment. Then install (snap) the thermostat onto the base.
The battery indicator will be visible when the battery voltage reaches the minimum allowable
level. It is recommended to replace the batteries with new alkaline batteries before each
heating season. Reprogram the controller if necessary.
CAUTION! Use only alkaline AA batteries to power the thermostat. Do not use
rechargeable batteries because their voltage is lower and their effective time is
shorter.
6. THERMOSTAT SETTINGS
SETTING DATE AND TIME
Notice: Settings may be confirmed in 2 ways: with the use of the or button. If
is used, the thermostat continues with the next setting (hour › minute › year › month › day ›
hour). If is used, the thermostat stores the change and restores operation.
If no key is pressed for 15 seconds, the change of setting is canceled.
To set the date and time, proceed as follows:
1. Press and hold button for 3 seconds –the hour digits begin to flash.
2. Using and set the time. Confirm with button Minute digits begin to flash.
3. Repeat the steps for minutes, year, month, and day.
4. Having set the day of the month, confirm all changes by pressing button or press
button to return to the settings and correct the values entered.
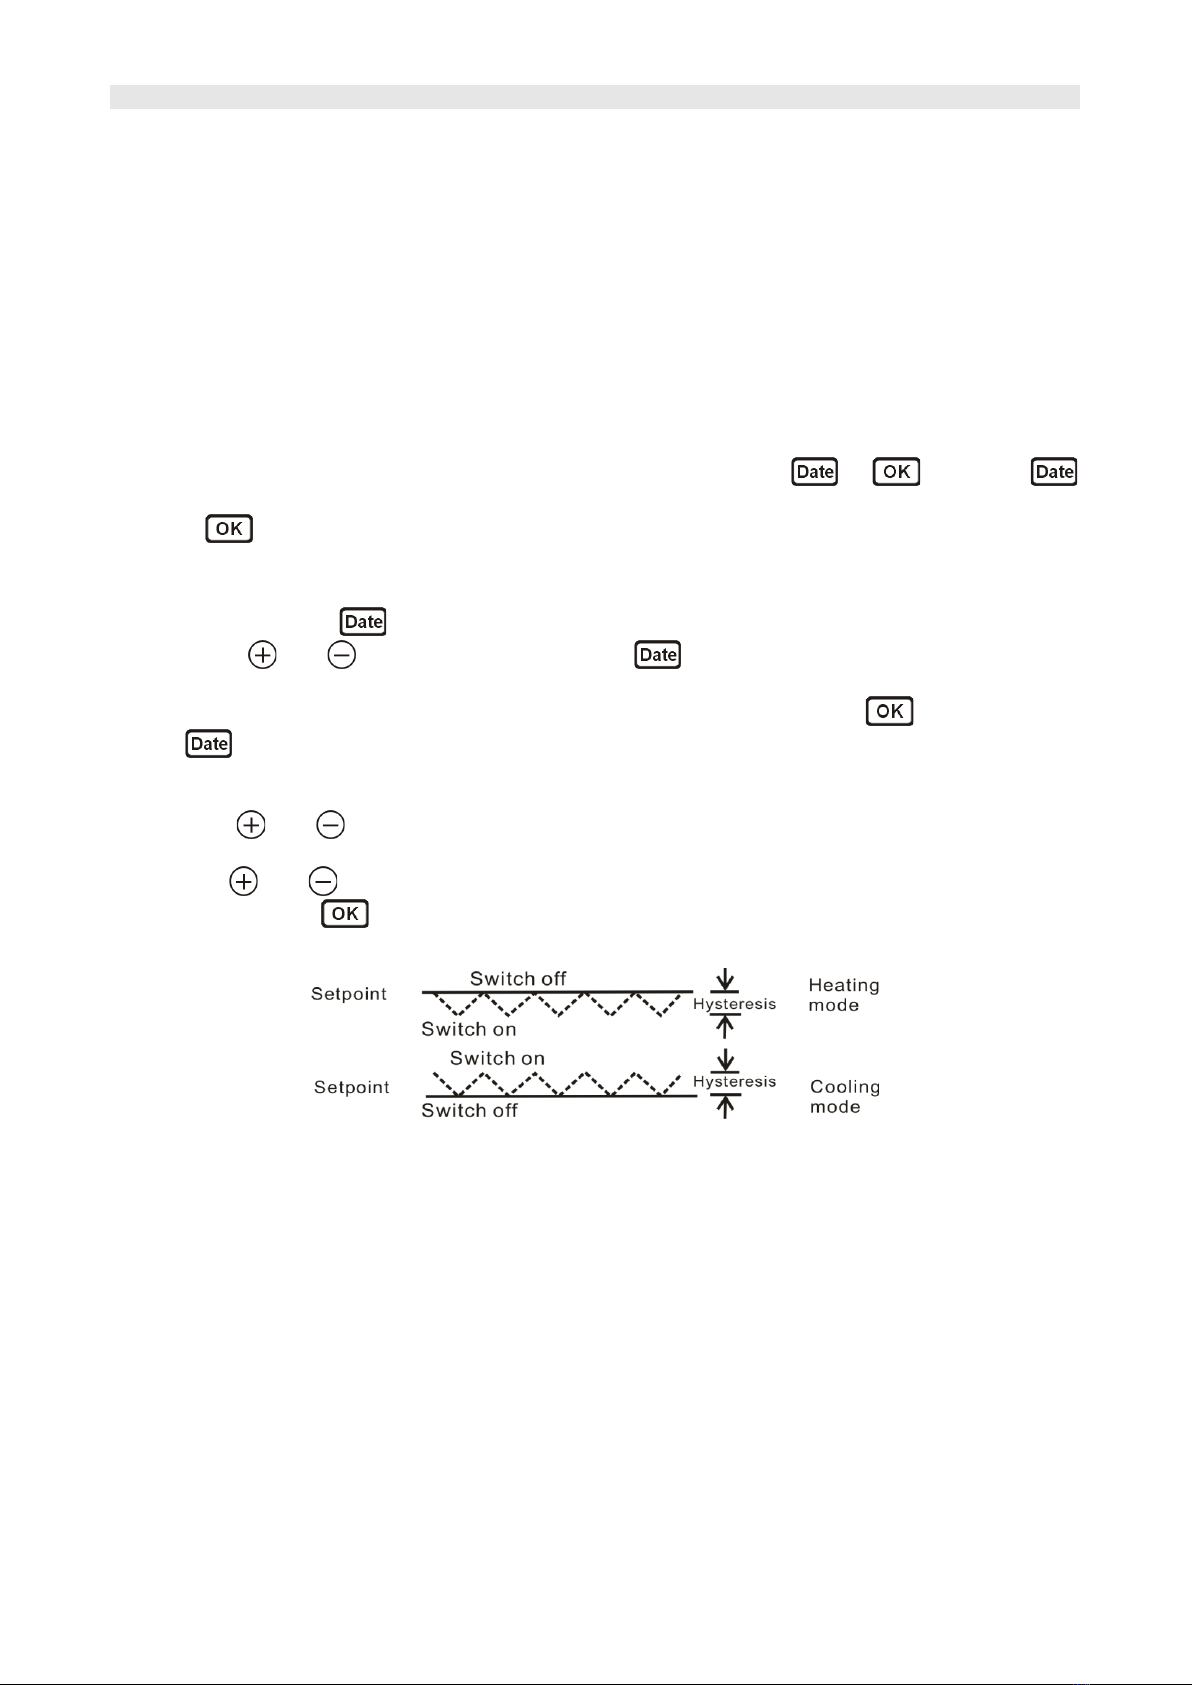
SETTING HYSTERESIS
1. Hold and for at least 3 seconds. The thermostat displays "Hysteresis" and shows
the current value.
2. Use and buttons to select the desired value.
3. Confirm with or wait 15 seconds for the change to be canceled.
The idea of the hysteresis-based thermostat operation is described below:
HEATING CURVE OPTIMIZATION ALGORITHM (PI)
2026 thermostat may be used with the heating curve optimization algorithm. This algorithm is
suited for systems with underfloor water heating. It is used to limit room temperature fluctua-
tions.
Unlike in on/off controls, the current status of the transmitter depends not only on the current
difference between the preset and measured temperature but also on the past changes of
temperature. For example, if the measured temperature is lower than the preset temperature
for a long period, the thermostat switches the heating device permanently on.
To use the PI mode, you must set its parameters correctly. These consist of:
Cycle duration period ("Con") 1-5
It is the minimum period (minutes) for which the thermostat switches the transmitter on each
time.
Maximum number of cycles per hour (‘CPH’) 3,6,9,12
The thermostat calculates the number of switch-ons and switch-offs (cycles) per hour (accord-
ing to temperature changes).

EUROSTER 2026TXRX –INSTALLATION AND OPERATION MANUAL 6
Width of proportional control range ("Pb") 1.5-3.0
If the difference between the preset and measured temperature is included in the proportional
control band, then the thermostat selects the switch-on and switch-off times. Outside of this
band, the output operates in continuous on or off operation.
SETTING PI ALGORITHM PARAMETERS
1. Set the jumper to the P.I. position (Page 5) and press reset.
2. Hold and for at least 3 seconds. The thermostat displays "Con” and shows the
current setting.
3. Use and buttons to select the desired value.
4. Confirm with or wait 15 seconds for the change to be canceled.
5. Repeat steps 2-3 for "CPH" and "Pb".
CORRECTION OF DISPLAYED TEMPERATURE (CALIBRATION)
The calibration range: -4.0 °C to +4.0 °C.
1. Turn the knob to the PN position.
2. Hold and buttons simultaneously for at least 3 seconds. The thermostat will
show the current correction value.
3. Use and buttons to set the desired correction. The increment is 0.2 °C.
4. Confirm the change with or wait 15 seconds to cancel the change.
7. THERMOSTAT OPERATION
Euroster 2026 is a programmable thermostat. You can set 4 different temperatures for 4
different periods, for each day of the week individually. Setting programs for the entire week
may be tedious, so the thermostat is equipped with a function to copy programs.
There are 2 settings for each program: The temperature and the starting time, which comes to
be the ending time of the previous program.
When a given program is active, the temperature assigned to it is maintained.
The starting time of the program is defined with an accuracy of 10 minutes. Range: 12:00 a.m.
to 11:50 p.m.
Programs are always implemented in the P1-P2-P3-P4 order. The user may set the starting
hours of the programs in an order other than P1-P2-P3-P4, however, in such case the thermo-
stat will disregard the programs that overlap each other.
Example:
P1-4 start consecutively; the user wants P4 to start before P3:
If P4 starts before P3, the thermostat automatically bypasses P3. The result is the following:
Similarly, if the user wants to move P2 and P3 "behind" P4:
P2 and P3 programs will be bypassed (P4 starts before P2 and P3):
PROGRAMMING THE THERMOSTAT
Notice: The sequence of weekdays in programming is irrelevant.
1. Turn the knob to PN.
2. Set the desired temperature for P1 using and buttons. Confirm with
button
3. Set the required P1 starting time using and buttons. Confirm with but-
ton
EUROSTER 2026TXRX –INSTALLATION AND OPERATION MANUAL 7
4. Set the desired temperature for P2 using and buttons. Confirm with
button
5. Set the required P2 starting time using and buttons. Confirm with
button
6. Similarly, set the temperatures and times for P3 and P4 programs.
7. Having set all parameters, turn the knob to the next day of the week (e.g. Tuesday).
8. Set the parameters for all programs on the next day.
9. Set all program parameters for all subsequent days in a similar way or copy programs
(see page 7)
10. Turn the knob to the START position. The thermostat starts operation with the new set-
tings.
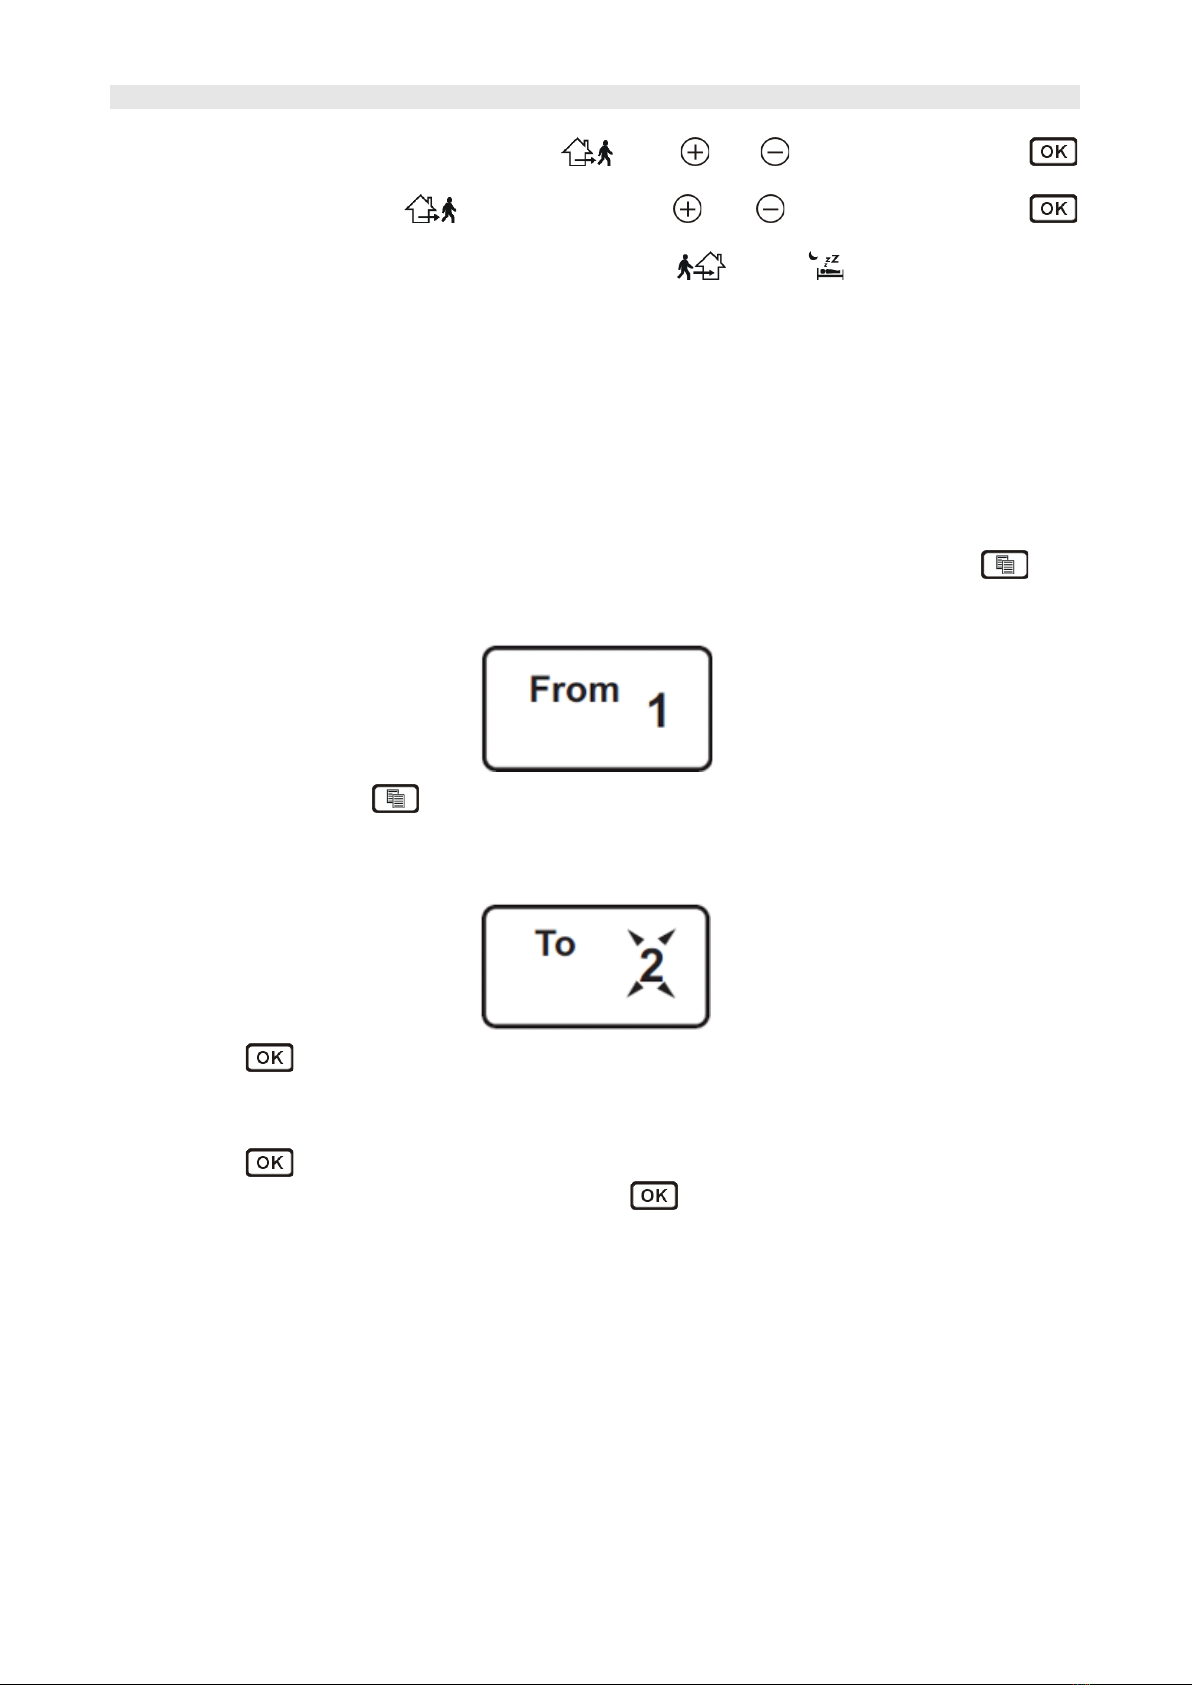
COPYING PROGRAMS
Start with setting program parameters for one selected day as described above.
In the following description, the Monday program is to be copied to Tuesday, Thursday, and
Friday.
1. Having set the program for Monday (the knob is still in the PN position), press but-
ton.
2. The display indicates that the source of the program is Monday:
Notice: Press the button again to exit the copy mode.
3. Use the knob to select a day of the week to which you want to copy the program from
Monday, e.g. Tuesday
4. The display shows that the program is to be copied to Tuesday: digit 2 starts flashing.
5. Press to copy the program. 2 stops flashing.
6. Turn the knob to a weekday which the Monday program is to be copied to, e.g. Thurs-
day.
7. The display shows that the program is to be copied to Thursday. Digit 4 starts flashing.
8. Press to copy the program. 4 stops flashing.
9. Similarly, turn the knob to Friday and press ; the program is copied
10. Turn the knob to the START position. The thermostat starts normal operation.
VACATION MODE
In holiday mode, the thermostat does not run a program but maintains the preset, constant
temperature. The user sets the number of hours or days to maintain the preset temperature.
The resolution for setting the time is 1 hour (for the period of 2 days) or 1 day (for the period
of 3 to 99 days). An infinite time may be set, and in such a case, the holiday mode must be
turned off manually.

EUROSTER 2026TXRX –INSTALLATION AND OPERATION MANUAL 8
Important note:
The holiday mode is activated when the settings are confirmed by pressing button.
icon appears on the display. Leaving the thermostat idle for more than 15 seconds cancels the
setting and restores normal operation.
Setting the vacation mode:
1. Turn the knob to the START and press button. The thermostat goes to temperature
setting mode –the temperature readout starts flashing. Use and buttons to ad-
just the desired temperature, then confirm with or .
2. The display shows:
–duration of the vacation mode on the left-hand side
- the time or date when the vacation mode ends on the right-hand side
Use and buttons to set the duration of the vacation mode.
3. The maximum number of hours is 48. The number of days is selected above this value.
The number on the right in such a case indicates the date (the display shows "Date"
and the symbol of the weekday)
You may also set the infinite duration of the vacation mode.
4. After entering the vacation duration setting, “1h” appears on the display. The changes
are implemented according to the following order:
"-" means infinite duration; vacation mode in such a case may only be finished manual-
ly.
5. Having set the period, confirm it by pressing .
RESTORING NORMAL OPERATION
The thermostat automatically restores normal operation at a specified time. If the selected
period was expressed in days, normal operation will be restored at midnight on the selected
day (that is, at the beginning of the day).
If you plan to go back e.g. on Sunday, the thermostat will turn on the heating on Sunday at
midnight and the room will be heated to normal temperature before you return.
If you select an infinite period, the vacation mode should be turned off manually.
In any case, the holiday mode is switched off by pressing button.
TIME/DAYS INDICATION
If the preset period is expressed in hours, the letter "h" is shown after the number, whereas if
it is expressed in days "d" appears on the display and "Date" is shown above the right number.
TEMPORARY CHANGE OF TEMPERATURE
Unlike in vacation mode, one does not set duration for the temporary change of temperature.
This mode is active until the next program starts.
To activate this function, set the desired temperature with and buttons. It is stored after
3 seconds. You can also confirm the setting using . The display shows , and all but-
tons except and become locked.
Example:
P1 maintains a temperature of 20 °C from 9.00 a.m., whereas P2 maintains 21 °C from 2.00
p.m. At noon, the user activates a temporary change of temperature, sets the temperature to
15 °C. The target temperature will be:
20 °C –9.00 a.m. ÷ 12.00 p.m
15 °C –12.00 p.m. ÷ 2.00 p.m.
21 °C –2.00 p.m. ÷ ….....

EUROSTER 2026TXRX –INSTALLATION AND OPERATION MANUAL 9
The function may be deactivated by turning the knob to any day of the week and then back to
START.
Frost protection mode (switching the thermostat off after the heating season)
In the frost protection mode, the thermostat switches to maximum energy saving. If it is used
with the air conditioning, it switches it off; if it controls the heating, it only maintains the min-
imum temperature to protect the system against freezing (5 °C).
To activate this function, press and hold button for more than 3 seconds.
The display becomes blank, only the measured temperature, the power symbol, and A-F letters
indicating the anti-freeze mode are displayed. To deactivate this function, press button for
at least 3 seconds.
Locking thermostat settings
The thermostat features a setting interlock function. The active interlock is indicated by
symbol. In such a case it is not possible to change the settings. However, you can view them.
Locking the thermostat:
1. Turn the knob to the “SOB” position.
2. Hold and for at least 3 seconds. After 3 seconds, the thermostat is locked, and
symbol appears on the display.
3. Turn the knob to the “START” position.
Follow the same steps to unlock the thermostat.
Active interlock does not affect the thermostat operation.
CHECKING THE OPERATING TIME
The thermostat features a function to measure the operating time of the controlled device. It is
used to determine a maintenance period or estimate costs.
The maximum counted value is 999:59. Having reached this value reached, the counter stops.
1. Press button to display the operating time. The thermostat displays the operating
time and or symbol, depending on which device is operating.
2. Press button (restore normal operation) or follow steps 3 to 5 to reset the counter.
3. Press and hold the button for 3 seconds –the digits begin to flash.
4. Press and the displayed value changes to 000:00 and stops flashing.
5. The thermostat restores normal operation after 15 seconds or when you press
button.
ANTI-STOP
The thermostat is equipped with the AntiStop function. The controlled device (e.g. pump) is
switched on for at least 1 minute, at least once a week, even if the thermostat is in the frost
protection mode. The operation is independent of the programs and is not configurable.
EUROSTER 2026TXRX –INSTALLATION AND OPERATION MANUAL 10
Factory settings
Air conditioning control
Monday Friday Saturday - Sunday
P1 6.00 a.m. / 23 °C P1 6.00 a.m. / 23 °C
P2 8.30 a.m. / 28 °C P2 11.00 a.m. / 22 °C
P3 3:00 p.m. / 22 °C P3 4.00 p.m. / 23 °C
P4 11.00 p.m. / 25 °C P4 11.00 p.m. / 25 °C
Heating control
Monday Friday Saturday - Sunday
P1 6.00 a.m. / 21 °C P1 08.00 a.m. / 21 °C
P2 8.30 a.m. / 18°C P2 08.30 a.m. / 21 °C
P3 04.00 p.m. / 21 °C P3 03.00 p.m. / 21 °C
P4 11.00 p.m. / 17 °C P4 11.00 p.m. / 17 °C
Hysteresis (all modes)
The factory preset hysteresis is 1 °C.
Jumper settings
The factory preset jumper position is as follows:
Type of system: Heating,
Selection of sensor: Internal,
Type of algorithm: ON-OFF,
Protection against overheating due to flat batteries: NO.
8. RX RECEIVER SETTINGS
ESTABLISHING CONNECTION BETWEEN 2026TX THERMOSTAT AND RX RECEIVER OR
RECEIVERS (PAIRING)
Each thermostat and each receiver has a unique number that distinguishes it from others. It is
not possible for any thermostat not paired with the particular receiver to interfere with the
operation of another pair or set.
The thermostat may be paired with other receivers at any time. A blackout, battery
replacement as well as a complete reset of all thermostat settings do not affect the pairing of
devices in any way.
Pairing procedure:
•Press the RESET button (under the front flap)
•Remove the thermostat cover
•Press the button on the transmitter board three times, the LED starts flashing in red
and green alternately
•Insert the RX receiver into the mains socket
•Press the button on the receiver 3 times –the blue LED lights up,
•When the connection is established, the blue LED on the receiver goes out
•If you use only one receiver, press the button on the transmitter board, the light goes
out. The pairing mode is ended.
If you are going to pair multiple receivers (maximum 6), proceed as follows:
•When the first receiver is detected,

EUROSTER 2026TXRX –INSTALLATION AND OPERATION MANUAL 11
•insert the second receiver into a mains socket.
•Press the button on the receiver 3 times –the blue LED lights up,
•when the receiver is detected, the blue led goes out,
•Proceed similarly with the connection of the subsequent receivers, then press the
button on the transmitter board. The pairing mode is ended.
Caution! Pairing mode is only available for 10 minutes after connecting the receiver
to the mains, resetting it, or installing batteries in the thermostat!
Factory-established pairs are paired, however, pairing may be repeated if necessary.
SELECTING OPERATING MODE
While holding the "B" button pressed, insert the receiver into a mains socket. Depending on
the mode set, the green or red LED lights up. Each time the button is pressed, the operating
mode changes. When you select the mode, the receiver restores operation.
Green –normally open mode (COM –NO). It is the mainly used operation mode. While the
device operation indicator is active, the output cables are shorted.
Red –normally closed mode (COM –NC). While the device operation indicator is active, the
output cables are opened.
Caution! The factory default setting is (COM-NO).
9. FIRST START
When inserted into the mains socket, the receiver indicates the relay operating mode. A flash
of green LED –normally open mode (COM-NO), a flash of red –normally closed mode (COM-
NC).
Any change in the status of the thermostat (switching the heating on/off) is made immediately
by the receiver, while the confirmation that the radio signal is received from the transmitter is
repeated every 15 minutes.
RADIO SIGNAL STRENGTH
The radio signal strength is indicated together with the reception of the transmitter signal.
Radio signal reception is indicated in green. LED flashing three times stands for a very strong
range, twice for a strong range, and once for sufficient range.
NO RADIO COMMUNICATION
If the communication between the thermostat and the receiver is interrupted (e.g. discharged
batteries) and if this condition lasts for 60 minutes (no response from the receiver), the
receiver switches to the frost protection mode. The heating device will be switched on every 3
hours for 20 minutes to prevent the rooms from being cooled down. At the time of re-
establishing communication (e.g. replacement of batteries), the receiver will automatically
switch the system off and resume operation.
If there is no radio communication, the green LED flashes rapidly.
CONTINUOUS OPERATION OF HEATING DEVICE (MAN)
In the event of system failure, it is possible to manually switch on the heating. Move the switch
on the RX receiver to the MAN position. Such status is indicated by a rapid flashing of the red
LED.
RECEIVER SIGNALING TABLE.
Function
Signaling
Pairing
Blue
Reception of radio signal
Green
No radio communication
Green –flashing
The heating/air-conditioning device is switched on
Red
Manual mode
Red –flashing

EUROSTER 2026TXRX –INSTALLATION AND OPERATION MANUAL 12
10. SAMPLE CONNECTION DIAGRAMS
The following diagrams are simplified and do not cover all elements necessary for the correct
installation.
In arrangement with a 230 V 50 Hz device
1. Electrical connection block
2. Output cable, using COM - NO contact (normally open)
3. Euroster RX (receiver)
4. Euroster TX placed in any room
In arrangement with a gas boiler
1. Electrical connection block
2. Output cable, using COM - NO contact (normally open)
3. Euroster RX (receiver)
4. Euroster TX placed in any room
11. MAINTENANCE
Do not use solvents and aggressive detergents to clean the thermostat, since they may
damage the surface of the housing and the display. Clean the thermostat housing with a soft
cloth.
12. DIMENSIONS
EUROSTER 2026TXRX –INSTALLATION AND OPERATION MANUAL 13
SPECIFICATIONS
Controlled device
heating/air-conditioning systems
Supply voltage
3 V (2 pieces of alkaline AA batteries)
receiver –230 V 50 Hz
Thermostat output
relay, voltage-free type, SPST
Maximum load
5 A 230 V 50 Hz
Temperature measurement range
0 °C...+50 °C
Temperature adjustment range
+5 °C...+45 °C
Temperature adjustment accuracy
0.2 °C
Temperature reading accuracy
0.1 °C
Hysteresis range
0.5, 1.0, 2.0, 4.0 °C, or PI mode,
Visual signalization
backlit LCD
Operation temperature
+5 °C...+40 °C
Storage temperature
-10 °C...+45 °C
Ingress protection rating
IP20
Color
White
Mounting method
thermostat –stand
receiver –230 V 50 Hz socket
Weight
Thermostat without batteries –171 g
receiver–170 g
Warranty period
2 years
Length of the receiver output cable
2 m
The operating frequency of the set
868 MHz
Maximum power of transmission of the
thermostat and receiver
< 25 mW
Thermostat class:
IV
Thermostat contribution to the seasonal
energy efficiency of room heating
2%
13. KIT CONTENTS
a) Euroster 2026TX thermostat
b) Euroster RX receiver
c) 2 pieces of alkaline AA batteries
d) thermostat stand
e) Installation and Operation Manual with Warranty Certificate
14. SIMPLIFIED DECLARATION OF CONFORMITY
P.H.P.U. AS AGNIESZKA SZYMAŃSKA-KACZYŃSKA hereby declares that the type of EUROSTER
2026TXRX equipment conforms to the following directives: 2014/35/EU (LVD), 2014/30/EU
(EMC), 2014/53/EU (RED), 2011/65/EU (RoHS).
The complete text of the Declaration of EU conformity is available at the following Internet
address: www.euroster.pl

EUROSTER 2026TXRX –INSTALLATION AND OPERATION MANUAL 14
ELECTRONIC WASTE MANAGEMENT INFORMATION
This product is designed and manufactured from high-quality materials and
components suitable for reuse.
The crossed-out wheelie bin symbol located on the product (Fig. 1) means that
the product is subject to selective collection in accordance with the provisions of
the Directive 2012/19/EU of the European Parliament and of the Council.
The product contains batteries, which are marked with a crossed-out wheelie bin
symbol (Fig. 1). The batteries are subject to selective collection in accordance with the
provisions of the Directive 2006/66/EC of the European Parliament and of the Council.
Such marking informs that the electrical and electronic equipment, as well as batteries and
accumulators, may not be disposed of together with other household waste after their service
life has ended. The user is obliged to take the used devices and batteries or accumulators to a
point of collection of waste electrical and electronic equipment and batteries and accumulators.
The entities collecting such equipment, including the local collection points, shops, and
municipal entities, set up an appropriate system enabling handover of such equipment and
batteries and accumulators. The proper disposal of waste equipment, batteries, and
accumulators contributes to the prevention of consequences hazardous to the health of
persons and nature, resulting from the possible presence of hazardous components in the
equipment and batteries and inaccurate storage and processing of such equipment and
batteries.
Households play an important role in contributing to reuse and recovery, including recycling, of
waste equipment. The attitudes influencing the protection of the common good of a clean
environment are shaped at this level. Households are also one of the larger users of small
equipment and its rational management at this level impacts the recovery of recyclables.
Inaccurate disposal of this product may be penalized in accordance with national legislation.
WARRANTY CERTIFICATE
EUROSTER 2026TXRX thermostat
Warranty terms:
1. The warranty is valid for 24 months from the device sale date.
2. The claimed thermostat together with this warranty certificate must be supplied to the
seller.
3. Warranty claims shall be processed within 14 business days from the date the
manufacturer has received the claimed device.
4. The device may be repaired exclusively by the manufacturer or by other parties clearly
authorized by the manufacturer.
5. Warranty becomes void in case of any mechanical damage, incorrect operation, and
repairs made by unauthorized persons.
6. This consumer warranty does not exclude, restrict nor suspend any right of the Buyer
ensuing if the product would not meet any of the sale contract terms.
...................................................................................................................................
Sale date
serial number
date of manufacture
Stamp
and signature
Service:
Phone No. 65-57-12-12
The business entity that issued this warranty certificate is:
P.H.P.U. AS Agnieszka Szymańska-Kaczyńska, Chumiętki 4, 63-840 Krobia, Poland
Table of contents
Other EUROSTER Thermostat manuals

EUROSTER
EUROSTER 3202 User manual

EUROSTER
EUROSTER Q1 User manual

EUROSTER
EUROSTER 6060 User manual

EUROSTER
EUROSTER 3000 User manual

EUROSTER
EUROSTER 2510 User manual

EUROSTER
EUROSTER Q7TXRXGW User manual

EUROSTER
EUROSTER 2006 User manual

EUROSTER
EUROSTER 4020TXRX User manual

EUROSTER
EUROSTER 2026TXRXG User manual

EUROSTER
EUROSTER EUROSTER 4010 User manual

EUROSTER
EUROSTER 4040TXRX User manual

EUROSTER
EUROSTER 4020 User manual

EUROSTER
EUROSTER Q7 User manual

EUROSTER
EUROSTER 2006 User manual

EUROSTER
EUROSTER 0101 SMART User manual

EUROSTER
EUROSTER 1310 User manual

EUROSTER
EUROSTER 4010TXRX User manual

EUROSTER
EUROSTER Q1 User manual

EUROSTER
EUROSTER 2006TXRX User manual

EUROSTER
EUROSTER 4040TXC6 User manual


