Eurotramp HDTS trampoline measurement system User manual

1
Eurotramp - Trampoline Kurt Hack GmbH
User guide
(standard guide for Ultimate models)
HDTS trampoline measurement system (Art.-Nr. HDTS01)
General informations ......................................................................................................................................... 2
General data ...................................................................................................................................................... 3
Parts list............................................................................................................................................................. 3
Assembly instructions ....................................................................................................................................... 4
Certicate ........................................................................................................................................................ 21

2
Eurotramp - Trampoline Kurt Hack GmbH
Information in this guide is subject to change without notice.
No part of this document may be reproduced or transmitted in any way without the express written permission of
Eurotramp Trampoline Kurt Hack GmbH.
November, 2019
Document-Nr.: HDTS01-19-02
European Patent-Nr.: 2962736.
About this Manual
HDTS is a measurement system for competitive trampolining. This manual describes the HDTS01 model.
The rst part of this manual describes how to install and set up your system, and verify that the system is
working properly.
The second part of this manual describes the features and capabilities of your system using the Qira software.
Troubleshooting information is also provided.
Intended Audience
This document is intended for Judges, Ofcials, Coaches, Athletes or other responsible for using the HDTS01-
measurement system.
Conventions Used in this Manual
Paragraphs with important additional information are marked with „NOTE“.
Paragraphs explaining optional features are marked with „OPTIONAL“.
Computer Requirements
• Windows 7 or newer
• Microsoft Visual C++ 2015-2019 Redistributable
Glossary
•ToF: Time of Flight
•HD: Horizontal Displacement
•SYN: Synchronicity
•IM: Individual Mode
•SM: Synchronized Mode
•FP: Force Plate
•USB-Box: USB-Master
General informations

3
Eurotramp - Trampoline Kurt Hack GmbH
Art.-No. HDTS01: HDTS trampoline measurement system
• FIG approved
• Standard for Eurotramp Ultimate models (Adapter for other models available)
• If the trampoline is not from Eurotramp, a stability plate adaptor can be purchased.
• This User Guide is especially for Qira V2.0.x. Some features may be similar in other versions. The current Qira
software can always be downloaded from the Eurotramp website, under the following link:
www.eurotramp.com/de-en/products/accessories/hdts/product-downloads/
• Be cautious when moving and operating;
• Keep system dry and clean;
• Prevent system from shocks and hits;
• Prevent system from extreme heat or cold;
• Recommendation: Transport in padded box or similar.
General data
Maintenance recommendations
Art.-No. HDTS01: HDTS trampoline measurement system Quantity
USB Master Box 2
Silver cable (USB-Micro to USB-cable for connecting the USB Box with the Computer) 2
USB ash drive with PC software 1
Measuring plates HDTS for two trampolines (4 measuring plates per trampoline) 8
Green cables (Ethernet-cables for connecting the FP‘s 2-3) 2
Blue cables (Ethernet-cables for connecting the FP‘s 1-2, 3-4) 4
Grey cable (Ethernet-cables for connecting the USB Master Box with FP Number 1) 2
Parts list (scope of delivery)
!
The very highest demands are placed on this high-end-product.
For safety reasons, only use original replacement parts! The use
of non-original replacement parts can result in considerable risk
to the user (danger of accidents, technical defects, loss of the
manufacturer’s liability, loss of warranty etc.).
All spare parts available from Eurotramp upon request.
Shown here: HDTS parts for 1 trampoline.
1
3
2
4
4
4
4
6
5
7
4
Eurotramp - Trampoline Kurt Hack GmbH
1Installation
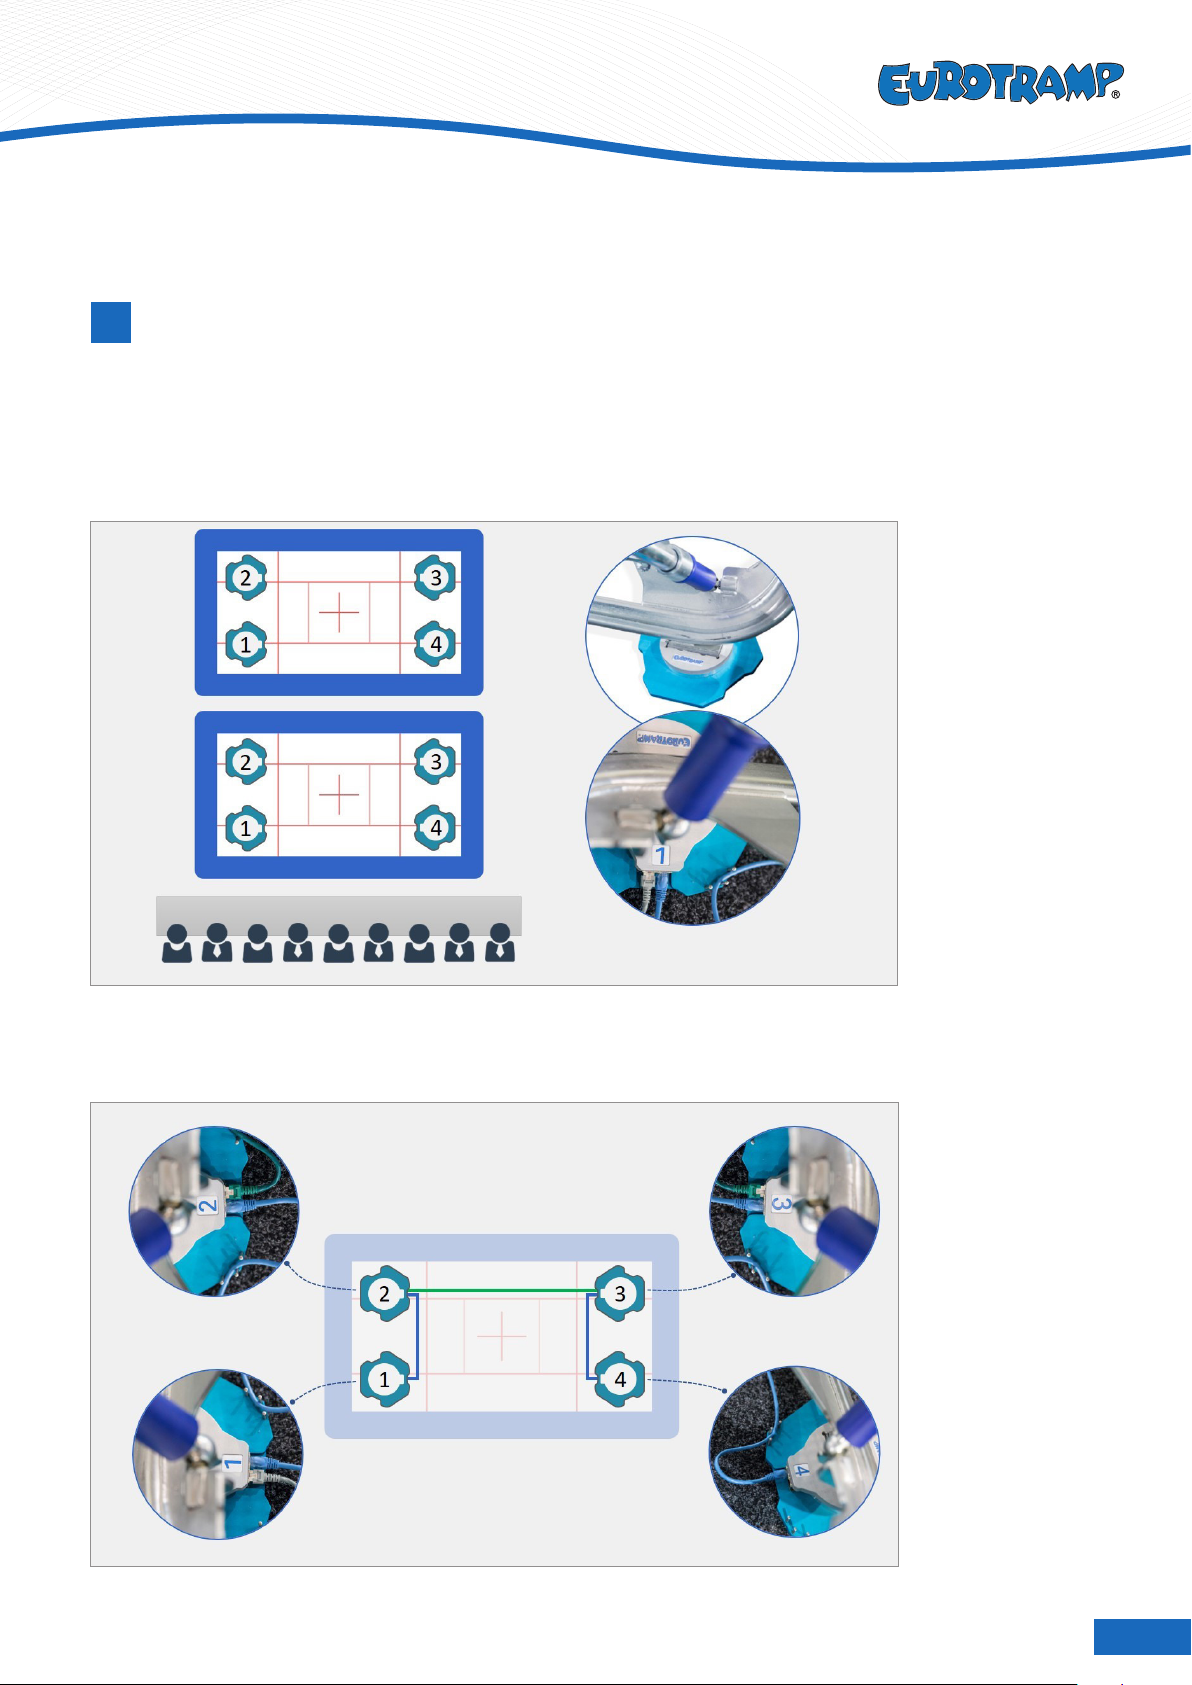
Start by setting up the trampolines. Place the force plates under the trampoline as shown in the picture. Ensure
the correct numbering of the plates: the plate labeled with number 1 is in the left corner close to the judges’ tab-
le. The other plates are positioned clockwise around the trampoline. Use only correct adapters depending on the
trampoline (either Ultimate or Premium).
The cable ports face inward.
Assembly instructions
Connect force plates 1 and 2 (3 and 4 respectively) with a blue ethernet cable using the inner ports. Connect
force plates 2 and 3 with a green ethernet cable using the outer ports. Make sure to lead the cables around the
pins as shown in the picture to prevent damage
5
Eurotramp - Trampoline Kurt Hack GmbH
2Overview of Competition Floor
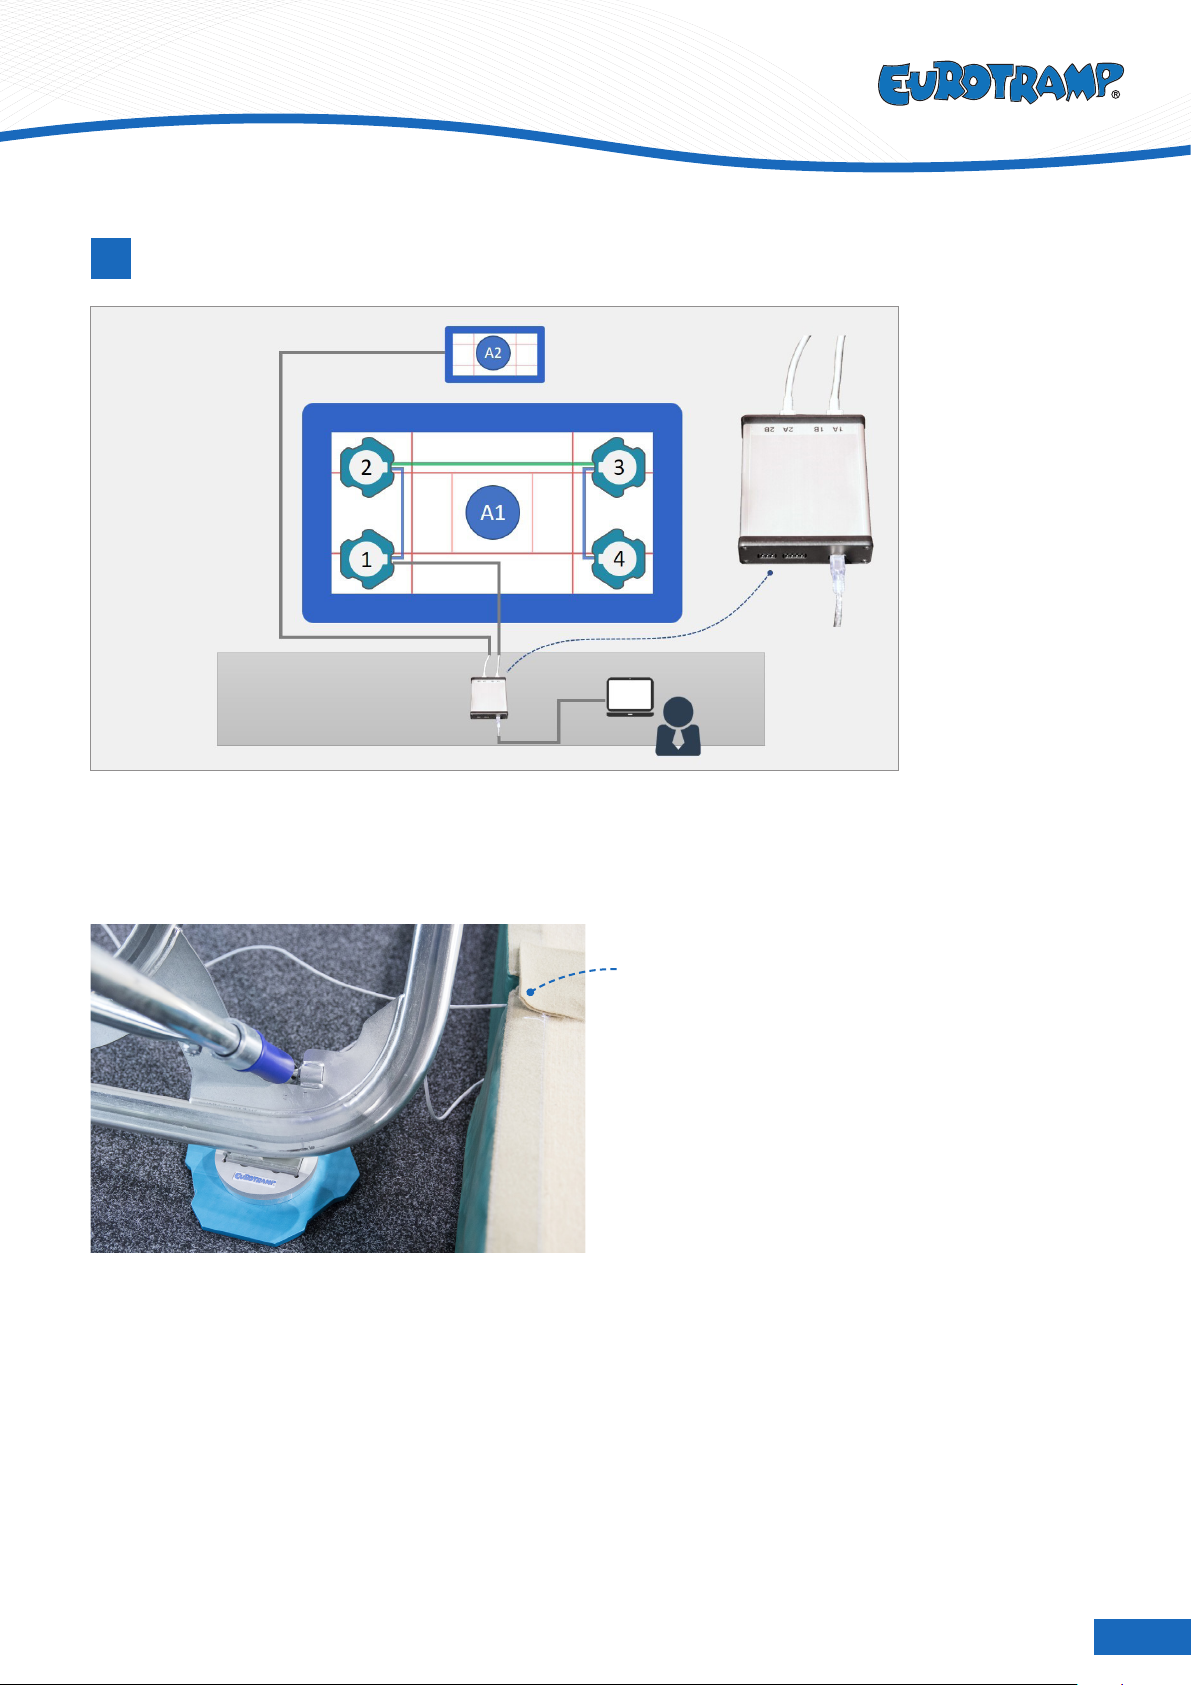
Connect force plate 1 (outer port) with a long ethernet cable (max. 30m) to the USB box. The trampoline facing
the judges is using port 1, the second trampoline is connected to port 2. Connect the USB box with the laptop
using the USB cable.
NOTE:
• Install the cables under butt connectors (trip
hazard and risk of damage);
• Fix USB-Box to the table or on the ground;
• Protect Ethernet-cables between trampoline and
judge’s table (for example: lay under mats and
ooring).
6
Eurotramp - Trampoline Kurt Hack GmbH
Qira installation
3
NOTE: This User Guide is especially for Qira V2.0.x. Some features may be similar in other versions.
The newest Version of Qira can be downloaded at www.eurotramp.com/de-en/products/accessories/hdts/product-downloads
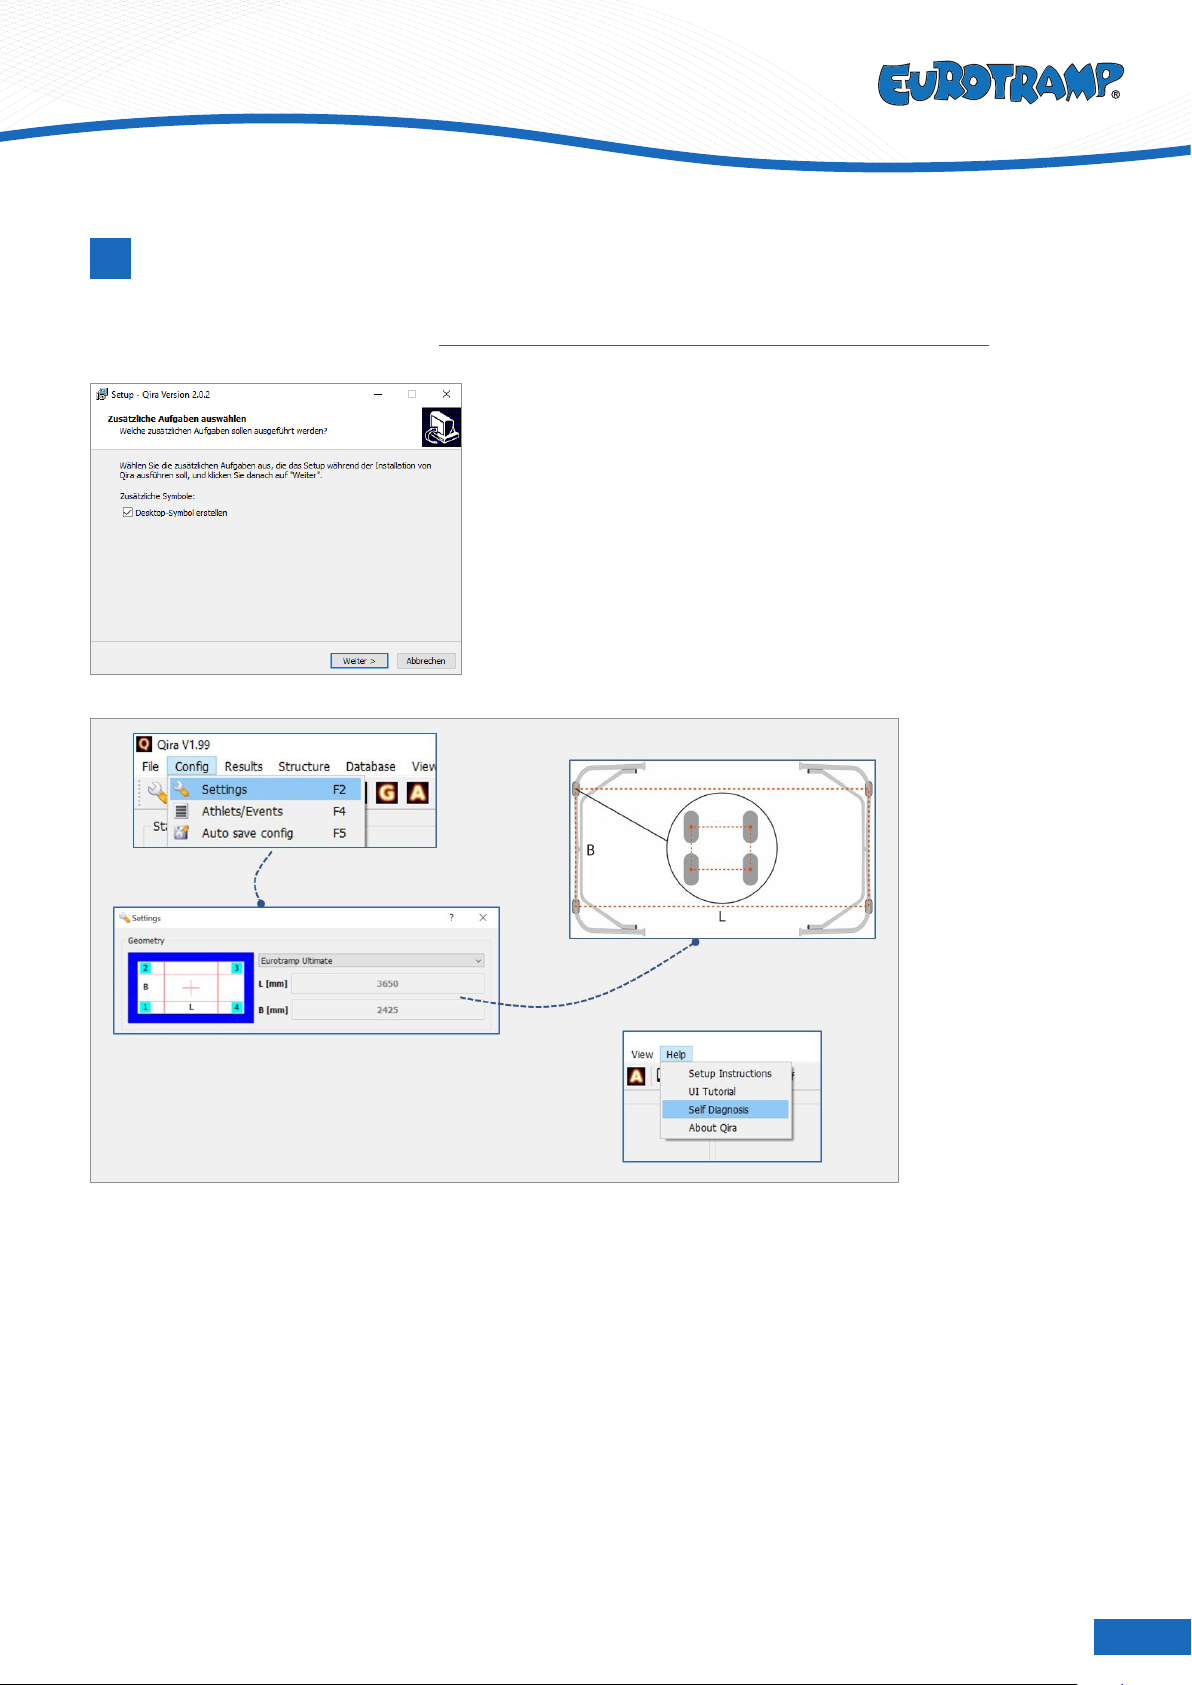
• Connect Eurotramp ash-drive
• Start Installer by double-clicking the setup le
(setupQiraV2.0.x.exe).
• Generate a desktop icon.
The setup of the HDTS system is complete. Make sure to select the correct trampoline brand and model in the
Settings menu. If the trampoline you are using is not listed, enter the distances between midpoints of the oor
protection of your trampoline.
Finally, continue with the self test to ensure the system’s function.
7
Eurotramp - Trampoline Kurt Hack GmbH
Self Diagnosis
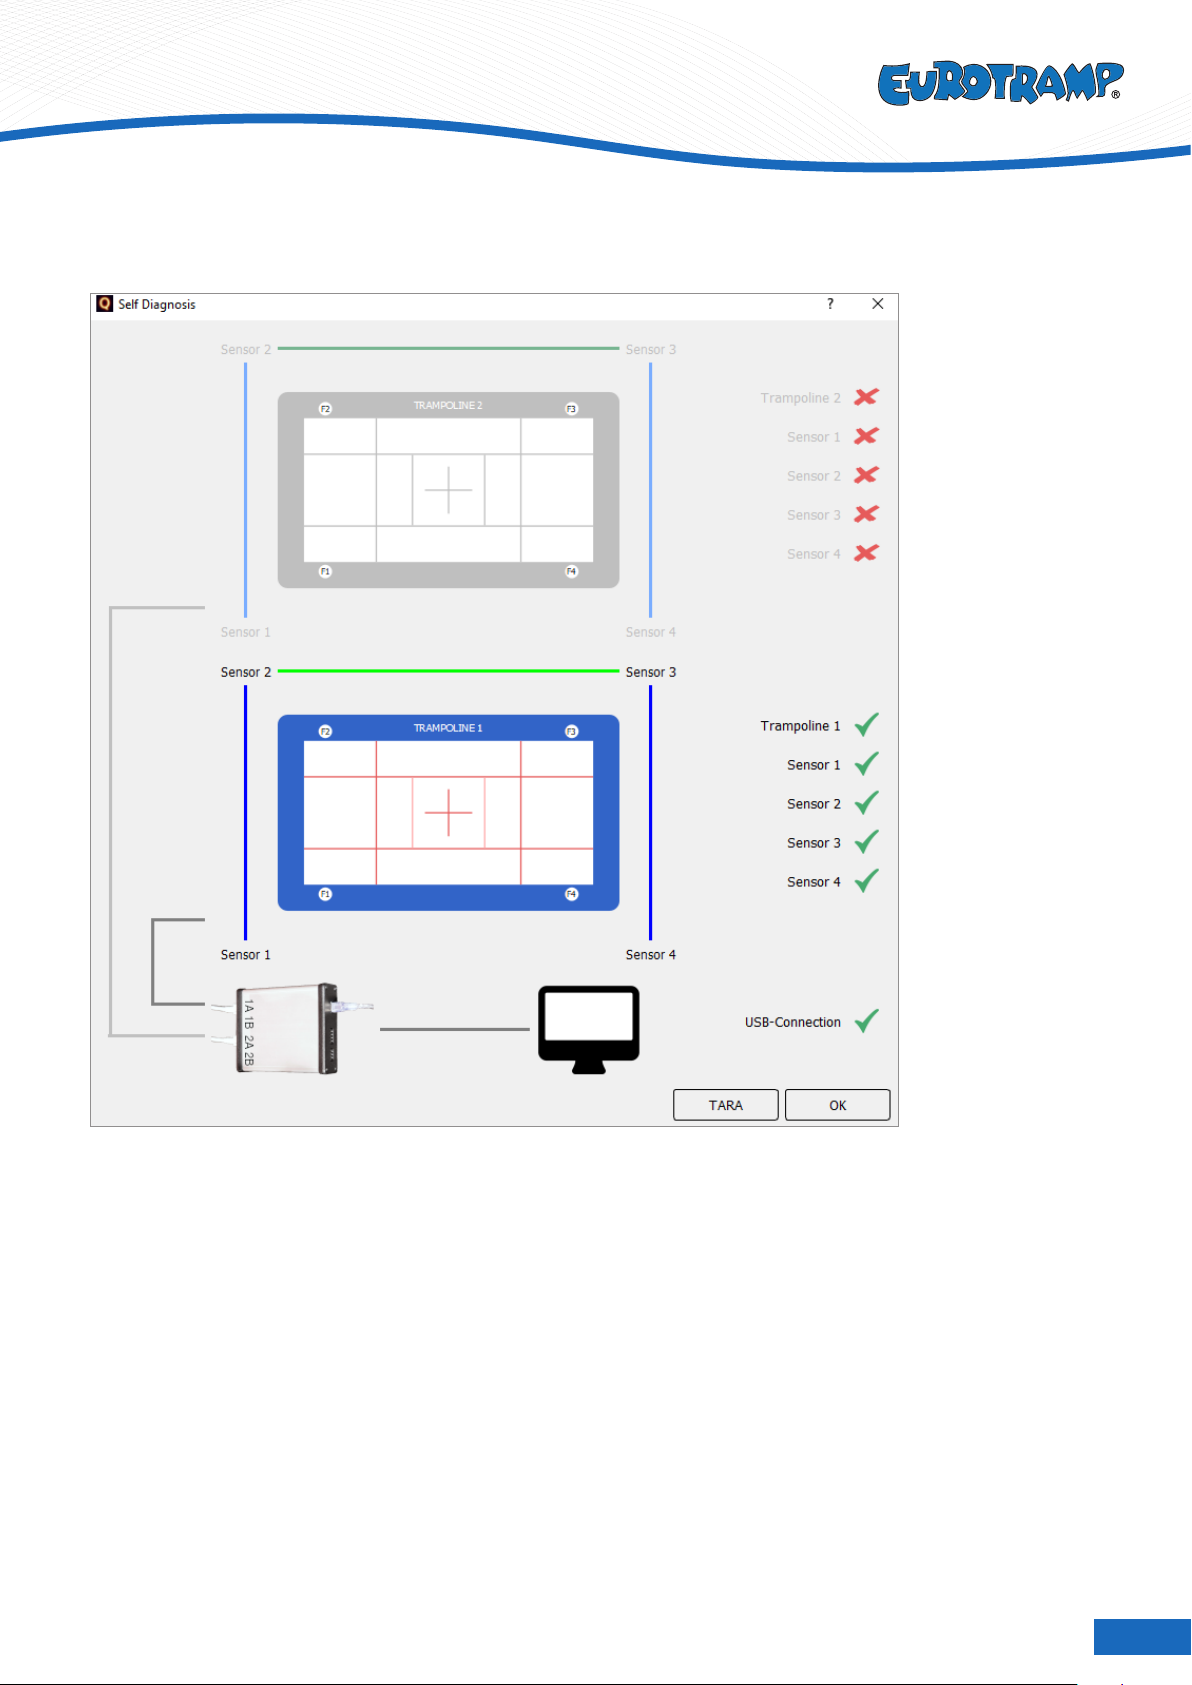
Go to „Help” on the toolbar to open Self Diagnosis.
Self Diagnosis shows the status of the connected hardware. In this example Qira receives measures from each
forceplate of trampoline 1 and no values from trampoline 2. In this state the system is ready to record routines on
trampoline 1.
Use for initial System-check and troubleshooting.

8
Eurotramp - Trampoline Kurt Hack GmbH
Right-Click in the window and click show details to present pressure-values (P), tara-values (T)
and net-values (N =P-T) for each forceplate.
Program interface
4
The application is structured in four major areas:
1 Current state
2Conguration
3 Competition organization
4 Results
9
Eurotramp - Trampoline Kurt Hack GmbH
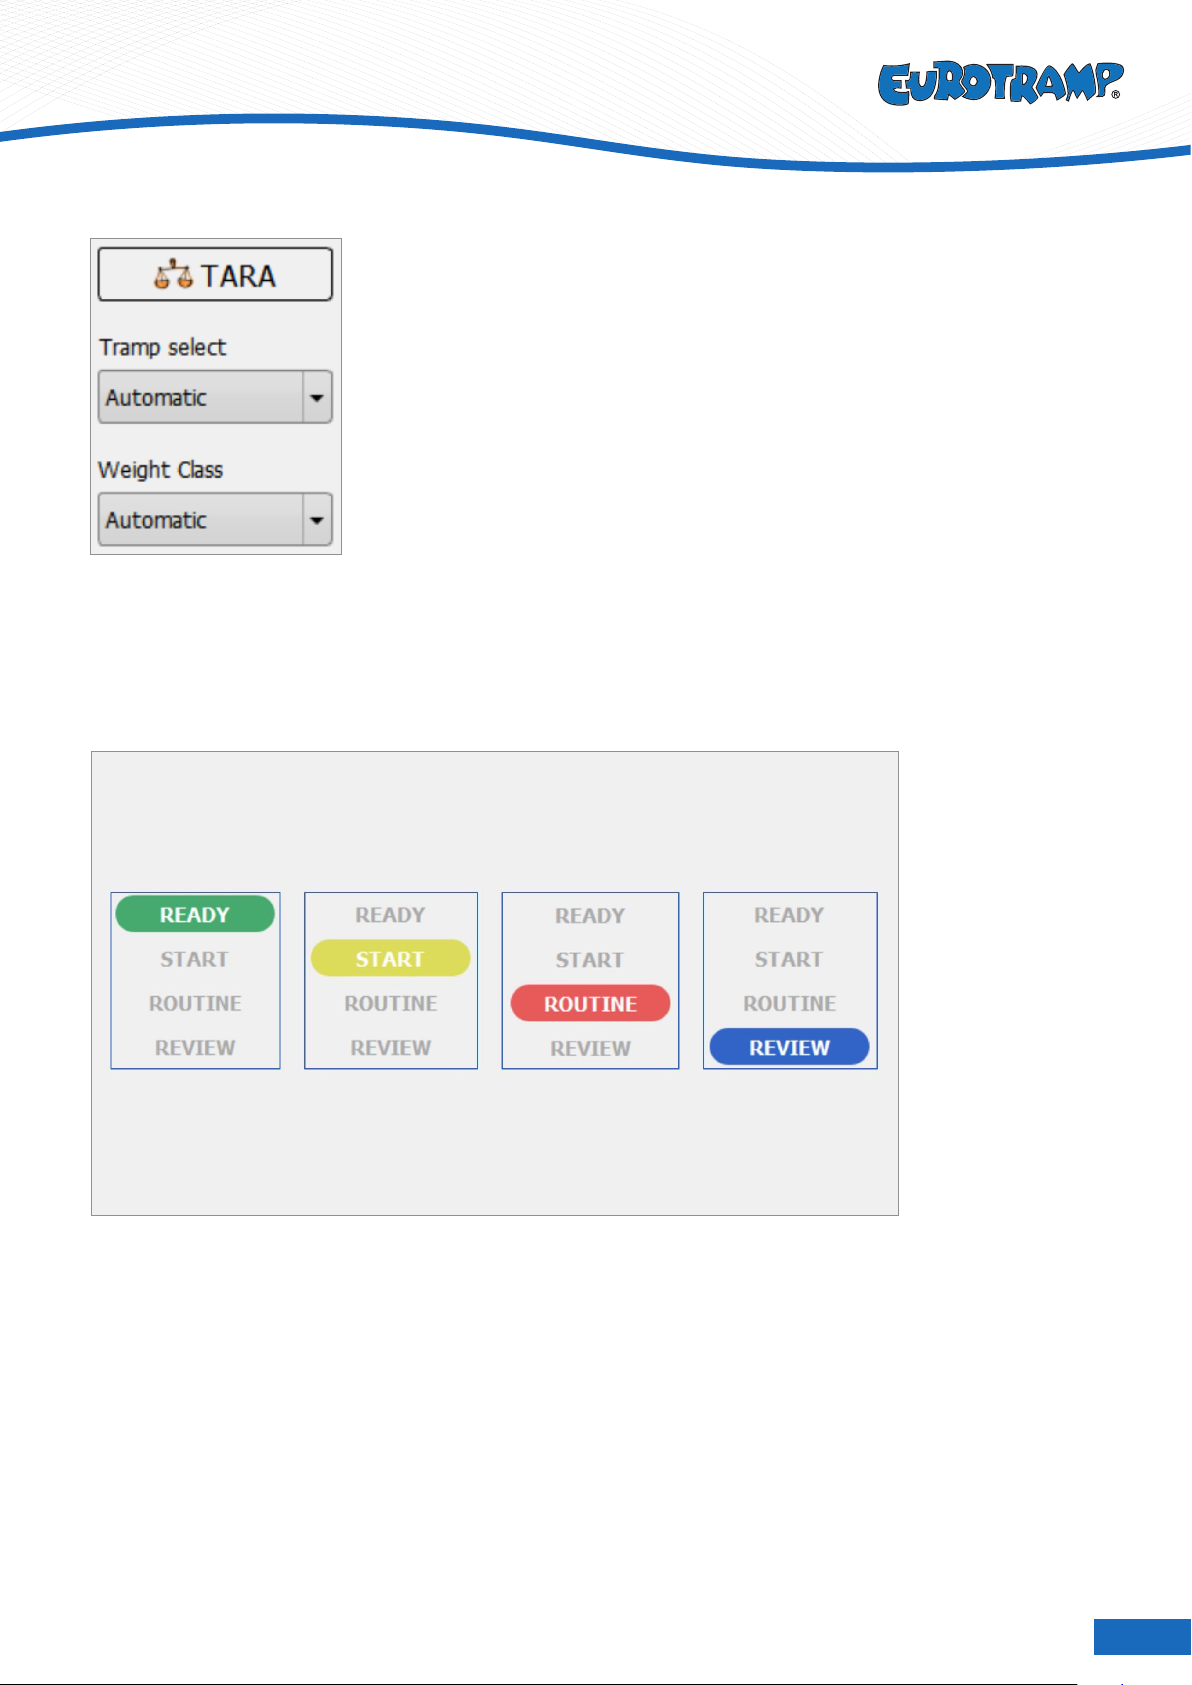
The conguration area has a button to calibrate the system (TARA). The system should be calibrated once after
setting up the system and with no additional weight on the trampolines. Afterwards, the software measures its
state independently and adjusts the calibration if needed.
Furthermore, the conguration area can be used to select the trampoline to use for measurements as well as the
athlete´s weight class. It is recommended to use the automatic detection of both parameters.
The current state during normal operation mirrors the phases of a trampoline routine:
• Measuring can be started in the state READY – the athlete has not yet started.
• The athlete gains height before showing his routine in the state START.
• The software measures and evaluates horizontal displacement as well as time-of-ight or synchrony in the
state ROUTINE.
• The REVIEW state is intended for checking and approving results.
Press space to iterate between the four states.

10
Eurotramp - Trampoline Kurt Hack GmbH
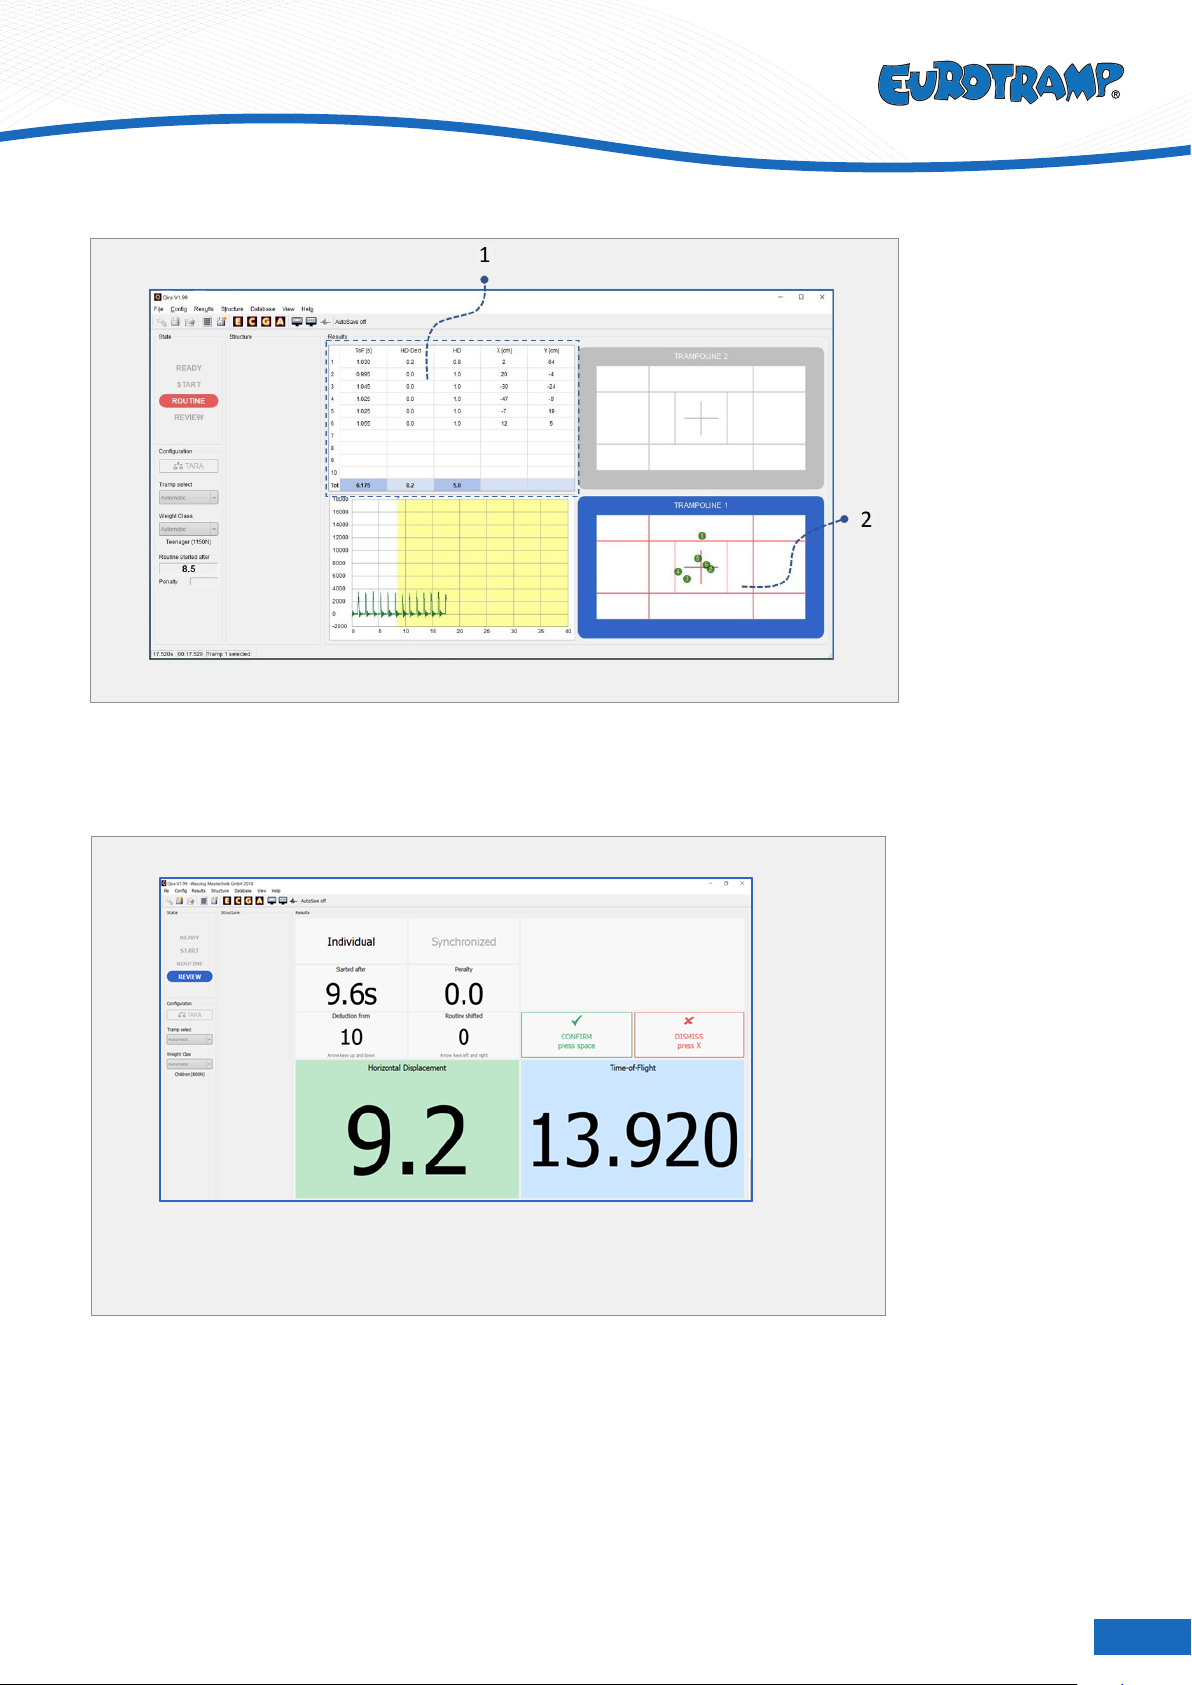
The state READY signals that the software is ready to start a measurement. The transition to the state START is
executed as soon as the athlete gets a signal from the chair of the judges’ panel to start the routine.
The athlete gains height before the actual routine in the state START.
Multiple pieces of information are shown in this state. A clock shows the time spent before the athlete starts the
routine (1). A chart shows current force values of the force plates – a landing in the trampoline should lead to a
spike in the chart (2). The trampolines in the application show which trampoline is currently used for the measure-
ments. The automatic trampoline detection takes up to ve seconds to switch the active trampoline.
The transition to the next state is initiated by pressing the spacebar as soon as the athlete shows the rst ele-
ment of the routine.
11
Eurotramp - Trampoline Kurt Hack GmbH
The athlete performs his routine in state ROUTINE. The landings are recorded in the table during the routine
(1). Additionally, the landing positions are shown in the trampoline (2). The measurement is ended after the last
landing or when the athlete interrupts the routine by pressing the spacebar. The software prevents routines with
more than ten elements, hence it is not possible to inadvertently end the routine „too late”.
After the routine, the results are presented in an overview in the state REVIEW. It is possible to go back to the
detailed result view by pressing the D key on the keyboard or by clicking the corresponding item in the action bar
(1). Furthermore, it is possible to shorten or lengthen a routine by pressing the up and down arrow keys (2). It is
possible to shift the whole measurement, should it not be aligned correctly to the athlete’s routine (e.g., if it was
started too late). This is done with the left and right arrow keys (3). When all results are correct, they can be con-
rmed by pressing the spacebar (4). Conrmed results can be shown on a second screen in a separate window
and are stored (if congured). Should the results be wrong, they can be dismissed by clicking the button or by
pressing the X key (5). Either conrming or dismissing the results leads to a transition to the READY state.
All necessary steps to measure a routine are covered. The next chapters describe advanced functions like con-
gurations, save-modes and structuring a competition.

12
Eurotramp - Trampoline Kurt Hack GmbH
Conguration
5
Geometry
Select the correct trampoline or enter distance between midpoints of
oor protection.
Data-Export
Specic conguration for „Auto-Save function (File)”.
Synchronisation
Function for system development.
Logging
Feature for recording events taking place in executing Qira. Creates a
logle in storage path.
a) Settings (Shortcut: F2)
b) Athlets/Events (Athleten/Veranstaltungen) (Shortcut: F4)
• Set Athletes and Events for Auto-Save Function (File)
• Not compatible with Auto-Save Function (Database)

13
Eurotramp - Trampoline Kurt Hack GmbH
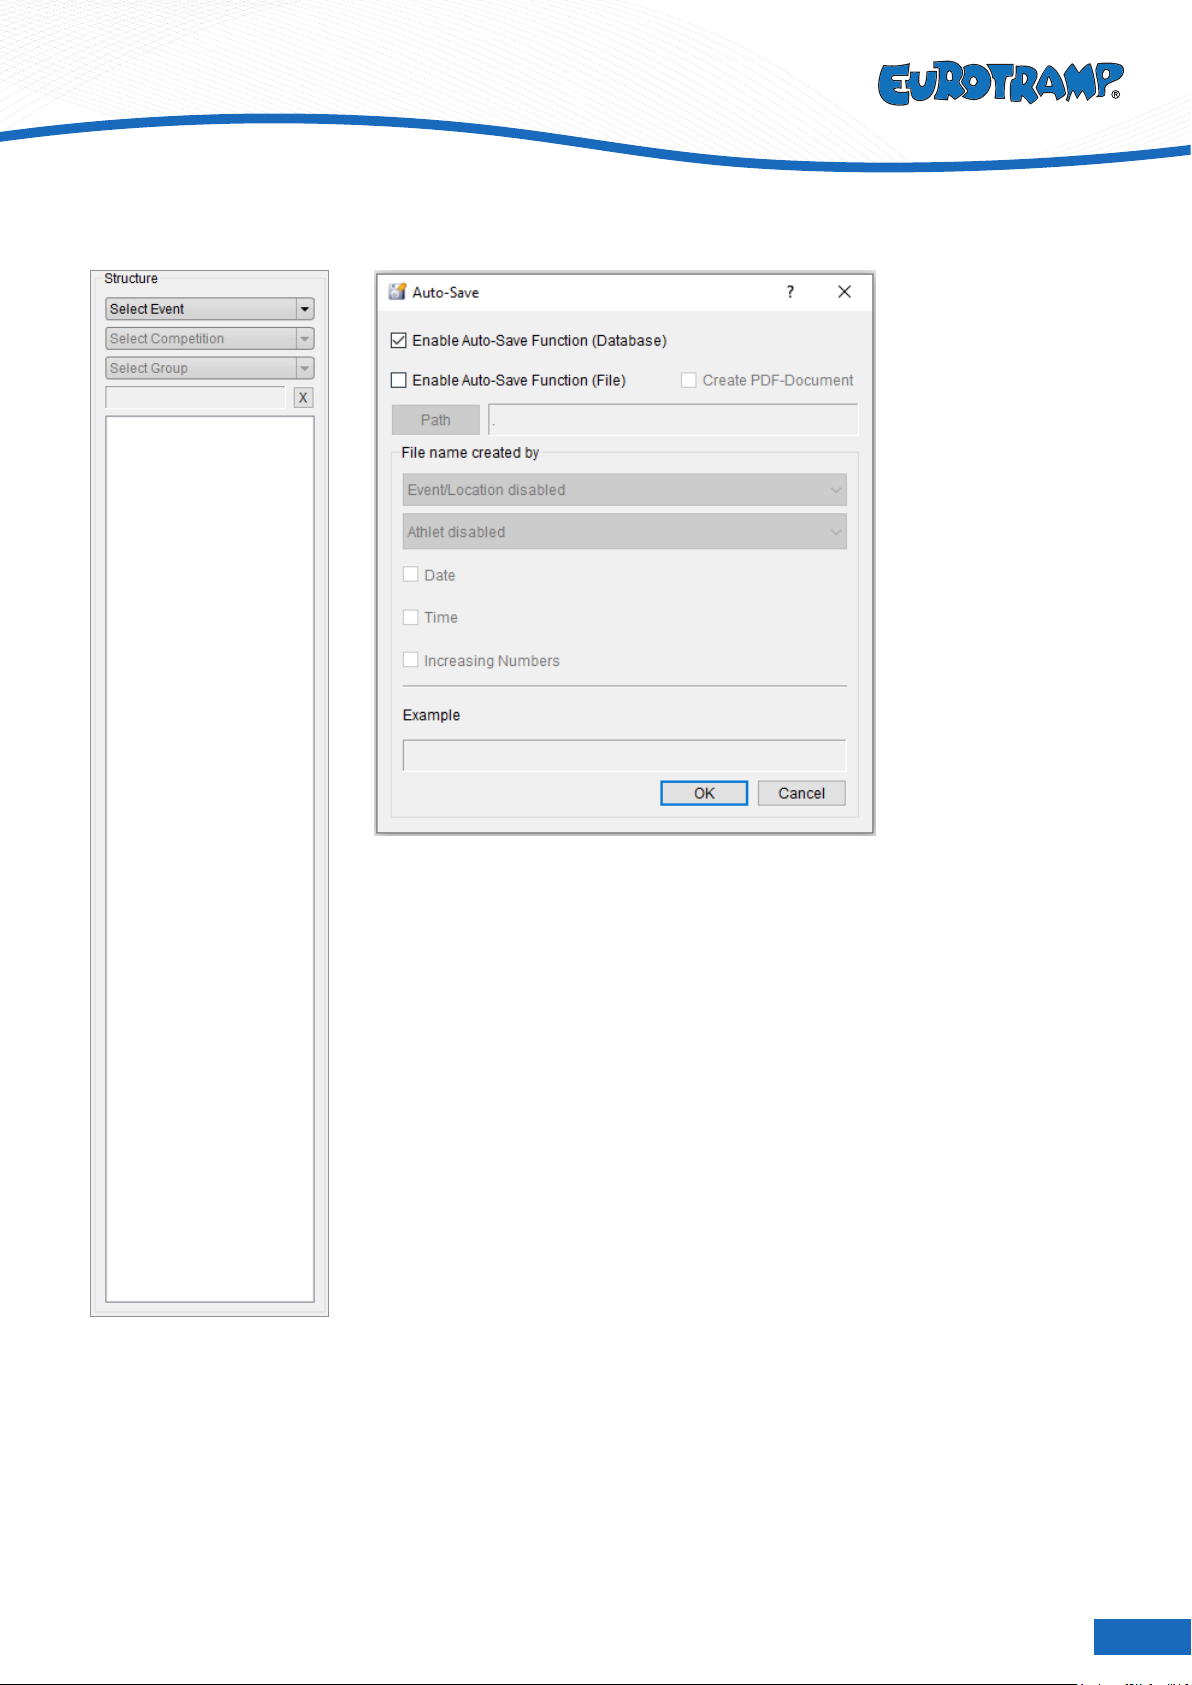
c) Auto save cong (Shortcut: F5)
Auto-Save Function FILE
Choose between Auto-Save Functions using a Database or create a File for the results.
Enable the Auto-Save Function (File). Set a storage
path for the result-les. The Athletes and Events crea-
ted in “Athletes/Events“ (F4) can be selected as part
of the lename. Add Date, Time or increasing Num-
bers to the lename.
14
Eurotramp - Trampoline Kurt Hack GmbH
Auto-Save Function DATABASE
Enables the Structure for Auto-Save Function (Database).
For more information and a guide how to set up the structure, see chapter 6 „Da-
tabase” and chapter 7 „Structure”.
d) Network
Settings for system communication – under development.
e) Single Drop Test
Function for system development – records a single landing position.
f) Font
Settings for font and font size (default: Arial, 10).

15
Eurotramp - Trampoline Kurt Hack GmbH
Database
5
a) DB Browser
• Shows current database le and path;
• Allows search with lters of current database le.
b) DB Cong
• Shows current database le and path;
• Browse and load another existing DB le;
• Browse and save the current DB le;
• Create a new DB le and copy selection of tables of
existing DB le;
• Merge current and another DB le without a
duplicate.
16
Eurotramp - Trampoline Kurt Hack GmbH
Structure
7
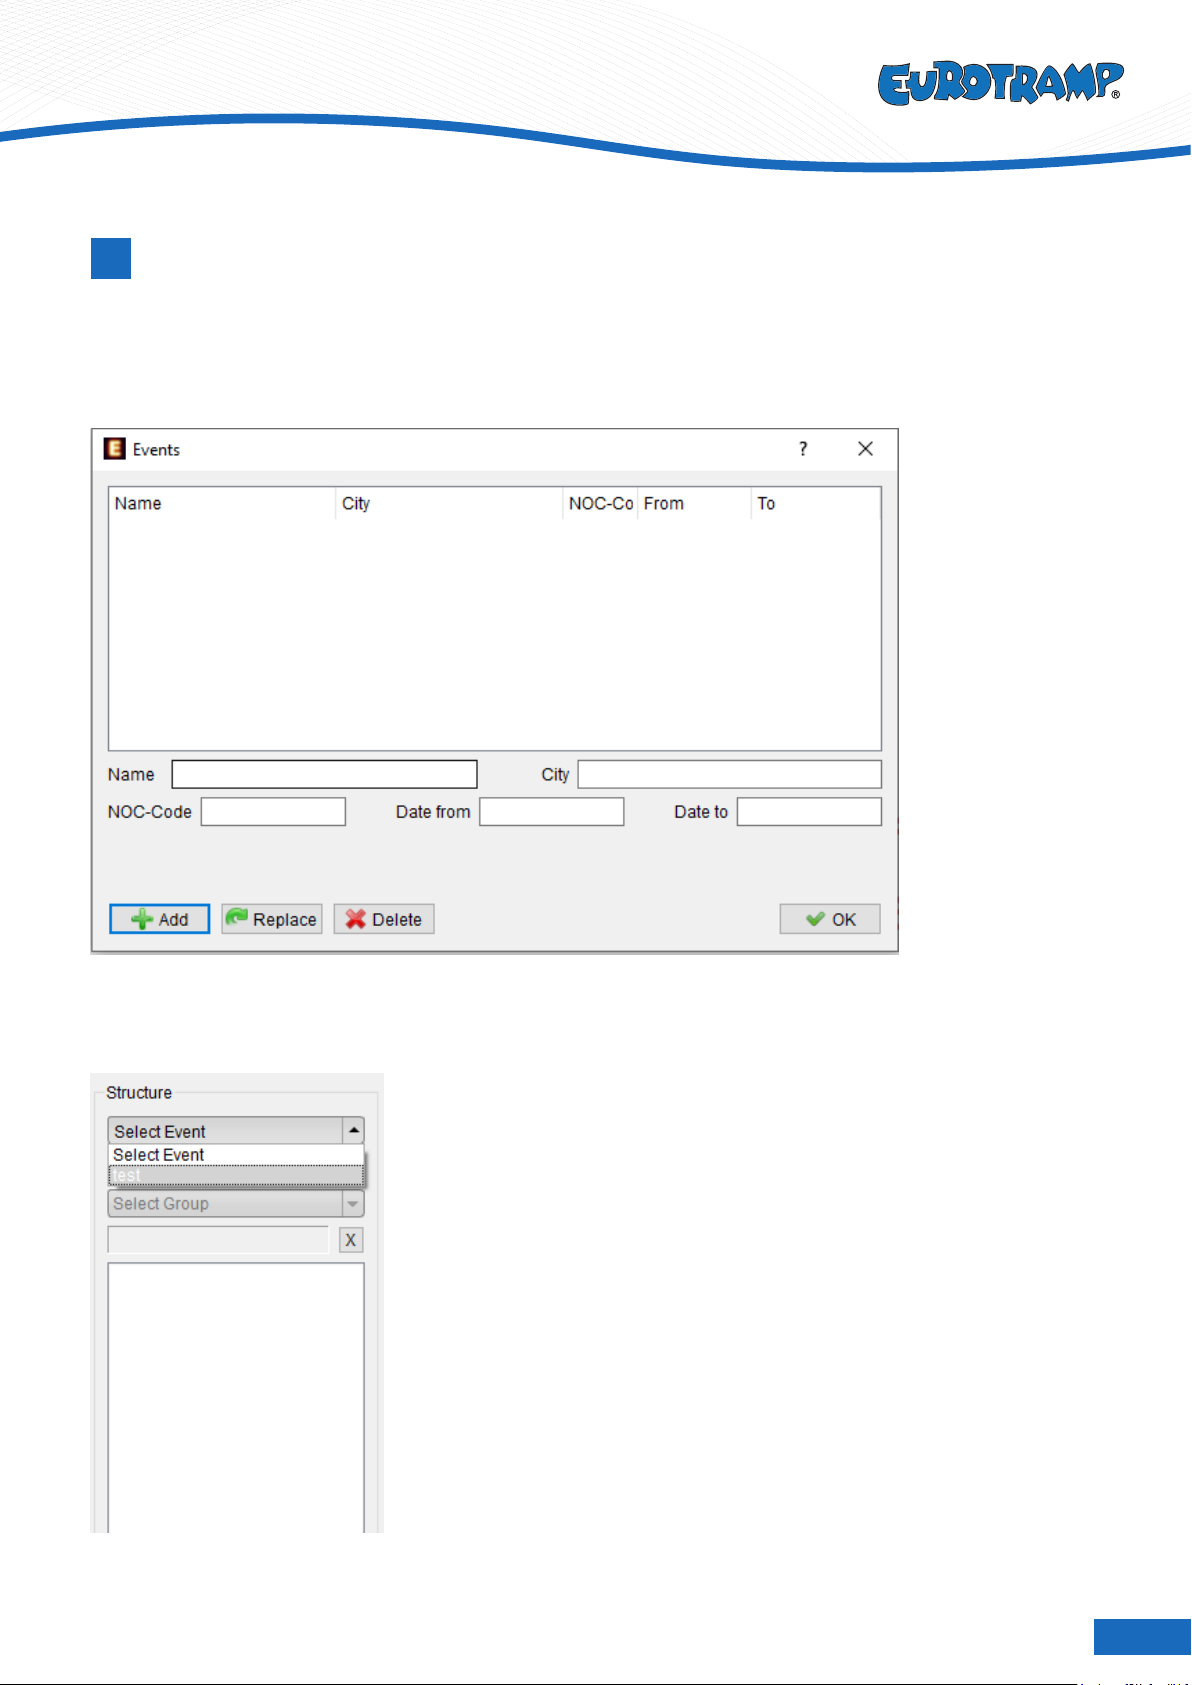
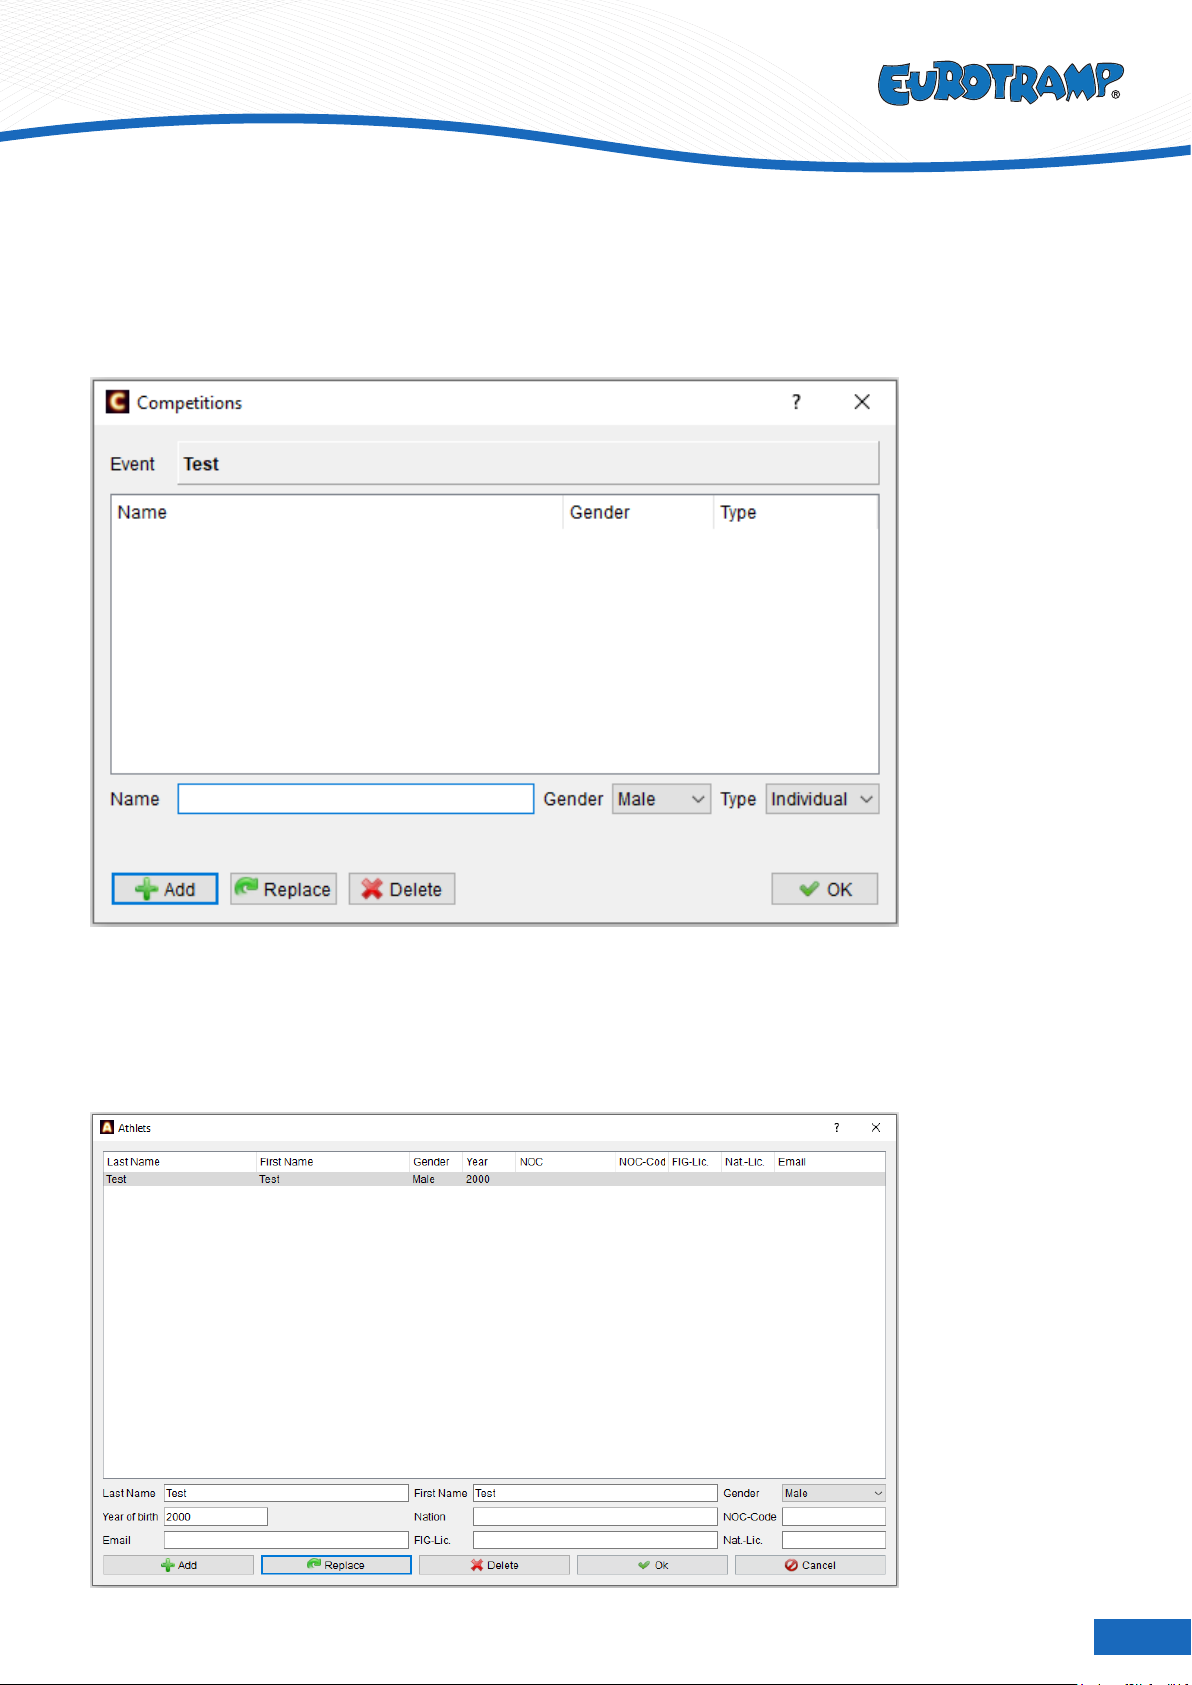
a) Create Event (Shortcut: F4)
• Conrm information-input with „Add“-button;
• Conrm changes with „Replace“-button;
• Delete incorrect input with „Delete“-button.
b) Select Event
Select an event in „Structure“ on the Qira mainscreen.
17
Eurotramp - Trampoline Kurt Hack GmbH
c) Create Competition (Shortcut: CTRL+C)
• Conrm information-input with „Add“-button;
• Conrm changes with „Replace“-button;
• Delete incorrect input with „Delete“-button;
• Select gender and type of competition.
d) Create Athletes (Shortcut: CTRL+A)
• Create athlete with „Add“-button;
• Create next athlete;
• Conrm changes with „Replace“-button;
• Delete athlete with „Delete“-button;
• Add Information and select gender.
18
Eurotramp - Trampoline Kurt Hack GmbH
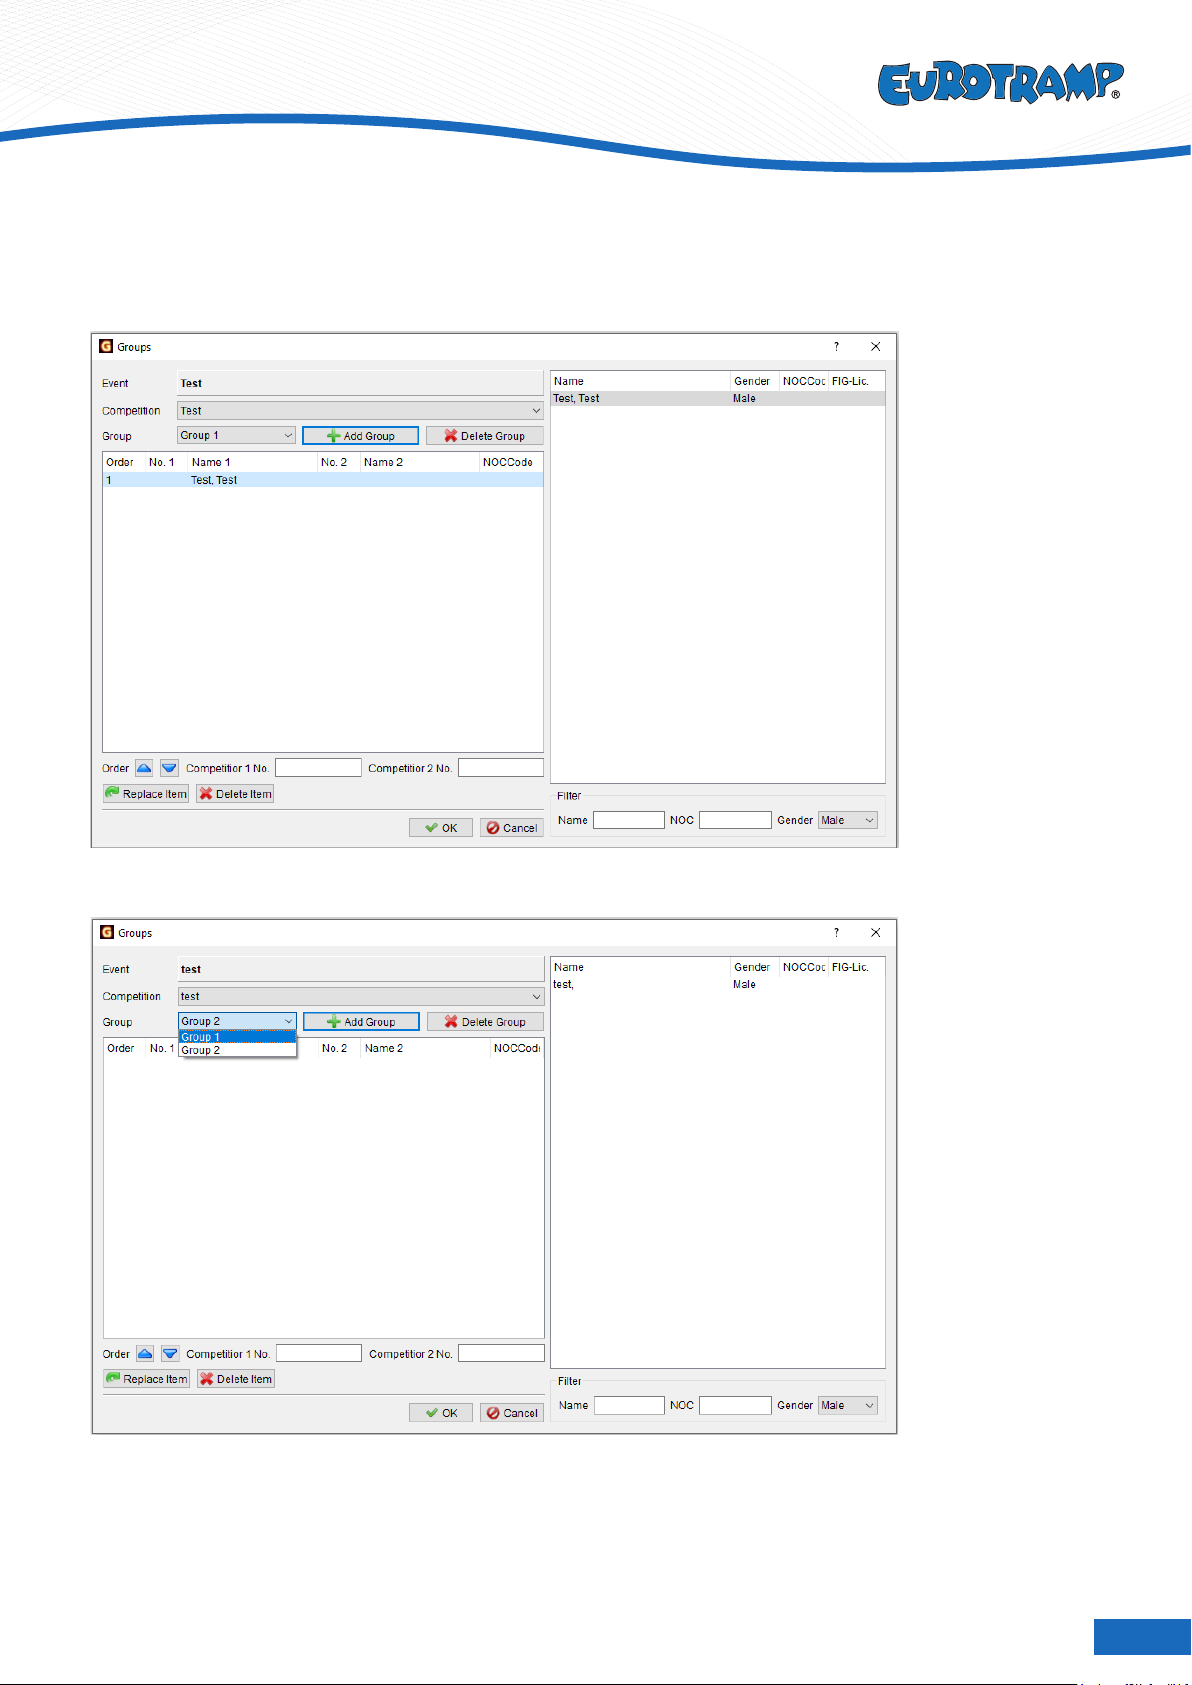
e) Create Groups (Shortcut: CTRL+G)
• Add group with „Add Group“-button;
• Delete incorrect input with „Delete Group“-button.
• Select group from dropdown-menu „Group“.

19
Eurotramp - Trampoline Kurt Hack GmbH
Fill groups with athletes:
• Select athletes from sidebar with double-click;
• Replace athlete with „Replace Item“-button;
• Delete athlete with „Delete Item“-button;
• Conrm with „OK“-button.
OPTIONAL:
• Filter athletes in sidebar (Name/NOC/Gender).
Store routine in database
• Select event, competition, group and athlete
• Name of athlete is shown on the selected trampoline
• Record routine for this athlete
• „X“ beneath the name cancels athlete
Show results afterwards
• Double click on athlete in sidebar;
• Single click on routine in sidebar.
20
Eurotramp - Trampoline Kurt Hack GmbH
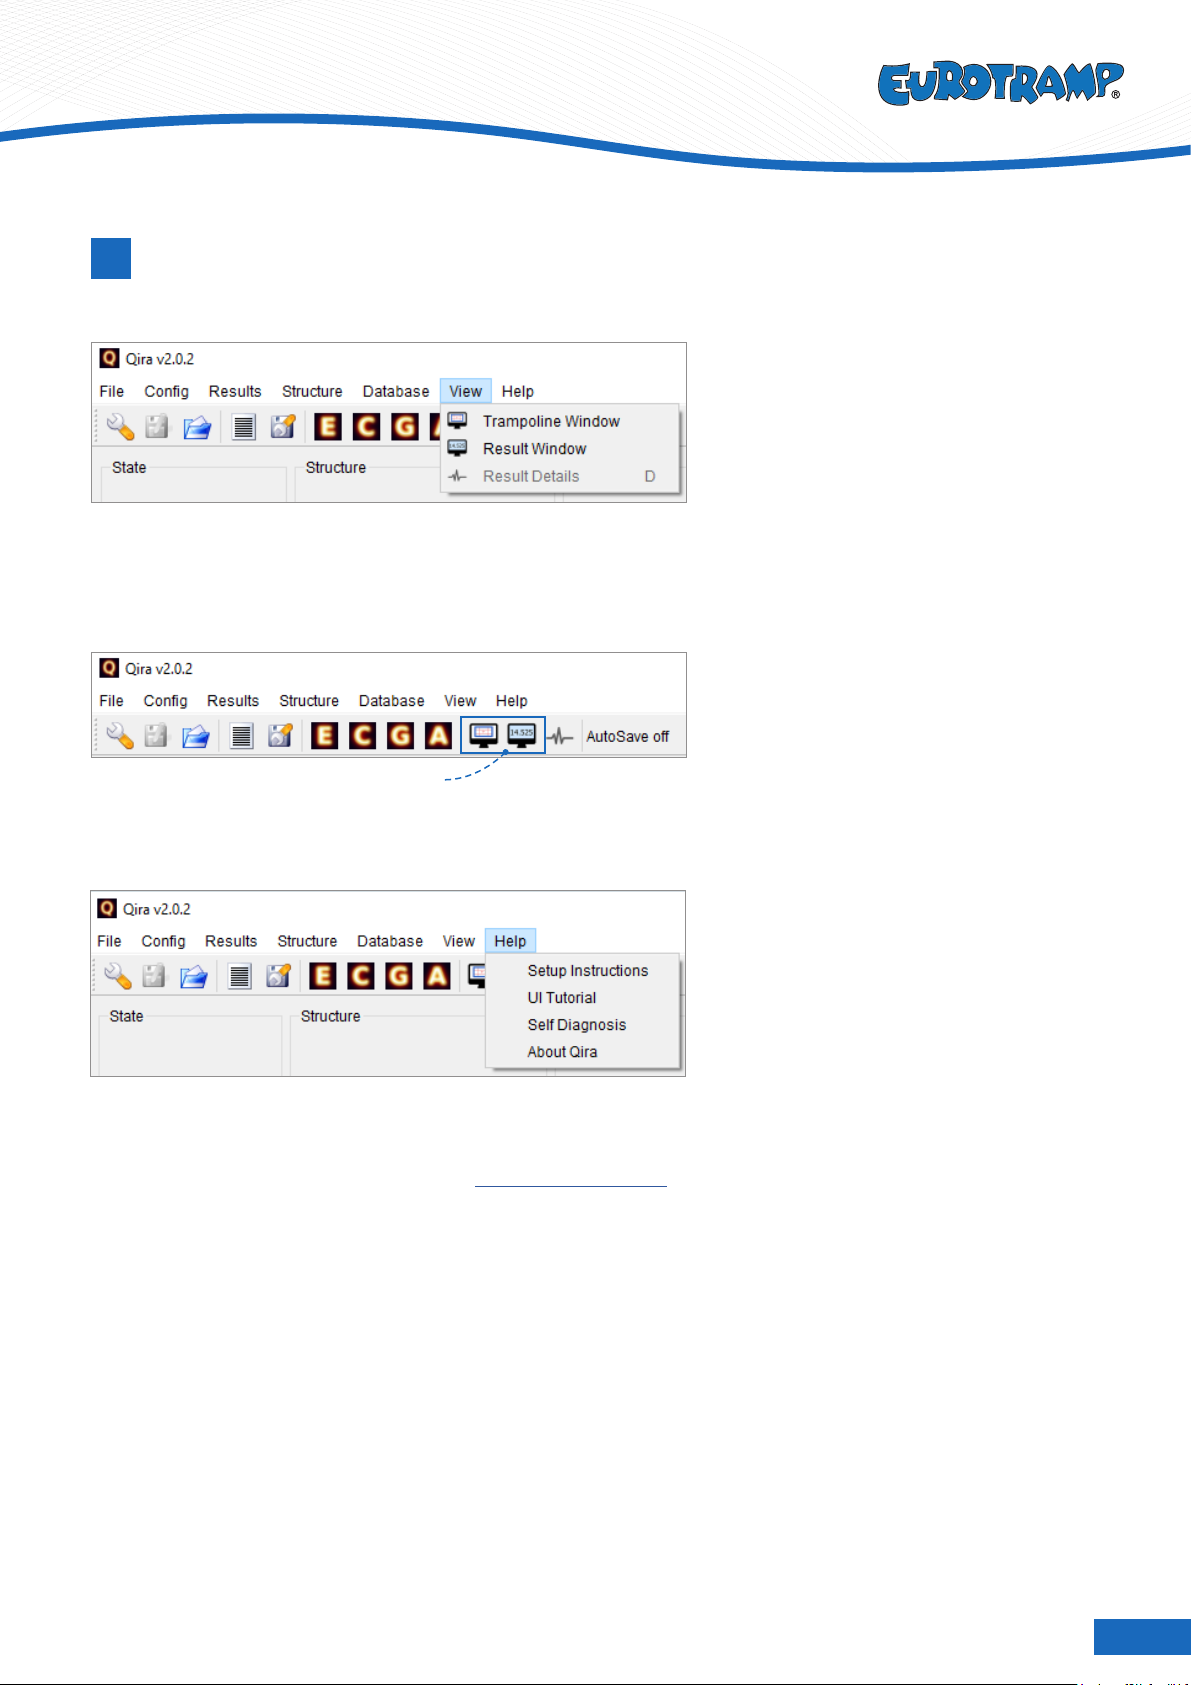
Additional features
8
View
Help
Shortcut-Icons in toolbar
Re-open instruction-dialogs, start self-diagnosis and learn about Qira:
• About Qira contains the Version, date and build-number. This might be useful for troubleshooting and service.
• Contact information for technical issues: [email protected]
If you have any questions, contact us any time:
Eurotramp-Trampoline Kurt Hack GmbH
Zeller Straße 17/1 | 73235 Weilheim
Tel. +49 (0)7023 - 9495-0 | Fax +49 (0)7023 - 9495-10
Opens a window for horizontal displacement and/or results:
• Trampoline Window: Landing positions of both trampolines are displayed
• Result Window: Results are displayed
Recommended to use in fullscreen for a second and third display.
This manual suits for next models
1
Table of contents


