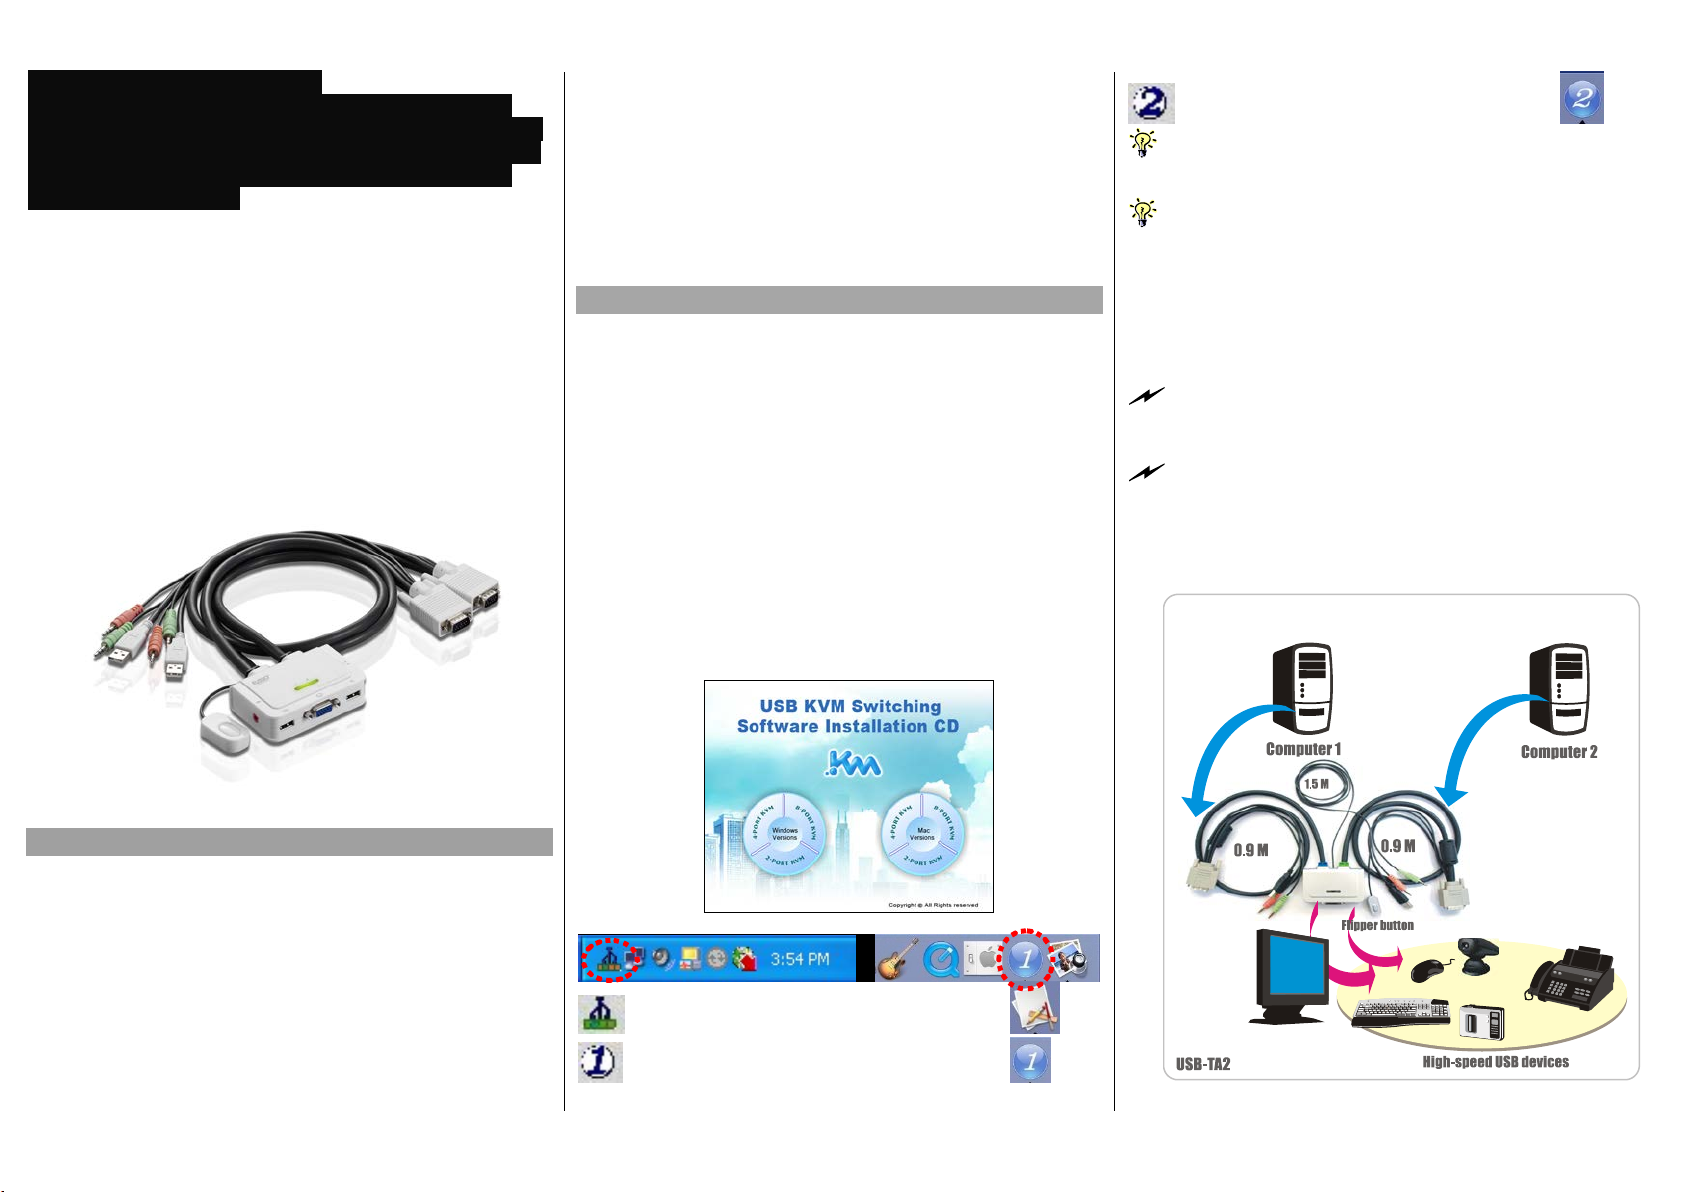
Operation Quick Reference Applicable model: USB-TA2 2-port USB Cable KVM w/ Audio&Mic + 1 x QuickSwitch Button for wired remote control
Rev. 1.0Copyright© All rights reserved.
Ways for KVM Switch Operation
There are three methods to control your KVM Switch for
computer and Audio/Mic channel selection: using (1) the
QuickSwitch Button (a wired remote control), (2) a hotkey
sequence or (3) the KVM Switcher Software.
QuickSwitch button (a wired remote control)
The QuickSwitch button is a wired remote control that allows
you a direct switching control. Simply press the button to
toggle between the two computers.
You can use the QuickSwitch button to switch to an empty port that
is not connected with any computer. Normally, if you use keyboard
hotkey or the KVM Switcher software, you will not be able to switch to an
empty port (and audio/mic channel, if binding is enabled). By default, PC
port switching and audio/mic port switching are bound together, unless
you specify the audio to be fixed a specific port.
Keyboard hotkeys
User-definable hotkeys for computer selection:
Hotkey sequence = Ctrl + Alt + [command key]*
* Please refer to next section for keys that are qualified to
be used as a command key
Universal hotkey for computer toggle-switching:
ScrLk + ScrLk
Both the universal hotkey, ScrLk + ScrLk and the user-definable
hotkey, Ctrl + Alt + [command key] WILL NOT allow you to switch to an
empty port that is not connected with any computer. To force your KVM
to switch to an empty port, just press the QuickSwitch button to switch.
Universal Hotkey sequence = ScrLk + ScrLk
* For other operating systems on computer such as Linux, you
can still use this special hotkey to facilitate computer
switching. This special hotkey is not available for Mac.
HOWEVER, you can press QuickSwitch button to switch in any
case.
Each keystroke within a hotkey sequence should be pressed within 2
seconds. Otherwise, the hotkey sequence will not be validated.
After port switching, you have to wait till the KVM Switch icon
shows forth the target port before you can perform next switching again.
The KVM Switcher icon could be found on the system tray/task bar of
your Windows/ Mac OS desktop after its installation.
All the hotkeys are only functional after your computers are booting
into the OS. If you want to switch computer in the BIOS/preboot stage,
press the QuickSwitch button to switch.
KVM Switcher Software (Windows & Mac platform)
In addition to computer switching, the KVM Switcher
Software also allows you more advanced functions such as
described in the next section….
KVM Switcher Operation Reference
Switch to Computer x by Operation Menu
Right-click the KVM Switcher icon to evoke the operation
menu, then select whichever computer that is available for
switching. Once you select a computer channel, it will
immediately switch to that computer. Note that the
unconnected port(s) or the active port will be grayed-out and
non-selectable.
Windows : Operation Menu Configuration Dialog Box
Mac OS: Operation Menu Configuration Dialog Box
The Mac version of KVM switcher user: if you want the KVM
switcher open at login or kept in Doc, just select the option in the
Operation Menu accordingly.
Switch to computer x by Keyboard Hotkeys
Hit the hotkey according to your current hotkey definition:
Hotkey sequence = Ctrl + Alt + [command key]*
* The factory default hotkey setting is Ctrl + Alt + 1/2/3/4
for computer 1/2/3/4. You can also use ScrLk + ScrLk to switch
COMPUTER.
Right-click the KVM Switcher icon to evoke the operation
menu, then select
Start Auto-Scan
to activate autoscanning.
(While autoscanning) right-click the KVM Switcher icon to
evoke the operation menu, then select
Stop Auto-Scan
to de-
activate autoscanning.
KVM Switcher configuration
Right-click the KVM Switcher icon and select
Settings
or
double-click the icon to bring up the configuration dialog box.
Define Hotkey commands
You can specify the command key as you like by typing it in.
For example, you can specify the hotkey for switching to
COMPUTER 1 as CTRL + ALT + A by typing an A (not case-
sensitive) in the editable field.
Hotkey = Ctrl+ Alt + [Command key]*
* The command key is user-definable via the configuration
dialog box
Except those control keys such as Alt, Ctrl, Shift, CAPS, Tab, Esc and
those functions keys and edit keys, all other keys on the keyboard,
including those number keys on the number pad are all qualified to be
used a hotkey command key. In addition to the software KVM Switching
by the operation menu and the user-defined hotkeys, you can always use
the universal hotkey for COMPUTER switching – ScrLk + ScrLk
Fix Audio Port at Computer x
Check this option and then select the computer to fix the
audio/mic channel to the selected computer. Once this option
is checked, the audio/mic channel will be fixed and become
non-switchable.
Auto Scan Period
Select the Autoscan period from 10 ~ 60 seconds with an
increment of 5 seconds. The Autoscan period is the time your
KVM Switch will wait to switch to next computer.