EV Depot Crystalyte User manual

Electric Bicycle
Hub Motor Conversion
2006 EV Depot, a Priority Fulfillment and Distribution, LLC Company
Home Assembly Guide
Overview......................................................................................................................... 2
Your safety.................................................................................................................. 2
Required tools ................................................................................................................. 2
Unpack ............................................................................................................................ 2
Kit Contents ....................................................................................................................3
Install the Tire................................................................................................................. 3
About tires................................................................................................................... 3
Install the Electric Wheel................................................................................................ 3
About Fork Width....................................................................................................... 4
About Dropout Diameter ............................................................................................ 4
About Torque.............................................................................................................. 5
Phoenix Front Wheel Torque Arm ................................................................................. 5
Install the Rack ............................................................................................................... 5
Mount the Controller....................................................................................................... 6
Mount the Throttle .......................................................................................................... 6
Run the Wire................................................................................................................... 7
Wire the Batteries ........................................................................................................... 8
About Batteries ........................................................................................................... 8
Connect the Battery Pack to the Controller .................................................................. 18
Enjoy your first E-Ride!................................................................................................ 18
Disclaimers ................................................................................................................... 19
Warranty ....................................................................................................................... 19
Upgrades, Parts, and Accessories ................................................................................. 20
Crystalyte Hub Motor Kit Home Assembly Guide
2006 EV Depot, a Priority Fulfillment and Distribution, LLC Company 1 of 20

Overview
This guide will take you from the boxes to your first ride. We assume your dealer has not
performed any pre-assembly, but some dealers do much of the work for you. They may
have packaged your system differently, might have performed part of the assembly, and
might have included accessories such as a third-party speedometer or light set. Those
items should have their own documentation. This guide covers installation and assembly
of the equipment supplied by EV Depot with your hub motor system.
Your safety
If you are not confident of your ability to assemble a safe, properly adjusted bike, please
take it to a bike shop now along with these instructions. The charge is minimal ($35-$60)
and it will take a professional less than an hour to do the job correctly. If you cannot
assemble a battery pack per these instructions, you must order a pre-wired kit.
We have prepared these instructions to make the installation of your hub motor
conversion kit as fast and worry-free as possible. If you are not confident in your ability
to assemble a safe, properly adjusted bike, please take it to a bike shop now, along with
these instructions.
Required tools
Scissors or wire snips
Crescent or 17mm
wrench
11/32” wrench
Phillips-head
screwdriver
3mm hex wrench
Unpack
Open the boxes and identify
all the parts with the Kit
Contents list below.
Crystalyte Hub Motor Kit Home Assembly Guide
2006 EV Depot, a Priority Fulfillment and Distribution, LLC Company 2 of 20

Kit Contents
Hub Motor laced to Wheel Controller
Throttle Cruise Control with Brake Inhibits
(Standard with Phoenix, optional on
RoadRunner and Sparrow)
Wire Set with Charger Port and Key
Switch
Jumper wires
Fuse Holder with Fuse Batteries
Battery Charger Rack or Basket
Bag Zip Ties
Install the Tire
1. Remove the original front
wheel from your bike.
2. From this wheel remove the
tire and tube for use on your
new Electric Wheel.
3. Push the tire and tube,
starting with the valve, onto
the rim, one side at a time,
being careful not to pinch
the tube.
4. Inflate to about 5 lbs
pressure and check to see
that the tire is evenly seated
all the way around the rim
on both sides. Inflate to 20
lbs pressure and repeat.
5. Inflate to the full pressure specified on the sidewall of your tire.
About tires
The higher the pressure, the less rolling resistance. Tires capable of higher pressure will
give you better range and speed. The smoother the tire, the less rolling resistance. Slicks
give you better range and speed than knobbies.
Install the Wheel
6. If you don’t have a bike stand, turn the bike upside down and rest it on the seat
and handlebars. Use wood blocks or other material to protect the seat and any
accessories on the handlebars.
7. Make sure the front brake arms are out of the way so the tire on your new wheel
will mount bypass them easily. Some brakes require that you loosen the cable.
Others have a quick-release for the cable.
Crystalyte Hub Motor Kit Home Assembly Guide
2006 EV Depot, a Priority Fulfillment and Distribution, LLC Company 3 of 20
8. When correctly mounted, the wires coming from a brushless (RoadRunner and
Phoenix) motor will exit on the left-hand side of the bike. For Sparrow, observe
the arrow on your hub indicating direction of rotation.
9. Before mounting the wheel on the frame, observe these two dimensions:
a. Fork width
b. Dropout Diameter
About Fork Width
We have successfully installed hub motors on many bike frames. If you do not have front
suspension, you can use a tool as simple as a threaded stud and bolts to spread the forks.
Turn the bolts on each side evenly, switching from left to right, spreading the fork to the
necessary width. Do NOT try to bend a front suspension fork, and do NOT try to bend
aluminum! For Phoenix systems, we recommend steel forks with large dropouts, usually
found on less expensive bikes.
About Dropout Diameter
If necessary, use a die grinder to enlarge dropouts to the 9mm diameter of the axle. Any
means of filing can be employed. The fit should be snug. For Phoenix systems, we
recommend steel forks with large dropouts, usually found on less expensive bikes.
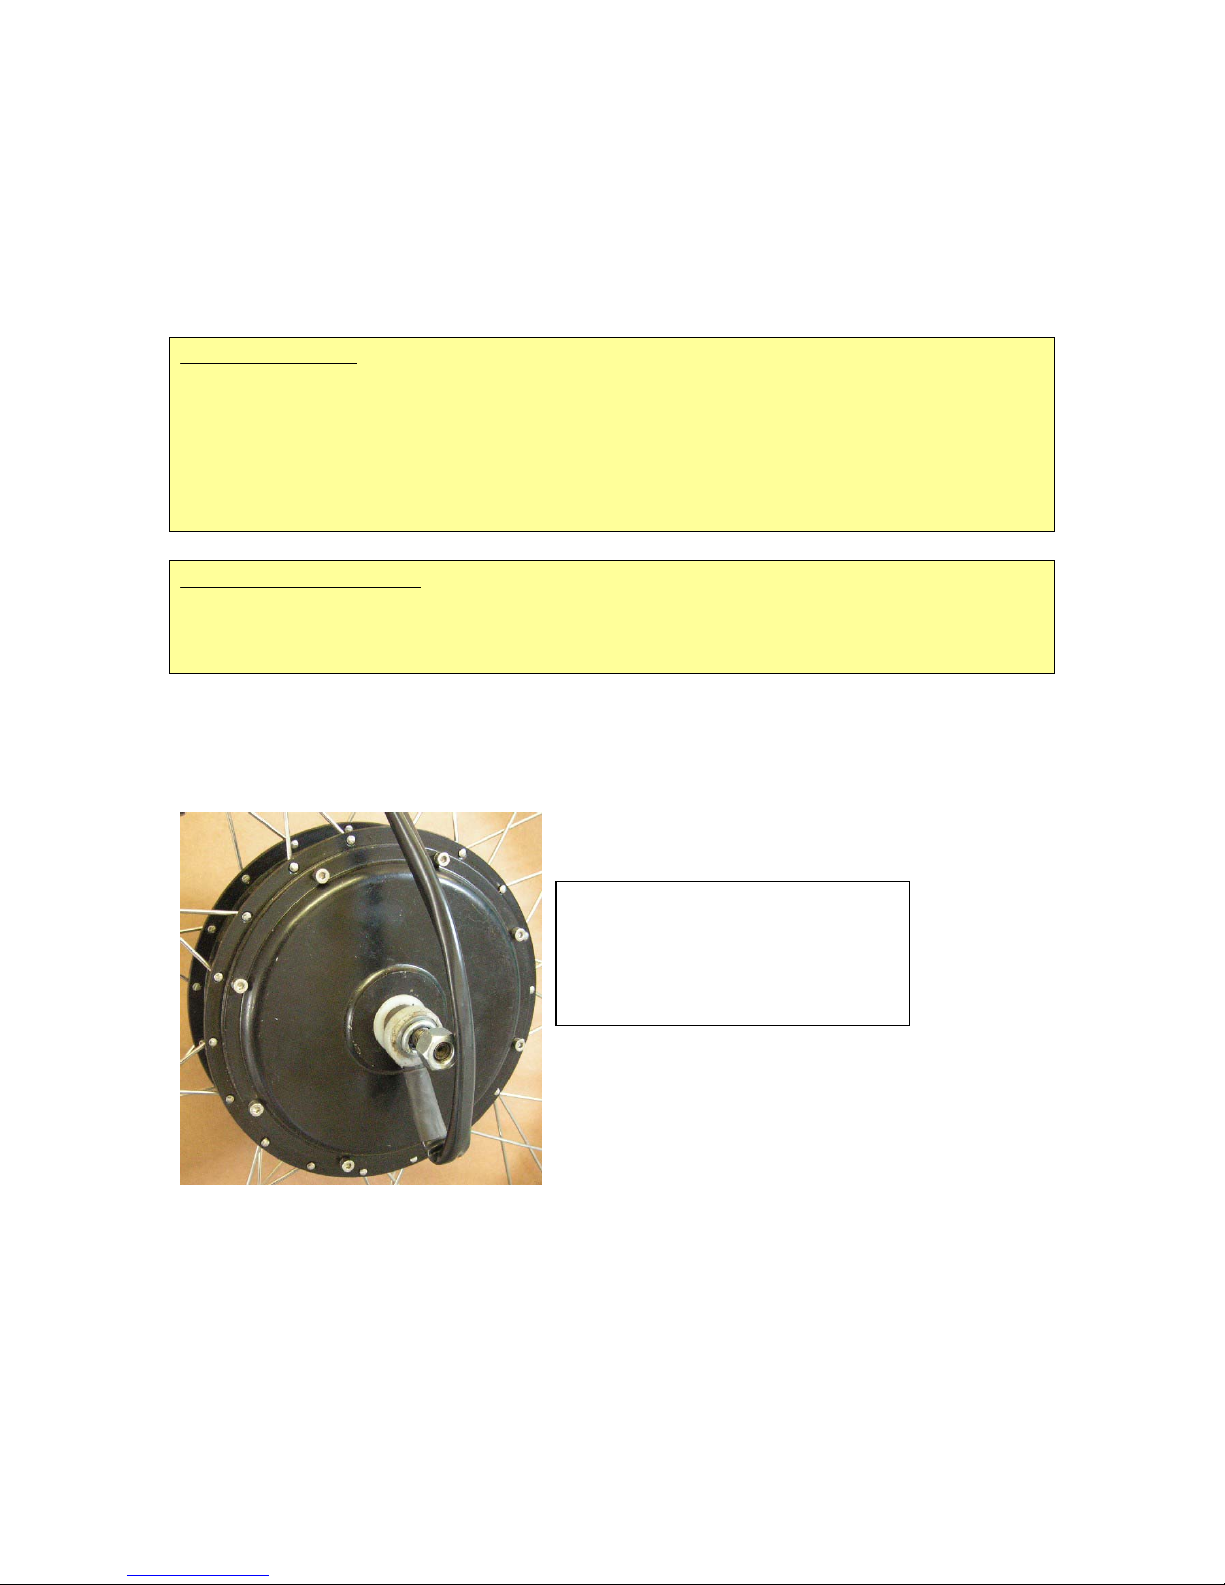
10. Put the wheel onto the frame, making sure that the channel through which the
wires run faces downward (when the bike is upright.) This will help protect it
from rain.
The channel of the axle should face
downward to help keep water out. Make
a loop of wire that extends below the
axle so water will drop off the wire
rather than into the channel.
11. Tighten the axle bolts with the crescent or 17mm wrench. They need to be tight
enough to prevent the motor from spinning the axle with it. Please note that
damaged caused by the bolts not being tight enough is not a manufacturing defect
and is not covered by your warranty. Please tighten the bolts!
Crystalyte Hub Motor Kit Home Assembly Guide
2006 EV Depot, a Priority Fulfillment and Distribution, LLC Company 4 of 20

Phoenix R2 Torque ArmPhoenix R1 Torque Arm
About Torque
Torque is twisting motion. If you apply throttle without first securely tightening the axle
bolts, the motor will try to turn inside the dropouts, permanently damaging the wires
coming out of the motor. Be sure the axle is very tightly secured to the dropouts. Phoenix
front wheel motors also have a torque arm.
Phoenix Front Wheel Torque Arm
The Phoenix R1 motor torque arm is attached to the motor and goes inside the front fork.
The R2 motor torque arm is a separate piece and goes outside the fork.
12. Re-install and adjust the brakes. Chances are good that the new rim and the old
one aren’t exactly the same, so adjust the shoes so that they engage the rim with
full contact. Adjust the cable for just enough free-play to keep the shoes off the
wheel during rotation. Remember, you will be asking more from your brakes
when riding at electric bike speeds.
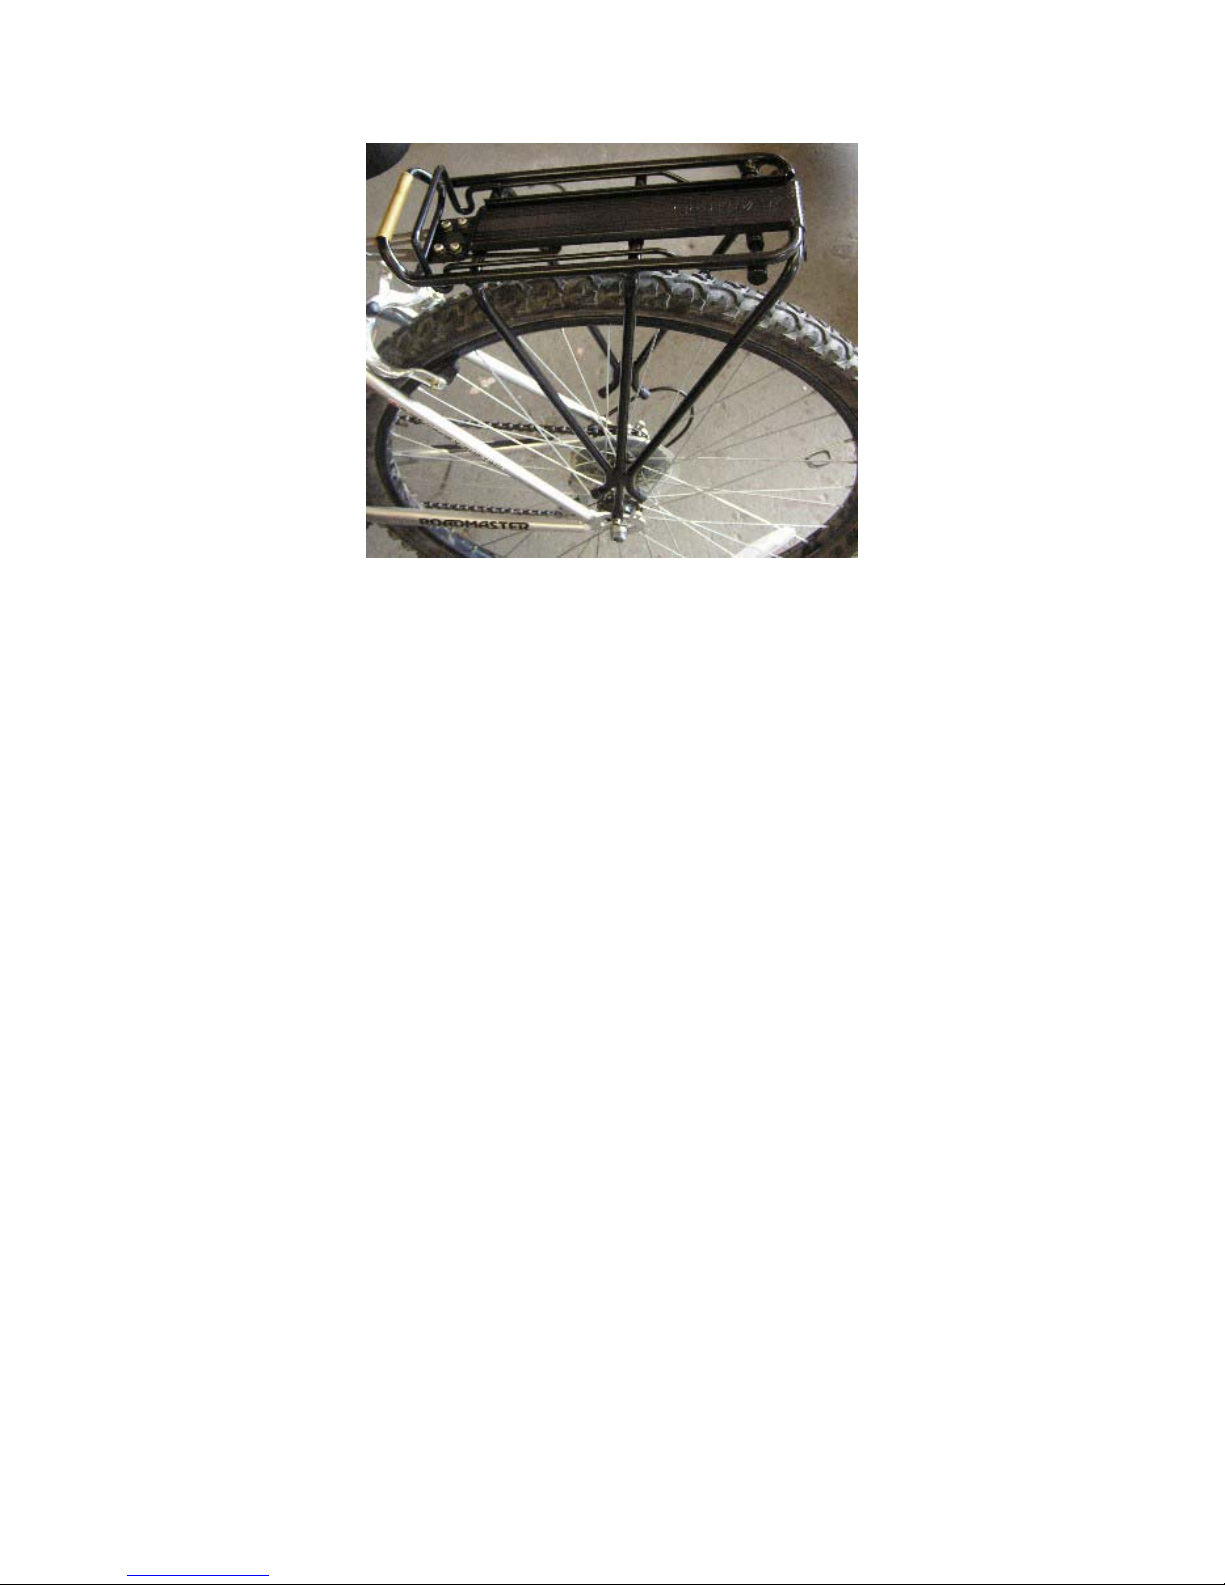
Install the Rack
13. Install the rack. It’s a little different for each bike, but generally you will use the
axle for the lower support and the seat clamp for the upper support. It may be
necessary to bend or grind a little off the upper supports of the rack to fit some
bikes. For the rack you will need a Phillips-head screwdriver and an 11/32” or
crescent wrench.
Crystalyte Hub Motor Kit Home Assembly Guide
2006 EV Depot, a Priority Fulfillment and Distribution, LLC Company 5 of 20
Mount the Controller
14. Most controllers will operate just fine if stored in the cargo bag with the batteries.
However, the larger systems such as the Phoenix may need air flow to stay cool.
If your controller shuts down from thermal overload, let it cool for a few minutes.
For external mounting you can secure the controller to your bike frame using zip-
ties, or secure it on top of your cargo bag using the attached bungee.
TIP: If you want to remove your battery pack for charging, it is best to mount the
controller on the bike frame. Doing this will allow you to leave throttle, motor,
and optional cruise control with inhibits connected to the controller as a part of
the bike. To remove the battery pack, you only have to disconnect one connector
from controller to batteries.
Mount the Throttle
15. Remove the right handlebar grip and shifter if there is one present. Push the
throttle onto the handlebar, and tighten using a 3mm hex wrench. You may need
to move the brake handle and shifter, or cut off part of the grip to make it all fit
nicely. There is a way on every bike; some just take a bit more creativity than
others.
Crystalyte Hub Motor Kit Home Assembly Guide
2006 EV Depot, a Priority Fulfillment and Distribution, LLC Company 6 of 20

Run the Wire
16. Connect the wires on the motor to the corresponding wires on the controller.
Connectors will only fit with the correct mate. For Phoenix motors, observe the
color coding and join the same color wires.
Phoenix RoadRunner Sparrow
17. Connect the throttle wire to the controller. There is only one plug on the
controller that fits the throttle connector. All of our throttles fit all of our
controllers.
Crystalyte Hub Motor Kit Home Assembly Guide
2006 EV Depot, a Priority Fulfillment and Distribution, LLC Company 7 of 20

18. Connect Cruise Control and Brake Inhibits (standard with Phoenix; optional for
RoadRunner and Sparrow) to the controller.
Cruise Control to Controller Brake Inhibit to Controller
19. Run all of these wires neatly along the frame where the movement of open brake
and shifter cables will not rub through the insulation. Zip-ties make for a tidy
installation. It is best to first install the zip-ties very loose. Once you make sure
you have adequate slack for full left-and-right movement of your handlebars and
bike suspension components, tighten the zips-ties until they are just snug. Over-
tightening the zip-ties can cause your wiring to overheat, insulation to melt, and
permanent damage to components.
Wire the Batteries
20. If you purchased a complete kit, the wiring may already be done for you. You will
need this information when it is time to replace your batteries, so hang on to it.
21. There are two types of battery packs supplied with EV Depot hub systems: 36-
volt (3 batteries) and 48-volt (4 batteries). Please see the detailed instructions for
how to wire your batteries.
Batteries contain a lot of energy! You can vaporize light metal with a single battery!
About Batteries
Your hub motor system uses sealed lead acid (SLA) batteries. The acid is fully absorbed
into a glass mat and the batteries are totally sealed. There is no maintenance to be done.
You can, however, form habits that will greatly extend the life of your batteries. Always
plug in the charger right after use. SLA batteries do not develop a memory, so you can
charge them anytime, charge them fully, or charge them partially and ride again. But if
you let them sit for weeks in a discharged state, they may never take a charge again. Take
note: these batteries produce enough energy to melt metal. Be very careful not to short
any leads. If you are at all unsure about wiring your batteries please consult a
professional.
Crystalyte Hub Motor Kit Home Assembly Guide
2006 EV Depot, a Priority Fulfillment and Distribution, LLC Company 8 of 20

48 volt wiring
36 volt wiring
Wired battery packs. This is what we’ll end up with at the end of this procedure. We spend
a lot of time describing battery wiring because mistakes can cause component failure.
Particularly susceptible to failure is the charger. If you have your pack wired incorrectly,
your charger is likely to blow. If you have a Soneil charger, the fuse will blow, but the
charger will survive.
1
Set your batteries on a non-metallic workbench as shown.
Crystalyte Hub Motor Kit Home Assembly Guide
2006 EV Depot, a Priority Fulfillment and Distribution, LLC Company 9 of 20

2
Familiarize yourself with the wiring. There is a segment with a key switch,
charger port, terminals that go to the batteries, and a large connector that goes to
the control unit. There are also two long wires and a fuse holder with wires.
3
Using scissors or wire cutters, cut the shrink tubing into 8 pieces.
Crystalyte Hub Motor Kit Home Assembly Guide
2006 EV Depot, a Priority Fulfillment and Distribution, LLC Company 10 of 20

4
Using a wire stripper’s 10 gauge wire size, remove about 3/8” of insulation from
the end of each wire before soldering to the battery terminal.
5
Push one piece of heat shrink tubing up the wire a few inches – far enough to
prevent being heated.
Crystalyte Hub Motor Kit Home Assembly Guide
2006 EV Depot, a Priority Fulfillment and Distribution, LLC Company 11 of 20

6
Load the wire with solder. Overloading the wire with solder will help keep the
heat in the wire rather than the battery terminal in the next step.
7
Load the soldering iron tip with a drop of solder. Place the solder-laden wire onto
the battery terminal. Touch the soldering iron to the wire. The drop of solder on
the tip will facilitate rapid heat transfer into the wire then onto the battery
terminal. As soon as the solder begins to flow on the terminal, remove the iron.
Too much heat on a terminal will destroy your batteries!
Crystalyte Hub Motor Kit Home Assembly Guide
2006 EV Depot, a Priority Fulfillment and Distribution, LLC Company 12 of 20

8
The resulting solder joint should be shiny and strong. If it is dull or there are
fractures, apply a drop of solder to the soldering iron tip and repeat previous step.
NEVER apply heat directly to the battery terminal.
9
Continue to solder (or use push-on tabs) until your battery pack looks like the
picture above. If you number the battery terminals 1 to 8, here is where they
connect: 1 to 8, 2 to negative (black) side of key switch harness, 3 to positive
(red) side of key switch harness, 4 to 5, 6 to 7
Crystalyte Hub Motor Kit Home Assembly Guide
2006 EV Depot, a Priority Fulfillment and Distribution, LLC Company 13 of 20

10
Slide the heat shrink tubing as far as it will go on to the battery terminals and
apply heat. What you see in the picture is a professional heat tool. The
appearance of red-hot on the battery surface around the wire is a reflection of
light – not heat! It doesn’t take much to shrink the tubing. A match or lighter will
work very well.
11
This is what solder joints should look like when complete.
Crystalyte Hub Motor Kit Home Assembly Guide
2006 EV Depot, a Priority Fulfillment and Distribution, LLC Company 14 of 20
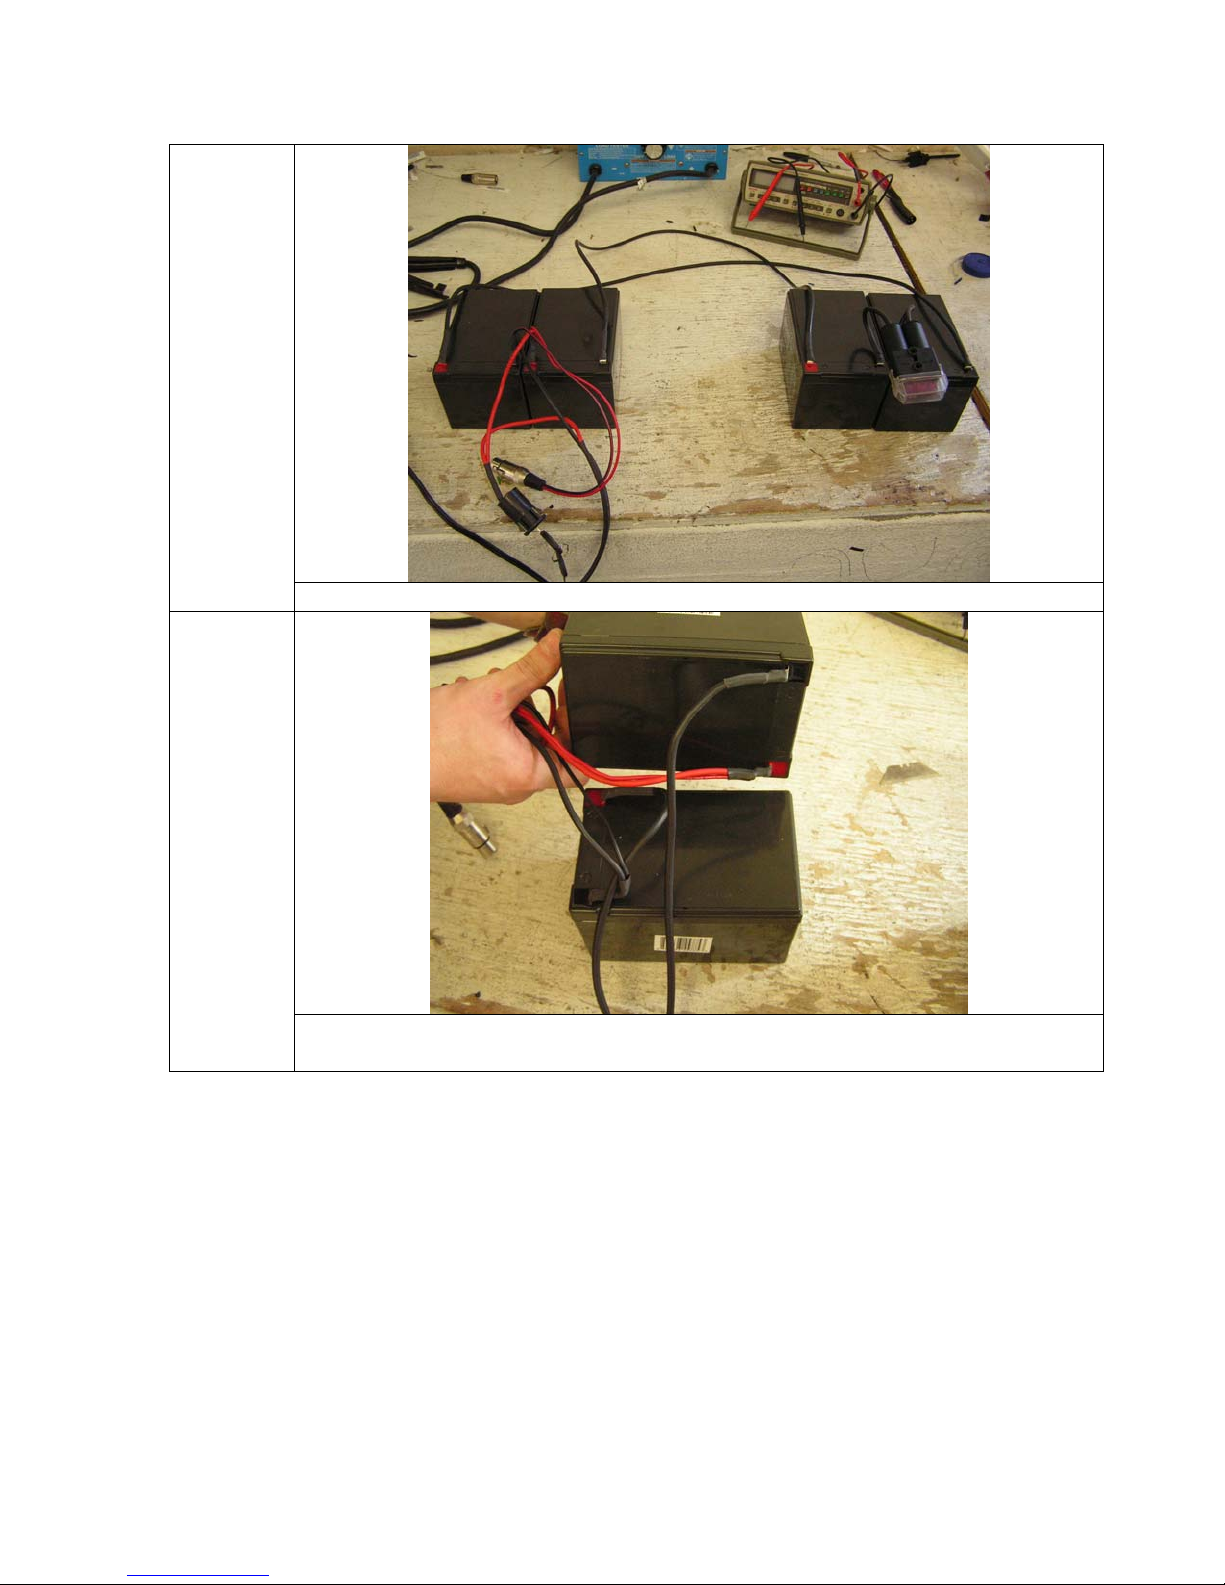
12
Separate the batteries into pairs, left and right.
13
For each pair, turn one battery so the leads are opposite the other, then set them
top-to-top on each other.
Crystalyte Hub Motor Kit Home Assembly Guide
2006 EV Depot, a Priority Fulfillment and Distribution, LLC Company 15 of 20

14
Using filament tape (strapping tape), tightly secure the batteries to each other. Be
sure to run the wires so that they do not cross each others’ paths or touch a
battery terminal. If they cross paths, vibration may, over time, cause the
insulation to wear. The result could smoke from melting insulation, severely
degraded performance, and one or more ruined batteries.
15
Put each pair of batteries in a side of the pannier bag. The key switch and charger
port normally go on the left side. Close the zippers with the cross-connect wires
that run to the opposite side pannier to the front of the bag.
Crystalyte Hub Motor Kit Home Assembly Guide
2006 EV Depot, a Priority Fulfillment and Distribution, LLC Company 16 of 20
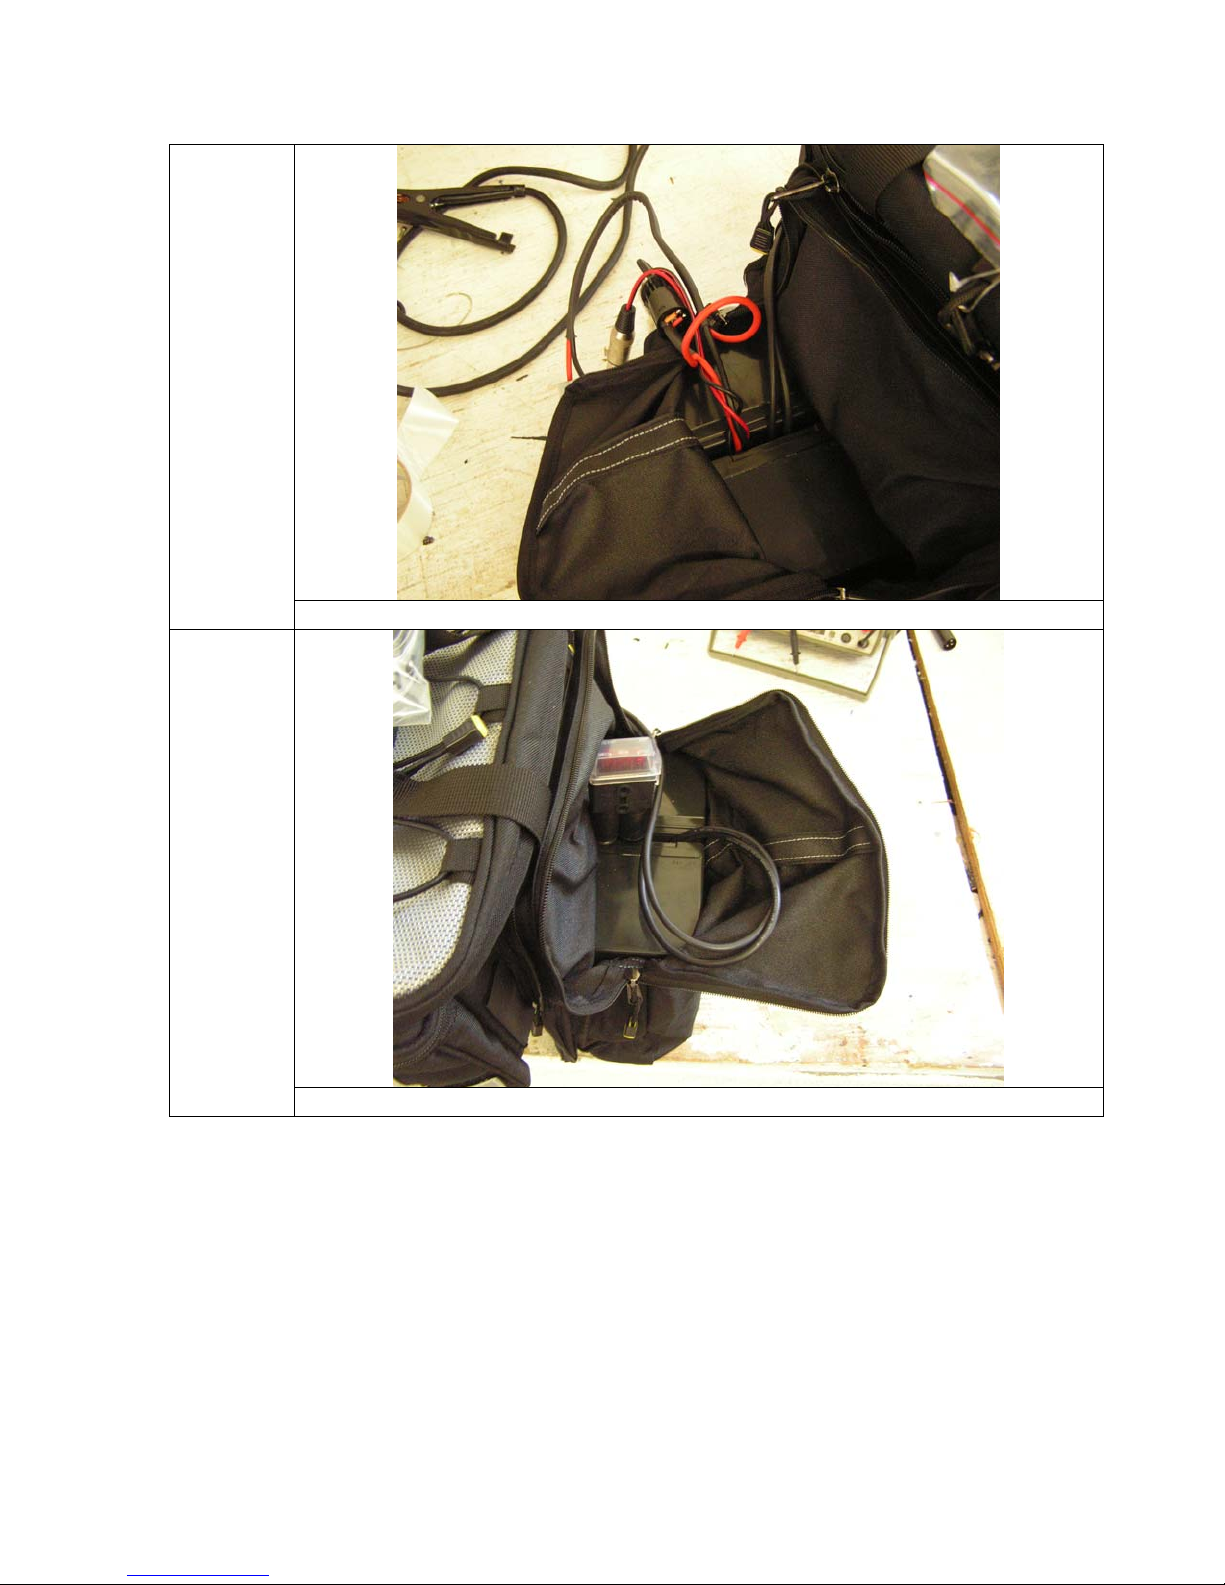
16
Left side.
17
Right side.
Crystalyte Hub Motor Kit Home Assembly Guide
2006 EV Depot, a Priority Fulfillment and Distribution, LLC Company 17 of 20

Connect the Battery Pack to the Controller
22. Connect the battery pack to the. If your keyswitch is on when you make the
connection, you will hear a “pop” and maybe see a spark. This is normal
behavior. It will not hurt you or the system.
Enjoy your first E-Ride!
Crystalyte Hub Motor Kit Home Assembly Guide
2006 EV Depot, a Priority Fulfillment and Distribution, LLC Company 18 of 20

Disclaimers
This publication is not a substitute for a bicycle mechanic. If you have any doubt
about the safety of your bike, or if you doubt your ability to assemble it safely,
take it to a bicycle shop now. Charges are usually minimal to assemble and adjust a
new bike, and your safety is well worth the money.
Truing wheels (keeping wobble out of wheels) is usually the most difficult
maintenance challenge for bicyclists. There are a number of good online “How To”
resources for every type of bicycle maintenance, but many prefer to have their bike
tuned up periodically by a professional. The electrical system and motor require no
maintenance.
We have tried to be 100% accurate in the development of this guide, but we are
human, subject to making mistakes, and cannot guarantee the absolute correctness or
completeness of this guide. If you have any questions or concerns not covered by this
guide, you should contact your Authorized Dealer.
Warranty
We have engineered our systems for maintenance and trouble-free operation. We also
realize manufacturing defects still occur. Electronic component defects usually show
up within the first two weeks of use. We stand behind our systems and will cover all
manufacturing defects by replacing failed parts. We will not cover abuse. That is, we
expect our customers to realize their light electric vehicles have limits. Most of the
same kinds of rules apply to electric vehicles as gas-powered vehicles. You can't hold
the throttle and brake at the same time for very long or something is going to break.
In the case of a car, it will probably be the transmission. In the case of an electric
vehicle, it will probably be the controller. Driven responsibly, you can expect years of
use from your system.
For 90 days from date of purchase, we will replace any defective part of your power
system purchased from an EV Depot authorized dealer. The warranty extends to 180
days for the motor. Here's how it works: Contact your dealer. He will listen to the
symptoms you describe and contact EV Depot for a replacement part. If your dealer
cannot be reached, call EV Depot at 785-749-0949. EV Depot’s policy is to give you
a choice of:
• Secure the return of the bad part with your credit card so your replacement
will ship immediately. Put the defective part in the box we send and ship it
back to us. There will be no charge made to your credit card as long as the
defective part is returned within 2 weeks.
• Exchange the defective part without using a credit card. Ship the defect to us
and we will ship your replacement as soon as the defect arrives.
Crystalyte Hub Motor Kit Home Assembly Guide
2006 EV Depot, a Priority Fulfillment and Distribution, LLC Company 19 of 20

Upgrades, Parts, and Accessories
Your Phoenix Authorized Dealer stocks a number of parts and accessories for electric
and pedal bikes. They also offer upgrades and accessories to make your bike go
faster and/or farther. From faster chargers to batteries to beefed-up motors, they will
try to satisfy your electric transportation needs.
Crystalyte Phoenix, RoadRunner, and Sparrow are distributed in the US by EV Depot
and are sold at EV specialty stores, bike shops, and a several online stores.
Crystalyte Hub Motor Kit Home Assembly Guide
2006 EV Depot, a Priority Fulfillment and Distribution, LLC Company 20 of 20
Table of contents


