EV LIGHT HL RGBW-MX User manual
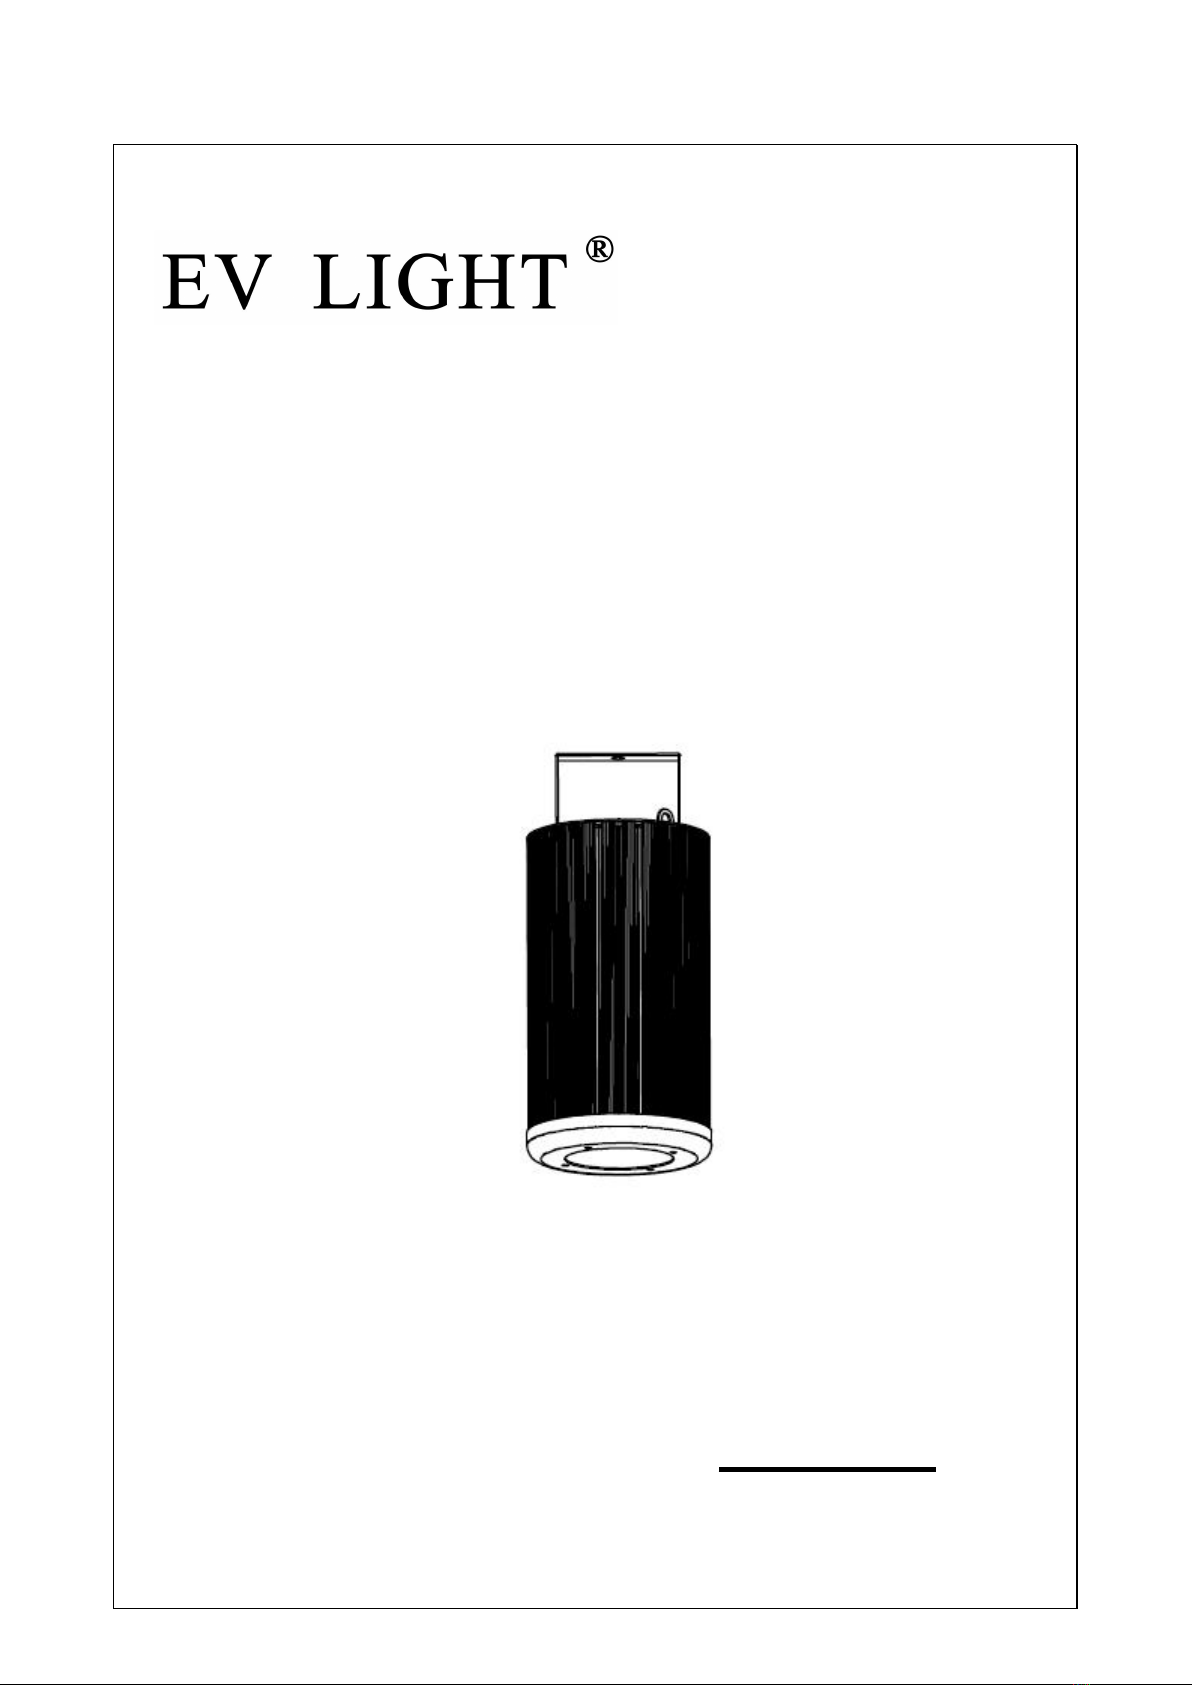
HL RGBW- MX
USER Manual
Please read it carefully

1
Menu
1.
Safety Guideline..............................................................................................................................................2
2.
Technical Parameter....................................................................................................................................... 3
3.
Parts .................................................................................................................................................................3
4.
Installation .................................................................................................................................................... 4
4.1. Hoisting ......................................................................................................................................................4
4.2. DMX512 Connection ..................................................................................................................................4
5.
Lighting Setting Parrameter Reset ................................................................................................................ 5
5.1. Control panel ........................................................................................................................................... 5
5.2. Main Function ......................................................................................................................................... 5
6.
Lighting Control ..............................................................................................................................................8
6.1. Master/Slave Built In Preprogrammed Function .................................................................................... 8
6.2. DMX Controller ...................................................................................................................................... 8
6.3. DMX Channel ..........................................................................................................................................9
7.
DMX512 configuration ................................................................................................................................. 10
8.Troubleshooting ............................................................................................................................................ 11
9.Fixture Cleaning .............................................................................................................................................11

2
1. Safety Guideline
WARNING
Please read the instruction carefully which includes important
information about the installation, usage and maintenance.
Please keep this User Guide for future consultation. If you sell the unit to another user, be sure
that they also receive this instruction manual.
Important:
Damages caused by the disregard of this user manual are not subject to warranty. The dealer
will not accept liability for any resulting defects or problems.
Unpack and check carefully that there is no transportation damage before using the unit.
The unit is for indoor use only. Use only in a dry location.
DO install and operate by qualified operator.
DO NOT allow children to operate the fixture.
The unit must be installed in a location with adequate ventilation, at least 50cm from adjacent
surfaces.
Be sure that no ventilation slots are blocked, otherwise the unit will be overheated.
Before operating, ensure that the voltage and frequency of power supply match the power
requirements of the unit.
It’s important to ground the yellow/green conductor to earth in order to avoid electric shock.
Maximum ambient temperature TA: 40℃.
DO NOT connect the device to any dimmer pack.
During initial start-up some smoke or smell may arise. This is a normal process and does not
necessarily mean that the device is defective, and it will decrease gradually within 15 minutes.
Make sure there are no flammable materials close to the unit while operating to avoid fire hazard.
Examine the power wires carefully; replace them immediately if there is any damage.
Unit’s surface temperature may reach up to 65℃. DO NOT touch the housing bare-handed during its
operation, and allow about 15 minutes for cooling the unit down before replacing bulb or
maintenance as it could be very hot.
Avoid any inflammable liquids, water or metal objects entering the unit. Once it happens, cut off

3
the mains power immediately.
DO NOT operate in dirty or dusty environment, do clean fixtures regularly.
DO NOT touch any wire during operation as there might be a hazard of electric shock.
Avoid power wires together twist other cables.
DO NOT open the unit as there are no user serviceable parts inside.
Never try to repair the unit by yourself. Repairs carried out by unskilled people can lead to damage or
malfunction. Please contact the nearest authorized technical assistance center if needed.
Disconnect the mains power if the fixture is has not been used for a long time.
DO use the original packing materials before transporting it again.
Cautions:
To prevent or reduce the risk of electrical shock or fire, do not expose the unit to rain or moisture.
DO replace the bulb once it is damaged, deformed or life-expired.
DO NOT look directly at the light while the bulb is on.
Never touch bulb with bare fingers, as it is very hot after using.
DO NOT start on the unit when housing is damaged.
2.Technical Parameter:
1.Input Voltage:
AC 100~240V, 50/60Hz
2.Total Power consumption:
165W
3.LED Sources:
CREE LED
4.Beam Angle:
35°or 60°
5.Color:
RGBW linear color mixing
6.Color Temperature:
color cast calibration setting、color
temperature output inside device
7.Dimmer:
0-100% linearly dimming,5 types dimmer
modes,smooth dimming, flicker-free;
8.Shutter:
independent electronic strobe;
9.Control Mode:
Standard DMX512
10.channel modes:
4,5,7, 9 CH;
11.Waterproof Grade
IP20
12.Work Environment Temperature
-20°C~40°C
4
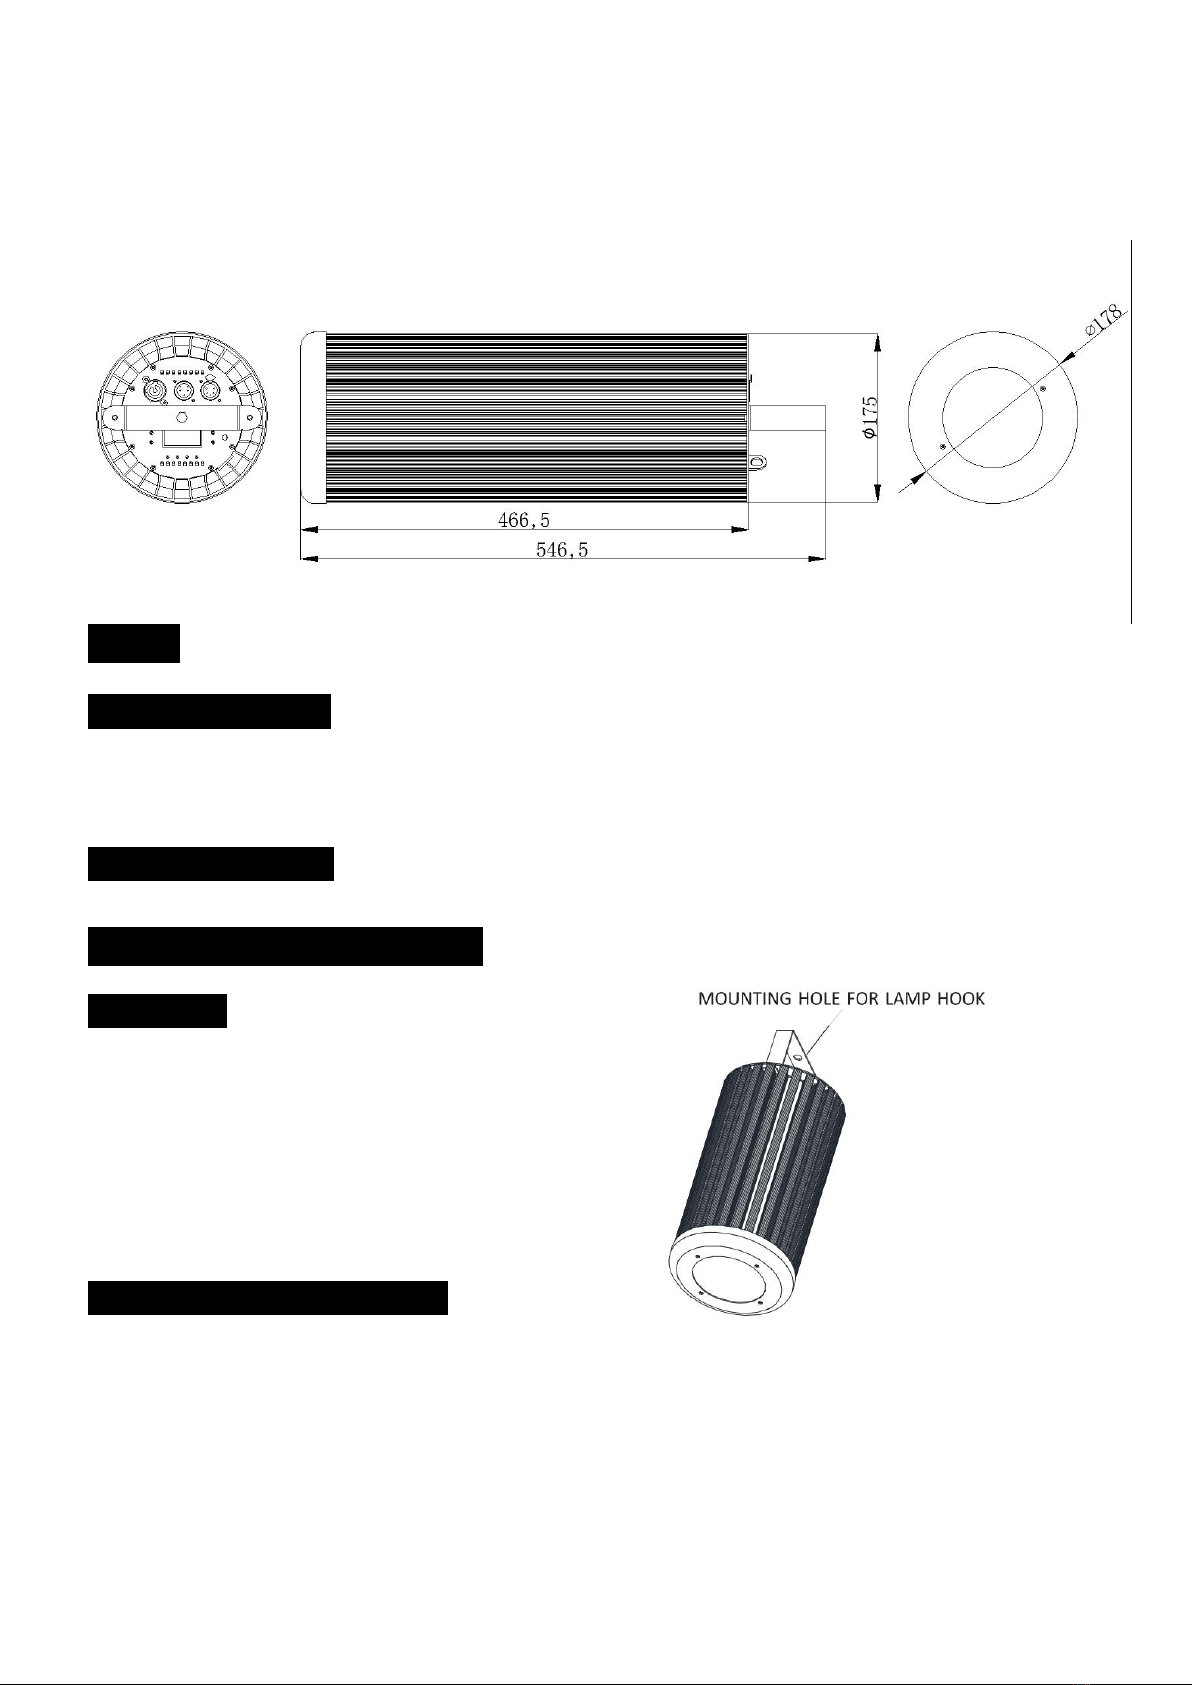
13.Dimension:
547x175x175mm
14.N.W:
5.9Kgs
3.Parts
Standard accessories
1. 1PCS 1.5m POWERCON
2. 1PCS 1.5m three core DMX signal wire
Optional accessories:
1. Handle 2.Lamp hook (various models available)
4.Lighting setting parameter reset
4.1.Hoisting
The lamp hook or safety rope can be used according to the situation.
Lamp hook (only one lamp can be hoisted)
We provide different types of lamp hooks for
selection. The following installationdrawing is for
reference.
Use screws and nuts to fix the lamp hook on the
lamp through the hole above the lamp. Fix the lamp
on the bracket.
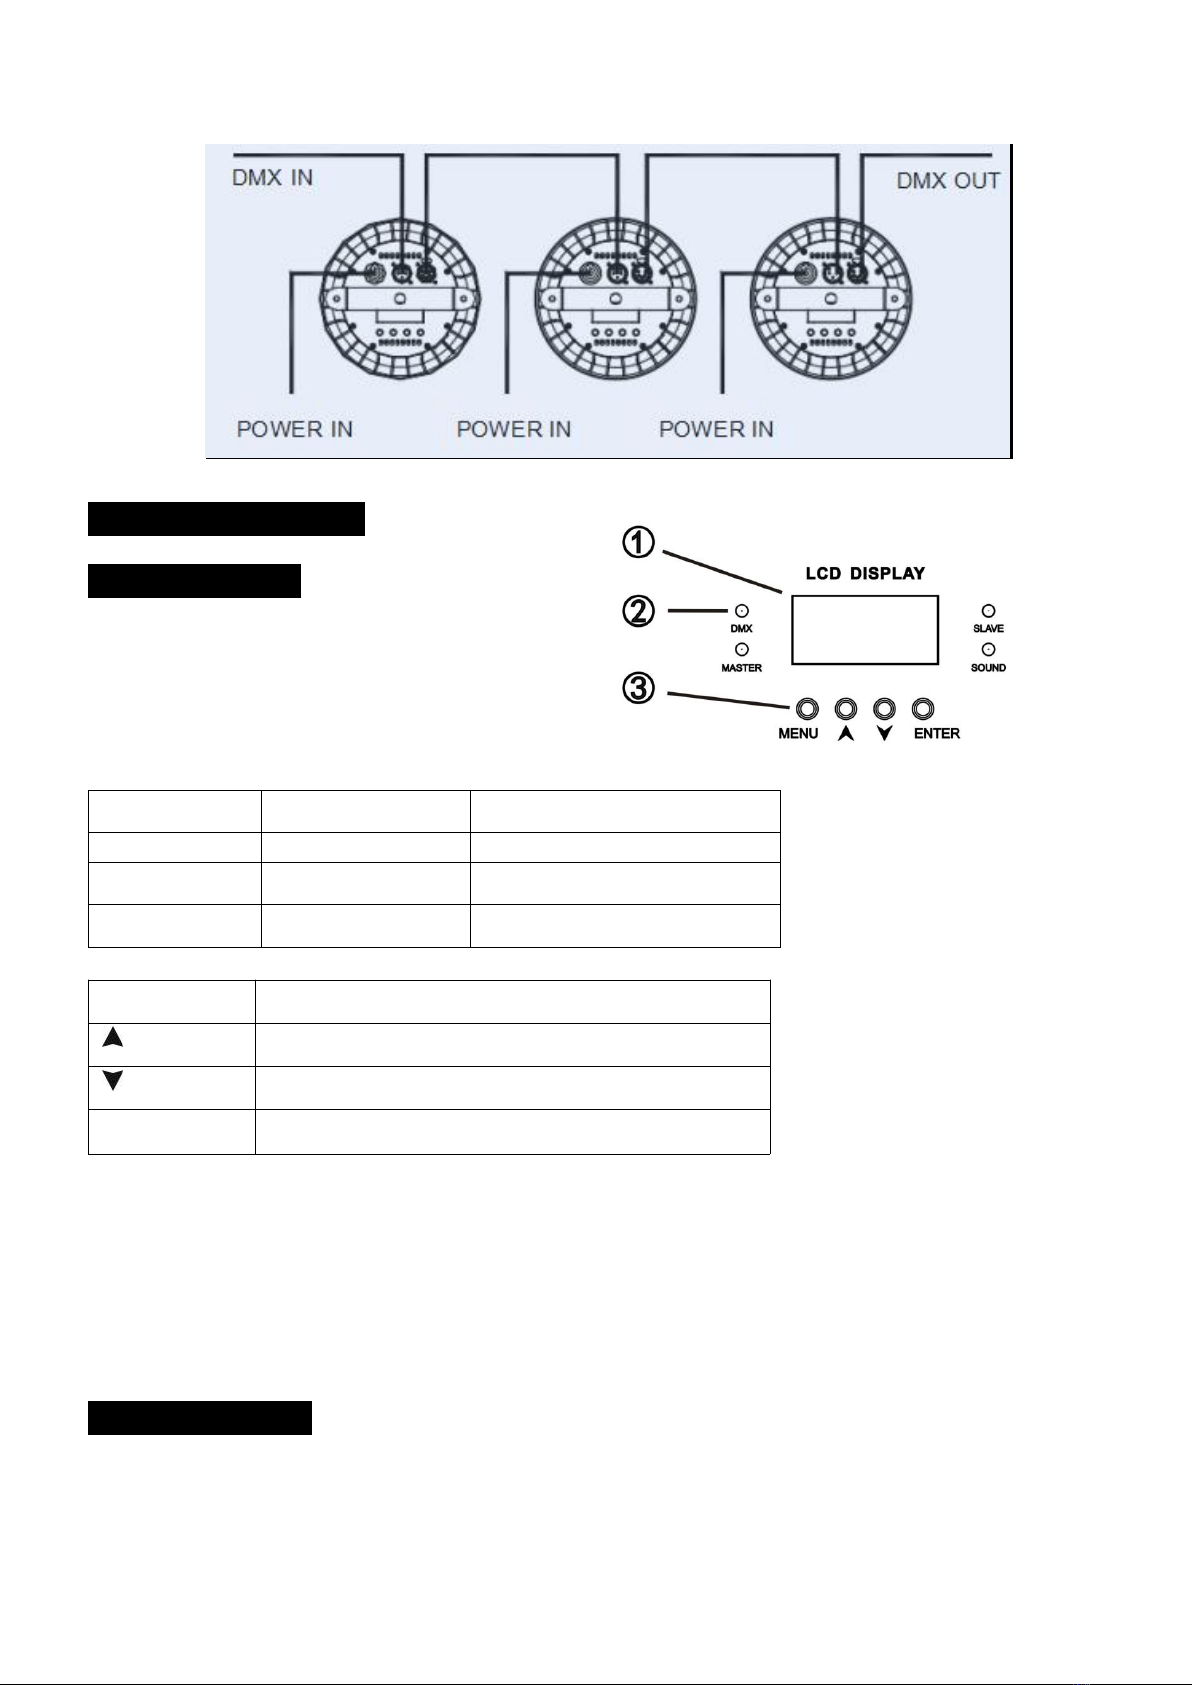
4.2. DMX512 Connection
DMX signal line (30 lamps in series)
Power supply (one power supply is connected to only one lamp)
The following installation drawing is for reference:
5
5.How to set the unit
5.1. Control panel
1.①DISPLAT:Display various function menus
2.② LED:
DMX
on
DMXsignalconnected
MASTER
on
Mastermode
SLAVE
on
Slavemode
SOUND
flash
Soundactive
3.③ Button:
MENU
Go to menu selection
DOWN
Go to the next option
UP
Go back to the previous option
ENTER
Confirm the selected function
4. Power input: connect the power supply;
5. 3-core DMX input:use 3-core XLR signal wire to connect the lamp and DMX console, and input DMX
signal;
6. 3-core DMX output: connect the next lamp with 3-core XLR signal wire and output DMX signal;
5.2. Main Function
Turn on the light, press the MENU button to enter the menu mode, use the UP and DOWN buttons to
find the menu, when the preset menu is displayed on the display screen, press the ENTER button to
confirm, use the UP and DOWN buttons to select the sub menu, press the ENTER button to save the
settings or automatically return to the previous menu. Press the MENU button to return, or wait for one
minute and then exit the menu mode automatically. When there is no power connection, press UP button
6
for 1 minute to enter the menu mode. After setting, press MENU button or wait for 1 minute to exit the
power-off setting function automatically.
Note: in the host mode, press and hold the Enter key, and use up and down to adjust the dimming in the
performance mode.
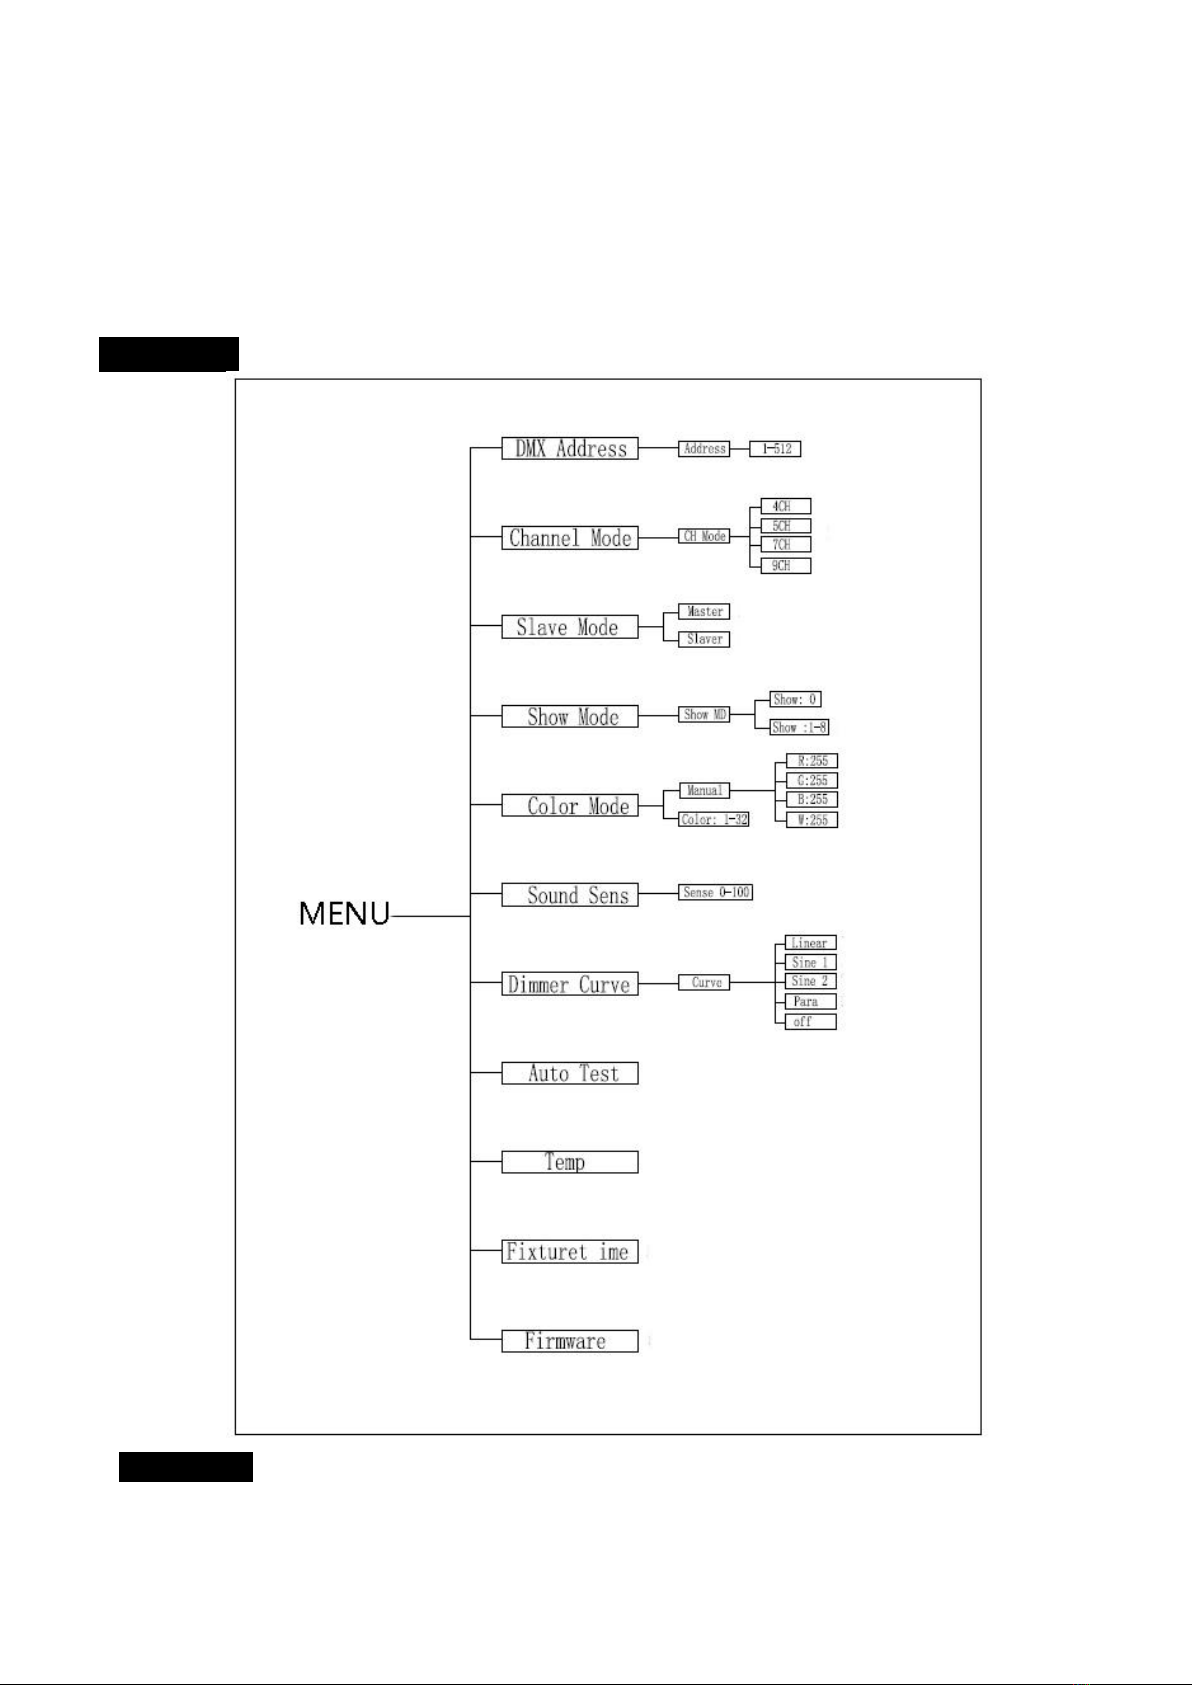
Main menu:
DMX Address
Select the DMX address, press ENTER to confirm, and the current DMX address will be displayed on
the display. Use UP / DOWN button to select 001-512 address, and press ENTER button to save. Press

7
the MENU button to return to the previous menu or wait one minute for the menu mode to exit
automatically.
Channel Mode
Select the Channel Mode, press ENTER to confirm, and the current Channel Mode will be displayed
on the display. Use UP / DOWN button to select 4CH/5CH/7CH/9CH, and press ENTER button to save.
Press the MENU button to return to the previous menu or wait one minute for the menu mode to exit
automatically.
Slave Mode
Select the Slave Mode, press ENTER to confirm, and the current Slave Mode will be displayed on
the display. Use UP / DOWN button to select Master/Slaver, and press ENTER button to save. Press the
MENU button to return to the previous menu or wait one minute for the menu mode to exit
automatically.
Show Mode
Select the Show Mode, press ENTER to confirm, and the current Show Mode will be displayed on
the display. Use UP / DOWN button to select Show 0(Voice control mode)/Show 1~8
(Performance mode1~8), and press ENTER button to save. Press the MENU button to return to the
previous menu or wait one minute for the menu mode to exit automatically.
Color Mode
Select the Color Mode, press ENTER to confirm, and the current Color Mode will be displayed on
the display. Use UP / DOWN button to select Manual(Manual mode R:000 G:000 B:000 W:000)/
Color 1...Color32, and press ENTER button to save. Press the MENU button to return to the previous
menu or wait one minute for the menu mode to exit .
Sound Sense
Select the Sound Sense, press ENTER to confirm, and the current Sound Sense will be displayed on
the display. Use UP / DOWN button to select 0-100, and press ENTER button to save. Press the MENU
button to return to the previous menu or wait one minute for the menu mode to exit .
Dimmer Curve
Select the Curve, press ENTER to confirm, and the current Curve will be displayed on the display.
Use UP / DOWN button to select Linear or Sine1 orSine2 orPara oroff, and press ENTER button to save.
Press the MENU button to return to the previous menu or wait one minute for the menu mode to exit .
linear Sine1 Sine2 Para
8
Auto Test
Select the Auto Test, press ENTER to confirm, The light will be automatically detected. Press the MENU
button to return to menu mode.
Temp
Select the Temp,press ENTER to confirm,Display temperature.Press the MENU button to return to
menu mode.
6. Lighting control
You can operate the unit in three ways:
1, By master/slave built-in auto-program function
2, By DMX controller
6.1. Master/Slave Built In auto -program Function
By linking the units in master/slave connection, the first unit will control the other units to
give an automatic, sound activated, synchronized light show.
6.2. DMX Protocol Controller
Using universal DMX controller to control the units, you have to set DMX address from 1 to
512 channel so that the units can receive DMX signal.
Press the MENU button up to when the DMX Address is showing on the display. Pressing
ENTER button and the display will blink. Use DOWN and UP button to change the DMX512
address.
Channel
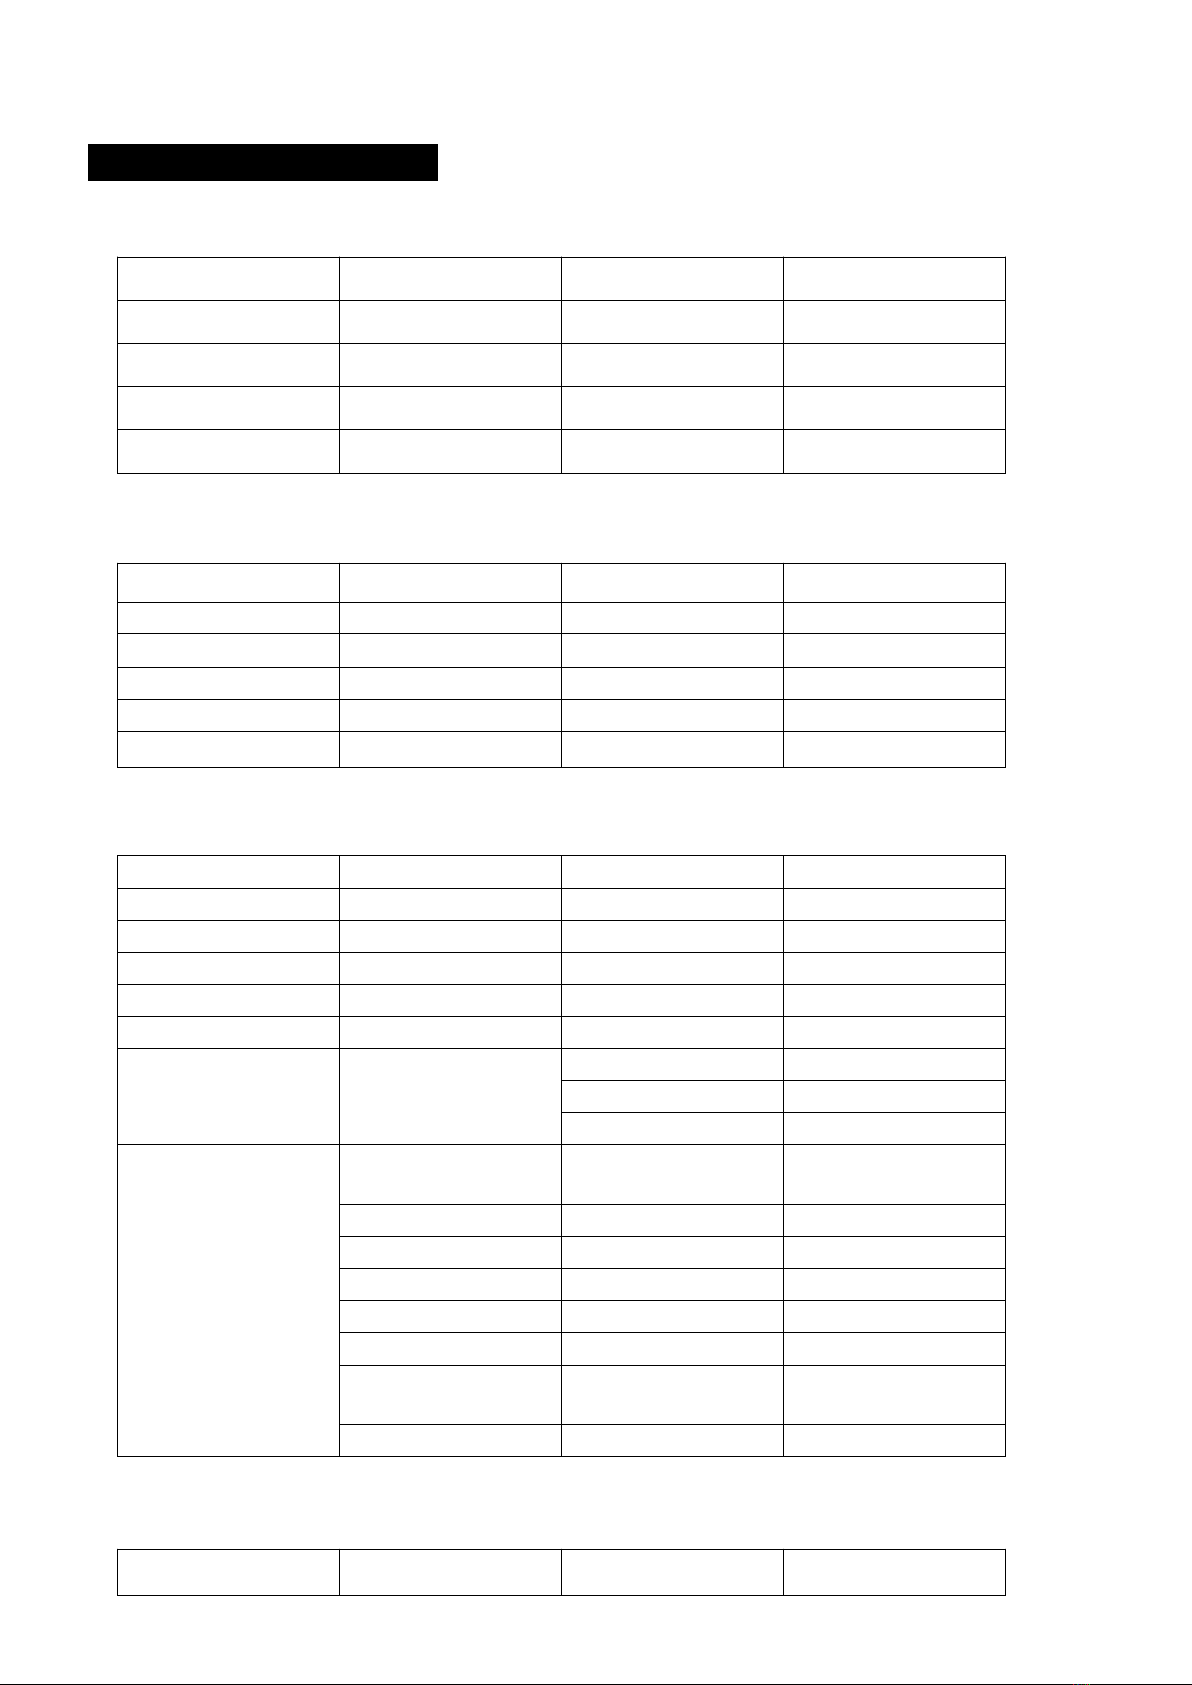
Mode
Unit 1 Addr
Unit 2 Addr
Unit 3 Addr
Unit 4 Addr
4 CH
1
5
9
13
5 CH
1
6
11
16
7 CH
1
8
15
22
9 CH
1
10
19
28
9
6.3. DMX512 configuration
4 Channel Mode:
5 Channel Mode:
7 Channel Mode:
9 Channel Mode:
Channel
Function
Value
1CH
Red
000-255
2CH
Green
000-255
3CH
Blue
000-255
4CH
White
000-255
Channel
Function
Value
1CH
Dimmer
000-255
2CH
Red
000-255
3CH
Green
000-255
4CH
Blue
000-255
5CH
White
000-255
Channel
Function
Value
1CH
Dimmer
000-255
2CH
Red
000-255
3CH
Green
000-255
4CH
Blue
000-255
5CH
White
000-255
6CH
Strobe
000-090
Slow to fast
091-173
Dark to bright
174-255
Bright to dark
7CH
Use menu setting
Dimmer Mode
000-010
Dimmer off
011-020
Dimmer1
021-030
Dimmer2
031-040
Dimmer3
041-050
Dimmer4
051-060
Use menu setting
Dimmer Mode
061-254
Reset
255
Channel
Function
Value

10
7. DMX512 Connection
Mode connection:
1. Connect the fixture together in a “daisy chain” by XLR plug cable from the output of the fixture to
the input of the next fixture. The cable cannot be branched or split to a “Y” cable. Inadequate or
damaged cables, soldered joints or corroded connectors can easily distort the signal and shut down
the system
2. The DMX output and input connectors are pass-through to maintain the DMX circuit when one of
the units’ power is disconnected.
3. At last fixture, the DMX cable has to be terminated with a terminator to reduce signal errors. Solder
a 120-ohm 1/4W resistor between pin 2 (DMX) and pin 3(DMX+) into a 5-pin XLR plug and plug it in
the DMX output of the last fixture.
4. Each lighting fixture needs to have an address set to receive the data sent by the controller. The
address number is between 0-511 (usually 0 & 1 are equal to 1).
5. 5 pin XLR connectors:.
5 pin XLR: Pin 1: GND, Pin 2: Negative signal (-), Pin 3: Positive signal (+) 4:Blank 5:Blank
1CH
Dimmer
000-255
2CH
Red
000-255
3CH
Green
000-255
4CH
Blue
000-255
5CH
White
000-255
6CH
Strobe
000-255
7CH
Show_Standby
000-110
Show1-Show5
111-160
Fade1-Fade5
161-210
Show_Standby
211-255
8CH
Speed
000-255
9CH
CCT(3200K-6500K)
000-127
Colour(9 colour)
128-255

11
8.Troubleshooting
Following are a few common problems that may occur during operation. Here are some suggestions for
easy troubleshooting:
A. The fixture does not work, no light
1. heck the connection of power and main fuse.
2. Measure the mains voltage on the main connector.
B. Not responding to DMX controller
1. DMX LED should be on. If not, check DMX connectors, cables to see if link properly.
2. If the DMX LED is on and no response to the channel, check the address settings and DMX polarity.
3. If you have intermittent DMX signal problems, check the pins on connectors or on PCB of the fixture
or the previous one.
4. Try to use another DMX controller.
5. Check if the DMX cables run near or run alongside to high voltage cables that may cause damage or
interference to DMX interface circuit.
9. Fixture Cleaning
The cleaning of internal must be carried out periodically to optimize light output. Cleaning frequency
depends on the environment in which the fixture operates: damp, smoky or particularly dirty
surrounding can cause greater accumulation of dirt on the fixture’s optics.
Clean with soft cloth using normal glass cleaning fluid.
Always dry the parts carefully.
Clean the external optics at least every 20 days. Clean the internal optics at least every 30/60 days.

12
EV LIGHT(GUANGZHOU) CO.,LTD.
ADD: EV INDUSTRIAL PARK,68 CHUANGYE ROAD, TAIPING
DEVELOPMENT ZONE, GUANGZHOU
TEL:+86-20-37929678
FAX:+86-20-37929298
Http://www.evlight.com.cn
Table of contents
Other EV LIGHT Dj Equipment manuals


