Evac 910 Manual
EVAC 910 WALL TOILET
TECHNICAL INFORMATION

EVAC reserves the right to make alterations to this specication without prior notice.
© Copyright Evac Oy. All rights reserved.
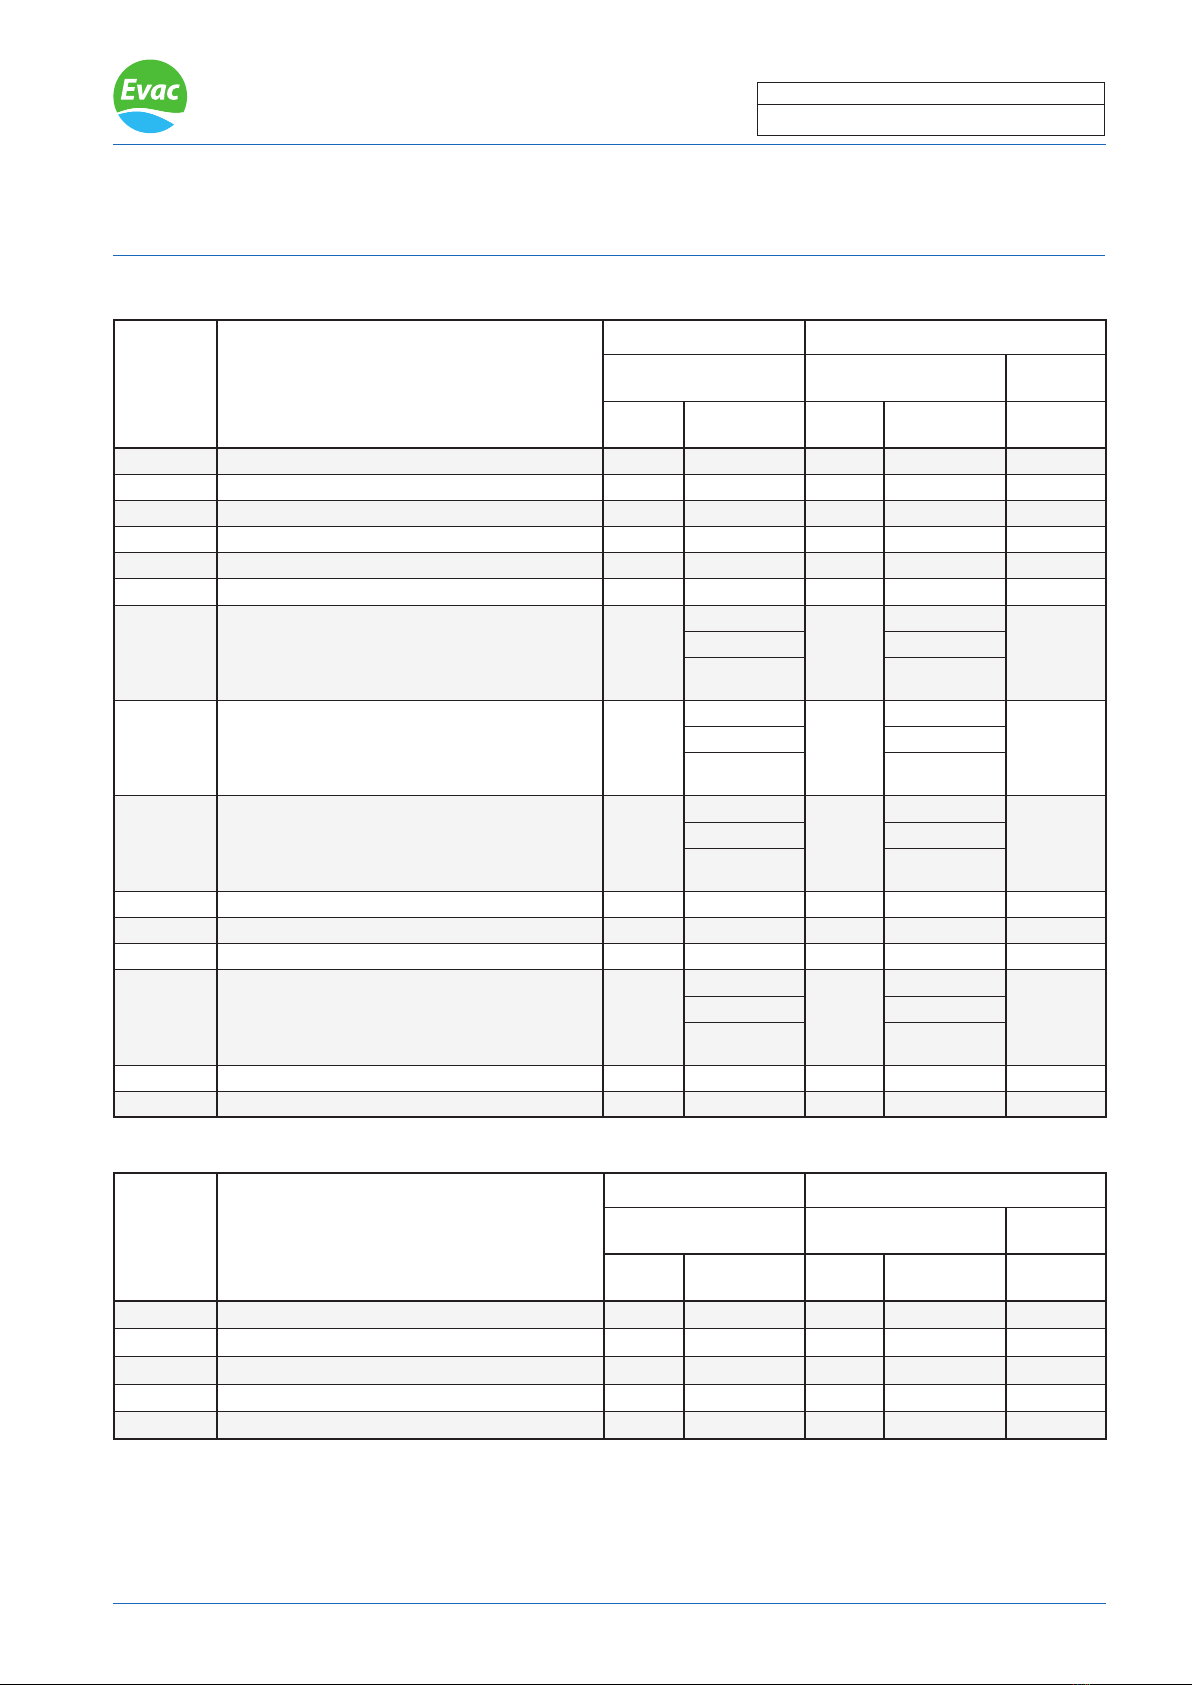
TECHNICAL DATA
Date: Doc.
VACUUM TOILET
1
6543418 EVAC 910, WALL MODEL, PRESTIGE SILENT, WHITE
6543419 EVAC 910, WALL MODEL, MOSAIK, WHITE
6547226 EVAC 910, WALL MODEL, PRESTIGE SOFT CLOSING, WHITE
09 Dec 2010 001991-3
* Prestige seat and cover fulll ANSI Z124.5 - 1997 [Plastic Toilet ( Water closet ) Seats] requirements.
** See available colours in document 002003-7
Materials Bowl: White vitreous china**
Seat; *Prestige and Prestige Soft Closing: UF-S**, Mosaik: PP**
Cover; *Prestige and Prestige Soft Closing: UF-S **, Mosaik: PP**
Pneumatic push button: White plastic, ABS
Discharge valve; plastic parts: PP, rubber parts: NR
Operating data Water pressure: 3 - 10 bar
Operating vacuum: -0.3 ... - 0.6 bar
Water consumption: ~1.2 ±0.15 litres/ush ( water pressure: 4 bar, vacuum: -0.4 bar )
Air consumption: ~60 ±10 litres/ush (normal atmospheric air)
Connections Water supply: 1/2” MPT, exible hose
Discharge: Discharge connection Ø50, connection sleeve includes two hose clamps
to O.D. 48 - 52mm pipes
Shipping data P/N 6543418 Evac 910, wall model, Prestige Silent and
P/N 6547226 Evac 910, wall model, Prestige Soft Closing:
Net weight: 20.8 kg
Shipping weight: 23.1 kg
Shipping volume: 0.168m3
P/N 6543419 Evac 910, wall model, Mosaik:
Net weight: 17.7 kg
Shipping weight: 19.7 kg
Shipping volume: 0.168m3
Water supply 1/2”
Shut-off valve
Vacuum breaker
P/N 6541458 Pneumatic push button, white
Max. 420
230
550
Max. 450
110
365
50 430
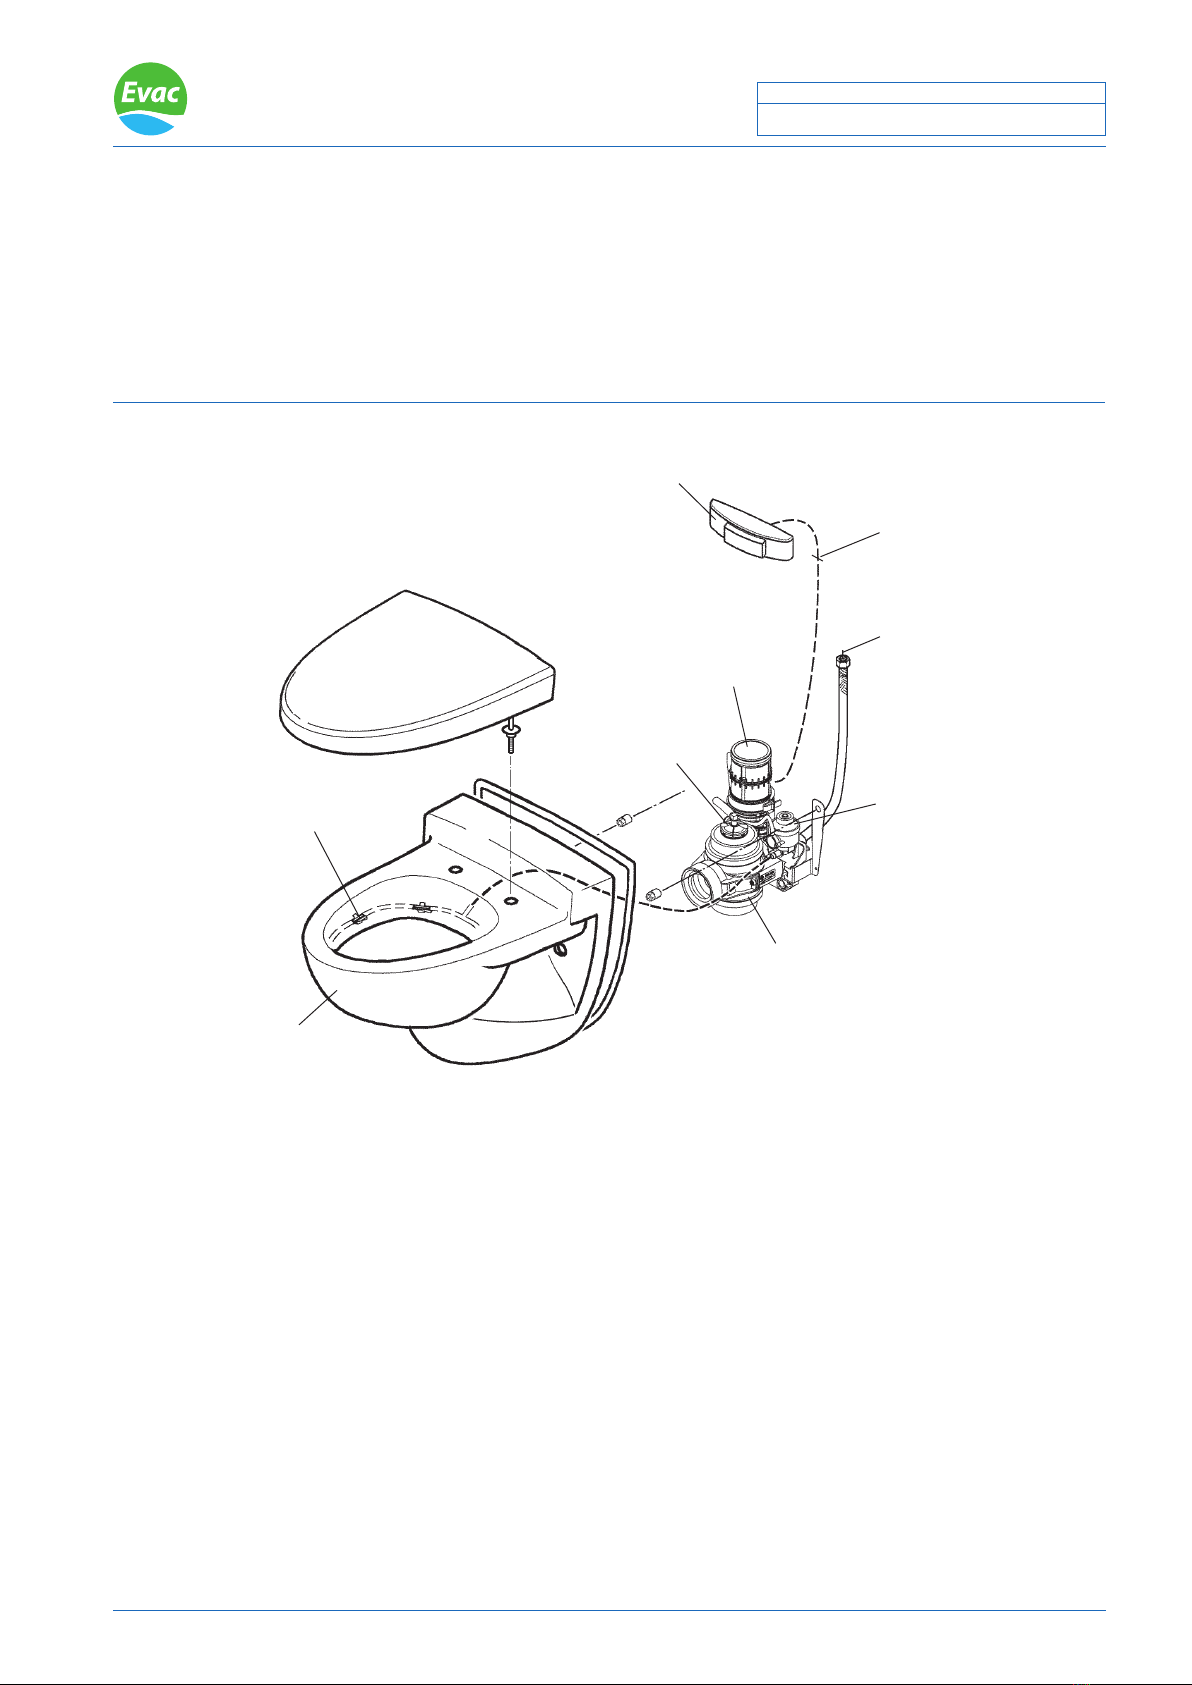
Seat and cover:
*Prestige, Mosaik or Prestige Soft Closing
Bowl
Connection sleeve
Discharge connection
250
400
Flexible water
connection hose
45
Edge strip
Ø50

EVAC reserves the right to make alterations to this specication without prior notice.
© Copyright Evac Oy. All rights reserved. 1
VACUUM TOILET
TECHNICAL DATA
Date: Doc.
09 Nov 2010 1:01005G
6541458 PNEUMATIC PUSH BUTTON, WHITE
Materials Cover: ABS, white
Button: PBT, white
Bottom plate: POM, natural
Connections Hose nipple Ø4
Shipping data Net weight: 0.2kg
40
58
170
60
Ø 4.5
EVAC reserves the right to make alterations to this specication without prior notice.
© Copyright Evac Oy. All rights reserved.
TECHNICAL DATA
Date: Doc.
VACUUM TOILET
1
09 Dec 2010 002003-7
STANDARD COLOURS, EVAC 910, WALL MODELS AND FLOOR MODELS
Product
no. Toilet name
Toilet bowl Seat and cover
Standard colour code Standard colour code Additional
colours*
min. 250
pcs / order
min. 1000
pcs / order
min. 1000
pcs / order
6543418 Wall model, Prestige Silent 01 white 01 white X
6543419 Wall model, Mosaik 01 white 01 white
6543420 Wall model USPH, Prestige Silent 01 white 01 white X
6543421 Wall model USPH, Mosaik 01 white 01 whitw
6544766 Wall model USPH, Open front 01 white 01 white
6544791 Wall model USPH, Prestige Silent, autoush 01 white 01 white X
6544792 Wall model USPH, Prestige Silent, autoush
10 Light grey 10 Light grey
X
30 Light green 30 Light green
68 Pregamon,
light beige
68 Pergamon,
light beige
6544793 Wall model, Prestige Silent
10 Light grey 10 Light grey
X
30 Light green 30 Light green
68 Pregamon,
light beige
68 Pergamon,
light beige
6544794 Wall model USPH, Prestige Silent
10 Light grey 10 Light grey
X
30 Light green 30 Light green
68 Pergamon,
light beige
68 Pergamon.
light beige
6545030 Wall model, B15, Prestige Silent 01 white 01 white X
6545031 Wall model USPH, B15, Prestige Silent 01 white 01 white X
6545818 Wall model USPH, Prestige Silent, autoush 01 white 01 white X
6546081 Wall model USPH, Prestige Silent, autoush
10 Light grey 10 Light green
X
30 Light green 30 Light green
68 Pergamon,
light beige
68 Pergamon,
light beige
6547226 Wall model, Prestige Soft Closing 01 white 01 white X
6547227 Wall model USPH, Prestige Soft Closing 01 white 01 white X
Product
no. Toilet name
Toilet bowl Seat and cover
Standard colour code Standard colour code Additional
colours*
min. 250
pcs / order
min. 1000
pcs / order
min. 1000
pcs / order
6545825 Floor model, Silent 01 white 01 white X
6545826 Floor model, Trevi 01 white 01 white
6545827 Floor model USPH, Silent 01 white 01 white X
6545828 Floor model USPH, Trevi 01 white 01 white
6545829 Floor model USPH, Open front 01 white 01 white
COLOURS FOR FLOOR MODEL TOILETS
COLOURS FOR WALL MODEL TOILETS

EVAC reserves the right to make alterations to this specication without prior notice.
© Copyright Evac Oy. All rights reserved.
TECHNICAL DATA
Date: Doc.
VACUUM TOILET
2
09 Dec 2010 002003-7
STANDARD COLOURS, EVAC 910, WALL MODELS AND FLOOR MODELS
Bowl, seat and cover are available in white and in standard colours. Standard colours are shown in the standard
colour palette.
! NOTE: Evac 910 vacuum toilets with the Mosaik, Trevi or Open front seats and covers are available only in
white colour.
When you order a toilet in standard colour you must give the toilet’s part number, the name and the standard
colour code. Example: 6544794 Wall model USPH, Prestige Silent, 30 Light green.
* You can order the Prestige and the Silent seats and covers in additional colours only in large series. When you
order seat and cover in additional colours you must give an international colour code like the Muncell or RAL.
01 White 10 Light grey 68 Pergamon,
light beige
30 Light green
Standard colour palette
EVAC reserves the right to make alterations to this specication without prior notice.
© Copyright Evac Oy. All rights reserved. 1
VACUUM TOILET
INSTALLATION
Date: Doc.
09 Dec 2010 001998-5
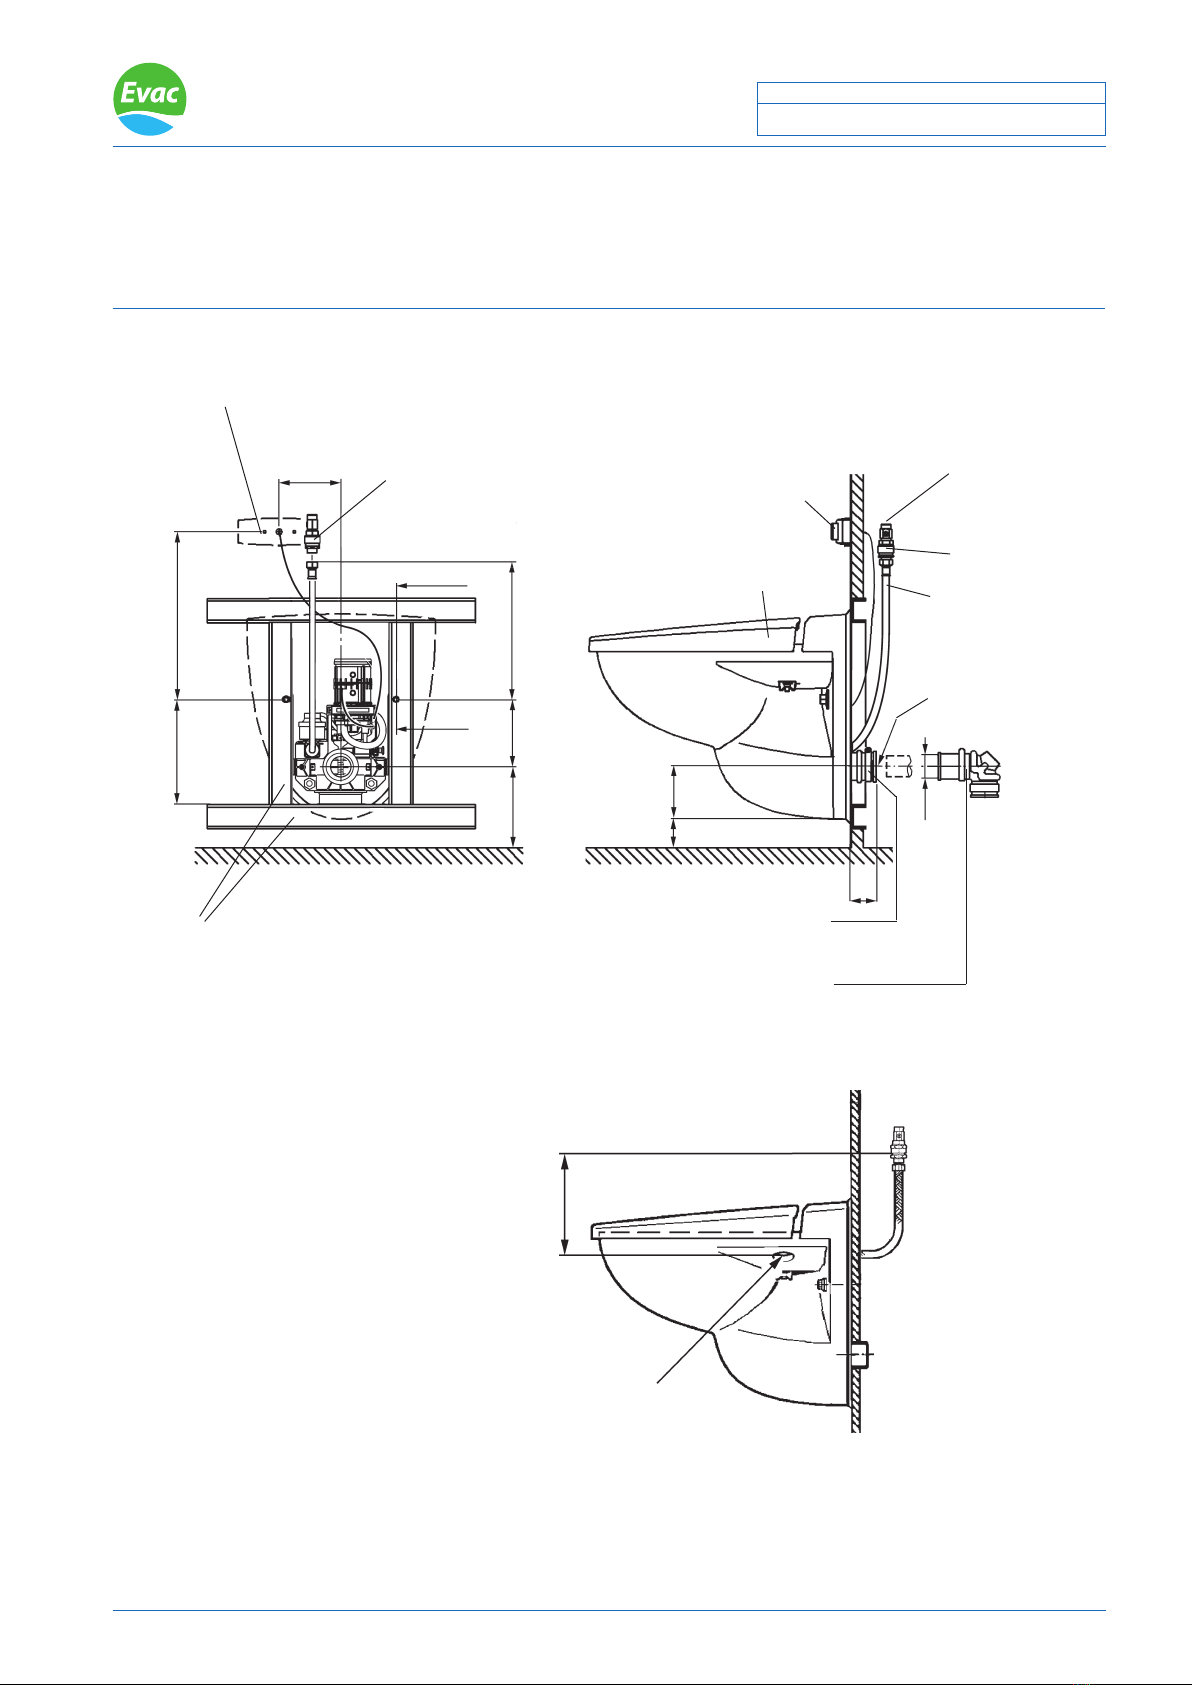
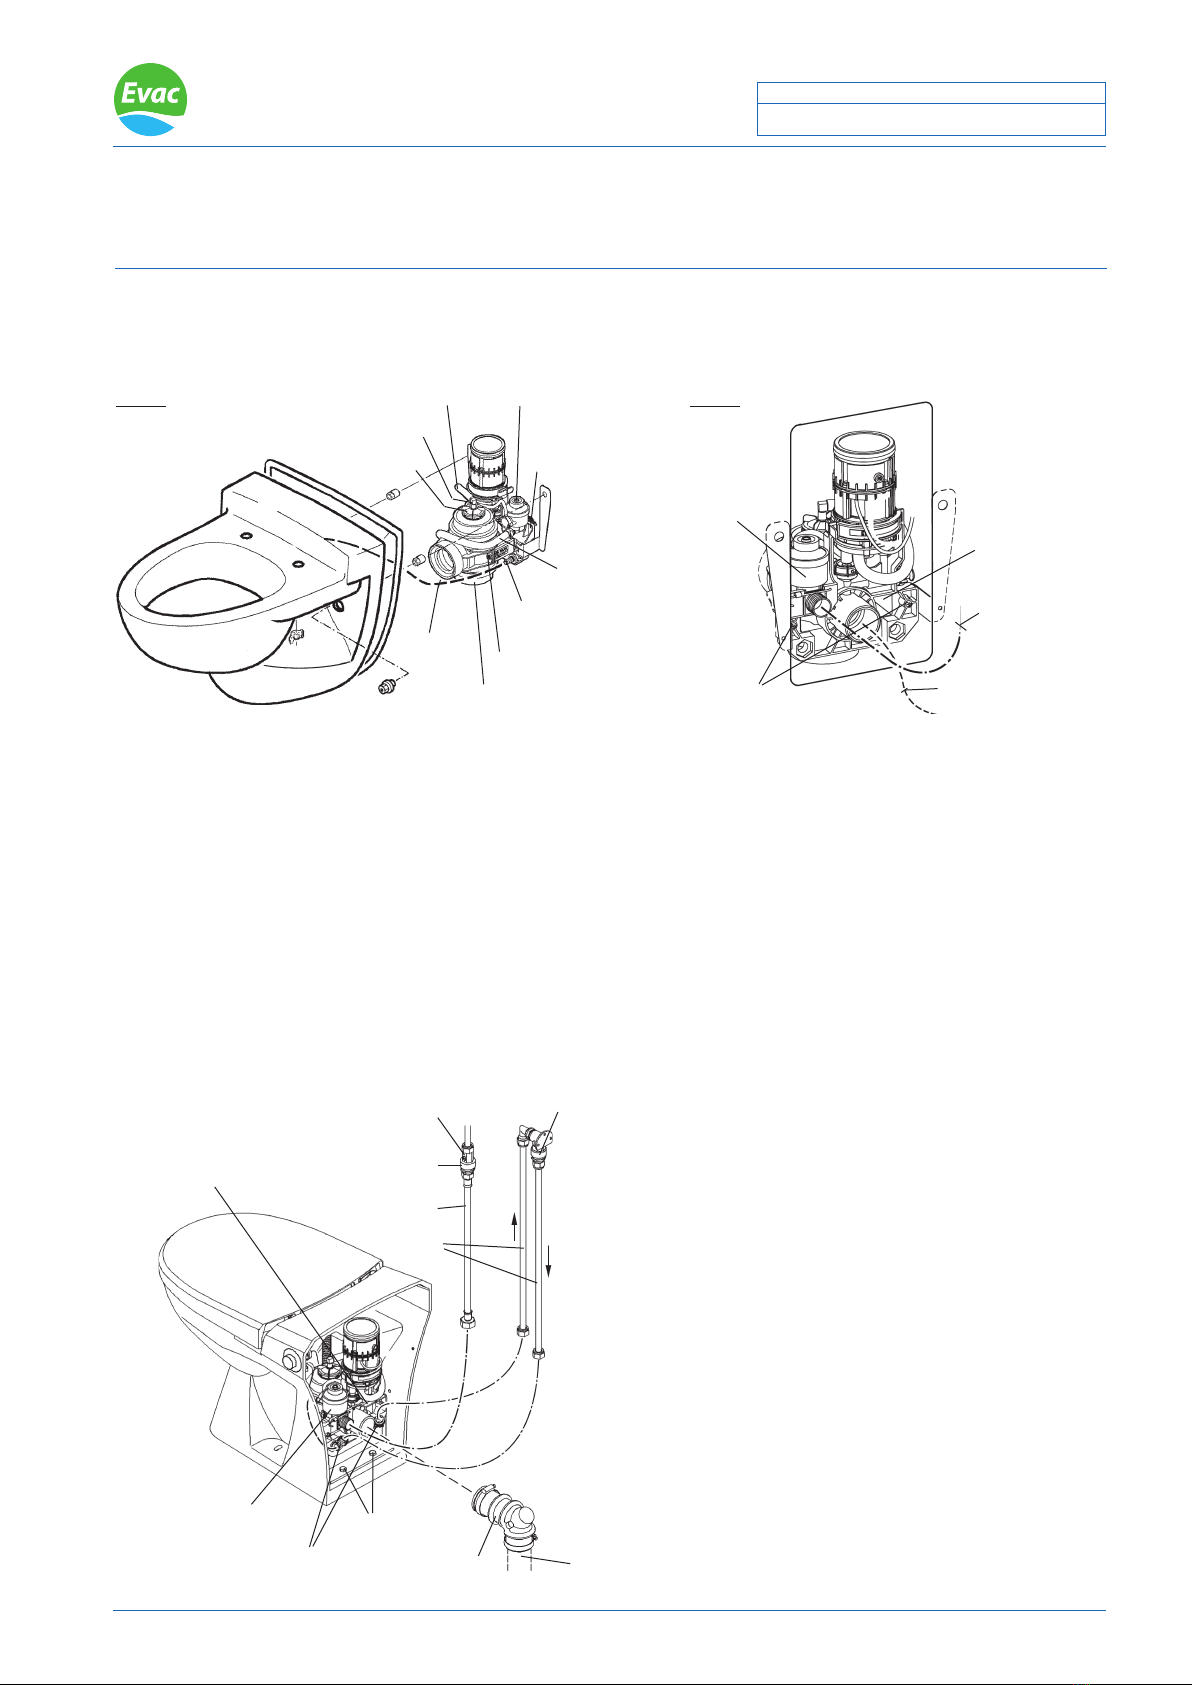
6543418 EVAC 910, WALL MODEL, PRESTIGE SILENT
6543419 EVAC 910, WALL MODEL, MOSAIK
6547226 EVAC 910, WALL MODEL, PRESTIGE SOFT CLOSING
220 330
140160 220
*(Water supply hose)
! NOTE: Recommended place for the button.
If place is changed, consult EVAC.
A
A
U-beam
(Not included in EVAC supply)
Fasten the beam to a solid structure.
130
P/N 5433572
Straight connection hose
Pneumatic push button
50
Seat and cover:
Prestige or Mosaik or
Prestige Soft Closing
110
45
Ø50
Shut-off valve
1/2” MPT
Flexible water hose
Vacuum breaker
Discharge pipe
alignment
tolerance
to be ±3.0 mm
P/N 6544769
Rubber elbow 90°,
optional connection
* The vacuum breaker air inlet must be located at a minimum of
150mm (6”) above the overow point of the toilet.
*150
! NOTE: Overow point is inside the toilet bowl
Overow point
Vacuum breaker installation,
see doc. 002017-3
EVAC reserves the right to make alterations to this specication without prior notice.
© Copyright Evac Oy. All rights reserved. 2
VACUUM TOILET
INSTALLATION
Date: Doc.
09 Dec 2010 001998-5
6543418 EVAC 910, WALL MODEL, PRESTIGE SILENT
6543419 EVAC 910, WALL MODEL, MOSAIK
6547226 EVAC 910, WALL MODEL, PRESTIGE SOFT CLOSING
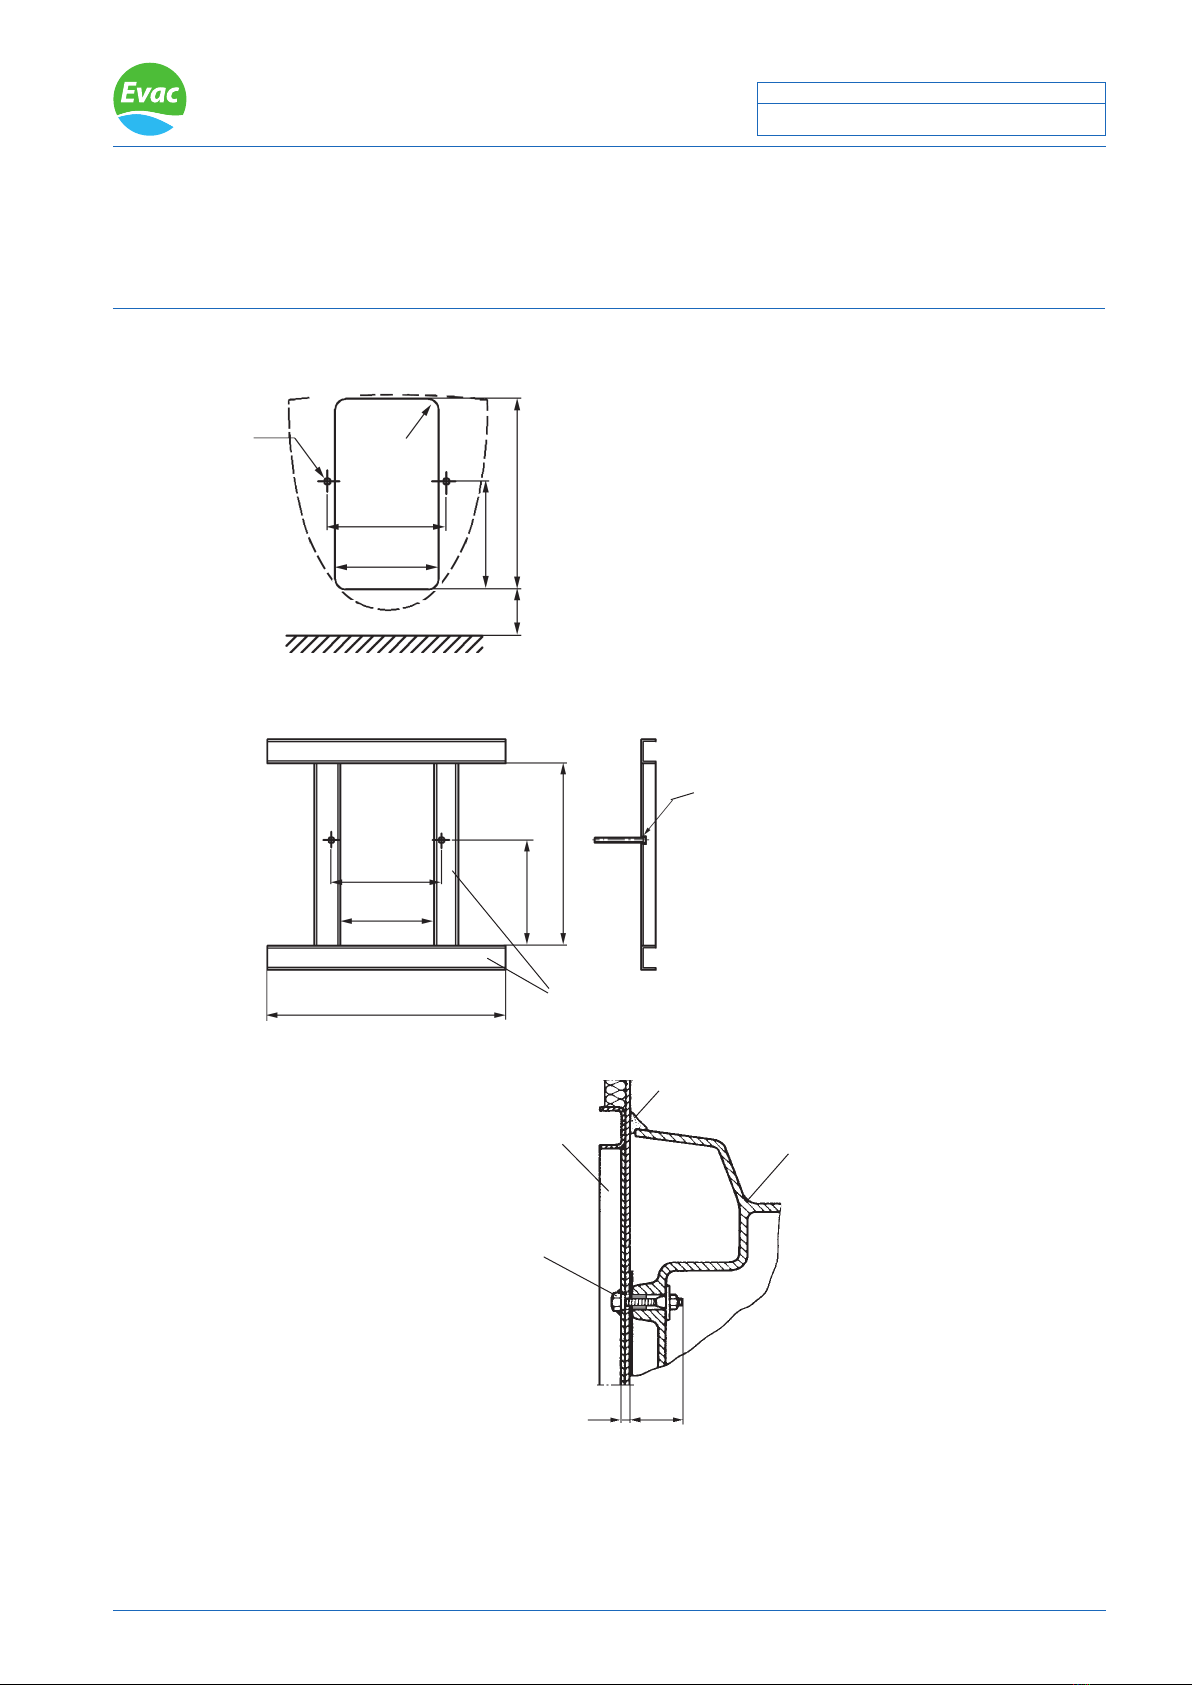
Installation kit 6540972 consists of:
Plastic nut M12 2 pcs
Guiding nut 2 pcs
Edge strip 1 pc
Mounting instruction 1 pc
Straight connection hose 1 pc
Hose clamp 2 pcs
Toilet supporting beams for wall models
Cross section A - A
Edge strip
Total length of bolt = T + 65 ± 2
T65±2
Beam Toilet bowl
Bolt M12 (not EVAC supply) to be welded.
! NOTE: Thread on the bolt must be full length.
Ø13
230
Dimensions of toilet service opening through the wall
370
210
200
90
R20
Bolt M12 to be welded
(not EVAC supply)
Length according to
the space available
230
220
380
200
U-beam 50x30x2 (not EVAC supply)

09 Dec 2010 002017-3
6543418 EVAC 910, WALL MODEL, PRESTIGE SILENT
6543419 EVAC 910, WALL MODEL, MOSAIK
6547226 EVAC 910, WALL MODEL, PRESTIGE SOFT CLOSING
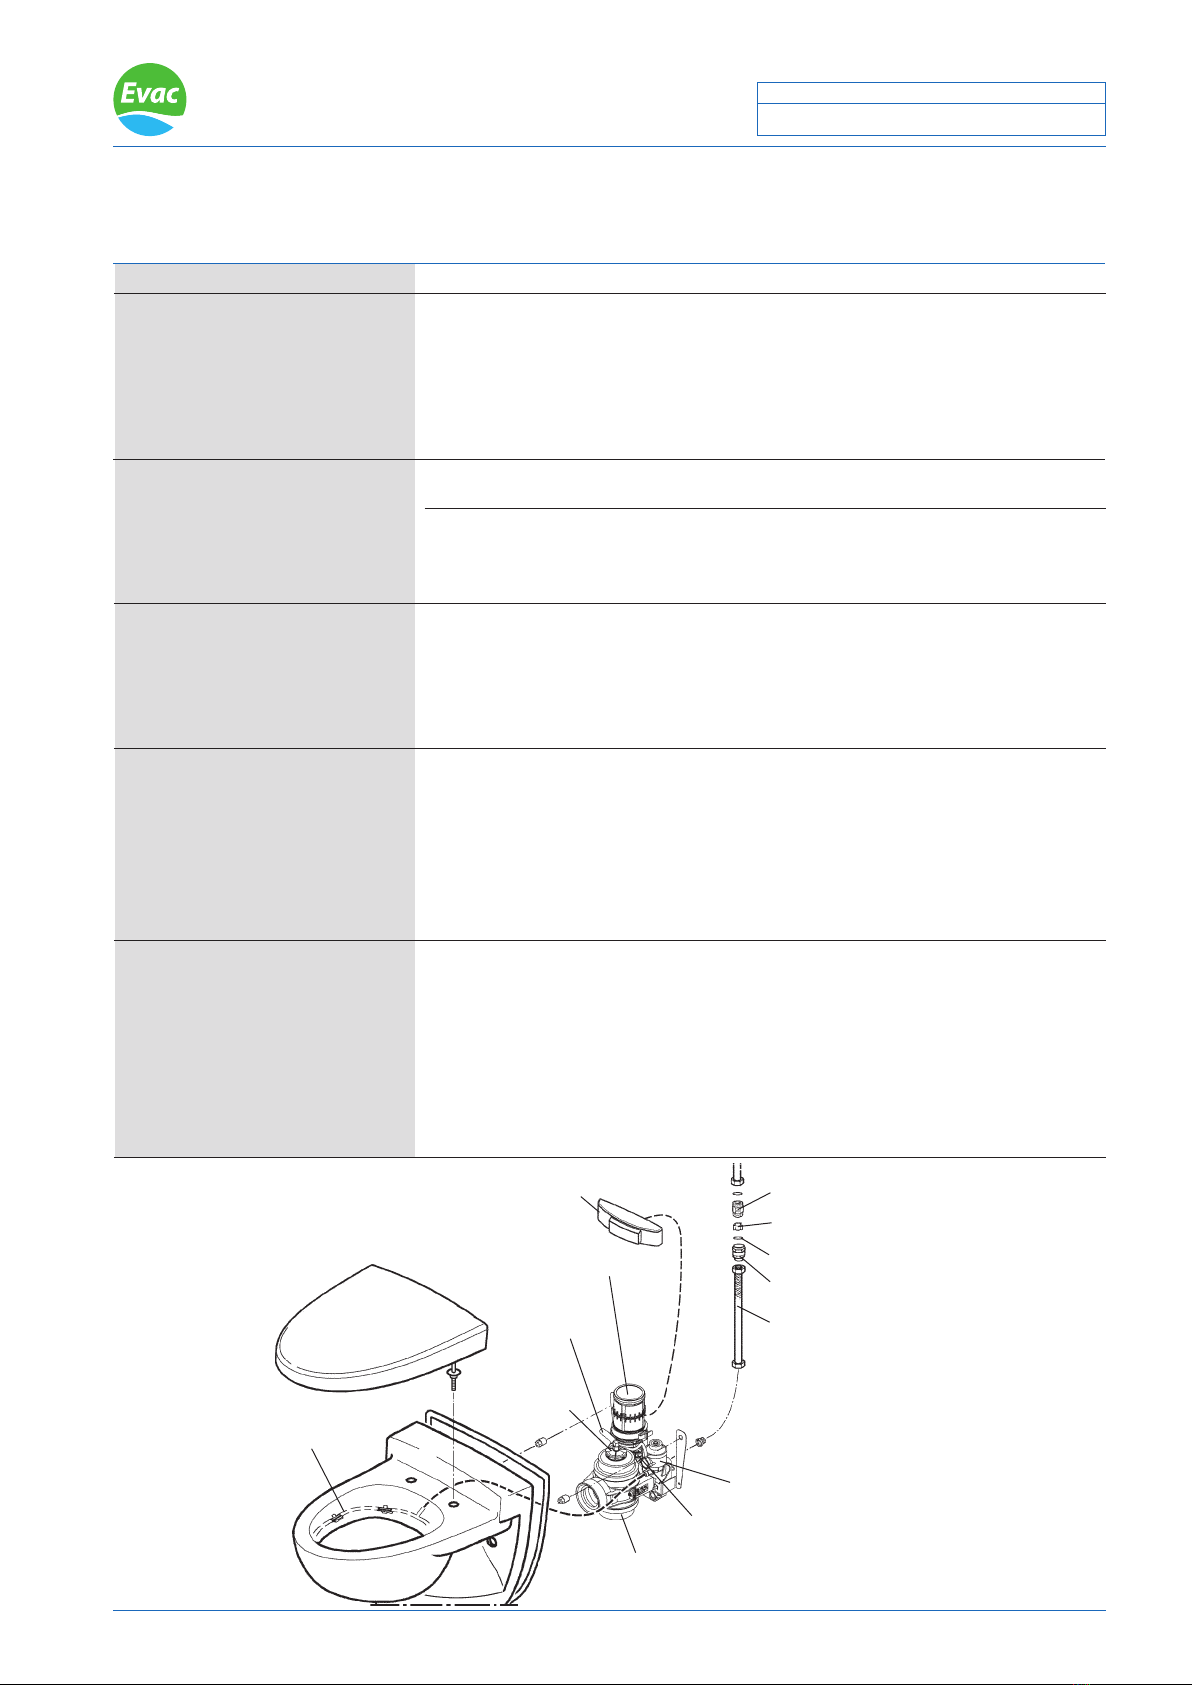
• Connect the water connection hose (A) to the water valve.
• Install the back plate assembly on the wall using the bowl fastening bolts (B) (M12, not included) and the
guiding nuts (C) (M12). The guiding nuts are necessary.
• Connect the hose (D) from the ushing ring to the water valve. Do not use any kind of grease during
installation! Secure with hose clamps. Tighten the hose clamps with pliers.
! NOTE: Install the hose (D) from the ushing ring in the toilet bowl to the right side of the discharge valve and
below all other hoses.
• Lift bowl onto the fastening bolts and tighten the securing nuts (E). Tightening torque is 15-20 Nm.
! NOTE: Check hoses through the toilet service opening in the wall that the hoses run smoothly. The hoses
shall not have any kinks.
• Fit the edge strip as shown in gure 1. Place the joint of the strip to the bottom side of the bowl.
• Install the seat and the cover. See the installation of the Prestige Soft Closing (document
002503-2).
• Connect the discharge connection. Secure with the hose clamps.
• Connect the shut-off valve/vacuum breaker assembly to the water supply. The shut-off valve must be installed
to the water supply piping’s side to ensure the correct ow direction in the vacuum breaker. Note the vacuum
breaker must be installed vertically as shown.
• Connect the water connection hose (A) to the shut-off valve/vacuum breaker assembly.
• Install the pneumatic push button (See document 002002-3).
E
Hose A (EPDM) L=400,
braid of stainless steel
wire
D
Water valve
B
Pneumatic push button
Edge strip
Mosaik
Prestige
Fig.1
C
Vacuum breaker
Shut-off valve,
1/2” MPT BSP
Shut-off valve /
vacuum breaker
assembly
Discharge valve (See notes!)
Hinge
Washer
Wing nut
Hingebody
or
Fresh water
connection
Back plate
assembly
Pipe Ø12
Washer
or
Prestige
Soft Closing
or
or
Nut Wing nut
Washer
Hinge
EVAC reserves the right to make alterations to this specication without prior notice.
© Copyright Evac Oy. All rights reserved.
INSTALLATION
Date: Doc.
VACUUM TOILET
1

EVAC reserves the right to make alterations to this specication without prior notice.
© Copyright Evac Oy. All rights reserved. 1
VACUUM TOILET
INSTALLATION
Date: Doc.
09 Dec 2010 002503-2
6546819 PRESTIGE SOFT CLOSING, SEAT AND COVER
002503-2
Screw
Washer (metal)
Bushing (plastic)
Washer
(metal and plastic)
Wing nut
Bowl
Hinge, left
(blue mark)
Hinge, right
(yellow mark)
Seat
Cover
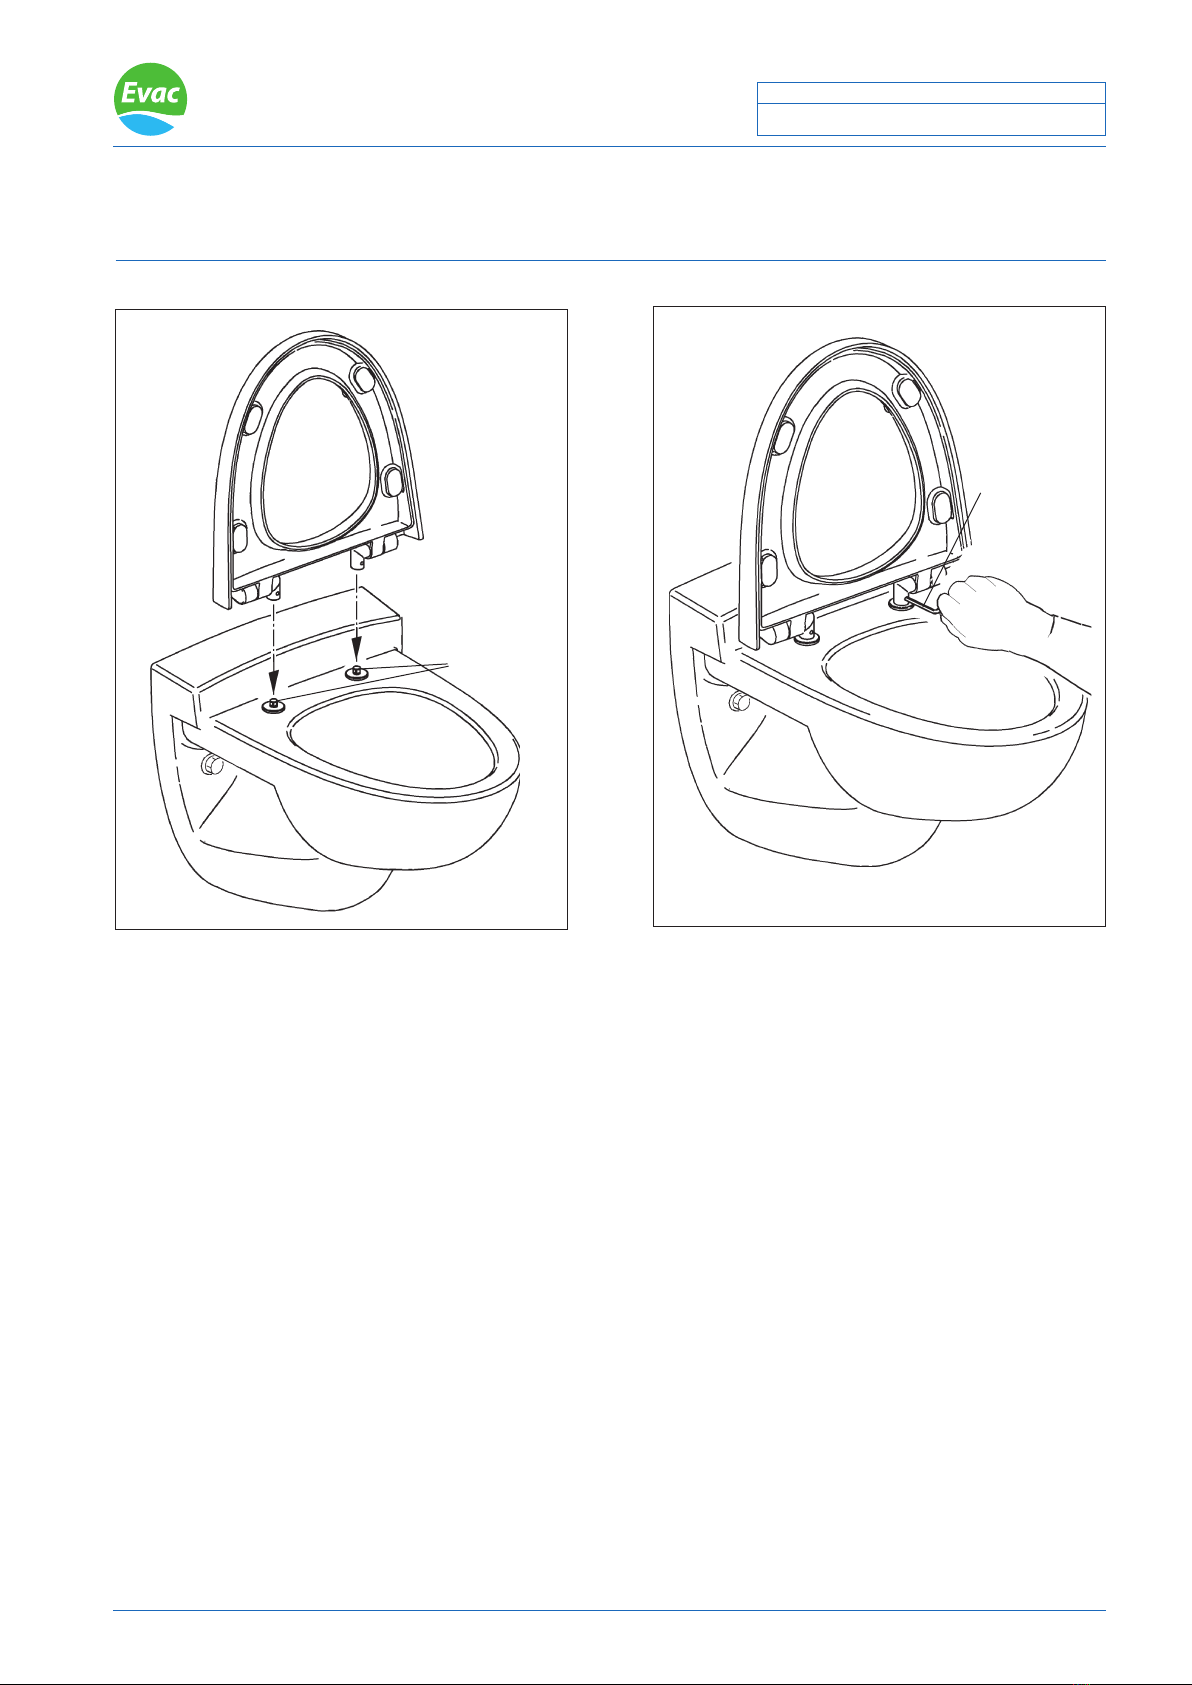
2. Push the hinges into the hole of the seat and the cover.
1. Install the parts of the installation kit. Note the installation
order.
! NOTE: Do not open the seat (with the hinges
inserted) hinges before assembly. The opening angle
must not exceed 110°.
Installation
EVAC reserves the right to make alterations to this specication without prior notice.
© Copyright Evac Oy. All rights reserved. 2
VACUUM TOILET
INSTALLATION
Date: Doc.
09 Dec 2010 002503-2
6546819 PRESTIGE SOFT CLOSING, SEAT AND COVER
3. Install the seat and the cover with the hinges on
the installation screws on the bowl.
Installation
screws
4. Tighten the retaining screws by the hex wrench.
(The installation kit includes two hex wrenches.)
Hex wrench
Maintenance
The seat is easy to clean, with just a few simple directions for you to observe.
• Use mild soap solution or biological cleaners.
• Rince the seat and cover and the hinges with water and dry with a soft cloth.
• Do not use abrasive scouring powders for the seat and cove and the hinges.
• Be careful with chemicals and cosmetics. Some of them may damage the seat at last.
• When you use abrasive, corrosive or chlorine based cleaners for the bowl, avoid contact with
the seat and cover and the hinges. Therefore, when you clean the bowl and ush cleaner
away, make sure that the seat and the cover are in an upright position.
! NOTE: Do not use too much force.
Do not use force when closing, this may cause
irreparable damage to the device.
EVAC reserves the right to make alterations to this specication without prior notice.
© Copyright Evac Oy. All rights reserved. 1
VACUUM TOILET
INSTALLATION
Date: Doc.
28 Jan 2011 002002-3
6541458 PNEUMATIC PUSH BUTTON, EVAC 910, WALL MODELS
6541057 OPTIONAL PNEUMATIC PUSH BUTTON KIT, EVAC 910, FLOOR MODELS
E
Ø 6
AD
3.
C
From the control
mechanism
60
60
A
B
C
D
E
B
From the control
mechanism
Plastic hose to the
push button
Control
mechanism
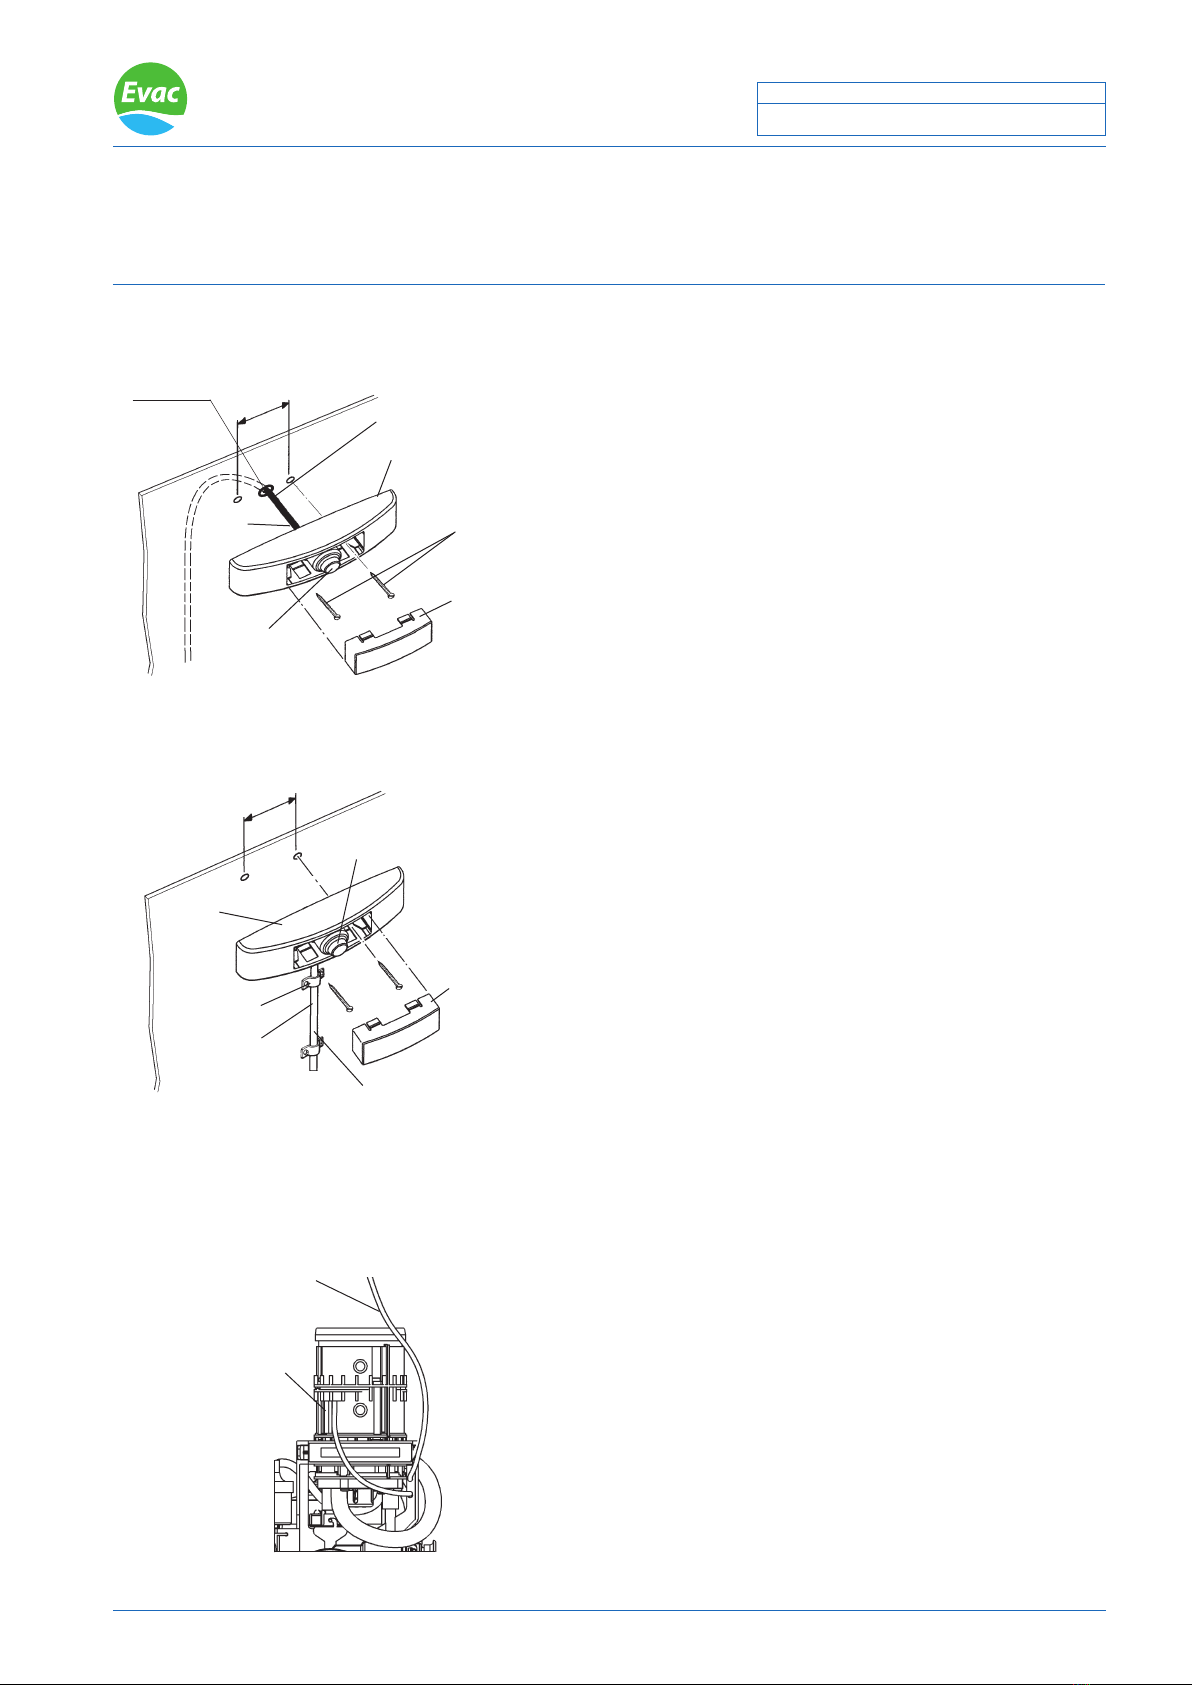
Installing the push button on the wall, oor models with
the optional push button kit.
(Hose and protecting pipe on the surface of the wall)
1. Drill Ø6 mm hole for the hose (A).
2. Connect the plastic hose (A) from the control mechanism to
the bellows (B). Warm the end of the hose if needed to help
installation.
3. Install the body (C) of push button on the wall using screws
(D) (not included).
4. Snap the cover (E) of the push button its place.
! NOTE: Secure, that the hose (A) is not attened after
installation. Air impulse must always ow free.
1. Thread the hose from the control mechanism through the
protection pipe (A).
2. Install the protection pipe (A) on the wall using screws and
clamps (B).
3. Cut off the lm of the bushing for the plastic hose in the
bottom side of the push buttons cover.
4. Connect plastic hose from the control mechanism to the
bellows (C). Snap the plastic hose on the clip behind the
bottom plate.
5. Install the push button body (D) to the wall using screws
(not included).
6. Snap the cover of the push button (E) its place.
Control mechanism
Make sure, that the plastic hose does not get loose from
the control mechanism.
EVAC reserves the right to make alterations to this specication without prior notice.
© Copyright Evac Oy. All rights reserved. 2
VACUUM TOILET
INSTALLATION
Date: Doc.
28 Jan 2011 002002-3
6541458 PNEUMATIC PUSH BUTTON, EVAC 910, WALL MODELS
6541057 OPTIONAL PNEUMATIC PUSH BUTTON KIT, EVAC 910, FLOOR MODELS
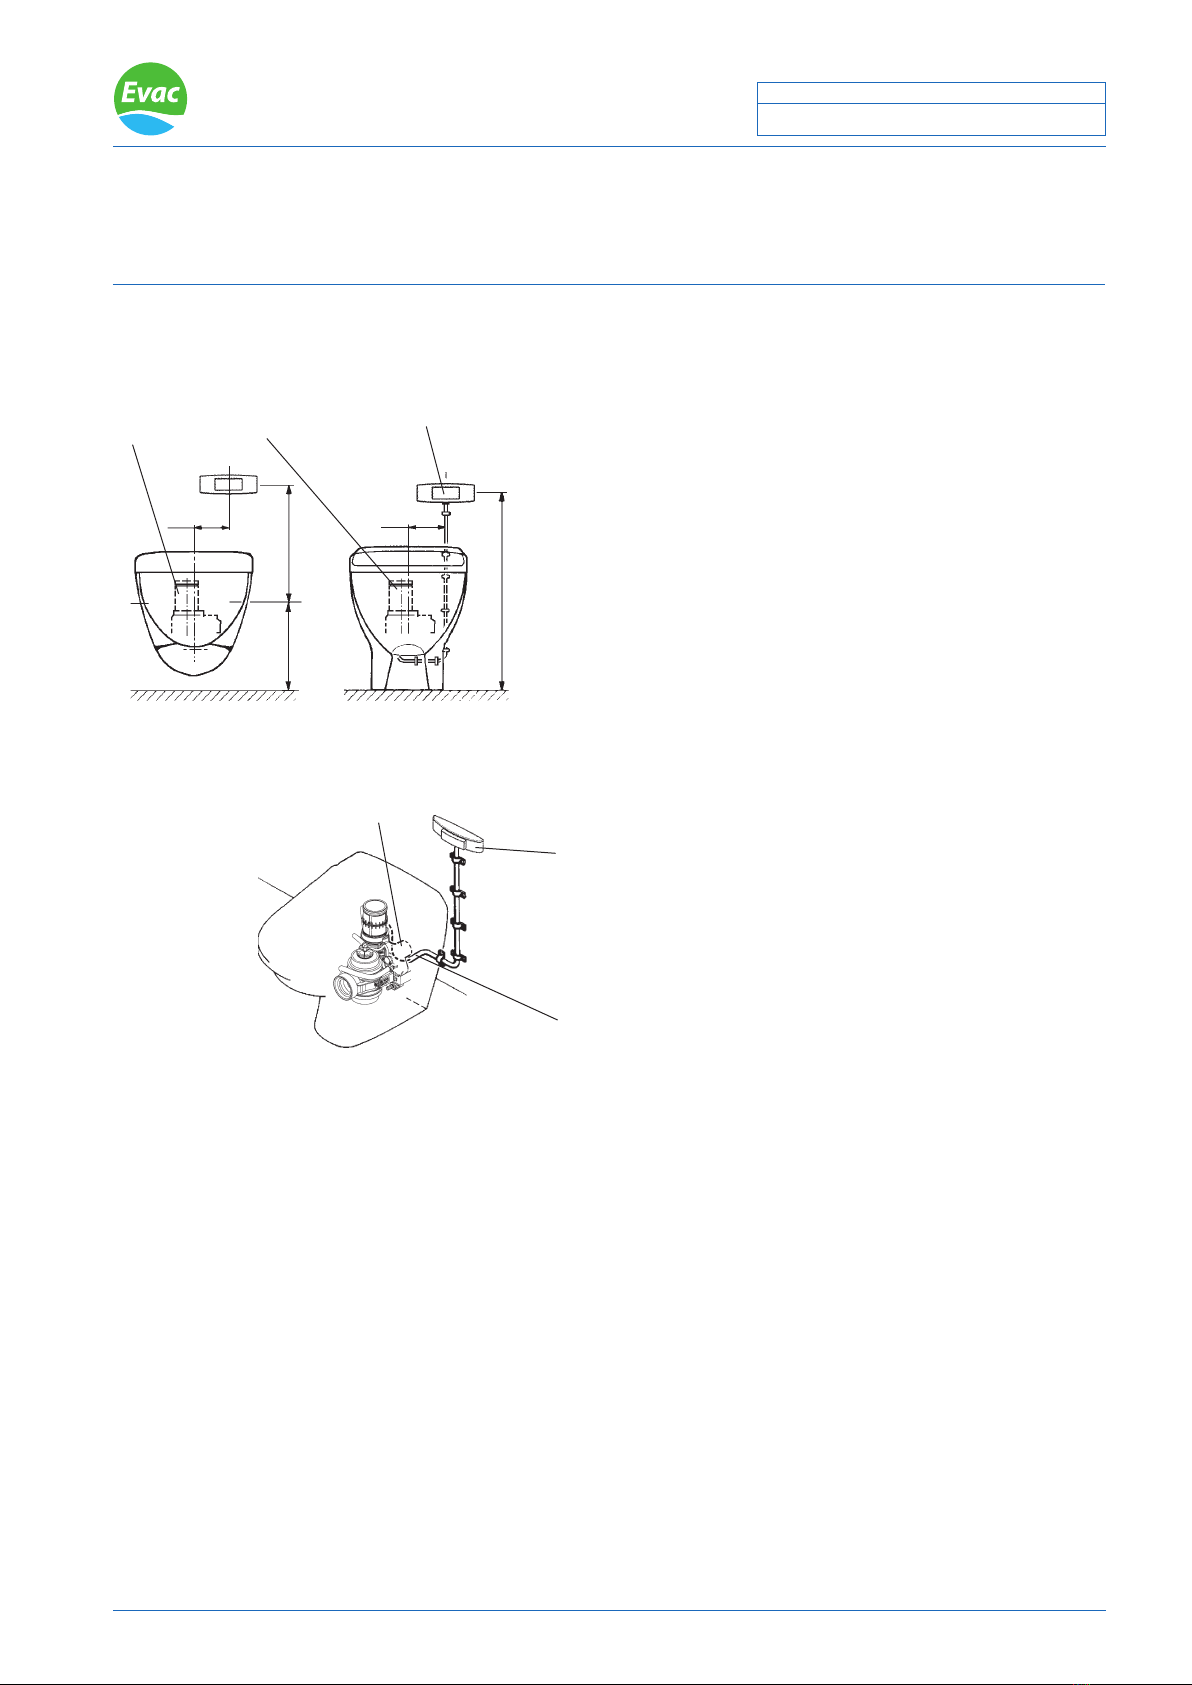
Control mechanism
~290 330*
130
~640*
110
Optional push button
(Floor models)
Discharge pipe
Recommended place for the button
! NOTE: Make sure, that cover does not hit the push button
when opened. (*In Aniara/Mosaik/Trevi models dimension
is 100mm smaller due to the exible cover.) If the place is
changed, consult EVAC.
Floor models
Optional pneumatic push button kit
Install the protecting pipe under the discharge pipe.
EVAC reserves the right to make alterations to this specication without prior notice.
© Copyright Evac Oy. All rights reserved. 1
VACUUM TOILET
OPERATION AND MAINTENANCE
Date: Doc.
09 Dec 2010 002029-4
6543418 EVAC 910, WALL MODEL, PRESTIGE SILENT
6543419 EVAC 910, WALL MODEL, MOSAIK
6547226 EVAC 910, WALL MODEL, PRESTIGE SOFT CLOSING
6543420 EVAC 910, WALL MODEL USPH, PRESTIGE SILENT
6543421 EVAC 910, WALL MODEL USPH, MOSAIK
6544766 EVAC 910, WALL MODEL USPH, OPEN FRONT
6547227 EVAC 910, WALL MODEL USPH, PRESTIGE SOFT CLOSING
Start-up
• Clean the bottom of the toilet bowl.
• Check the mini-check valve and the discharge valve are clean and working correctly.
• Check the water supply hose and the lter of the water valve are not blocked up.
• Check sufcient vacuum (-0.3 bar) is available.
• Open the water supply valve in the water supply piping.
• Press the toilet push button. Pressing the button starts the ushing sequence. The discharge valve opens and
the contents of the bowl are extracted by vacuum. At the same time the bowl is rinsed by water.
• When the discharge valve has been closed water level is restored in the bowl by the closing time delay of the
water valve.
Monitoring the vacuum toilet in the normal operation
• Check the water valve provides the rinse water to the bowl at the same time as the discharge valve extracts
the bowl contents when the push button is pressed.
• Check the push button returns to it´s non-activated state.
• Check after the discharge valve closes, the water valve continues to provide water to the bowl. If the water
valve time delay is correctly adjusted, there should be a pool of water at the bottom of the bowl.
• Check there are no water or air leaks.
! NOTE: Water consumption is dependent on the water supply pressure and the vacuum level.
Preparation for a toilet not to be used for a long period
• Close the water supply valve.
• Run a ush cycle by pressing the push button.
• Close the toilet seat cover.
Water valve
Flushing ring
Discharge valve
Push button on the wall
(wall model toilets)
Control
mechanism
Mini-check
valve
Direction A
Seat and cover
Filter of the
water valve
Water supply piping
Water supply valve
A
EVAC reserves the right to make alterations to this specication without prior notice.
© Copyright Evac Oy. All rights reserved. 1
VACUUM TOILET
OPERATION AND MAINTENANCE
Date: Doc.
09 Dec 2010 002028-4
6543418 EVAC 910, WALL MODEL, PRESTIGE SILENT, WHITE
6543419 EVAC 910, WALL MODEL, MOSAIK, WHITE
6547226 EVAC 910, WALL MODEL, PRESTIGE SOFT CLOSING
6543420 EVAC 910, WALL MODEL USPH, PRESTIGE SILENT, WHITE
6543421 EVAC 910, WALL MODEL USPH, MOSAIK, WHITE
6544766 EVAC 910, WALL MODEL USPH, OPEN FRONT, WHITE
6547227 EVAC 910, WALL MODEL USPH, PRESTIGE SOFT CLOSING
Operation
The toilet is ushed by pressing the push button. The pneumatic push button is connected to the control mechanism
with a control hose, which transports the air pulse from the push button to the control mechanism. The air pulse
starts the ushing sequence and the control mechanism connects vacuum to the control connections of the water
valve and the discharge valve. The water valve opens and lets rinsing water ow into the bowl through the ushing
ring. After a short delay vacuum acts in discharge valve housing and forces the rubber diaphragm in discharge
valve to open. Contents of the bowl is drained to the vacuum sewer by a pressure difference between the bowl
and vacuum sewer. The ushing cycle in the control mechanism starts the closing cycle. Vacuum enters to the
relief valve. The relief valve opens the port between athmospheric air and the discharge valve. Athmospheric air
enters to the discharge valve witch closes immediatelly. After a short delay the atmospheric air pulse reaches to the
water valve and the relief valve. The water valve closes and lets a certain level of water at the bottom in the bowl.
After the ushing cycle has stopped the push button and the system will be ready for the next ush.
Discharge valve
Pneumatic push button
Flushing ring Water valve
Water supply
connection
Control
mechanism
Control hose
Bowl
Relief valve
EVAC reserves the right to make alterations to this specication without prior notice.
© Copyright Evac Oy. All rights reserved. 1
VACUUM TOILET
OPERATION AND MAINTENANCE
Date: Doc.
09 Nov 2010 002030-2
5775500 CONTROL MECHANISM, EVAC 910, WALL MODELS AND FLOOR MODELS
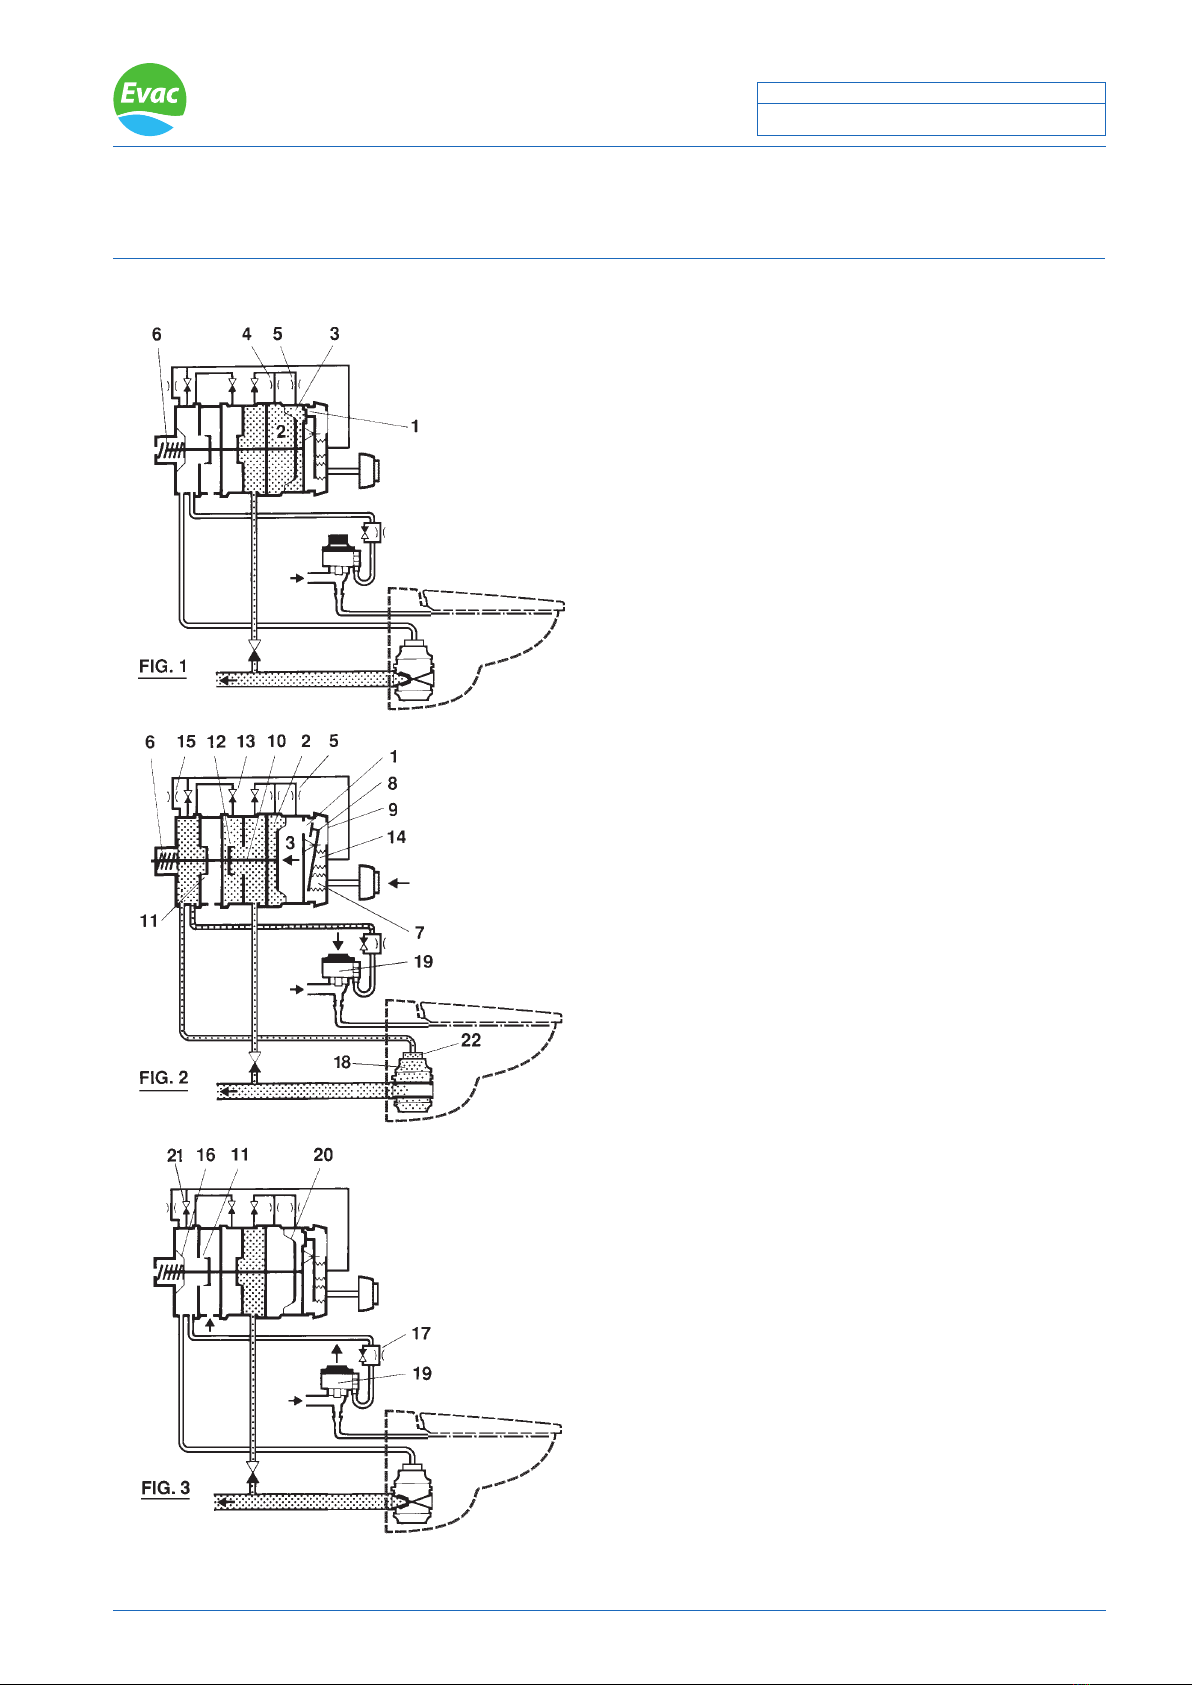
Description of the ushing sequence
In the standby position FIG.1
The control valve (1) is closed. Vacuum in the chambers
(2) and (3) is equalized by the jets (4) and (5). Force of the
spring (6) holds the mechanism in the non-activated position.
In the position immediately after the push button has
been pressed FIG.2
Air pressure applied from the ush button to the chamber
(7) has lifted the lever (8) and opened the control valve
(1). Atmospheric air has entered the chamber (3) through
the lter (9) and the valve (1). The force from the pressure
difference between (2) and (3) has moved the shaft (10) to
the left and the following sequence of events has occured:
The inlet valve (11) has closed. The vacuum valve (12) has
opened. Vacuum is distributed via the check valve (13) to
the discharge valve (18) and the water valve (19) which will
both open. The chamber (14) is also subjected to vacuum
through the check valve (21).
This vacuum will pull the lever (8) and the close valve (11)
and the timer function will start. The chamber (3) will be
evacuated through the jet (5) and the pressure difference
(2-3) equalizes. At the certain level, the counterforce from
the spring (6) will outweigh and the cycle will go in the
opposite direction:
The vacuum valve (12) will close. The air inlet valve (11)
will open and vacuum will enter the relief valve (22), the
athmospheric air enters the water valve, the discharge
valve and the chamber (14). The discharge valve (18) will
close and somewhat later (because of the jet (17)), the
water valve (19) closes when a suitable water level has been
reached at the bottom of the bowl. The relief valve closes.
Returning to the standby position FIG.3
The whole system goes to the standby position ready for
another VT-ush.
! NOTE: The diaphragm (16) has the same effective area as
the air inlet valve (11) to balance the vacuum forces. FIG.3
! NOTE: Check the valve (13) ensures that connected the
valves in the activated position are unaffected by changes
in the vacuum supply level.
! NOTE: If vacuum is too low or absent the function is
delayed. The control valve (1) stays open until the chamber
(14) is subject to vacuum.

EVAC reserves the right to make alterations to this specication without prior notice.
© Copyright Evac Oy. All rights reserved. 1
VACUUM TOILET
OPERATION AND MAINTENANCE
Date: Doc.
09 Nov 2010 002032-2
5775500 CONTROL MECHANISM, EVAC 910 WALL MODELS AND FLOOR MODELS
Operation
The functioning of the vacuum toilet is entirely controlled by the control mechanism. The operation of the control
mechnism is based on vacuum in the sewage piping system.
Description of ushing sequence see document 002030-2.
Jet 1 (document 002030-2 pos. 5) controls the discharge valve opening time.
Jet 2 (document 002030-2 pos. 4) counters the effect of quick changes in the vacuum supply.
Jet 3 (document 002030-2 pos. 15) delays the vacuum changes in the chamber (14) (see document 002030-2).
This prevents a new ushing procedure to start before the previous procedure has stopped.
Maintenance
Check that the air lters (4) and (5) are not blocked.
Check hoses and pipe connections for leaks.
Toilet discharge time
Jet 1 Short discharge period Red jet 1.5 sec.
Normal discharge period Blue jet 2.0 sec.
Longer discharge period White jet 2.5 sec.
Less restriction shortens the time
Water valve opening time
Jet 6 Normal bowl water level White jet
Low bowl water level Blue jet
Push button
Filter 4
Jet 1
Jet 2
Control mechanism
Jet 6
(inside plastic cover)
Water valve
Discharge valve
Mini-check valve
Filter 5
(athmospheric air inlet for relief valve)
Jet 3
Control mechanism
Relief valve

EVAC reserves the right to make alterations to this specication without prior notice.
© Copyright Evac Oy. All rights reserved. 1
VACUUM TOILET
OPERATION AND MAINTENANCE
Date: Doc.
09 Nov 2010 002033-4
6543002 DISCHARGE VALVE, EVAC 910, WALL MODELS, FLOOR MODELS AND
STAINLESS STEEL MODELS
Operation
Closed condition:
The control mechanism shuts off connection between the vacuum piping and the discharge valve housing. As the
valve housing is under atmospheric pressure the spring-loaded closing mechanism closes the rubber diaphragm
and isolates the bowl from the vacuum piping.
Open condition:
As the control valve opens the discharge valve housing is subjected to vacuum, thus forcing the closing mechanism
to open. This in turn allows the rubber diaphragm to open, and connects the bowl to the vacuum pipe line.
Closing sequence:
The vacuum pulse enters to the relief valve. The relief valve opens the port between athmospheric air and the
discharge valve. Athmospheric air enters to the discharge valve witch closes immediatelly. After a short delay the
atmospheric air pulse reaches to the water valve and the relief valve. The water valve closes and lets the certain
level of water at the bottom in the bowl.
Maintenance
See document 002034-6 for scheduled maintenance.
CLOSED
CONDITION
Closing
mechanism
Control mechanism
Bowl
side
Vacuum
piping
Vacuum hose
Connection
pipe
OPEN CONDITION CLOSING SEQUENCE
Rubber diaphragm
Rubber
sleeve
Rubber
sleeve
Relief valve
Discharge
valve
Discharge valve
Atmospheric air
EVAC reserves the right to make alterations to this specication without prior notice.
© Copyright Evac Oy. All rights reserved. 1
VACUUM TOILET
MAINTENANCE
Date: Doc.
11 Nov 2010 002034-6
EVAC 910, WALL MODELS, FLOOR MODELS AND STAINLESS STEEL MODELS
Cleaning instruction for the seat
• The seat is easy to clean, with just a few simple directions for you to observe.
• Use a mild soap solution or biological cleaners.
• Seat and hinges should not be left damp, but be dried with a soft cloth.
• When using abrasive, corrosive or chlorine based cleaners for the bowl, avoid contact with the seat and
hinges. Therefore, when cleaning the bowl, make sure that seat and cover are in an upright position until all the
cleaner has been ushed away.
Scheduled maintenance program
Maintenance program is based on 20 toilet ushes per day and 20 years operation.
Every year:
• Change ap of Mini-check valve in every toilet.
• Check operation, push button, seat and cover, rinse pattern, discharge pattern.
• Check possible water and vacuum leakage.
• Clean Filter ( not in USPH models ) in water supply.
Every 5 years:
• Change Flap of mini-check valve in every toilet.
• Open and clean Water valve lter 5774150.
• Clean Control mechanism air lter 5778600.
• Check operation, push button, seat and cover, rinse pattern, discharge pattern.
• Check possible water and vacuum leakage.
• Check Flushing ring 6541025 (oor models), 6540968 (wall models) or 5433471 (Stainless steel models) and
ushing operation.
Every 10 years:
• Change Flap of mini-check valve in every toilet.
• Change Discharge valve rubbers: Rubber sleeve 6542990 (2pcs), Rubber diaphragm 6542989 and Diaphragm
6543134 in relief valve.
• Change Water valve diaphragm 5774400.
• Open and clean Water valve lter 5774150.
• Clean Control mechanism air lter 5778600.
• Check operation, push button, seat and cover, rinse pattern, discharge pattern.
• Check possible water and vacuum leakage.
• Check Flushing ring 6541025 (oor models), 6540968 (wall models) or 5433471 (Stainless steel models) and
ushing operation.
! NOTE: Use only genuine Evac spare parts.
Discharge valve Water
sypply
Control mechanism
Flushing ring
Floor models:
6541025 Flushing ring
Wall models:
6540968 Flushing ring
5778600
Air lter
Water valve 5774400
Diaphragm
5774150
Filter
6 5 4 1 4 5 8
Push button
Pneumatic push buttons
6542990
Rubber
sleeve
6542989
Rubber
diaphragm Mini-check
valve
Filter
Relief valve
6544996
Push button
Stainless steel toilet:
5433471 Flushing ring
EVAC reserves the right to make alterations to this specication without prior notice.
© Copyright Evac Oy. All rights reserved. 1
VACUUM TOILET
TROUBLE SHOOTING
Date: Doc.
Filter ( not in USPH models )
11 Nov 2010 002031-3
EVAC 910, WALL MODELS
Push button
Water valve
Discharge valve
Vacuum
hose
Control mechanism
Mini-check valve
Flushing ring
Shut-off valve
Seal ( not in USPH models )
Vacuum breaker
Water supply hose
Trouble
Toilet is discharging continuously
(discharge valve open)
Bowl does not become empty
when ushed
No water or too little rinsing
water
Toilet is overowing
Toilet does not ush.
Cause
• Foreign object in bowl or
in discharge valve
• Blocked air relief tubing
• Quick relief valve malfunction
• Discharge valve blocked
• Leak in discharge valve housing
• Discharge pipe blocked
• Rubber sleeves leaking
• Water shut-off valve closed
• No water pressure
• Filter full or dirt in water valve
• Flush ring loose
• Flush ring clogged
• Filter blocked up in water supply
• Water valve jammed in open
position
• Bowl clogged or discharge valve
not operating
• Misuse (buckets of water thrown in
the bowl)
• Too low vacuum (less than 30%) to
ush
• No vacuum or low vacuum (less
than 30kPa)
• Clogged mini-check valve
• No impulse from push button
• Jammed control mechanism
• Jammed quick relief valve
Remedy
• Shut off the problematic branch line
valve
• Remove foreign object
• Change discharge valve
• Check and if necessary change
control mechanism
• Check relief valve operation
• Clear stoppage, if any, in discharge
valve
• Sharp tools may damage rubber
• Check that rubber sleeves are
undamaged and correctly tted
• Check relief valve operation
• Open valve
• Provide water pressure
• Clean lter
• Connect ushing ring
• Clean ushing ring
• Clean lter
• Close water shut-off valve
• Clean / change water valve nozzles,
springs, rubbers
• Discharge bowl, valve and piping
with normally ushing
• Check vacuum level, remove
blockage in piping
• Clean / change mini-check valve
• Check hoses and membrane of push
button
• Change control mechanism
• Check air lter condition. It should
be place.
• Check relief valve operation
Relief valve
EVAC reserves the right to make alterations to this specication without prior notice.
© Copyright Evac Oy. All rights reserved. 1
VACUUM TOILET
TROUBLE SHOOTING
Date: Doc.
11 Nov 2010 002262-2
6543002 DISCHARGE VALVE, EVAC 910, WALL MODELS AND FLOOR MODELS
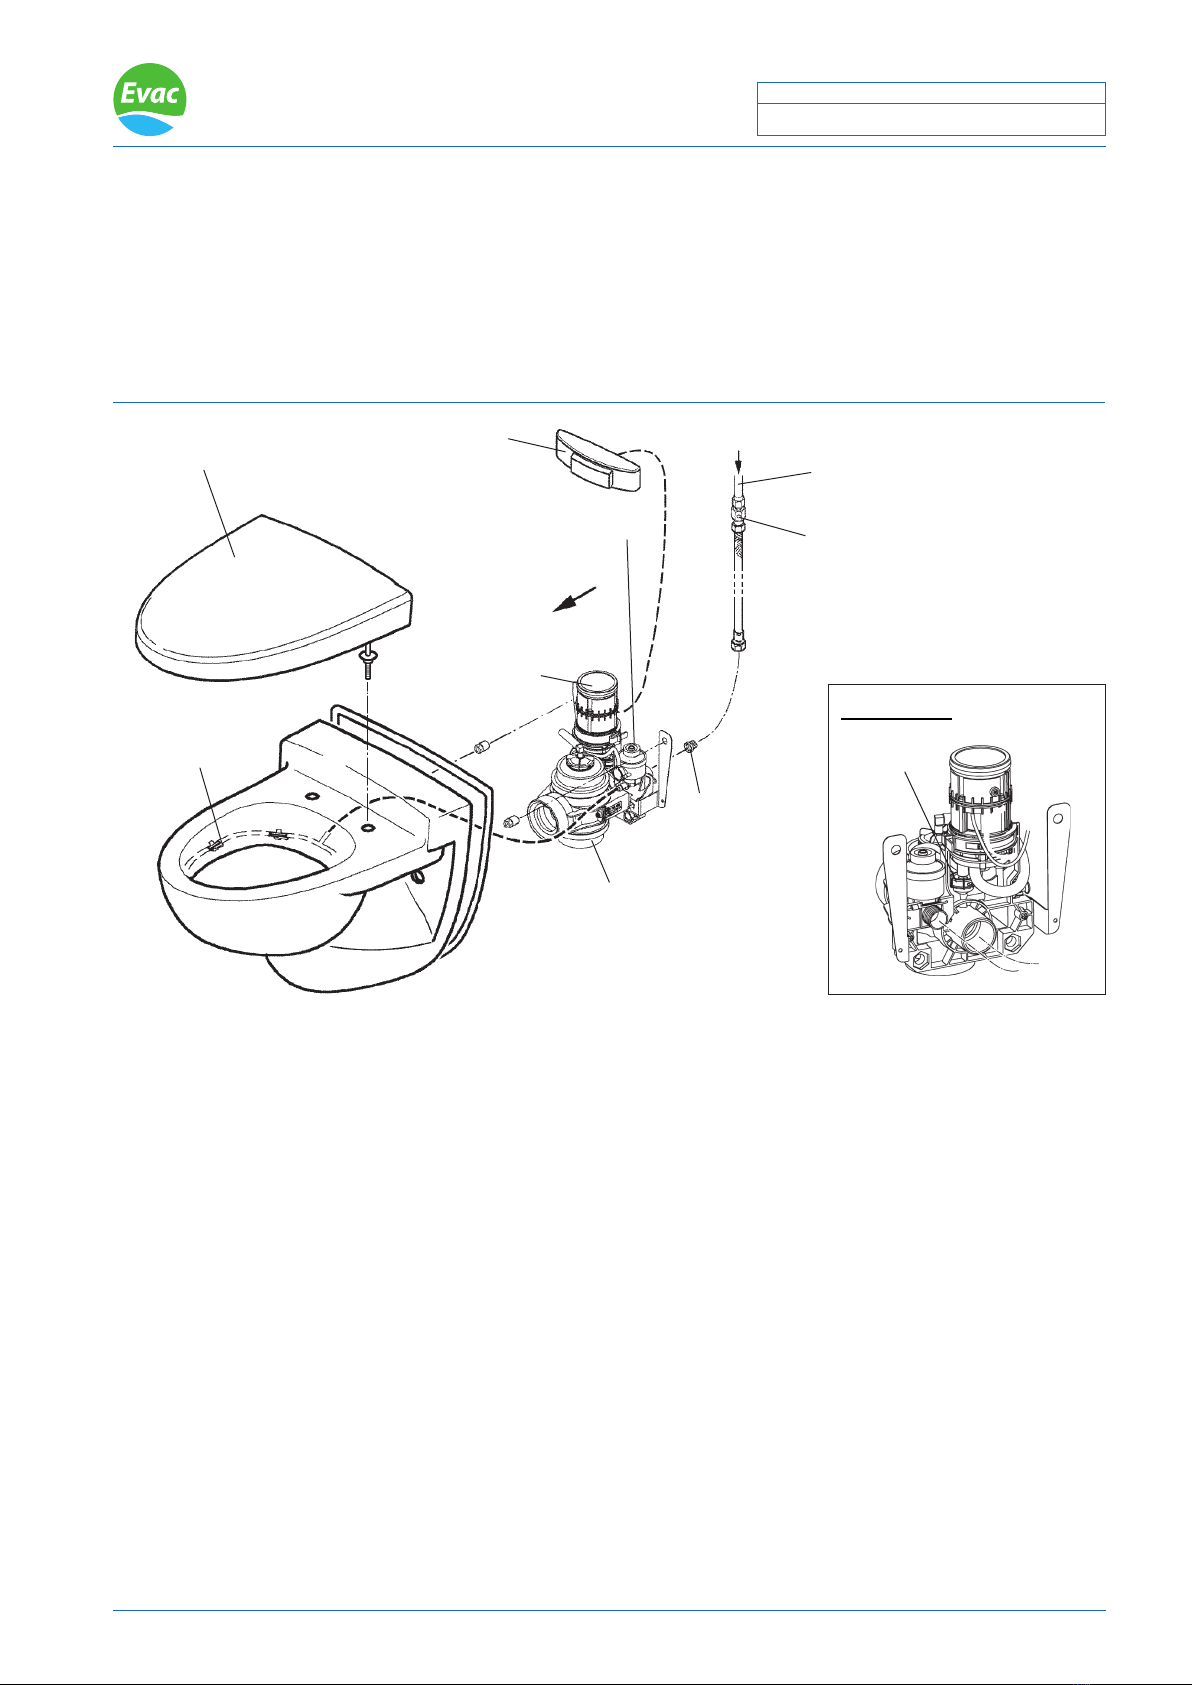
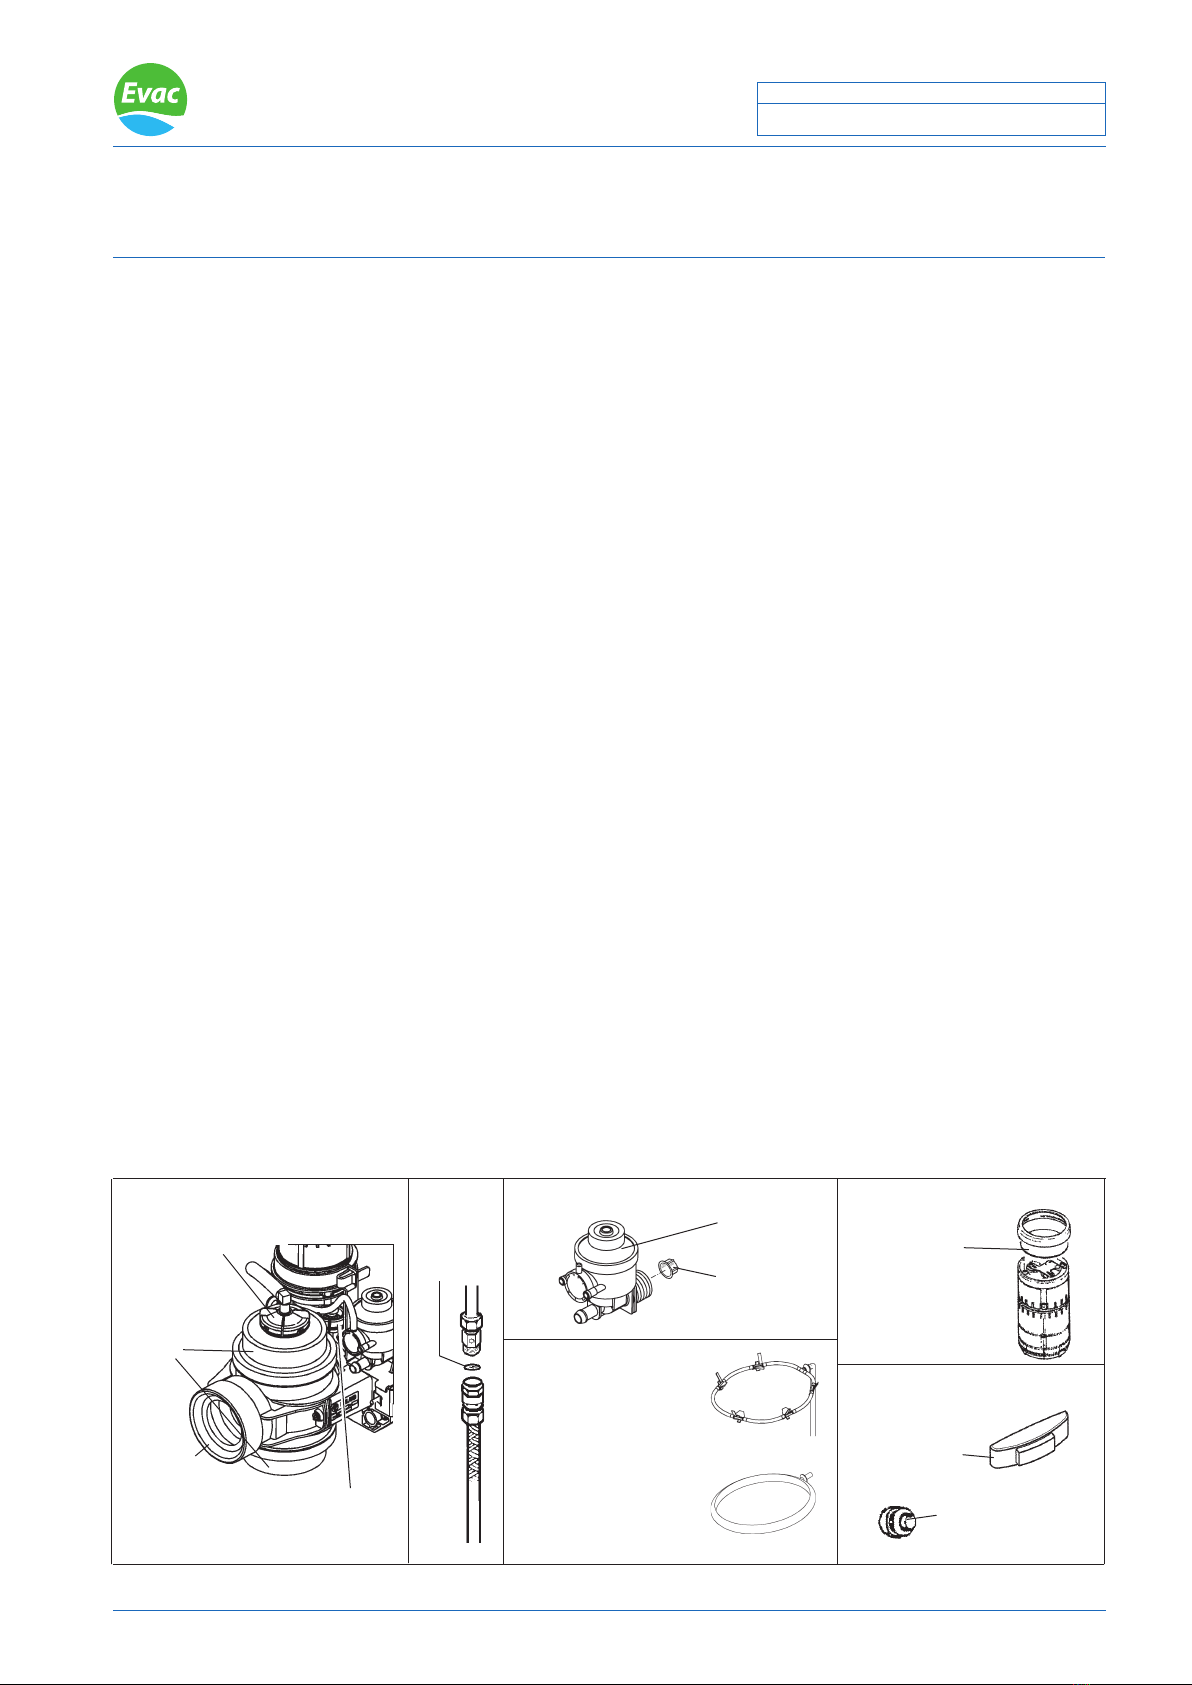
Removal of the discharge valve (wall models)
1. Remove the bowl.
2. Disconnect the rubber hose A from the water
valve or from the connecting nipple (only in
USPH models).
3. Loose (only in USPH models) water valve from
the component plate.
4. Disconnect the hose C with the elbow from the
relief valve.
5. Unscrew two screws**.
Hose A
Water valve
Hose B
Elbow
Connecting
nipple
Relief valve
Hose C
Screw**
Fig. 1 Fig. 2
1. Disconnect the water supply hose from the water
valve and the discharge pipe from the backplate.
2. Unscrew two screws* (see g.2).
3. Disconnect the rubber hose A from the water valve
or from the hose nipple (only in USPH models).
4. Loose (only in USPH models) water valve from the
component plate.
5. Disconnect the hose from the relief valve.
6. Unscrew two screws** (see g.1).
From the cabin side: From the service space side:
Screws*
Water
valve
Discharge pipe
Water supply
hose
Back plate
Removal of the discharge valve (oor models)
Water supply
Water hose
Pipes
Rubber bend
Screws***
Water valve
Connection nipples
Vacuum breaker
(USPH models)
Back plate
Vacuum breaker
(not in USPH models)
Discharge piping
1. Close the water supply valve.
2. Disconnect the water hose from the water valve.
3. Disconnect the pipes of the vacuum breaker from
the connection nipples
4. Disconnect the toilet from the rubber bend.
5. Remove the toilet if needed.
6. Remove the screws***.
7. Disconnect the rubber hose A from the water
valve or the connecting nipple (only in the USPH
models).
8. Remove the back plate.
Component
plate
Discharge valve
Table of contents
Popular Toilet manuals by other brands

Scarabeo
Scarabeo Moai 8606 manual

Swiss Madison
Swiss Madison Sublime II SM-2T257 installation instructions

Kohler
Kohler C3-129 Homeowner's guide

Styron
Styron NIAGARA FIX installation guide

Setma
Setma waterGenie Compact Installation and operating instructions

Kohler
Kohler STERLING 402040 Homeowner's guide


