Progetto EVO EV105 Manual

IMPORTANT!
Please read these instructions prior to installation
INSTALLATION INSTRUCTIONS
& USER MANUAL
EVO INTELLIGENT BIDET SHOWER SEAT SIDE INLET
EV105
www.plumbline.co.nz
Distributed by:

Please carefully check the bidet shower seay prior to installation to ensure it has not been damaged
during handling or transport, and check that all parts have been supplied.
We suggest you keep this manual after reading/installation for later reference.
Due to the continuous improvement of this products, details are subject to change without notice. The
illustrations in this manual are only schematic diagrams, please refer to the actual product for further
detail.
Please also read this manual carefully before using for the rst time so that you are familiar with the
functions, safety notes and user precuations.
General Installation Instructions
INSTALLATION INSTRUCTIONS
EVO INTELLIGENT BIDET SHOWER SEAT SIDE INLET | EV105
One (1) Year warranty from date of purchase.
Plumbline will undertake to replace free of charge any faulty product due to defects in materials or
manufacturer workmanship within the warranty period (Proof of purchase must be retained). Plumbline
will also supply parts and labour costs for the replacement or repair of any faulty product within One (1)
Year of installation date.
Plumbline (or their approved retailer) reserve the right to assess, repair, replace or service any warranty
claims as they see fit.
The above warranties are upheld providing the products have been used for normal domestic only and
exclude any defect or injury caused by or resulting from misuse, abuse or neglect, accidental damage,
improper installation or other alterations or modifications which affect the reliability or performance of
the item not attributed to faulty manufacture. The above warranties do not apply to the replacement of
products where damage is caused by normal wear and tear, where the hot water temperature exceeds
55˚C or where the warranty claim has not been notified to Plumbline (or their approved retailer) within
ninety (90) days of the problem first appearing.
The above warranties do not include consequential loss or damage due to the product.
Warranty Information
2

Safety Notes 4
User Precautions 4
Product Description 9
Components Description 10
Contents
Before use
Installation Steps 11
Method of Use 13
Installation and use
Cleaning & Maintenance 15
Faults & Troubleshooting 17
Product Dimensions 18
Product Technical Specication 19
Other
3
Please observe the following when replacing the
power cord:
If the power cord is damaged please replace it
immediately.
Only an authorised technician or electrician can
replace the power cord.
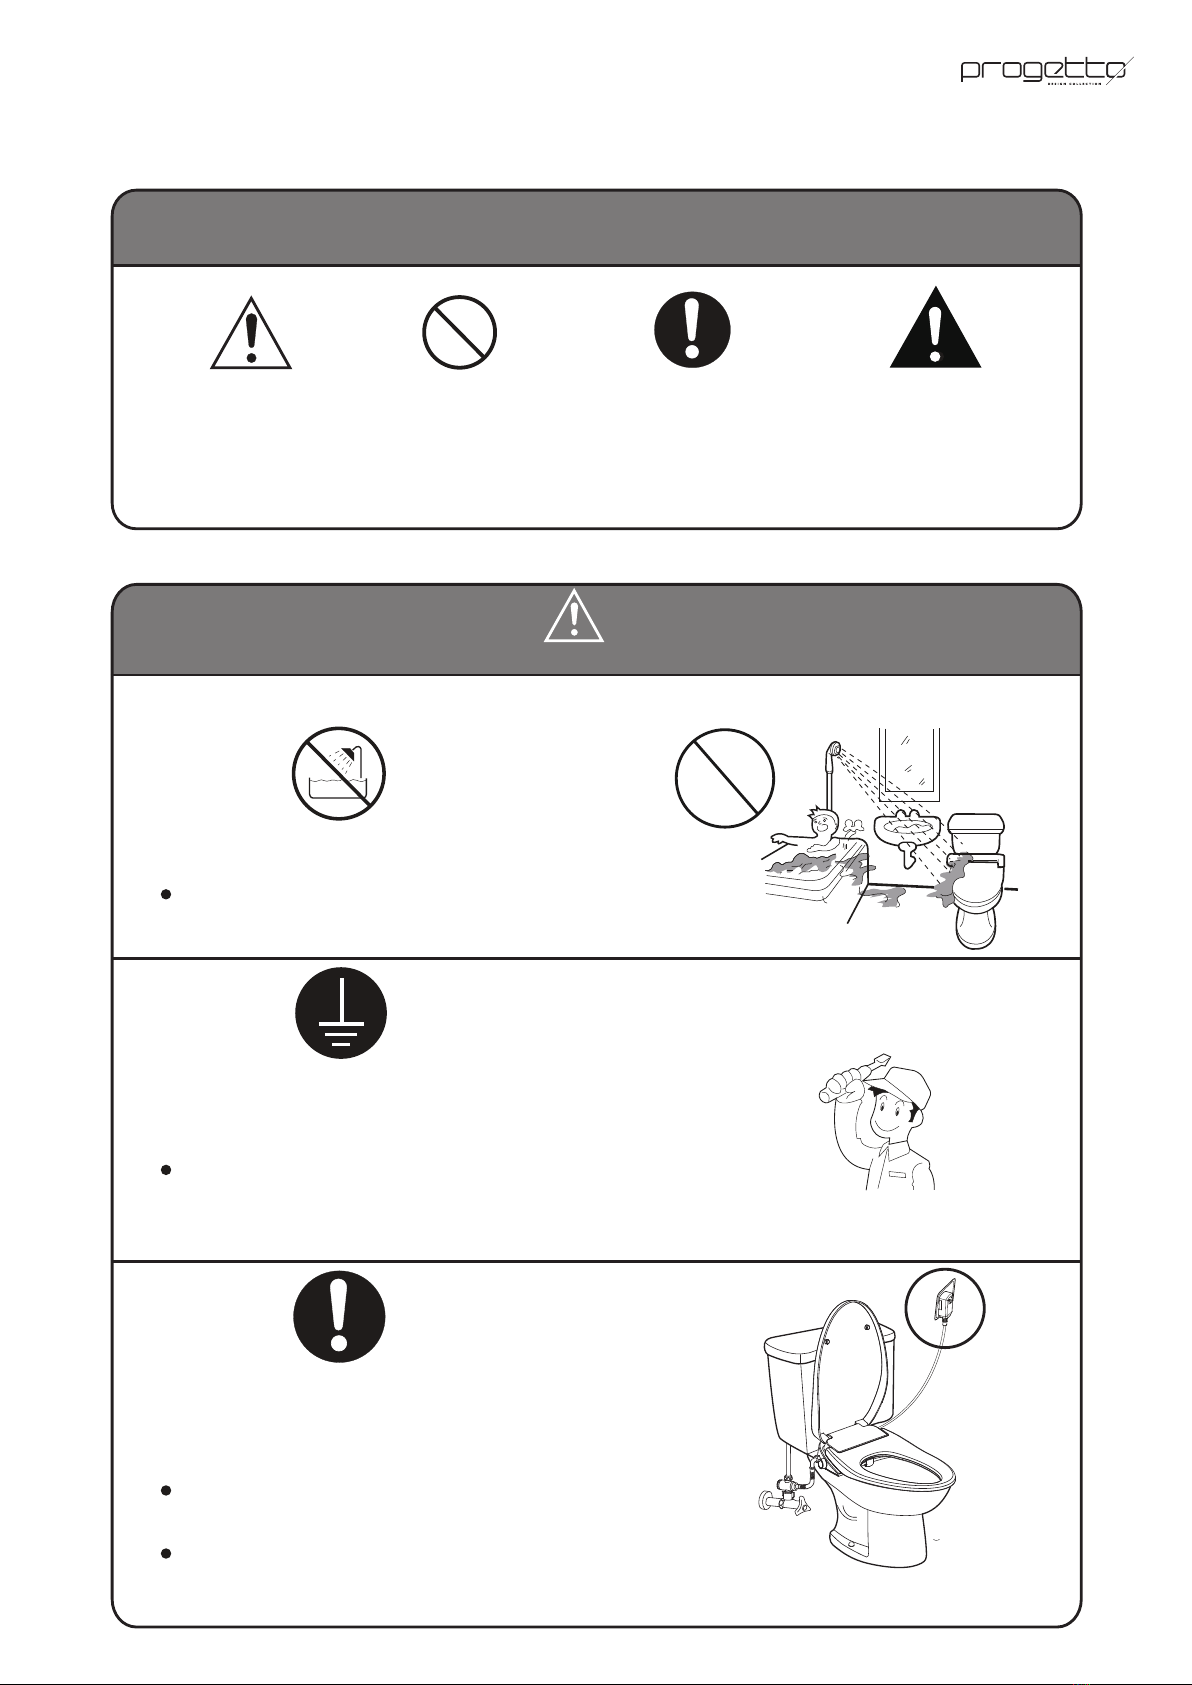
Read the safety instructions carefully before use so as to use the bidet seat correctly. Note
the following warnings relevant to safety
ProhibitedWarning Compulsory
Compulsory
Note
Failure to observe the above-mentioned warning signs may result in
injury or life-threatening risk.
Warning
Avoid splashing water on the bidet seat
Splashing may result in fire or electric shock.
Grounding
Check if the power supply is grounded.
Power supply must be grounded, or otherwise
product failure or electrical surge may occur.
Safety Notes
4

Only use a suitable power outlet socket.
Excessive loads on multi-outlet
powerboards is strictly prohibited.
May result in overheating or fire.
Do not pull on the power plug/ power
cord.
May result in fire or electric shock.
Do not touch the power plug
with wet hands.
Ensure that no water, cleaning
chemical or urine comes in
contact with the power plug.
May result in fire or
electric shock.
Do not use if socket is loose.
May result in fire or electricshock.
May result in skin infections or
product damage.
Do not connect to a
substandard water pipe
May result in electric shock.
industrial
water
Wells
Safety Notes
5

Do not place heavy objects on the
toilet seat or the toilet seat cover
May result product damage.
Do not invert product.
May result in product damage.
May result in water leakage.
Do not bend or twist the
water supply hose.
Do not use cigarettesor other
combustible items near the bidet seat.
May result in fire.
May result in product damage.
Please clean with adiluted kitchen cleaning agent.
Do not use the following items:
Benzene, paint thinner, detergent powder, nylon brush, etc.
Do not disassemble, repair and modify
without authorization.
May result in fire or electric shock.
Unplug the power supply when
cleaning the bidet seat.
May result in electric shock.
Safety Notes
6

Ensure room temperature is above 0°C.
If temperature is below 0°C
water supply can freeze.
Do not place this product in direct sunlight.
May cause product discoloration
and failure of seat heating function.
Do not use substandard power supply.
May cause bidet seat failure.
Do not shower urine on the bidet
body and nozzle.
When not in use for a long time, drain the
stored water and pull out the power plug.
May result in water pollution and skin
infections.
Do not lean against the toilet
seat lid when in use
May cause damage to the lid.
Pull out the power plug when
lightning strikes.
May result in product failure or
damage.
May result in blockage.
User Precautions
7

Disassembly button
Functional setting key
Toilet cover
Toilet seat
Nozzle
Control Knob
Water supply hose
joint
Drain plug
Power plug
Control Knob
STOP
Bidet Hip washing
Water temperature
adjustment key
Water temperature
adjustment indicator
Seat temperature
adjustment key
Seat temperature
adjustment indicator
Functional setting key
Product Description
8

1.Cover plate
4.T-junction 5. Water inlet hose
2. Installation template
6. Installation
Instructions
Filter
3.Fixing parts
Expansion bolt (2)
(up lock)
Screw (2)
Adjustment sheet (2) Nut (2)
(down lock)
Fixing plate (1)
Installation
Instructions
Note: There are two installation methods for this product (see 3A and 3B on the following
page). Please choose one of the methods according to the actual situation .
Component Description
9
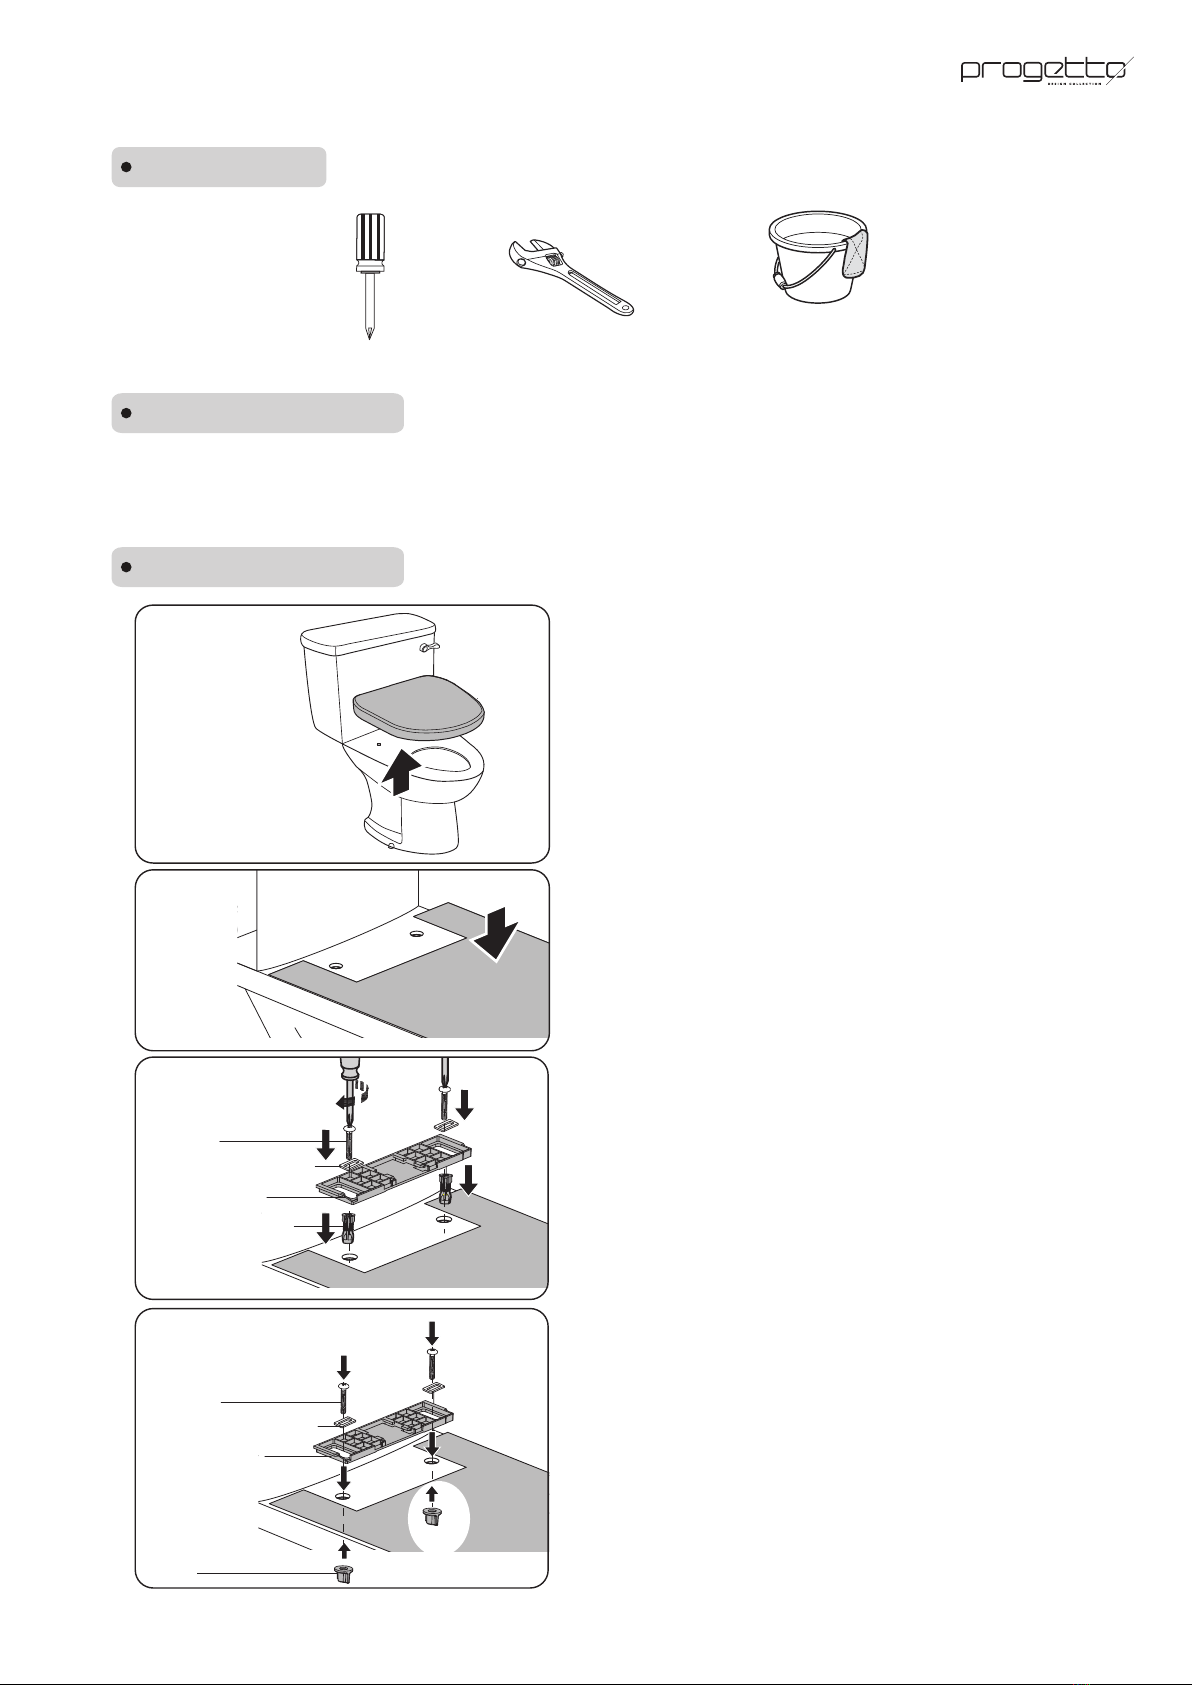
Installation tools
Installation precautions
1. Recommended Water pressure range: 0.1-0.75MPa.
2. Water inlet valves must be located close to the location where this
product is installed and disassembled.
1.Remove the old toilet seat plate.
Note: You can choose installation method 3A or
3B depending on the actual situation.
2.Place the installation template on top
of the toilet as shown. Align it with the
rim of toilet.
3A. Install fixing plate (up locking)
(2)Place the stainless steel adjusting sheets
in the mounting groove, align the expansion
boltsand tighten the screws.
(1)
Insert the expansion boltsinto the holes on
the toilet, and place the fixing plate in the
notch part of installation template.
Screw
Fixing plate
Adjustment sheet
3B. Install fixing plate (down locking)
(1)Place the fixing plate in the notch part of
mounting template.
(2)Place the stainless steel adjusting sheet
in the mounting groove, align the holes on the
toilet and place in the screw. Screw on the
plastic nutsfrom the underside of the toilet.
Cross screwdriver Adjustable wrench Bucket and rag
Expansion bolt
Screw
Fixing plate
Adjustment sheet
Nut
Installation Procedure
Installation Steps
10

1. It is strictly prohibited to move the product from the toilet cover, otherwise easy
to cause mechanical failure.
2. It is strictly prohibited to connect hot water above 40℃ and cold water that may
lead to icing.
Prohibited
5.Slightly push the bidet seat into the fixing
plate in the specified direction until a "click"
sound is heard, indicating that the bidet seat
has been installed in place.
CLICK
4.The installation template is designed for
one- time use. Please discard it after the
installation is completed.
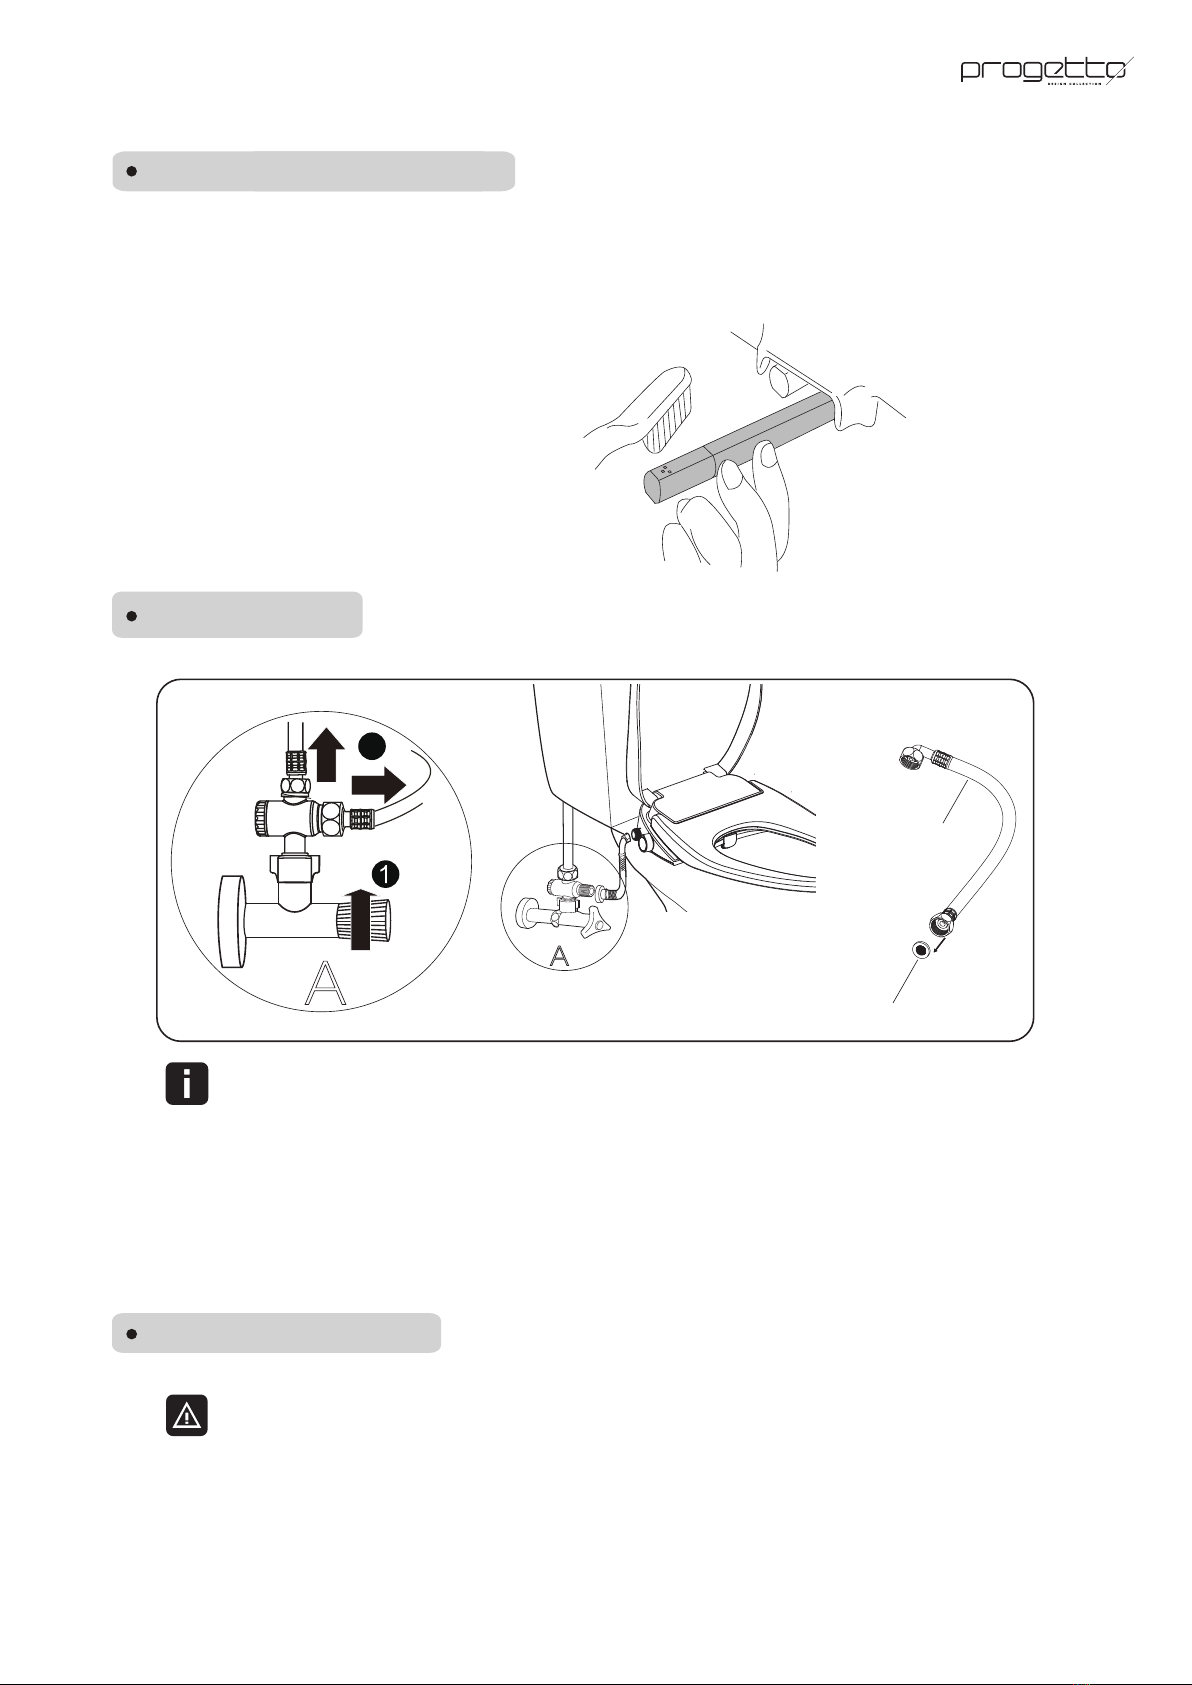
Connect water pipes
3B.Turn on the water supply and check for
water leakage.
Note:There are two methods of pipe connecting
1A.Turn off the water supply and remove the
water supply hose connected to the water
tank. Connect the three-way T-junction to
the angle valve,ensuring the rubber
sealing ring is properly seated.
2A.Install the filter and rubber sealing ring
on the water inlet hose and connect as shown.
3A.Turn on the water supply and check for
water leakage.
Rubber
gasket
Filter
1B.Turn off the water supply.
2B.Connect the three-way T-junction to the
bottom of the water inlet valve on the
toilet. Install the filter and rubber sealing
ring on the water inlet hose and connect
as shown.
E
AD
B
C
Gasket
Filter
Installation Steps
11
1.Make sure the plug is dry before power supply is connected.
2.After the power supply is connected, the bidet seat will perform a self-check, and
the “beep” indicates that the self-check is completed and the toilet can be used
normally. At this time, the control knob lamp and the night light are always on.
3.Water temperature adjustment is enabled, and by default at low gear position: about 35℃.
4. Seat temperature regulation is enabled, and by default at low gear position: about 33℃.
5. After the power supply is connected, the control knob light and night light are constantly on,
and the power usage is about 1 kWh/ month without enabling seat temperature heating.
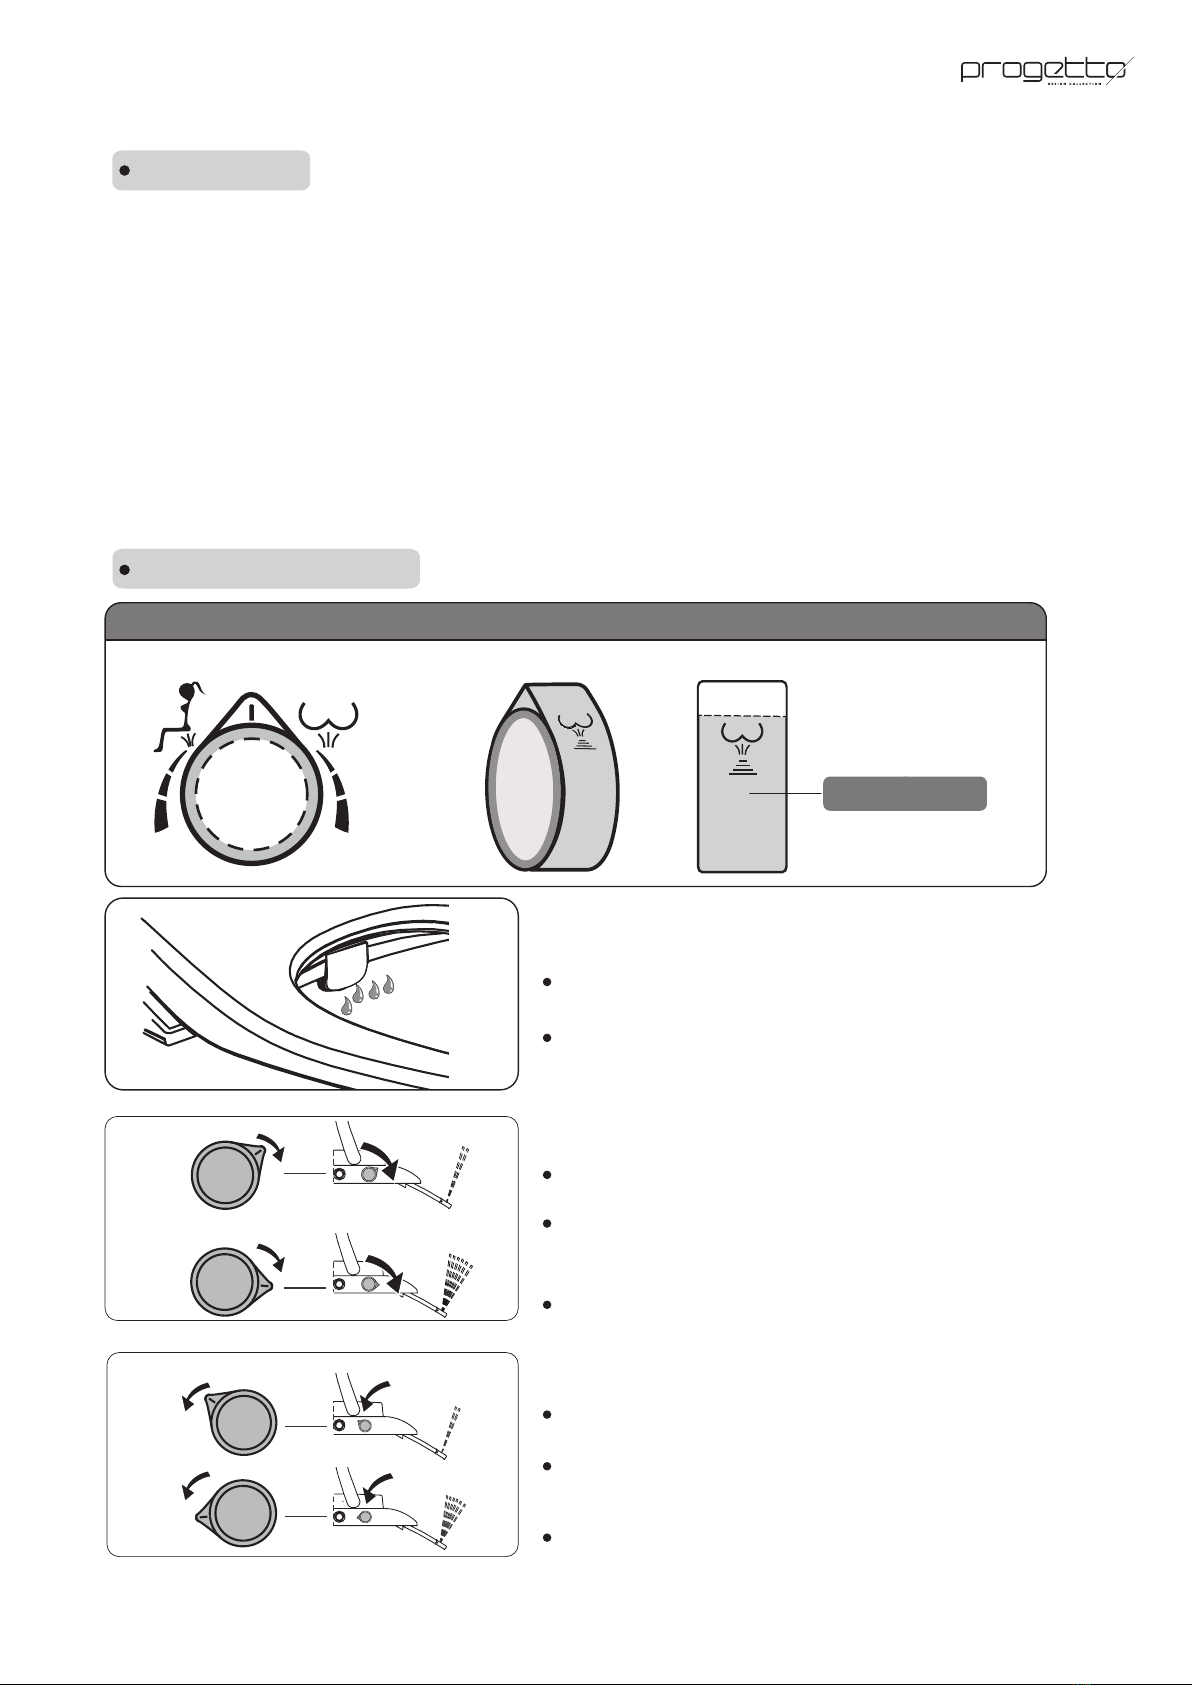
Control Knob Functions
Low
flow
High
flow
Low
flow
High
flow
Note: When the hip/ bidet cleaning function is used, please enable the maximum flow. If the
washing force is too large, adjust the amount of water through the control knob, hence reducing
the washing force.
Lower body cleaning function (bidet washing)
The control knob is rotated by the vertical gear in the
specified direction (anticlockwise).
After cold water is discharged at the front end for 5
seconds, the lower body cleaning nozzle extends and
water is sprayed for cleaning.
The flow varies with the rotation of the control knob.
After being seated, the nozzle will automatically
close after 5 seconds of self-cleaning.
After rinsing is completed, the nozzle is
automatically closed after 2 seconds of self-cleaning.
Self-cleaning function
Standby mode
Hip cleaning function (hip wash)
The control knob is rotated by the vertical gear in the
specified direction (clockwise).
After cold water is discharged at the front end for 5
seconds, the hip cleaning nozzle extends and water is
sprayed for cleaning.
The flow varies with the rotation of the control knob.
Breathing light
Breathing light will
flash when the
product is working
Bidet Hip washing
STOP
Control Knob
Method of Use - Control Knob Instructions
12

Function settingsinstructions
1.Low temperature scalding protection function: 5min after being seated, the product
will be under low temperature scalding protection mode with a temperature of about 29℃.
2.Alarm function: when you are not seated and the control knob is not closed, the product will
sound an alarm.
3.Water temperature protection function
(1)When the water temperature exceeds 43℃during use, the flushing water will be turned off
and the product automatically switch to self-cleaning mode.
(2)After the water temperature returns to normal, the flushing can be continued.
Protection functions:
Note: After the rinse is over, turn the knob to the neutral stop position to prevent splashing.
Normal use during power failure
The water temperature and seat temperature cannot be adjusted when the power supply is
cut off, but flushing with normal temperature can be used normally.
OFF
Repeatedly pressing “ ” will switch over water
temperature in the sequence indicated in
the left diagram.
When you turn off the water temperature you
will hear a two second "beep"; When you switch
over there will be a one second "beep".
Water temperature low gear: about 35℃.
Water temperature high gear: about 38℃.
Repeatedly pressing “ ” will switch over water
temperature in the sequence indicated in
the left diagram.
When you turn off the water temperature you will
hear a two second "beep"; When you switchover
there will be a one second "beep".
Seat temperature low gear: about 33℃.
Seat temperature high gear: about 37℃.
OFF
LowHigh
LowHigh
Seat temperature
adjustment indicator
Water temperature
adjustment key
Seat temperature
adjustment key
Prompt
Light ON HighlightedLight OFF
Function settings key
Water temperature
adjustment indicator
Method of Use - Function Settings
13
Manual cleaning of spray nozzle
- Gently pull out the nozzle and apply a
neutral detergent with a soft cloth, sponge
or small brush.
- Gently supporting the nozzle, wipe the
spray tube and nozzle.
Cleaning the filter
Braided hose
Filter
- Make sure that the water supply is turned off and the power is off before you clean the filter.
- Clean the filter when the water flow is less than normal hours.
-Remove the filter from the water inlet hose to clean it.
- Re-install the filter in reverse order after cleaning.
Tips:
- Wipe the product surface with a sponge or soft cloth dampened with lukewarm water or a
neutral detergent.
- Lift the upper cover and the seat ring when cleaning the toilet bowl.
- Do not put lid/seat down until the toilet bowl is completely cleaned, or the bidet seat
surface may be damaged by the cleaning chemicals.
Note: Please turn off the power supply before cleaning.
Product surface cleaning
2
AA
Cleaning & Maintenance
14

Product maintenance in winter
Surge protector
If left unused for a long period of time
- Press the surge protector Reset button:
-indicator light is on, and the power supply is on.
- Press the surge protector "Test" key button:
-indicator light is off, and the power supply is disconnected.
- When the operation is completed and the indication information doesn't show as
above, stop using the bidet seat and contact an authorised technician or electrician to
replace the surge protector.
-Always ensure that the surge protector indicator light is on when the bidet seat is being
used.
Schematic diagram of surge protector:
Keep the water temperature above 0℃ to prevent the water in the toilet and the water
pipe from being frozen.
Stop using the product and close the water inlet valve when the ambient temperature is
below 0℃.
If the bidet seat is going to be unused for a long period of time, drain the water in the
product and cut off the power supply:
- Pull out the power plug or press the "Test" key of surge protector.
- Close the water inlet valve.
- Remove the water inlet hose and empty the water in the water inlet hose.
- Close the upper lid, press and hold the removal button by hand, and remove the
electronic seat cover from the toilet.
- Place the unit in a cool and dry place.
Check the surge protector regularly, at least once a month
Inspection method:
A078238
S
Reset
10A 220V ~
Test before use
Indicator Test
Leakage initiating current
Cleaning & Maintenance
15

Night light analysis
Phenomenon Possible cause
Night light is not ON.
Knob light is not ON
Power cord of night light shows poor contact
Power cord of knob light shows poor contact
Night light is damaged
Common fault diagnosis
1.If power supply is under normal state.
2.If surge protector trips
1.If water supply is under normal state.
2.If water inlet valve is closed.
If the following occurs, cut off the power supply immediately.
The buzzer continues to beep The surge protector trips frequently
Note: When water leakage occurs, close the water inlet valve and
cut off the power supply.
Seat heating failure analysis
Cut off the power supply, close the
water inlet valve and contact an
authorised technician.
Cut off the power supply, close the
water inlet valve and contact an
authorised technician.
Reset Control Knob to OFF
Phenomenon Possible cause Solution
Base gap leakage
Flushing module
leakage
Pressure maintaining valve is
damaged
Control Knob is not
reset to OFF position
Control valve is failed
Flushing failure analysis
Water leakage analysis
Phenomenon Possible cause Solution
Seat temperature is
not sufficient
Seat temperature is set at low
gear Adjust seat temperature to higher gear.
Seat temperature is
too high
Seat temperature is set at high
gear Adjust seat temperature to lower gear.
Temperature is too
low when making
contact with the seat
Seat heating function not enabled
Cut off power supply and contact an
authorised technician.
Enable seat heating function in advance.
No seat heating
function
Seat heating coil in poor contact.
If you think the bidet seat has a fault, try some of the following process methods. If the product is
still not working properly, contact an authorised technician or electrician .
Check power supply Check water supply
Phenomenon Possible cause Solution
Spray tube extends too
slowly Cool water should be released
from front end before flushing.
Insufficient water amount Control Knob is not
completely turned on.
Insufficient water
temperature Water temperature is set at low
gear.
Water temperature too low
Water temperature is set at
lowest gear.
Automatic protection for
over-high temperature
Water flowsout
when seated Self-cleaning function is enabled.
It is normal, and provides normal flushing
about 5 seconds later.
Increase Control Knob regulating angle.
Adjust water temperature to higher gear.
Adjust water temperature to higher gear.
Restart water temperature adjustment.
It is normal, and water flow automatically
stopsabout 5 seconds later.
Water is not heated
Breathing light not flashing The flowmeter is abnormal Cut off power supply and contact an
authorised technician.
Faults & Troubleshooting
16
Buzzer continuously
beeps
Control Knob switch is not reset to
OFF state when away from seat
Reset Control Knob to OFF state.
Surge protector
sometimes trips.
Electricity leakage beyond
normal value
Cut off power supply, stop using product, contact
and authorised technician.
Alarm function
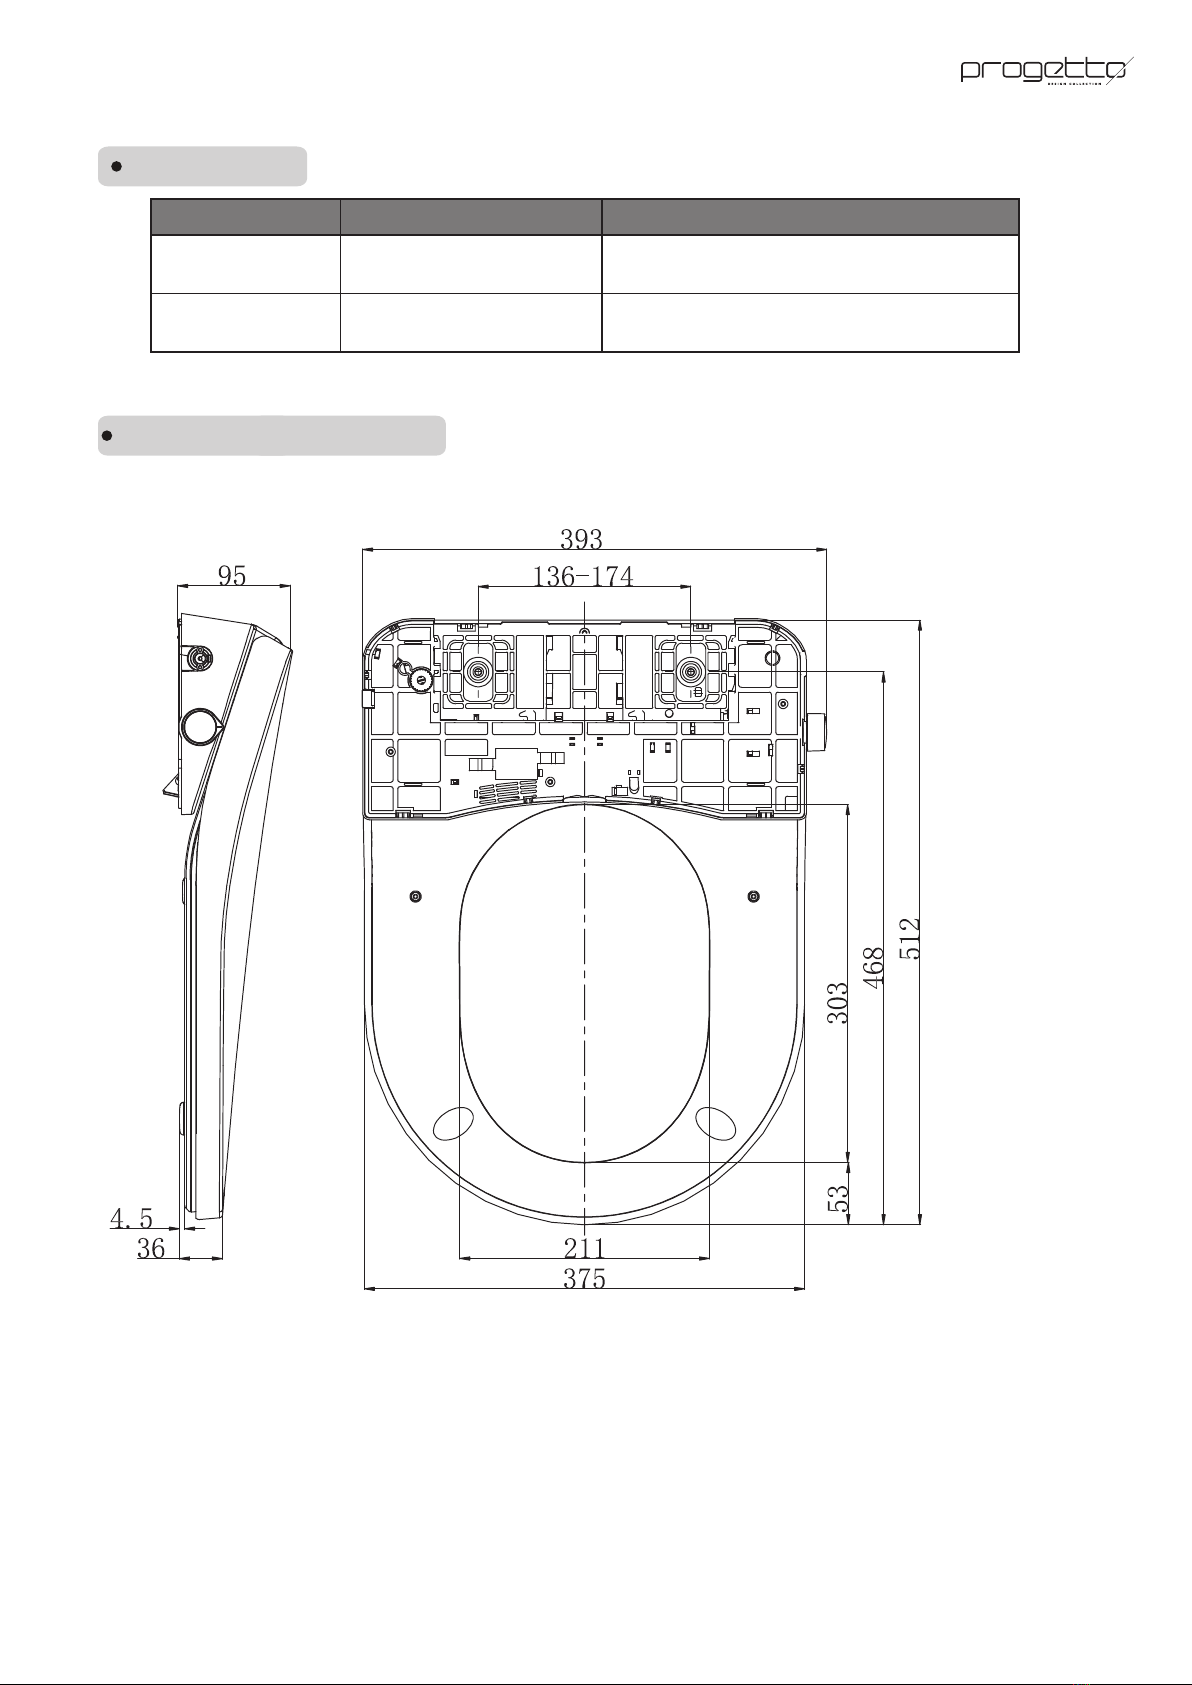
Product dimension drawing
Unit: mm
Phenomenon Possible cause Solution
Faults & Troubleshooting / Product Dimensions
17

EV105 Product Technical Specification
Items Description
FE105-12
220V~, 50Hz
960W
(Inlet water temperature 15±5℃, flow at 600ml/min)
1550W
≥1.1m
0.1 ~ 0.75MPa
5 ~ 35℃
0 ~ 40℃
545×410×145mm
Model
Rated voltage
Rated power
Max. transient power
Length of power line
Water supply pressure
Water supply temperature
Ambient temperature
Net weight
Package dimensions
Water proof grade IPX4
Cleaning
device Instant heating
Anti-siphon valve
Water amount regulation
Water temperature regulation
Heating method
Anti-backflow device
Safety device Temperature fuse and thermal controller
Seat
heating
Surface temperature
Heater power 50W
Safety device Temperature fuse and thermal controller
Others
Cover plate slowly descends
Antibacterial material Nozzle and seat
Low temperature scalding
protection
Abnormality prompt
Control operation One-key knob
Water temperature and seat temperature settingAuxiliary key
Seat sense Yes
Alarm sound
Yes
Yes
Gear 2: about 35/38℃
Stepless regulation
About 33/37℃
About 3.5kg
Product Technical Specication
18
Table of contents
Other Progetto Toilet manuals


