manuals.online logo
Brands
  1. Home
  2. •
  3. Brands
  4. •
  5. Everbilt
  6. •
  7. Water Pump
  8. •
  9. Everbilt UTA02510 User manual

Everbilt UTA02510 User manual

1. Attaching the suction hose to strainer
Attach the clear suction hose to the suction strainer by pushing the male threaded
end into the rubber coupler on the suction strainer.
Then, place the strainer in at least 1 in. of water at the lowest point to be pumped.
NOTE: Make sure the connection is airtight. An air leak can cause the pump to run dry.
1. Colocación de la manguera de succión para Colador
Conecte la manguera de succión al empujar el extremo roscado macho en el colador
de succión de goma.
A continuación, coloque el colador al menos 25.4 mm en el punto más bajo de agua
que se debe bombear
NOTE:Verique que la conexión esté cerrada herméticamente.Una fuga de aire puede
hacer que la bomba funcione en seco.
2. Attaching hoses
Open the bottom cover.
Thread the other end of the suction hose to the inlet of the pump.
Thread a 5/8 in. garden hose (sold separately, 50 ft. max. length) onto the discharge outlet of the pump.
NOTE: Always ensure the washer in the hose bib is not damaged. An airtight seal is necessary for this pump to operate.
NOTE: Make sure the end of the outlet hose is not under water. If the outlet is under water, the pump may not work.
NOTE: Do not coil or kink the hose.
2. Colocación de mangueras
Abra la tapa inferior.
Enrosque el otro extremo de la manguera de succión a la entrada de succión de la bomba.
Enrosque una manguera de jardín de 5/8” o más grande (se vende por separado, longitud máx. de 15.24 m) en la salida de
descarga de la bomba.
NOTA: Asegúrese siempre de que la arandela del grifo de manguera no esté dañada.Es necesario un sello hermético para que esta
bomba funcione.
NOTA: Asegúrese de que el extremomanguera de salida no esté bajo el agua.Si la salida está bajo agua, puede que la bomba no
funcione.
NOTA: No enrolle ni doble la manguera.
3. Priming water
Unscrew the priming plug.
Fill water through priming hole as the picture shows until to overow.
Tighten the priming plug.
3. Agua de cebado
Desatornille el tapón de cebado.
Cargue agua a través del oricio de cebado según se muestra en la imagen
hasta que desborde.
Ajuste el tapón de cebado.
Quick Start Guide/Guía de Referencia Rápida
2-in-1 Utility Pump / Bomba De Uso General 2 En 1
4. Operating
To operate, plug the pump into a GFCI outlet.
When the water level has been reduced to approximately 1/8 in. you MUST
UNPLUG THE PUMP. DO NOT RUN DRY.
NOTE: Make sure the suction hose and suction strainer are in the water before
plugging in the pump.
NOTE: If water is not pumped in 30 seconds, unplug the power cord and check
the connection on the two ends of the inlet hose to make sure there are no air
leaks. Then, add water into the outlet again and repeat the process.
4. Funcionamiento
Para hacerla funcionar, conecte la bomba a un tomacorriente GFCI.
Cuando el nivel de agua se ha reducido a aproximadamente 3.2 mm, DEBE
DESCONECTAR LA BOMBA.NO LA HAGA FUNCIONAR EN SECO.
NOTA: Asegúrese de que el extremomanguera de salida no esté bajo el agua.Si
la salida está bajo agua, puede que la bomba no funcione.
NOTA: Si no se bombea el agua en 30segundos, desconecte el cable eléctrico y
compruebe la conexión de los dos extremos de la manguera de entrada para
asegurarse de que no haya fugas de aire.A continuación, añada agua a la
entrada de nuevo y repita el proceso.
Non Submersible Transfer Pump Function
Función de bomba de transferencia no sumergible
Read your manual for installation, operation, and safety information.
This guide neither supplements nor replaces the Owner’s Manual.
Es importante leer el manual para obtener información sobre la instalación, la operación
y la seguridad.Esta guía no complementa ni reemplaza al Manual del Propietario.
SKU# 1002 921 354 Model/Modelo UTA02510
1 in.(25.4 mm)
NO KINKS!
NO COILS!
No existan dobleces!
NO BOBINAS!
Filtro de
aspiración
Suction hose
La manguera
de succión
Priming plug
Tapón de cebado Outlet
Salida
Suction strainer
Filtro de
aspiración
Suction hose
La manguera
de succión
Priming plug
Tapón de cebado Outlet
Salida
Suction strainer
1-1/2 in. (38.1 mm) 1/2 in. (12.7mm)
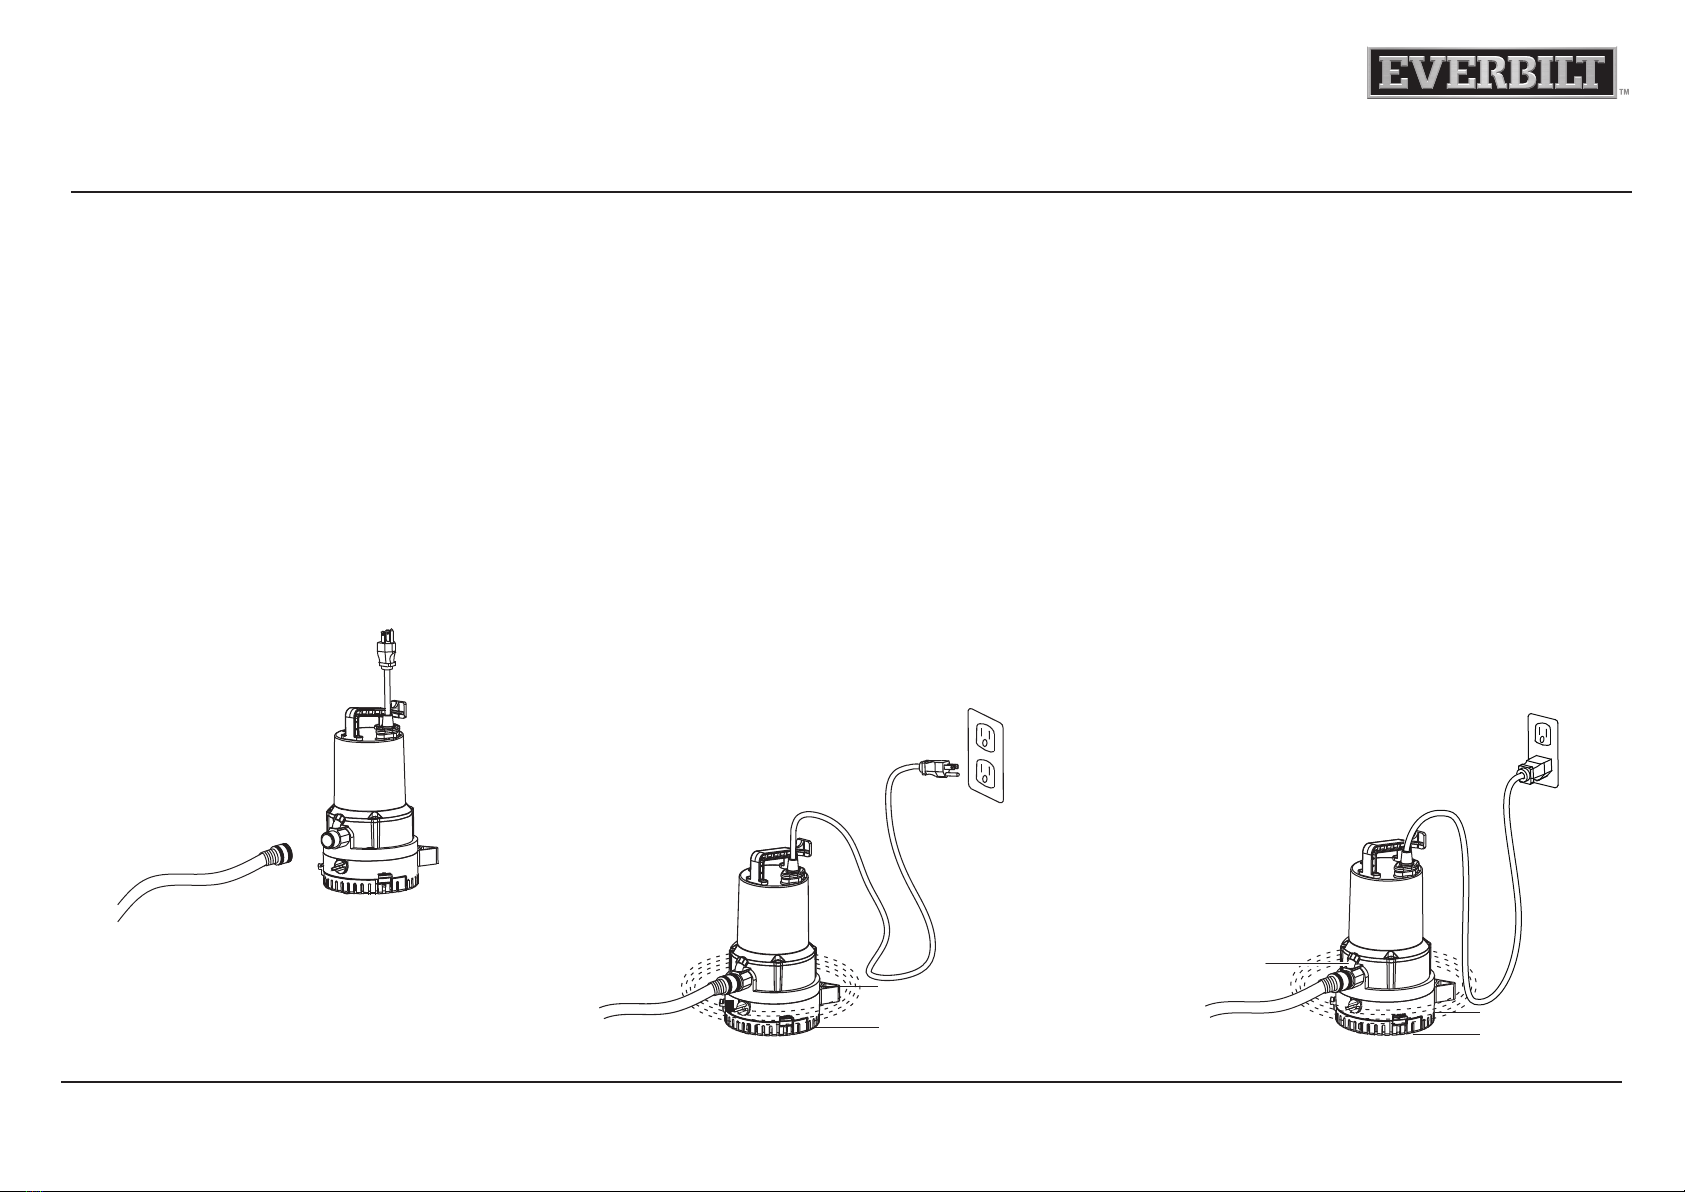
2. Plugging in the pump
Place the pump on a solid base in ooded area or any place that you
would like to remove water. Plug the pump into a 115 volt GFCI power
outlet
WARNING: Do not allow the plug to fall in water and do not stand in water
while the pump is plugged in.
NOTE: Place upright on a solid base.
NOTE:The pump must be standing in at least 1-1/2 in. (38.1 mm) of
water before you start it. The shaft seal is water lubricated and may be
damaged if the pump runs dry.
2. Como conectar la bomba
Coloque la bomba en una supercie sólida en el área inundada o en
cualquier lugar que necesite remover agua. Conecte la bomba a una
toma de corriente de 115 volteos con un circuito de falla a tierra GFCI
(por sus siglas en inglés).
ADVERTENCIA: No use la bomba o el motor de la bomba con las manos
mojadas, o cuando esté de pie sobre la supercie mojada o húmeda, o
en agua.
NOTA: Coloque en posición vertical sobre una base sólida.
NOTA: La bomba debe colocarse a al menos 38.1 mm de sumersión en
agua antes de ser prendida. El sello del eje es lubricado por agua y se
pueden dañar si la bomba funciona en seco.
1. Connecting garden hose
Attach a garden hose with a 3/4 in. garden hose thread (not included) to
the pump outlet.
NOTE: Be sure a 3/4 in. garden hose thread connector has a rubber
gasket to minimize water leaks.
NOTE: The larger the inside diameter and the shorter the length of hose,
the less pressure that is lost (or the larger the ow rate).
1. Conexión de manguera de jardín
Conecte una manguera de jardín con rosquilla para manguera de jardín
de 3/4” (no incluida) al adaptador.
NOTA: Asegúrese de que la punta de la manguera de jardín de 3/4”
tenga una junta para minimizar goteras.
NOTA: Cuanto mayor sea el diámetro interior y más corta será la
longitud de la manguera, la menor presión que se pierde (o cuanto
mayor sea la velocidad de ujo).
3. Operating the pump
Allow the pump to run and monitor its progress.Unplug the pump when it
has removed water down to approximately 1/2 in. (12.7 mm). Remove the
pump and hose from the location when nished pumping. The hose still has
water that can drain back through the pump. Remove remaining water with
a squeegee, mop, sponge, towel, wet/dry vac, etc.
CAUTION: Do not run the pump dry. Operating the pump without water will
cause damage to the seals and will cause the pump to fail, thereby voiding
the pump’s warranty.
CAUTION: This hole is for anti-airlock purposes only. Leakage of air or water
is normal and necessary. DO NOT REMOVE OR PLUG THIS HOLE!
3. Como operar la bomba
Deje correr la bomba y monitoree su progreso.Desconecte la
bombacuandohayaremovido el agua hasta aproximadamente 12.7mm.
Remueva la bomba y la manguera del sitio asignado cuando termine de
bombear. Si la manguera retiene agua, deje drenarla de regreso a través de
la bomba. Remueva el agua sobrante con una escoba, trapeador, esponja,
toalla, aspiradora en seco/mojado, etc.
PRECAUCIÓN: No haga funcionar la bomba en seco. Funcionamiento de la
bomba sin agua pueden causar daños a los sellos y hacer que la bomba no,
anulando así la garantía de la bomba.
PRECAUCIÓN: Este oricio sirve solamente propósitos de anti-esclusa. La
fuga de aire o agua es NORMAL. ¡NO OBSTRUYA ESTE ORIFICIO!
Quick Start Guide/Guía de Referencia Rápida
SKU# 1002 921 354 Model/Modelo UTA02510
2-in-1 Utility Pump / Bomba De Uso General 2 En 1
Submersible Utility Pump Function
Función de bomba de utilidad sumergible
Read your manual for installation, operation, and safety information.
This guide neither supplements nor replaces the Owner’s Manual.
Es importante leer el manual para obtener información sobre la instalación, la operación
y la seguridad.Esta guía no complementa ni reemplaza al Manual del Propietario.
For Professional Technical Support call 1-844-241-5521
Para comunicarse a Soporte técnico profesional llame al 1-844-241-5521
Rev. 01/08/19
Anti-airlock hole
agujero anti-esclusa

This manual suits for next models

1

Other Everbilt Water Pump manuals

Everbilt SBF300 User manual

Everbilt

Everbilt SBF300 User manual

Everbilt EFLS10-HD User manual

Everbilt

Everbilt EFLS10-HD User manual

Everbilt THD1100 User manual

Everbilt

Everbilt THD1100 User manual

Everbilt SSB300 User manual

Everbilt

Everbilt SSB300 User manual

Everbilt UT03301 User manual

Everbilt

Everbilt UT03301 User manual

Everbilt UT03301 User manual

Everbilt

Everbilt UT03301 User manual

Everbilt UT08804 User manual

Everbilt

Everbilt UT08804 User manual

Everbilt PUP63-HD User manual

Everbilt

Everbilt PUP63-HD User manual

Everbilt HDS30 User manual

Everbilt

Everbilt HDS30 User manual

Everbilt THD1095 User manual

Everbilt

Everbilt THD1095 User manual

Everbilt EFSUB5-122HD User manual

Everbilt

Everbilt EFSUB5-122HD User manual

Everbilt SBA025BC User manual

Everbilt

Everbilt SBA025BC User manual

Everbilt ZE00802A User manual

Everbilt

Everbilt ZE00802A User manual

Everbilt WG20 User manual

Everbilt

Everbilt WG20 User manual

Everbilt EBAU33 User manual

Everbilt

Everbilt EBAU33 User manual

Everbilt ZE00804 User manual

Everbilt

Everbilt ZE00804 User manual

Everbilt AUTOJ100A2 User manual

Everbilt

Everbilt AUTOJ100A2 User manual

Everbilt ZE00802A User manual

Everbilt

Everbilt ZE00802A User manual

Everbilt PCP10001-VSP User manual

Everbilt

Everbilt PCP10001-VSP User manual

Everbilt HDPCP25 User manual

Everbilt

Everbilt HDPCP25 User manual

Everbilt SP03302VD User manual

Everbilt

Everbilt SP03302VD User manual

Everbilt ZE00802A User manual

Everbilt

Everbilt ZE00802A User manual

Everbilt SP03302VD User manual

Everbilt

Everbilt SP03302VD User manual

Everbilt SW07501T User manual

Everbilt

Everbilt SW07501T User manual

Popular Water Pump manuals by other brands

baracuda SUPRA ECO VS Installation & operating instructions

baracuda

baracuda SUPRA ECO VS Installation & operating instructions

Graco HIGH-FLO 243737 instructions

Graco

Graco HIGH-FLO 243737 instructions

Eckerle GO 200 instruction manual

Eckerle

Eckerle GO 200 instruction manual

Lowara 5HM12 Installation, operation and maintenance manual

Lowara

Lowara 5HM12 Installation, operation and maintenance manual

Giant GP7150A manual

Giant

Giant GP7150A manual

Fieldmann FVC 7005-EC manual

Fieldmann

Fieldmann FVC 7005-EC manual

NexPump Ai Single Notification guide

NexPump

NexPump Ai Single Notification guide

Holmatro Varipump M304 manual

Holmatro

Holmatro Varipump M304 manual

mbp MAGNUS 8000 HYDRAULIC Instructions and parts list

mbp

mbp MAGNUS 8000 HYDRAULIC Instructions and parts list

Trotec TWP 4005 E operating manual

Trotec

Trotec TWP 4005 E operating manual

Franklin Electric Little Giant VCC-20-P owner's manual

Franklin Electric

Franklin Electric Little Giant VCC-20-P owner's manual

Meec tools 015259 operating instructions

Meec tools

Meec tools 015259 operating instructions

platypus PP10LV instruction manual

platypus

platypus PP10LV instruction manual

vacuubrand MD 12C NT VARIO o.C. Instructions for use

vacuubrand

vacuubrand MD 12C NT VARIO o.C. Instructions for use

Pioneer APPLI-PRO DASIC manual

Pioneer

Pioneer APPLI-PRO DASIC manual

Standard Pump SP-PP Series Operating instructions and parts manual

Standard Pump

Standard Pump SP-PP Series Operating instructions and parts manual

DAB NOVA Instruction for installation and maintenance

DAB

DAB NOVA Instruction for installation and maintenance

KSB CTN Installation & operating manual

KSB

KSB CTN Installation & operating manual

manuals.online logo
manuals.online logoBrands
  • About & Mission
  • Contact us
  • Privacy Policy
  • Terms and Conditions

Copyright 2025 Manuals.Online. All Rights Reserved.