Everest ECB36D2 User manual
Thank you for choosing EVEREST
A Step Above the Standard
Owner’s Manual for models:
ECB36D2, ECB48D2, ECB52D2, ECB52-60D2
ECB72D4, ECB82D4, ECB82-84D4, ECB82-86D4, ECB96D4
Chef Bases
www.EVEREST .ref
com
ISO-9001
US
R
C

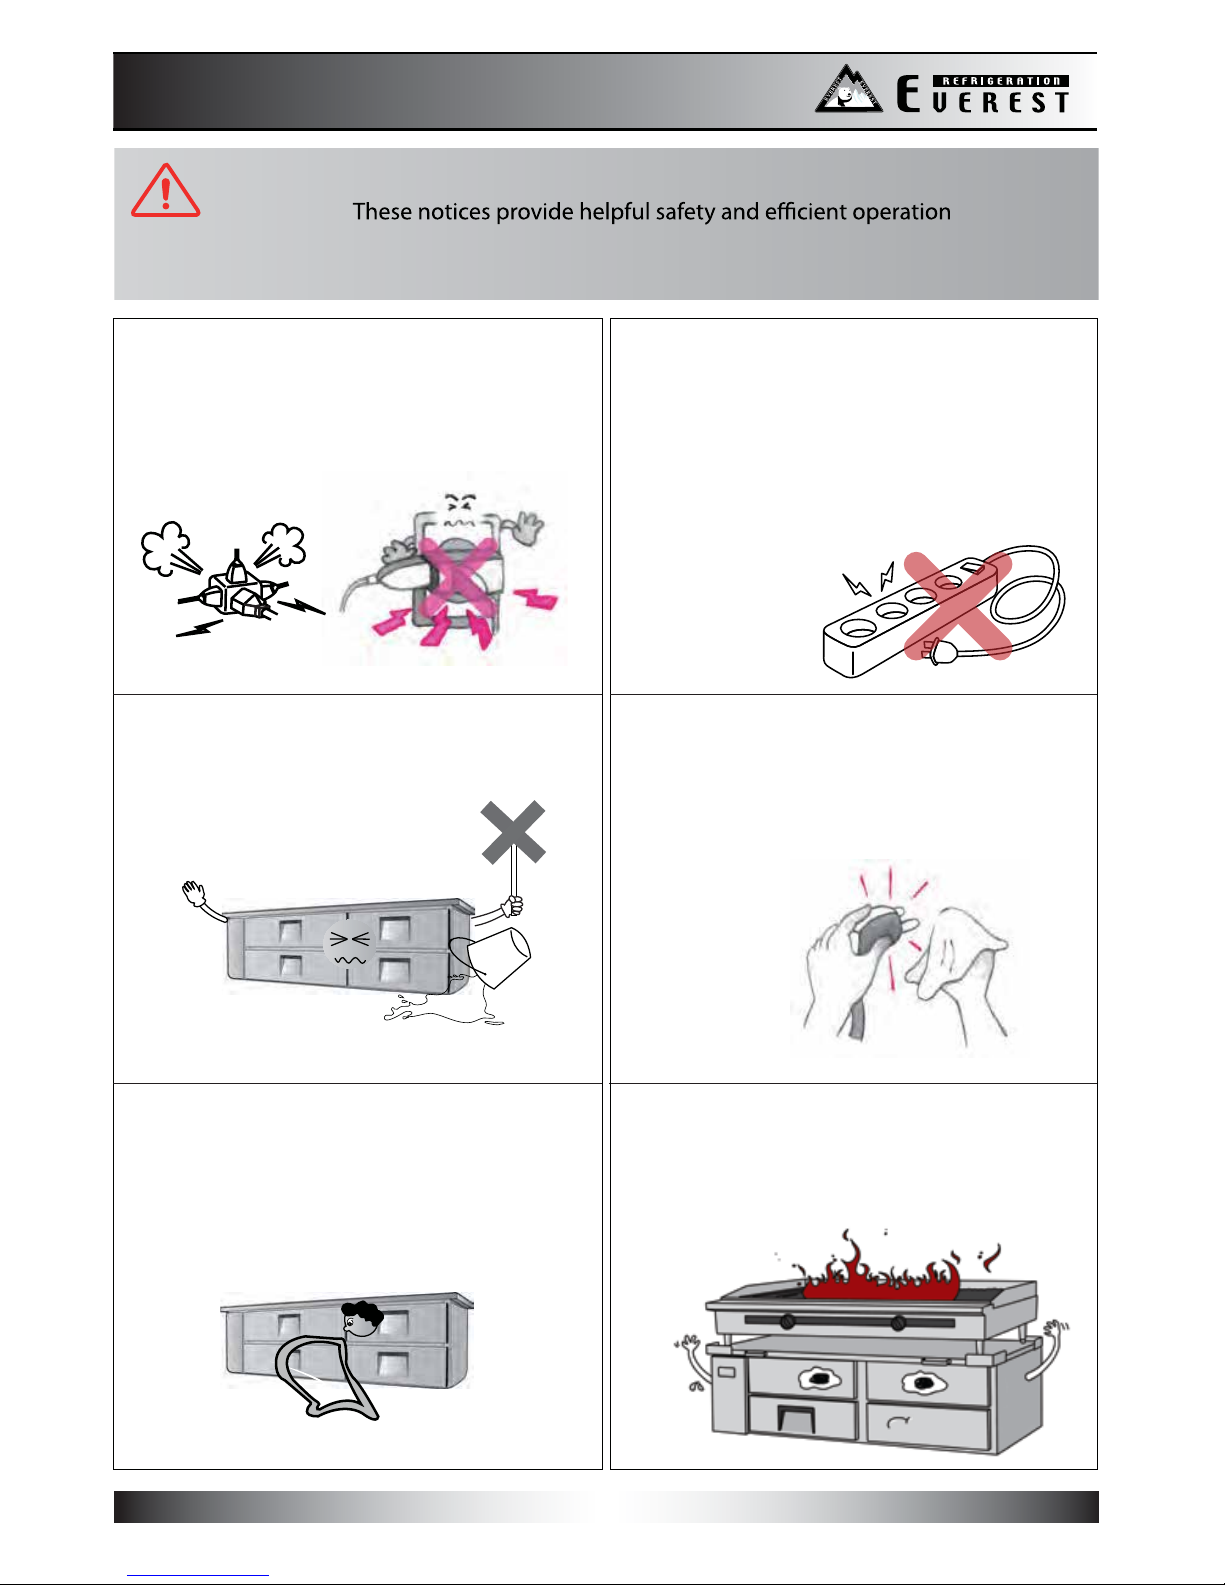
When installing the unit, be careful that the
electrical cord is not under the unit or
pressed against the wall.
This could cause a damage to the cord.
Before starting the unit for the frist time,
make sure the unit is free from all packaging.
Packaging left on the unit during operation
may cause a re hazard.
To prevent electrical shock, please do
not plug or unplug the cord
with wet hands.
WARNING - When using your appliance, always follow basic precautions, including
the following :
Install the unit on a hard
and level surface.
Before cleaning or maintaining the unit,
please unplug it. Do not use any ammable
cleaning products on or around the unit.
Please do not store temperature
sensitive items in the unit,
such as medical or
science research
related materials.
If you suspect a refrigerant leak,
unplug the unit and
immediately contact an
authorized service
technician.
Please do not hang or climb on the unit as
this may cause the unit to fall.
Safety Notices
Safety Notices
REFRIGERATION
1
Safety Notices
Safety Notices
To minimize shock and re hazards, be sure
not to overload the outlet into which the
unit is plugged into. A dedicated circuit of
sucient amperage is required.
To prevent electrical shock and
malfunction, do not spray the
unit with water.
Clean the pronges of the electrical plug
A minimum clearance of 4" is required bet-
ween the bottom of the cooking equipment
heating element and the chef base worktop.
Failure to provide clearance voids manu-
facturer warranty.
with a soft cloth or brush before plugging
it into an electrical receptacle to prevent a
re hazard.
WARNING - Read and follow all safety notices in this installation guide.
or damage to the unit.
When it is time to salvage the unit, make
sure to remove the rubber gaskets from
the drawers to prevent the risk of
children or animals getting trapped
inside the unit.
REFRIGERATION
2
To prevent damage to the electrical
components, have the unit plugged in directly
to its own circuit. EVEREST is not responsible
for any damage caused by improper electrical
connections resulting from electrical power
failure, use of extension cords &
surge protectors, and any
voltage drops to the unit.

Caution!
Caution!
To prevent electrical shock and damage to
the electrical cord, please hold
the plug head
when plugging
and unplugging
the unit.
Do not use the
electrical cord
or plug if they
are damaged
in any way.
After unplugging the unit, please wait at
least 6 minutes
before re-plugging
it in. Failure to do
so could cause
extensive damage
to the compressor.
Avoid installing the unit where it could
be exposed to water or moisture.
If the unit will
not be used for an
extended period of
time, please unplug
it from the outlet.
Please do not attempt to remove or repair
any components unless you are an
authorized service technician.
The refrigerator compartment’s temperature
should be set from 33°F~40°F(See page 9).
Setting the temperature out of the
recommended ranges will void the unit’s
warranty.
Do not put your hands under the unit when
moving it. You could be injured by sharp
edges, protruding
parts, crushing, etc.
REFRIGERATION
6
minutes!
Keep the drawers closed properly at all times.
Check periodically if the drawer gaskets seal
perfectly. Losing cold air from the cabinet due
to old gaskets will lead to a severe damage to
the product and increased electrical
consumption.
3

Plastic Pan Cleaning
Periodically remove the pans from the unit
and clean them with mild soap
and warm water.
Door Gasket Cleaning
To preserve the life span of the drawer
gasket, clean the gasket with mild soap and
water on a regular basis.
Do not use the following products when cleaning
Clean the exterior of the product with a stainless steel cleaner only.
Never use steel wool, strong acids, abrasive cleaners or degreasers.
Acidic products and products containing vinegar must
be stored in sealed containers to prevent acid damage
to the interior of the unit and the evaporator coil. (Rust
resulting from the lack of or improper maintenance will
not be covered under warranty.)
Interior Cleaning
Clean the interior surface of the unit with mild soap and warm
water. Do not let water accumulate inside the unit. To prevent
water damage, wipe the interior of the unit with a dry cloth as
needed. Do not use abrasive cleaners, concentrated detergents,
bleaches, cleaning waxes, solvents or polishes to clean the interior
of the unit.
Condenser Coil Cleaning
Poor condensing unit performance is caused by heavy dust
build-up on the condenser coil. The condenser coil should be
condenser with a soft brush or a vacuum with a brush
attachment. The condenser coil should be cleaned in the
Maintenance Guide
Maintenance Guide
REFRIGERATION
4

Condenser Coil Maintenance
Condenser Coil Maintenance
REFRIGERATION
5
Model Shown: ECB72D4
ECB Series
Applicable Model Prefix: ECB
IMPORTANT: Failure to clean the condenser coil will result in a void of warranty.
Follow these simple steps at least once a month to ensure the proper operation of your Everest product.
1. Always unplug the unit before performing maintenance.
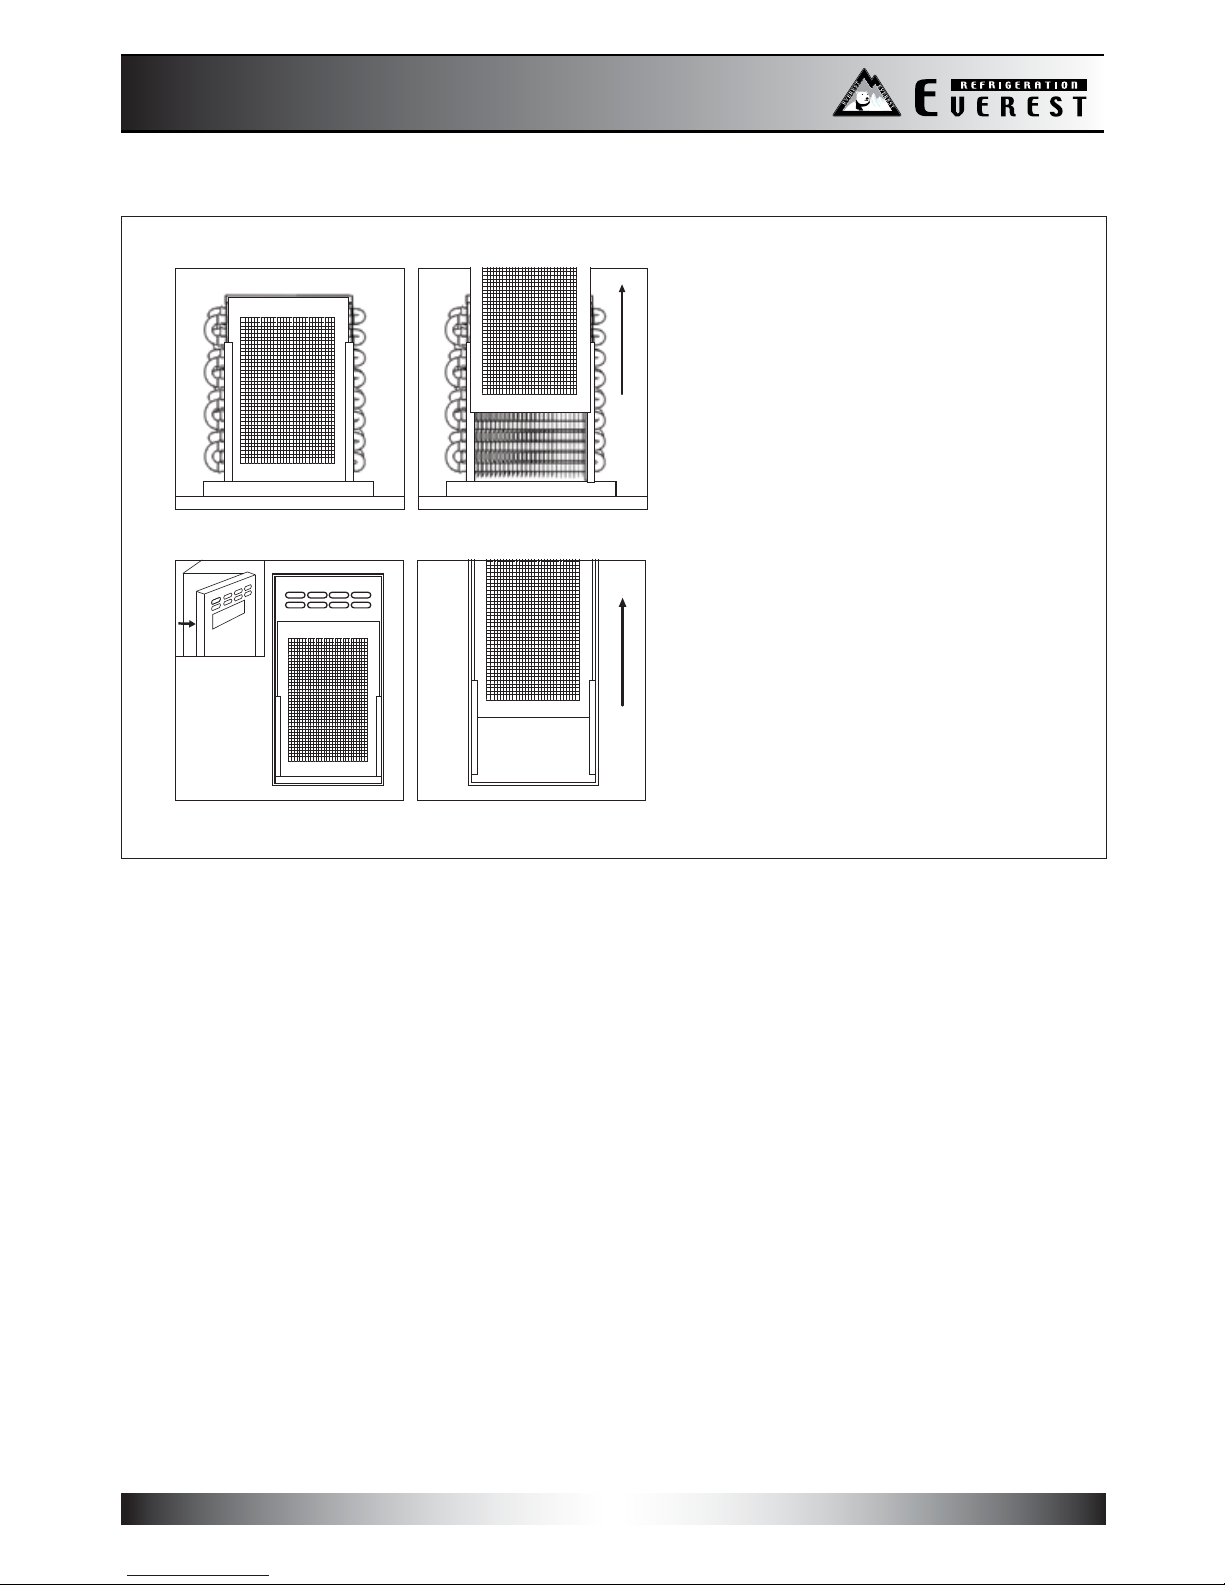
2. Locate the condensing unit panel door at the front, left side of the unit. See diagram ECB-L-001-D1.
3. Open the condensing unit panel door to access the condenser coil. See diagram ECB-L-001-D2.
4. Take note of two possible locations of the condenser coil black mesh air filter. Type (A) air filters will be
mounted in front of the condenser coil. Type (B) air filters will be mounted behind the condensing unit
panel door. See diagrams ECB-L-001-D3 and ECB-L-001-D4.
5. Completely detach the air filter from the mounting brackets. See diagrams ECB-L-001-D3 and ECB-L-001-D4.
6. Rinse air filter in lukewarm water and soap solution*.
7. Repeat step 6 until air filter is clear of any blockage from lint, dust or grease.
* Do not use abrasive, acid-based cleaners or degreasers to avoid damage to the air filter.
Diagram ECB-L-001-D1 Diagram ECB-L-001-D2
Condenser Coil Maintenance
Condenser Coil Maintenance
REFRIGERATION
6
Diagram ECB-L-001-D3
A type
Diagram ECB-L-001-D4
B type

Installation Guide
Installation Guide
Install the unit on a hard and level surface
or the unit could produce undesired noises.
The unit should be positioned at least 7”
away from the wall for proper ventiliation.
For side mount units, a 7” space should also
wall.
Indoor Use Only
Outdoor use may cause a decrease in
unit.
Dusty and High Humidity Areas
Dusty environments will cause the
condenser coil to prematurely clog which
will require it to be cleaned more often.
High humidy environments could cause the
unit to rust.
Do not build an enclosure or cabinet
around the unit.
condenser area will cause the compressor to
work harder, which can result in compressor
failure and the unit not being able to maintain
the desired
temperature.
Select a location away from other heat
and moisture generating equipment
such as stoves, ovens, dish washers, etc.
High ambient temperatures cause the
compressor to work harder, which can result
in compressor failure
and the unit not being
able to maintain the
desired temperature.
REFRIGERATION
7”
Back Wall
7
Keep the unit upright at all times during
delivery. Tilting the unit during delivery
will cause harm to the refrigeration system.

Please check the following before requesting service
Trouble Shooting
Trouble Shooting
Symptom Possible Solutions
Condensing unit
fails to start
a. Ensure the electrical cord has not been
disconnected.
b. Ensure the unit is turned on.
Refrigerated
compartment is too
cold
a. Adjust the temperature control to a warmer
setting.
Sound of water
dripping
a. This is the sound of the refrigerant circulating
during the compressor rest period and it is
normal.
Exterior walls are
warm a. Heaters have been placed around the drawer
openings to prevent condensation buildup.
This is normal.
Condensation on the
interior
a. Condensation can occur during hot and humid
weather with frequent or prolonged drawer
opening. This is normal.
b. The drawer might not be closed roperly. Check
drawer alignment and gaskets for proper seal.
Condensation on the
exterior surface
a. Condensation on the exterior surface of the
unit is perfectly normal during periods of high
humidity.
b. Check drawer alignment and gaskets for
proper seal.
Noisy operation a. Check for loose parts.
b. Check for tubing rattle.
c. Check for a bent fan blade.
d. Check for damaged fan motor bearings.
e. Ensure the unit is stable.
f. Ensure the cabinet is level.
Cabinet does not
maintain proper
temperature
a. Check the drawer gaskets for proper seal.
b. Check to see if the temp. control setting is too
high, then adjust as necessary.
c. Avoid installing the unit next to heat generating
equipment and direct sunlight.
d. Avoid storing hot contents.
e. Ensure the drawers are fully closed.
REFRIGERATION
HOT !
8
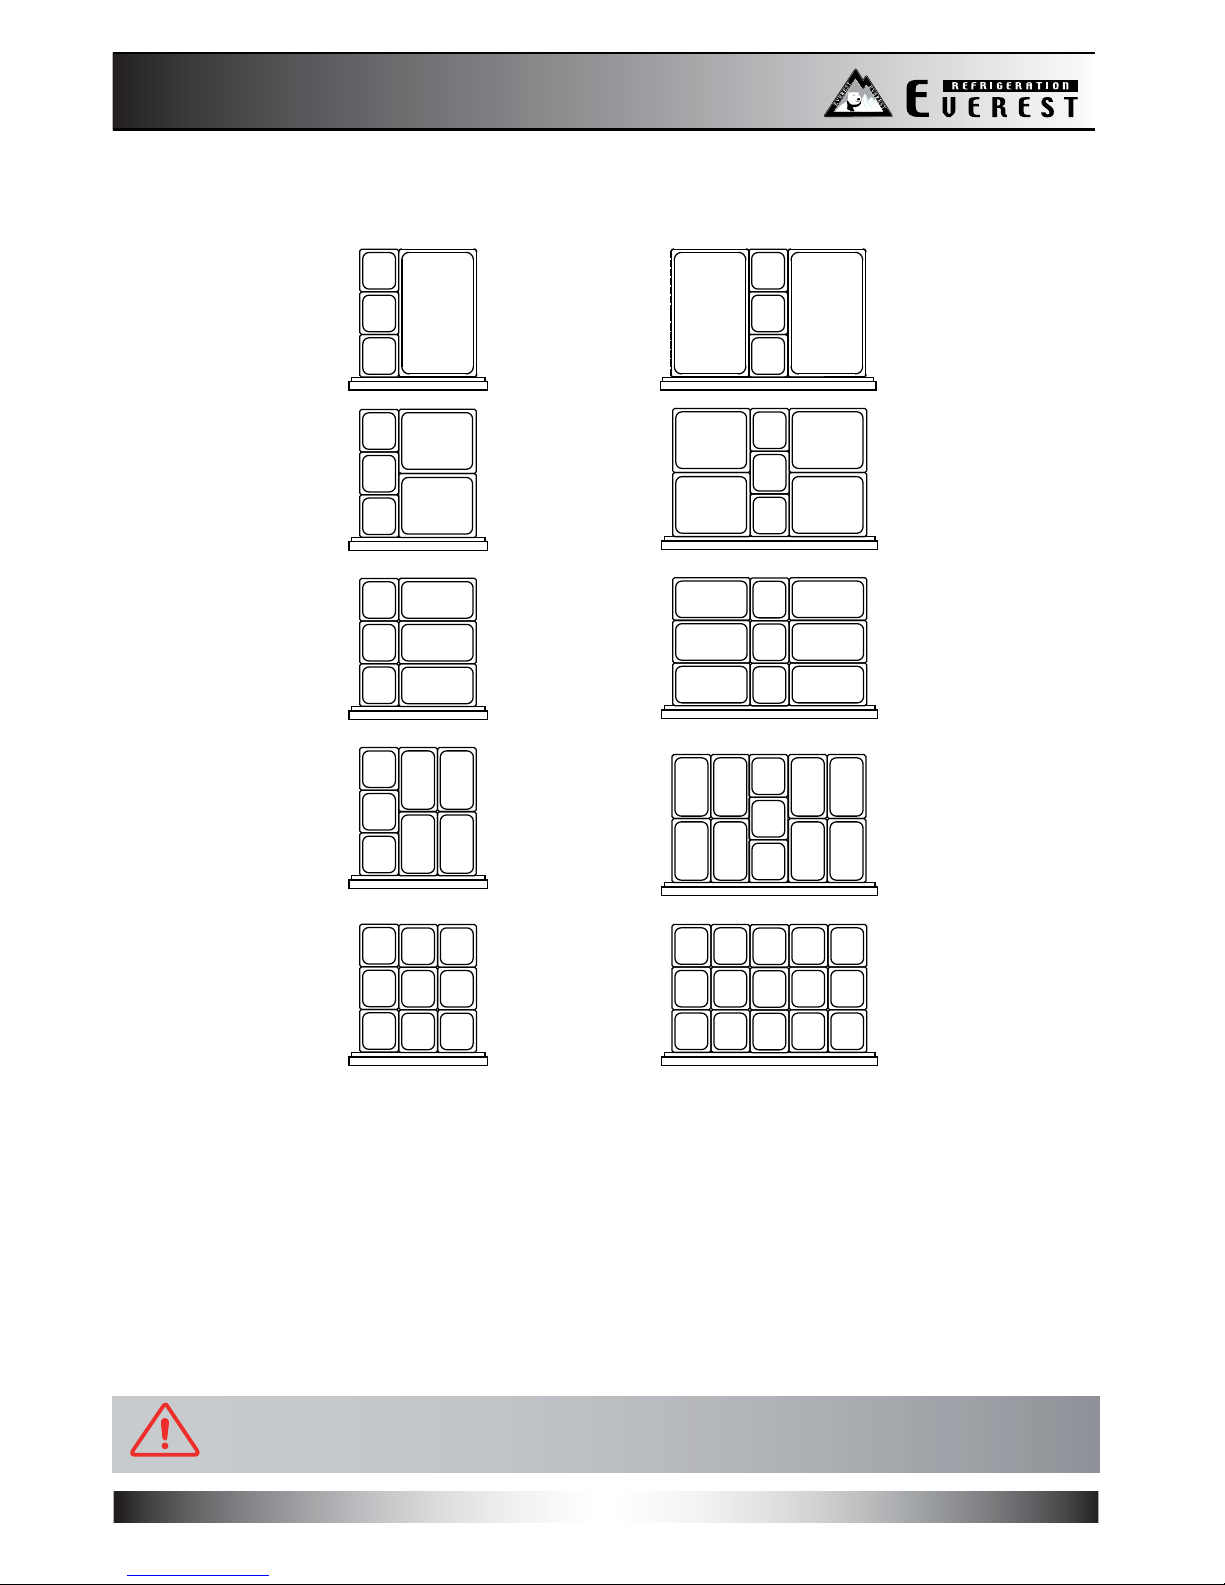
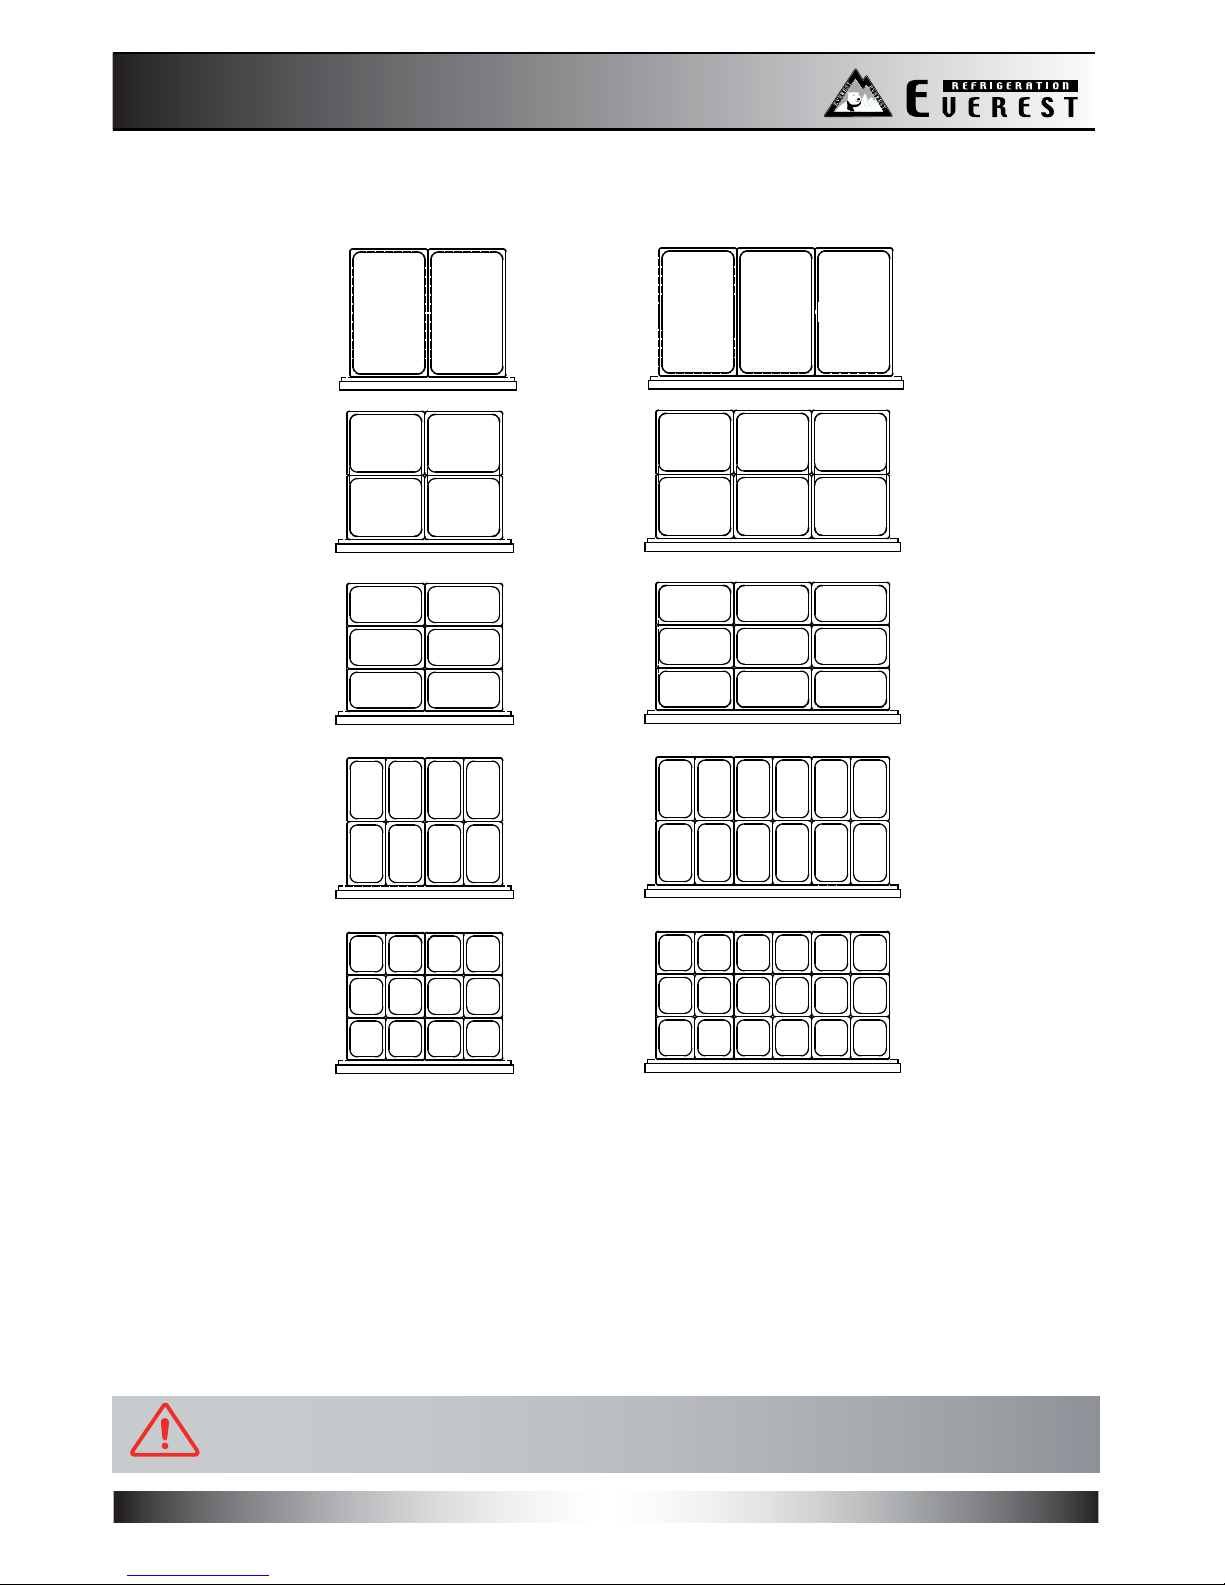
Warning - Do not attempt to adjust pan dividers when loaded!
Pan Configurations
Pan Configurations
REFRIGERATION
ECB36D2 (2) “A” Drawers
ECB48D2 (2) “B” Drawers
[Note] Additional pan dividers are not included in the unit. They are optional.
9
Drawer Type - A Drawer Type - B
1 1
Standard Standard
(1) Vertical Pan Divider
(1) Vertical Pan Divider
(1) Vertical Pan Divider
(2) Vertical Pan Dividers
(2) Vertical Pan Dividers
(2) Vertical Pan Dividers
(2) Vertical Pan Dividers
(2) Vertical Pan Dividers
(4) Vertical Pan Dividers
(4) Vertical Pan Dividers
1/2
1/2
1/3
1/4
1/6
1/3
1/6
1/6
1/6
1/6
1/6
1/6
1/6
1/6
1/6
1/6
Warning - Do not attempt to adjust pan dividers when loaded!
Pan Configurations
Pan Configurations
REFRIGERATION
ECB52D2 (2) “D” Drawers
ECB52-60D2 (2) “D” Drawers
ECB72D4 (4) “C” Drawers
ECB82D4 (2) “C” Drawers and (2) “B” Drawers
ECB82-84D4 (2) “C” Drawers and (2) “B” Drawers
ECB82-86D4 (2) “C” Drawers and (2) “B” Drawers
ECB96D4 (4) “D” Drawers
Drawer Type - C Drawer Type - D
1 1
1/2 1/2
1/3 1/3
1/4 1/4
1/6 1/6
Standard Standard
(2) Vertical Pan Dividers
(1) Vertical Pan Divider
(1) Vertical Pan Divider
(1) Vertical Pan Divider
(3) Vertical Pan Dividers
(3) Vertical Pan Dividers
(2) Vertical Pan Dividers
(2) Vertical Pan Dividers
(5) Vertical Pan Dividers
(5) Vertical Pan Dividers
[Note] Additional pan dividers are not included in the unit. They are optional.
10
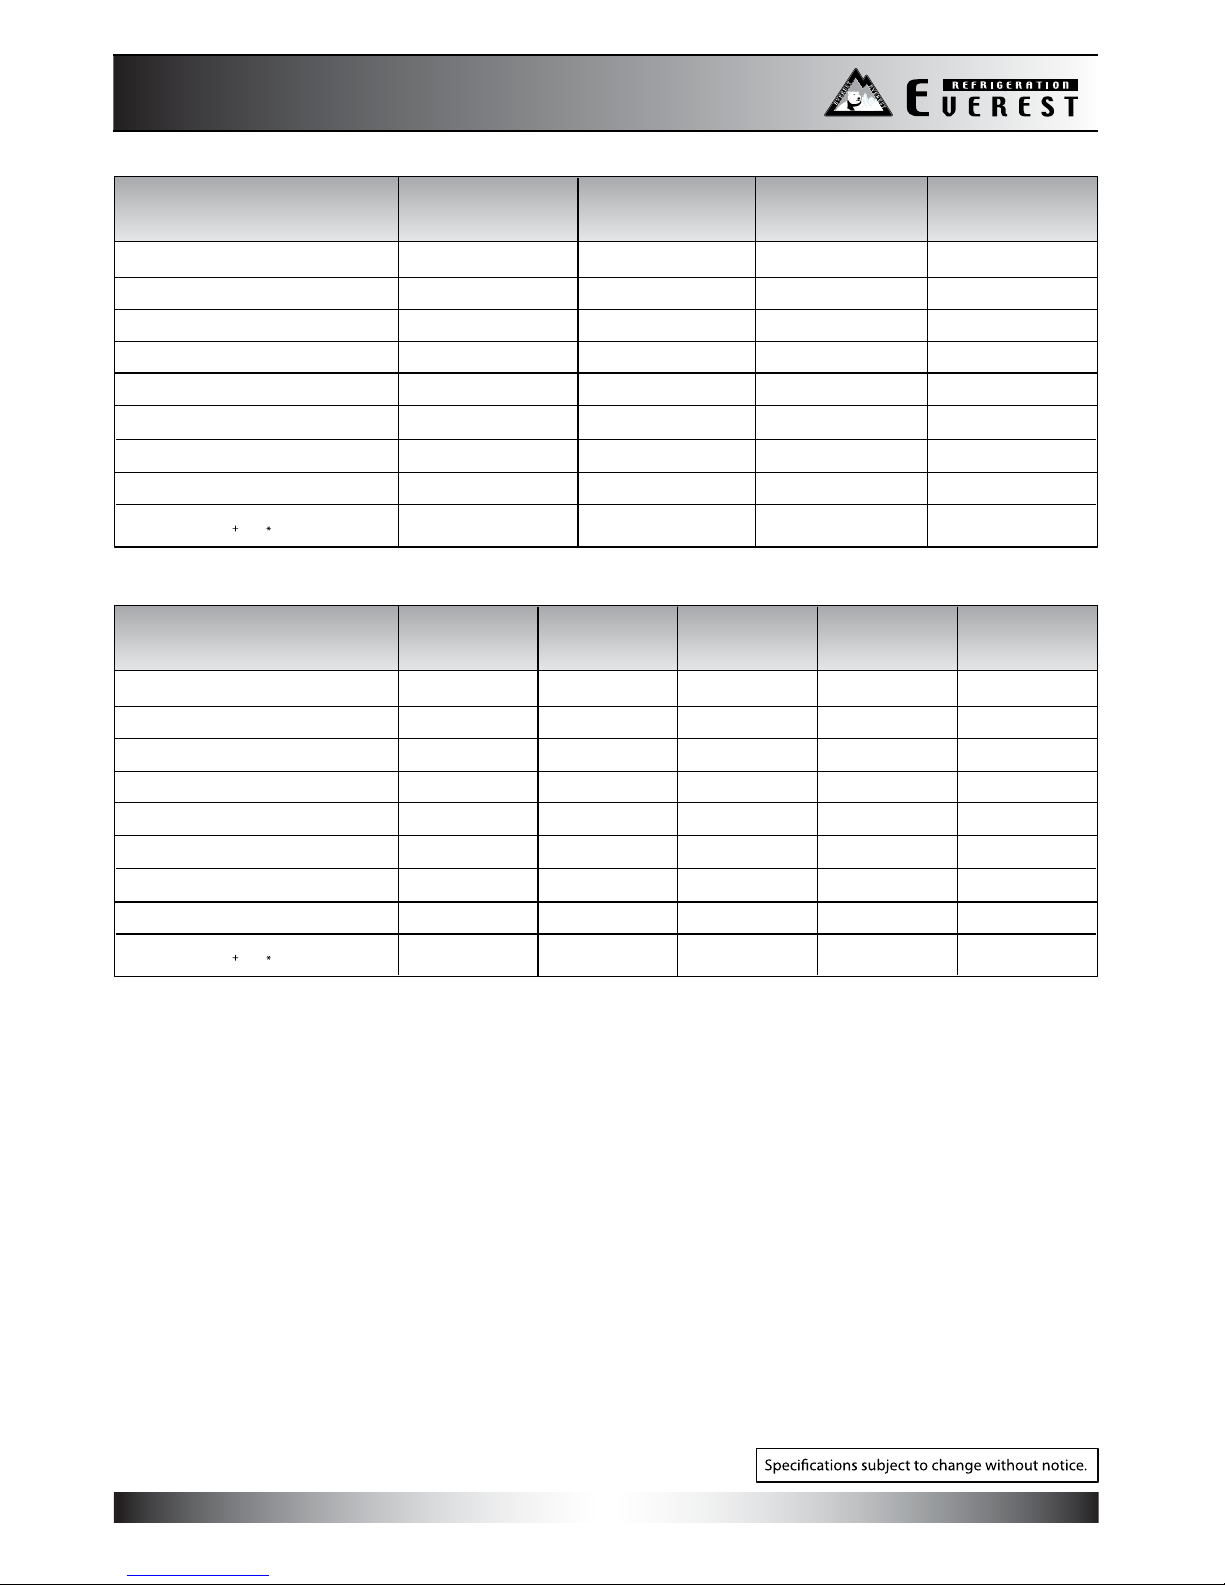
Specification
Specifications
REFRIGERATION
+ Depth does not include 1” for stainless steel grip.
* Height does not include 5” for casters.
[NOTE]
12
Model
# of Pans
# of Drawers
Compressor (HP)
Power (V-Hz-Ph)
Temp. Range (°F)
Refrigerant
Crated Weight (LBS)
Amps (A)
1 x 2, 1/6 x 6
2
1/5
115 -60-1
33 ~ 54 33 ~ 54 33 ~ 54 33 ~ 54
R-134A
TBA
4.20
36 3/8 x 32 1/8 x 20 48 3/8 x 32 1/8 x 20 51 7/8 x 32 1/8 x 20 60 x 32 1/8 x 20
1 x 4, 1/6 x 6
2
1/4+
115-60-1
R-134A
TBA
4.40
1 x 6
2
1/4+
115-60-1
R-134A
315
4.40
1 x 6
2
1/4+
115-60-1
R-134A
337
4.40
ECB52-60D2ECB52D2ECB48D2ECB36D2
Exterior Dimensions
(W x D x H inches)
Model
# of Pans
# of Drawers
Compressor (HP)
Power (V-Hz-Ph)
Temp. Range (°F)
Refrigerant
Crated Weight (LBS)
Amps (A)
1 x 8
4
1/4+
115 -60-1
33 ~ 54 33 ~ 54 33 ~ 54 33 ~ 54
R-134A
412
4.40
72 3/8 x 32 1/8 x 20 82 3/8 x 32 1/8 x 20 84 x 32 1/8 x 20 86 1/4 x 32 1/8 x 20
1 x 10
4
1/3
115-60-1
R-134A
455
6.00
1 x 10
4
1/3
115-60-1
R-134A
466
6.00
1 X 10
4
1/3
115-60-1
R-134A
477
6.00
ECB82-86D4
33 ~ 54
95 1/2 x 32 1/8 x 20
1 X 12
4
1/3
115-60-1
R-134A
506
6.00
ECB96D4ECB82-84D4ECB82D4ECB72D4
Exterior Dimensions
(W x D x H inches)
REFRIGERATION
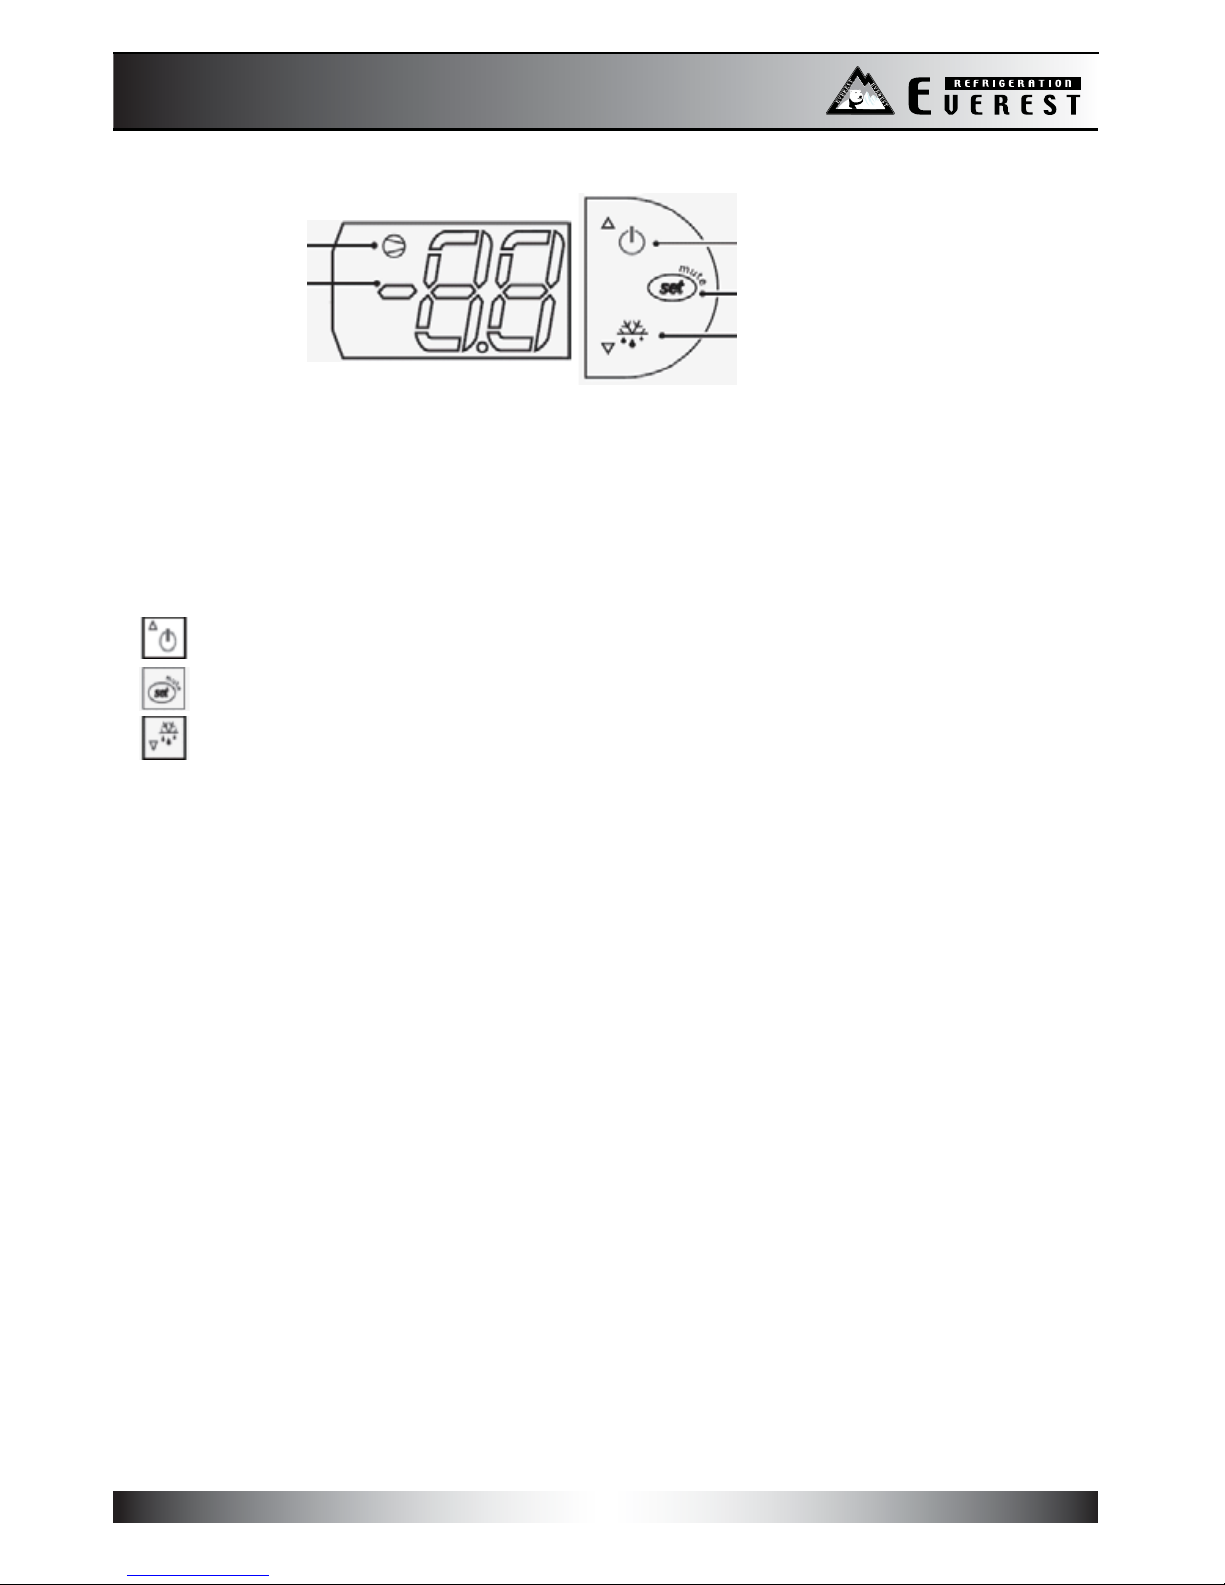
Temperature Setting
Temperature Setting
A
B
C
D
E
* LED Display
A Operation of compressor
B Current cabinet temperature
* Control Buttons
C Power button
D Temperature setting button
E Defrost button
* How to set desired temperature
Press and hold “ D” button until the LED displays “ set ” symbol and a number
consecutively. The number is the previous setting temperature (recommended
setting is 35 °F). When the number is ashing, release the button.
Caution: If “ PS ” symbol appears on the LED, it means that you pressed and held
“ D ” button too long. Release it, and then press “ D” button twice to restart the
temperature setting.
While ashing the number, set your desired temperature by pressing “ C” (high) or
“ E” (low) button. The number increases or decreases by a decimal point.
Note: Your new setting temperature should be in the range of between 32°F and
42°F.
Press “ D” button to get out of the setting mode. The LED will show the current
cabinet temperature.
Step 1
Step 2
Step 3
13

REFRIGERATION
Pan Configurations
Pan Configurations
14
Chaf Bases
ECB36D2
ECB48D2
ECB52D2 / ECB52-60D2 / ECB82D4 / ECB82-84D4 / ECB82-86D4 / ECB96D4
ECB72D4 / ECB82D4 / ECB82-84D4 / ECB82-86D4
[Standard: (1) 1 size pans w/ 1 pan dividers per drawer included] / 4" Depth
[Standard: (1) 1 size pans w/ 2 pan dividers per drawer included] / 4" Depth
[Standard: (3) 1 size pans w/ 2 pan dividers per drawer included] / 4" Depth
[Standard: (2) 1 size pans w/ 1 pan dividers per drawer included] / 4" Depth
REFRIGERATION
1/6
1
1/6
1
1/6
1/2 1/61/3 1/6
1/4 1/6
1/61/2 1/6 1/3 1/61/6
1/4
1
1
1/2 1/3 1/4 1/6
1/2 1/3
1/4 1/6
REFRIGERATION
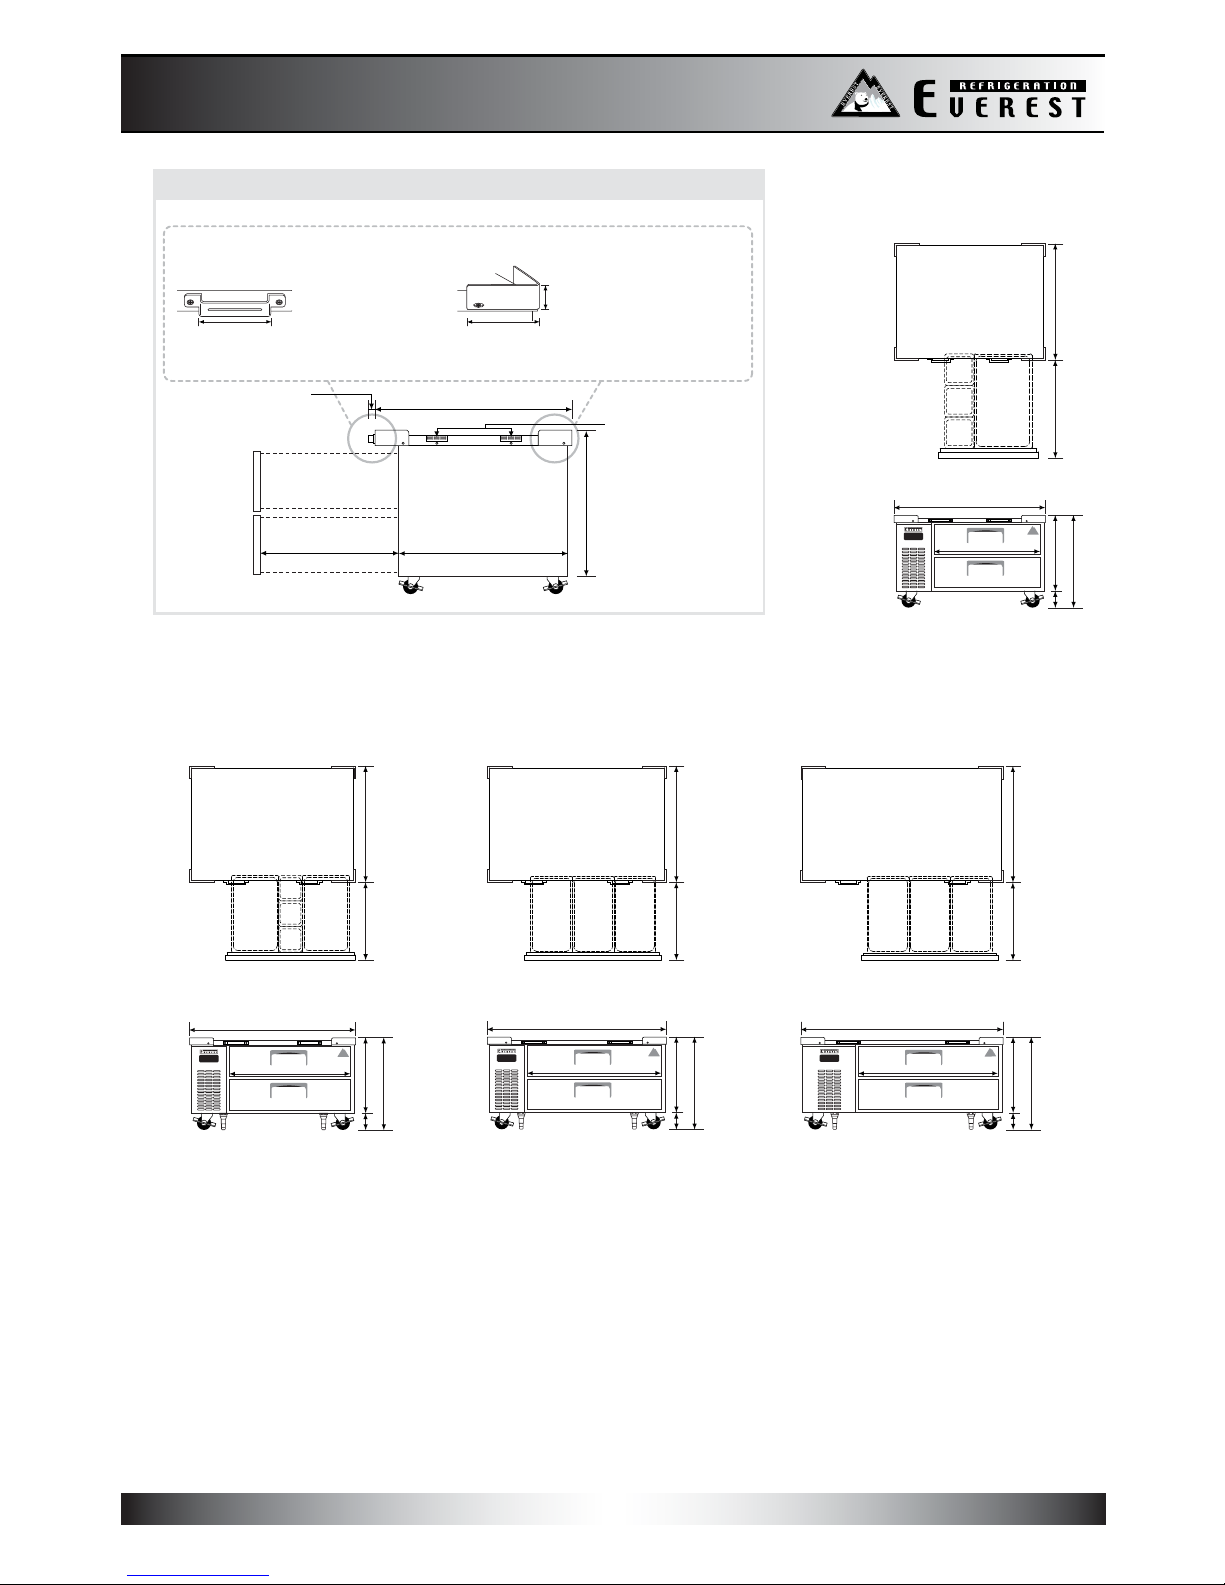
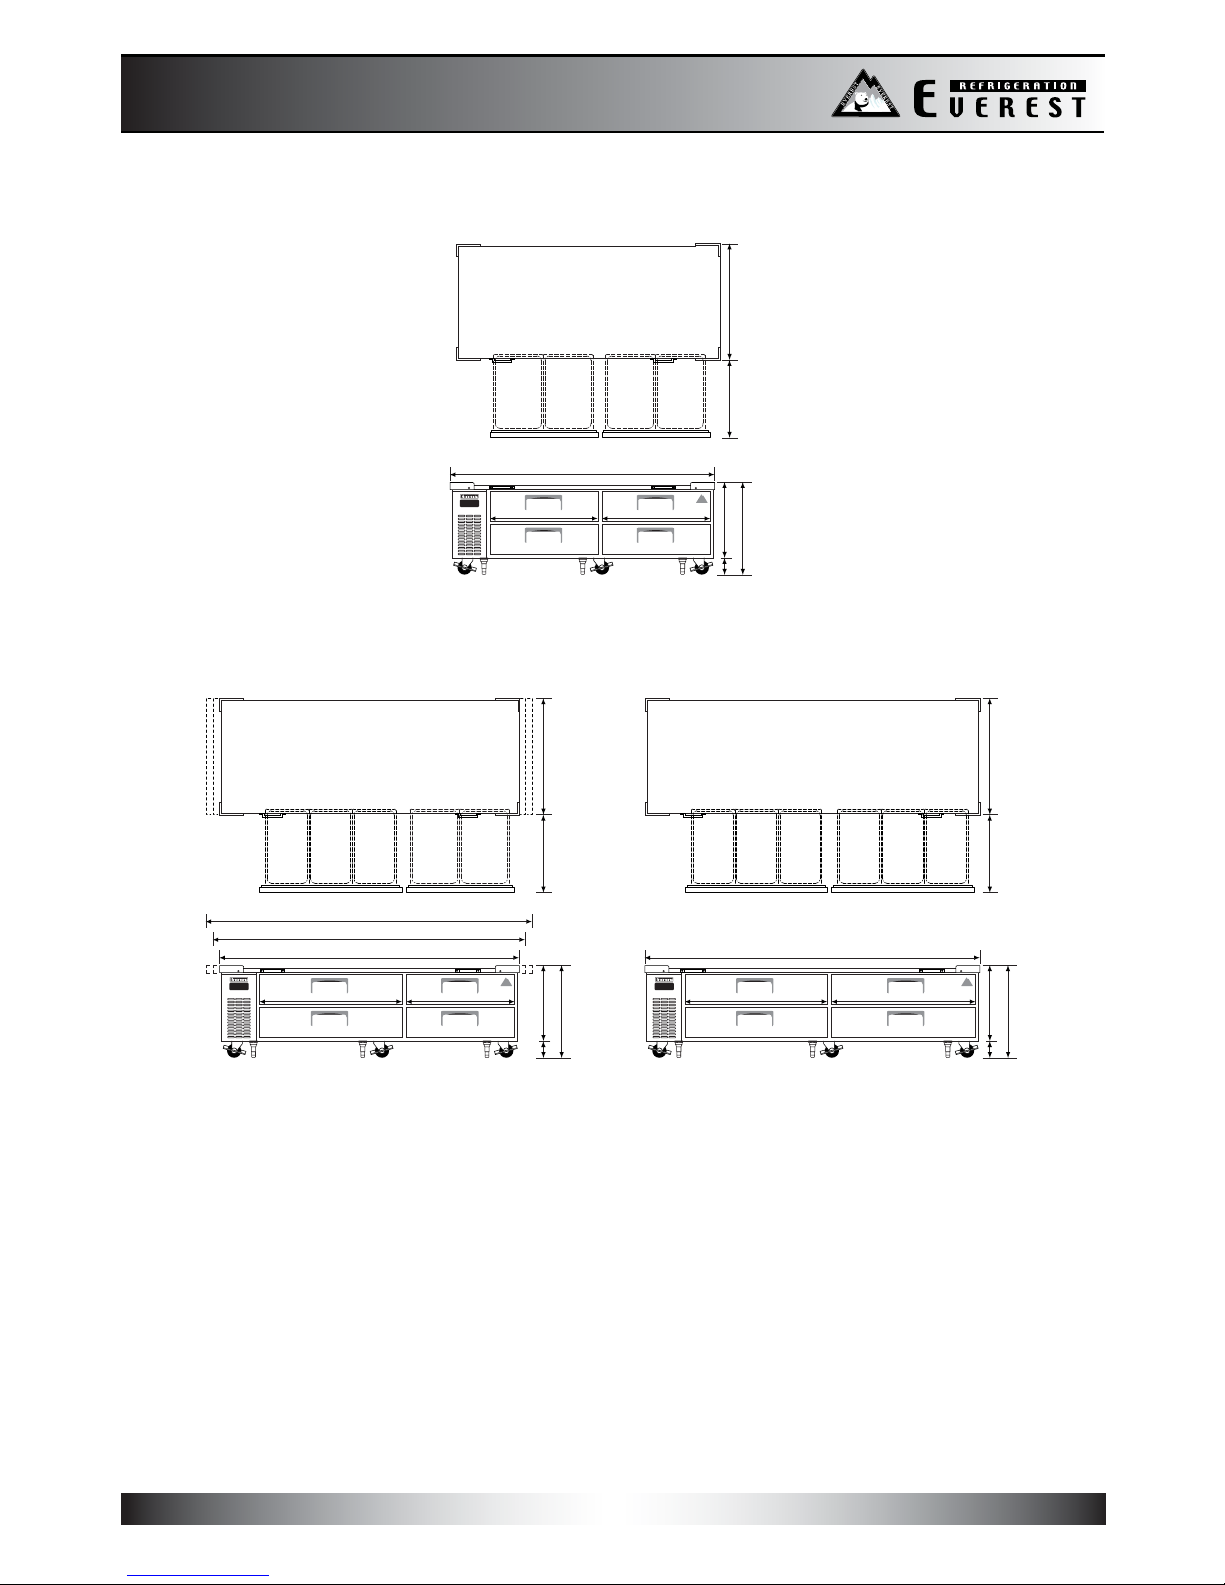
Product Drawings
Product Drawings
15
ECB52D2ECB48D2
51 7/8"
41 1/8"
20" 5"
25"
32 1/8" 21 3/4"
ECB52-60D2
ECB36D2
60"
41 1/8"
20" 5"
25"
32 1/8" 21 3/4"
Air chamber & Vent
32 1/8"
21 3/4"
1"
29 1/2"
20"
Corner Guards
Durable stainless steel corner
guards mounted on the top
surface prevent cooking
equipment from accidentally
sliding off the unit.
Stainless Steel Grips
Heavy duty stainless steel
top surface grips for easy
and safe maneuverability
of the unit. 4 1/2"
1 3/4"
SIDE VIEWSIDE VIEW
4 1/2"
1
1
1/6
1
36 3/8"
22"
20" 5"
25"
32 1/8" 12 3/4"
48 3/8"
35"
20" 5"
25"
32 1/8" 12 3/4"
1
1/6
REFRIGERATION
Product Drawings (continued)
Product Drawings (continued)
16
ECB72D4
5"
72 3/8"
28 1/8"
20"
25"
28 1/8"
32 1/8" 21 3/4"
ECB82D4
•
ECB82-84D4
•
ECB82-86D4 ECB96D4
5"
82 3/8"
41 1/8"
20"
25"
84"
86 1/4"
28 1/8"
32 1/8" 21 3/4"
5"
95 1/2"
41 1/8"
20"
25"
41 1/8"
32 1/8" 21 3/4"
1 1
1
17
Critical Information
Critical Information
REFRIGERATION
The warranty card below must be submitted to Everest within thirty (30) days of purchase.
WARRANTY REGISTRATION CARD
Business Name : Telephone : ( )
Address :
City : State : Zip :
Place of Purchase : Date Purchased : Date Installed :
Model No : Cabinet Serial No :
3 YEAR PARTS and LABOR WARRANTY
(Applicable to units purchased after July 1, 2014.)
5 YEAR COMPRESSOR WARRANTY
Name of Business Owner : Date :
Signature of Business Owner :
18
Warranty Certificate
Warranty Certificate
REFRIGERATION
EVEREST warrants to the original purchaser of every new EVEREST unit, the cabinet and all parts thereof, to be free from defects in
material or workmanship, under normal and proper use and maintenance service as specied by EVEREST and upon proper
installation and start-up in accordance with the instruction packet supplied with each unit. Our obligation under this warranty is
limited to a period of three (3) years from the date of original installation or thirty six (36) months after shipment date from EVEREST,
which ever occurs rst. This is applicable to units purchased after July 1, 2014. Any part covered under this warranty that is determined
by EVEREST to have been defective within three (3) years of original installation or thirty six (36) months after shipment date from the
manufacturer, which ever occurs rst, is limited to the repair or replacement, including labor charges, of defective parts or assemblies.
The labor warranty shall include standard straight time labor charges only and reasonabletravel time, as determined by EVEREST.
All warranty claims for labor or parts must be made directly through EVEREST. All claims shall include: unit model number, cabinet
serial number, proof of new product purchase, installation date, and all pertinent information related to the alleged defect. For
compressor warranty claims, the compressor tag shall be returned to EVEREST with the above listed information.
EVEREST's sole obligation under this warranty is limited to either the repair or replacement of parts, subject to the additional limitations
below. This warranty neither assumes nor authorizes any person to assume obligations other than thoseexpressly covered by this
warranty.
B. INDIRECT OR CONSEQUENTIAL DAMAGE
EVEREST does not warrant economic loss, prot loss, or special, indirect or consequential damages including without
limitation, losses ordamages arising from food or product spoilage claims caused by refrigeration failure.
C. IMPROPER USAGE
EVEREST is not responsible for parts or labor coverage for component failure and or other damages resulting from
improper usage, installation or failure to clean and/or maintain product as set forth in the user's manual provided with this
unit. All EVEREST products are designed for commercial usage, not for residential use. Therefore, the warranty will not be
honored if product is installed in a residential house.
D. WARRANTY IS NOT TRANSFERABLE
Warranty is limitedto only the original purchaser/user to whom delivered. It is not transferable.
E. ALTERATION, NEGLECT, MISUSE, ABUSE, ACCIDENT, DAMAGE DURING TRANSIT OR INSTALLATION, FIRE, FLOOD, ACTS
OF GOD.
EVEREST is not responsible for malfunctions due to alteration, neglect, misuse, abuse, accident, damage during transit or
installation, re, ood, storm, and/or other acts of God. And EVEREST is not responsible for any improper electrical
connections resulting from electrical power failure, the use of extension cords, and low voltage or voltage drops to the unit.
F. UNAUTHORIZED MODIFICATION
EVEREST is not responsible for the repair or replacement of failed or damaged components resulting from unauthorized
modications to units or the use ofnon-standard parts without prior writtenapproval from EVEREST.
G. RESIDENTIAL, NON-COMMERCIAL USE
This warranty doesnot apply to aunit installed in a residential setting. This unit is for commercial use only.
H. OUTSIDE THE U.S.
This warranty does not apply to any parts and/or labor warranty claims made on units sold or used outside of the United
States.
ADDITIONAL TWO(2) YEAR COMPRESSOR WARRANTY
In addition to the warranty set forth above, EVEREST warrants the hermetically sealed compressor for an additional two (2) years, not
to exceed sixty (60) months from the date of shipment from EVEREST, provided upon receipt of the compressor, manufacturer
examination shows the sealed compressor to be defective. This compressor warranty does not apply to shipping or labor costs or
any other parts of the unit whether electrical or mechanical.
These warranties are exclusive and in lieu of all other warranties, expressed or implied, and all other obligations or liabilities on our
part, and we neither assume nor authorize any other person to assume for us any other obligation or liability in connection with
thesaleofsaid refrigeration units or any part thereof.
A. NON WARRANTY PARTS
EVEREST excludes specic parts exposed to normal wear and tear. These parts include, but are not limited to, lamps,
gaskets, casters, shelves and shelf clips, pans, bin and pan dividers and airow guards.

REFRIGERATION
Memo
Memo
REFRIGERATION
201 W. Artesia Blvd., Compton CA 90220
Tel : 310-323-6586, 800-444-6285
Fax : 310-323-7524, 310-761-1127
Visit our website at www.EVERESTref.com
REFRIGERATION
A S tep Above the S tanda rd
REFRIGERATION
This manual suits for next models
8
Table of contents
Other Everest Refrigerator manuals


