Everest EMGR24 User manual

A Step Above the Standard
967 Sandhill Ave., Carson, CA 90746
Visit our website at www.EVERESTref.com
Tel : 310-323-6586, 800-444-6285
Fax : 310-323-7524
MANUFACTURING
MANUFACTURING
EVEREST REFRIGERATION
Commercial Refrigerators & Freezers
Owner’s Manual
Thank you for selecting an EVEREST product.
www.EVERESTref.com
A Step Above the Standard
Glass Door Merchandiser Refrigerators
Models: EMGR24, EMGR33, EMGR48, EMGR69
MANUFACTURING
EMSGR33, EMSGR48, EMSGR69

When installing the unit, be careful that the
electrical cord is not under the unit or
pressed against the wall.
This could cause
damage to
the cord.
Before starting the unit for the rst
time, make sure the unit
is free from all packaging.
Packaging left
on the unit
during
operation may
cause a re hazard.
To prevent electrical shock, please do
not plug or unplug the cord
with wet hands.
WARNING - When using your appliance, always follow basic precautions, including
the following :
Install the unit on a hard
and level surface.
Before cleaning or maintaining the unit,
please unplug it. Do not use any
ammable
cleaning
products
on or
around
the unit.
Please do not store temperature
sensitive items in the unit,
such as medical or
science research
related materials.
If you suspect a refrigerant leak,
unplug the unit and
immediately contact an
authorized service
technician.
Please do not hang or climb
on the unit as this may
cause the unit to fall.
2
Safety Notices
Safety Notices
To minimize shock and re hazards, be sure
not to overload the outlet into which the
unit is plugged into. A dedicated circuit of
sucient amperage is preferred.
To prevent electrical shock and
malfunction, do not spray the
unit with water.
Clean the pronges of the electrical plug
with a soft cloth or brush before plugging
it into an electrical receptacle to prevent a
re hazard.
WARNING - Read and follow all safety notices in this installation guide.
These notices provide helpful safety and ecient operation
information. Failure to do so may lead to serious injury and /
or damage to the unit.
When it is time to salvage the unit, make
sure to remove the rubber gaskets from
the doors to prevent the risk of children
or animals getting trapped inside the
unit.
1
Safety Notices
Safety Notices
MANUFACTURING MANUFACTURING

3
Caution!
Caution!
To prevent electrical shock and damage to
the electrical cord, please hold
the plug head
when plugging
and unplugging
the unit.
Do not use the
electrical cord
or plug if they
are damaged
in any way.
After unplugging the unit, please wait at
least 6 minutes
before re-plugging
it in. Failure to do
so could cause
extensive damage
to the compressor.
Avoid installing the
unit where it could
be exposed to
water or
moisture.
If the unit will
not be used for an
extended period of
time, please unplug
it from the outlet.
Please do not attempt to
remove or
repair any
components
unless you are
an authorized
service technician.
The refrigerator compartment’s temperature
should be set from 34°~54°F. Setting the
temperature
out of the
recommended
ranges will
void the unit’s
warranty.
Do not put your hands
under the unit when
moving it. You could
be injured by sharp
edges, protruding
parts,
crushing, etc.
Avoid touching frozen
foods or containers,
especially metal
containers, with
wet hands. It
could cause
frostbite.
4
Installation Guide
Installation Guide
Install the unit on a hard and level surface
or the unit could produce undesired noises.
The unit should be positioned at least 7”
away from the wall for proper ventiliation.
Indoor Use Only
Outdoor use may cause a decrease in
performance and signicant damage to the
unit.
Dusty and High Humidity Areas
Dusty environments will cause the
condenser coil to prematurely clog which
will require it to be cleaned more often.
High humidy environments could cause the
unit to rust.
Do not build an enclosure or cabinet
around the unit.
Restricting the airow around the unit’s
condenser area will cause the compressor to
work harder, which can result in compressor
failure and the unit not being able to
maintain the desired temperature.
Select a location away from other heat
and moisture generating equipment
such as stoves, ovens, dish washers, etc.
High ambient temperatures cause the
compressor to work harder, which can result
in compressor failure and the unit not being
able to maintain the desired temperature.
MANUFACTURING MANUFACTURING
OFF
(
℉)
5
6
7
89
4
32
1
6minutes!
7” Back Wall
7”
5
Maintenance Guide
Maintenance Guide
Shelf Cleaning
Periodically remove the shelves from the unit
and clean them
with mild soap
and warm water.
Door Gasket Cleaning
To preserve the life span of the door gasket,
clean the gasket
with mild soap
and water on
a regular basis.
Do not use the following products when cleaning
Clean the exterior of the product with a stainless steel cleaner only.
Never use steel wool, strong acids, abrasive cleaners or degreasers.
Acidic products and products containing vinegar must
be stored in sealed containers to prevent acid damage
to the interior of the unit and the evaporator coil. (Rust
resulting from the lack of or improper maintenance will
not be covered under warranty.)
Interior Cleaning
Clean the interior surface of the unit with mild soap and warm
water. Do not let water accumulate inside the unit. To prevent
water damage, wipe the interior of the unit with a dry cloth as
needed. Do not use abrasive cleaners, concentrated detergents,
bleaches, cleaning waxes, solvents or polishes to clean the interior
of the unit.
Condenser Coil Cleaning
Poor condensing unit performance is caused by heavy dust
build-up on the condenser coil. The condenser coil should be
cleaned monthly. Shine a flashlight through the condenser coil
to check for dirt between the fins. Clean the outside of the
condenser with a soft brush or a vacuum with a brush
attachment. The condenser coil should be cleaned in the
direction of the fins, top to bottom, not side to side. Be careful
not to bend the fins. Detailed instructions of this procedure can
be found on page 11 in this manual.
MANUFACTURING
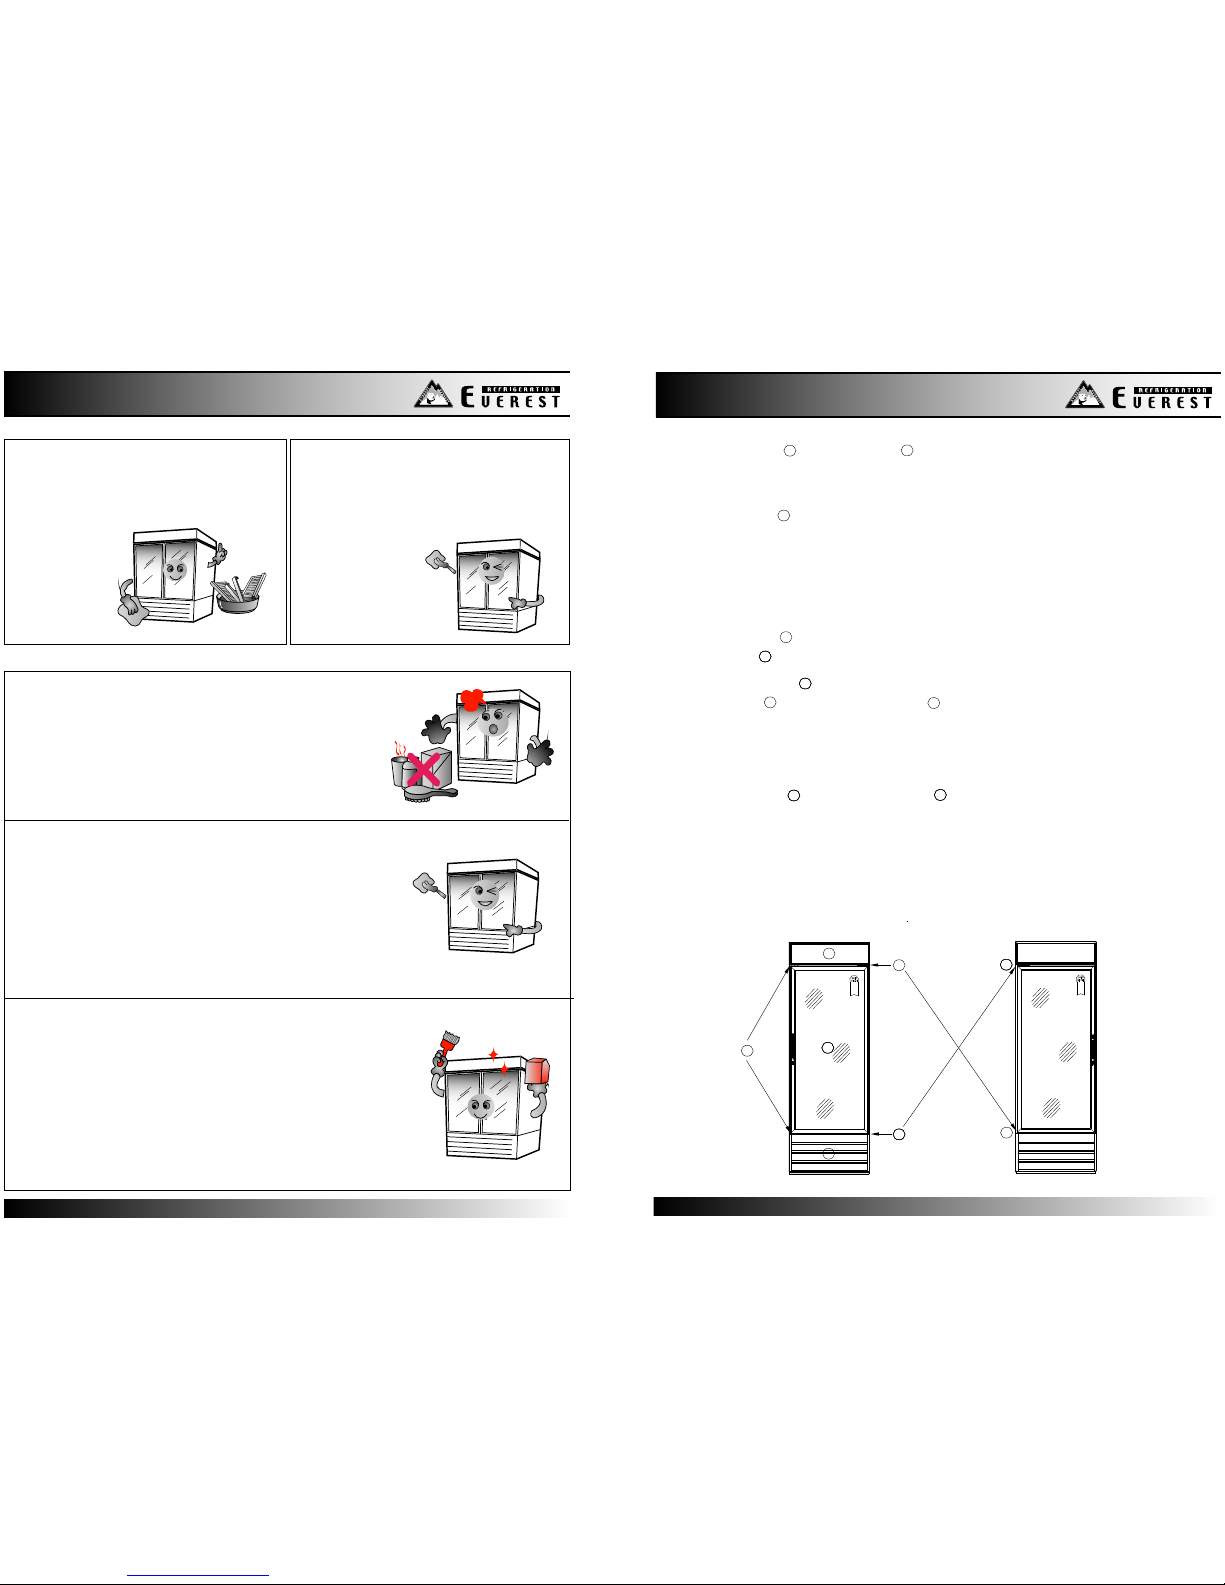
How to Reverse Door - EMGR24
How to Reverse Door - EMGR24
MANUFACTURING
6
AD
E
F
B
C
1.The front top signboard and front bottom grill must be removed to access the door hinge mounting screws.
Remove the front top signboard by removing the 3 screws which attach it on the top and the 2 screws which attach
on the bottom.
2. Remove the front bottom grill by removing the 2 screws on the bottom of the grill and to either side which attach it
to the unit. Once the screws are removed, the front bottom grill slides down for removal.
3. Remove the 6 screws which are located in the pre-drilled holes used to mount the door hinges on the left door
pillar (when facing the unit). 3 screws are for the top hinge and 3 screws are for the bottom hinge.
4. Before the door can be removed, the tension stored in the top and bottom of the doors’ self closing springs must
be safely released. To release the tension in the springs, insert a rigid object into one of the door spring shaft’s
unoccupied tension lock screw holes. Gently turn the door spring shaft until you can easily unscrew the tension lock
screw. Remove the tension lock screw. Slowly remove the rigid object which was inserted into one of the spring
shaft’s unoccupied tension lock screw holes. When the rigid object clears the hole, the door spring will release the
stored tension and the door spring shaft will spin violently. Remember that there are two springs, the top and the
bottom, whose tensions must be released.
5. Have a second person secure and hold the door against the unit while the top hinge is removed.
6. Remove the top hinge by removing the 3 screws securing it.
7. Remove the door by lifting it until the bottom clears the bottom hinge. Ensure that the top and bottom springs
and springs’ shafts do not fall out.
8. Remove the bottom hinge by removing the 3 screws securing it.
9. The right top hinge becomes the left bottom hinge . Install the right top hinge into the left bottom position
using 3 screws. Ensure that the door hinge pins are facing up.
10. Flip the door over so that the hinged part is on the left side, when facing the door.
11. Install the door onto the bottom door hinge. The longer of the two pins pointing upward should be inserted into
the bottom spring shaft.
12. Have a second person secure and hold the door against the unit while the top hinge is installed.
13. The right bottom hinge becomes the left top hinge . Install the left top hinge onto the door. The two pins on
the door hinge should be facing down and the longer of the two inserted into the top door spring shaft.
14. Secure the top hinge to the unit using 3 screws.
15. The door should now be secured to the unit. Ensure that the door is secured before proceeding.
16. Tension must be added to the doors’ springs for the self closing action to work. Using two rigid objects that can
be inserted into the door springs’ unoccupied door spring shaft tension lock screw holes, turn the shaft
counterclockwise, when viewing the shaft from a birds eye perspective. 2 to 3 rotations of tension should be added.
17. Install the tension lock screw into the door spring shaft once tension has been added. Remember that steps 19
and 20 must be completed for both the top and bottom springs.
B
C
A
D
F
E
DD’
FF’
F’
D’
[BEFORE] [AFTER]
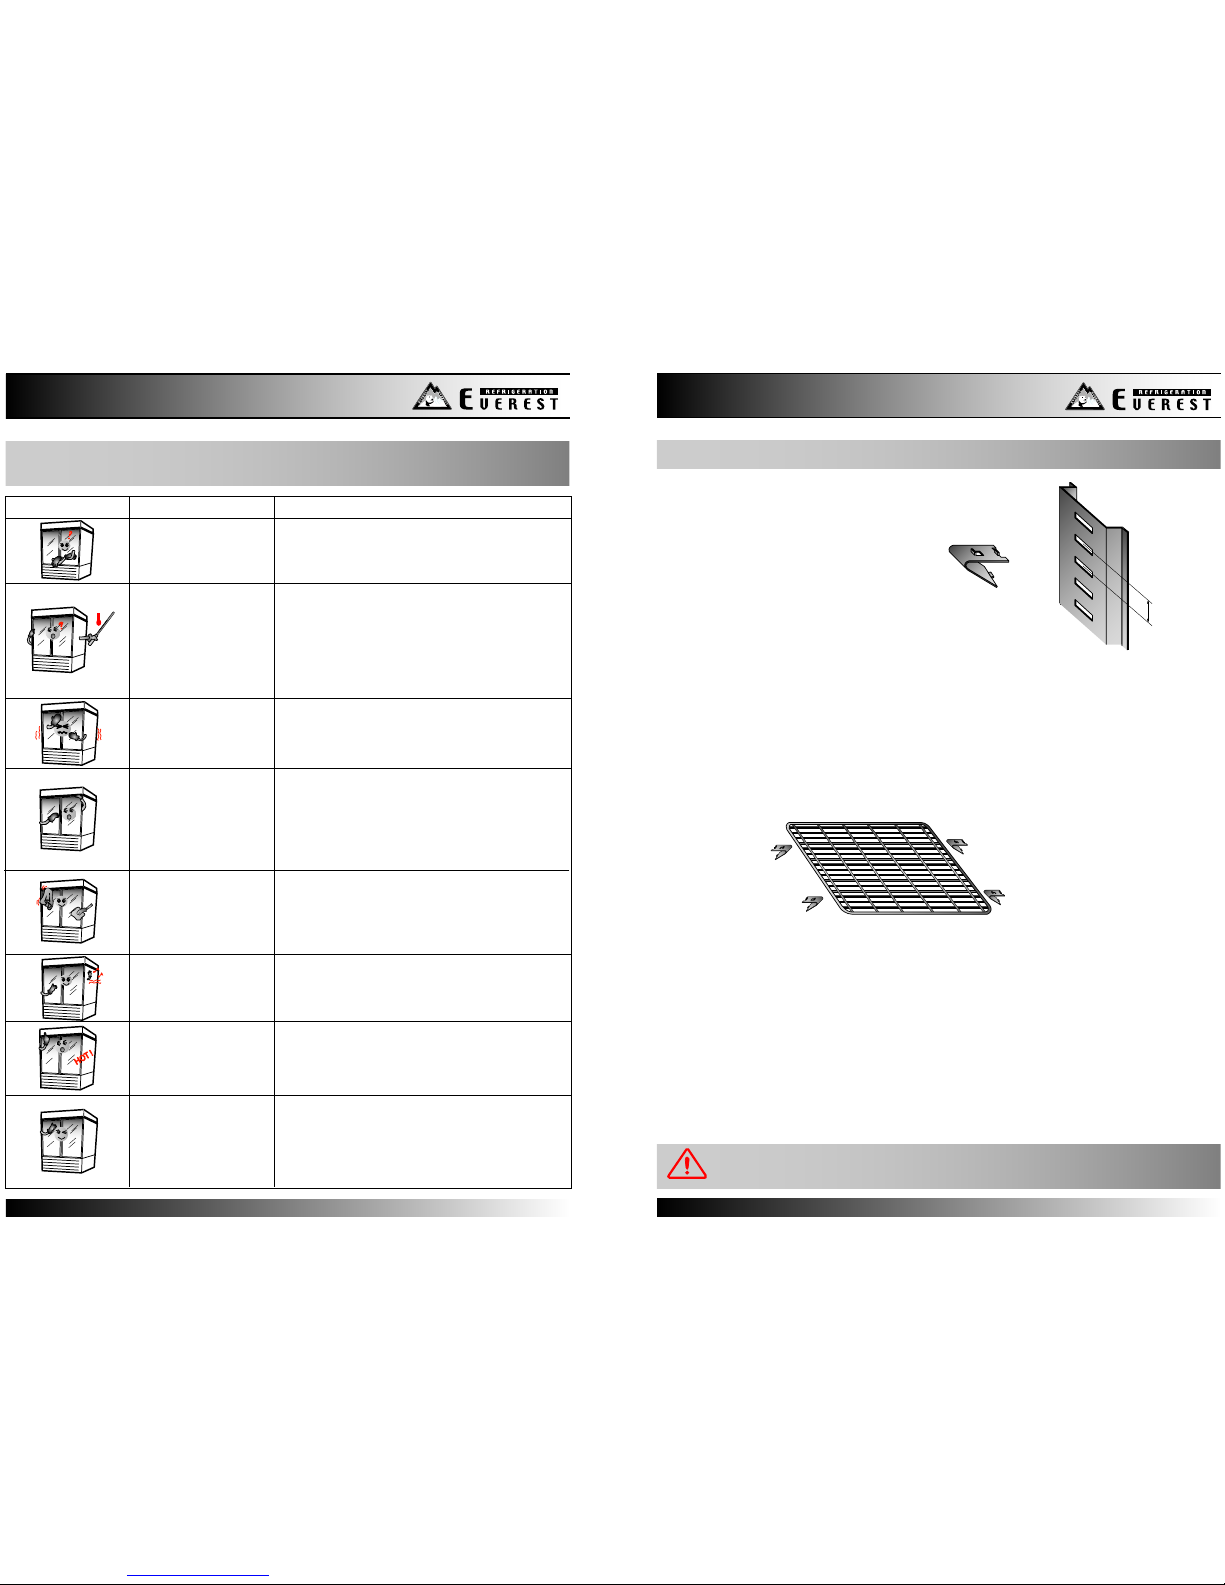
Warning - Never attempt to adjust a shelf when loaded!
Shelves
The unit’s shelves are adjustable so that
the refrigerated compartment can be
configured to suite your needs.
The shelf clip pilasters are spaced and
labeled in 1” increments for your
convenience.
To install a shelf, hook the shelf clips into the pilasters by inserting the top part of the clips
first and then the bottom. Each shelf requires 4 clips.
To remove a shelf, start by unloading the shelf. Second, remove the shelf itself. Finally,
remove the shelf clips by tilting them up and allowing the bottom of the clip to come out
first and then remove the top part of the clip from the pilaster.
Shelf Clip
Pilaster
1”
8
Shelves
Shelves
MANUFACTURING
BEFORE YOU CALL
Please check the following before requesting service
7
Trouble Shooting
Trouble Shooting
Symptom Possible Solutions
Condensing unit
fails to start
a. Check to see that that the electrical cord has
not been disconnected.
b. Check to see that the unit is turned on.
Refrigerated
compartment is too
cold
a. Adjust the temperature control to a warmer
setting.
Sound of water
dripping
a. This is the sound of the refrigerant circulating
during the compressor rest period and it is
normal.
Exterior walls are
warm
a. Heaters have been placed around the door
openings to prevent condensation buildup.
This is normal.
Condensation on the
interior
a. Condensation can occur during hot and
humid weather with frequent or prolonged door
opening. This is normal.
b. The doors might not be closed properly.Check
door alignment and gaskets for proper seal.
Condensation on the
exterior surface
a. Condensation on the exterior surface of the
unit is perfectly normal during periods of high
humidity.
b. Check door alignment and gaskets for proper
seal.
Noisy operation a. Check for loose parts.
b. Check for tubing rattle.
c. Check for a bent fan blade.
d. Check for damaged fan motor bearings.
e. Check that the unit is stable.
f. Check that the cabinet is level.
Cabinet does not
maintain proper
temperature
a. Check the door gasket for proper seal.
b. Check to see if the temp. control setting is too
high and adjust as necessary.
c. Avoid installing the unit next to heat
generating equipment and direct sunlight.
d. Avoid storing hot contents.
e. Make sure the doors are fully closed.
MANUFACTURING
HOT !
This manual suits for next models
29
Table of contents
Other Everest Refrigerator manuals


