Everfit TMILL-TITAN42-PAD User manual

TREADMILL
MODEL: TMILL-TITAN42-PAD
USER MANAUAL
Note: Following the principles of sustainable development, wemay modify
machines when necessary and will not notify again. It all depends onthe actual product.

CONTENTS
1.Product Brief ……………… …………………………………………....1
2.Security Precautions and Warnings……………………………….……...2
3.Installation Instructions ………………………………………………......5
4.Using Instructions .......…………………………………....…................7
5.Routine Maintenance and Instructions...…………………………….…...10
1
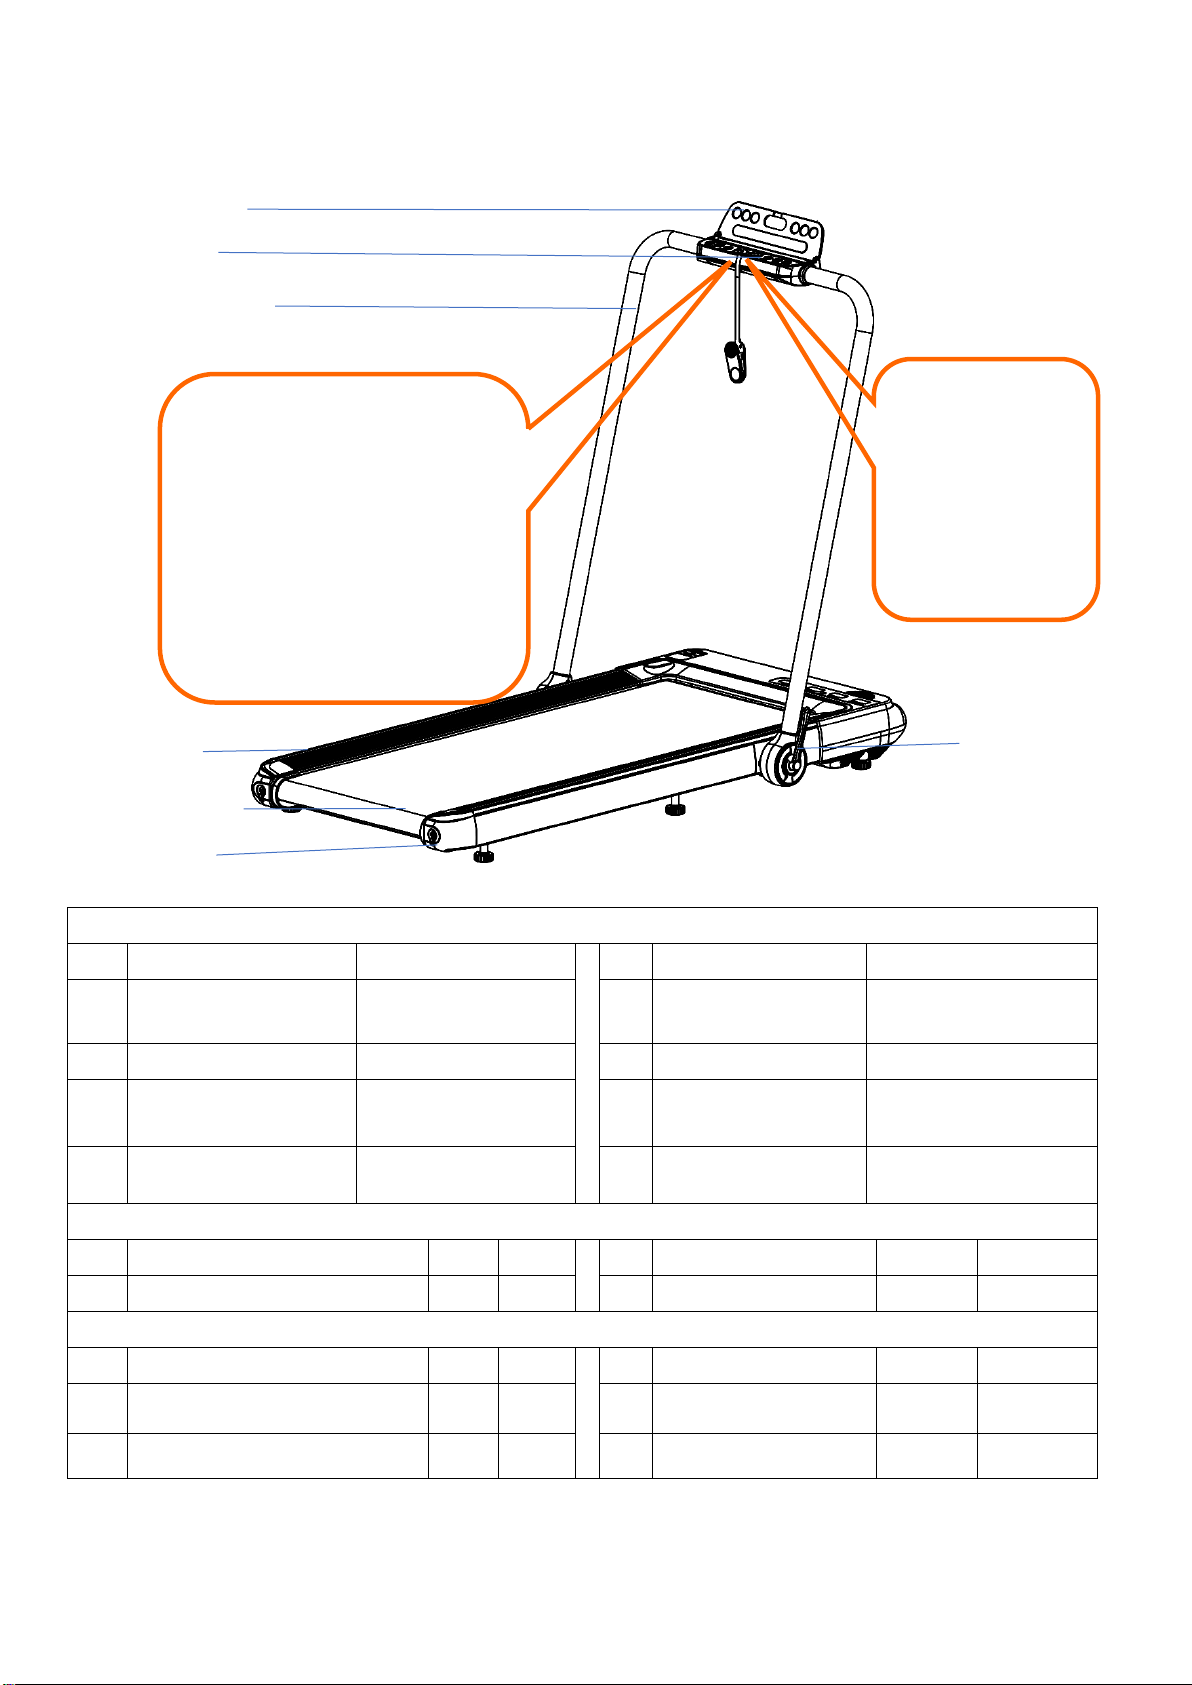
1. Product Brief
Button cover
Console
Upright column
Side rail
Running belt
End cap
Main parameters and parts list
No.
Parameters Names
Description
No.
Parameters Names
Description
1
Input power voltage
220-240V~; 50-60Hz
5
Running surface
420*1050mm
2
Motor power
2.5HP
6
Expand dimensions
1273*688*1062mm
3
Speed
Running 0.8-12km/h
Walking 0.8-6km/h
7
Function
Running mode Walking
mode
Bluetooth Speaker
4
Max user weight
100kg
Packing list
No.
Name
Unit
s
Qty
No
.
Name
Units
Qty
1
Complete machine
set
1
2
Accessories Bag
set
1
Accessories Bag
No.
Name
Unit
Qty
No
.
Name
Units
Qty
1
Inner hexagon wrench 6mm
pcs
1
3
Safety key
pcs
1
2
Wrench
pcs
1
4
User’s manual
pcs
1
Key points: the safety key is red in
color and put in the plastic bag of
the instruction manual
Inside, there is a red device with
magnet and red rope, it is the safety
key, put the magnet end on the
yellow label of the instrument!
(When running, pull the safety key,
the treadmill stop immediately!)
Lock the handle
If walking mode,
safety lock is
unplugged, the
treadmill will
continue to run
without affecting
the use

2
2. Security Precautions and Warning
In order to ensure your safety and avoid accidents, Please read the instructions
carefully before use.
Safety Instructions: This product was designed and manufactured with many safety
concerns in mind, but please follow the instructions below, just in case. We are not
responsible for any consequences arising from abnormal operations.
◆The treadmill must be placed on a flat ground; the treadmill should be placed indoors to
avoid moisture, and water should not be splashed on the treadmill. Do not place any
foreign objects on the treadmill. There should be a safe use space of 2m x 1m
(2000mm*1000mm) at the end, which is convenient for emergency jumping off.
(Emergency jump: both hands hold
While holding the handrail to support your body, step on the side bar with your feet and
jump off the treadmill from one side. )
◆The power plug must be grounded reliably, and the socket must have a dedicated circuit
to avoid sharing with other electrical equipment;
◆If the power cord is damaged, in order to avoid danger, it must be replaced by
professionals from the manufacturer, its maintenance department or similar
departments;
◆When the treadmill is not in use, keep the safety lock out of the reach of children; if it is
not used for a long time, please unplug the power cord;
◆Please keep the lubricating oil in the accessories bag out of the reach of children. If
accidentally swallowed or in the eyes, rinse with water and seek medical attention in
time;
◆This product is not suitable for disabled people and children; if you feel unwell or
mentally handicapped and lack common sense, it is prohibited to use it unless under the
supervision or guidance of a person responsible for its safety. ----If not followed, there
may be a risk of injury.
◆Do not use the treadmill in a dusty space, and keep a certain humidity in the room to
avoid strong static electricity, otherwise it may interfere with the normal work of the
electronic watch and the controller; please use the original accessories, and it is strictly
forbidden to replace them without permission.
◆Keep your hands away from all moving parts, and it is forbidden to put your hands and
feet in the space under the running belt.
◆Do not place the power cord near hot or moving objects; do not use the product

3
outdoors, in high humidity and sunlight.
◆Unplug the treadmill before moving it. Non-professionals are not allowed to disassemble
the machine without authorization, otherwise serious consequences may occur
◆Please clip the safety lock cable clip to the clothes when exercising to prevent safe
shutdown in case of emergency.
◆Please check whether the clothing is buttoned or zipped before using the treadmill, or
the clothing is too loose.
◆If you feel any abnormality such as discomfort during use, please stop exercising and
consult a doctor.
◆This product should not be used for a long time, as long-term use may easily cause the
electrical equipment of the treadmill to overheat and cause electrical failure.
◆Use qualified sockets to avoid danger. If the plug and socket are not compatible, do not
touch the plug and ask an electrician to handle it.
◆This product is suitable for home use, not for professional training and testing, nor for
medical purposes.
◆Do not use it in a state where the outer casing is cracked, cracked and detached
(internal structure exposed) or the welded part is cracked.
◆Do not jump up or down on the machine during exercise. ------ May cause injury due to
falling.
◆Do not use after eating, when tired, or in poor physical condition. ---- May cause
damage to health.
◆Do not allow pins, garbage or moisture to adhere to the power plug. --- May cause
electric shock or short circuit, fire. Never use with wet hands!
◆Please unplug the power plug from the outlet when it is not in use. ----Due to dust and
moisture, the insulation will be aged, resulting in leakage fire.
◆The product must be grounded. In the event of malfunction, grounding provides the
least resistance path for current to reduce the risk of electric shock.
◆This product is HC grade. If you are in doubt about the correct grounding of this product,
please entrust a professional electrician to check it.
Scale chart: When you start to assemble the treadmill, you can measure the length of the
screw through the following scale, which is convenient for installation.
4
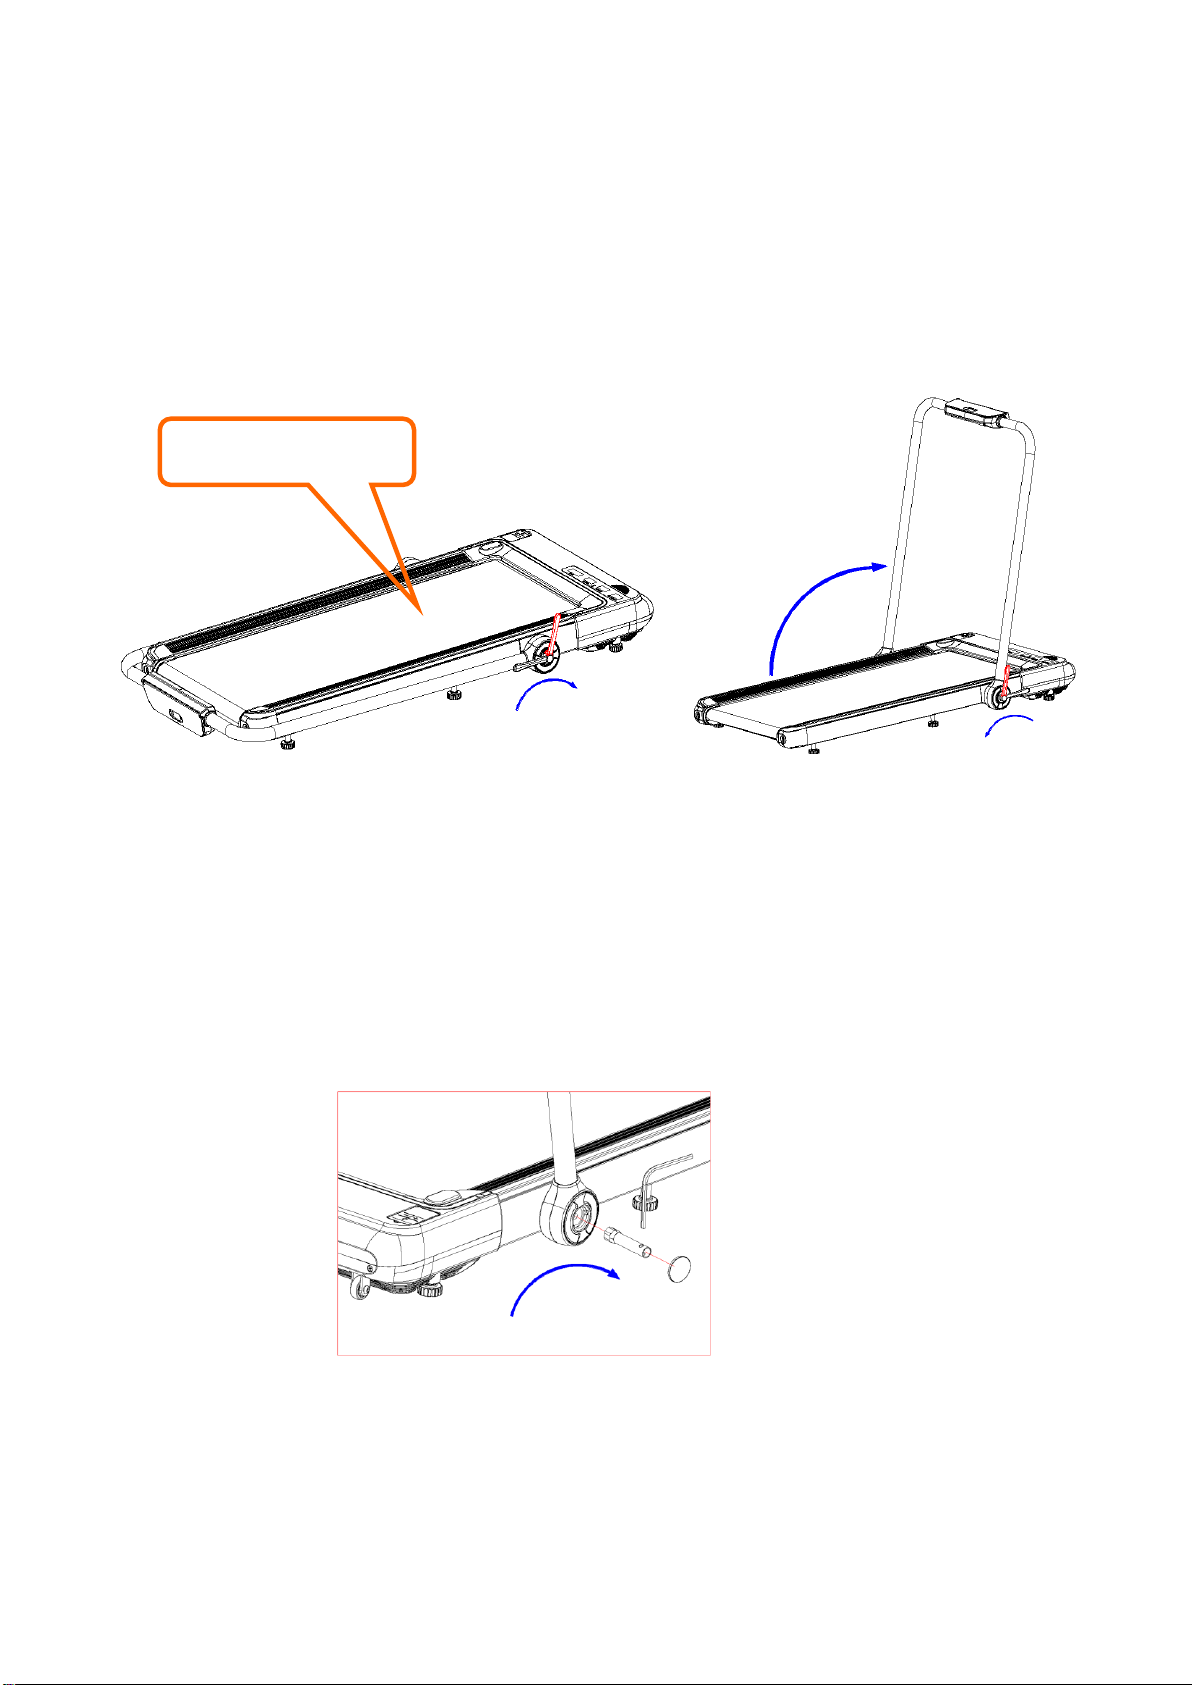
3. Installation Instructions
When installing, simple fix all screws first, then tighten the screws when the
installation of frame is done.
step 1.take the treadmill out of the carton and lay it flat on a level surface; then unscrew the
locking handle as shown in the figure below (Figure 1); lift the column up to the upper limit
point, and tighten the locking handle. (Figure 2: Note that require 2 or more people to
install.)
Locking handle strength adjustment
1. Pull out the soft round plug at the lower end of the left column;
2. Insert the hexagonal head end of the socket wrench in the accessory bag into the hole of
the left column to cooperate with the hexagonal nut, insert the provided hexagonal wrench
into the socket hole to form a simple T-shaped socket wrench, and turn it clockwise to lock ,
counterclockwise is loose;
3. Cover with a soft plug after reconciling;
Note: Check 6 adjustable foot pads at the bottom of the machine, make sure all the
foot pads are on the ground, otherwise abnormal noise and unnecessary damage
may be caused to the user during exercise.
Figure 2
Figure 1
Walking mode style
5
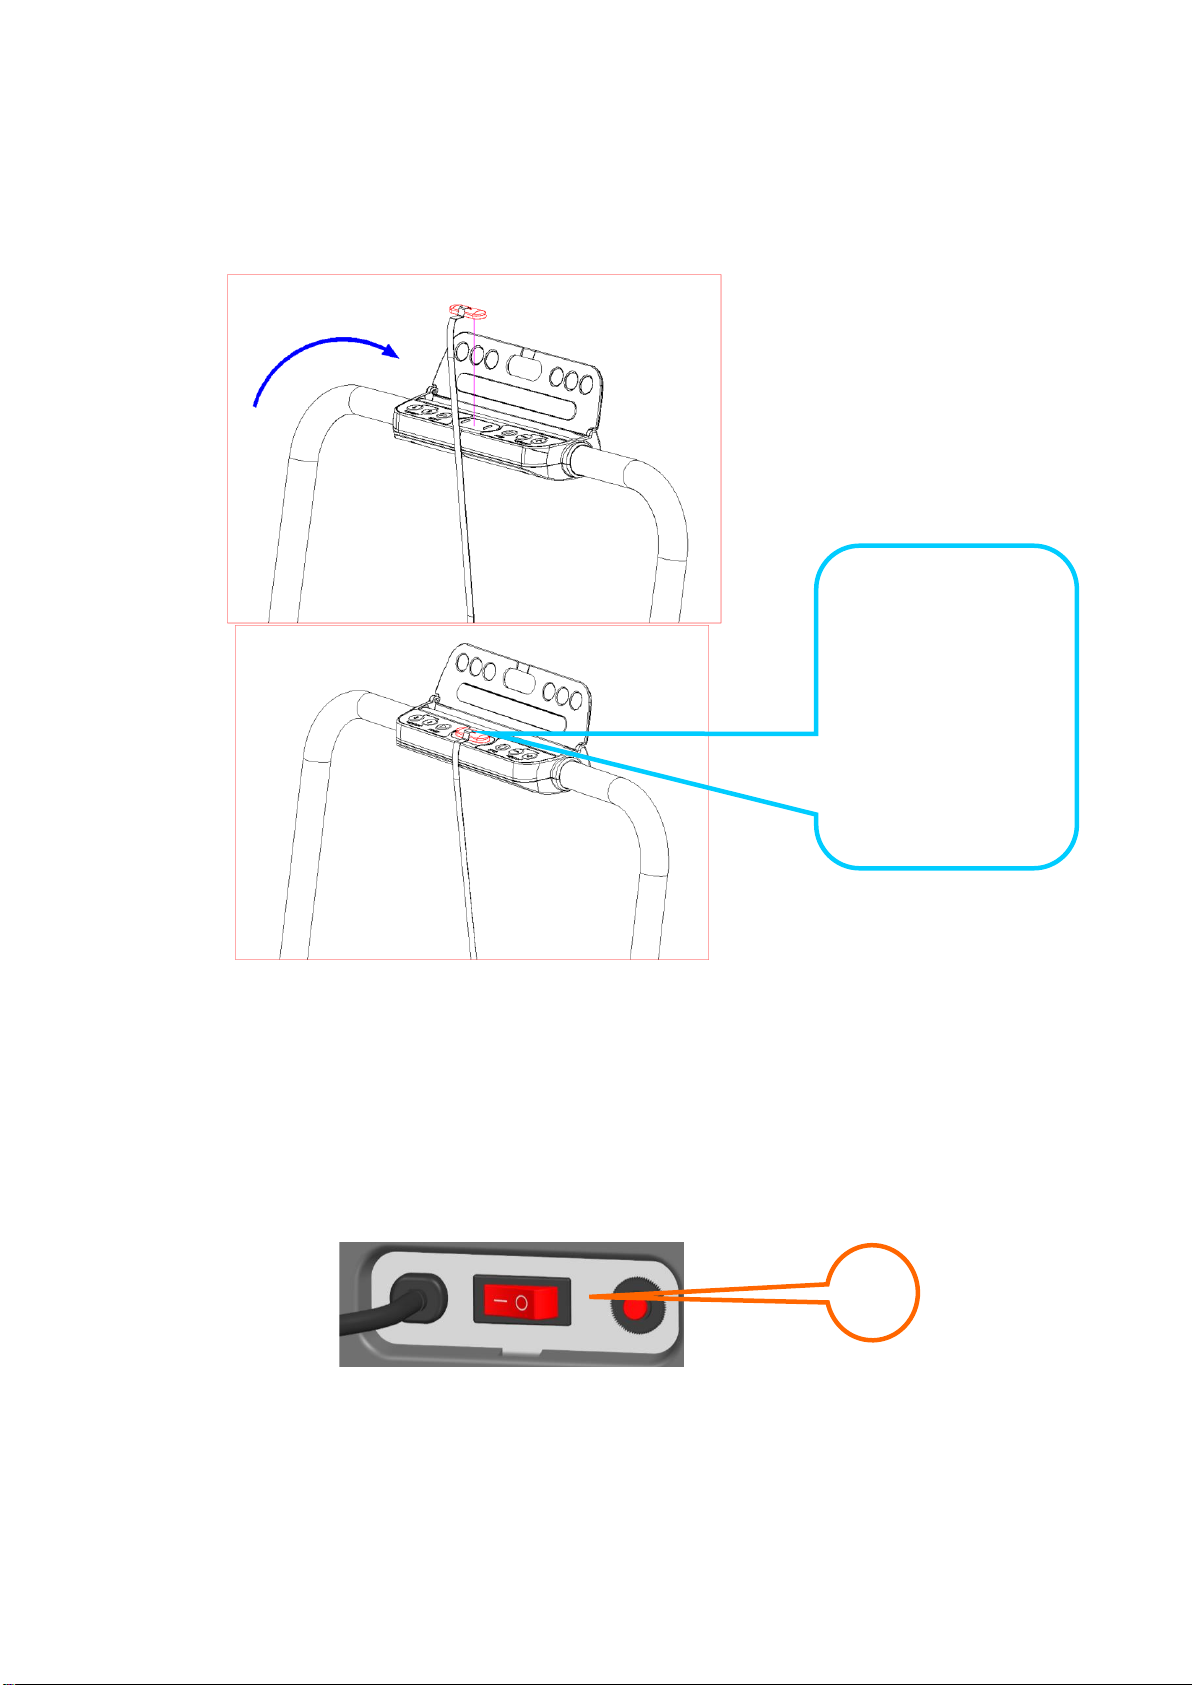
Step 2. Open the button cover first, then put the safety key in the position as shown in the
figure, and press the start button before the machine can run! (Note: The treadmill can be
started normally only if the safety key is placed on the yellow sticker in the middle under the
meter)
Note: After confirming that all the installations are completed according to the above
requirements, then lock all the screws uniformly, and check that there is no omission
before turning on the power.
4. Using Instructions
1. Use the treadmill:Plug in the power, turn on the switch (the switch is red), it will light
up, then you will hear a "beep", then the screen lights up.
2. Safety key introduction:
Put the safety lock completely on the yellow sticker of the meter, the treadmill can run; clip
the safety lock clip to the clothes, in case of an accident, pull the safety lock immediately to
stop the motor running immediately; if you want to continue to use Treadmill, please put the
Note: The color of the
safety key is red, find
the red safety key in
the accessory bag,
place the magnet
end on the yellow
label of the
instrument, and
press the start button
to start the machine!
1

6
safety lock back; in any case, unplug the safety lock to stop the treadmill;
3.Remote control, operation during walking function:
After the power is turned on, press and hold the "Start/Stop" button on the remote control for
about 7 seconds to perform a one-to-one pairing connection (the buzzer sounds several
times in succession, indicating that the pairing is successful, if the buzzer does not sound
continuously, the pairing is unsuccessful), pairing After the success, the remote control can
control the walking machine remotely; on the remote control, you can "start/stop", "speed+",
"speed-".
4.Console operation instructions
Button Function
Start/Stop:When the treadmill is stopped, press the "Start/Stop" button to start the
treadmill.During the running process of the treadmill, press the "Start/Stop" button, the
treadmill stops and all data is cleared.
Program:In standby state, press this key to cycle from manual mode to automatic
program; manual mode is the default operating mode of the system.
Mode:In the standby state, press this key to cycle through 3 different countdown operation
modes.
Speed shortcuts:After the treadmill is started, press this key to adjust the speed; when
the key is pressed, the treadmill speed will cycle in sequence of 3, 6, and 9.
Speed+/Speed-: After the treadmill is started, press this key to adjust the speed, press the
"+" key to increase the speed, and press the "-" key to decrease the speed;
Display function
Time display: When the time indicator is on, it displays the running time in manual mode or
the countdown of running time in mode and program.
Speed display: When the speed indicator light is on, the current running speed value is

7
displayed.
Mileage display: When the indicator light of mileage is on, it will display the accumulated
distance in manual and program mode or the distance in program mode.
Calorie display: When the calorie indicator light is on, it will display the calorie value during
exercise in manual and program mode; or the calorie value during exercise in program and
mode operation.
The Range of Data display for each parameter are as follows:
TIME 0-99.59 (minutes)
RUN SPEED 0.8-12 (km/h)
WALK SPEED 0.8--6KM/H
DISTANCE 0-99.9 (km)
CALORIES 0-999 (Kcal)
Code Meaning of error messages
5. Routine maintenance and Instructions
Open the motor cover at least twice a year, and vacuum the motor. A thorough cleaning can
Error code
Description
Solution
E1
Communication
Abnormal: when the
power is on, the
connection between
lower controller and the
console is abnormal.
Possible Cause:
The communication between the lower controller and
console is blocked, check each joints between the controller
and console, ensure that each core is fully plugged in.
Check the the connection line, replace it if it’s damaged.
E2
No signal from motor.
Possible Cause:
Check the motor cable to see whether it is connected well or
not, if not, connect the motor wire again.
Check the motor cable to see whether it is damaged or has
a burnt smell, if yes, replace the motor.
Check the speed sensor to see whether it is correctly
installed or damaged
E5
Over current
protection:
In working , the
lower controller
detects the current to
be over 6A for more
than 3 seconds.
Possible Cause:
Overloading leads to excessive current, and the system
stops out of self-protection, or some part is stuck, causing
the motor to stop. Adjust the treadmill and restart it. Check if
there is liquid or burnt smell while the motor is running, if
yes, replace the motor; check if the controller has a burned
smell, if yes, replace the controller; check the power supply
voltage, if it does not match the specifications, change into
correct voltage and test the machine again.
E6
Explosion-proof
impact protection:the
abnormal voltage or
motor cause the
faulty of circuit that
drive the motor.
Possible Cause:
Check if the power supply voltage is 50% lower than normal
voltage ,use the correct voltage and test the machine
again;check if the controller has a burnt smell and replace
the controller; Check if the motor cable is connected and
connect the motor wire again.
E7
No safety key
Put the safety key on the right place.

8
extend the life of your treadmill. Clean the exposed parts on both sides of the running belt to
reduce the accumulation of impurities under the running belt. Make sure your sneakers are
clean and avoid carrying foreign objects under the running belt to wear out the running
board and running belt. The surface of the running belt must be wiped with a damp cloth
moistened with soap, taking care not to splash water on the electrical components and
under the running belt.(WARNING: Before cleaning, maintaining or moving the
treadmill, be sure to unplug the treadmill. )
Running Belt alignment:
⚫Put electric treadmill flat on the ground. Make the electric treadmill run at a speed of
about 6-8km/hour .
⚫If the running belt is closer to the left, rotate the left adjusting bolt with 1/2 turn
clockwise, then rotate the right adjusting bolt with 1/2 turn counter-clockwise. (Picture A)
⚫If the running belt is closer to the right, rotate the right adjusting bolt with 1/2 turn
clockwise, then rotate the left adjusting bolt with 1/2 turn counter-clockwise. (Picture B)
Figure A Figure B
Adjustment method for running belt slippage:
When you use the treadmill for a long time, the running belt or V-ribbed belt will become
loose due to a little wear or stretch deformation. At this time, you must make appropriate
adjustments for safe use.
Judgment method: During your normal running, when your feet fall on the running board, if
you feel that the running has occasional pauses, it means that the running belt or the V-V-
belt is somewhat loose, and further confirmation must be made.
Step 1: Use a multi-purpose wrench to remove the motor cover screw, let the treadmill run
at a speed of 1 km/h, then stand on the running belt, hold the side armrest or front
handle with both hands, and press your foot slightly to run belt.
A. If you observe that the instantaneous stepping pressure causes the running belt to stop

9
rotating, but the V-ribbed belt and the front roller are still rotating, it means that the
running belt is a little loose and must be adjusted properly for safe use.
B. If you observe that the instantaneous stepping pressure causes the running belt and the
V-ribbed belt to stop rotating, but the motor is still running, it means that the V-ribbed belt
is somewhat loose and must be properly adjusted for safe use.
C. If the instantaneous stepping pressure cannot stop the running belt from rotating, it
means that the tightness of the running belt and the V-ribbed belt is appropriate.
Step 2: Turn off the power of the treadmill or stop the treadmill, and use an L-shaped Allen
wrench (6mm) to adjust the adjusting screw on the motor base according to the
situation. Gently flip the V-ribbed belt between the motor shaft and the front roller
by hand; (if the V-ribbed belt can be turned over 100%, it means it is too loose; if
the V-ribbed belt can be turned over 50%, it is more appropriate.)
Step 3: Finally, lock the motor base and install the motor cover; use a multi-purpose wrench
to fix and lock the removed motor cover screws.
Treadmills are sports equipment, so they need propermaintenance and maintenance.
The maintenance and maintenance suggestions are as follows:
1: Due to wear and damage, frequent inspections are required; worn or damaged
accessories (such as motors, electric controls, power cords,Running belt), after
maintenance or professional repair, its safety level is the same as that of the factory.
2: Immediately replace those defective parts and repair the equipment idle: (such
as power cord)
3: Pay special attention to the components that are most prone to wear. (like a
running belt)
Table of contents
Other Everfit Treadmill manuals

Everfit
Everfit TFK110 MAG User manual

Everfit
Everfit TMILL-360-BK-R01 User manual

Everfit
Everfit TFK 100MAG User manual

Everfit
Everfit TFK655 SLIM User manual

Everfit
Everfit TFK 750 User manual

Everfit
Everfit TFK350 User manual

Everfit
Everfit TFK 600 User manual

Everfit
Everfit NEW TFK 135 SLIM User manual

Everfit
Everfit TFK 430 User manual

Everfit
Everfit TFK I 250 EVO User manual

Popular Treadmill manuals by other brands
ICON Health & Fitness
ICON Health & Fitness PROFORM PERFORMANCE 750 user manual

Insportline
Insportline Hill Pro user manual

Smooth Fitness
Smooth Fitness EVO 3i user manual

Keys Fitness
Keys Fitness KF-T4-0 owner's manual

Domyos
Domyos TC 140 operating instructions

Yowza
Yowza delray elite Assembly instructions and owner's manual


