Evergreen Performa III User manual

Before you get started...
The Evergreen Performa III processor upgrade kit contains everything
needed to install the upgrade. Gather your system manual as a reference
to answer specific questions about your system.
The kit includes:
• Performa III processor upgrade
• Performa III Installation Guide
• Performa III INSTALL Diskette
• Performa III INSTALL CD
• Product Warranty Card
1. Read entire installation guide before proceeding.
Gather the following items for installation:
• Tool for opening the system case
(usually a screwdriver)
• Motherboard and system manuals
• Performa III processor upgrade
• INSTALL Diskette and CD
2. Run INSTALL software.
Shut down your computer properly. Insert the INSTALL Diskette into
drive A. If your system does not boot when you turn the system on,
download the appropriate file from our web site, and create a new
install diskette using a fresh floppy. (http://www.evergreennow.com,
go to the “Support” section and choose your product.) INSTALL will
display system and performance information. Please write down this
information for your records.
Dhrystones:
Mediastones:
3. Upgrade BIOS if necessary.
INSTALL may indicate there is a motherboard specific note for your
system. Please view this note and jot down any relevant information
before proceeding.
The INSTALL program will tell you:
A. Your system requires a BIOS upgrade. The program will
guide you through the process described in steps 4 & 5.
B. No BIOS update required. Proceed with the installation by skipping
to step 6.
(Only the BIOS upgrade option (A) requires use of the CD-ROM)
4. Upgrading (“Flashing”) the BIOS
• If INSTALL indicates Evergreen has a BIOS upgrade for the system
on the CD, remove the floppy diskette and reset the system.
• Allow the system to load the Windows Operating System.
• Insert the INSTALL diskette into drive A.
• Insert the CD into the CD-ROM drive. If the program does not
start automatically, run SETUP.EXE from the CD. Follow the
onscreen instructions to copy the BIOS upgrade files.
• Exit Windows, and restart the system, with the INSTALL Diskette
still in the A: drive.
• In the “After Upgrade” section, INSTALL will display
“When the INSTALL program has finished loading, please choose
the “Update BIOS” option to proceed.”
Award BIOS Update.
• INSTALL presents a new screen. Follow the instructions and press
the ENTER key.
• The “BFLASH LOADER UTILITY” screen appears on a black
background. This automated process creates a backup of your
existing BIOS, verifies a successful backup, and installs a new
BIOS on your system. Note the onscreen progress bar and
please wait while the program executes these steps.
CAUTION: DO NOT TURN THE SYSTEM OFF DURING THIS
PROCESS! IF YOU DO, IT WILL RENDER YOUR SYSTEM INOPERABLE.
• Once the BIOS upgrade is complete, the program will prompt you
to either press F10 to EXIT or F1 to RESET (Figure 4-1). Press
F10, remove the INSTALL Diskette, and restart the system. If you
accidentally press F1, you will have to manually reset the computer.
• The boot process will be interrupted by this message:
“CMOS checksum error –Defaults loaded.” THIS IS NORMAL
AND DOES NOT CAUSE ANY HARM TO YOUR SYSTEM.
Press F2 to enter Setup, then press F10 to Save and Exit.
Change the “N” to a “Y” and press “Enter”. The CMOS error is
fixed and will not occur again.
5. Test BIOS Upgrade.
• Restart into Windows and run standard applications to verify that
the system is running correctly.
• Check that all accessories (printers, modems, etc.) are functioning
properly.
• If everything runs correctly, move to step 6.
Installation Guide
PROCESSOOR
Upgrade
Performa III
Processor Upgrade
Figure 4-1
6. Open case.
Before you open your system “ground” yourself (discharge any static
electricity) by touching an unpainted metal object, such as the system
chassis. Leave the system plugged in and grounded (but turned off)
throughout the install process, and touch the chassis frequently.
7. Remove the heatsink/fan power connector from the motherboard.
Before removing the original Slot 1 processor, disconnect the
heatsink/fan power connector that is connected to the main system
motherboard. Observe the orientation of the black and red wires and
the way the connector attaches to the motherboard pins, you may need
to duplicate this connection with the upgrade fan power connector.
This connection needs to be detached to allow you to remove the
processor module assembly.
Note: Not all Slot 1 processors have fans connected to them.
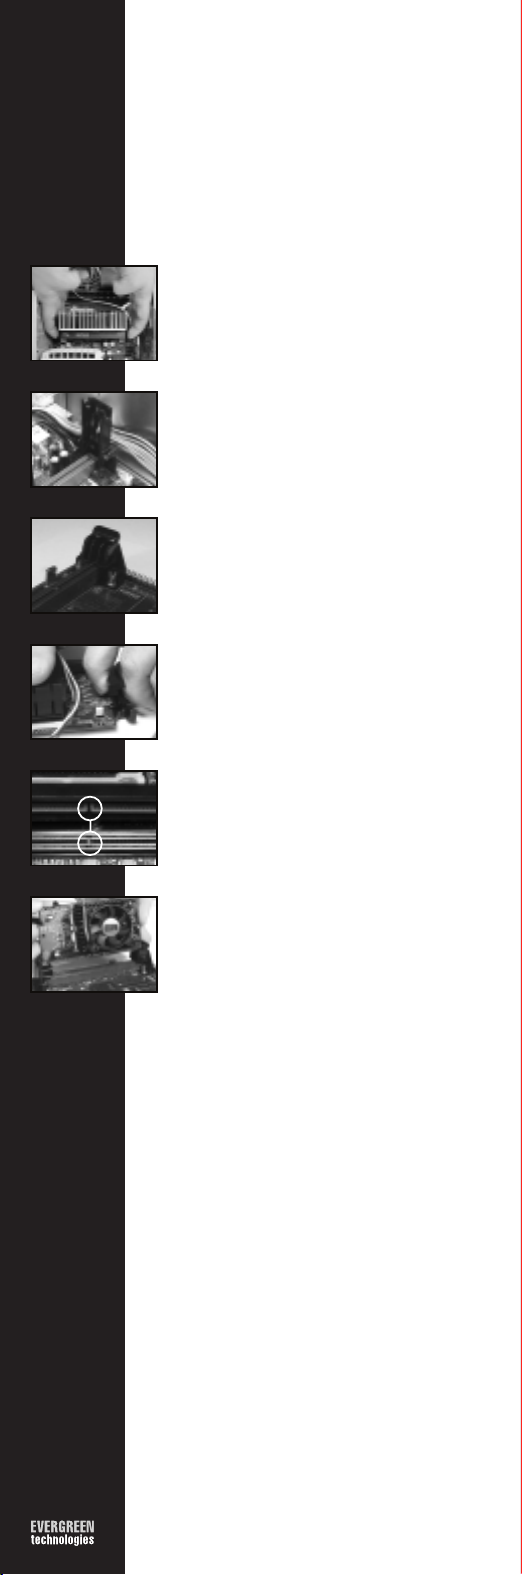
8. Remove the original Slot 1 procesor. (Figure 8-1)
Remove the original Slot 1 processor by pushing the tabs on the top
corners of the Slot 1 processor in toward the center of the module.
After the tabs have been moved into the proper position, grasp the
card with one hand on each side of the unit. Slowly and evenly pull
the component up out of its seated position. Your system manual may
have additional information on removing the original processor.
9. Identify the Slot 1 rails on your motherboard.
The Pentium II and the Celeron “stick” processors use different types
of rails to hold the processors in place. First identify which type you
have. Figure 9-1 shows the Pentium II rails and Figure 9-2 shows the
Celeron “stick” rails.
10. Case Removal
If you have the Pentium II rails skip to step 11. If you have the Celeron
rails, remove the black case from the Performa III. First, lay the card
flat with the fan facing up. With one hand holding the fan down, gently
lift the arm closest to the fan wires away from the card (Figure 10-1).
The case is hinged and opens like a door. Once you have the case
open, grasp the card and pull upward to release it from the notches.
Next, slide the card out of the case being careful not to damage the
Performa III.
11. Installing Evergreen’s upgrade
Installing Evergreen’s upgrade is the reverse of removing the Slot 1
processor module. Find the notch on the bottom of the upgrade and
make sure you are aligning it properly (Figure 11-1).
With the notch properly aligned, slowly and evenly insert the upgrade
by pushing down on the top edge of the card until it seats fully into
the processor slot (Figure 11-2).
12.Secure card into place
Pentium II rails: Push the tabs away from the card until they “click”
into place. Celeron rails: Push down evenly on the top edge of the
upgrade to ensure the card is inserted securely into the slot.
13. Connect Heatsink/Fan Cable
There are 2 types of connectors; a standard pass through that attaches
to your computer’s power supply and a plug type connector that
attaches to pins on the motherboard. The Performa III comes equipped
with both.
•Pass through Connector Install (Large 4-Pin Connector)
When the upgrade is seated and locked, attach the heatsink/fan
connector to the computer’s power supply. If you have a power
cable that is not being used, plug the four-pin/male connector into
the fan’s power supply.
If all power cables are being used, disconnect the power cable from
the back of a hard drive or CD/ROM drive. Next, plug the female
end of the fan connector into the power supply you just removed.
Plug the male end of the fan connector back into the drive.
•Motherboard Connector Install (Small 3-Pin Connector)
When the upgrade is seated and locked, attach the fan connector
to the same pins on the motherboard that were used for the fan
connector. Check the orientation of the black and red fan wires to
make sure they are in the same positions as the original.
14.Test installation, Reassemble System
Insert the INSTALL Diskette into drive A and start the computer.
INSTALL will display your Before and After performance.
Dhrystones:
Mediastones:
Remove the INSTALL diskette and restart your computer to verify
operation. The Performa III installation is complete.
Reassemble your computer and complete the owner registration process
at: www.evergreennow.com
75-R000-0
Evergreen Technologies, Inc. 808 NW Buchanan Ave. Corvallis, OR 97330-6218
Tel: 541.757.0934 Fax: 541.757.7350 Web: www.evergreennow.com
Contact Information:
Americas
Sales
tel: (541) 757-0934
fax: (541) 757-7350
Technical Support
tel: (541) 757-7341
fax: (541) 752-9851
www.evergreennow.com
Europe
Sales
tel: +44 (0) 1793 601300
fax: +44 (0) 1793 539799
Technical Support
tel: +44 (0) 1793 601333
fax: +44 (0) 1793 539799
www.evergreennow.co.uk
Figure 8-1
Figure 10-1
Figure 11-1
Figure 11-2
Figure 9-2
Figure 9-1
Table of contents


