Evermount EM-SBBU User manual
1 SBBU.SB.102011.IM
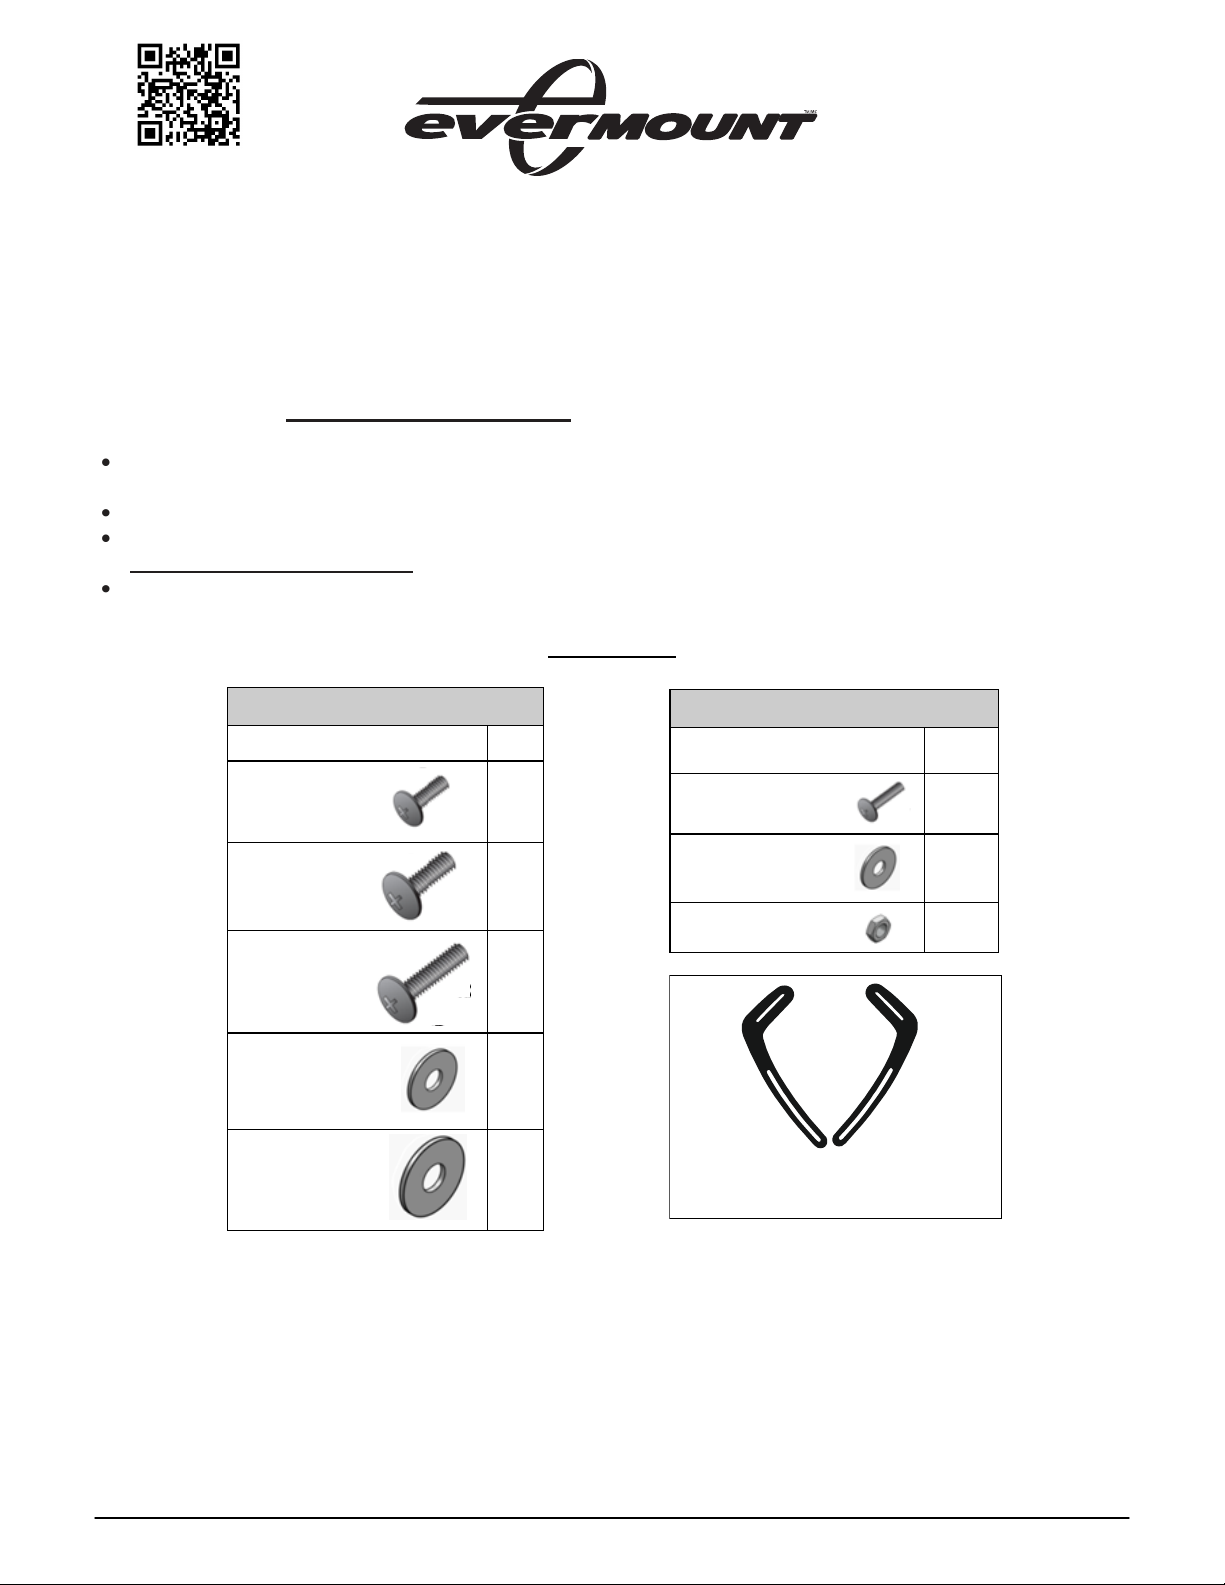
PARTS LIST
EM-SBBU
PLEASE READ THESE INSTRUCTIONS CAREFULLY AND KEEP FOR FUTURE REFERENCE! IF
YOU DO NOT UNDERSTAND THE INSTRUCTIONS, OR DO NOT FEEL THAT YOU CAN FOLLOW
THEM SAFELY, CONTACT A QUALIFIED CONTRACTOR. THE WARRANTY WILL BE HONOURED IF
ACCOMPANIED BY AN ORIGINAL SALES RECEIPT, AND ONLY IF THE INSTRUCTIONS HAVE
BEEN FOLLOWED EXACTLY.
Before beginning, please check to ensure you have all the parts listed below. To acquire missing
parts please visit www.everik.com/parts.html or call 1-866-604-6966.
The EverMount EM-SBBU is an universal soundbar bracket that is compatible with most flat panel
models and soundbar models.
A second person will be required to assist with the installation.
For additional assistance with your installation, you can view instructional videos at
www.SoundbarBrackets.com.
Do not exceed maximum load 35 lbs.
Instructional videos available at
SoundbarBrackets.com
Bolt Bag A
Description Qty.
M6x16mm 2
M8x16mm 2
M8x25mm 2
Medium washer 2
Large washer 2
Bolt Bag B
Description Qty.
#10x3/4” bolt 2
Small washer 4
#10 hex nut 4
Soundbar Brackets
x2
2 SBBU.SB.102011.IM
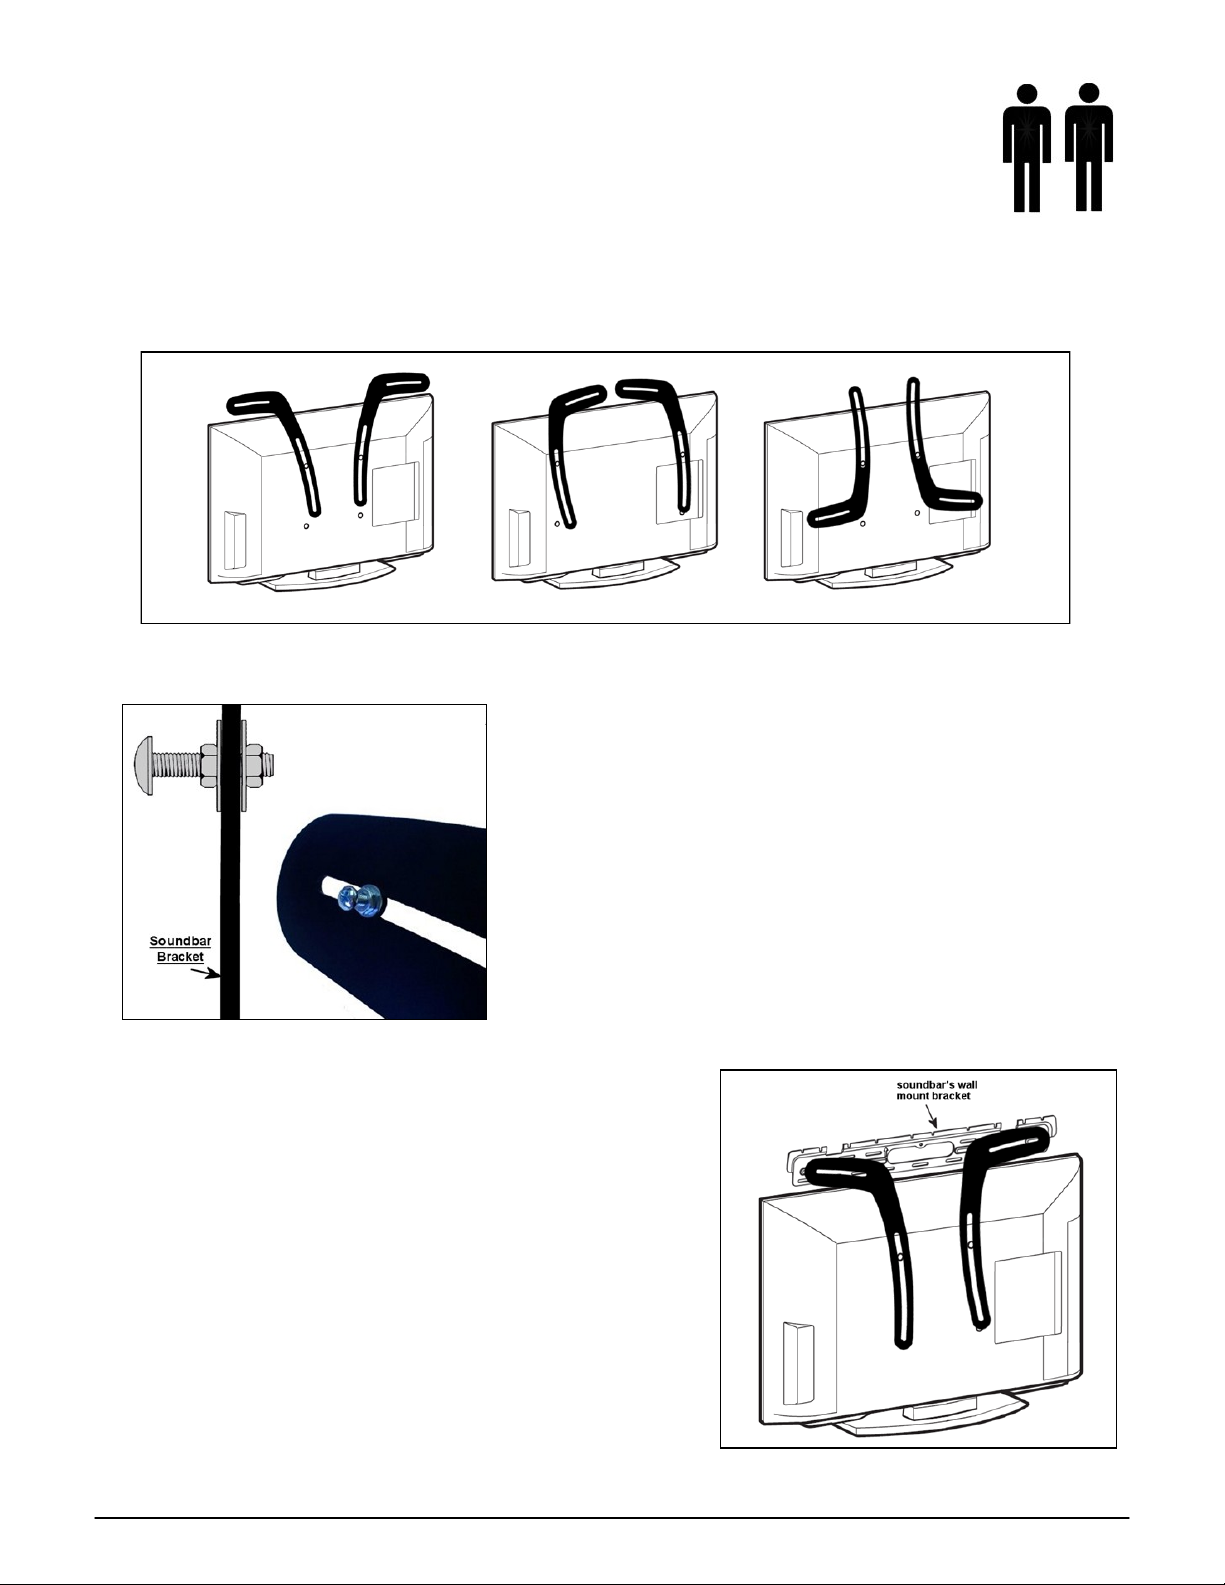
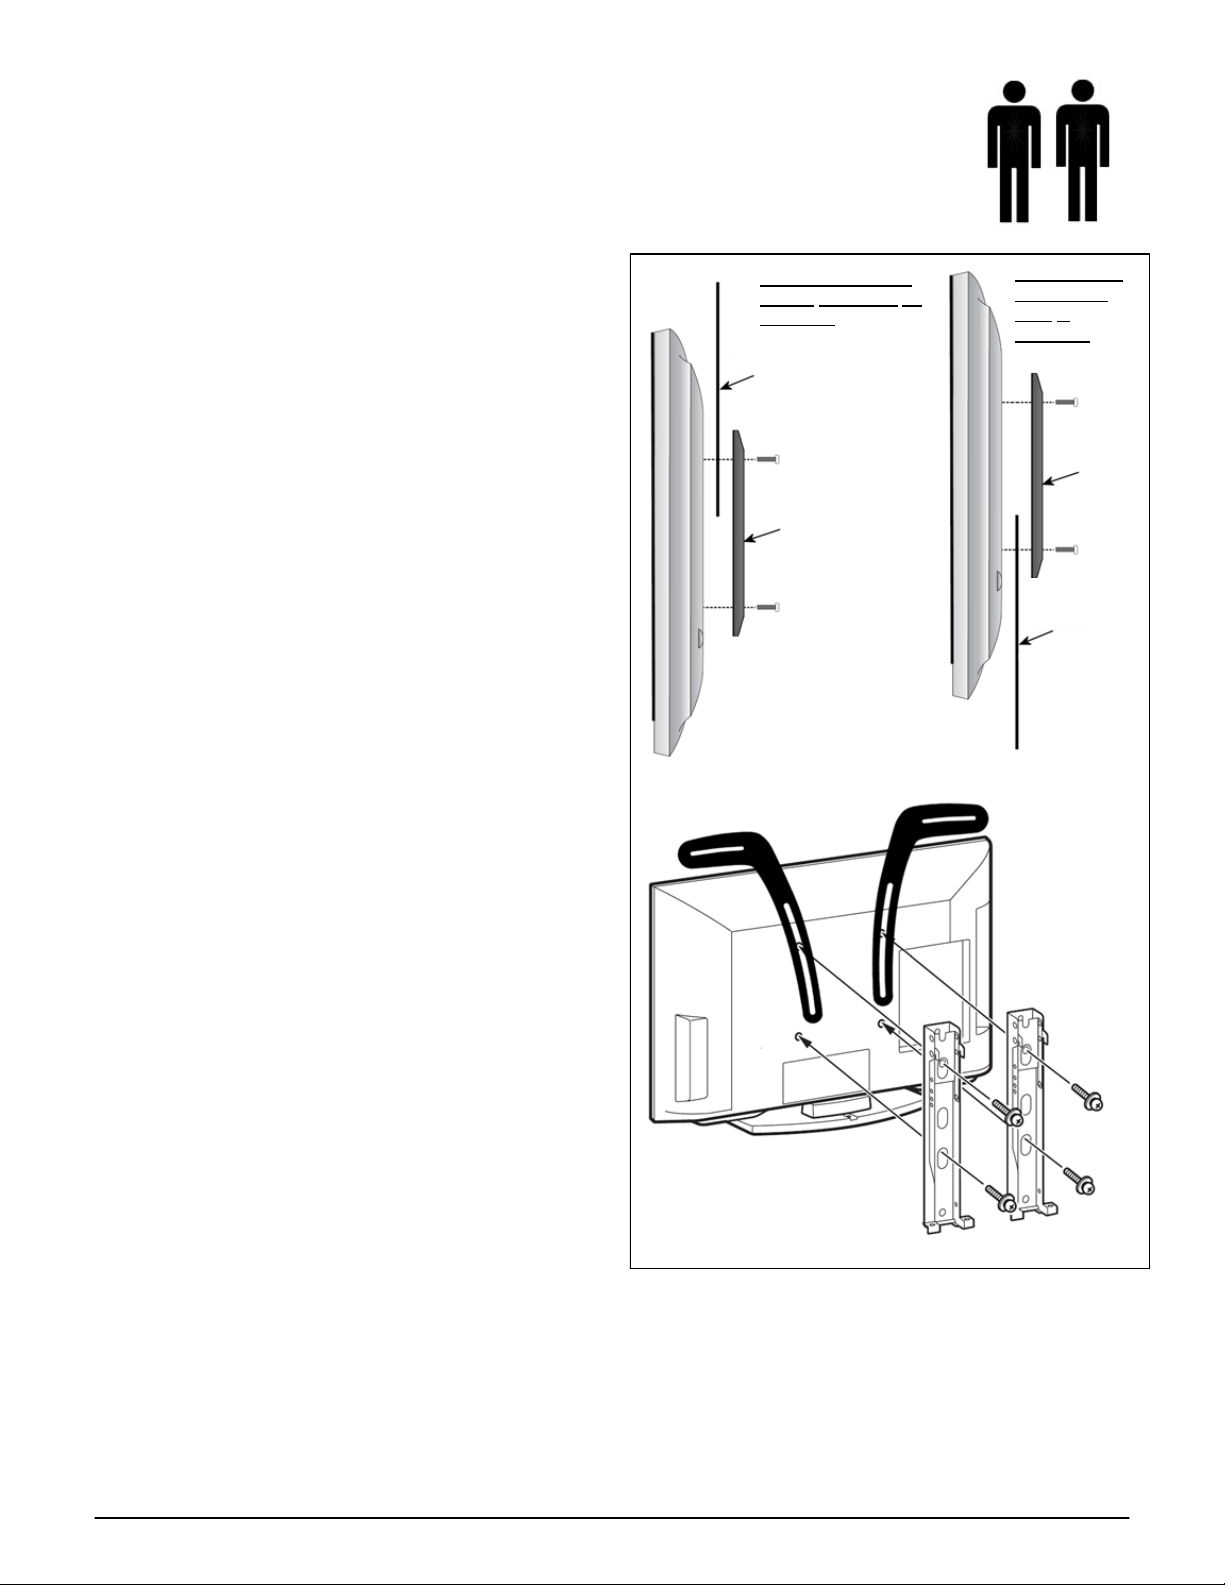
Configuration 1: Installing Soundbar Brackets to a flat panel on a pedestal
Step 1: Select the two bolts and two washers from Bolt Bag A that best fit the mounting hole pattern
on the back of your flat panel.
Step 2: See Fig. 1 for examples of multiple configurations you can use to adapt the bracket to
match your flat panel and soundbar requirements. Use the configuration that works best with your equipment.
NOTE: Only secure Soundbar Brackets with one bolt in each bracket as shown in diagrams. Additional washers
may be used as spacers if needed.
Step 3: There are three ways to mount your soundbar to the
Soundbar Brackets, depending on the mounting specifications of
your soundbar:
NOTE: Due to the lack of industry standard in mounting patterns
on soundbars, the provided hardware in Bolt Bag B may not suit
your specific model. Additional soundbar hardware may be
required.
A) If your soundbar has tear drop or keyhole mounting holes
Use all the parts from Bolt Bag B and attach the bolts as shown in
Fig. 2. Hang your soundbar on the bolts, making sure the bolt
head fits properly in the holes. Make desired alignment
adjustments and tighten all bolts. Do not over tighten.
B) If your soundbar is already fixed to a soundbar wall mount
Using hardware from Bolt Bag B, attach your soundbar’s wall mount
bracket to the Soundbar Brackets as shown in Fig.3.
C) If the back of your soundbar has threaded mounting holes
Using hardware from Bolt Bag B, screw your soundbar directly into
the brackets. Make desired alignment adjustments and tighten all
bolts. Do not over tighten.
Fig. 1
Fig. 2
Fig. 3
3 SBBU.SB.102011.IM
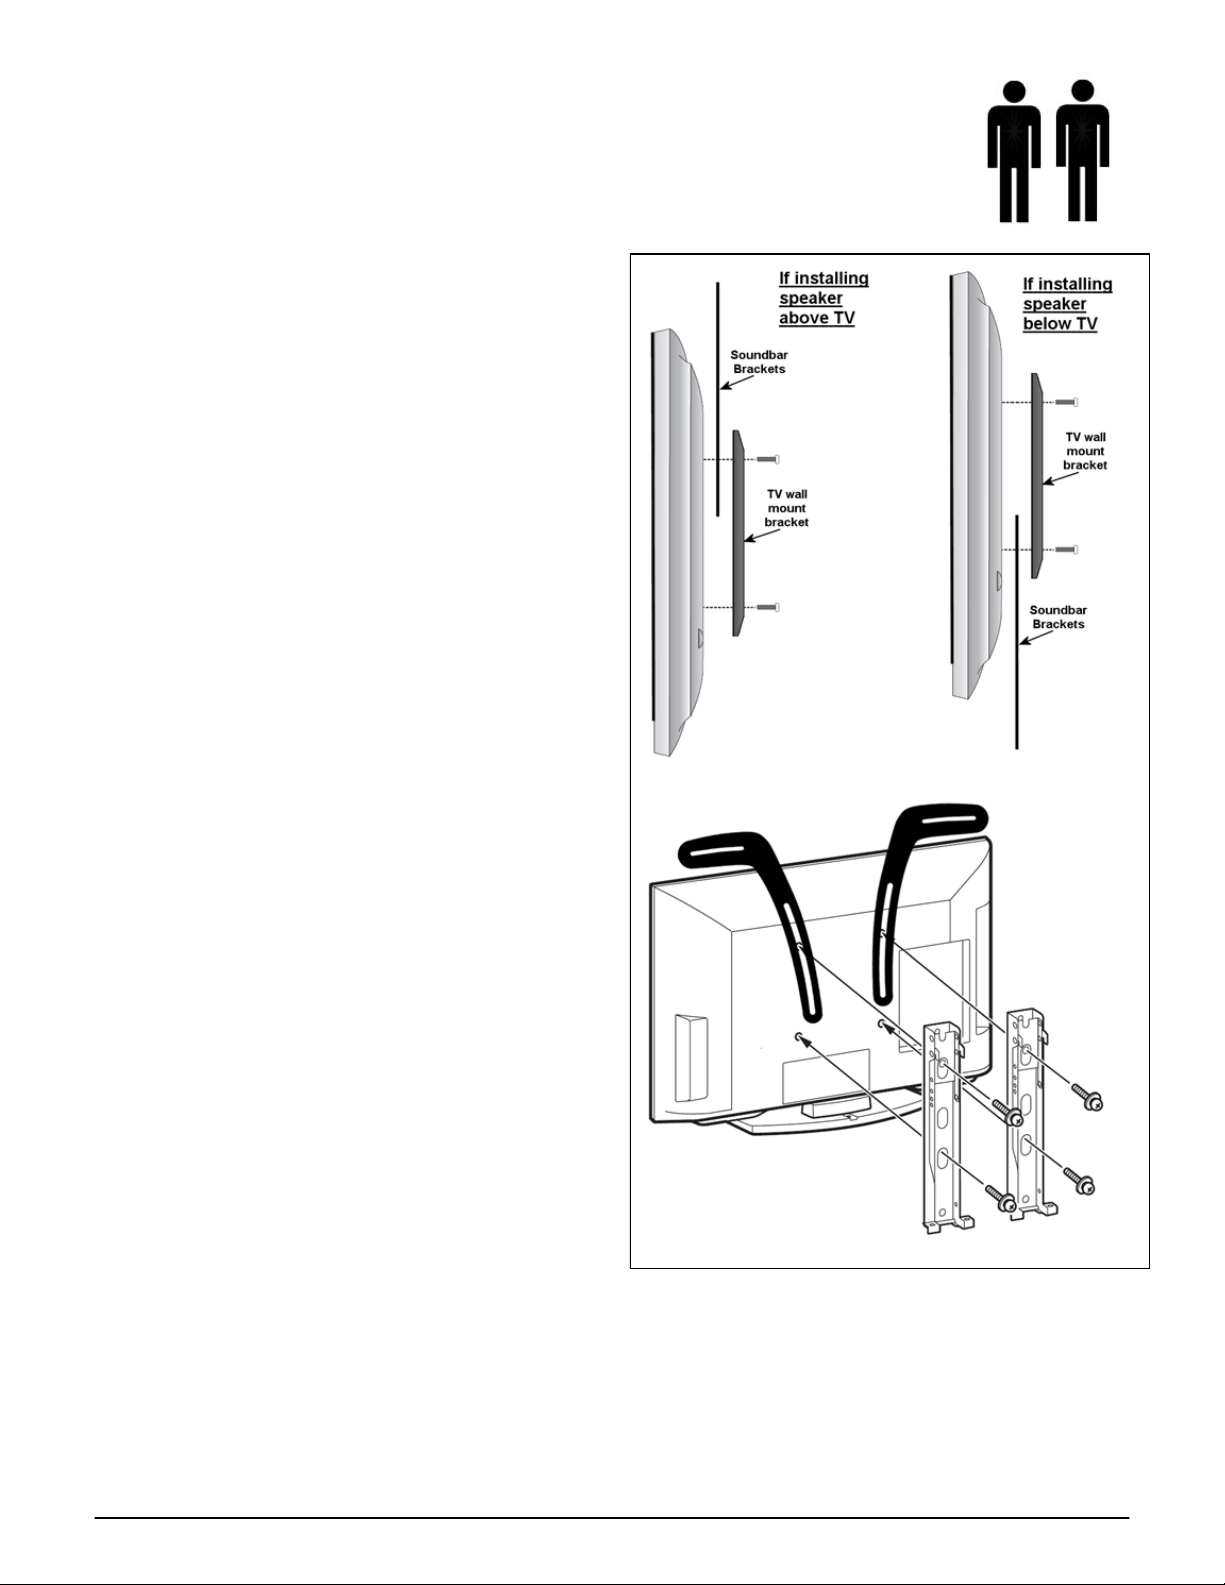
Configuration 2: Installing Soundbar Brackets to a wall mounted flat panel
NOTE: This product is designed to be sandwiched in between the back of the flat panel and the
other wall mount as shown in Fig. 4. Since this will require using the wall mount
hardware, Bolt Bag A will not be required.
Step 1: Insert the Soundbar Brackets in between the back of your flat panel and your wall mount, as
shown in Fig. 4. Only secure with one bolt in each bracket as
demonstrated in the diagram.
Step 2: Re-install your flat panel wall mount into the back of
your flat panel using it’s own hardware.
Step 3: There are three ways to mount your soundbar to the
Soundbar Brackets, depending on the mounting
specifications of your soundbar:
NOTE: Due to the lack of industry standard in mounting
patterns on soundbars, the provided hardware in Bolt Bag B
may not suit your specific model. Additional soundbar
hardware may be required.
A) If your soundbar has tear drop or keyhole mounting holes
Use all the parts from Bolt Bag B and attach the bolts as
shown in Fig. 2. Hang your soundbar on the bolts, making
sure the bolt head fits properly in the holes. Make desired
alignment adjustments and tighten all bolts. Do not over
tighten.
B) If your soundbar is already fixed to a soundbar wall mount
Using hardware from Bolt Bag B, attach your soundbar’s wall
mount bracket to the Soundbar Brackets as shown in Fig.3.
C) If the back of your soundbar has threaded mounting holes
Using hardware from Bolt Bag B, screw your soundbar
directly into the brackets. Make desired alignment
adjustments and tighten all bolts. Do not over tighten.
Step 4: Hang your flat panel back on your wall mount.
Maintenance
It is recommended that you check the brackets once a month
to ensure all connections are secure.
Re-tighten screws when necessary.
Fig. 4
4 SBBU.SB.102011.IM
LISTE DES PIÈCES
EM-SBBU
VEUILLEZ LIRE CES INSTRUCTIONS ATTENTIVEMENT ET LES GARDER POUR Y RÉFÉRER AU
BESOIN. SI VOUS NE COMPRENEZ PAS LES INSTRUCTIONS OU SI VOUS NE CROYEZ PAS
ÊTRE EN MESURE DE LES SUIVRE EN TOUTE SÉCURITÉ, VEUILLEZ COMMUNIQUER AVEC UN
TECHNICIEN QUALIFIÉ. LA GARANTIE NE SERA HONORÉE QU'EN LA PRÉSENCE DU COUPON
DE CAISSE ORIGINAL ET UNIQUEMENT SI LES INSTRUCTIONS ONT ÉTÉ SUIVIES À LA LETTRE.
Avant de commencer, assurez-vous d'avoir en votre possession toutes les pièces énumérées
ci-dessous. Pour obtenir des pièces manquantes, visitez www.everik.com/parts.html ou
téléphonez au 1 866 604-6966.
L'EverMount EM-SBBU est un support universel pour barre de son qui est compatible avec la plupart
des modèles d'écrans plats et de barres de son.
L'aide d'une seconde personne est requise pour l'installation.
Pour obtenir de l'aide pour l'installation, des vidéos instructives sont disponibles sur
www.SoundbarBrackets.com.
Ne dépassez pas la charge maximale de 35 lb.
Vidéos instructives disponibles
sur SoundbarBrackets.com
Sac de boulons A
Description Qté.
M6x16mm 2
M8x16mm 2
M8x25mm 2
Rondelle, moyenne 2
Rondelle, grande 2
Sac de boulons B
Description Qté.
Bouton #10x3/4 po 2
Rondelle, petite 4
Écrou hex #10 4
Supports pour barre de son
x2

5 SBBU.SB.102011.IM
Configuration 1 : Installation des supports pour barre de son à sur un
écran plat ou sur un socle
Étape 1 : Sélectionnez les deux écrous et les deux rondelles du sac de boulons A qui
correspondent le mieux aux trous de montage au dos de votre écran plat.
Étape 2 : Consultez la Fig. 1 pour voir des exemples des configurations possibles pour adapter
les supports aux trous de montage de votre écran plat ou de votre barre de son. Utilisez la
configuration la plus adéquate pour votre équipement.
REMARQUE : Ne fixez les supports pour barre de son Soundbar Brackets qu'avec un boulon pour chaque support,
tel que montré sur les diagrammes. Des rondelles supplémentaires peuvent être utilisées comme cales si nécessaire.
Étape 3 : Il y a trois façons d'installer votre barre de son sur les
supports, en fonction des spécifications de montage de votre barre
de son.
REMARQUE : Puisqu'il n'existe aucune norme industrielle sur les
schémas de montage des barres de son, le matériel fourni dans le
sac de boulons B peut ne pas convenir à votre modèle spécifique.
Du matériel supplémentaire peut être requis.
A) Si votre barre de son possède des trous en forme de 'goutte' ou
de trou de serrure
Utilisez toutes les pièces du sac de boulons B et vissez les boulons
tel que montré à la Fig. 2. Installez votre barre de son sur les
boulons, en vous assurant que les têtes des boulons sont bien
ajustées dans les trous de la barre de son. Ajustez l'alignement au
besoin et serrez tous les boulons. Ne serrez pas trop fort.
B) Si votre barre de son est déjà fixée sur un support mural
À l'aide du matériel du sac de boulons B, fixez le support mural de
votre barre de son aux supports pour barre de son Soundbar
Brackets comme le montre la Fig. 3.
C) S'il y a des trous de montage avec filetage au dos de votre barre
de son
À l'aide du matériel du sac de boulons B, vissez la barre de son
directement sur les supports. Ajustez l'alignement au besoin et
serrez tous les boulons. Ne serrez pas trop fort.
Fig. 1
Fig. 2
Fig. 3
Support pour
barre de son
Support mural pour barre de son
6 SBBU.SB.102011.IM
Configuration 2 : Installation des supports pour barre de son sur un écran
plat monté au mur
REMARQUE : Ce produit est conçu pour être inséré entre le dos de l'écran plat et l'autre support
mural, comme le montre la Fig. 4. Puisque vous utilisez le matériel de votre support mural, le sac
de boulons A ne sera pas nécessaire.
Étape 1 : Insérez les supports pour barre de son entre le
dos de l'écran plat et le support mural, comme le montre la
Fig. 4. Ne fixez les supports pour barre de son qu'avec un
boulon pour chaque support, tel que montré sur le
diagramme.
Étape 2 : Réinstallez le support mural au dos de votre
écran plat à l'aide de son matériel de montage.
Étape 3 : Il y a trois façons d'installer votre barre de son
sur les supports, en fonction des spécifications de
montage de votre barre de son.
REMARQUE : Puisqu'il n'existe aucune norme industrielle
sur les schémas de montage des barres de son, le
matériel fourni dans le sac de boulons B peut ne pas
convenir à votre modèle spécifique. Du matériel
supplémentaire peut être requis.
A) Si votre barre de son possède des trous en forme de
'goutte' ou de trou de serrure Utilisez toutes les pièces du
sac de boulons B et vissez les boulons tel que montré à la
Fig. 2. Installez votre barre de son sur les boulons, en
vous assurant que les têtes des boulons sont bien
ajustées dans les trous de la barre de son. Ajustez
l'alignement au besoin et serrez tous les boulons. Ne
serrez pas trop fort.
B) Si votre barre de son est déjà fixée sur un support
mural À l'aide du matériel du sac de boulons B, fixez le
support mural de votre barre de son aux supports pour
barre de son Soundbar Brackets comme le montre la
Fig. 3.
C) S'il y a des trous de montage avec filetage au dos de
votre barre de son À l'aide du matériel du sac de boulons
B, vissez la barre de son directement sur les supports.
Ajustez l'alignement au besoin et serrez tous les boulons.
Ne serrez pas trop fort.
Étape 4 : Réinstallez votre écran plat sur le support mural.
Entretien
Il est recommandé de vérifier les supports une fois par mois pour vous assurer que votre matériel est bien fixé.
Resserrez les vis si nécessaire.
Fig. 4
Installation du haut-
parleur au-dessus du
téléviseur
Supports pour barre de son
Soundbar Brackets
Support mural
pour TV
Installation du
haut-parleur
sous le
téléviseur
Support mural
pour TV
Supports pour barre
de son Soundbar
Brackets
Table of contents
Languages:
Other Evermount TV Mount manuals


