EverSewn Sparrow X User manual
Start your embroidery design !
SEWING+EMBROIDERY
COMBO
Instruction Manual
Complete instruction manual
can be found on DVD/APP

Machine Introduction 2
Principal parts of the machine ............................................................................................... 2
Accessories.............................................................................................................................. 3
Standard................................................................................................................................................. 3
Optional.................................................................................................................................................. 3
Connecting machine to power source................................................................................... 4
Polarized plug information ..................................................................................................................... 4
Foot control (In sewing mode)................................................................................................................ 4
Display instruction................................................................................................................... 5
Screen.................................................................................................................................................... 5
Status lndicator ...................................................................................................................................... 7
Machine Setup 8
Winding the bobbin ................................................................................................................. 8
Inserting the bobbin .............................................................................................................. 10
Threading the upper thread .................................................................................................. 11
Replacing the needle ............................................................................................................. 14
Matching needle/fabric/thread ............................................................................................. 15
Changing the presser foot .................................................................................................... 16
Remove the presser foot...................................................................................................................... 16
Attach the presser foot......................................................................................................................... 16
Remove and insert the presser foot holder.......................................................................................... 16
Insert the edge/quilting guide............................................................................................................... 16
Replacing the needle plate ................................................................................................... 17
To raise or drop the feed dogs ............................................................................................. 18
Adjusting the presser foot pressure.................................................................................... 18
Thread tension ....................................................................................................................... 19
Instruction 20
Operation buttons.................................................................................................................. 20
Selecting stitch ...................................................................................................................... 22
Altering the stitch length & width ........................................................................................ 23
Altering the stitch length....................................................................................................................... 23
Altering the stitch width........................................................................................................................ 23
Starting to sew ....................................................................................................................... 24
Contents

Note
1. The above contents can be found on the digital version of
the manual located on the DVD that was included with the
machine or can be found in the APP.
2. App system requirement: support WiFi 802.11b/g/n(2.4G HZ).
Embroidery Preparation 26
Embroidery quick guide........................................................................................................ 26
Important embroidery information ...................................................................................... 28
Embroidery threads.............................................................................................................................. 28
Bobbin threads ..................................................................................................................................... 28
Stabilizer .............................................................................................................................................. 29
Adhesive Spray .................................................................................................................................... 30
Iron-on interfacing................................................................................................................................ 31
Embroidery unit overview..................................................................................................... 32
Embroidery hoop overview................................................................................................... 33
Preparing the embroidery hoop........................................................................................... 33
Attaching a stabilizer to the fabric........................................................................................................ 33
Hopping the fabric................................................................................................................................ 34
Use the quick release device ............................................................................................................... 35
Using embroidery sheet....................................................................................................................... 36
Embroidery Process 38
Step 1. Preparation for embroidery .................................................................................... 38
Step 2. Starting the connection ........................................................................................... 40
Embroidery software installation.......................................................................................................... 40
Connection Mode A: Point-to-Point ..................................................................................................... 40
Connection Mode B: Station (the rst time to set up) .......................................................................... 42
Connection Mode B: Station ................................................................................................................ 43
Step 3. Import/edit embroidery pattern............................................................................... 44
Importing les on iOS .......................................................................................................................... 44
Importing les on Andriod.................................................................................................................... 44
Location of imported les on App ........................................................................................................ 44
Step 4. Install the embroidery hoop .................................................................................... 45
Step 5. Begin to embroider ................................................................................................... 46
Load a Design after interruption .......................................................................................................... 47
Adjust the thread tension ..................................................................................................................... 48
Step 6. Back to sewing mode ............................................................................................... 49
Remove embroidery hoop.................................................................................................................... 49
Remove embroidery unit...................................................................................................................... 49

22
Machine Introduction
1. Take-up lever
2. Presser foot pressure dial
3. Auto-lock button
4. Thread cutter button
5. Reverse button
6. Start/stop button
7. Thread cutter
8. Sewing table and accessory box
9. Drop feed lever
10. Needle up/down position button
11. Group switch button
12. Bobbin winder spindle
13. Bobbin winder stopper
14. Screen
15. Speed adjustment slider
16. Stitch adjustment button
17. Value setting buttons
18. Status indicator
19. Quick reference plate
20. Buttonhole lever
21. Needle threader
22. Needle plate
23. Needle clamp screw
24. Presser foot
25. Bobbin cover
26. Horizontal spool pin
27. Second spool pin hole
28. Handwheel
29. Main power switch
30. Power cord
31. Foot control connector
32. Bobbin thread guide
33. Upper thread guide
34. Handle
35. Thread cutter
36. Presser foot lifter
37. Embroidery unit
Principal parts of the machine
21
22
23
25
24
20
16
17
6
4
3
7
9
5
2
1
8
1110
14
13
12
19
18
15
26
30
34
31
27
28
29
35
36
33
32
37
Machine Introduction

3
Machine Introduction
Accessories
Accessories are stored inside the
accessory box.
vStandard
1. All purpose foot
2. Zipper foot
3. Buttonhole foot
4. Satin stitch foot
5. Button sewing foot
6. Blind hem foot
7. Overcasting foot
8. Darning/embroidery foot
9. Bobbin (3x)
10. Edge/quilting guide
11. Spool holder (Large)
12. Spool holder (Small)
13. Spool pin felt
14. Second spool pin
15. Pack of needles
16. L-screwdriver
17. Screwdriver
18. Seam ripper/brush
19. Thread net
20. Embroidery set (120*180mm)
21. Embroidery set (50*70mm)
22. DVD
23. Straight stitch plate
29
27 28
2524 26
vOptional
24. Hemmer foot
25. Cording foot
26. Quilting foot
27. Adjustable guide foot
28. Gathering foot
29. Walking foot
Note
To purchase optional accessories,
please consult your local dealer
for further information.
232220
3
24
12 13
67
598
11
15 16 17 1918
14
1
21
10

44
Machine Introduction
Connecting machine to power source
1
2ON
OFF
nAttention
Always make sure that the machine is
unplugged from power source and the main
switch is off ("O"), when the machine is not
in use and before inserting or removing
parts.
Before connecting the power supply, make
sure that the voltage shown on the rating
plate is conforming with your main power.
Put the machine on a stable table.
1. Connect the machine to a power source
as illustrated.
2. Turn the power switch to on ("I").
The sewing lamp will light up when the switch
is turned on.
vPolarized plug information
This appliance has a polarized plug (one
blade is wider than the other), to reduce the
risk of electrical shock; this plug will t in a
polarized outlet only one way. If the plug does
not t fully in the outlet, reverse the plug. If it
still does not t, contact a qualied electrician
to install the proper outlet. Do not modify the
plug in any way.
vFoot control (In sewing mode)
When the machine is off, insert the foot
control plug into its connector on the machine.
Turn on the machine, and then slowly press
down the foot control to start sewing. Release
the foot control to stop the machine.
User can quickly kick one step on the foot
control to change the needle position and set
the stop position at the same time.
nAttention
Foot control will be disabled in embroidery
mode.
Note
Consult a qualied electrician if in doubt
as to connect the machine to the power
source.
5
Machine Introduction
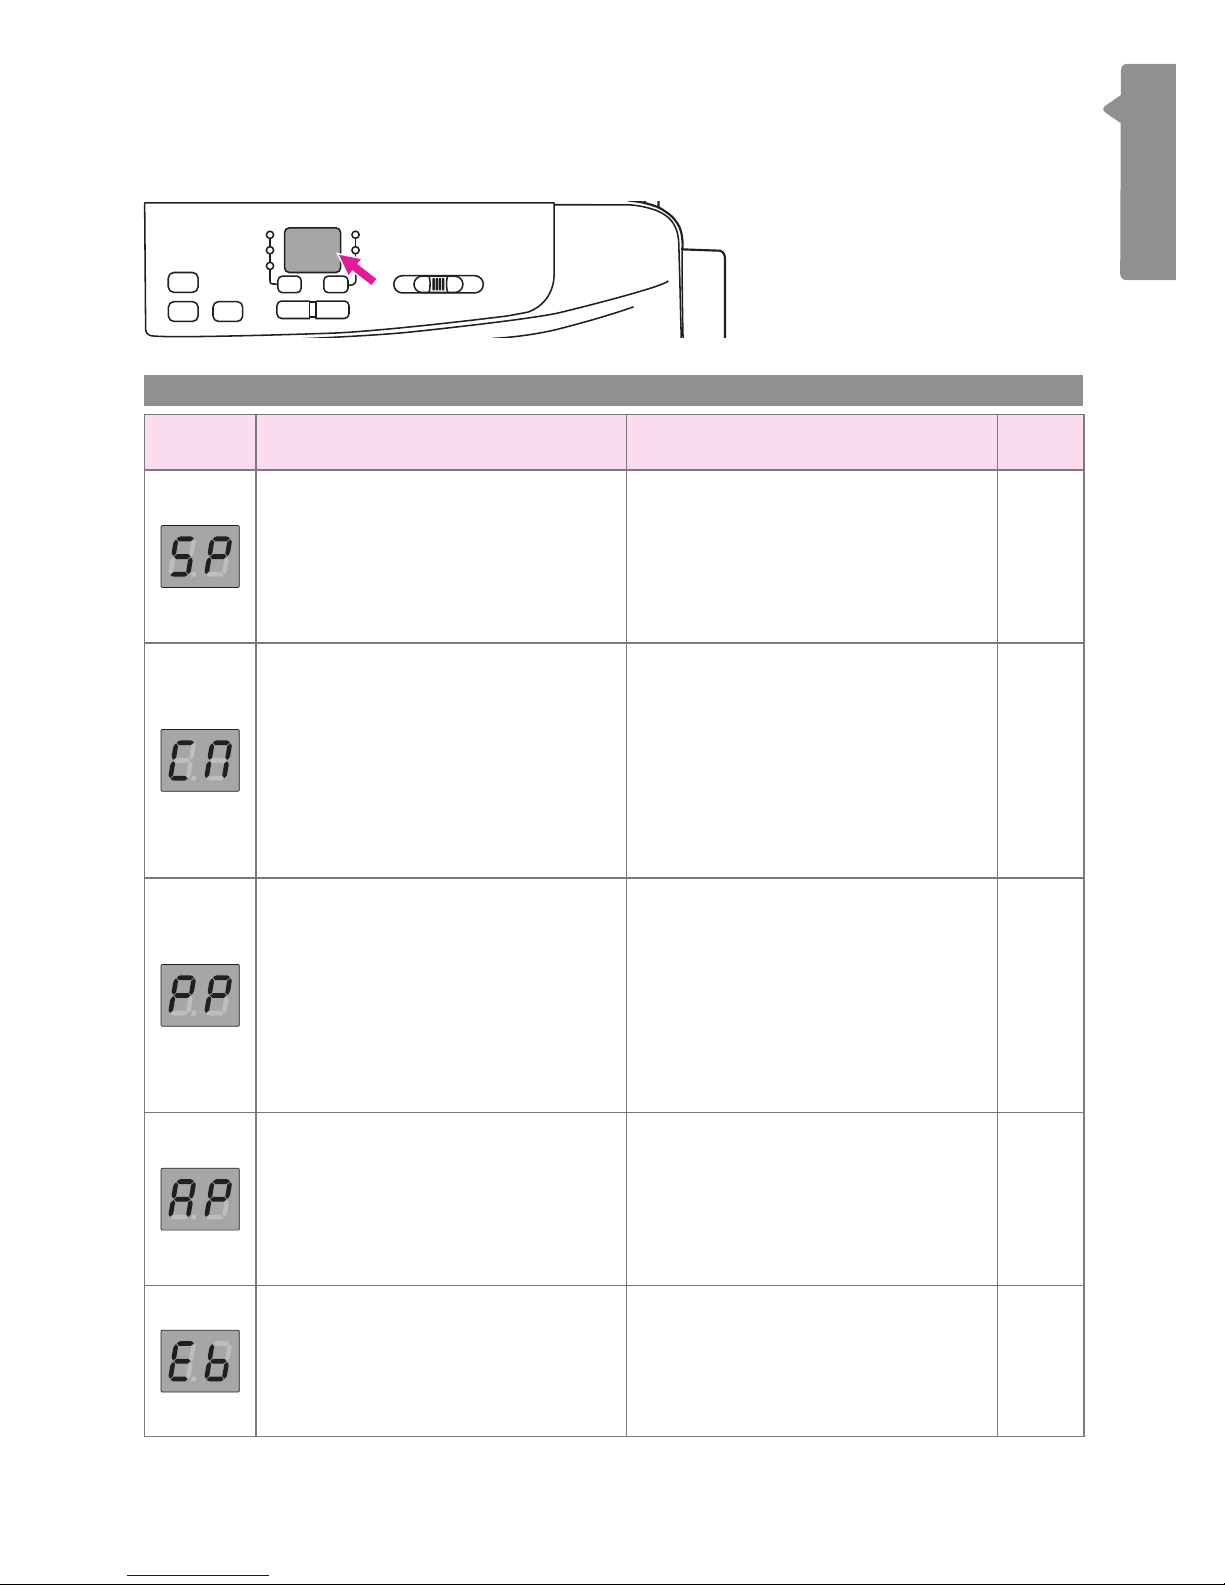
Display instruction
vScreen
Screen In general Embroidery mode Page
Winding the bobbin
Bobbin winder spindle is on the
right for bobbin winding. Push the
spindle to the left for sewing. Please
refer to "Winding the bobbin"
chapter for more information.
-8-10
-
The machine is connecting to
the WiFi router
The WiFi light keeps ashing until it
successfully connects to the base
station (screen shows "Eb").
Please refer to "Starting the
connection" chapter for more
information.
43
-
Machine is in point-to-point (PP)
mode
The WIFI light keeps ashing until
the setup is ready (screen shows
"Eb").
Please refer to "Starting the
connection" chapter for more
information.
40
-
Machine is in Access Point (AP)
mode
For the rst-time setting, please
refer to "Starting the connection"
chapter to complete the internet
setting.
42
-
Machine can be connected to
APP
Please refer to "Starting the
connection" chapter to complete
the internet setting.
40
5
Operation mode
66
Machine Introduction
** Please refer to instruction manual in DVD for detailed information.
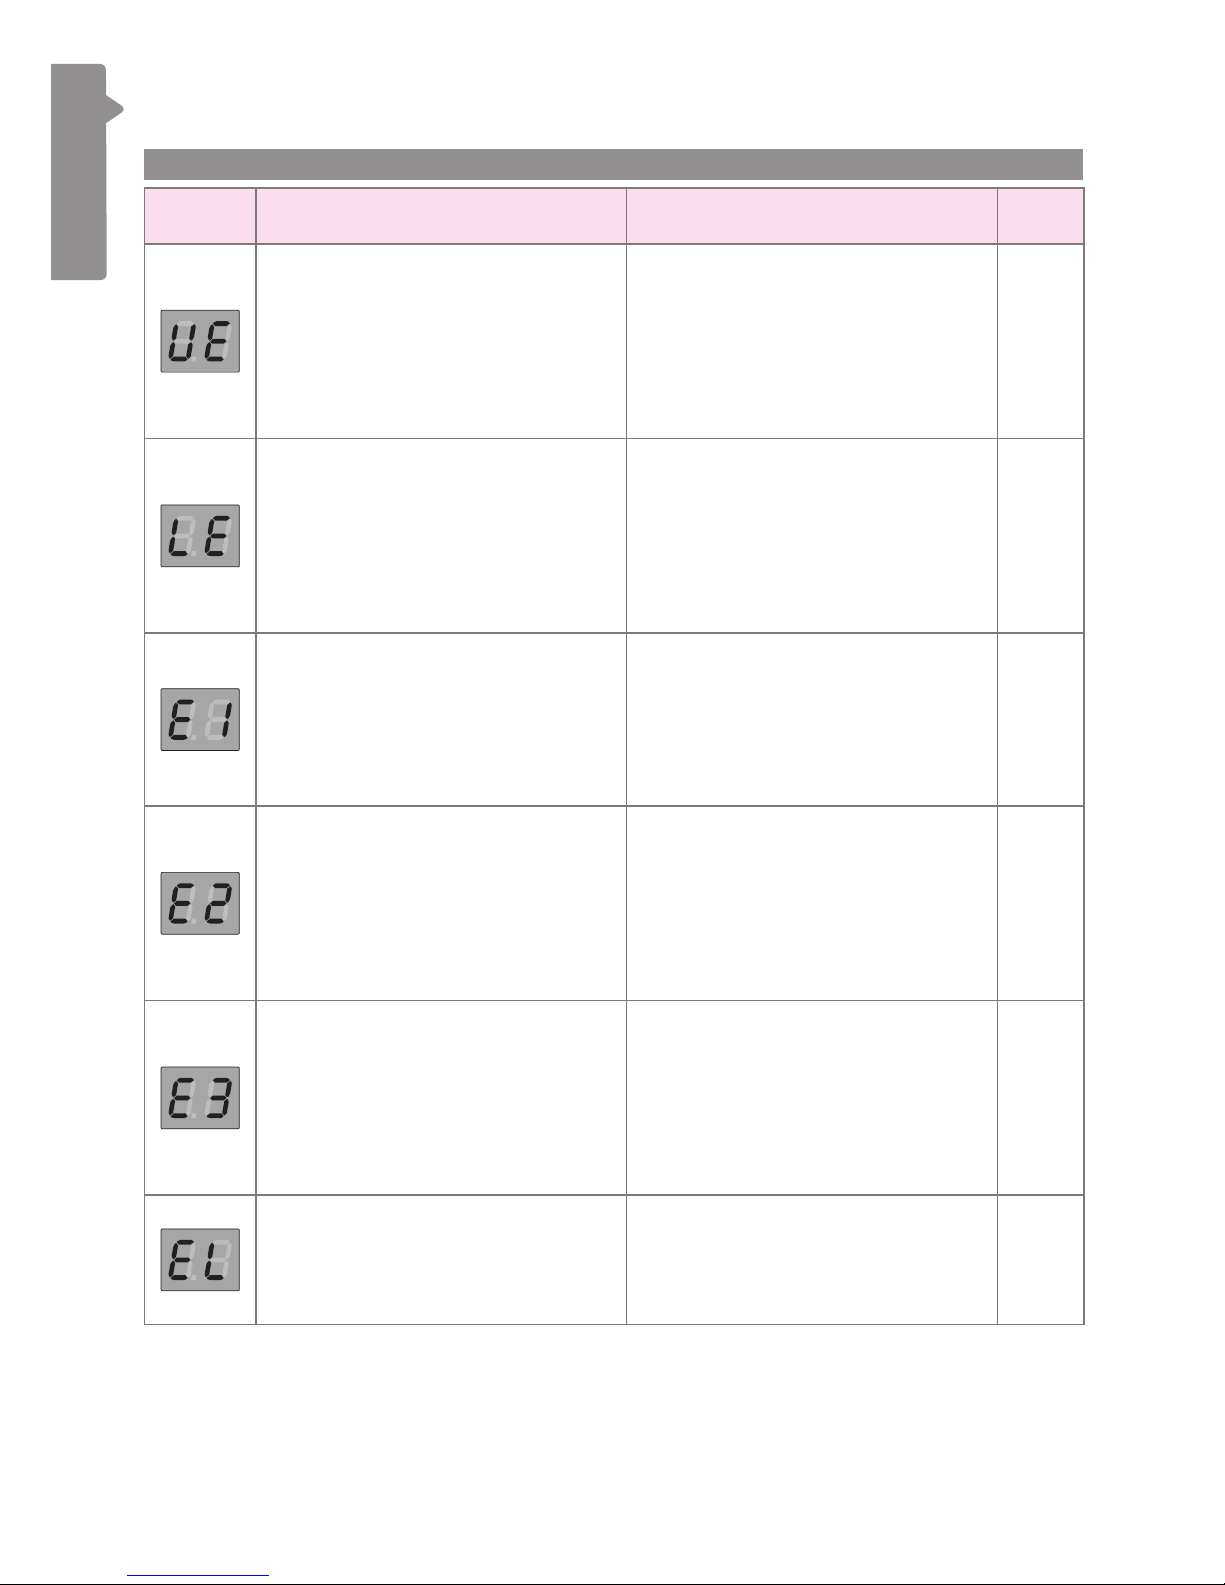
Screen In general Embroidery mode Page
Upper thread error
The upper thread is broken or
running out soon. Please change
and re-threading the upper thread.
Please refer to "Threading the
upper thread" chapter for more
information.
-11-13
Lower thread error
The lower thread is broken or
almost running out, please change
and rell the lower thread. Please
refer to "Winding the bobbin" and
"Inserting the bobbin" chapters for
more information.
-8-10
-
The presser foot is not raised
Please raise the presser foot, and
then press the auto-lock button to
resume. Please refer to "Starting
the connection" chapter for more
information.
41
-
Embroidery hoop is not
removed
Please remove the embroidery
hoop and then press the auto-lock
button to resume. Please refer to
"Starting the connection" chapter
for more information.
41
-
Straight stitch plate is not
installed
Please replace the straight stitch
plate and then press the auto-lock
button to resume. Please refer
to "Replacing the needle plate"
chapter for more information.
41
Motor overload protection
The motor is overloaded due to the
jammed threads or the fabrics are
too thick to be penetrated.
-**
Error messages
6
7
Machine Introduction
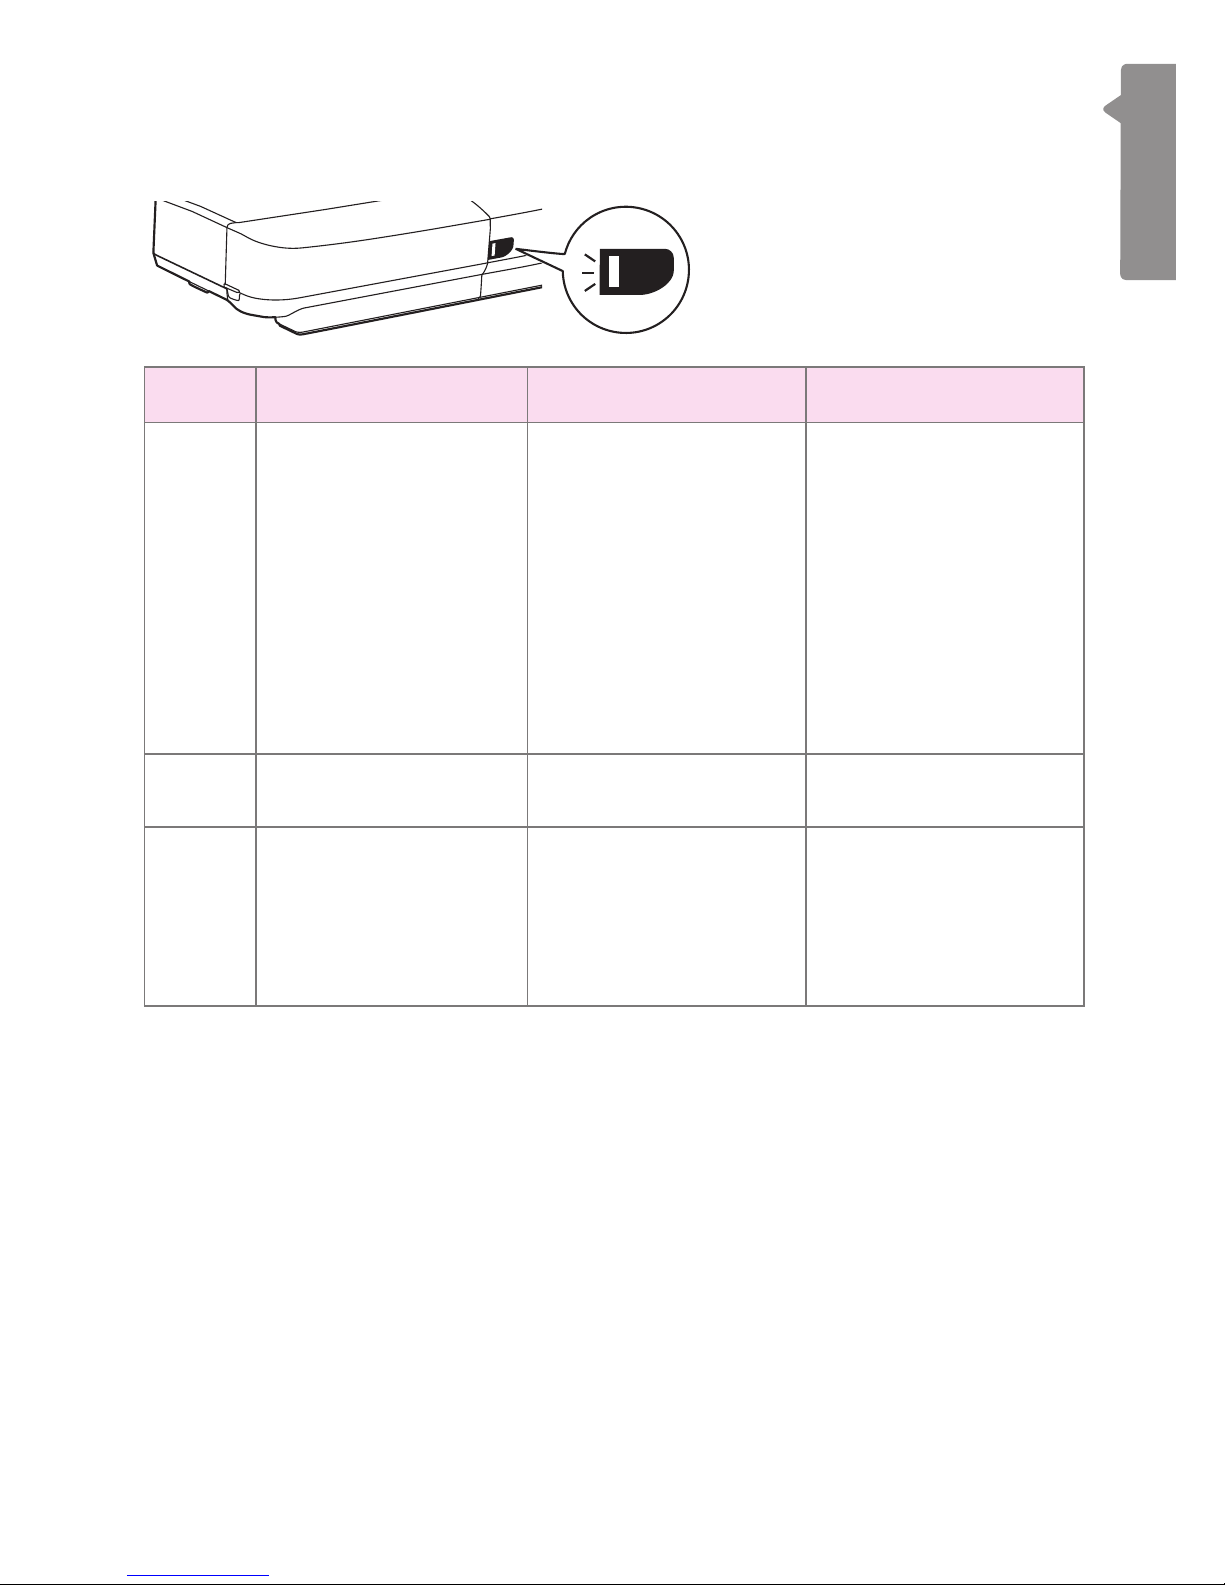
vStatus lndicator
Display In general Sewing mode Embroidery mode
Green
When the upper thread
breaks, the motor will
stop. Green light will
ash 3 times then back
resume to constantly
bright status.
When remaining amount
of bobbin thread is low,
the motor will stop.
Green light will ash 3
times then back resume
to constantly bright
status.
Constantly bright:
Machine is ready to
sew; press the start/stop
button to start sewing
immediately.
Constantly bright:
Machine is ready to
embroider ; press the
start/stop button to
start embroidering
immediately.
Yellow -Machine is not able to
sew.
Machine is not able to
sew.
Red
Motor is overloaded or
the shaft locked down.
Once the problem
solved, the lighting will
resume to previous
condition.
- -
7
88
Machine Setup
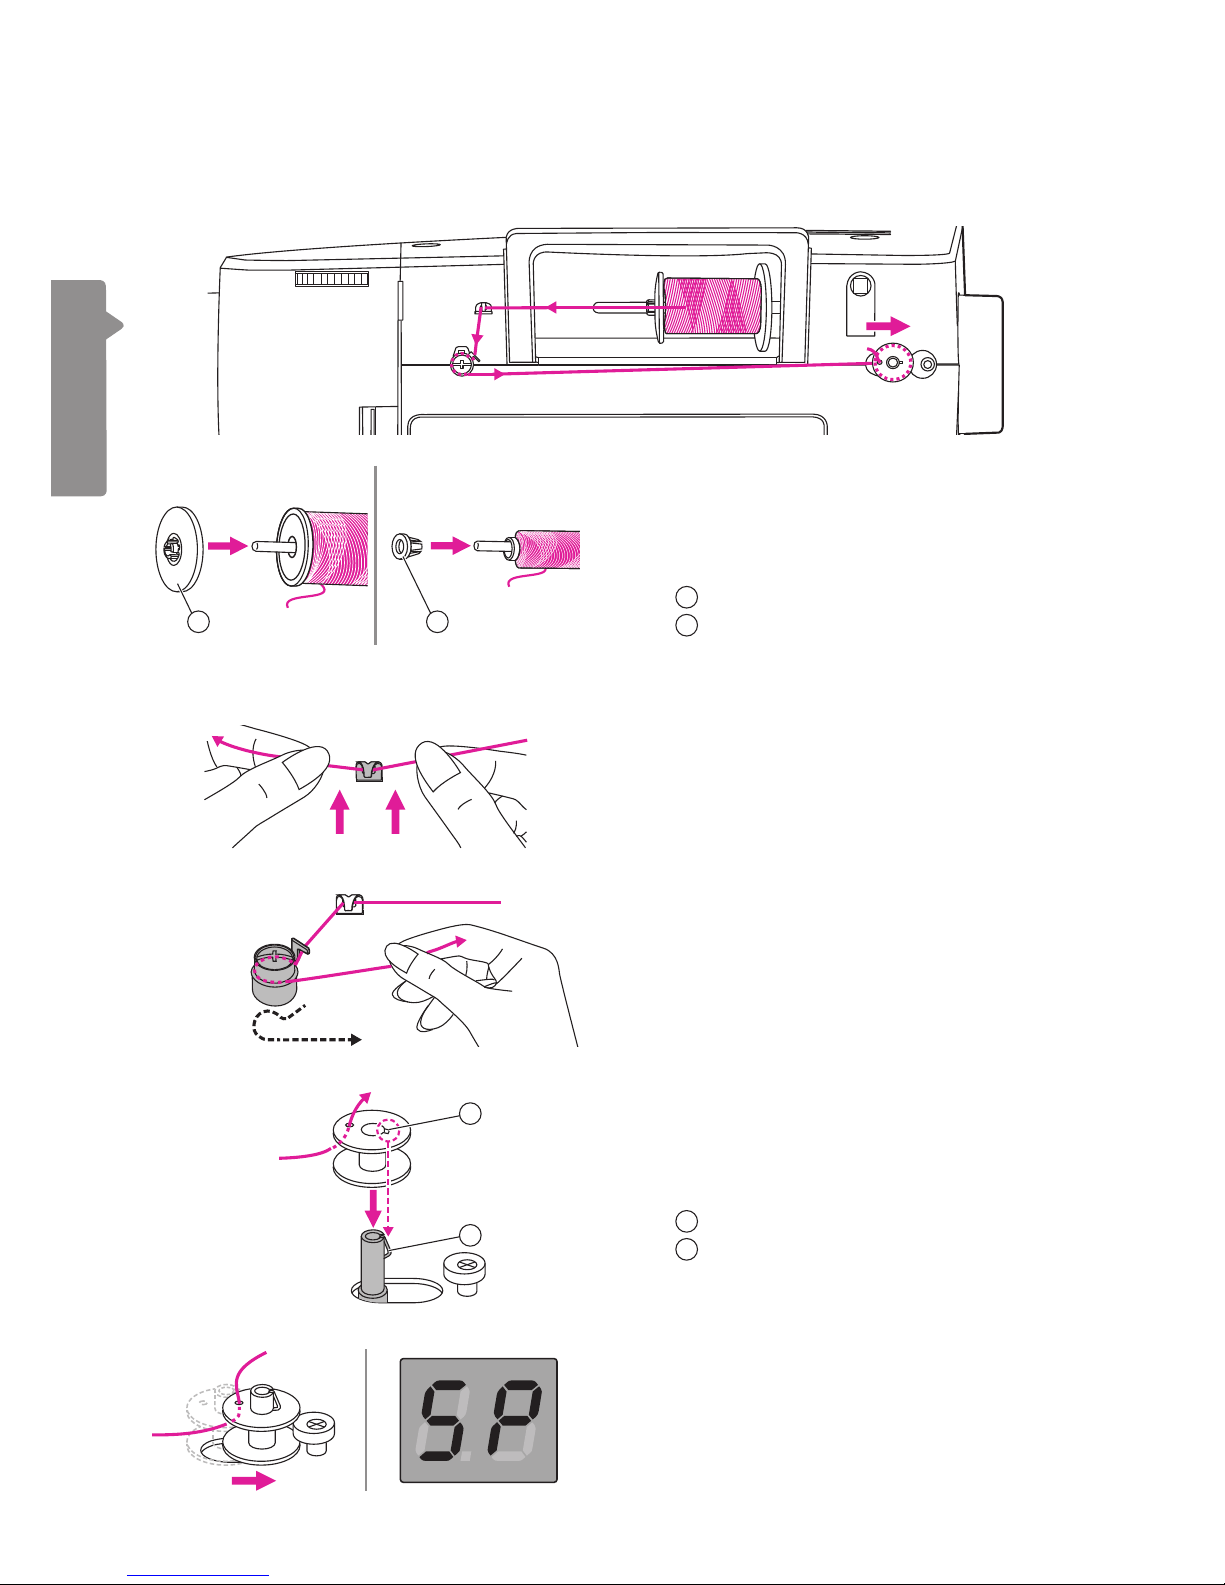
Winding the bobbin
Machine Setup
1. Place the thread and spool holder onto
the spool pin. For better sewing quality,
choose a proper size of the spool holder
for the thread and attach it next to the
spool.
1
Large spool holder
2
Small spool holder
1
4-9
2
3
2. Draw the thread from the spool and place
the thread in between the upper thread
guide.
3. Wind the thread counter-clockwise around
the tension discs.
4. Place the thread end through one of
the inner holes as illustrated and place
the empty bobbin on the bobbin winder
spindle. Then align the notch with bobbin
winder spindle spring.
1
Notch
2
Bobbin winder spindle spring
5. Push the bobbin to the right. When the
bobbin winder spindle is pushed to the
right, the screen will show "SP".
Please following the number order and see the corresponding illustrations below.
12
2
1
99
Machine Setup
6. Hold the thread tail securely in one hand.
7. Step on the foot control (only in the
sewing mode) or long press the start/stop
button to start winding the bobbin.
8. After the bobbin has wound a few rounds,
stop the machine and cut the thread near
the hole of the bobbin. Continue lling
the bobbin until it is full. Once the bobbin
is full, it rotates slowly. Release the foot
control or press the start/stop button to
stop the machine, then push the bobbin
winder spindle to the left.
9. Cut the thread and then remove the
bobbin.
Note
When the bobbin winder spindle is pushed
to the right position, it’s in "bobbin winding"
mode and the machine is not allowed to
sew and the handwheel will not be able
to turn. To start sewing, push the bobbin
winder spindle back to the left.
Note
Use a bobbin that has been correctly
wound with thread, otherwise the needle
may break or the thread tension will be
incorrect.

1010
Machine Setup
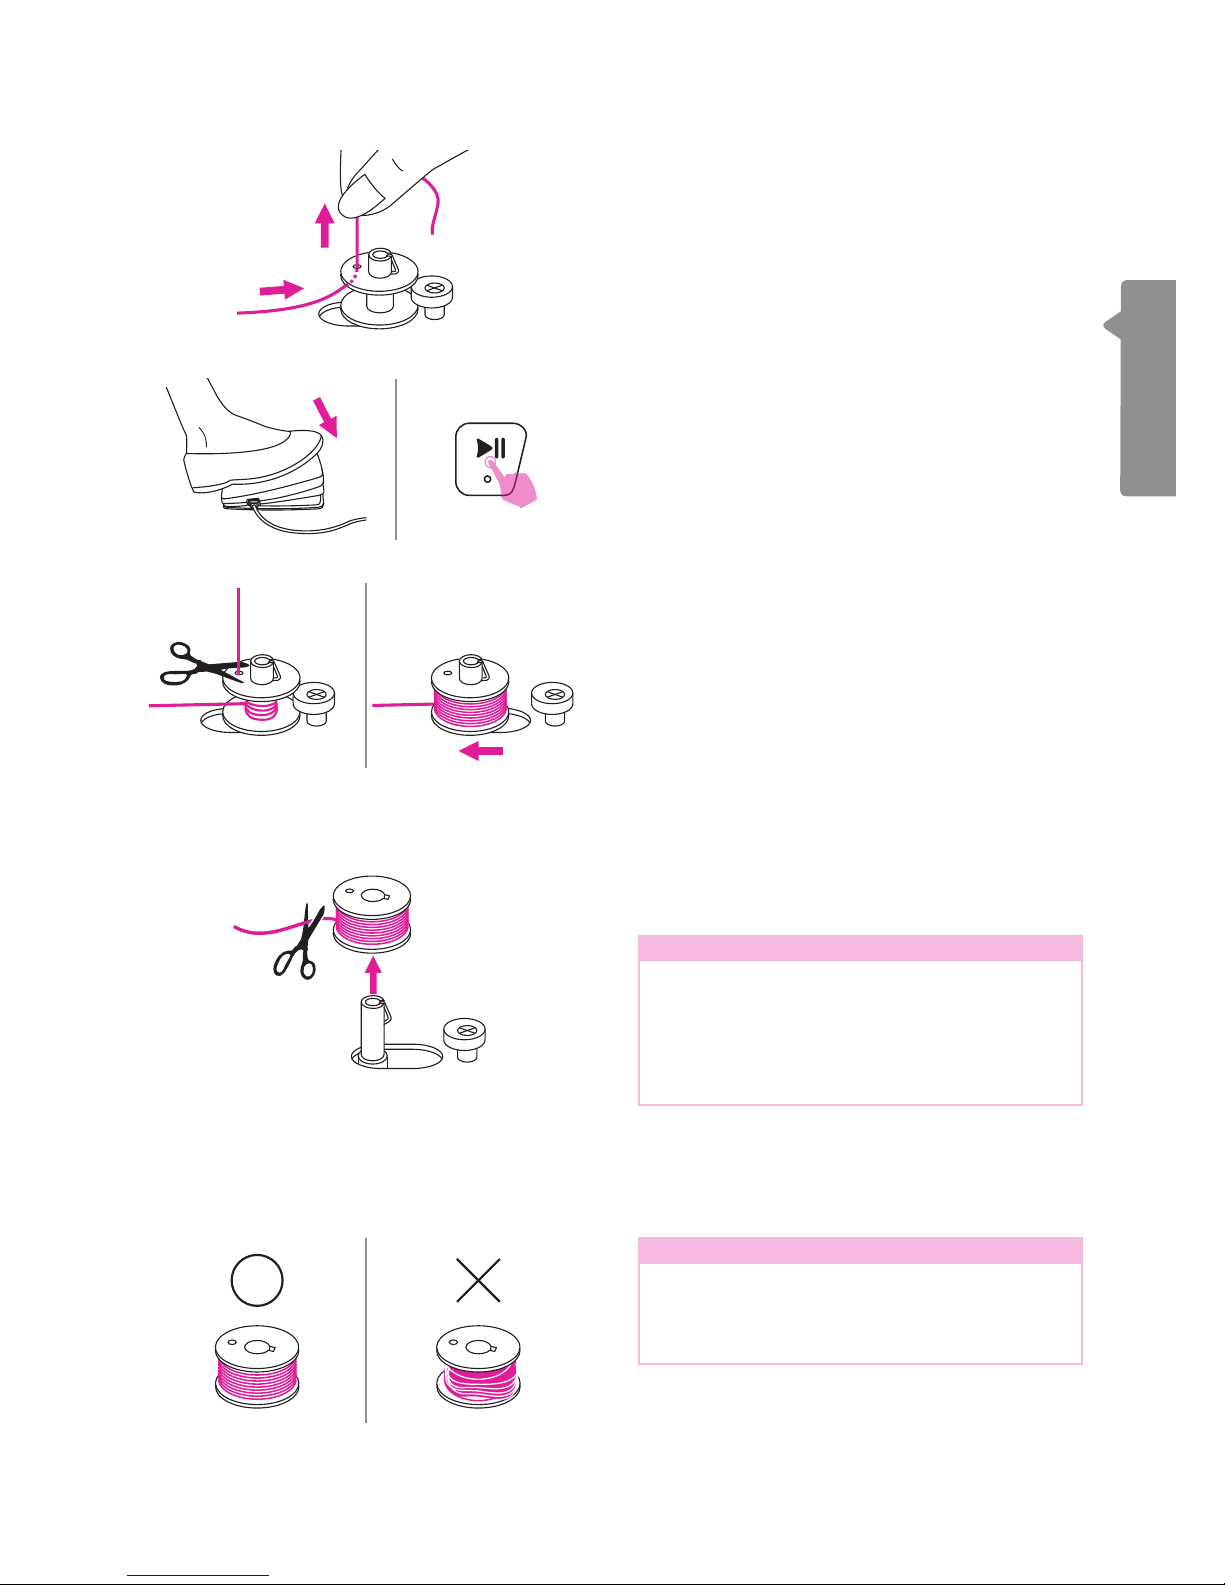
Inserting the bobbin
nAttention
Turn the power switch to off ("O").
When inserting or removing the bobbin, the
needle and the presser foot must be fully
raised.
Open the bobbin cover by pushing the release
button to the right.
1
Release button
Insert the bobbin in the bobbin case with
the thread running in a counter-clockwise
direction (arrow).
1
Pull the thread through the slit (A).
With a nger hold gently on top of the bobbin,
please follow the arrow markings and draw
the thread into the bobbin thread guide.
To cut off excessive thread, pull it to the cutter
at point (B).
Close the bobbin cover.

1111
Machine Setup
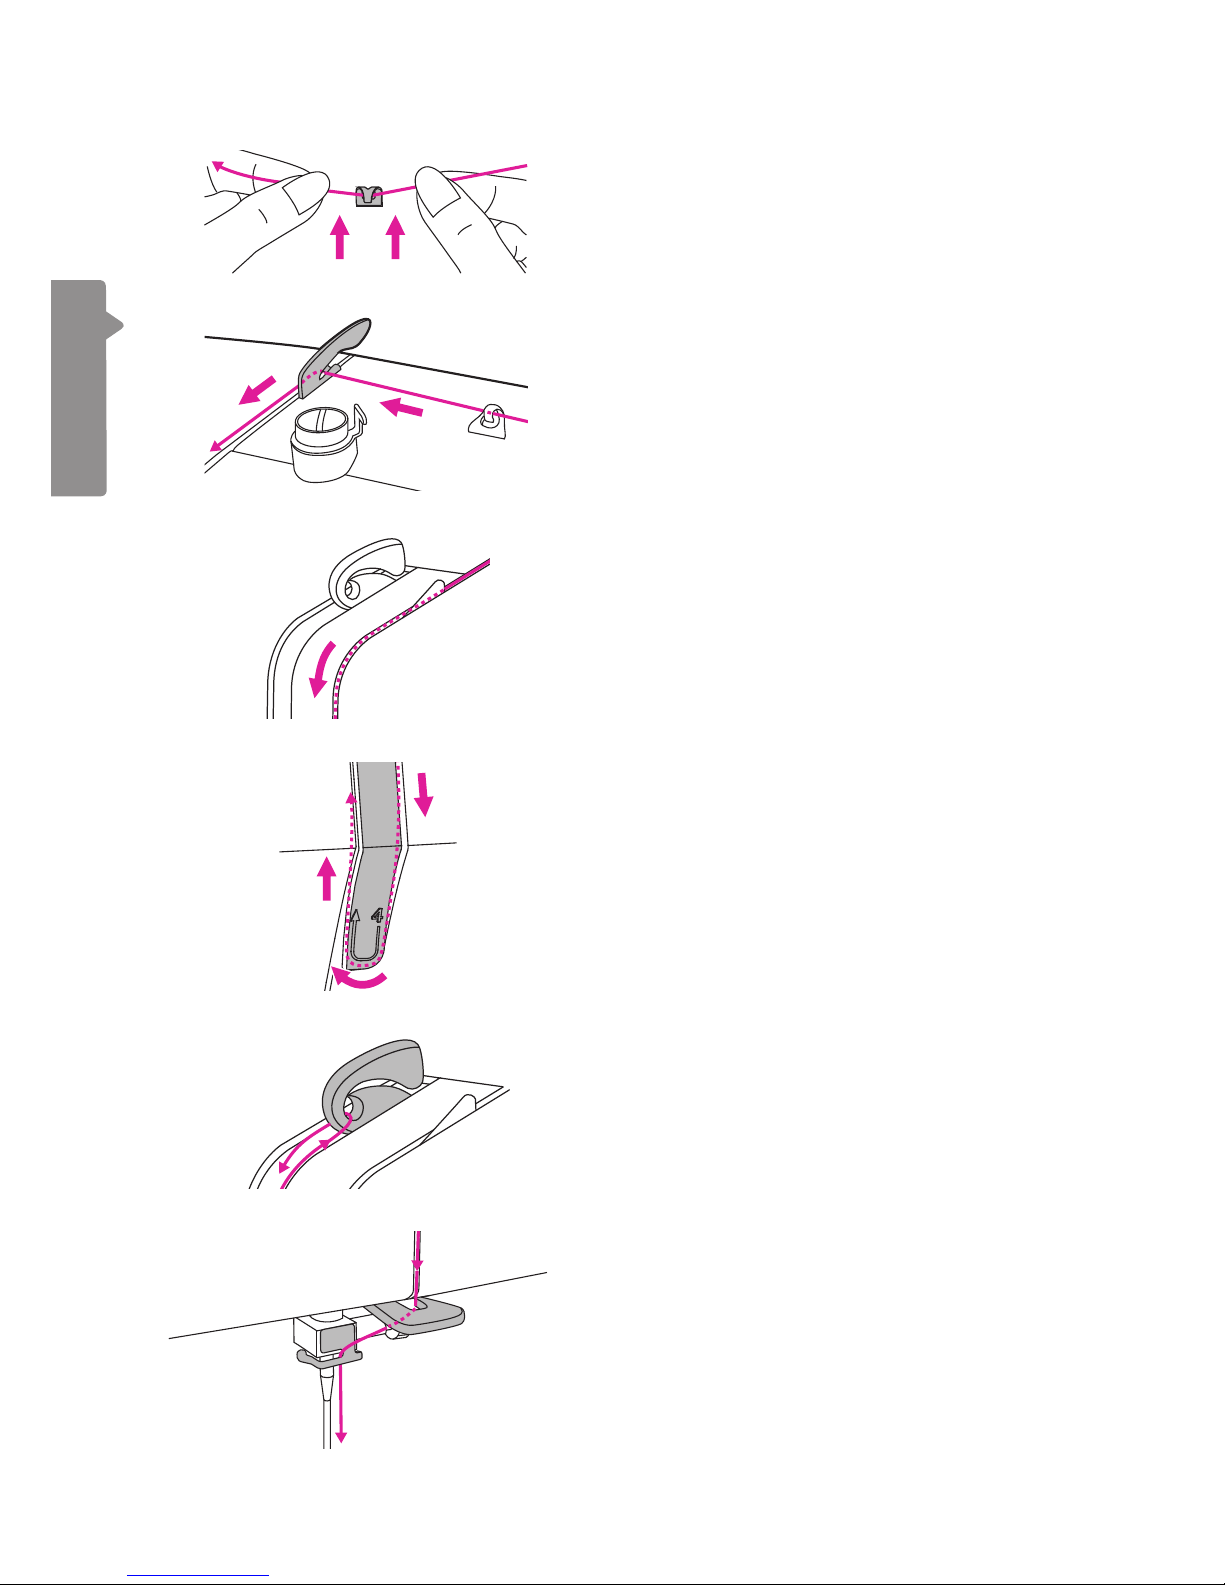
Threading the upper thread
1. Turn the power switch to on ("I"). Raise
the presser foot lifter.
2. Press the needle up/down button to bring
the needle and take-up lever to highest
position.
3. Place the thread and spool holder onto
the spool pin. For better sewing quality,
choose a proper size of the spool holder
for the thread and attach it next to to the
thread.
1
Large spool holder
2
Small spool holder
ON
OFF
Please following the number order and see the corresponding illustrations below. It is
important to carry out the threading correctly to get a quality sewing. Otherwise several
problems will occur.
12
3
4
5
4
6
2
10
1
68
7
9
11-14
1212
Machine Setup
4. Draw the thread from the spool and place
the thread in between the upper thread
guide.
5. Guide the thread ahead and pull the
thread through the pre-tension spring as
illustrated.
6. Continue to guide the thread into the silver
discs to keep the thread in proper tension.
7. Pass the thread under the take-up spring
then pull it upwards as arrow marks
illustrated.
8. Pull the thread to the top then pass the
thread through the slotted eye of the
take-up lever. Guide the thread down
afterwards.
9. Pass the thread behind the at, horizontal
thread guide.
Use the needle threader to thread the
needle.

1313
Machine Setup
10. Lower the presser foot lifter.
2
3
1
1
2
1
11. Pull down the lever to the very bottom.
When heard a "click" sound, it will be
on the right position to do the needle
threading and the hook pin passes
through the needle eye.
1
Lever
2
Hook pin
3
Needle
12. Pass the thread around the thread guide.
Take the thread in front of the needle and
make sure it is under the hook pin.
1
Thread guide
2
Hook pin
13. To cut the excess thread, take thread end
and gently slip it over the thread cutter
located on the right of the needle.
1
Thread cutter
14. Raise the lever, the hook will rotate and
pass the thread through the needle eye to
form a loop.
Pull the thread through the needle eye to
nish threading.
Note
Your machine is threaded and ready for
sewing, follow the instructions on "Starting
to sew" chapter to start sewing.

1414
Machine Setup
Replacing the needle
1
1
2
1
2
3
nAttention
Turn the power switch to off ("O") when
carrying out below operations!
Turn the handwheel toward you to raise the
needle then loosen the needle clamp screw to
remove the needle.
1
Needle clamp screw
Needles must be in perfect condition.
When inserting a new needle, keep the at
side of the shaft to the back.
Push the needle into the clamp until it touches
the pin and stops. Then secure it by tightening
the needle clamp screw.
1
Flat side of the shaft
2
Pin
Change the needle regularly, especially when it shows signs of wear or if it causes
problems.
Problems can occur with:
1
Bent needles
2
Blunt needles
3
Damaged points
1515
Machine Setup
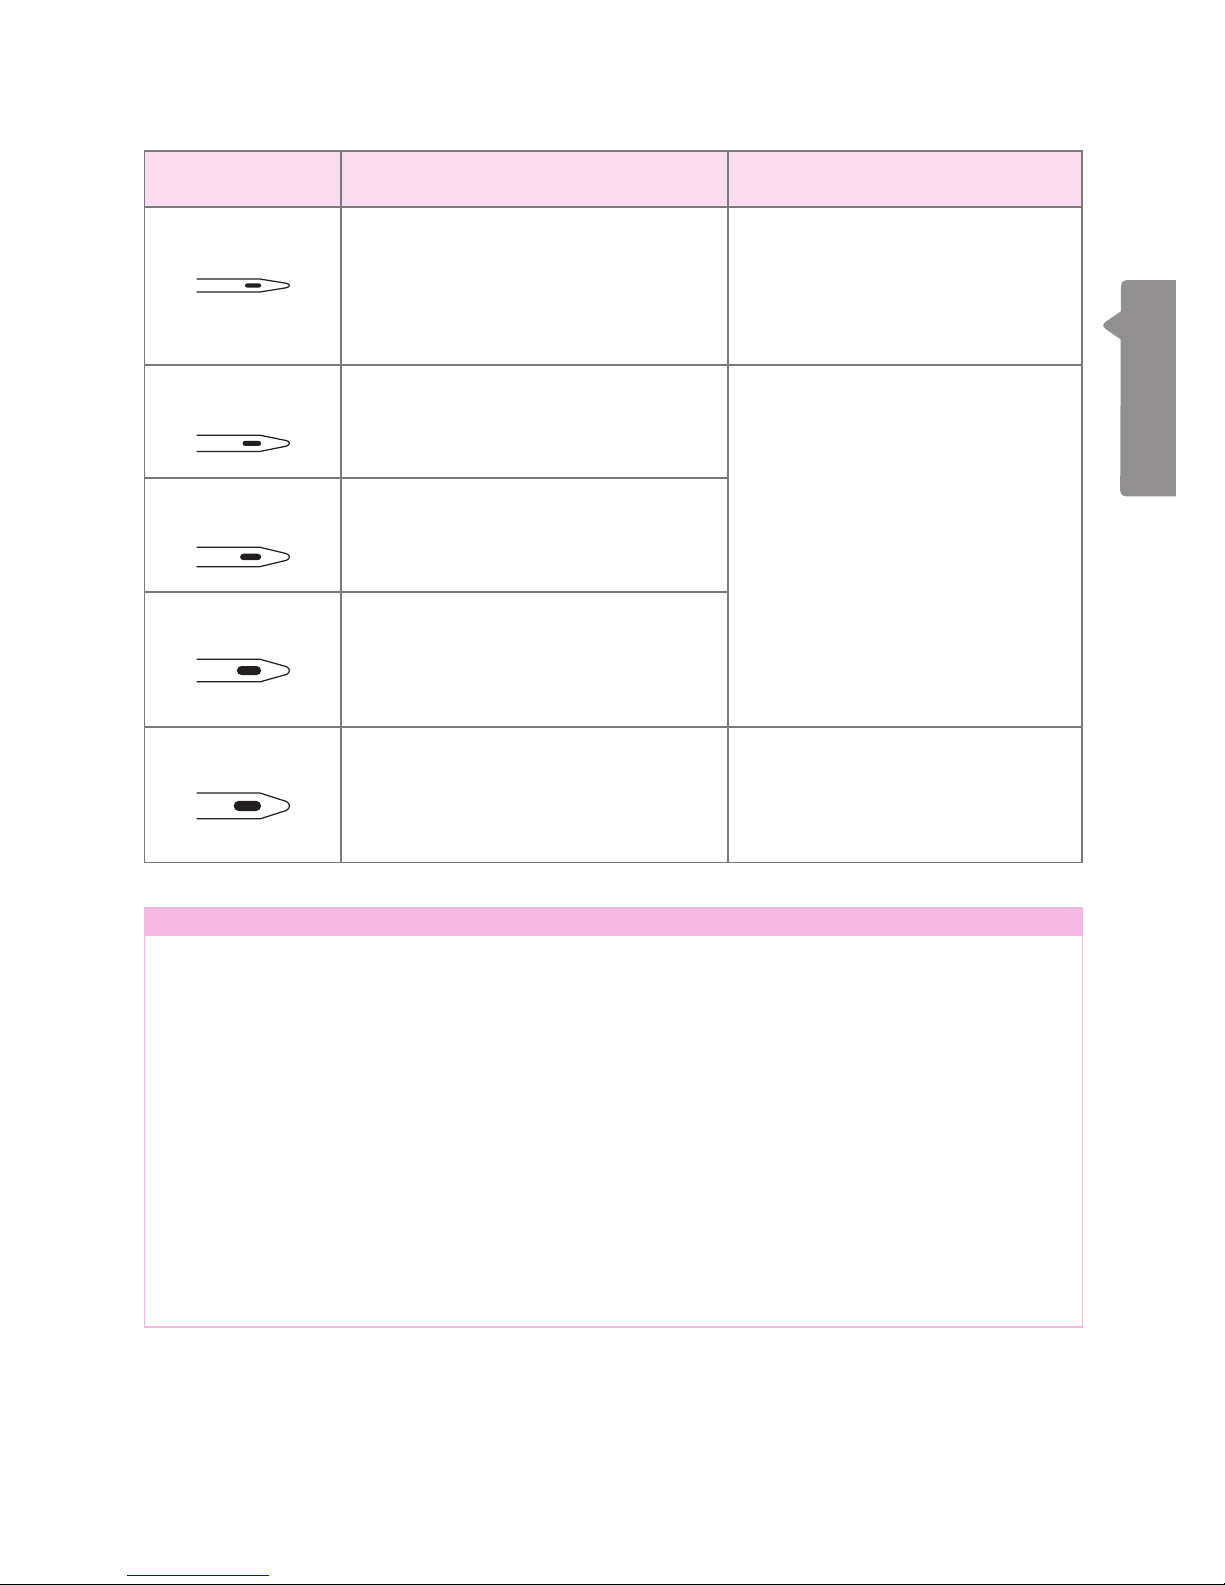
Matching needle/fabric/thread
NEEDLE SIZE FABRICS THREAD
9-11 (70-80) Lightweight fabrics-
thin cottons, voile, serge, silk, muslin,
Qiana, interlocks, cotton knits, tricot,
jerseys, crepes, woven polyester,
shirt & blouse fabrics.
Light-duty thread in cotton, nylon,
polyester or cotton wrapped
polyester.
11-14 (80 - 90) Medium weight fabrics-
cotton, satin, kettleclote, sailcloth,
double knits, lightweight woolens.
Most threads sold are medium
size and suitable for these fabrics
and needle sizes.
Use polyester threads on
synthetic materials and cotton
on natural woven fabrics for best
results.
Always use the same thread on
top and bottom.
14 (90) Medium weight fabrics-
cotton duck, woolen, heavier knits,
terrycloth, denims.
16 (100) Heavyweight fabrics-
canvas, woolens, outdoor tent and
quilted fabrics, denims, upholstery
material (light to medium).
18 (110) Heavyweight fabrics-
Heavy woolens, overcoat fabrics,
upholstery fabrics, some leathers
and vinyls.
Heavy duty thread, carpet thread.
Note
1. In general, ne threads and needles are used for sewing ne fabrics, thicker threads and
needles are used for sewing heavy fabrics.
2. Always test thread and needle size on a small piece of fabric which will be used for actual
sewing.
3. Use the same thread for needle and bobbin.
4. Use a stabilizer or place a backing for ne or stretchy fabrics, and select the correct
presser foot.
5. It is recommended that a 90/14 needle should be used when embroidering on heavyweight
fabrics or stabilizing products (for example, denim, puffy foam, etc.). A 75/11 needle may
bend or break, which could result in injury.
6. For transparent nylon thread, always use needle 90/14 - 100/16. The same thread is
usually used for the bobbin thread and upper threading.
7. For good quality embroidery designs, recommend to use a 75/11 needle when
embroidering.
1616
Machine Setup
Changing the presser foot
1
2
1
2
1
2
1
nAttention
Turn the power switch to off ("O") when
carrying out any of the operations below!
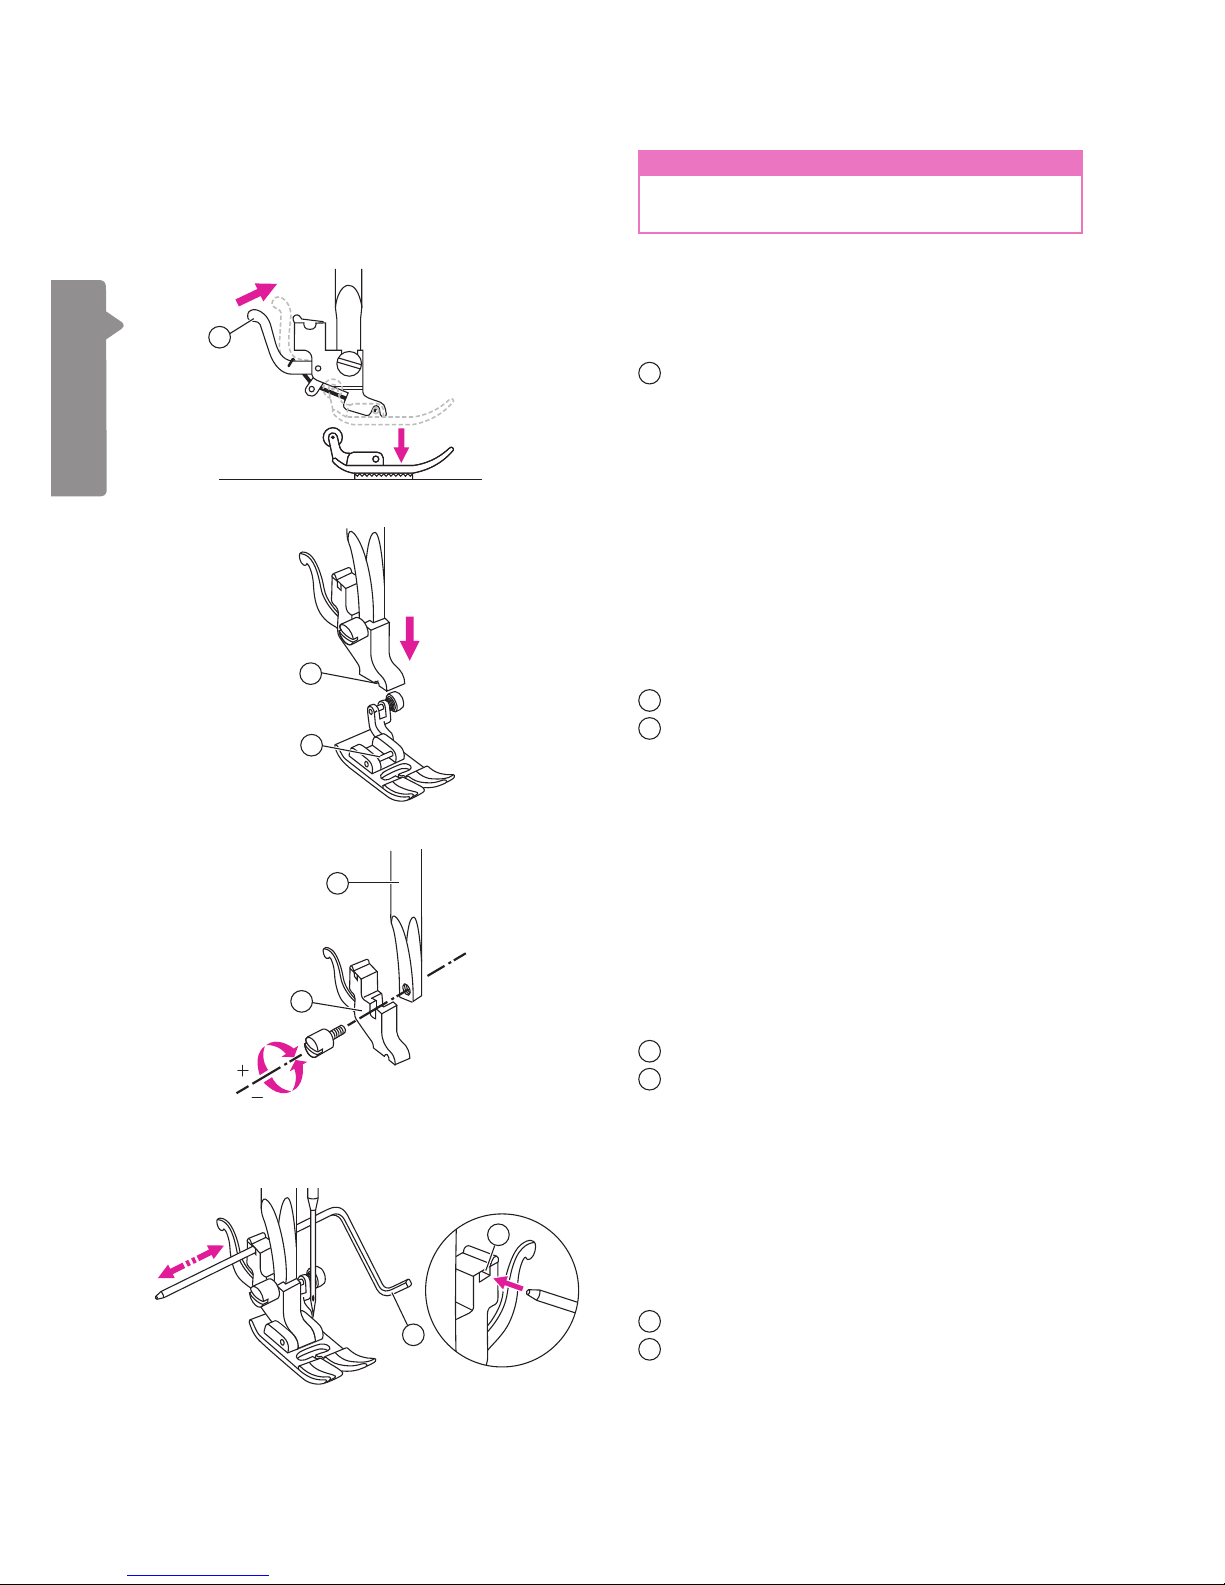
vRemove the presser foot
Raise the presser foot lifter. Press the back
lever to release the presser foot.
1
Lever
vAttach the presser foot
Lower the presser foot lifter until the cut-out
meets the pin.
The presser foot will attach to the presser foot
holder automatically.
1
Cut-out
2
Pin
vRemove and insert the presser
foot holder
Raise the presser foot lifter. Align the presser
foot holder with the lower left side of the
presser bar. Hold the presser foot holder,
then tighten the screw using the enclosed
screwdriver.
1
Presser foot bar
2
Presser foot holder
vInsert the edge/quilting guide
Insert the edge/quilting guide in the slot as
illustrated. Adjust the needed width according
to your sewing applications.
1
Slot
2
Edge/quilting guide

1717
Machine Setup
Replacing the needle plate
nAttention
Turn the power switch to off ("O").
Only specic straight stitches are
applicable while using straight stitch needle
plate. (stitch pattern 01 & 03 & 05)
1
1
Remove the needle, presser foot and presser
foot holder.
Remove the screws on the needle plate then
remove the needle plate.
1
Screws
Change the straight stitch plate and tighten
the screws.
The straight stitch plate is recommended
for embroidery mode for better embroidery
quality. It can be also used for straight stitches
in middle needle position in normal sewing
mode.
The particular design of smaller central hole
can give a better support of the fabric during
straight stitch sewing.
Thus, the fabric can be prevented from being
pulled down into bobbin/hook area, especially
in the beginning or end of a seam.
0301 05
3.5
1818
Machine Setup
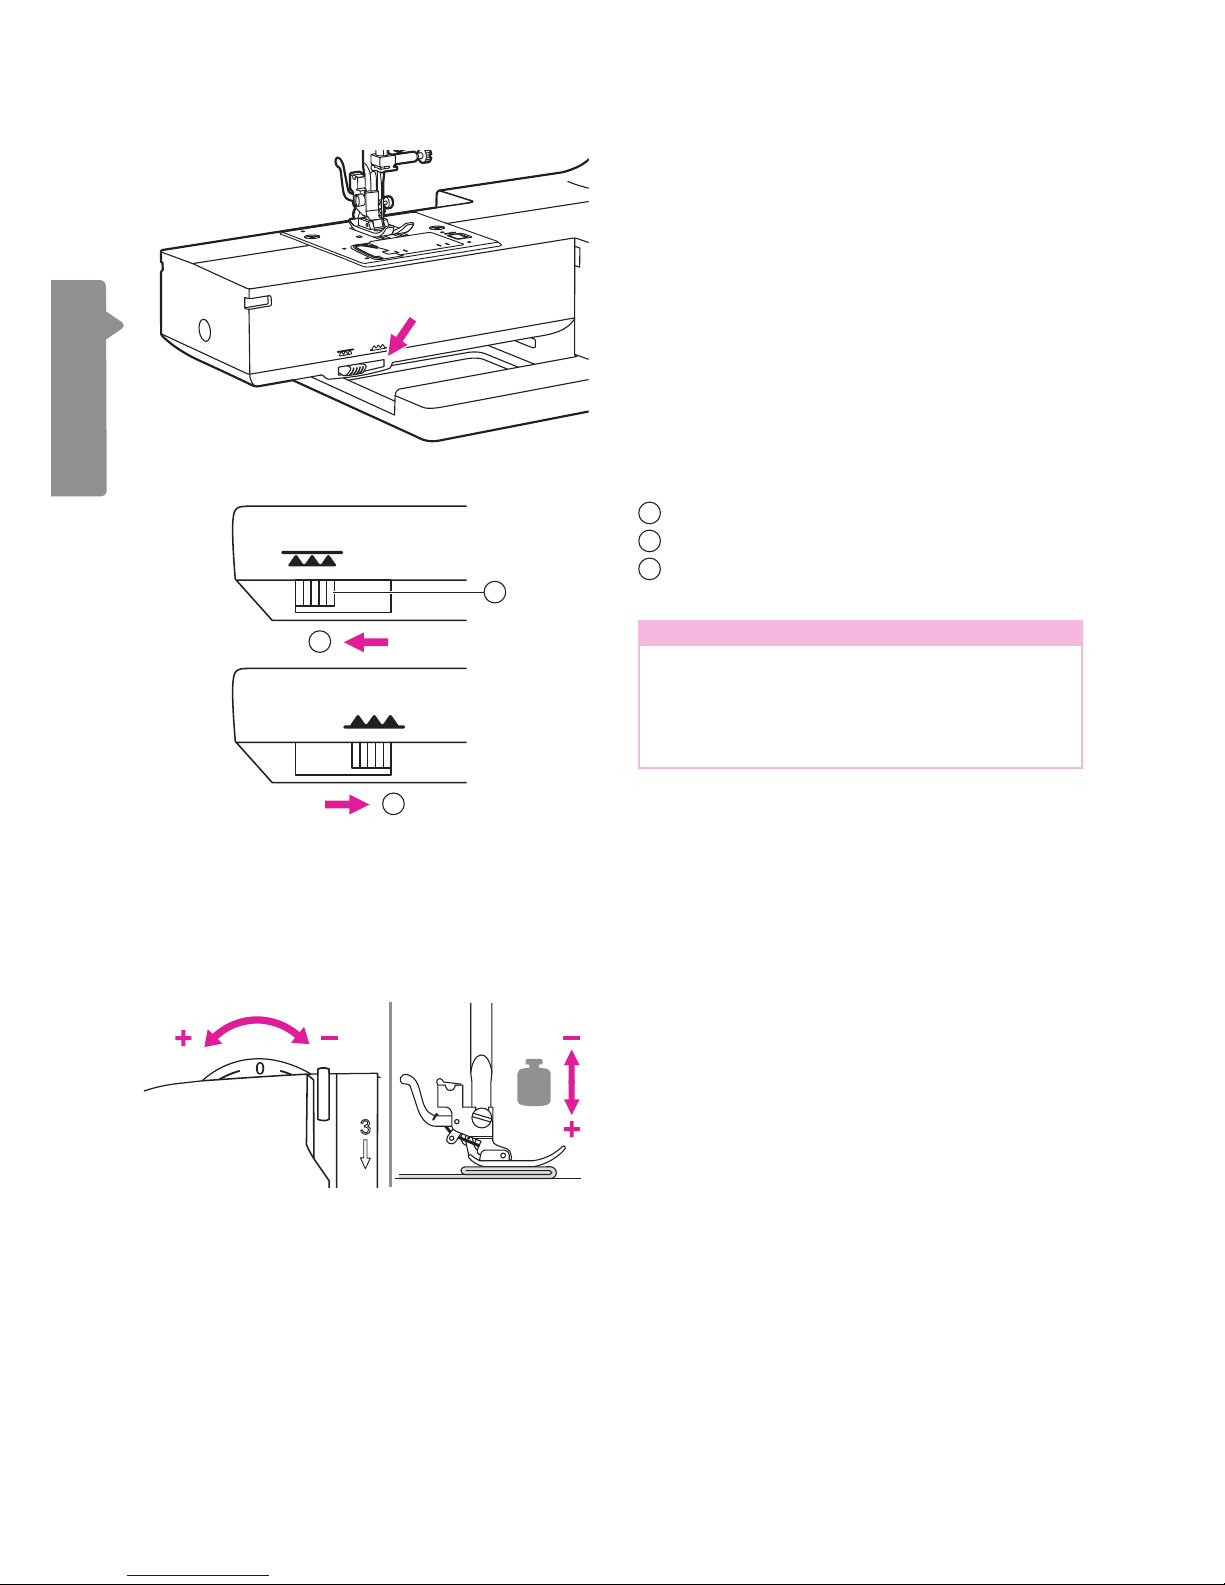
To raise or drop the feed dogs
The drop feed lever can be seen on the base
at the front side of the sewing machine.
Sliding the drop feed lever to lower or raise
the feed dogs. When lever is in raised
position, the feed dog will arise automatically
when you are sewing.
2
3
1
Adjusting the presser foot pressure
The presser foot pressure dial is on the top
left of the face plate.
The presser foot pressure of the machine
has been pre-set and requires no particular
adjustment for general sewing.
Basic presser foot pressure setting: "0".
For sewing with very thin fabric, reduce the
pressure by turning the knob clockwise (-1, -2,
-3) and for heavy fabric, increase the pressure
by turning it counter-clockwise (+1, +2).
1
Drop feed lever
2
Lowered position
3
Raised position
Note
When you nish the work, (e.g. button
sewing, free motion darning, embroidery
and monogramming), please move the drop
feed lever to raised position for general
sewing purpose.
Table of contents
Other EverSewn Sewing Machine manuals

EverSewn
EverSewn Celine User manual

EverSewn
EverSewn sparrow 20 User manual

EverSewn
EverSewn Maker 200 User manual

EverSewn
EverSewn CH04AX Operating instructions

EverSewn
EverSewn Hero User manual

EverSewn
EverSewn sparrow 15 Series Operating instructions

EverSewn
EverSewn Sparrow QE User manual

EverSewn
EverSewn sparrow 15 User manual


