EverSewn Sparrow QE User manual


1
INSTRUCTION MANUAL
This sewing machine is intended for household use.
IMPORTANT SAFETY INSTRUCTIONS
When using a sewing machine, basic safety precautions should always be followed, including the following.
Read all instructions before using.
DANGER - To reduce the risk of electric shock:
Never leave unattended when plugged in. Always unplug this machine from the electric outlet immediately after
using and before cleaning.
WARNING-
To reduce the risk of burns, re, electric shock, or injury to persons:
1. Do not allow to be used as a toy. Close attention is necessary when this sewing machine is used by or near
children.
2. Use this sewing machine only for its intended use as described in this manual. Use only attachments
recommended by the manufacturer as contained in this manual.
3. Never operate this sewing machine if it has a damaged cord or plug, if it is not working properly, if it has been
dropped or damaged, or dropped into water. Return the sewing machine to the nearest authorized dealer or
service center for examination, repair, electrical or mechanical adjustment.
4. Never operate the sewing machine with any air openings blocked. Keep ventilation openings of the sewing
machine and foot controller free from the accumulation of lint, dust, and loose cloth.
5. Never drop or insert any object into any opening.
6. Do not use out doors.
7. Do not operate where aerosol (spray) products are being used or where oxygen is being administered.
8. To disconnect, turn the power switch to the o position (symbol O), then remove plug from outlet.
9. Do not unplug by pulling on cord. To unplug, grasp the plug, not the cord.
10. Keep ngers away from all moving parts. Special care is required around the sewing machine needle.
11. Always use the proper needle plate. The wrong plate can cause the needle to break.
12. Do not use bent needles.
13. Do not pull or push fabric while stitching. It may deect the needle causing it to break.
14. Switch the sewing machine o (symbol O) when making any adjustments in the needle area, such as threading
needle, changing needle, threading bobbin, or changing presser foot.
15. Always unplug sewing machine from the electrical outlet when removing covers, lubricating, or when making
any other user servicing adjustments mentioned in the instruction manual.
16. Handle the foot controller with care and avoid dropping it on the oor. Be sure not to place anything on top of it.
17. Use only the handle to lift and move the machine.
18. Do not expose the machine or machine plastic case to sunlight directly. Also, do not keep it in a very warm or
damp place.
19. The Appliance is not intended for use by young children or inrm persons without supervision.
20. Young children should be supervised to ensure that they do not play with the appliance.
SAVE THESE INSTRUCTIONS
Servicing should be performed by an authorized service representative.
WARNING
Cancer and Reproductive Harm - www.P65Warnings.ca.gov

2
CONTENTS
STARTING TO SEW...................................................23
A. START AND END OF SEAM ................................... 23
B. REVERSE STITCHING ........................................... 24
C. AUTO TACK, AUTO TACK & CUT........................... 24
D. TURNING CORNERS ............................................. 25
E. SEWING HEAVY FABRIC ....................................... 25
F. SEWING OVER OVERLAPPED AREAS................. 26
G. THREAD CUTTER .................................................. 26
H.
IF YOU WANT TO DRAW UP THE BOBBIN THREAD
... 26
STRAIGHT STITCH SEWING....................................27
ELASTIC STITCH SEWING.......................................28
ZIGZAG STITCH SEWING.........................................29
HAND LOOK QUILTING STITCH...............................29
MULTI-STITCH ZIGZAG ............................................30
A. MENDING................................................................ 30
B. ELASTIC BAND SEWING ....................................... 30
APPLIQUE..................................................................30
OVERCASTING-OVERLOCKING..............................31
A. USING THE OVERCASTING FOOT ....................... 31
B. USING THE REGULAR FOOT................................ 31
BLIND HEM STITCHING............................................32
BUTTONHOLE SEWING ...........................................33
AUTOMATIC BAR-TACK............................................35
INSERTING ZIPPERS
(CENTERED INSERTION /
LAPPED INSERTION)
........................................ 36
A. CENTERED INSERTION ........................................ 36
B. LAPPED INSERTION .............................................. 37
SCALLOP STITCH.....................................................38
A. SCALLOP HEM ....................................................... 38
B. SCALLOP EDGING ................................................. 38
PATCH WORK............................................................39
DECORATIVE STITCHES..........................................39
PIN TUCK...................................................................40
FREE ARM SEWING..................................................40
MAINTENANCE .........................................................41
A. BOBBIN HOLDER ................................................... 41
B. HOOK RACE AND FEED DOG ............................... 41
MESSAGE..................................................................42
HELPFUL HINTS........................................................43
SETTING OF LCD, LED LIGHT, and BEEP...............44
MAIN PARTS................................................................3
EXTENSION TABLE.....................................................5
ACCESSORIES............................................................5
CONNECTING THE MACHINE....................................6
FOOT CONTROLLER..................................................6
FUNCTION OF EACH PART........................................7
A. START/STOP BUTTON............................................. 7
B. REVERSE BUTTON.................................................. 7
C. NEEDLE UP-DOWN/SLOW BUTTON ...................... 7
D. THREAD CUTTER BUTTON..................................... 7
E. SPEED CONTROL BUTTON .................................... 7
F. PRESSER FOOT LIFTER ......................................... 8
G. DROP FEED LEVER ................................................. 8
H. PRESSURE REGULATOR........................................ 8
HOW TO USE THE NEEDLE PLATE FOR STRAIGHT
STITCH.........................................................................9
KNEE LIFTER LEVER................................................10
DUST COVER............................................................10
TO SELECT A PATTERN / ADJUST A PATTERN .....11
A. TO SELECT A BASIC PATTERN............................. 11
B. TO SELECT OTHER PATTERN .............................. 12
C. TACK/CUT BUTTON ............................................... 13
D. ADJUSTING THE STITCH WIDTH AND LENGTH... 13
E. NEEDLE POSITION CONTROL.............................. 13
F. TENSION BUTTON ................................................. 13
G. STITCH PATTERN................................................... 14
THREAD TENSION....................................................15
BOBBIN SETTING .....................................................16
A. REMOVING THE BOBBIN ...................................... 16
B. WINDING THE BOBBIN .......................................... 16
C. INSERTING THE BOBBIN....................................... 17
THREADING THE MACHINE.....................................18
A. PREPARING TO THREAD MACHINE..................... 18
B. SETTING SPOOL OF THREAD ON SPOOL PIN.... 18
C. THREADING THE UPPER THREAD ...................... 19
D. THREADING THE NEEDLE EYE............................ 20
CHANGING THE PRESSER FOOT...........................21
A. CHANGING THE PRESSER FOOT ........................ 21
B. REMOVING THE PRESSER FOOT HOLDER ........ 21
FABRIC, THREAD AND NEEDLE TABLE..................22
INSERTING THE NEEDLE ........................................22

3
PatternTension
Width/
Length
Tack/
Cut
MAIN PARTS
1. Needle Up-Down/Slow
Button
2. Thread Cutter Button
3. Speed Control Button
4. Top Cover
5. Hand Wheel
6. Pressure Regulator
7. Light Cover
8. Reverse Button
9. Start/Stop Button
10. LCD
11. Function Buttons
12. Control Panel
13. Tack/Cut Button
14. Width/Length Button
15. Tension Button
16. Pattern Buttons
17. Basic Stitch Buttons
18. Extension Table
19. Knee Lifter Lever Socket
20. Thread Cutter
21. Hole for Loupe (Option)
22. Buttonhole Lever
23. Needle Threader Lever
24. Needle Threader
25. Presser Foot Holder
26. Presser Foot
27. Fabric Feed Dogs
28. Needle Clamp Screw
29. Needle Bar Thread Guide
30. Needle
31. Lock Button
32. Needle Plate
33. Bobbin Cover Latch
34. Bobbin Cover

4
REAR VIEW
35. Inside of Top Cover*
36. Pattern Chart
37. Bobbin Winder Thread
Guide
38. Thread Guide
39. Thread Guide
40. Thread Take-up lever
(Inside)
41. Thread Tension Regulator
(Inside)
42. Spool Cap
43. Spool Pin
44. Felt Washer
45. Bobbin Winder Thread
Guide
46. Thread Cutter
47. Bobbin Winder Stop
48. Bobbin Winder Spindle
49. Handle
50. Thread Cutter
51. Presser Foot Lifter
52. Power Switch
53. Terminal Box
54. Foot Controller Jack
55. Foot Controller
56. Power Line Cord
57. Drop Feed Lever
* To open the top cover, lift up
the front of cover.
* The Drop Feed Lever is
only accessible after the
extension table is removed.
5
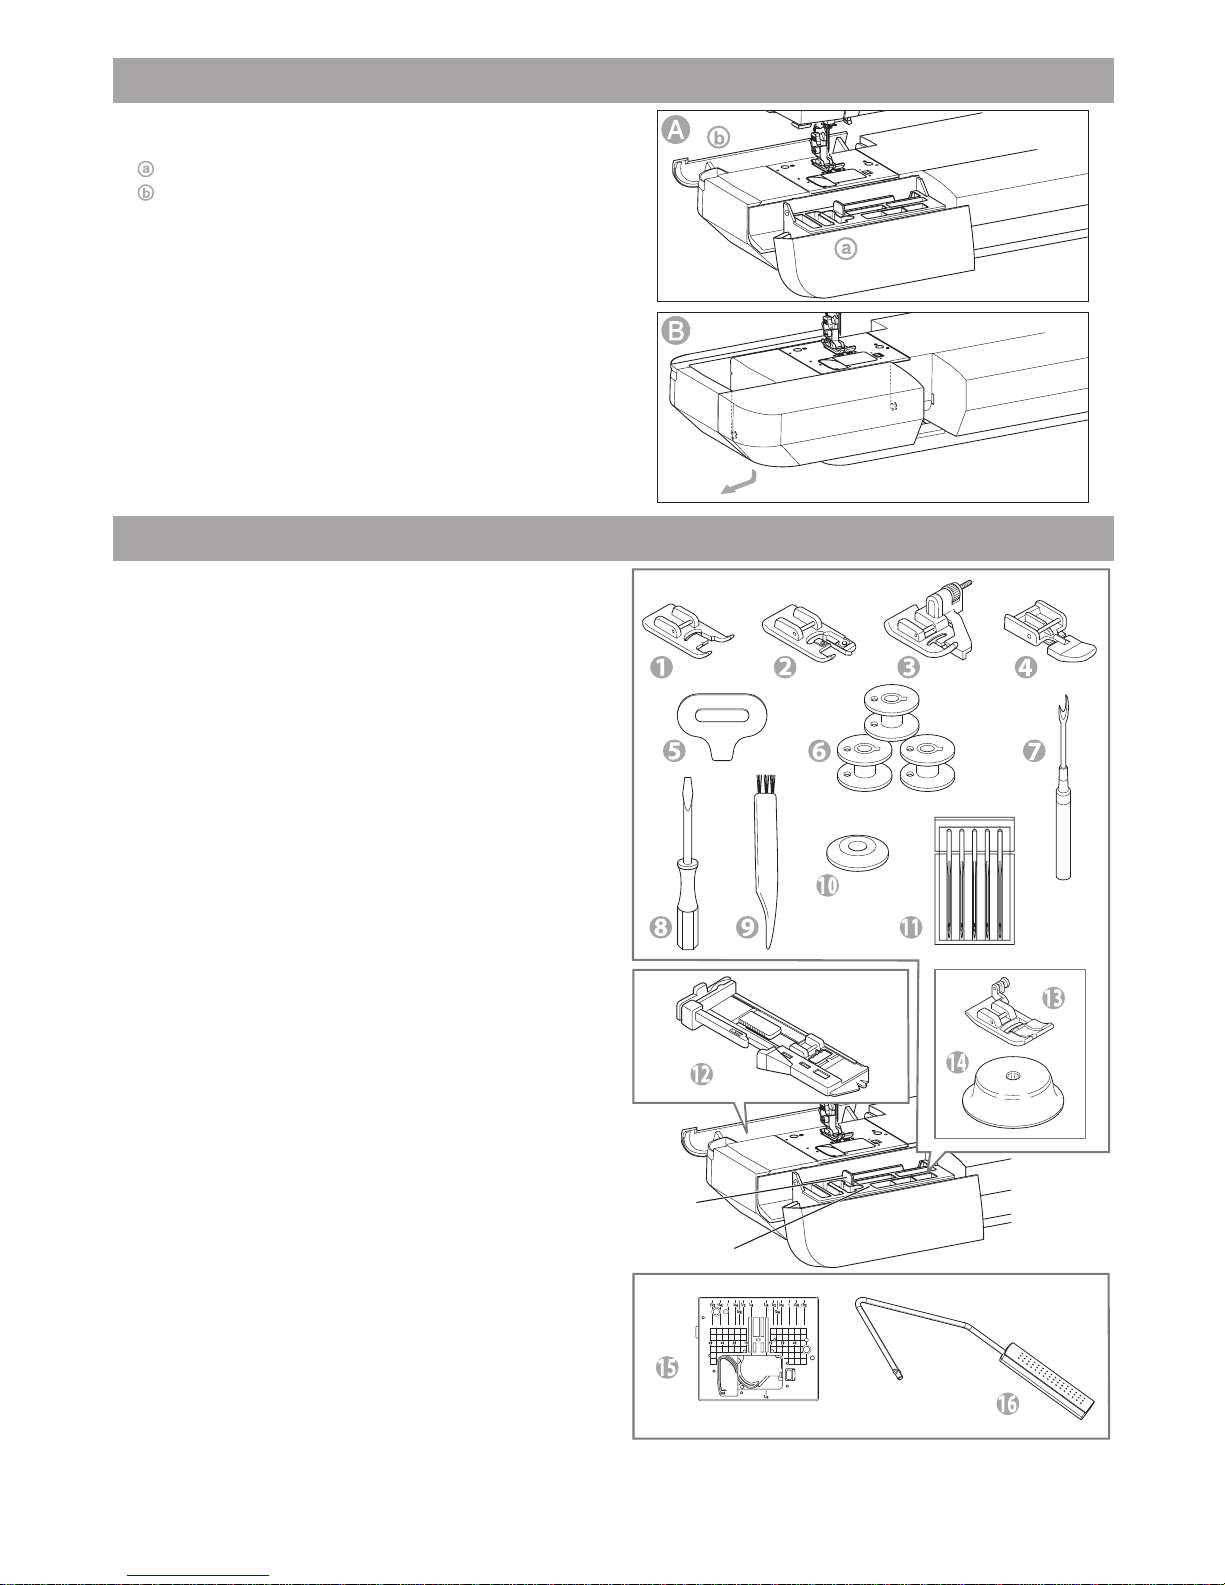
EXTENSION TABLE
A. OPENING THE ACCESSORY CASE
Grasp the front/rear case and pull outwards.
: Front Case
: Rear Case
B. REMOVING THE EXTENSION TABLE
Hook your nger to the left bottom side of extension
table and slide it to the left. To attach, insert to the
right.
1. Satin Foot (B)
2. Overcasting Foot (C)
3. Blind Foot (D)
4. Zipper Foot (E)
5. Driver for Needle Plate
6. 4 Bobbins (1 is in the machine)
7. Seam Ripper
On the accessory tray (Front case)
In the rear accessory case
Under the accessory tray (Front case)
Lift up the tray by holding the tab. There is a
compartment underneath.
On the machine when delivered
Provided on the top of styrofoam when
delivered
Accessories are provided in the accessory case.
8. Screw Driver
9. Brush
10. Small Spool Cap
11. Needle Pack
12. Buttonhole Foot
13. Regular Foot (A)
14. Spool Cap Tab
Tray
ACCESSORIES
15. Needle Plate for Straight Stitch
16. Knee Lifter Lever
BC D E
A
6
DANGER: To reduce the risk of electric
shock.
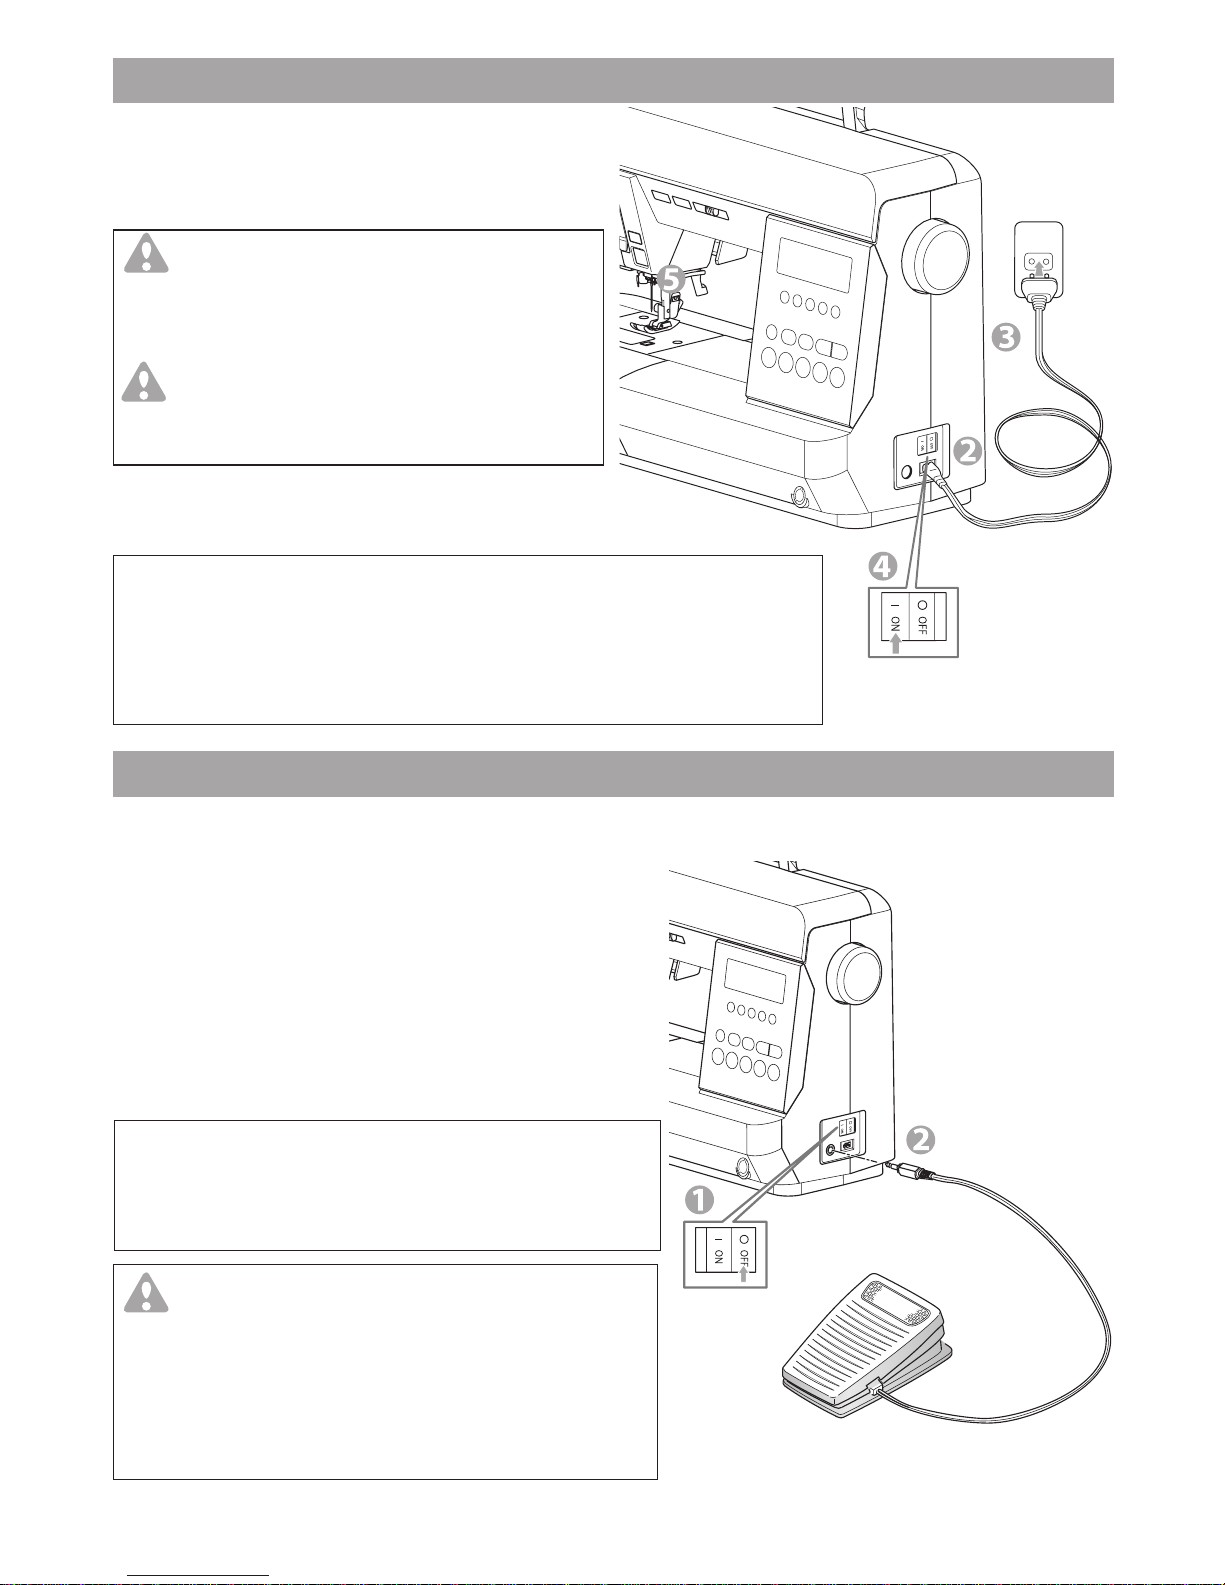
CONNECTING THE MACHINE
Use of foot controller will permit control of start, stop and
speed with your foot.
When the foot controller is connected, start/stop button will
be deactivated. (See page 7)
1. Turn o the power switch. (Symbol O)
2. Push foot controller plug into the jack on machine.
3. Place foot controller at your feet.
4. Turn on the power switch.
5. A lamp will light up when switch is turned on.
6. The harder you press the foot controller, the faster the
machine will sew. The machine will stop when foot
controller is released.
WARNING: To reduce the risk of burns, re,
electric shock, or injury to persons.
Tap Function
When you press and release the foot controller quickly, the
needle position will be changed.
NOTE: Needle stop position will not be changed.
1. Place machine on stable table.
2. Connect the power line cord to the machine by
inserting the 2-hole plug into the terminal box.
3. Connect the power line plug to the electric outlet.
4. Turn on the power switch.
5. A lamp will light up when switch is turned on.
6. To disconnect, turn the power switch to the o
position (Symbol O), then remove plug from outlet.
FOR UNITED STATES AND CANADA USERS:
POLARIZED PLUG INFORMATION
This sewing machine has a polarized plug (one blade wider than the other). To
reduce the risk of electric shock, this plug is intended to t in a polarized outlet
only one way. If the plug does not t fully in the outlet, reverse the plug. If it still
does not t, contact a qualied electrician to install the proper outlet. Do not
modify the plug in any way.
Never leave unattended when plugged in. Always
unplug this machine from the electric outlet
immediately after using and before maintenance.
WARNING: To reduce the risk of burns,
re, electric shock, or injury to persons.
Do not unplug by pulling on cord. To unplug, grasp the
plug, not the cord.
FOOT CONTROLLER
1. Turn o the power when connecting the foot controller to
the machine.
2. Handle the foot controller with care and avoid dropping it
on the oor. Be sure not to place anything on top of it.
3. Use only foot controller provided with this machine. (Type
C-9001 manufactured by CHIEN HUNG TAIWAN Ltd))
7
PatternTension
Width/
Length
Tack/
Cut
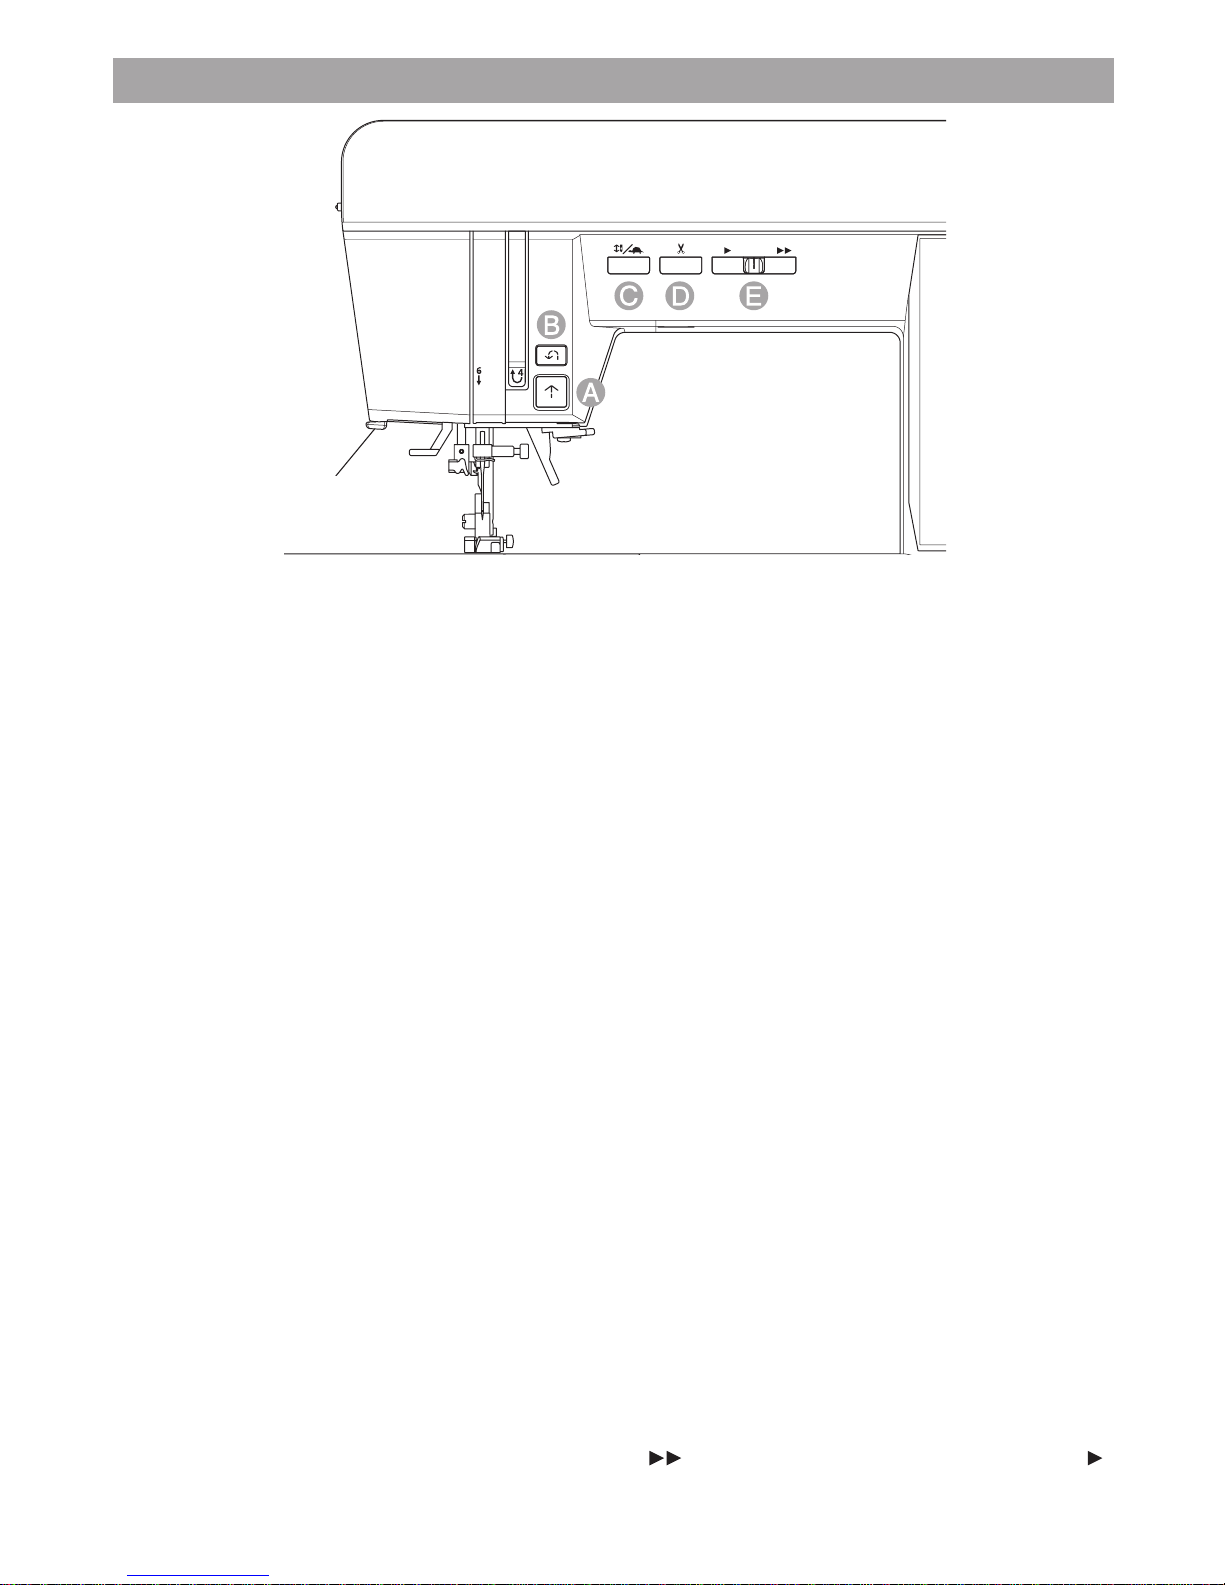
FUNCTION OF EACH PART
A. START/STOP BUTTON
The machine will start running when start/stop button is pressed and will stop when pressed the second time. The
machine will rotate slowly at start of sewing.
MONITOR LAMP
Green Light “ON”: Ready to sew or to wind bobbin.
Red Light “ON”: Presser foot is not in down position or buttonhole lever is not lowered.
If the red light is on, the machine will not start even when start/stop button is pressed.
If upper thread is not threaded, machine will stop after a few turns. (Upper thread sensor)
NOTE:
When the foot controller is connected, start/stop button will be deactivated.
B. REVERSE BUTTON
The machine will continue to sew in reverse at low speed while this button is pressed and stop when this button is
released.
NOTE:
When the foot controller is connected and the pedal is pressed, machine will sew in reverse while this button is
pressed. When released, machine will sew forward.
C. NEEDLE UP-DOWN/SLOW BUTTON
While NOT sewing, needle STOP position will be changed up or down by pressing this button.
While sewing, by pressing this button, machine will sew in slow speed. Pressing this button again, the speed will
return.
D. THREAD CUTTER BUTTON
Press this button after sewing to cut the upper and lower bobbin threads.
The machine will cut both threads automatically.
CAUTION:
* Do not press this button when there is no fabric in the machine or if there is no need to cut the threads. The thread
may tangle, resulting in damage.
* Do not use this button when cutting thread thicker than #30, nylon thread or other speciality threads. In this case,
use the thread cutter. See page 26.
E. SPEED CONTROL BUTTON
The machine will sew faster when the button is slid to the right ( ), and sew slower when button is slid to the left ( ).
NOTE:
When the foot controller is connected, the speed control is automatically set to the maximum speed.
Thread Cutter

8
G.DROP FEED LEVER
NOTE:
The Drop Feed Lever is only accessible after the
extension table is removed.
The fabric feed dogs project up through the needle
plate, directly below the presser foot. Their function
is to move the fabric being sewn. The drop feed lever
controls the fabric feed dogs.
For ordinary sewing, move the lever to the right. This
raises feed dogs to their highest position. For most
sewing, the lever should be in this position.
For darning or free motion embroidery or whenever
fabric is to be moved by hand, move the lever to the left
to lower the fabric feed dogs.
F. PRESSER FOOT LIFTER
The presser foot is lifted up or down by this lever.
NOTE:
Machine will not start when the presser foot is lifted.
(Except for bobbin winding)
H. PRESSURE REGULATOR
The correct pressure allows fabrics to feed properly
while sewing. The setting of the presser foot pressure
is determined mainly by the weight of the fabric being
sewn.
For lightweight fabrics such as sheers, batiste, voile,
etc, the pressure is decreased. For heavyweight fabrics
like denim or canvas, the pressure in increased.
To increase the pressure, turn dial to 5. (○○○○○)
To decrease the pressure, turn dial to 1. (○)
For most fabrics, turn dial to 3. (○○○)
Fabric
feed
dogs
Front
Back

9
HOW TO USE THE NEEDLE PLATE FOR STRAIGHT STITCH
When sewing light-weight fabric you can get beautiful
straight stitches without puckering by using the
needle plate for straight stitch. This is because the
needle plate for straight stitch has a smaller needle
hole than the regular needle plate.
Remove the regular needle plate and attach the
needle plate for straight stitch.
Regular Needle Plate
(On the machine when delivered)
PatternTension
Width/
Length
Tack/
Cut
CHANGING THE NEEDLE PLATE
SEWING
CAUTION: To prevent accidents.
Disconnect the power when changing the needle
plate.
Select the straight stitch center needle position (No. 2,
4, 30).
CAUTION: To prevent accidents.
Select stitch numbers 2, 4 and 30 only while using
the needle plate for straight stitch. Do not move the
needle position from center (3.5).
Otherwise, needle hit the needle plate and break.
1. Remove the extension table, the needle, the
presser foot and the holder. Remove the bobbin
cover and bobbin. Remove the screws holding
the regular needle plate.
: Driver for needle plate
2. Remove the regular needle plate by lifting up the
right side of the plate.
3. Place the needle plate for straight stitch inserting
the hook ( ) and holes ( ) into the machine.
Retighten the screws.
4. Replace the bobbin and the bobbin cover, the
presser foot and holder.
Replace the needle and extension table.
Needle Plate for Straight Stitch

10
KNEE LIFTER LEVER
Convexes
Slits
By attaching the knee lifter lever to the machine, you
can lift or down the presser foot by your knee.
1. Insert the knee lifter lever into the socket of machine
so that the convexes of the lever t into the slits of
the socket.
2. Press the lever to the right to lift up the foot.
Release the lever to lower the foot.
CAUTION: To prevent the accidents.
- Insert the knee lifter lever all the way into the socket.
If it is not inserted correctly, it may come o during
use.
- DO NOT TOUCH THE KNEE LIFTER LEVER
WHILE SEWING. Needle may break or sewing may
jam.
Cover the machine with dust cover when it is not in use.
DUST COVER
11
This machine has 70 patterns.
(See the pattern chart located inside of the top cover.)
When you turn on the machine, straight stitch ( ) will be
selected and indicated on the LCD.
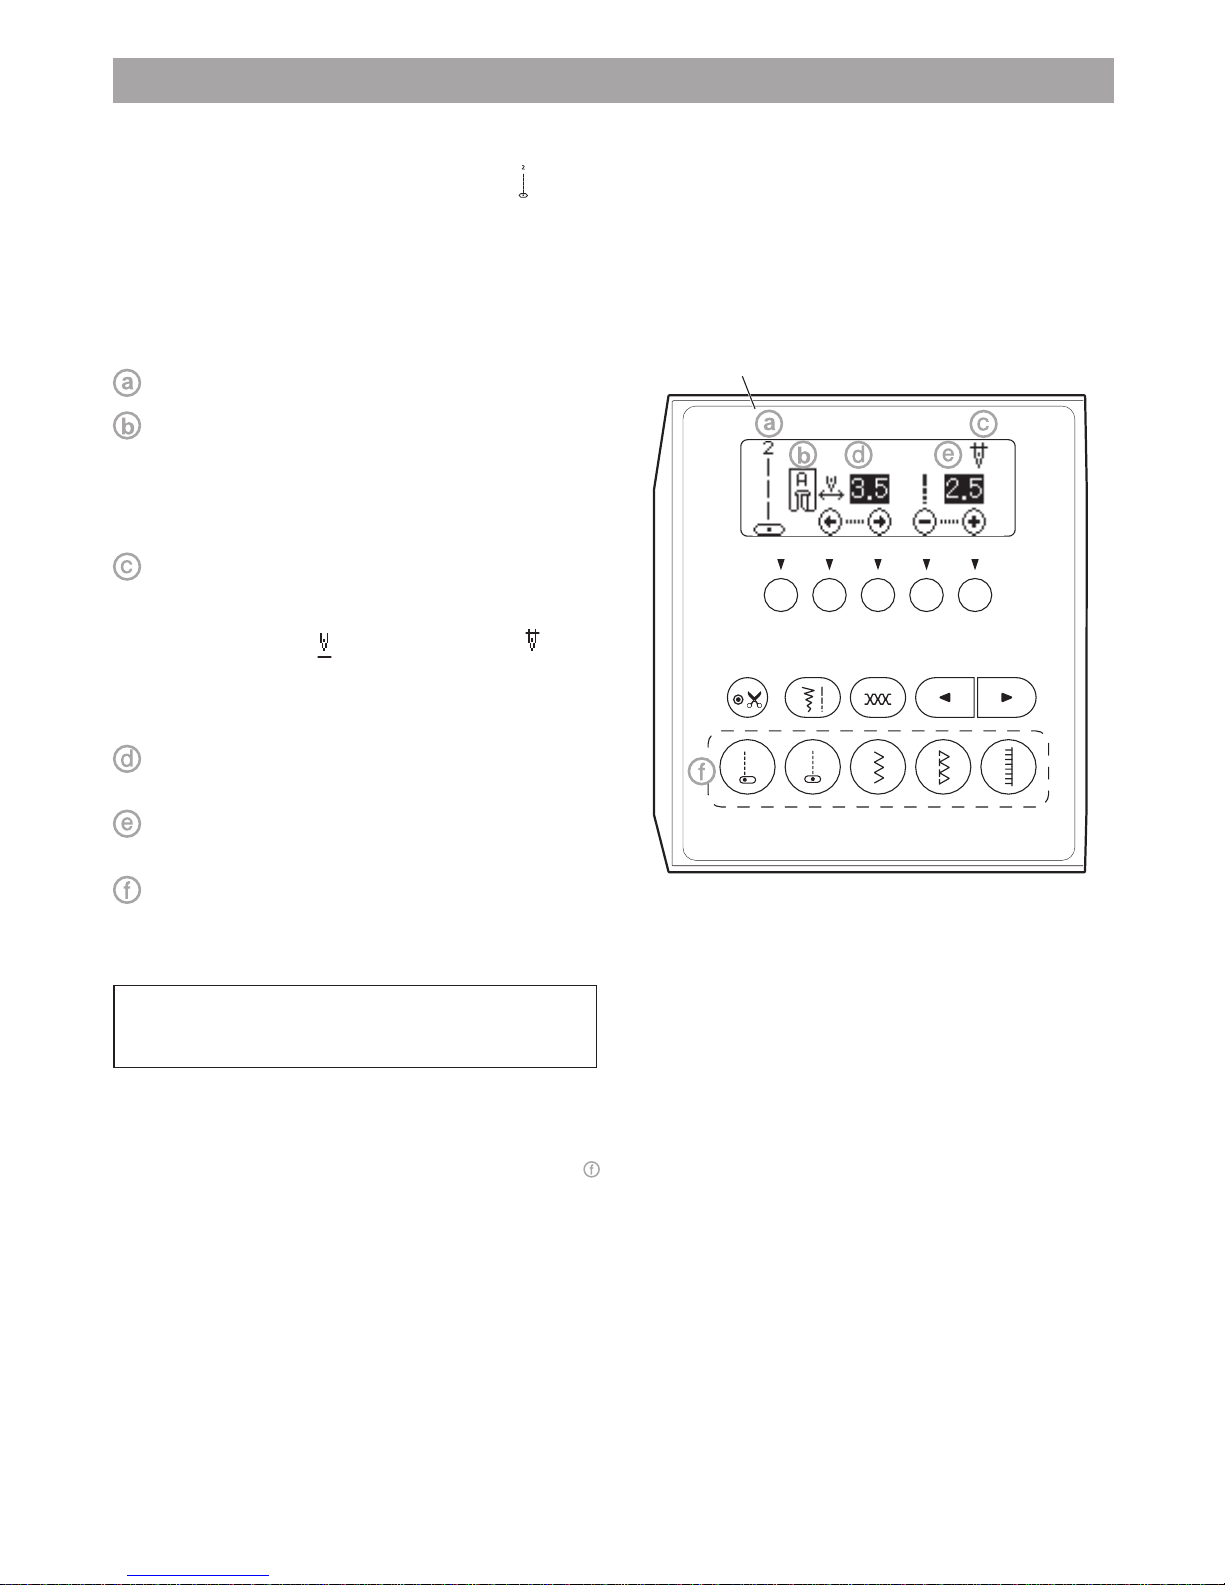
When you select a pattern, the following are indicated
on the LCD:
You can select basic stitch by touching these buttons ( )
directly. Selected stitch will be indicated in the screen.
NOTE:
Please do not press the buttons strongly.
The buttons in the control panel react by lightly touching
with the ngertip.
NOTE:
If the LCD can not be seen well, you can adjust the
brightness. (See page 44)
PatternTension
Width/
Length
Tack/
Cut
Control Panel
Pattern Number and Stitch Pattern
TO SELECT A PATTERN / ADJUST A PATTERN
A. TO SELECT A BASIC PATTERN
Suitable Presser Foot
The presser foot indicated on the LED is suggested
for use for normal sewing.
You can use other presser feet according to the
purpose of sewing described in this manual.
Needle Stop Position
Indicates needle stop position by selecting needle
up/down button.
Up position: Down position:
When you turn on the machine, needle stop position
is set to down position.
Stitch Width/Needle Position
Stitch Length
Basic Stitch Buttons
See page 13.
See page 13.
See the next topic "TO SELECT A BASIC
PATTERN".
12
Tension
Width/
Length
Tack/
Cut Pattern
Tension
Width/
Length
Tack/
Cut Pattern
Tension
Width/
Length
Tack/
Cut Pattern
Tension
Width/
Length
Tack/
Cut Pattern
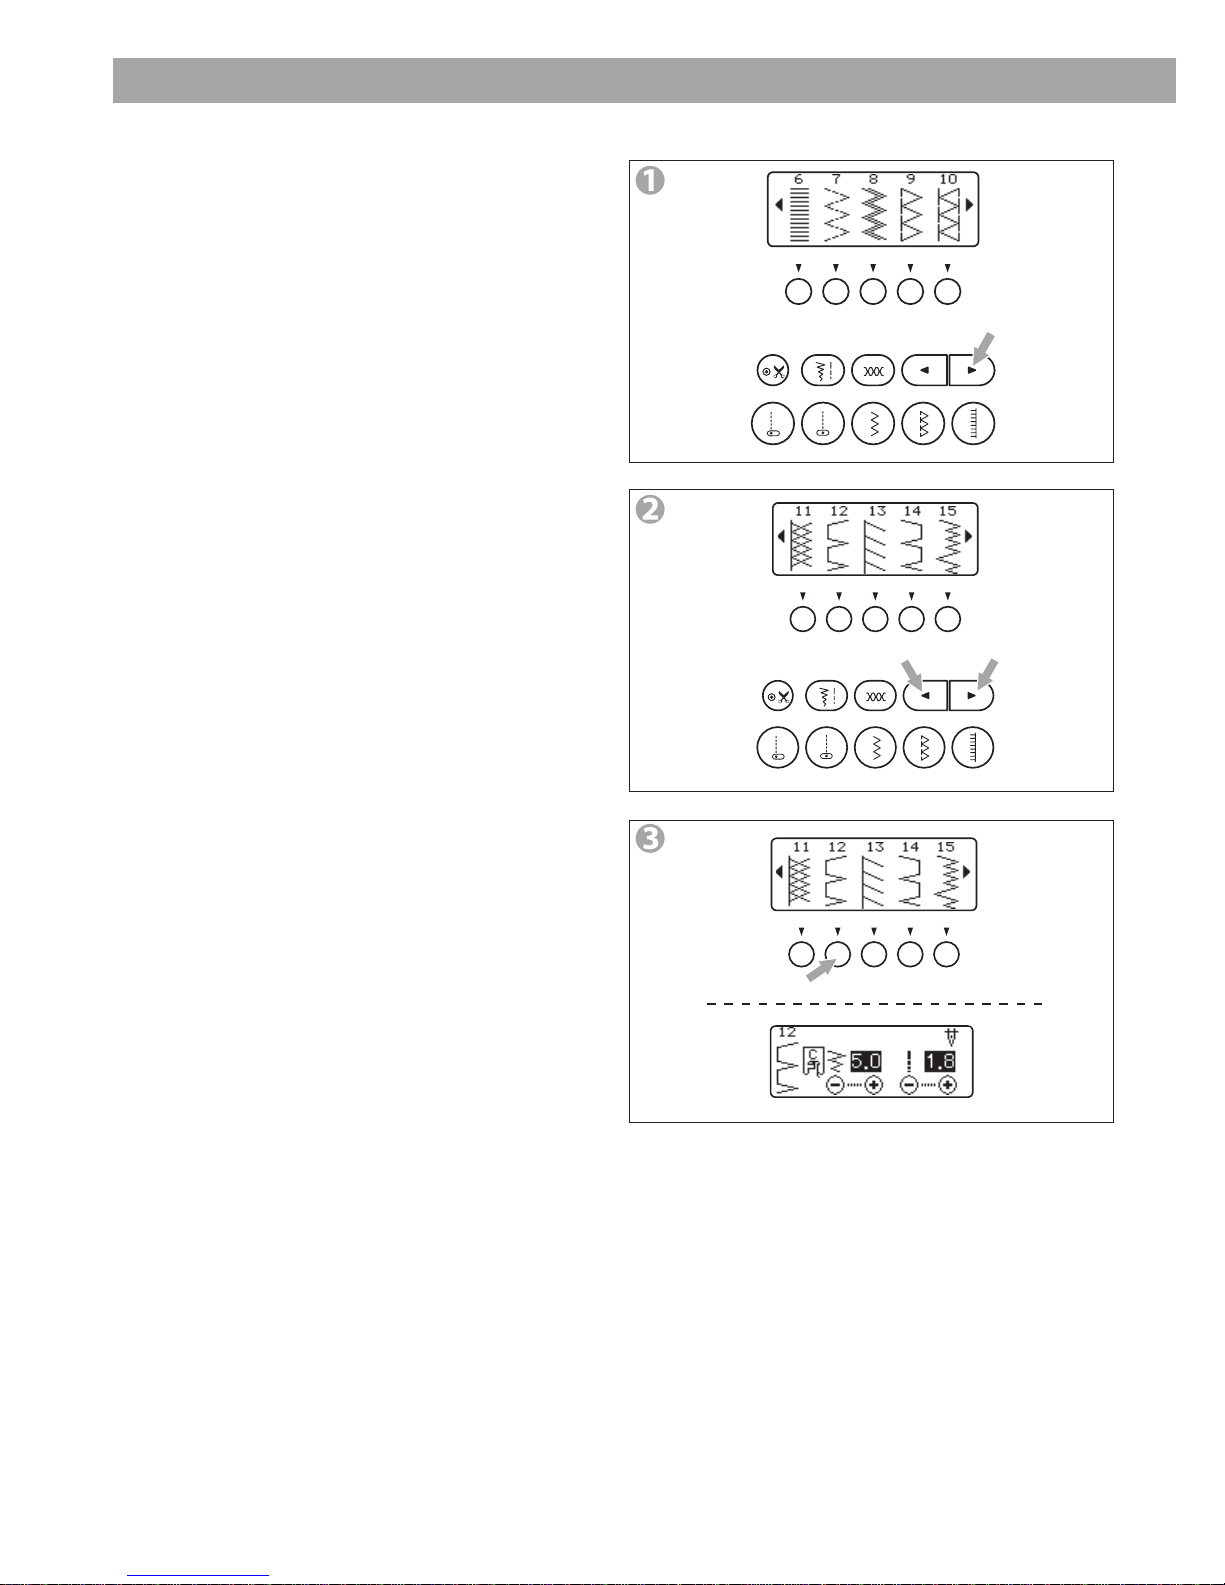
NextPrevious
1. Touch the right or left pattern button.
The 5 patterns including currently selected will be
displayed on the LCD.
2. By touching the left pattern button, the previous 5
patterns will be displayed.
By touching the right pattern button, the next 5
patterns will be displayed.
Touch these buttons until the pattern which you want
to sew will appear.
3. Touch the function button under the pattern you
want to sew.
The LCD screen will indicate the stitch width/needle
position and stitch length of the selected pattern.
B. TO SELECT OTHER PATTERN

13
You can sew tack stitch at the beginning and end of the
stitch by touching the tack/cut button. Also, you can cut
threads automatically after end tacking. See page 24.
Touching the width/length button, the display changes
as illustration (D).
When you select a pattern, stitch width and length are
set for suitable width and length automatically and
indicated on the screen. You can adjust them manually.
If the screen is indicating the thread tension, touch the
width/length button to indicate them.
To narrow the stitch width, touch the function button (a).
To widen the stitch width, touch the function button (b).
To shorten the stitch length, touch the function button (c).
To lengthen the stitch length, touch the function button (d).
* Preset stitch width and length are indicated as a
highlighted number.
* The beep sounds at the maximum or minimum value.
(The maximum or minimum value is dierent by each pattern. When
stitch width or length is not appeared, its pattern cannot change these
settings.)
When straight stitch patterns (1, 2, 4, 30) have been
selected, stitch width buttons change to adjust the
needle position.
To move the needle to the left, touch the function button
(e).
To move the needle to the right, touch the function
button (f).
Touching the tension button, the display changes as
illustration (F).
The thread is automatically setup to a suitable thread
tension. When you touch this button you can adjust it
manually. See page 15.
Number 0 - 3.5 - 7.0
Position Left Center Right
PatternTension
Width/
Length
Tack/
Cut
PatternTension
Width/
Length
Tack/
Cut
PatternTension
Width/
Length
Tack/
Cut
Stitch Width
Stitch Length
PatternTension
Width/
Length
Tack/
Cut
C. TACK/CUT BUTTON
D. ADJUSTING THE STITCH WIDTH AND
LENGTH
E. NEEDLE POSITION CONTROL
F. TENSION BUTTON
-+
-+
f
e
d
c
b
a

14
* Highlighted pattern numbers indicate the
basic stitch patterns.
G.STITCH PATTERN
15
This machine adjusts the thread tension automatically
when you select a pattern.
However, you can change the thread tension as follows.
1. Touch the thread tension button.
The state of thread tension is displayed with
numerical value and scale. (Thread tension screen)
2. Change the thread tension with function buttons:
• To return to default tension, touch the function
button (a).
• To weaker the tension, touch the function button (b).
• To stronger the tension, touch the function button (c).
* Preset tension number is highlighted.
* You can start sewing on this thread tension screen as
it is.
* When you reselect a pattern, tension will return to
default.
Thread tension except for straight stitch
When sewing stitches other than straight stitch, thread
tension is automatically adjusted to be weaker than
when sewing a straight stitch.
This will cause upper needle thread to appear on the
bottom side of fabric, resulting in better stitching.
Helpful Hints
If your sewing appears as shown on the right, (stitches
on the top side of fabric are good but bottom side tends
to look like a towel), it could be that the upper thread
is not threaded correctly. Refer to page 18 for correct
threading.
* Also, if the bobbin thread comes out on the front side of the fabric
even though the thread tension is set to the automatic setting value,
the way of setting bobbin is wrong. Refer to page 17 and set the
bobbin correctly.
PatternTension
Width/
Length
Tack/
Cut
Preset thread tension
Upper and bobbin thread will lock appromaximately in
the middle of fabric.
When thread tension is decreased.
Upper thread will appear on the bottom side of fabric.
When thread tension is increased.
Bobbin thread will appear on the top side of fabric.
THREAD TENSION
b
ac
Thread Tension Guide

16
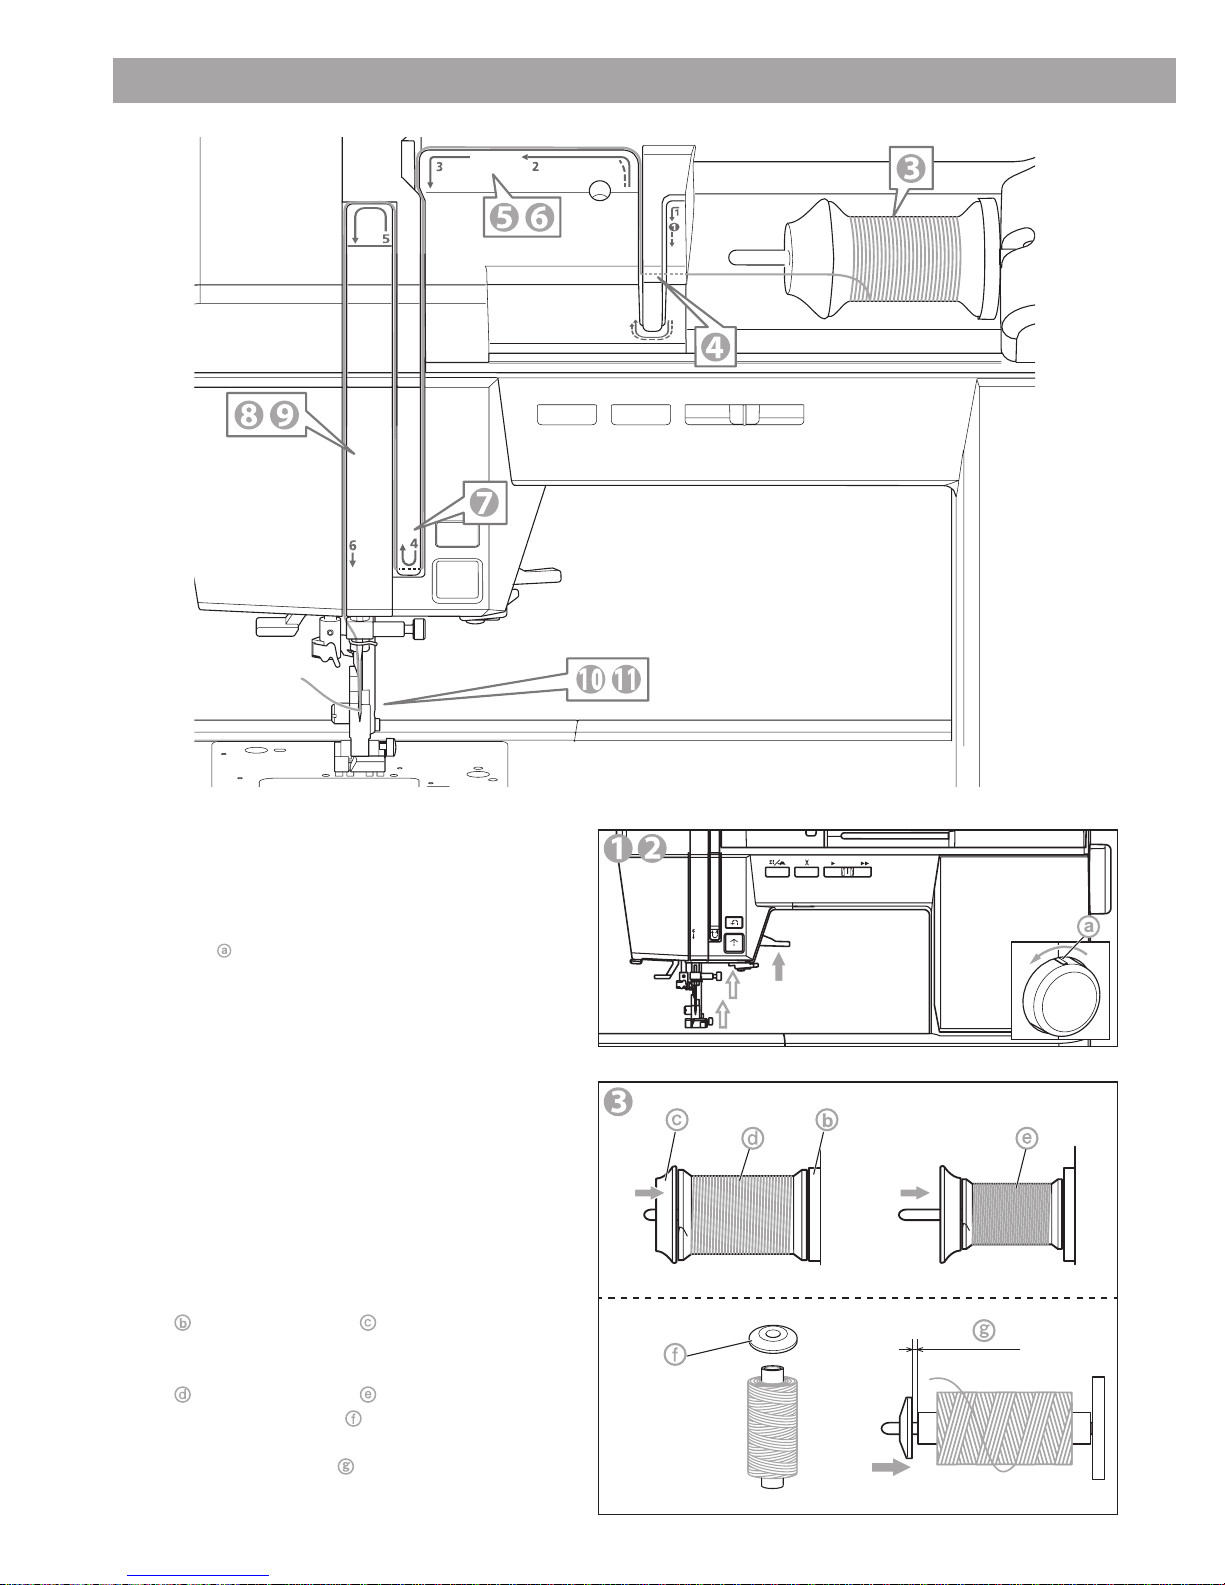
B. WINDING THE BOBBIN
1. Open the top cover.
2. Place the bobbin on the bobbin winder spindle
so that the groove ( ) on the bobbin ts to the
spring ( ) on the spindle.
Push bobbin to the right to engage bobbin winder.
(LCD will indicate the bobbin winder mode.)
3. Set the felt washer ( ) to the right side of spool.
Set the spool of thread on spool pin so that the
thread unrolls from the front of the spool.
Set the spool cap ( ) on spool pin as far as it will
go.
Reverse spool cap direction according to the size
of spool.
: Large Spool : Small Spool
Use the small spool cap ( ) when you use cross
wound thread. Leave small opening between cap
and spool as illustrated ( ) for smooth thread
feeding.
4. Hold thread in both hands and hook thread to
the guide from rear opening.
Bring thread frontward and pass through the
thread guide from right to left.
5. Bring thread backward and pass through the
thread guide ( ) from left to right.
6. Bring thread to the right and pass thread through
the thread guide from rear side. Pass thread
under tension disc in counter clockwise direction.
A. REMOVING THE BOBBIN
11.5 mm
Actual Size
NOTE:
Use the bobbin dedicated to this model.
BOBBIN SETTING
1. Raise the presser foot lifter.
2. Pull the bobbin cover latch to the right and
remove the bobbin cover.
3. Lift up the bobbin from the machine.

17
PatternTension
Width/
Length
Tack/
Cut
C. INSERTING THE BOBBIN
1. Place bobbin into bobbin holder ( ) with the
thread unwinding counter clockwise.
2. Draw thread into notch ( ) with holding the
bobbin.
3. Pull thread along the groove from up to down.
Pull thread to the right to cut the thread ( ).
4. Replace the bobbin cover. Set the left tabs ( )
into the holes in needle plate and push the right
side of bobbin cover down until it clicks into
place.
7. Hold the thread by your left hand and wind the
thread to the bobbin 4-5 times clockwise.
8. Hook the thread under the front wing of the
bobbin winder thread guide ( ) from left to right
and cut the thread.
9. Start the machine by pressing the start/stop
button or pressing the foot controller pedal.
The bobbin winding will stop automatically when
bobbin is full. (Release the pedal.)
10. Push the bobbin and spindle to the left.
Remove the bobbin from the spindle. Hook
thread to the thread cutter ( ) from left-back to
right-front.
NOTE:
This machine can start to sew without drawing
up the bobbin thread.
If you want to draw up the bobbin thread, see
page 26.
CAUTION: To prevent accidents.
Turn o the power before carrying out the below
operation.
18
THREADING THE MACHINE
A. PREPARING TO THREAD MACHINE
B. SETTING SPOOL OF THREAD ON SPOOL
PIN
1. Raise the presser foot lifter.
2. Raise the needle to its highest position by turning
the hand wheel toward you.
The mark ( ) of hand wheel comes to the top.
(Keep this position until needle eye threading.)
3. Open the top cover and set spool as below.
- Pull up the left end of spool pin.
- Set the spool of thread on spool pin so that the
thread unrolls from the front of the spool.
- Set the spool cap on spool pin as far as it will go. (See
illustration.)
: Felt Washer : Spool Cap
Reverse spool cap direction according to the size
of spool.
: Large Spool : Small Spool
Use the small spool cap ( ) when you use cross
wound thread. Leave small opening between cap
and spool as illustrated ( ) for smooth thread
feeding.
Table of contents
Other EverSewn Sewing Machine manuals

EverSewn
EverSewn sparrow 15 Series Operating instructions

EverSewn
EverSewn Hero User manual

EverSewn
EverSewn Celine User manual

EverSewn
EverSewn Maker 200 User manual

EverSewn
EverSewn sparrow 20 User manual

EverSewn
EverSewn CH04AX Operating instructions

EverSewn
EverSewn sparrow 15 User manual

EverSewn
EverSewn Sparrow X User manual


