EverSewn sparrow 15 User manual


IMPORTANT SAFETY INSTRUCTIONS
1
IMPORTANT
DANGER!
WARNING!
When using an electrical machine, basic safety precautions should always be followed,
including the following:
Please read the instruction manual carefully before using this machine.
Keep the instruction manual at a suitable place with the machine and hand it over if you give the
machine to a third party.
To reduce the risk of electric shock:
1. Never leave the machine unattended when it is plugged in.
2. Always unplug this machine from the electric outlet immediately after using and before
cleaning.
3. LED RADIATION: Do not view directly with optical instruments Class.
To reduce the risk of burns, fire, electric shock or injury to persons:
1. The machine mustn't be used by children under 8 or by people with reduced physical,
When the machine is not in use or left unattended, always disconnect the machine from
the power supply system. Unplug it from the outlet.

2
sensory or mental capabilities or if there is a lack of experience and knowledge how to
operate the machine. Unless they have been given instruction concerning the use of the
machine and the involved risks by a person who is responsible for their safety.
2. Do not use this machine as a toy. Close attention is necessary when this machine is used
by children, near children or people with reduced sensation.
3. Use this machine only for its intended use as described in this manual. Use only
accessories recommended by the manufacturer.
4. Children should be supervised to ensure that they do not play with the machine.
5. Never operate this machine if it has a damaged cord or plug, if it is not working properly, if it
has been dropped or damaged, or dropped into water. Return the machine to the nearest
authorized dealer or service centre for examination, repair, electrical or mechanical
adjustment.
6. Never operate the machine with any air openings blocked. Keep ventilation openings of the
machine and the foot control free from accumulation of lint, dust, and loose cloth.
7. Keep fingers away from all moving parts. Special care is required around the machine
needle.
8. Always use the proper stitch plate. The wrong plate can cause needle breakage.
9. Do not use bent needles.
10. Do not pull or push the fabric while sewing. This can result in needle breakage.
11. Switch the machine off ("O") when making any adjustments in the needle area, such as
threading or changing the needle, threading the bobbin, or changing the presser foot, and
the like.

3
12. Always unplug the machine when performing cleaning or maintenance work such as
replacing the sewing light or when making any other user maintenance adjustments
mentioned in the instruction manual (disconnect the power plug). Cleaning and
maintenance work must not be carried out by children without supervision.
13. Never drop or insert any object into any openings.
14. Use this machine only in dry and protected areas. Never operate the machine in a damp or
wet environment.
15. Do not operate the machine where aerosol spray products are being used or where oxygen
is being administered.
16. To disconnect, turn the power switch to ("O")(off), then remove the plug from the outlet. Do
not unplug by pulling the cord, instead grasp the plug to pull it from the outlet.
17. If the supply cord of the foot control is damaged, it must be replaced by the manufacturer or
an appropriate service agent or a similar qualified person in order to avoid endangerment.
18. Never place anything on the foot control.
19. When replacing the light bulb, always use the same type.
20. The machine may only be used in combination with a foot control of the type
21. The sound pressure level during normal operation is lower than 75dB(A).
22. This machine is provided with double insulation (except U.S.A/Canada). Use only identical
replacement parts. See instructions for Servicing of double-insulated products.
KD-1902, FC-
1902 (110-120V area) / KD-2902, FC-2902A, FC-2902C, FC-2902D (220-240V area) / 4C-
316B (110-125V area) / 4C-316C (127V area) / 4C-326C (220V area) / 4C-326G (230V
area) / 4C-336G (220-240V area).

4
SERVICING OF DOUBLEINSULATED PRODUCTS
In a double-insulated product, two systems of insulation are provided instead of grounding. No
grounding means is provided on a double-insulated product nor should a means for grounding
be added to the product. Servicing a doubleinsulated product requires extreme care and
knowledge of the system and should only be done by qualified service personnel. Replacement
parts for a double-insulated product must be identical to those parts in the product. A
double insulated product is marked with the words "DOUBLE INSULATION" or
"DOUBLE INSULATED".
The symbol may also be marked on the product.
SAVE THESE INSTRUCTIONS!
Attention!
Note:
- This machine is intended for household use only. If used intensively or commercially, regular cleaning and
especially attentive care is required.
- Signs of wear and tear owing to intensive or commercial use are not covered automatically, even if they occur
within the warranty period. The decision on how to deal with any such cases rests with the local authorised
servicing staff.
If the machine is stored in a cold room, it should be brought to a warm room about one hour before use.

All rights reserved
Environmental protection
For technical and product improvement reasons, the machine's features, parts and accessory are subject to
unannounced changes and alterations at any time. The accessory included can differ from country to country.
is committed to the protection of the environment. We strive to minimize the environmental
impact of our products by continuously improving product Design and our technology of manufacturing.
Do not dispose of electrical machines as unsorted municipal waste, use separate collection facilities.
Contact your local government for information regarding the collection systems available.
If electrical machines are disposed of in landfills or dumps, hazardous substances can leak into the
groundwater and get into the food chain, damaging your health and well-being.
When replacing old machines with new ones, the retailer is legally obligated to take back your old
machine for professional disposal free of charge.
Ever Sewn
5

Contents
6
Machine overview..........................................................................7
Accessories ...................................................................................9
Machine preparation ...................................................................10
Sewing
Maintenance.................................................................................45
Sewing table .....................................................................10
Connecting machine to power source...............................11
Adjusting presser foot pressure........................................12
Presser foot lifter...............................................................13
Darning plate ....................................................................13
Changing the presser foot ................................................14
Winding the bobbin...........................................................15
Inserting bobbin ................................................................16
Inserting the needle ..........................................................17
Threading the upper thread ..............................................18
Automatic needle threader................................................19
Thread tension..................................................................20
Raising the bobbin thread.................................................21
Matching needle/fabric/thread ..........................................22
Stitch selection..................................................................23
Stitch width dial & stitch length dial...................................24
Sewing straight stitch........................................................25
Securing a seam (beginning and ending the seam) .........26
Blind hem / lingerie stitch..................................................27
Overlock stitches ..............................................................28
Sew 1-step buttonholes ....................................................30
Zippers..............................................................................32
Sewing with the hemmer foot ...........................................33
3-step zig-zag ...................................................................34
Triple straight / zigzag.......................................................35
Smocking stitch.................................................................36
Darning .............................................................................37
Practical stitches...............................................................38
Quilting..............................................................................39
Patch work........................................................................40
Applique............................................................................41
Twin needle.......................................................................42
Monogramming and embroidery.......................................43
Sewing on buttons ............................................................29
Buttonhole on stretch fabrics ............................................31
Trouble shooting guide ...............................................................46
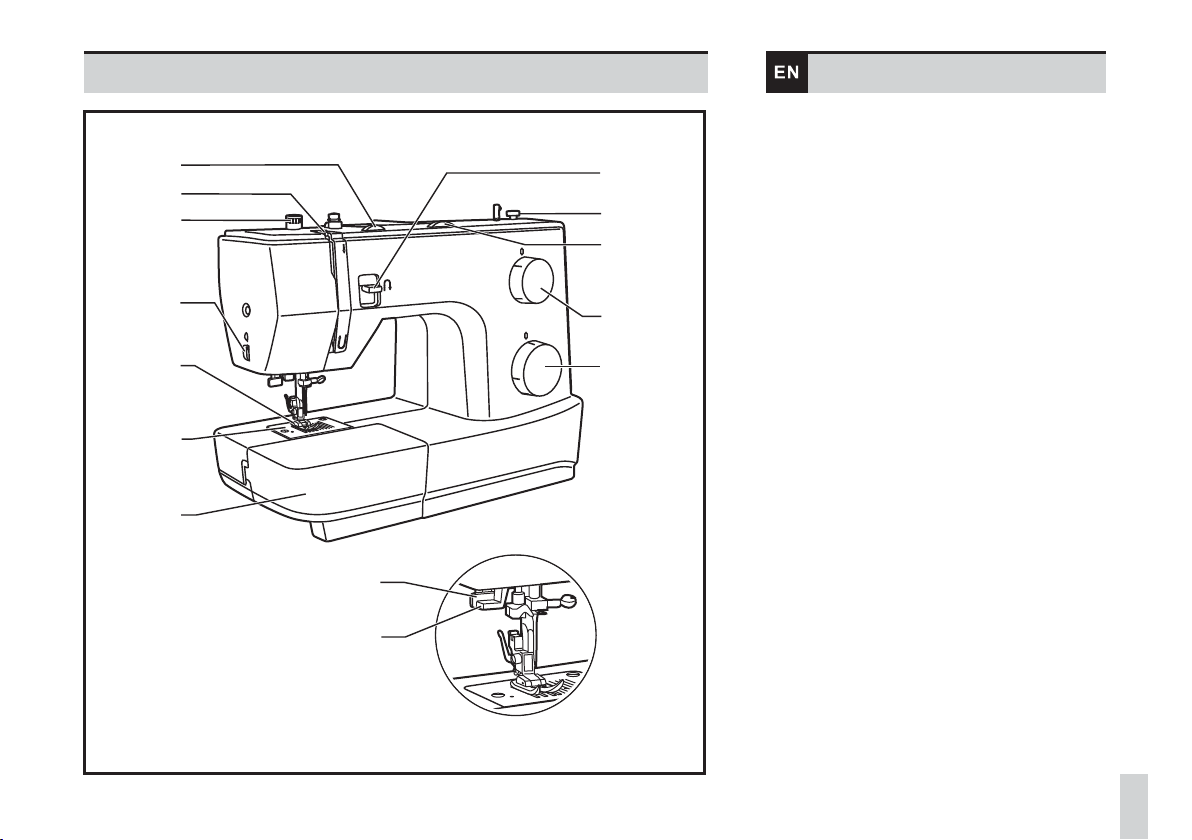
Machine overview
1. Thread tension dial
2.
4.
5.
6.
7.
8.
9.
11.
12.
Thread take-up lever
3. Presser foot pressure adjustment
Thread cutter
Presser foot
Stitch plate
Sewing table and accessory box
Reverse sewing lever
Bobbin winder stopper
10. Stitch width dial
Stitch length dial
Stitch selector dial
13. One step buttonhole lever
14. Automatic threader
1
2
3
4
6
7
8
9
10
12
11
5
13
14
sparrow 15
7

Overview
15. Horizontal spool pin
16. Bobbin winder spindle
Hole for second spool pin
Handwheel
Power switch
Main plug socket
Bobbin thread guide
Upper thread guide
Face plate
Handle
Presser foot lifter
26. Foot control
27. Power cord
17.
18.
19.
20.
21.
22.
23.
24.
25.
19
20
15
16
18
17
21
22
23
25
24
26
27
8
sparrow 15
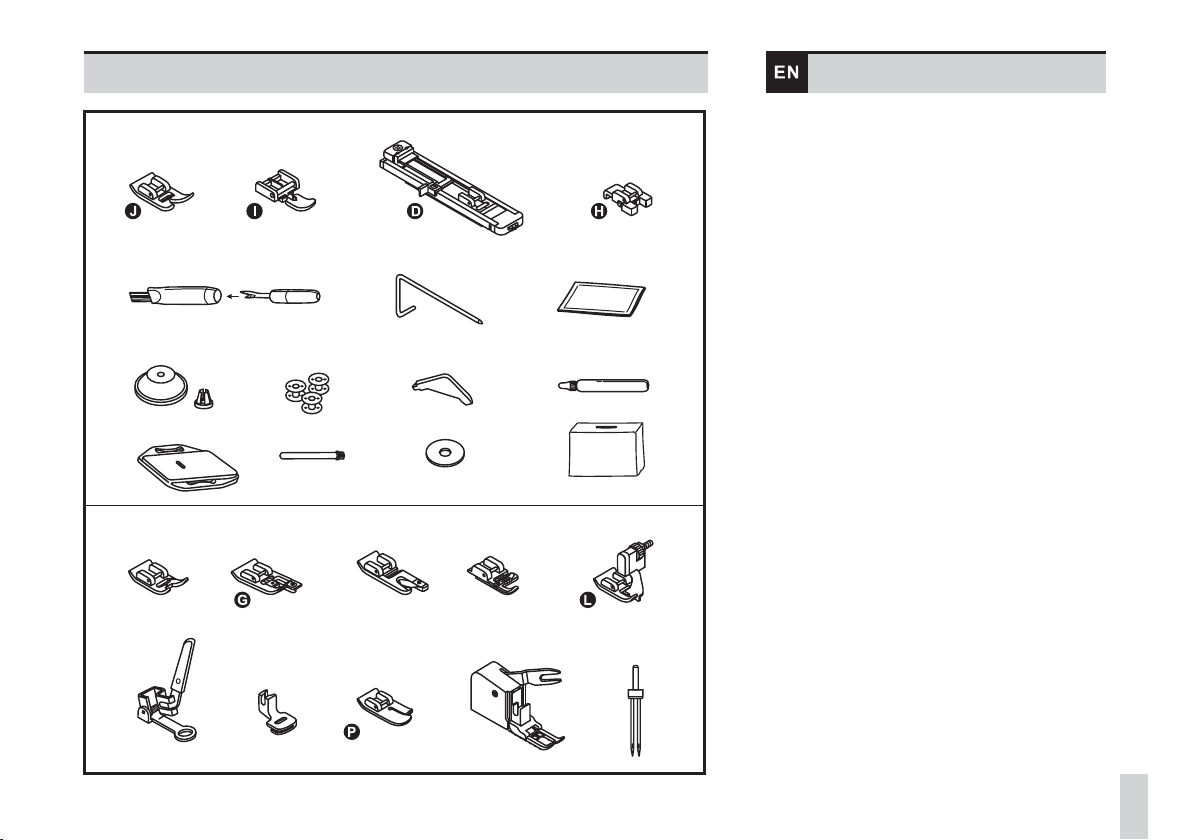
Accessories
Accessories are stored inside the accessory
box.
Standard
Optional
1. Zig zag foot
2. Zipper foot
3. Buttonhole foot with slide
4. Button-sew-on foot
5. Brush & seam ripper
6. Right seam guide
7. Needle set
8. Spool holder small & large
9. Bobbins
10. L Screwdriver
11. Oiler
12. Darning plate
13. Spool pin long V
14. Spool pin felt
15. Dust cover
16. Embroidery foot
17. Overlock foot
18. Hemmer foot
19. Cording foot
20. Blindstitch foot
21. Darning- / Embroidery foot
22. Gathering foot
23. Quilting foot
24. Walking foot
25. Twin needle
* Optional accessories are not supplied with
this machine; they are however available as
special accessories from your local dealer.
18
16 17 20
21 22
19
23
10911
3
2
12
14
8
7
6
5
13 14
24
9
15
25
sparrow 15
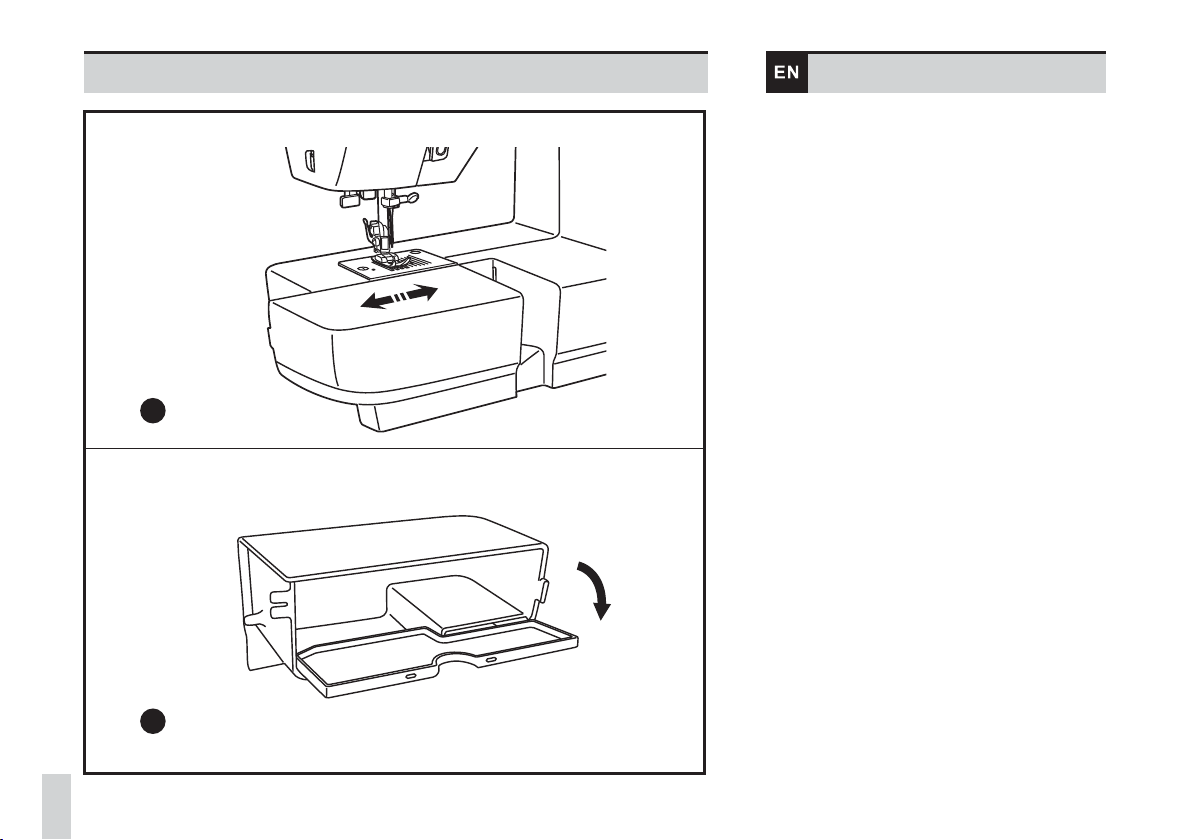
Sewing table
1. Keep the snap-in sewing table horizontal,
and push it in the direction of the arrow.
2. The inside of the snap-in sewing table can be
utilized as an accessory box.
2
1
10
sparrow 15
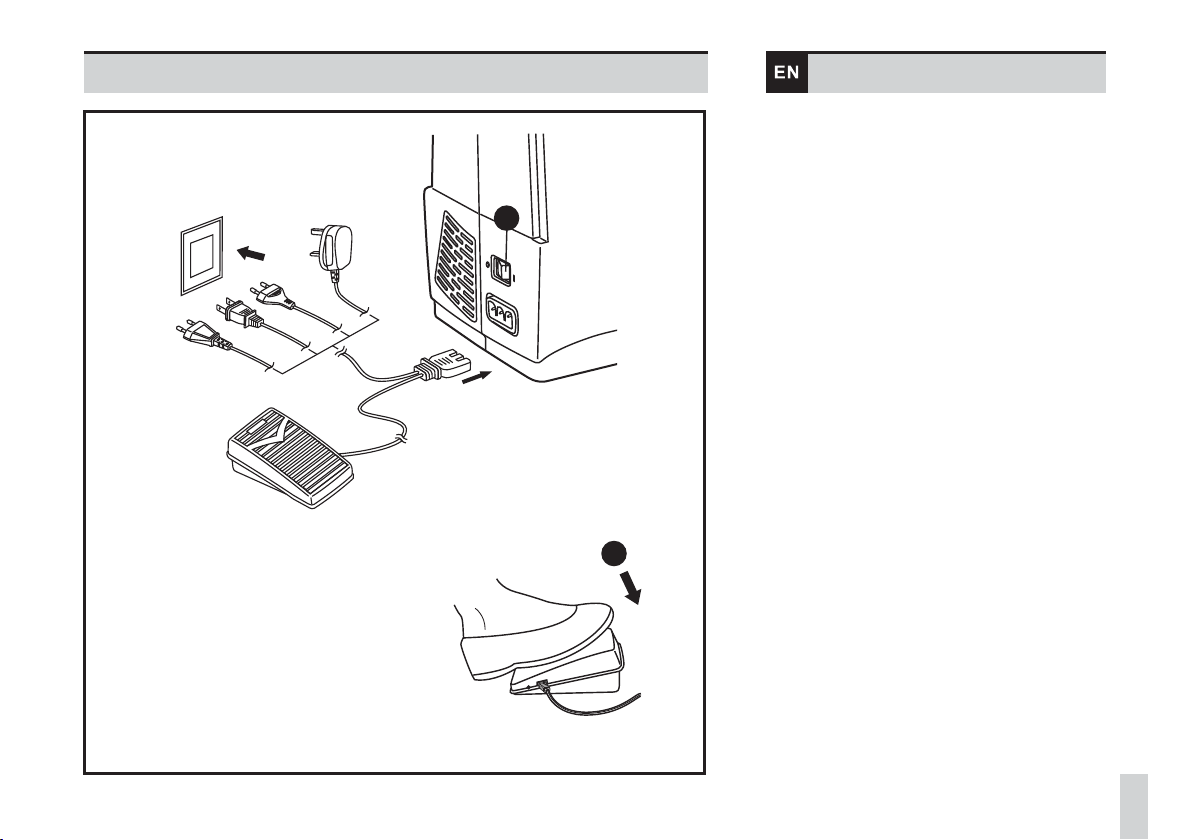
Connecting machine to
power source
2
Attention:
Unplug power cord when machine is not in use.
Consult a qualified electrician if in doubt of how
to connect machine to power source.
Connect the machine to a power source as
illustrated.
This appliance is equipped with a polarized plug
which must be used with the appropriate
polarized outlet.
Sewing light
Foot control
1. Press main switch to "I" for power and light.
2. Foot control pedal regulates the sewing speed.
IMPORTANT NOTICE
For appliance with a polarized plug (one blade
is wider than the other). To reduce the risk of
electric shock, this plug is intended to fit in a
polarized outlet only one way. If it does not fit
fully in the outlet, reverse the plug. If it still does
not fit, contact a qualified electrician to install
the proper outlet. Do not modify the plug in any
way.
1
11
sparrow 15
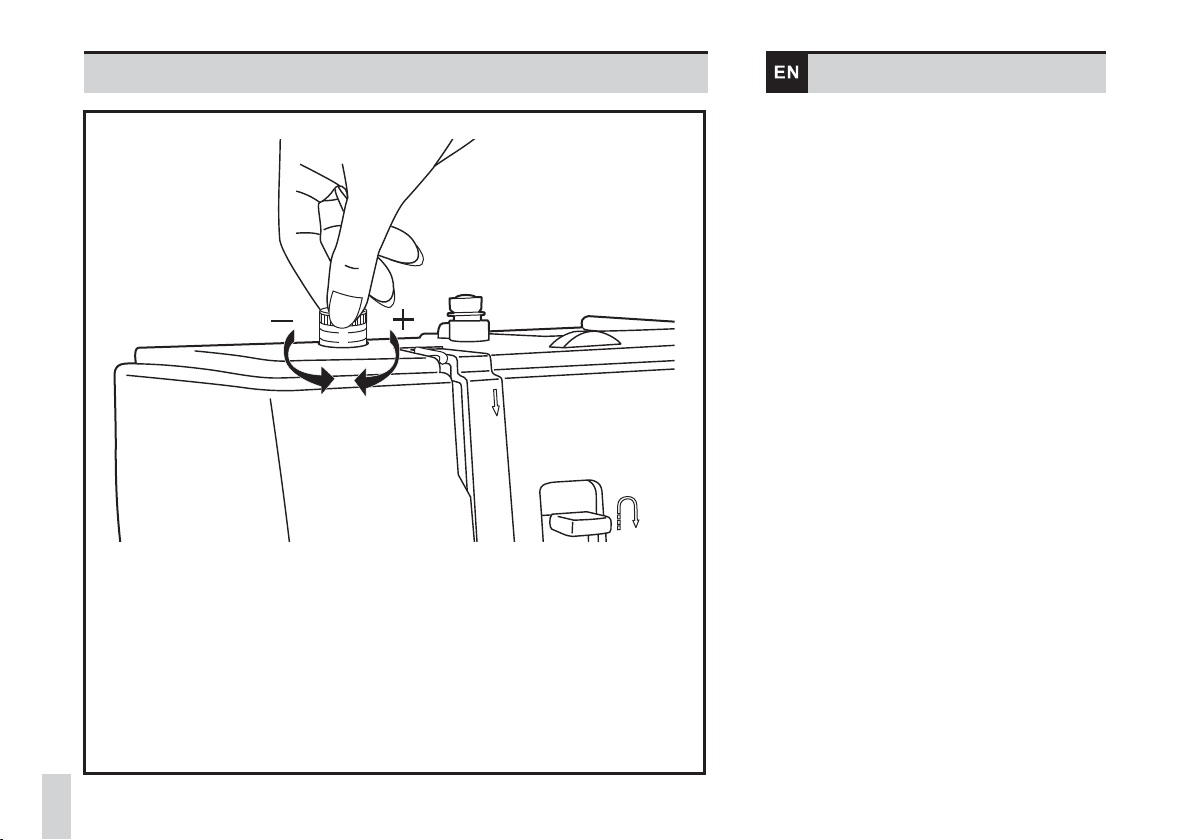
Adjusting presser foot pressure
Standard presser foot pressure set at "2".
The presser foot pressure of the machine has
been pre-set and no need for change is
required unless sewing particular type of fabric
(light-or-heavy weight).
If you do need to adjust the presser foot
pressure, turn the presser adjusting screw by
ones finger.
For sewing very thin fabric, loosen the pressure
by turning the screw counterclockwise to move
the screw upward and the pressure decreases.
If you keep turning the screw, it could be taken
out. By that time, just turn the screw clockwise,
it can be locked back and readjust the pressure.
For heavy fabric, tighten the pressure by turning
the screw clockwise to move the screw
downward and the pressure increases.
Once the screw cannot be turned any further, it
has reached the bottom, please do not turn any
more.
3
2
12
sparrow 15
Presser foot lifter
A
B
The presser foot lifter raises and lowers your
presser foot. (A)
When sewing several layers or thick fabrics, the
presser foot can be raised a second stage for
easy positioning of the work. (B)
13
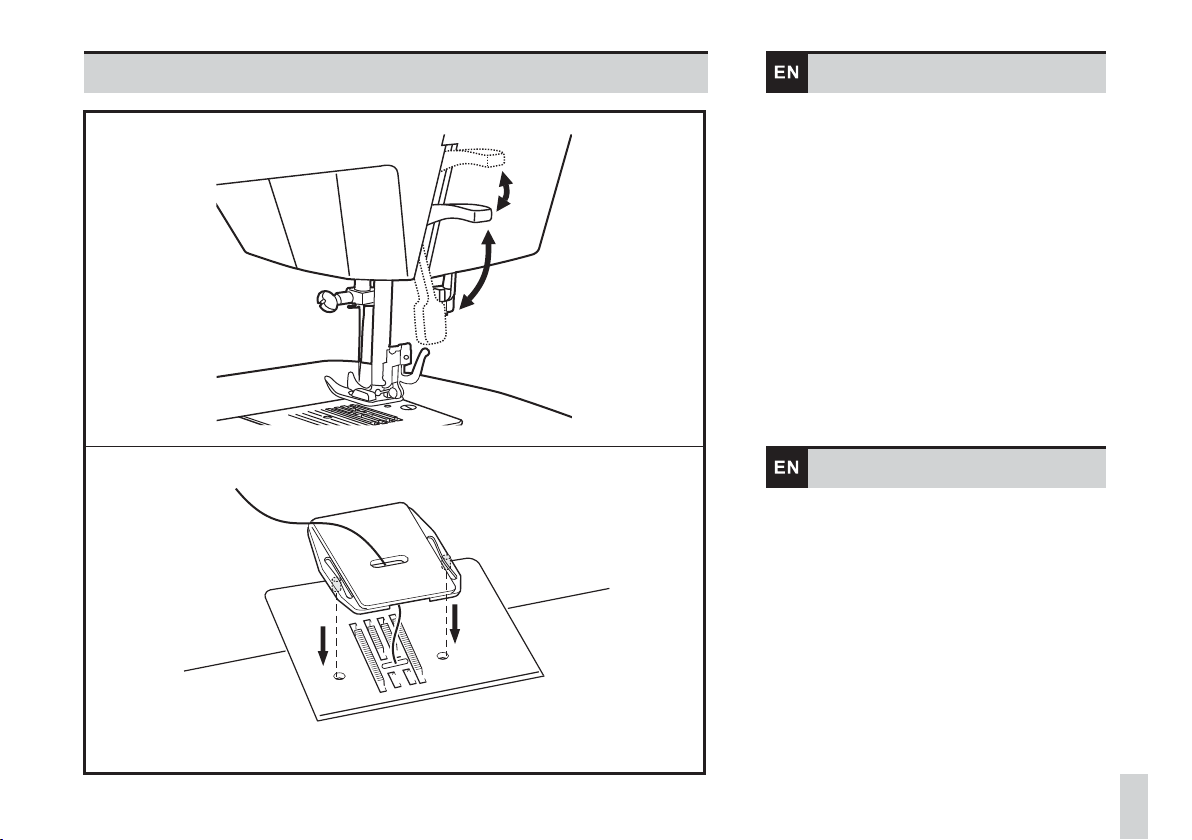
Darning plate
For certain types of work, (e.g. darning or free-
hand embroidery), the darning plate must be
used.
Install the darning plate as illustrated.
For normal sewing, remove the darning plate.
sparrow 15

1
3
2
4
Attention:
Turn power switch to off ("O")!
1. Removing the presser foot
2. Attaching the presser foot
4. Attaching the Seam guide right
Raise the presser foot using the presser foot
lifter.
Raise the lever (e) and the foot disengages.
Lower the presser foot holder (b) using the
presser foot lifter, until the cut-out (c) is directly
above the pin (d).
The presser foot (f) will engage automatically.
Raise the presser clamp (a) with the presser
foot lifter.
Removing and Attaching the presser foot
shank (b) as illustrated.
Attach the seam guide right (g) in the slot as
illustrated. Adjust as needed for hems, pleats,
quilting, etc.
3. Removing and Attaching the presser foot
shank
14
g
a
b
e
a
c
d
e
f
b
Changing the presser foot
sparrow 15
1
3
5
8
2
4
7
6
10
9
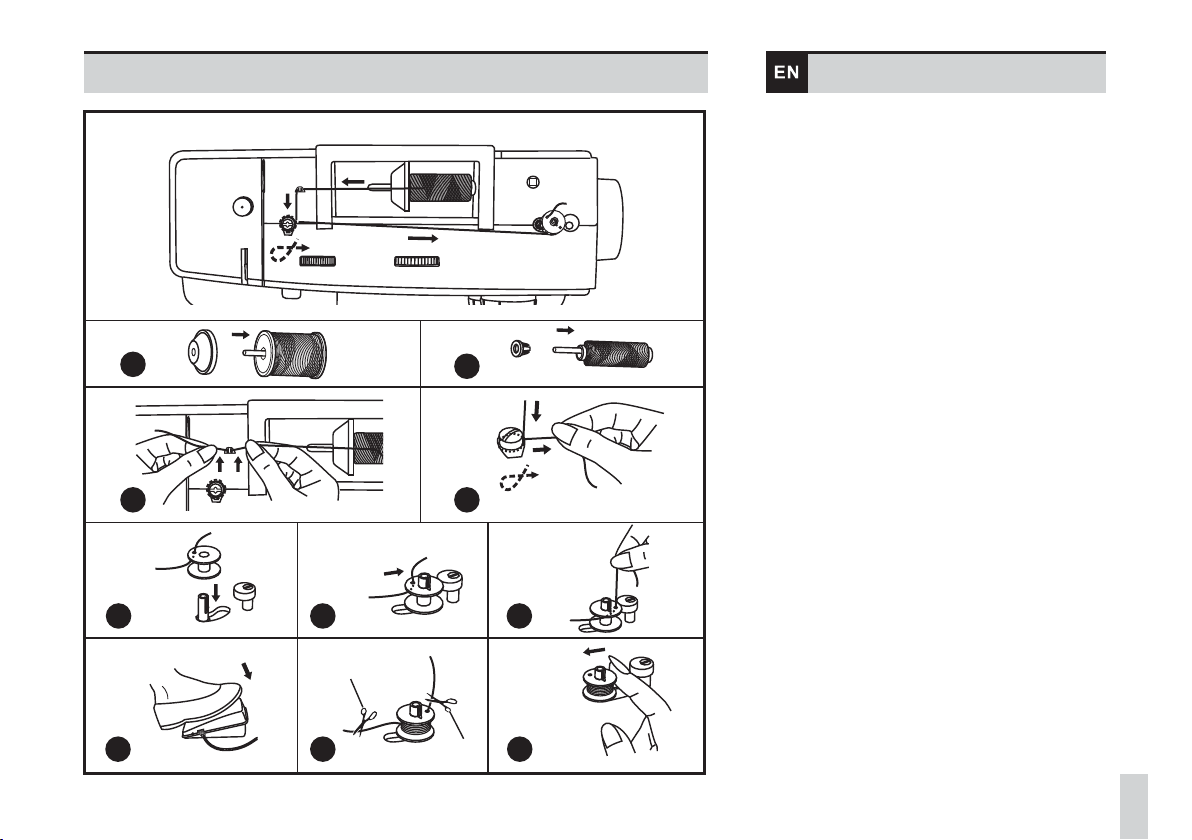
Winding the bobbin
1/2.Place thread and corresponding spool
holder onto spool pin.
3. Snap thread into thread guide.
4. Wind thread clockwise around bobbin
winder tension discs.
5. Thread bobbin as illustrated and place on
spindle.
6. Push bobbin winder spindle to right.
7. Hold thread end.
8. Step on foot control.
9. Release the pedal after a few turns.
Release the thread and cut as close as
possible to the bobbin (a). Press the pedal
again. Once the spool is full, it rotates
slowly. Release the pedal and cut thread (b).
10. Push bobbin winder spindle to left and
remove.
Please Note:
When the bobbin winder spindle is in "bobbin
winding" position, the machine will not sew and
the hand wheel will not turn. To start sewing,
push the bobbin winder spindle to the left
(sewing position).
15
a
b
sparrow 15
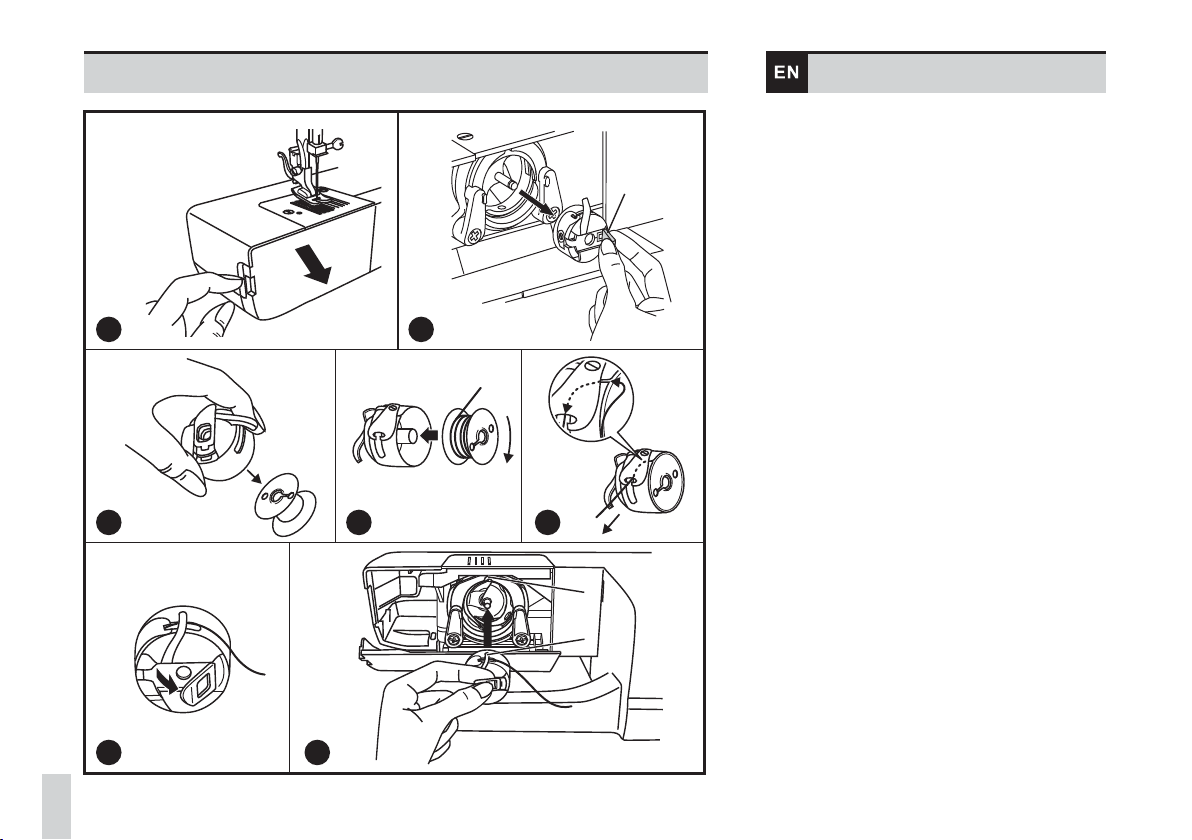
Inserting bobbin
Attention:
Turn power switch to off ("O") before inserting or
removing the bobbin.
When inserting or removing the bobbin, the
needle must be fully raised.
1. Remove the sewing table, then open the
hinged cover.
2. Pull the bobbin case (a).
4. Hold the bobbin case with one hand. Insert
the bobbin so that the thread runs in a
clockwise direction (arrow).
5. Pull the thread through the slit and under the
finger. Leave a 6 inch tail of thread.
6. Hold the bobbin case by the hinged latch.
by the hinged latch
3. Remove the bobbin of the bobbin case.
7. Make sure the bobbin case finger (b) fits into
the notch (c) at the top of the race as shown.
Note:
If the bobbin case is not properly placed back
into the machine, it will fall out of the shuttle
immediately after starting to sew.
6
4
2
1
a
16
5
3
c
b
7
sparrow 15
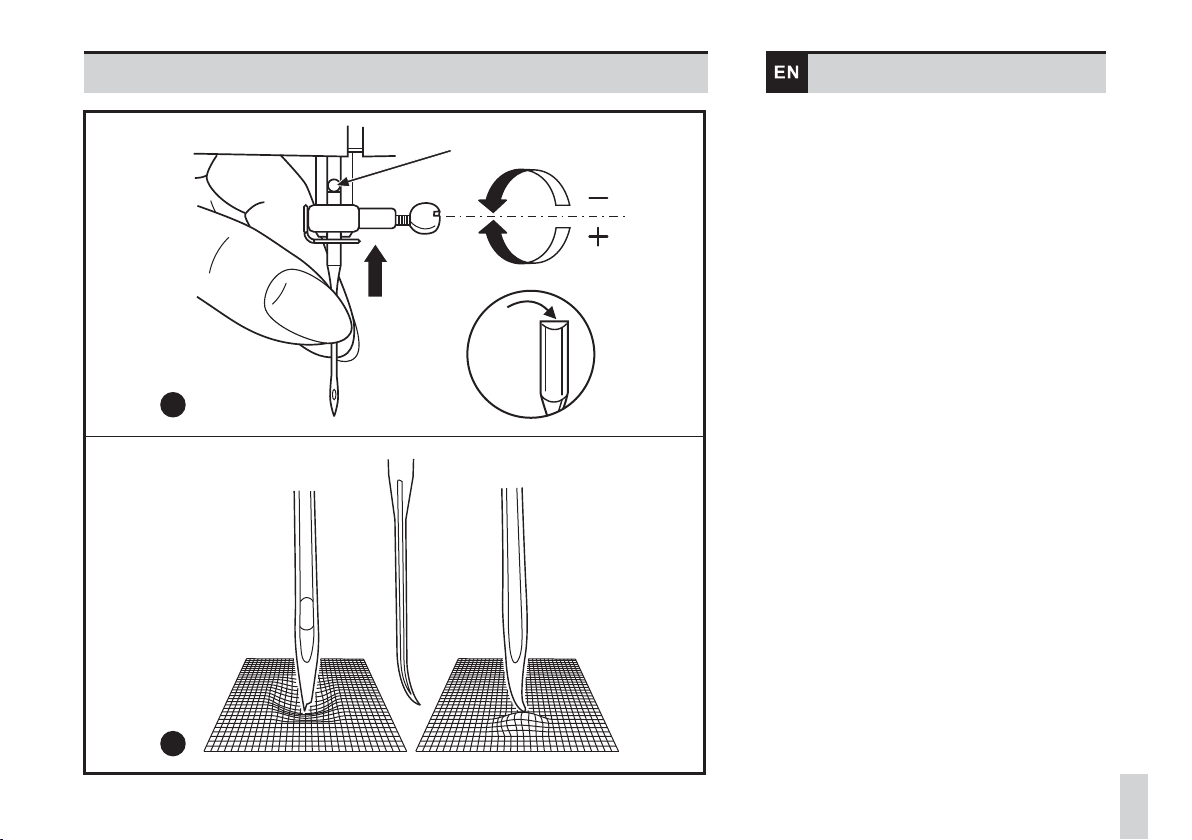
Inserting the needle
AC
B
A
B
C
D
1
2
Attention:
Turn power switch to off ("O") before inserting or
removing the needle.
1. Change the needle regularly, especially if it is
showing signs of wear and causing problems.
Insert the needle as illustrated as follows:
A. Loosen the needle clamp screw and
tighten again after inserting the new
needle.
B. The flat side of the shaft should be
towards the back.
C/D.Insert the needle as far up as it will go.
2. Needles must be in perfect condition.
Problems can occur with:
A. Bent needles
B. Damaged points
C. Blunt needles
17
sparrow 15

1234
567 8
Threading the upper thread
This is a simple operation but it is important to carry
out correctly as by not doing so several sewing
problems could result.
1. Start by raising the needle to its highest point,
and continue turning the handwheel
counterclockwise until the needle just slightly
begins to descend. Raise the presser foot to
release the tension discs.
2. Lift up the spool pin. Place the spool of thread on
the holder with the thread coming off the spool as
shown. For small thread spools, place small side
of spool holder next to spool.
3. Draw thread from spool through the upper
thread guide.
4. Pulling thread through pre-tension spring as
illustrated.
5. Thread tension module by leading thread down
right channel and up left channel.
During this process it is helpful to hold the
thread between the spool and thread guide.
6. At the top of this movement pass thread from
right to left through the slotted eye of the take-up
lever and then downwards again.
7. Now pass thread behind the thin wire needle
clamp guide and then down to the needle which
should be threaded from front to back.
8. Pull about 6-8 inches of thread to the rear
beyond the needle eye. Trim thread to length
with built-in thread cutter.
Note:
Note:
For safety, it is strongly suggested you
turn off the power before threading.
If your sewing machine is equipped with the factory
installed optional automatic needle threader,
instructions for use can be found on next page.
18
sparrow 15
Table of contents
Other EverSewn Sewing Machine manuals

EverSewn
EverSewn Celine User manual

EverSewn
EverSewn Sparrow X User manual

EverSewn
EverSewn sparrow 15 Series Operating instructions

EverSewn
EverSewn CH04AX Operating instructions

EverSewn
EverSewn Sparrow QE User manual

EverSewn
EverSewn sparrow 20 User manual

EverSewn
EverSewn Maker 200 User manual

EverSewn
EverSewn Hero User manual


